D1. Fundamentals of VR

Learning Outcomes
- Explain the core concepts of VR and their application in immersive environments. Before class, review the definitions of immersion, interactivity, and presence, and be ready to share how these concepts apply to VR experiences you’ve seen or studied.
- Describe the VR development lifecycle and its key phases. As preparation, study the stages of Conceptual Design, Prototyping, Interaction, and Optimization, and note how each stage supports building an effective VR experience.
- Identify essential Unity tools for VR development. Ahead of the session, review XR Plug-in Management, XR Interaction Toolkit, OpenXR, XR Core Utilities, and the Input System, and understand the role each plays in the VR workflow.
- Compare different VR hardware types and their applications. For your pre-work, read the hardware categories and comparison table, and choose at least one device you would consider for engineering use cases.
- Set up a basic VR project in Unity. Prior to class, create a new Unity project using Unity’s VR Template, open
SampleScene, and inspect the preconfigured XR Interaction Toolkit setup without rebuilding the rig from scratch.
What Is VR?
Virtual Reality (VR) is a technology that simulates a three-dimensional, computer-generated environment that a user can explore and interact with. The term “virtual” means “near” or “almost,” while “reality” refers to our everyday sensory experiences. In VR, these two ideas combine to create an experience that mimics real life, even if the environment is entirely artificial. In XFactory, users can enter the virtual interior of a smart manufacturing facility and explore different stations such as the assembly or welding area. With a VR headset, the user doesn’t just view the factory—they are inside it, turning their head to observe moving robots and hearing spatial audio from nearby CNC machines. Once the correct XR Interaction Toolkit components, input actions, and OpenXR settings are in place, they can also interact with objects and UI panels as they would in a real-world facility. Unique affordances of VR include:
- Immersion: Immersion refers to the extent to which the VR system can convincingly substitute real-world sensory input with digital stimuli. The goal is to achieve a state where users feel fully “present” in the virtual environment, with minimal awareness of the actual physical world around them. This is accomplished through coordinated visuals, auditory, and (sometimes) haptic feedback. In XFactory, when users approach the welding station, they are enveloped in ambient factory sounds, the glow and flicker of robotic welding arcs, and positional audio cues that change as they move. The environment, lighting, and sound design all contribute to the feeling of truly “being there.”
- Interactivity: A core principle of VR is that users can interact with the environment when the project includes the right XR Interaction Toolkit setup—interactors, interactables, locomotion providers, and enabled input actions. Head tracking and spatial audio can create presence on their own, but grabbing, teleportation, UI activation, and haptics require those components to be configured deliberately. For engineers, this means that virtual models can be tested dynamically once interaction is wired up, allowing for rapid iteration and problem solving. In the XFactory’s logistics station, users can pick up boxes, scan them with a virtual barcode scanner, or load them onto a forklift once
XR Grab Interactable, ray/direct interactors, and the related input maps are assigned—simulating practical tasks in logistics operations. - Sensory Substitution: VR works by presenting alternative sensory data to the user. By delivering precise visual and auditory cues (and sometimes tactile feedback), it “tricks the brain” into interpreting digital information as if it were coming from the real world. The challenge is to maintain sensory synchronicity to avoid discrepancies like latency or conflicting cues (which can lead to motion sickness). When using hand controllers to operate the robotic arm in the assembly station, XFactory can synchronize haptic feedback with the visual grip and release action once the relevant interactor and haptic events are configured. Any lag would immediately break the illusion and reduce effectiveness.
- Presence: The concept of “presence” is the subjective feeling of being inside the virtual environment. Strong visuals, spatial audio, and head tracking often create this feeling even before full hand interaction is implemented. When a VR system is highly immersive and interactive, users experience a sense of being “there” rather than merely looking at a simulation. This psychological state is key to the effectiveness of VR applications, from training simulations to design reviews. Presence is powerfully demonstrated in XFactory when users walk through the exhibit area and observe futuristic machines like a quadruped robot. The experience can feel tangible enough that users instinctively step aside to avoid virtual drones flying overhead—even when they are not yet grabbing or activating every object in the scene.
In collaboration with Ghost Lab at Northeastern University, SAIL contributed to the design, development, testing, and deployment of this VR training system for the Navy. Visit the project website to learn more.
VR Development Lifecycle
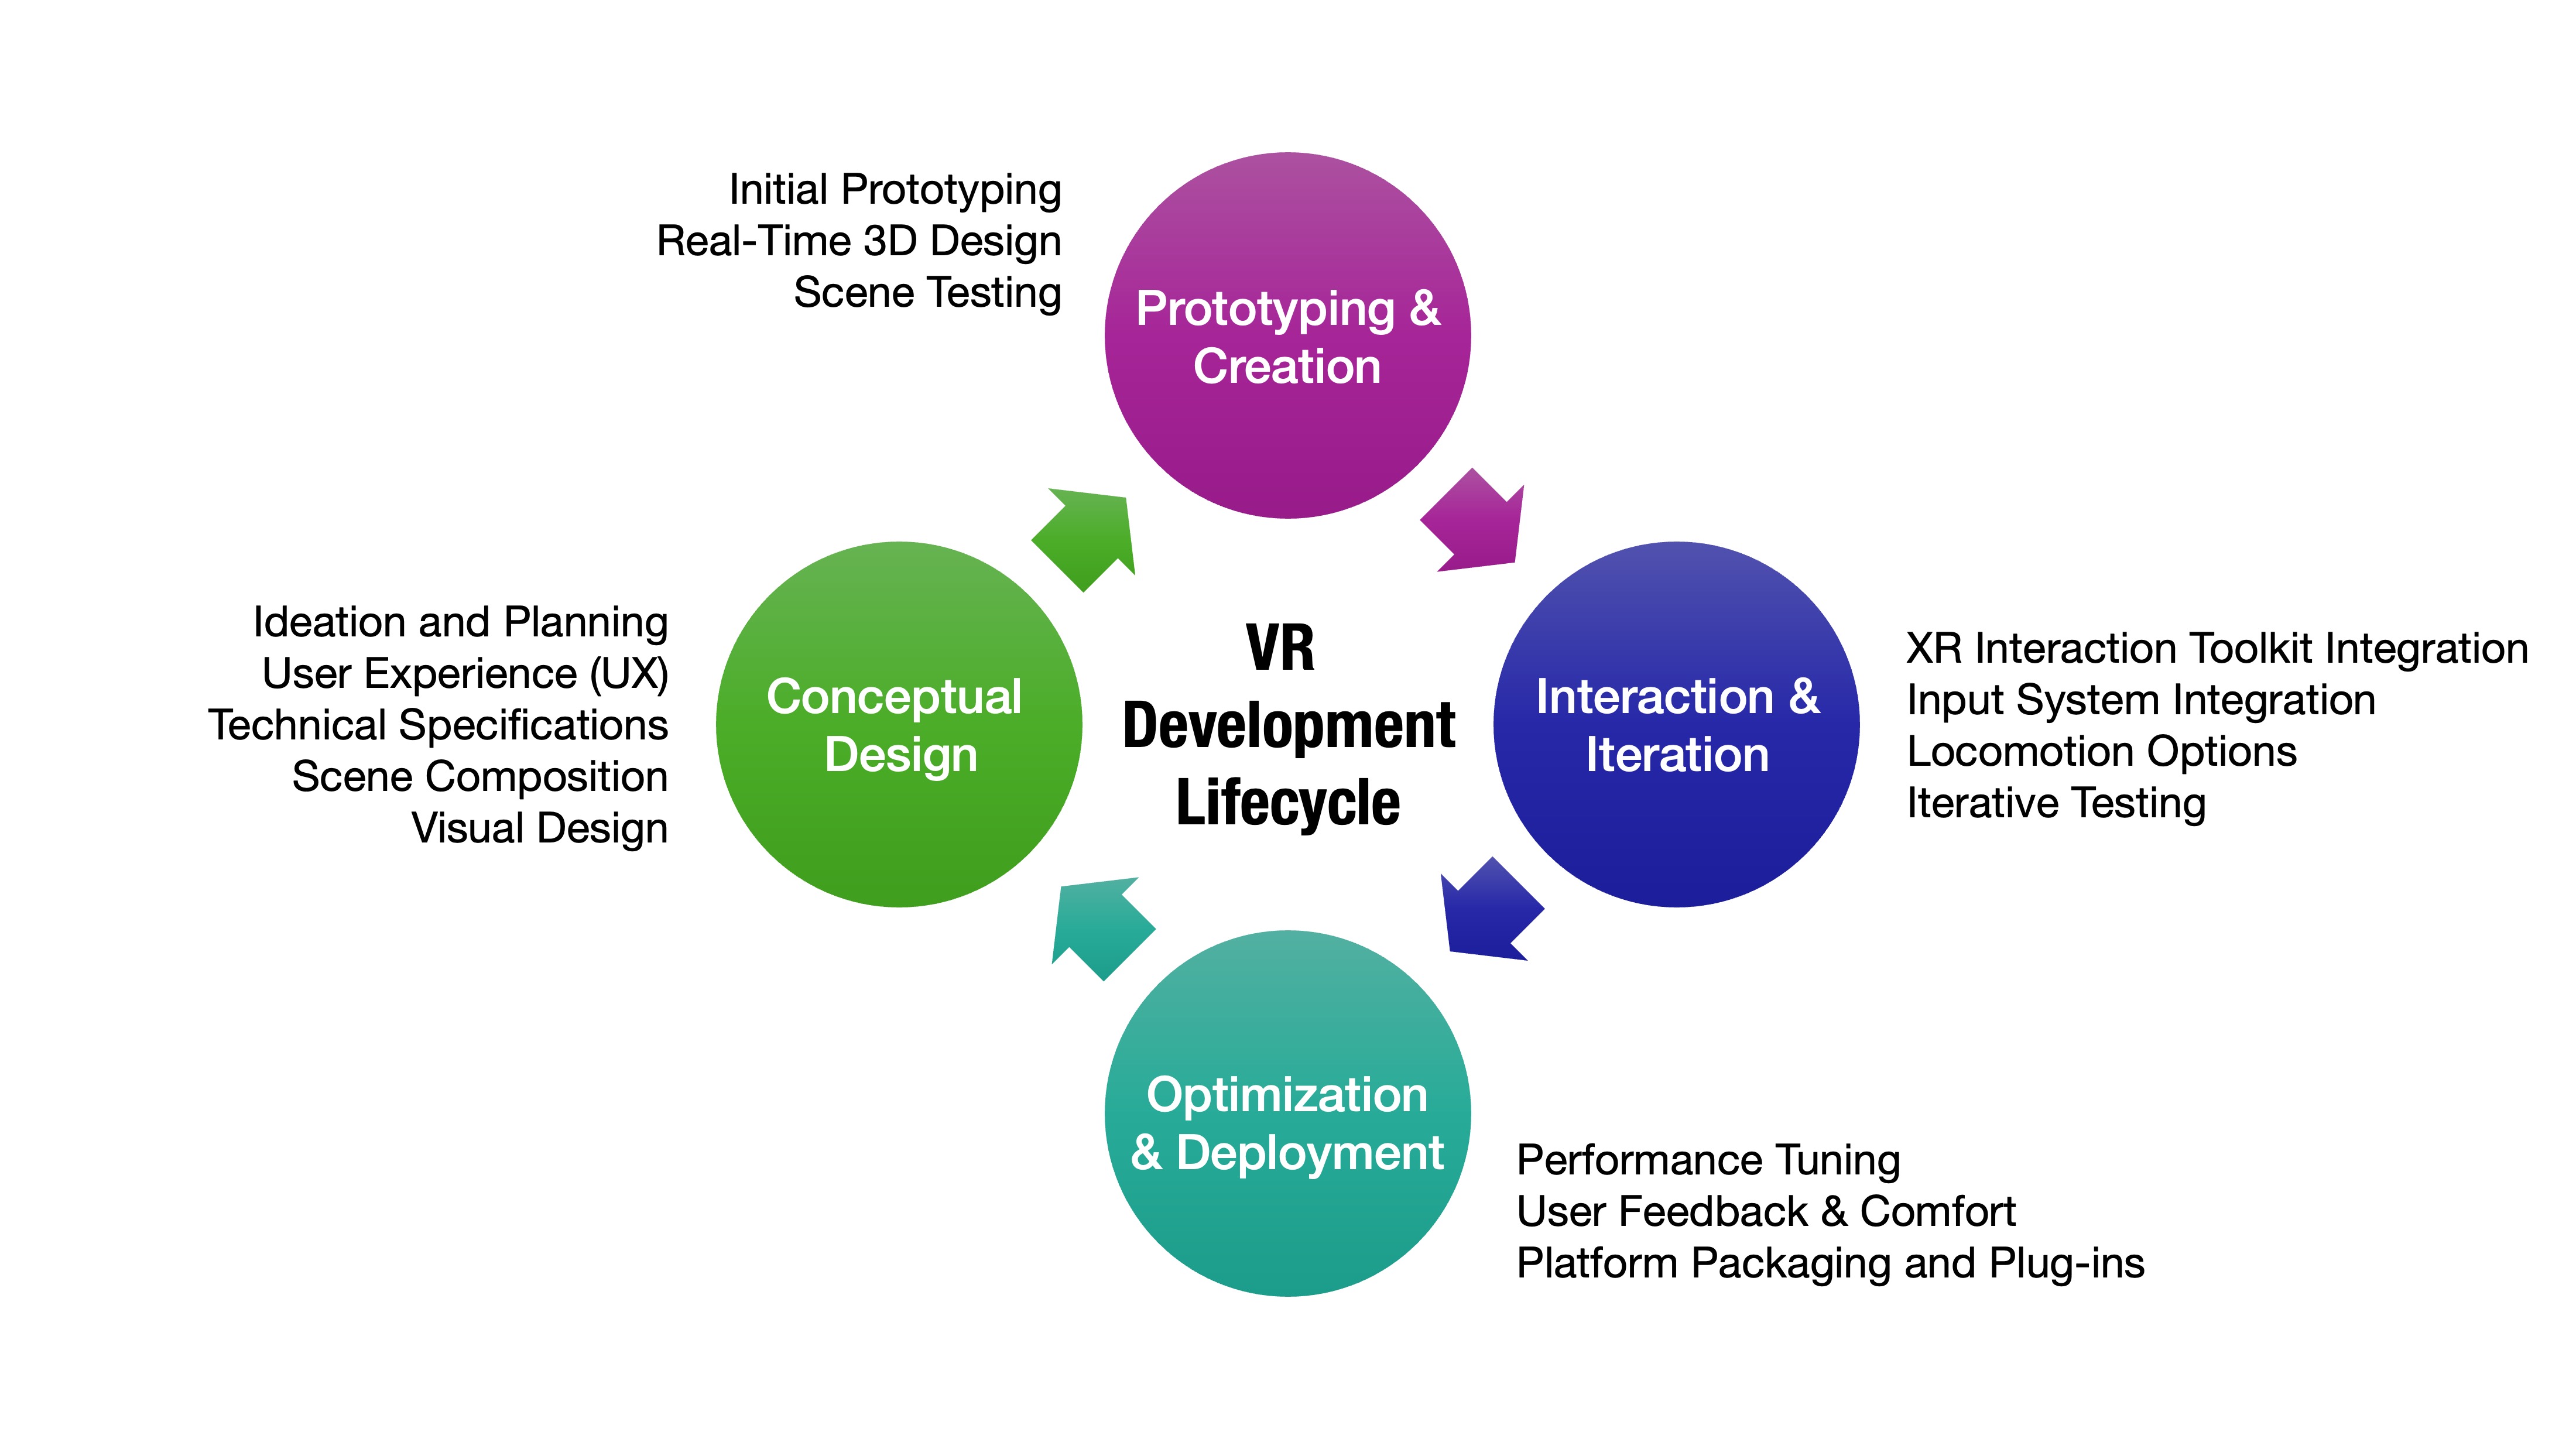
VR development in Unity is a structured, multistage process that blends creative vision with technical precision. From initial concept to final deployment, developers leverage Unity’s robust 3D engine, XR Interaction Toolkit, and OpenXR support to craft virtual experiences that are immersive, interactive, and optimized for performance. Each phase—whether focused on design, prototyping, interaction, or optimization—plays a critical role in shaping user engagement and ensuring the final product runs smoothly across a range of VR hardware.
Conceptual Design
Effective VR projects begin with a strong foundation: identifying the purpose of the experience, designing user flows, and setting up the XR Origin and spatial layout in Unity. At this stage, aligning technical design with user intent ensures a seamless pipeline for later development.
- Ideation and Planning: Define clear goals for the experience, such as education, training, or simulation. In XFactory, the goal is to let users explore modern manufacturing systems like drones, robotic arms, and digital twins within a safe and immersive environment, then interact with them once XRI and OpenXR setup are in place. Stakeholder input, including from training leads or subject matter experts, is often gathered here to inform priorities and use cases.
- User Experience (UX): Design intuitive, task-driven interactions and interfaces that guide users naturally. In XFactory,
Teleportation AnchorandTeleportation Areacomponents help users move between stations, while glowing panels and floating tooltips at machines offer cues for interaction once XRI setup is complete. The UX design phase also involves accessibility considerations, ensuring all users can complete tasks without excessive motion or cognitive load. - Technical Specifications: Select target devices and performance benchmarks, including supported frame rates and input types (e.g., HMDs, controllers, hand tracking). XFactory targets Meta Quest 3 for classroom use and OpenXR-compatible PC VR headsets for tethered testing, ensuring a headset-agnostic development path through Unity’s XR Interaction Toolkit and OpenXR. Performance constraints and platform limitations are identified early to avoid costly rework later.
- Scene Composition and
XR Origin(XR Rig) Setup: Start with a well-configuredXR Origin(Unity’s current term for the tracked player rig; some prefabs are still namedXR Rig) and a clean spatial layout that distinguishes interactive zones from static backgrounds. XFactory uses a shared XR Origin across scenes. The rig is repositioned via teleportation to stations like logistics or assembly, maintaining consistency across the virtual space. This modular approach also simplifies rig updates and standardizes user orientation across levels. - Visual Design: Organize static vs. dynamic assets to optimize lighting and performance. In XFactory, static meshes like walls and floors are grouped under “StaticEnvironment” with baked lighting, while interactables like forklifts and robots are grouped for real-time updates. Clear naming conventions and layer usage also help streamline rendering logic and collision setup.
Prototyping and Creation
This stage focuses on rapid testing, blocking out scenes, and building immersive environments using Unity’s 3D tools and placeholder assets. It’s an iterative loop of testing, feedback, and incremental fidelity improvements.
- Initial Prototyping: Use basic geometry and mockups to validate user navigation, reach distances, and planned interaction zones. XFactory prototypes used graybox robots to test interaction distance and arm collision detection before modeling final assets and before final
XR Grab Interactable/ interactor placement. This phase is also ideal for confirming spatial scale and adjusting player reach or comfort zones. - Real-Time 3D Design: Implement terrain, lighting, VFX, and spatial audio to deepen immersion. XFactory’s drone launchpad features dynamic lighting, animated propellers, and ambient machinery sounds to simulate a busy outdoor tech environment. Designers may also introduce weather systems or particle effects to test responsiveness under load.
- Scene Testing: Use Unity’s in-editor tools (like the
XR Device SimulatororXR Interaction Simulator) for early interaction testing without a headset. Developers can validate collider bounds, interaction layering, and UI placement in XFactory’s welding cell before deploying to actual VR headsets. Simulator testing is useful, but it does not replace Quest Link or build-to-device checks for comfort, controller feel, and runtime performance.
Scale and ergonomics check: In headset, confirm that XFactory/CAD assets appear at real-world scale, controls are within comfortable reach, panels are readable, machine clearances make sense, and users can inspect equipment without awkward posture or excessive motion.
Interaction and Iteration
Building dynamic, responsive interactions in Unity means integrating multiple input sources, interaction systems, and feedback loops to shape user engagement. It also involves tuning these interactions based on user comfort and intended task flow.
- XR Interaction Toolkit Integration: Use components such as
XR Grab Interactable,XR Ray Interactor,XR Direct Interactor,XR Socket Interactor,Teleportation Area,Teleportation Anchor, and anXR Interaction Managerto implement object manipulation, UI pointing, and locomotion. In XFactory, users grab engine pistons and slot them into crankshafts using socket and direct interactor logic once those components and input actions are configured—reducing the need for bespoke physics or interaction scripts. - Input System Integration: Leverage Unity’s Input System through XRI Starter Assets or custom
InputActionAssets for controller buttons, joysticks, and haptic feedback. At the assembly station, XFactory can map an input action to trigger a tightening sequence on tire lug nuts, synchronizing a ratchet sound and haptic feedback once the action, interactor, and device bindings are set up correctly. - Locomotion Options: Provide both teleportation and smooth movement to accommodate user comfort using XRI locomotion providers. While XFactory defaults to teleportation, users inspecting the conveyor belt can switch to joystick movement via a toggle in the radial menu once the corresponding locomotion components are enabled.
- Iterative Testing: Continuously test and refine on both simulator and hardware. Adjust scenes based on feedback regarding comfort, clarity, or interaction fidelity. After usability testing, XFactory developers can consider adding larger UI canvases and repositioned machines for better line-of-sight during training simulations. Capturing user metrics and heatmaps during these tests often guides design refinements.
Optimization and Deployment
Finalizing a VR experience involves polishing the environment for performance, ensuring platform compatibility, and preparing for delivery. Deployment readiness includes stress testing, QA, and compliance with store requirements if publishing publicly.
- Performance Tuning: Optimize lighting, LODs, physics, and rendering settings to maintain frame rate and responsiveness. In XFactory, LODs reduce the complexity of outdoor drones at a distance, and baked lighting keeps indoor welding areas performant under load. On Meta Quest, profile frame rate, draw calls, physics load, and GPU/CPU bottlenecks on the actual device—not only in the Unity Editor—because thermal throttling and standalone rendering costs can differ significantly from Quest Link Play Mode testing.
- User Feedback and Comfort Enhancements: Incorporate feedback on accessibility, usability, and motion sensitivity. When test users were unsure which robots were interactive, XFactory added glowing outlines and UI pop-ups to signal interactivity. Additionally, UI text size and contrast were adjusted for users with varying levels of vision and headset resolution.
- Platform Packaging and Plug-ins: Use Unity’s
XR Plug-in Managementwith OpenXR for cross-platform builds. Configure runtime settings per device. XFactory builds as an.apkfor Meta Quest and a desktop app for PC VR, using XR Interaction Toolkit and Input System for consistent behavior across both. Build automation and cloud delivery pipelines may also be used to streamline testing and publishing.
Engineering validation: A VR prototype is not automatically a validated engineering simulation. Before using a VR scene to support design or training conclusions, verify real-world scale, units, motion behavior, constraints, tolerances, and source data against the intended engineering model.
VR Software
Unity provides a robust ecosystem for developing VR experiences. Its modular architecture relies on packages and plugins that streamline the development process, ensuring that developers can quickly set up projects, handle diverse input methods, and support a range of devices.
XR Plugin Management
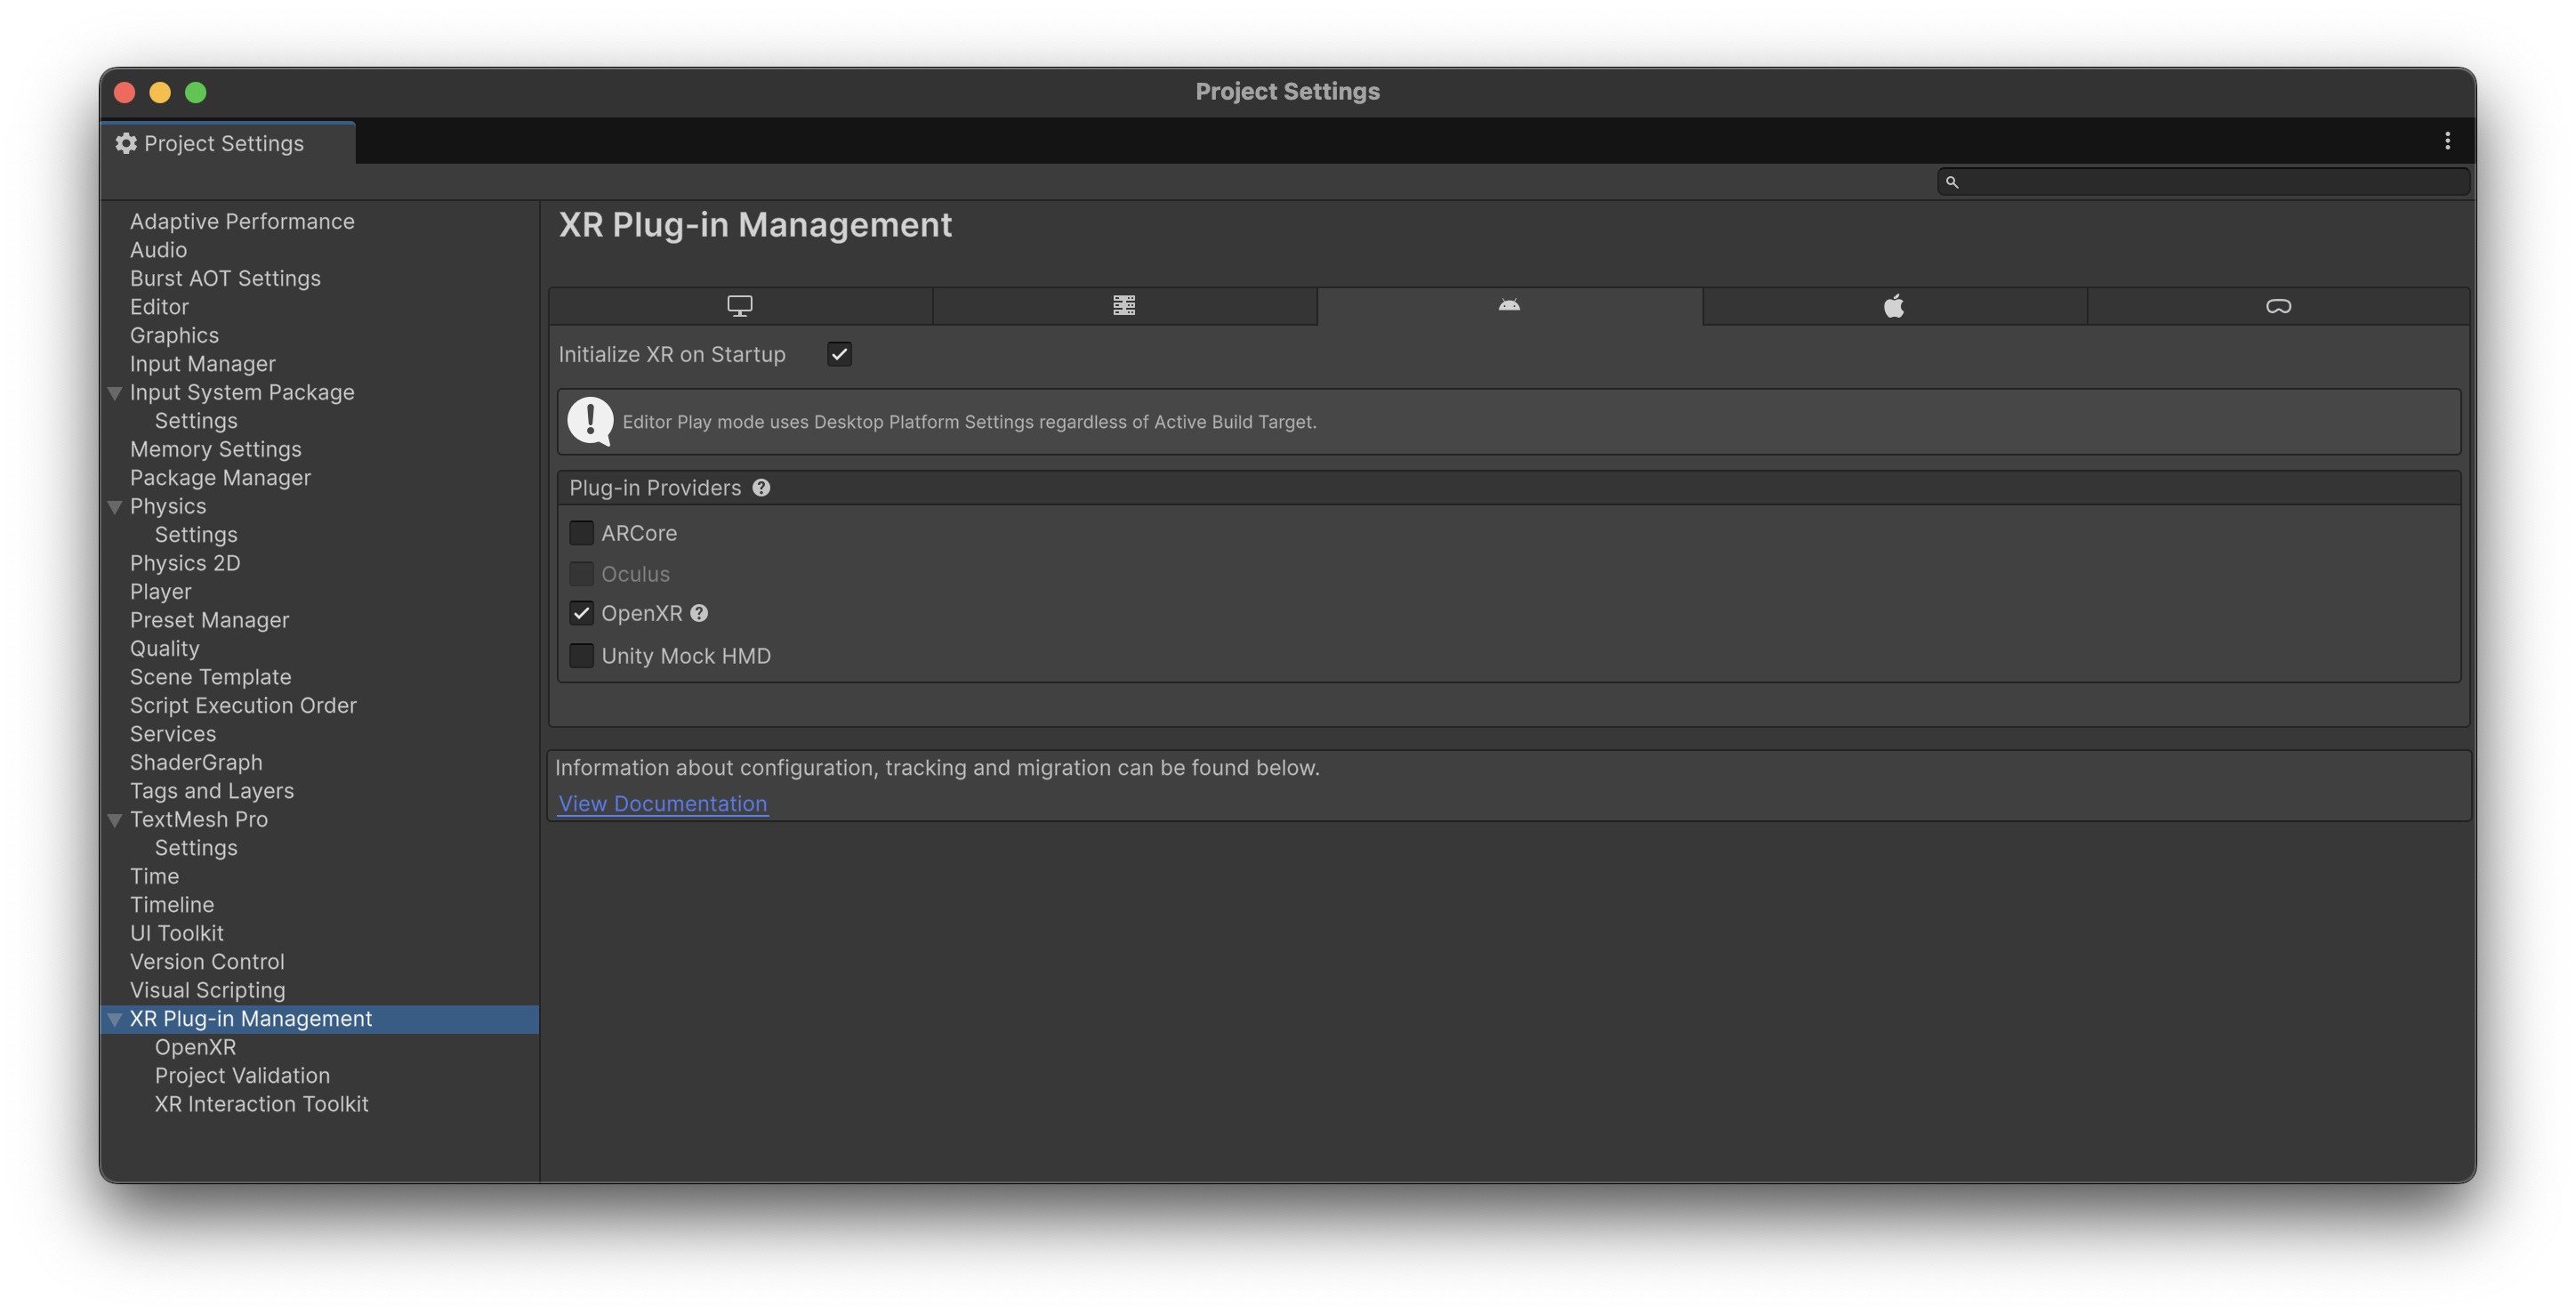
XR Plugin Management is Unity’s system for managing and loading XR providers (loaders/plug-ins) at runtime. It selects the correct XR runtime for each build target without rewriting your scene logic. For this course, OpenXR is the default headset-agnostic path through XR Interaction Toolkit. Core concepts include:
- Loader Management: Activates the correct XR provider for each platform tab (for example, Android for Quest builds or Desktop for Quest Link / PC VR testing).
- Plug-in Ecosystem: Supports multiple providers when a project truly needs them, but the course standard is OpenXR plus XRI rather than device-specific SDK-only workflows.
- Configuration and Optimization: Helps manage XR settings and ensures the correct plug-in is active based on the target platform.
In Unity, plugins are external libraries—either managed (C# DLLs) or native (C++, Java, Objective-C)—that extend the engine’s functionality, often enabling platform-specific features or third-party integrations. They are commonly used for tasks like accessing native device APIs, integrating SDKs, or enhancing editor tools.
XR Interaction Toolkit
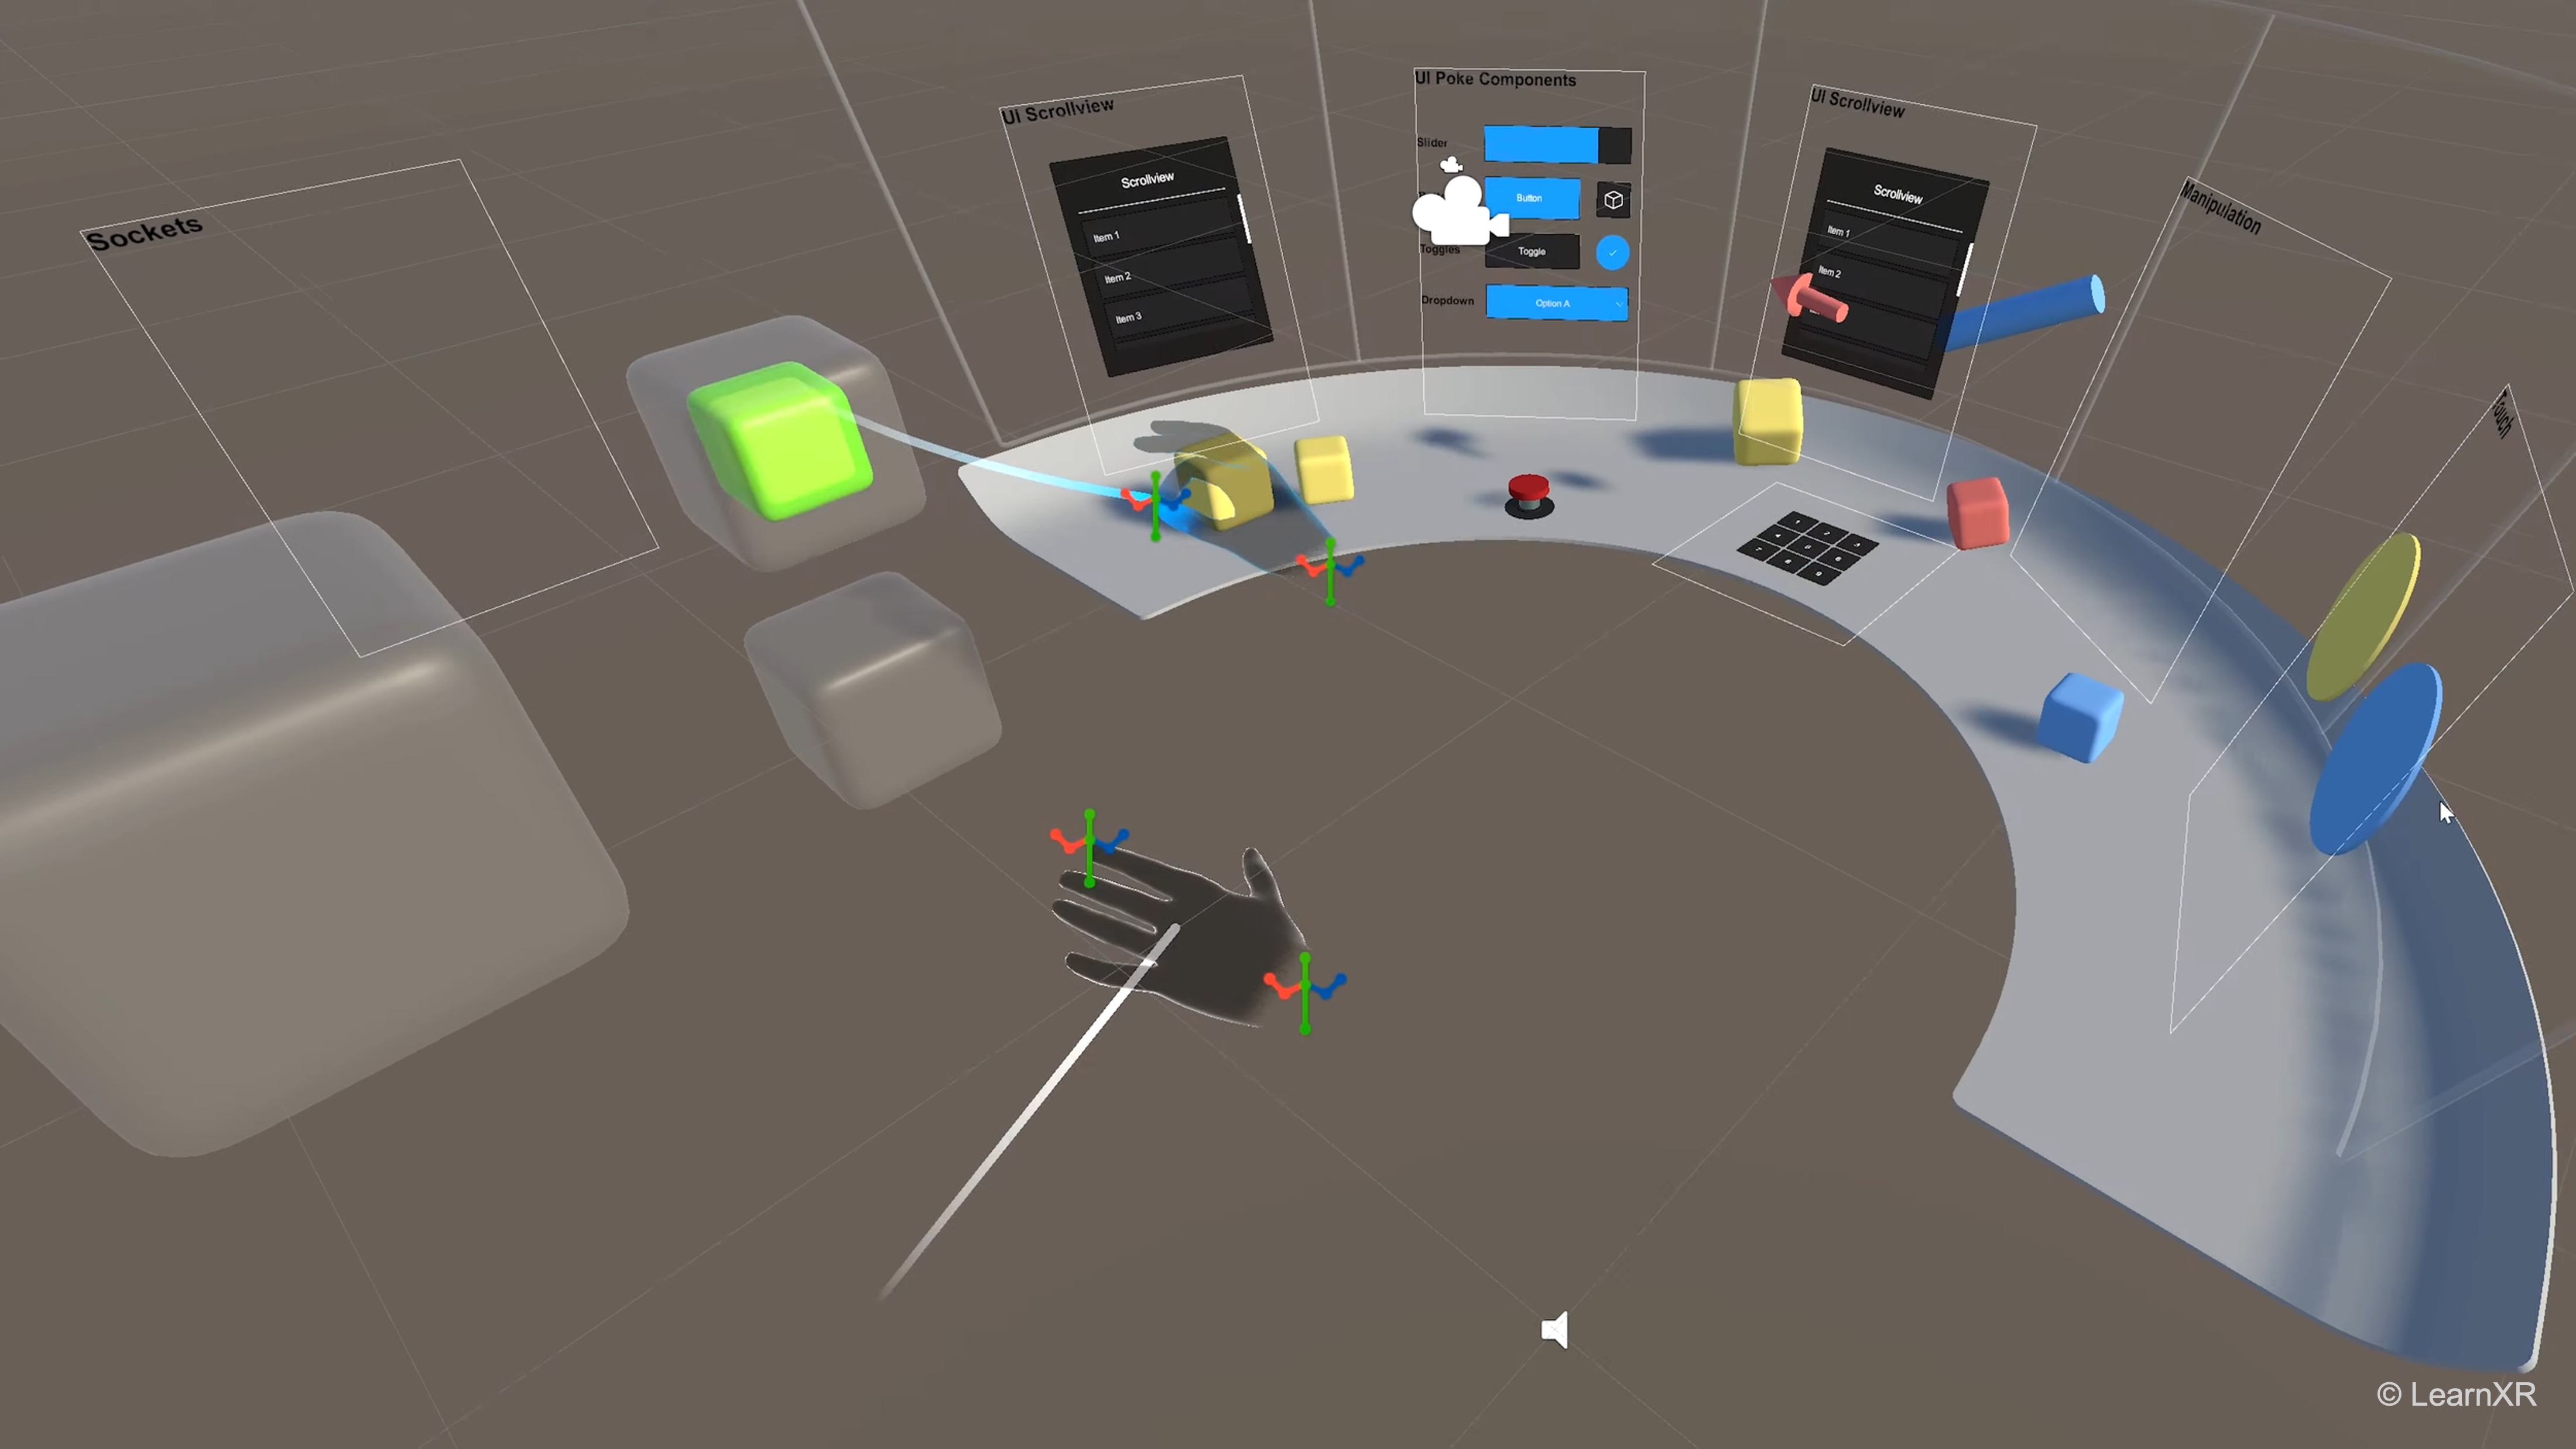
The XR Interaction Toolkit is a framework provided by Unity for creating and managing user interactions in XR environments. It offers components and tools that enable developers to easily set up common interaction patterns such as grabbing, teleportation, and UI manipulation. With the XR Interaction Toolkit, you can quickly prototype and deploy VR games or AR experiences with intuitive user interactions and create realistic interaction scenarios for simulation training programs. This toolkit provides a rapid development toolset for experimenting with new interaction paradigms in XR. Its core concepts include:
- Interaction Components: Pre-built components for common interactions (for example,
XR Grab Interactable,XR Ray Interactor,XR Direct Interactor,XR Socket Interactor, andXR Interaction Manager). - Event-Driven Architecture: Utilizes Unity events to trigger interactions, making it easier to extend and customize behavior.
- Modularity: Designed to be modular so that developers can mix and match components based on the needs of their application.
In XFactory, users grab tools, activate machines, and assemble engine parts using
XR Grab InteractableandXR Socket Interactorcomponents once interactors and input actions are configured.XR Ray Interactorcomponents allow for controller-based UI navigation in the exhibit station’s holographic panels.
OpenXR
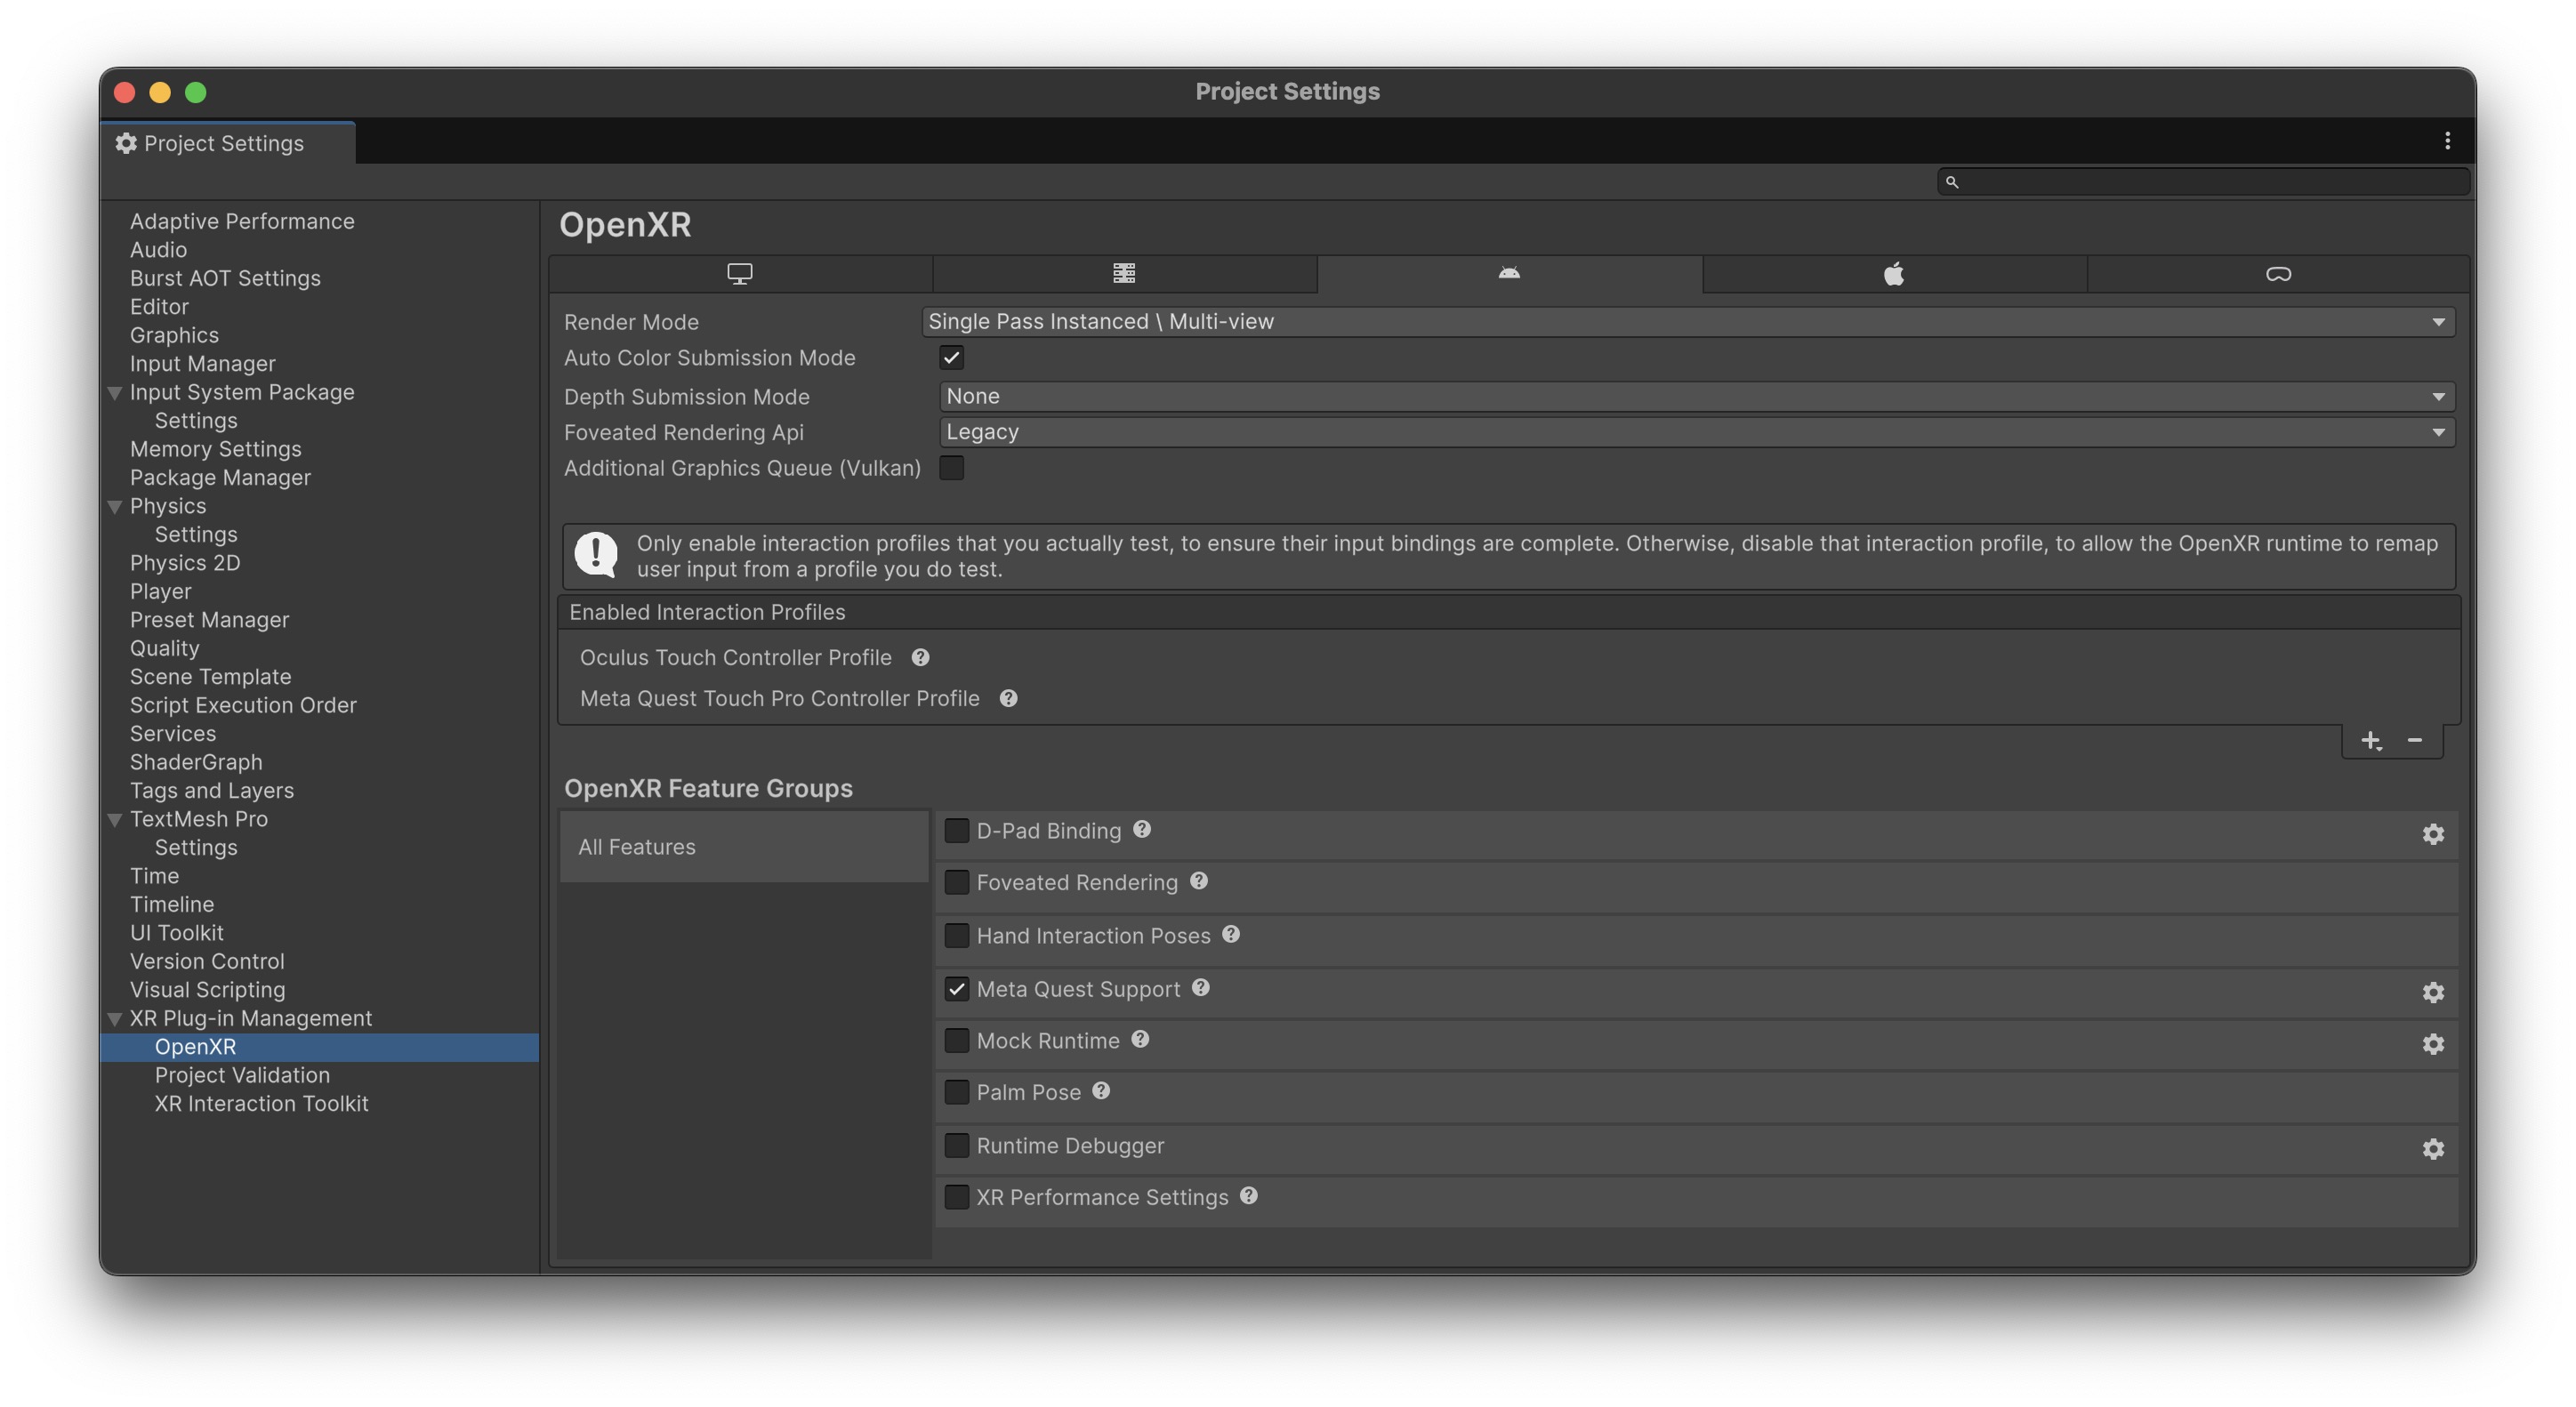
OpenXR is an open standard for XR application development, designed to standardize how VR and AR hardware interact with software. In Unity, this standard is supported through provider plug-ins, which serve as bridges between the OpenXR API and specific XR hardware. OpenXR reduces device-specific code, but each target still needs the correct runtime, interaction profile, feature group, platform settings, and testing. Core concepts include:
- Open Standard: A universal API that reduces fragmentation across various XR devices.
- Provider Plug-ins: Specific implementations that allow Unity to communicate with different hardware ecosystems (such as Meta Quest and other OpenXR-compatible PC VR headsets).
- Interoperability: Helps applications target multiple OpenXR runtimes, but compatibility still depends on the headset runtime, interaction profile, and project validation—not automatic plug-and-play behavior.
For Meta Quest development in this course, use Unity OpenXR rather than the deprecated Oculus XR Plugin path. OpenXR still requires correct Android/Desktop settings, interaction profiles, and build or Quest Link testing for each target.
When moving between headsets, expect to review OpenXR interaction profiles, feature groups, and platform settings even if your XRI scene setup stays the same.
Input System Package
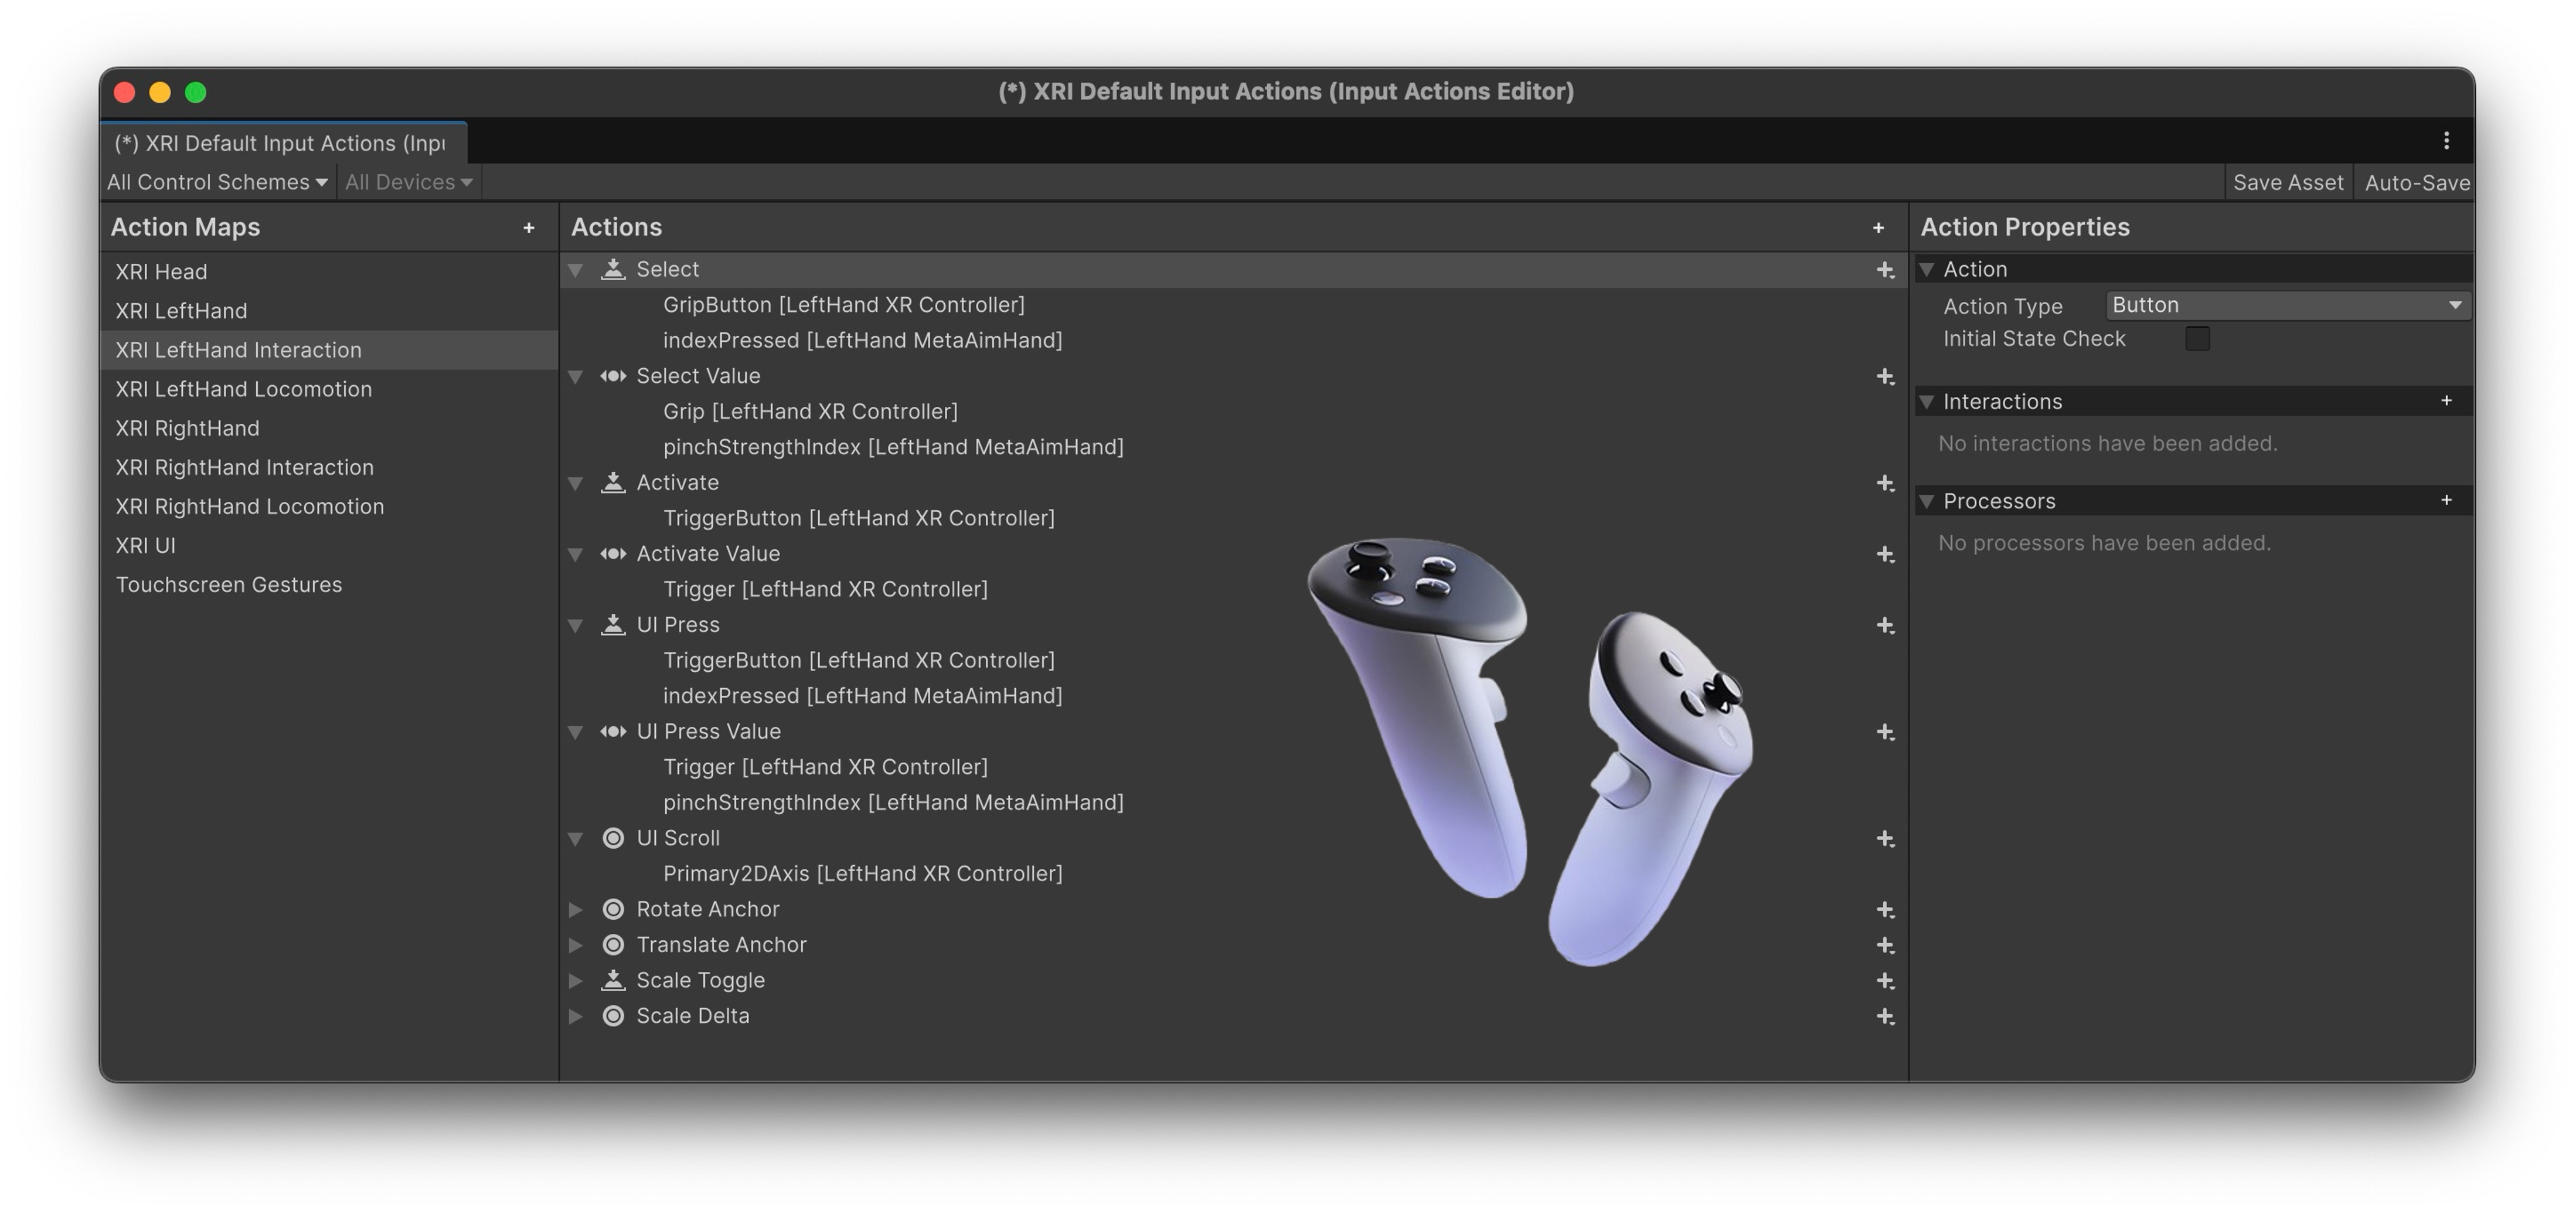
The Input System Package in Unity is a modern approach to handling user input. It is designed to replace the older input system by providing a more robust, flexible, and extensible framework, especially beneficial in XR contexts where diverse input methods (controllers, gestures, voice, etc.) are common. This package seamlessly integrates inputs from various XR devices, including VR controllers and hand-tracking systems, usually through action maps such as the XRI Starter Assets XRI Default Input Actions. Core concepts include:
- Action-Based Input: Uses input actions and bindings, allowing developers to map various input devices to logical actions.
- Extensibility: Easily supports custom devices and input types without major overhauls.
- Event-Driven Model: Provides a more responsive input system that triggers events based on user interactions.
Voice commands like “Activate Welding Sequence” and thumbstick input for drone inspection in XFactory are managed using action maps defined in the Input System. This modularity allows toggling input profiles per station with ease.
XR Device Simulator
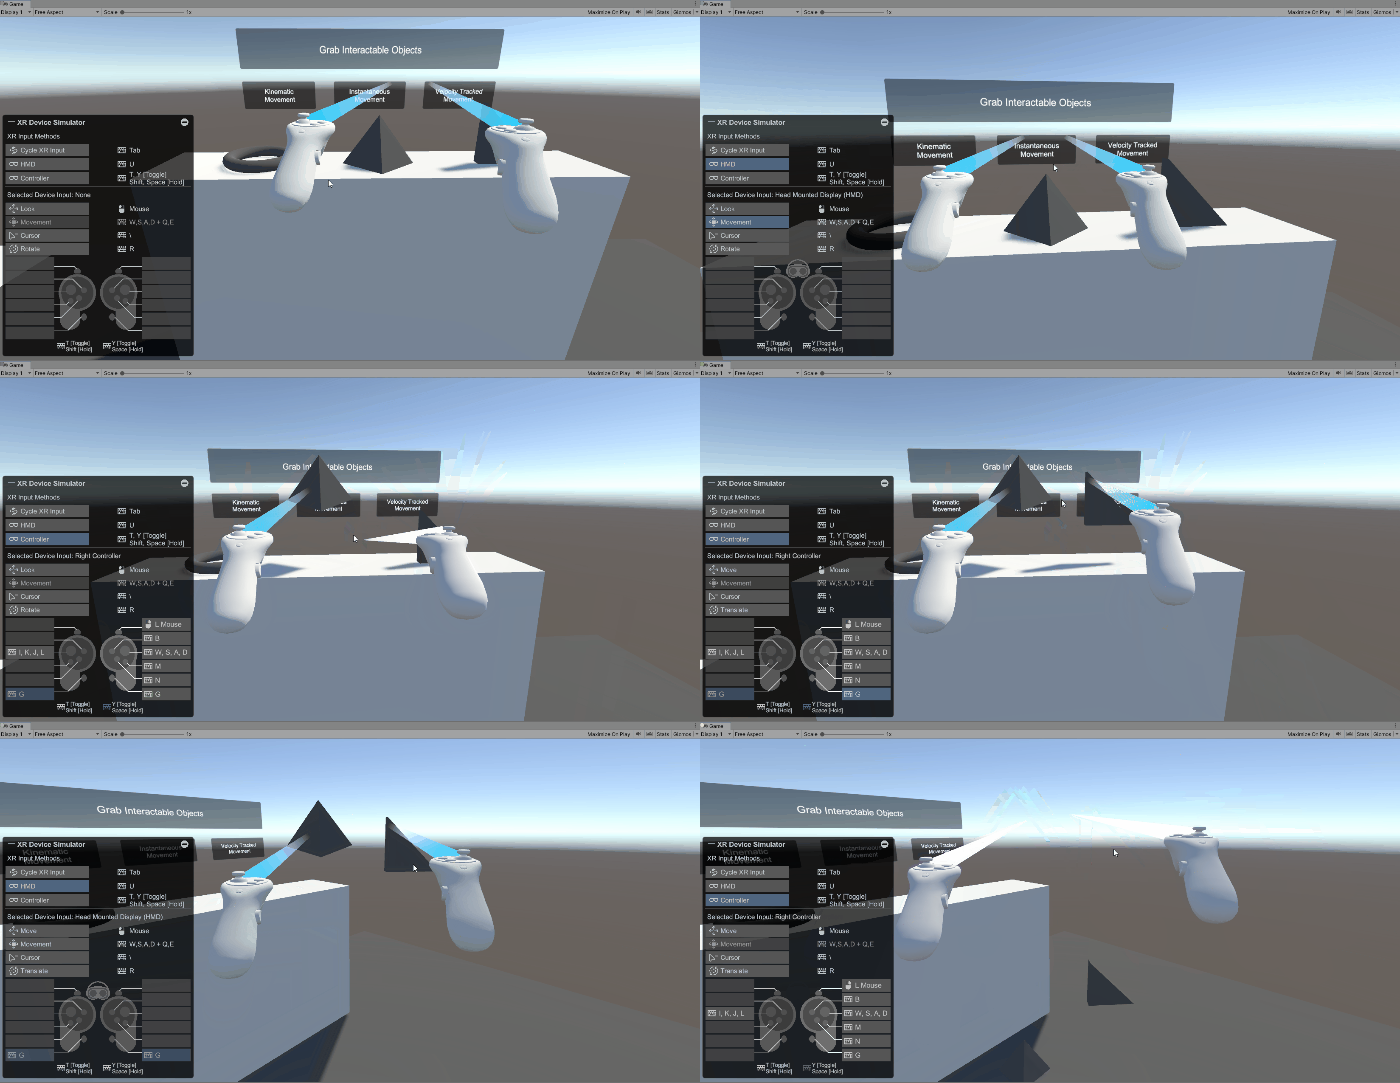
The XR Device Simulator is a Unity tool that allows developers to simulate XR hardware input within the Unity Editor. This tool helps in testing and debugging XR interactions without needing the actual hardware during development. It allows you to quickly test and refine interactions without switching to real hardware and offers a convenient way to prototype XR interactions and debug issues directly in the editor. Core features include:
- Simulation Environment: Emulates VR/AR controllers and headset movements within the editor.
- Debugging Tool: Provides a visual and interactive interface for testing XR interactions.
- Efficiency Booster: Reduces the need for physical hardware in early stages of development, speeding up iteration cycles.
During early development, XFactory interaction flow can be tested with the XR Device Simulator, but grabbing, socketing, and UI selection still require the correct XRI components and enabled input actions before they behave like real VR interactions.
VR Hardware
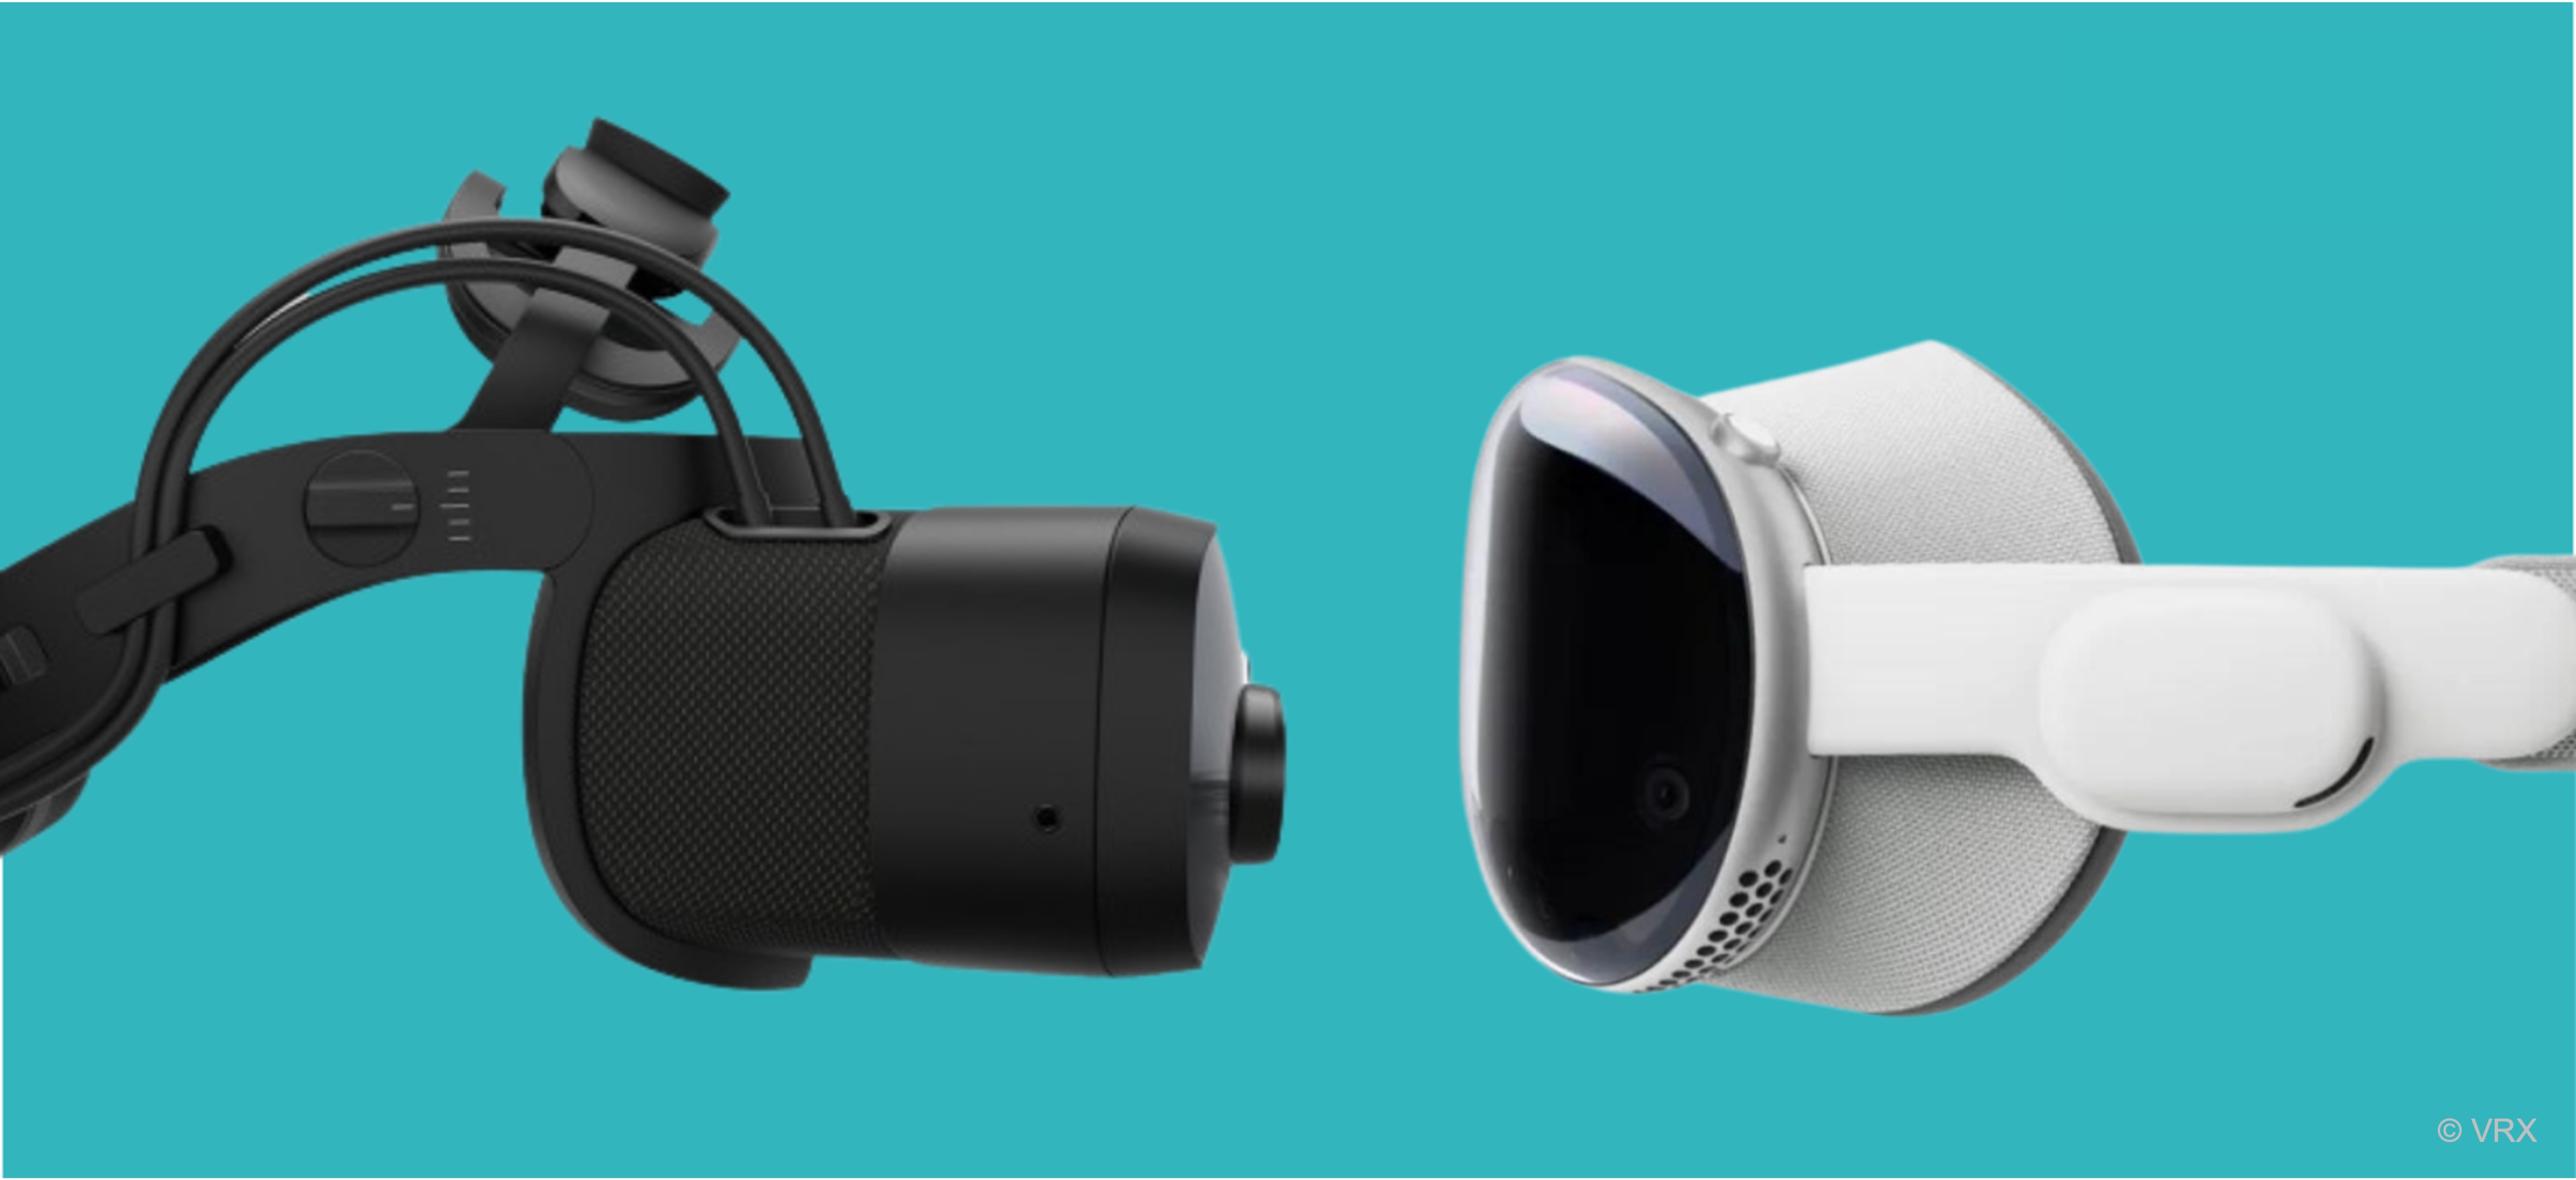
VR hardware includes head-mounted displays (HMDs), motion controllers, sensors, and tracking systems that work together to create immersive digital environments. These devices offer high-resolution visuals, spatial audio, and increasingly precise tracking and interaction capabilities, enabling users to experience realistic and interactive virtual worlds. As technology advances, improvements in display quality, reduced latency, hand and eye tracking, and haptic feedback continue to expand the applications of VR—from gaming and entertainment to education, engineering, and professional training. VR systems generally fall into three broad categories, each with its own tradeoffs in performance, portability, and use case suitability:
- Tethered Systems: Devices connected to a powerful PC or workstation via cables, offering high-resolution displays, superior graphics performance, and advanced tracking capabilities. These are commonly used in engineering labs where precise 3D model visualization and high-performance simulation are required. Examples include HTC Vive Pro 2, Valve Index, and Varjo XR-4.
- Standalone Systems: Self-contained devices with built-in processing, tracking, sensors, and battery power. They offer portability and ease of use without external computers. These are ideal for mobile demonstrations, offsite training sessions, field-based data collection or design review. Examples include Meta Quest 3, HTC Vive Focus, and Apple Vision Pro.
Some earlier VR devices were hybrid systems that used smartphones or detachable compute units for VR rendering. These were an earlier entry point into VR, but are now largely supplanted by more capable standalone devices.
Technical Capabilities
Understanding the technical capabilities of VR hardware is essential when integrating with tools like Unity for immersive engineering applications.
- Display & Resolution: High-resolution displays enable detailed viewing of schematics, CAD assemblies, and interface elements. For example, the Varjo XR-4 delivers human-eye-level visual clarity, allowing users to interact with detailed 3D models in VR with confidence.
- Tracking and Positional Accuracy: Accurate motion tracking is essential for realism, especially when users interact with virtual components. For example, Valve Index and HTC Vive Pro use Lighthouse tracking for sub-millimeter precision.
- Interaction and Controllers: Controllers with features like finger tracking, capacitive sensors, and haptics enable intuitive and expressive manipulation of virtual tools. The Meta Quest 3’s controllers offer fine-grained haptics and self-contained tracking, letting users simulate hand tools and interactions in VR without external cameras.
- Field of View (FOV) and Refresh Rates: A wide FOV enhances peripheral awareness, while high refresh rates (90Hz and above) reduce motion blur and VR sickness. For example, Valve Index’s 144Hz refresh rate improves user comfort during extended simulation sessions.
- Developer Ecosystem and SDK Support: Unity supports major VR platforms through OpenXR and XR Plug-in Management. For Meta Quest 3, this course uses Unity OpenXR plus XR Interaction Toolkit; optional Meta-specific SDK features can be added later for Quest-only capabilities, but they are not the default classroom path.
Considerations for Engineers
VR hardware should be selected based on the specific needs of engineering workflows and environments:
- Simulation and Prototyping: Use high-end tethered devices such as Varjo XR-4 or HTC Vive Pro 2 where graphical fidelity and spatial precision are critical—for example, evaluating the mechanical fit of engine parts or inspecting factory layouts.
- Remote Collaboration and Training: Devices like Meta Quest 3 and Pico 4 support multi-user virtual environments and remote design review sessions. These are ideal for teams working across locations or conducting training without physical equipment.
- Ergonomics and Extended Use: Comfortable headsets such as the HP Reverb G2 reduce fatigue during long sessions. Adjustable head straps, balanced weight, and high-quality padding make them suitable for prolonged design reviews or educational walkthroughs.
- Integration with Existing Tools: Modern headsets often integrate with platforms like Unity, Unreal, and professional CAD tools. Unity bridges engineering software and VR visualization, enabling immersive experiences like XFactory where learners can explore machine interfaces, assembly processes, and robot paths once XR Origin, XRI, and OpenXR setup are complete.
Common VR Devices
The devices below illustrate the range of standalone and tethered headsets used in engineering and training contexts.
Meta Quest 3
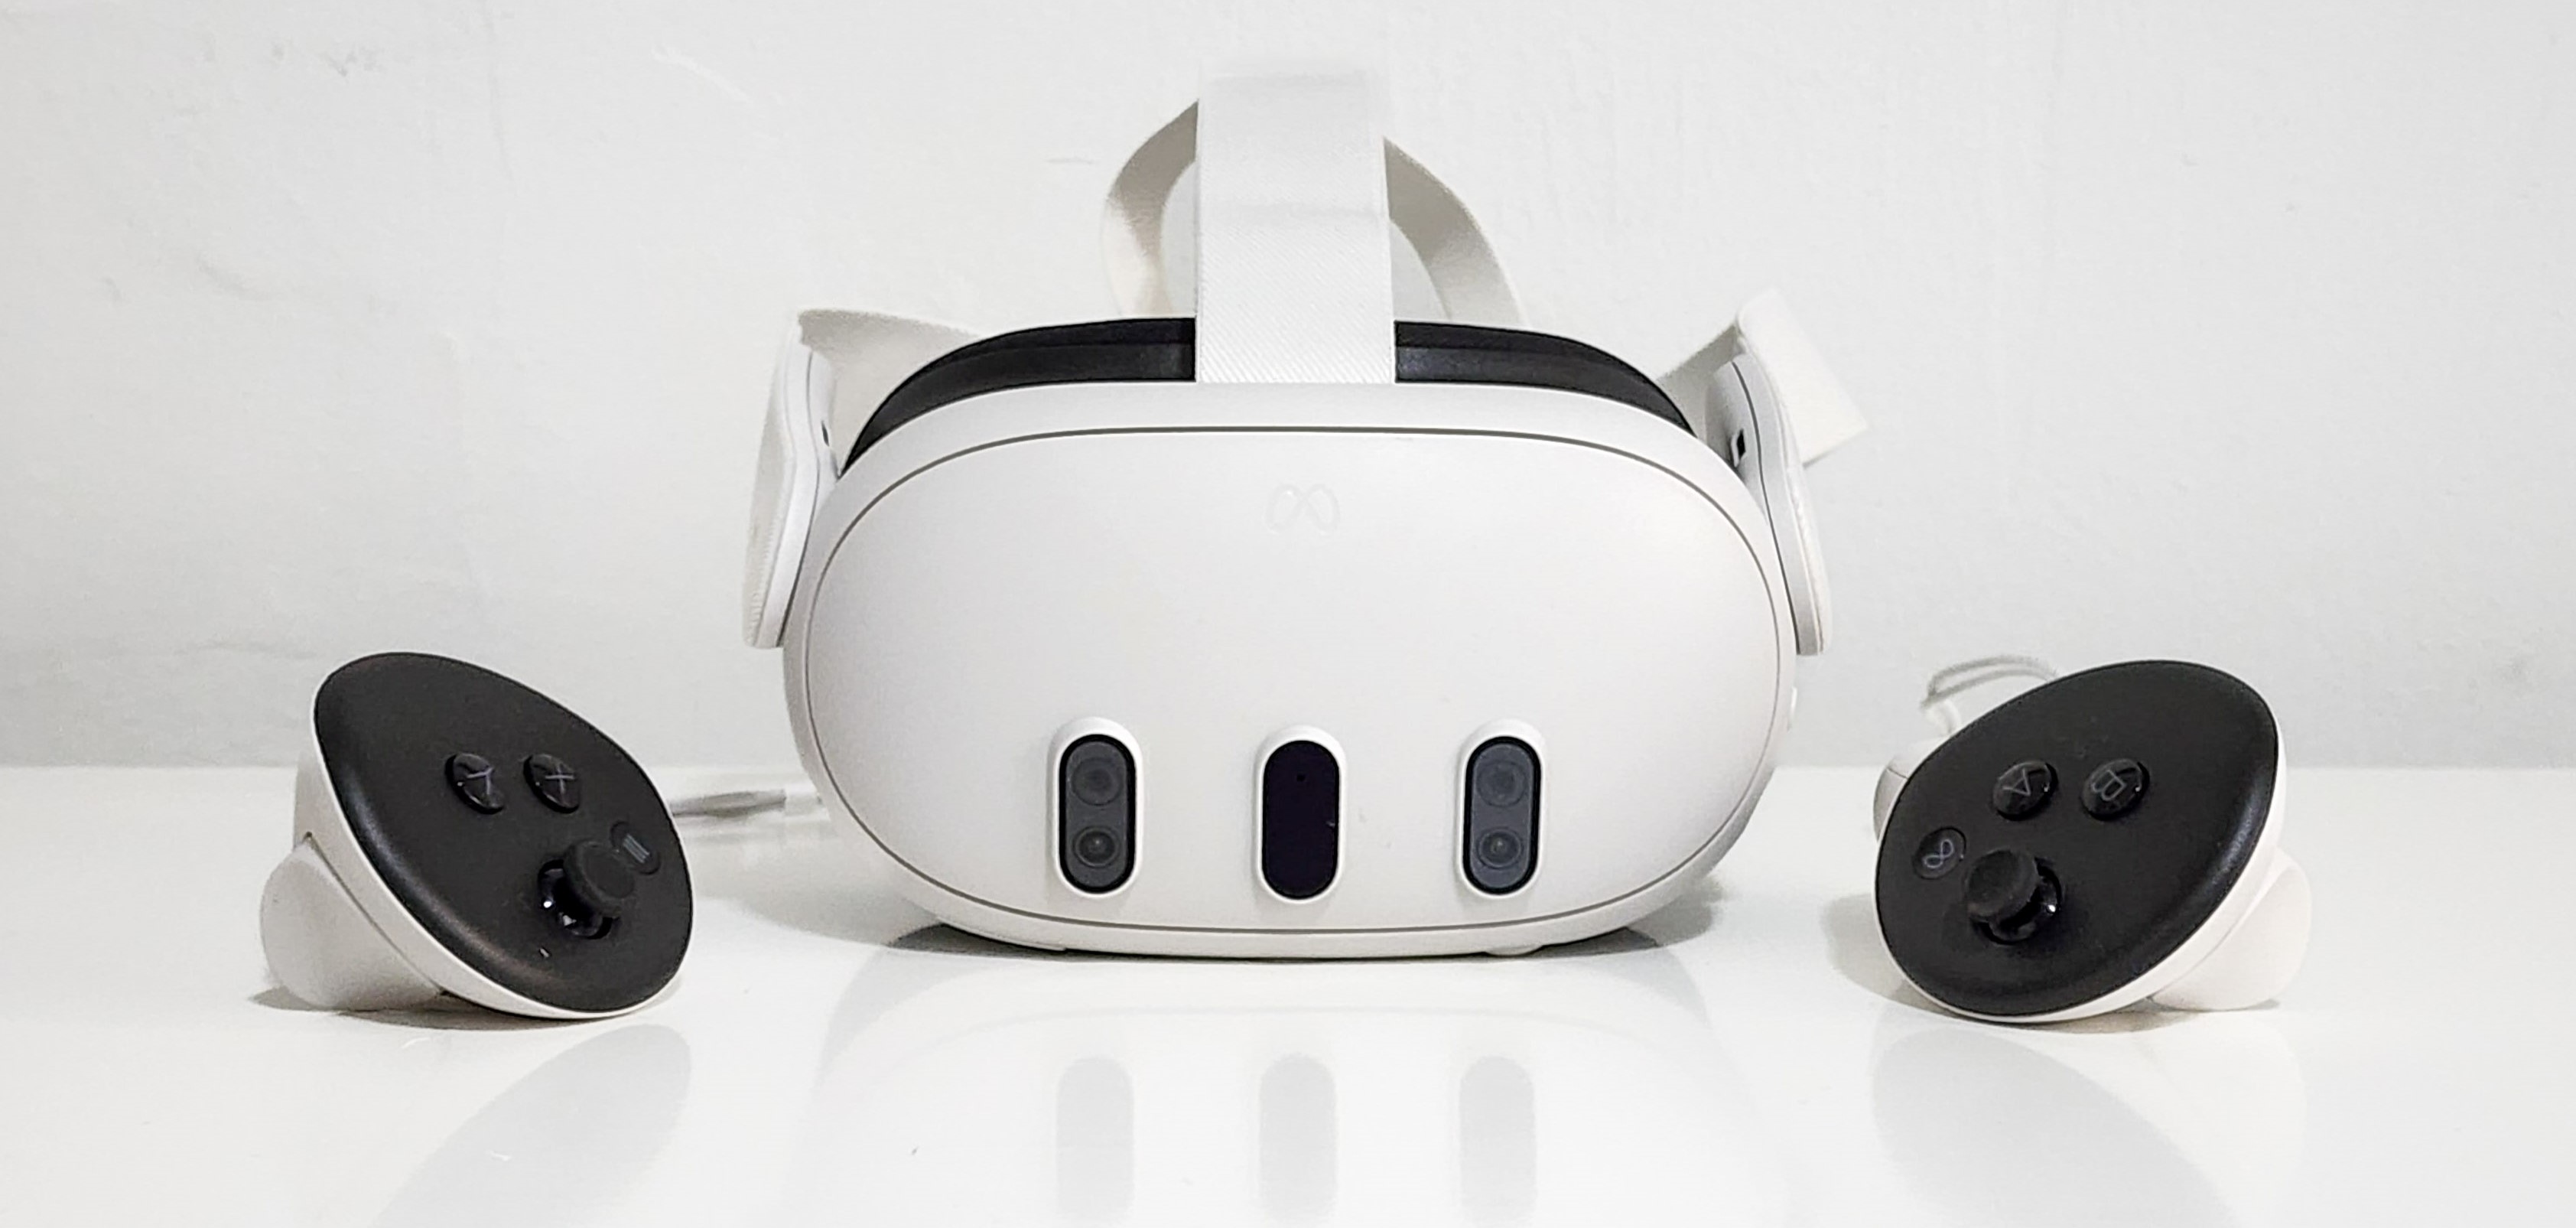
- A standalone, consumer-focused VR headset featuring pancake lenses for a slimmer profile and better image clarity.
- Boasts a higher resolution than the Quest 2, with significantly reduced screen-door effect.
- Includes full-color passthrough for immersive mixed reality experiences and uses the Snapdragon XR2 Gen 2 chipset, delivering roughly twice the GPU processing power of its predecessor.
- Great for gaming, productivity, and fitness in a wireless format.
HTC Vive Focus 3
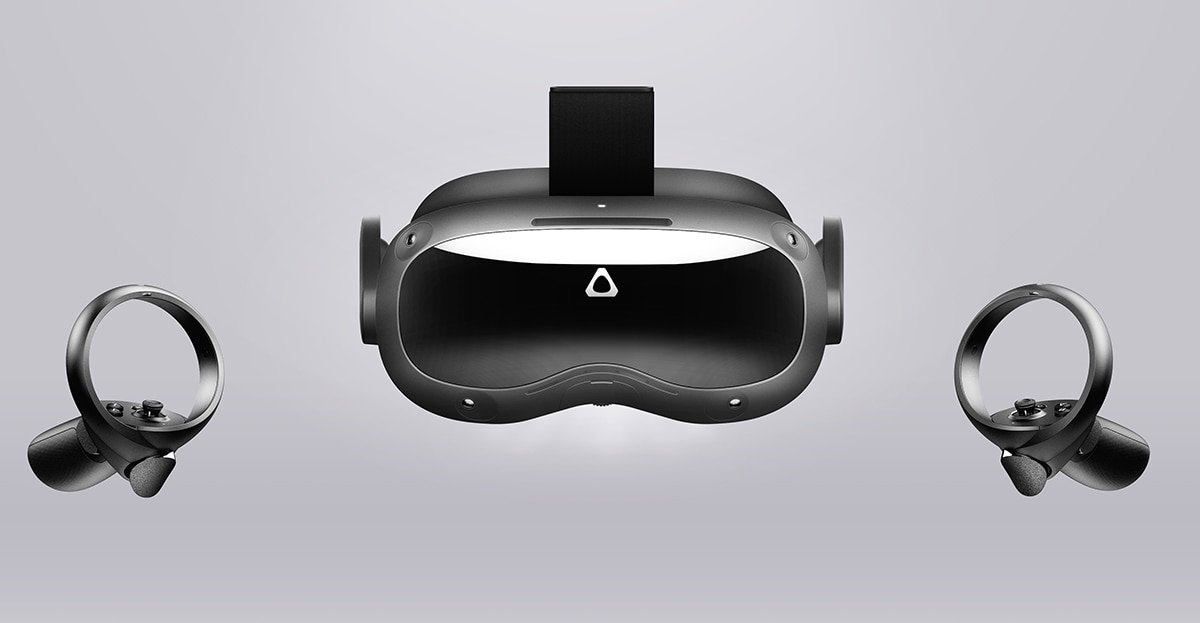
- An all-in-one enterprise-grade VR headset designed for training, collaboration, and simulations.
- Features 2448 × 2448 per eye resolution, 90Hz refresh rate, and wide 120° FOV.
- Offers inside-out tracking with four built-in cameras and swappable batteries for all-day use.
- The magnesium alloy frame ensures both strength and lightness, making it ideal for extended sessions.
HTC Vive Focus Vision
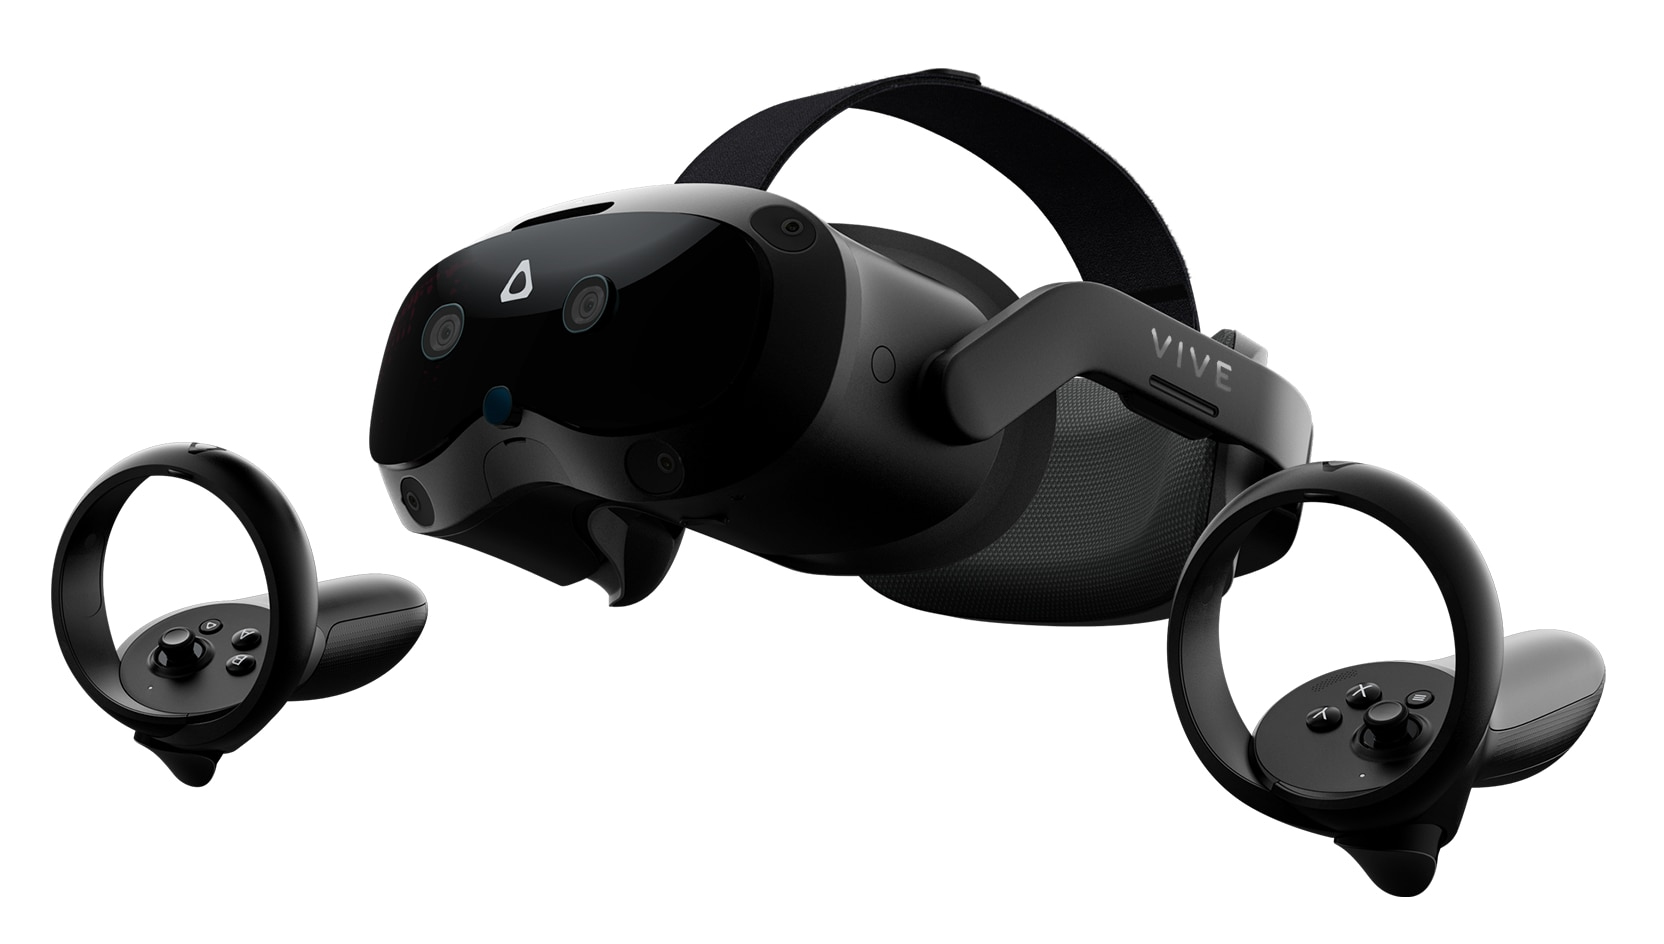
- A cutting-edge standalone VR/AR headset with a focus on advanced optics, mixed reality, and enterprise applications.
- Equipped with the Snapdragon XR2+ Gen 2 chipset, delivering enhanced AI and graphics performance.
- Features full-color passthrough, improved depth sensing, and advanced hand tracking for natural user interaction in training, design visualization, or remote support scenarios.
HTC Vive Pro 2
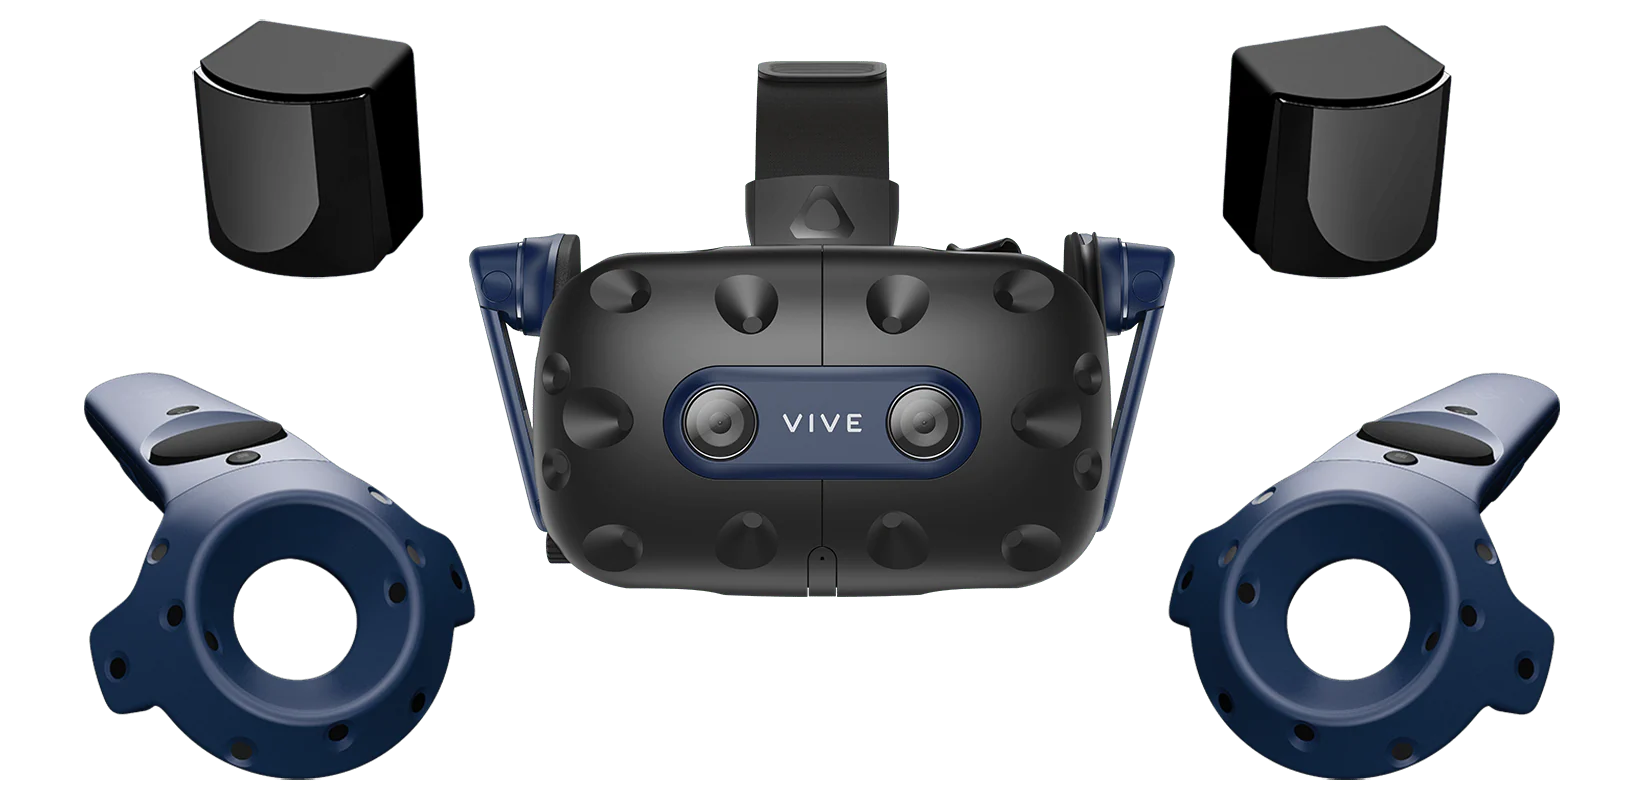
- Premium tethered VR headsets with a focus on professional and enthusiast users.
- The Vive Pro 2 features a dual 5K resolution (2448 × 2448 per eye), 120Hz refresh rate, and a wide 120° FOV.
- Utilizes Lighthouse 2.0 base stations for room-scale tracking, offering pinpoint spatial accuracy.
- Includes integrated Hi-Res certified headphones, a comfortable adjustable head strap, and modular accessories for eye tracking and facial tracking.
Valve Index
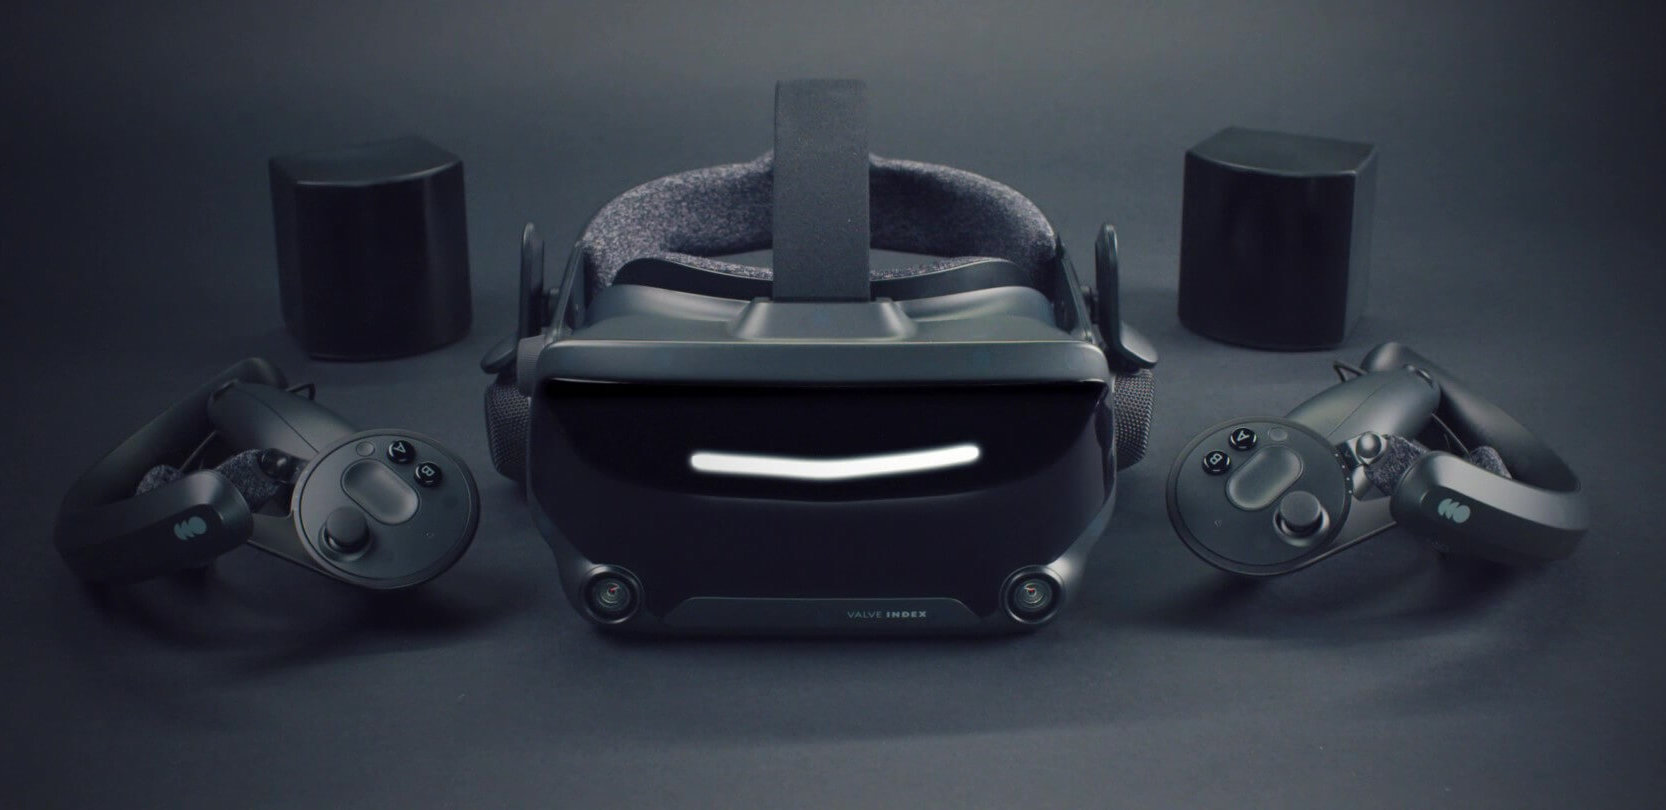
- A PC-tethered headset popular among enthusiasts and developers for its superior tracking and input fidelity.
- Offers a refresh rate up to 144Hz, 130° FOV, and a custom LCD panel to reduce motion blur.
- Paired with Knuckles controllers, it allows individual finger tracking, enabling precise gesture input.
- Uses external Lighthouse base stations for high-fidelity room-scale VR with sub-millimeter accuracy.
Varjo XR-4
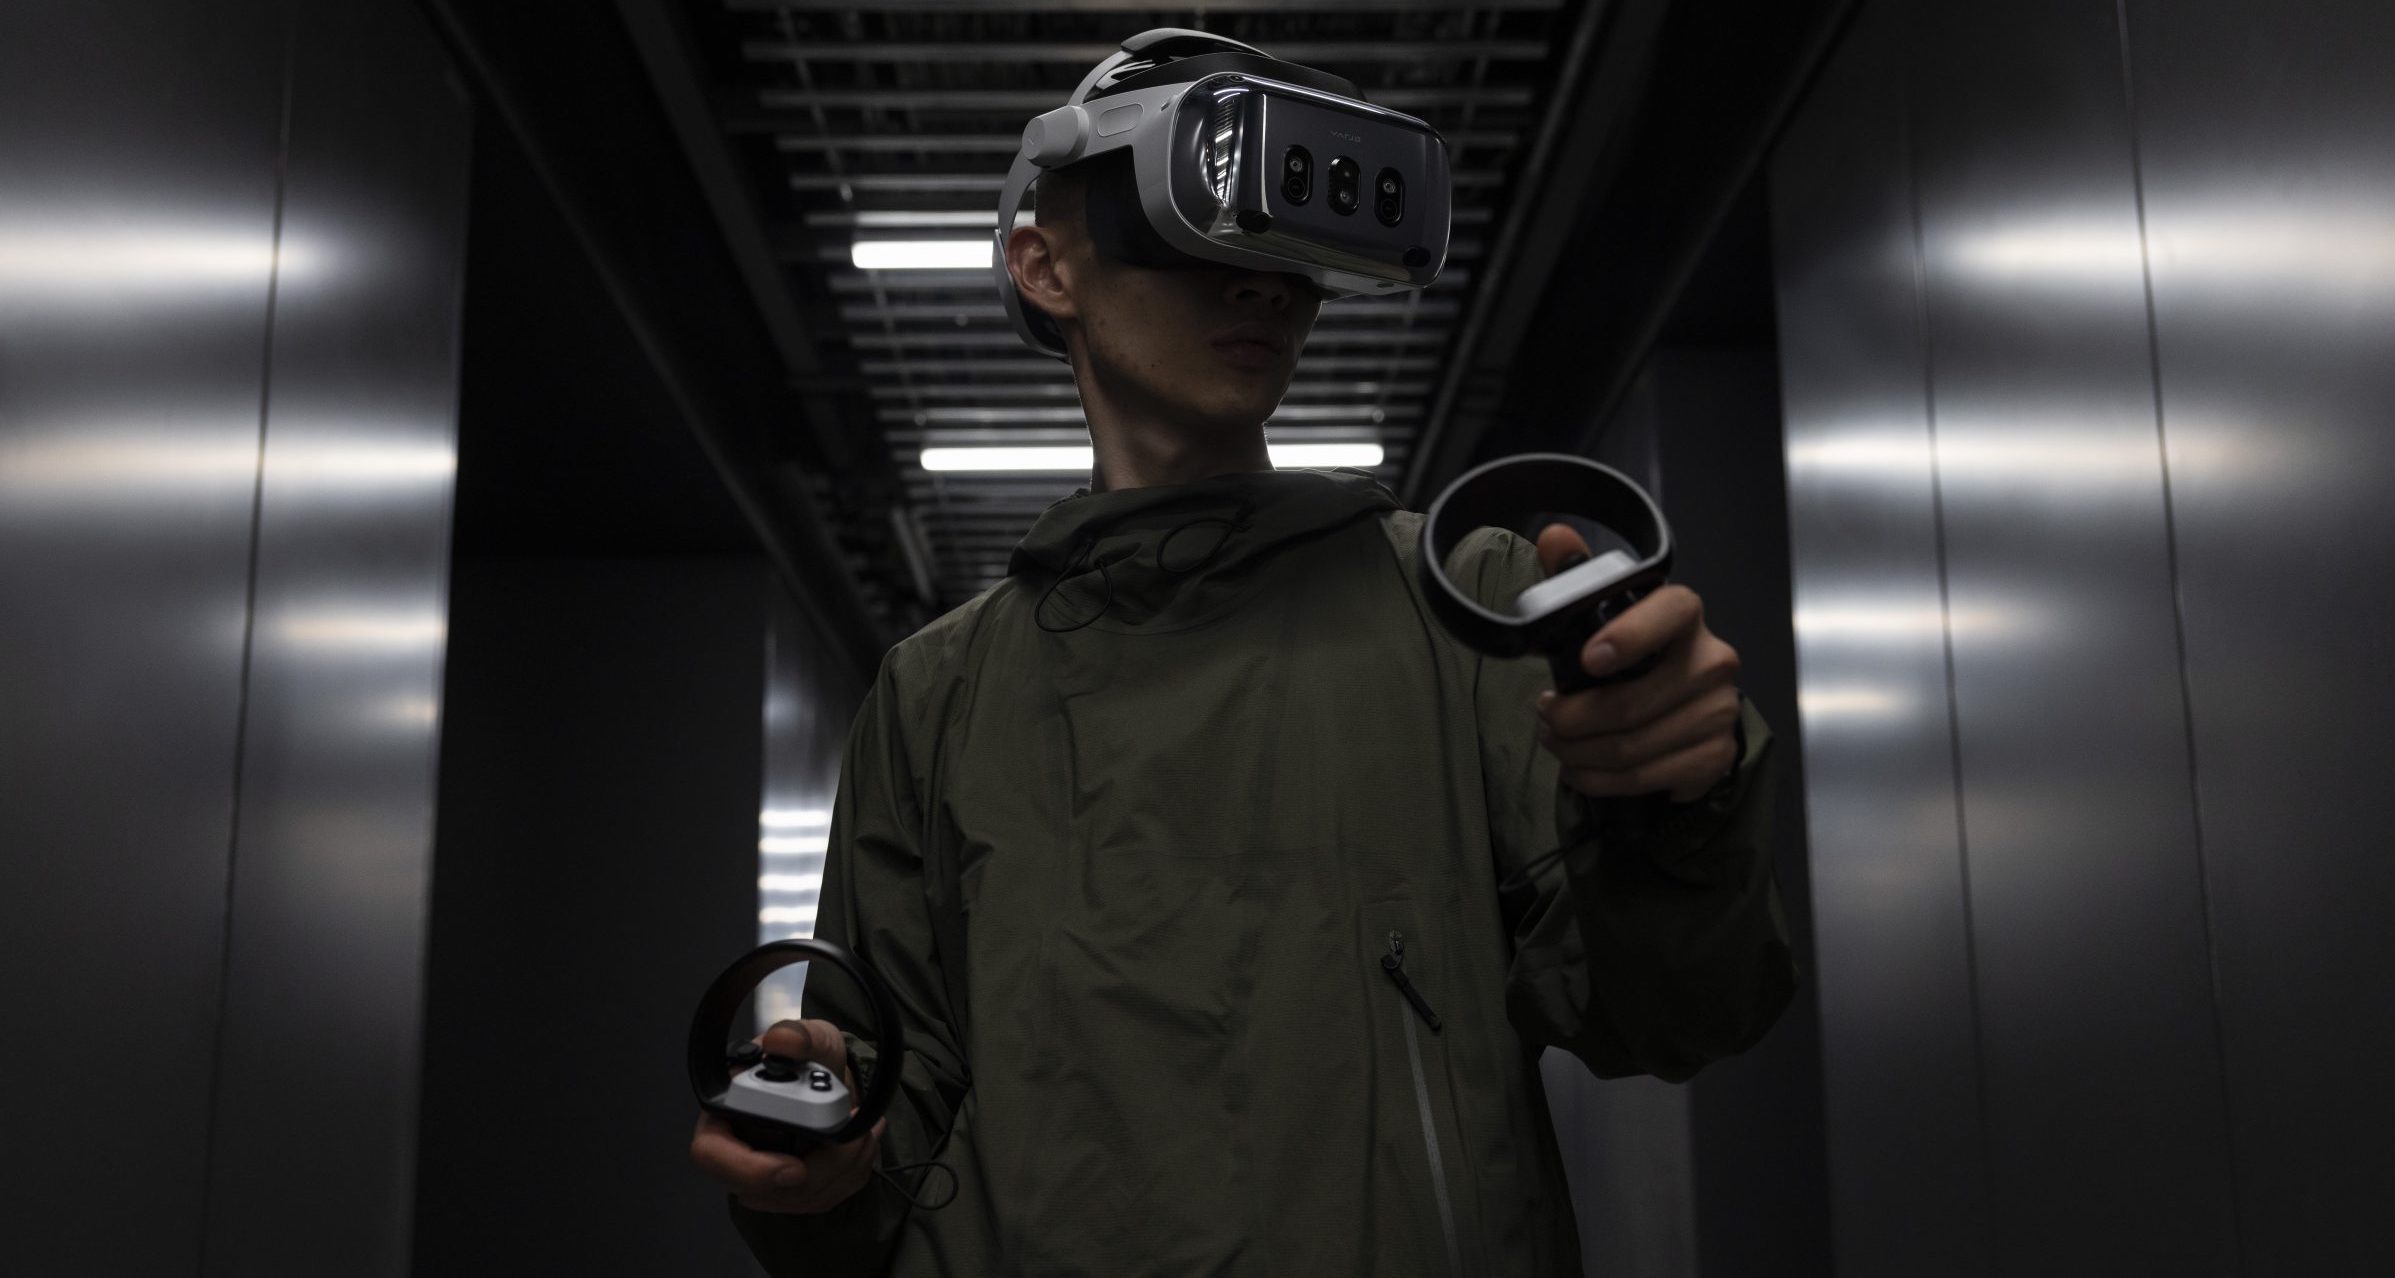
- A high-end mixed reality headset targeted at industrial, aerospace, and research applications.
- Features dual displays with exceptionally high pixel density (over 70 PPD) and bionic display technology for human-eye resolution in the focus area.
- Offers low-latency passthrough with stereo RGB cameras, real-time environment segmentation, and occlusion handling.
- The expanded FOV and depth sensors enable more realistic and immersive VR scenarios.
Other OpenXR-compatible headsets are also used in engineering and training workflows, including the standalone PICO 4 Ultra, PICO 4, Apple Vision Pro, and PC-tethered options such as the HP Reverb G2. This course focuses on Meta Quest 3, but the Unity OpenXR + XRI workflow is intended to transfer across supported runtimes with the correct interaction profiles and platform testing.
Setting Up a VR Project in Unity
To set up a VR project in Unity, create a project from Unity’s official VR Template, inspect the preconfigured XR systems, and validate on Quest hardware. D1 focuses on understanding what the template configures—not manually wiring every XR component from scratch.
Required Modules
- Update Unity Hub: Open Unity Hub and ensure it is updated via the settings menu.
- Install the course-recommended Unity editor: If not already installed, select the course-supported Unity version from the available versions.
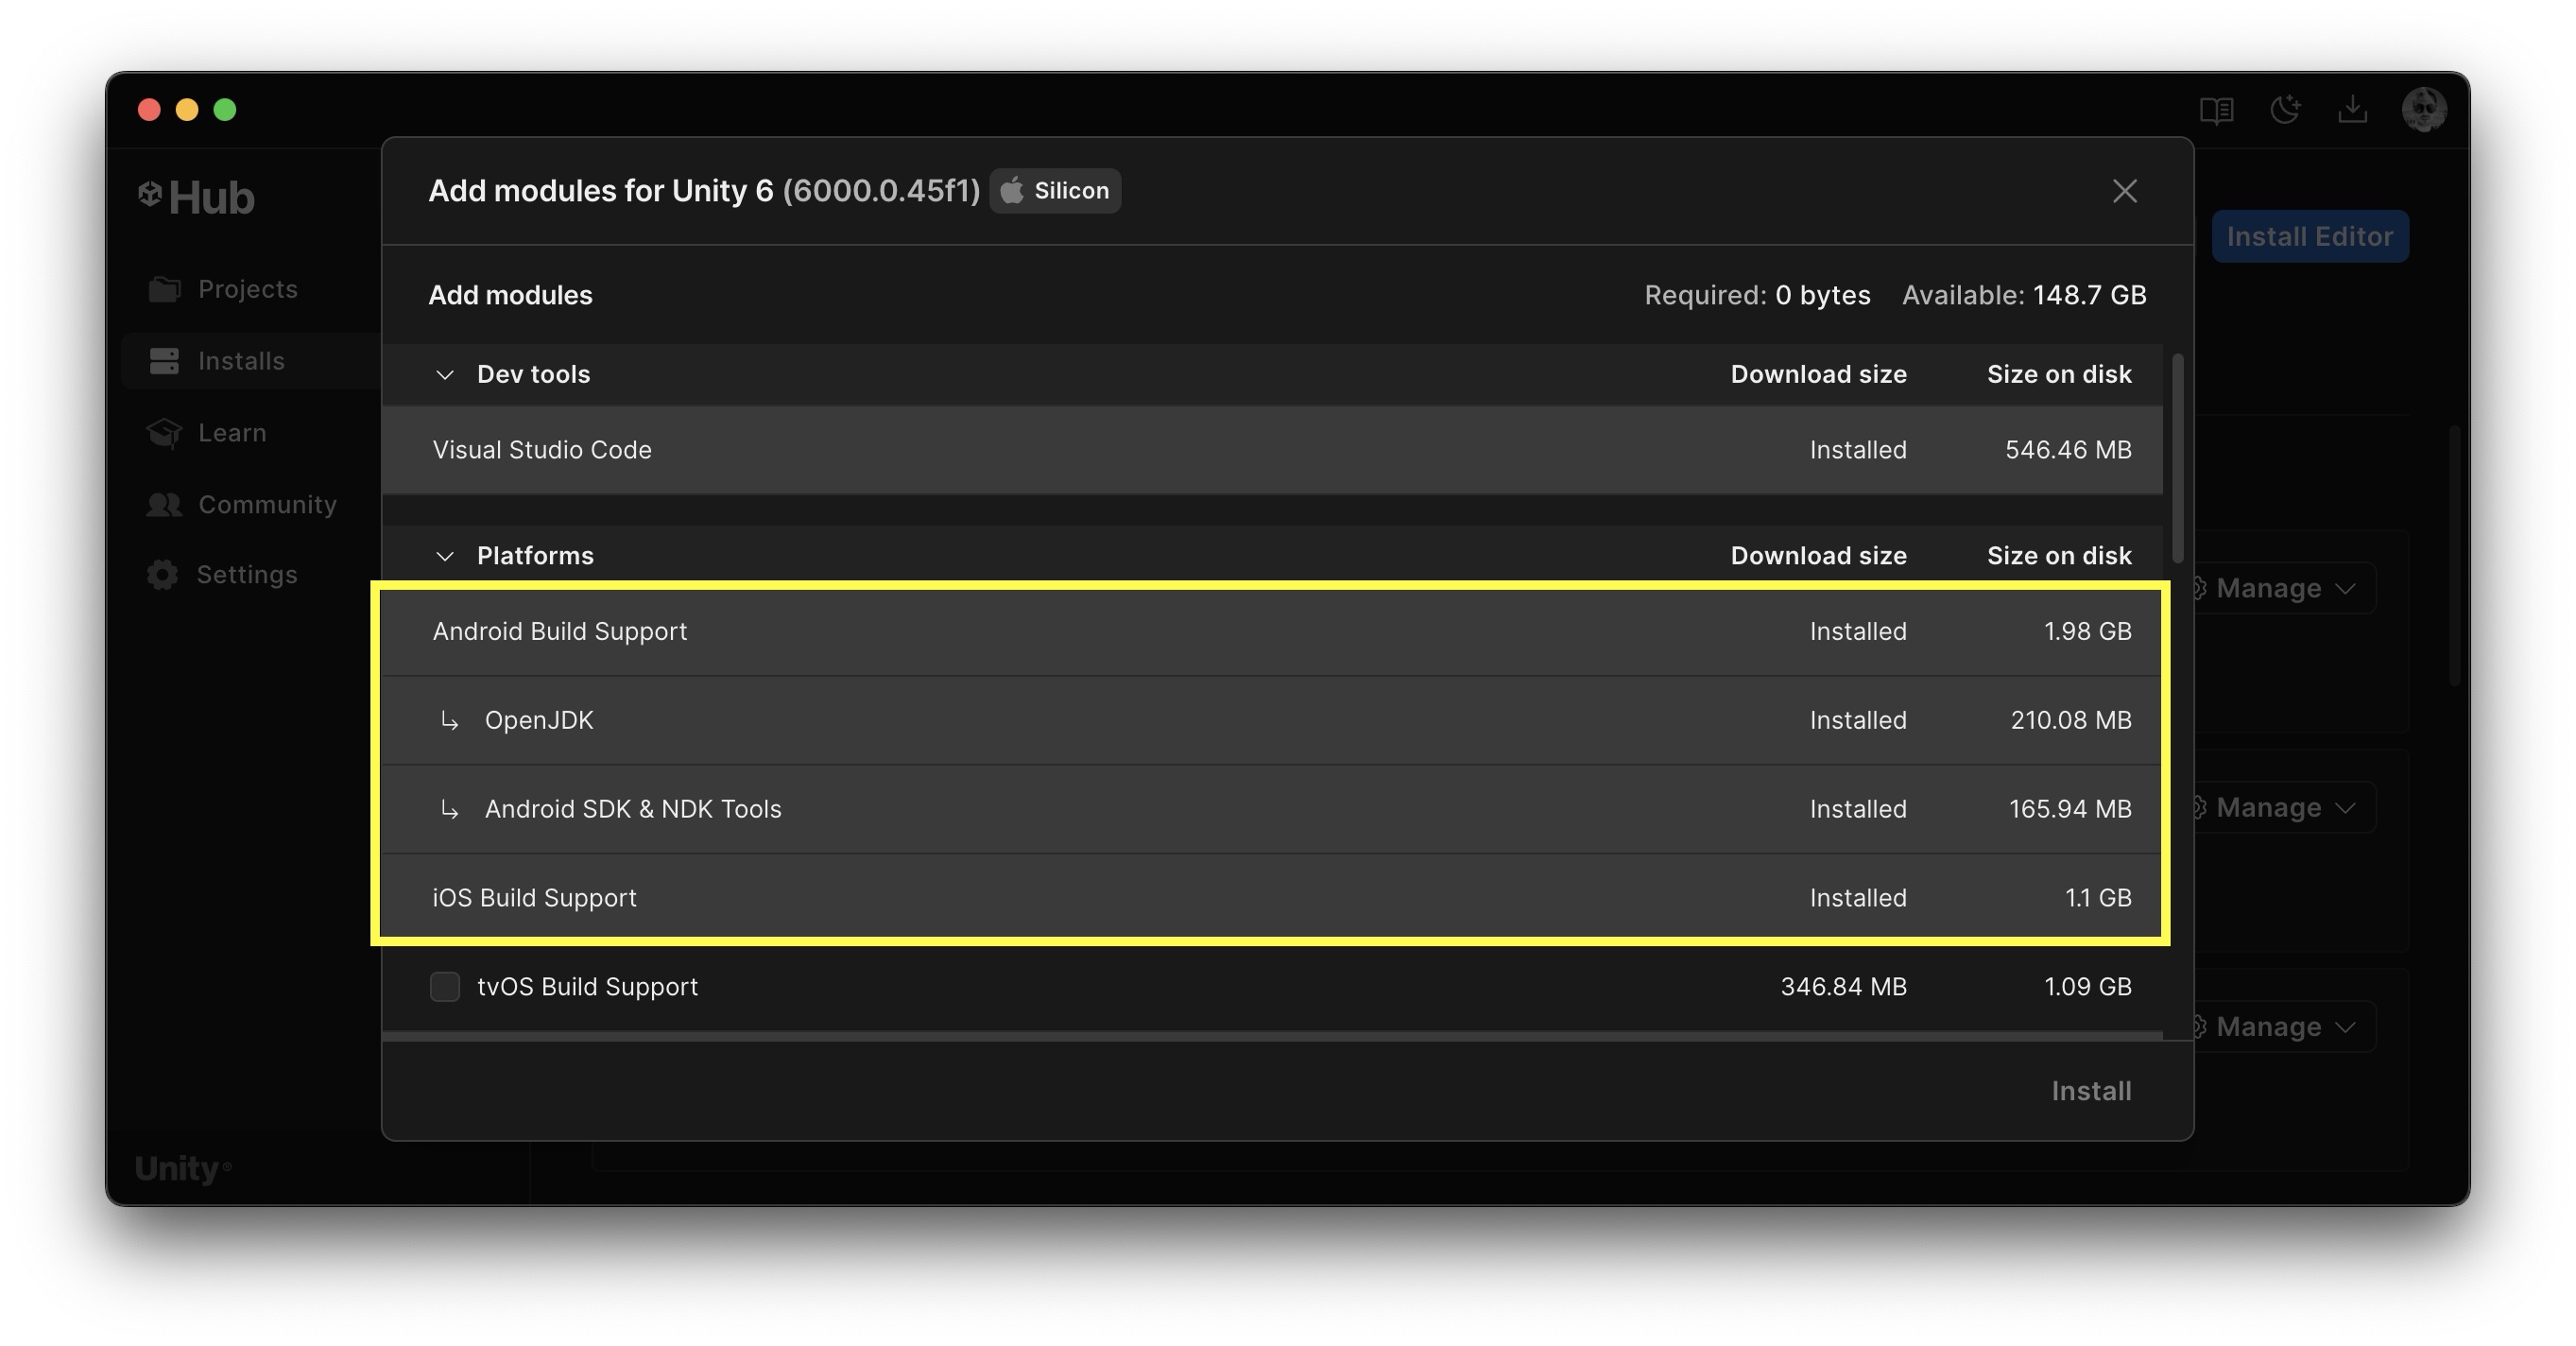
- Add Required Modules: When installing Unity, make sure to include
Android Build Support,OpenJDK, andSDK & NDK Tools. These modules are essential for building and exporting VR apps to Android-based headsets like the Meta Quest. -
Complete Installation: Follow the prompts to finish installing Unity and the selected modules.
Configure Your VR Hardware
To prepare your VR hardware for development, use the steps below. Note that this guide focuses on the Meta Quest 3, but basic compatibility tips for other headsets are included.
- Enable Developer Mode:
- Go to the Meta Developer Portal and create a developer account.
- Create an organization and accept the developer agreement.
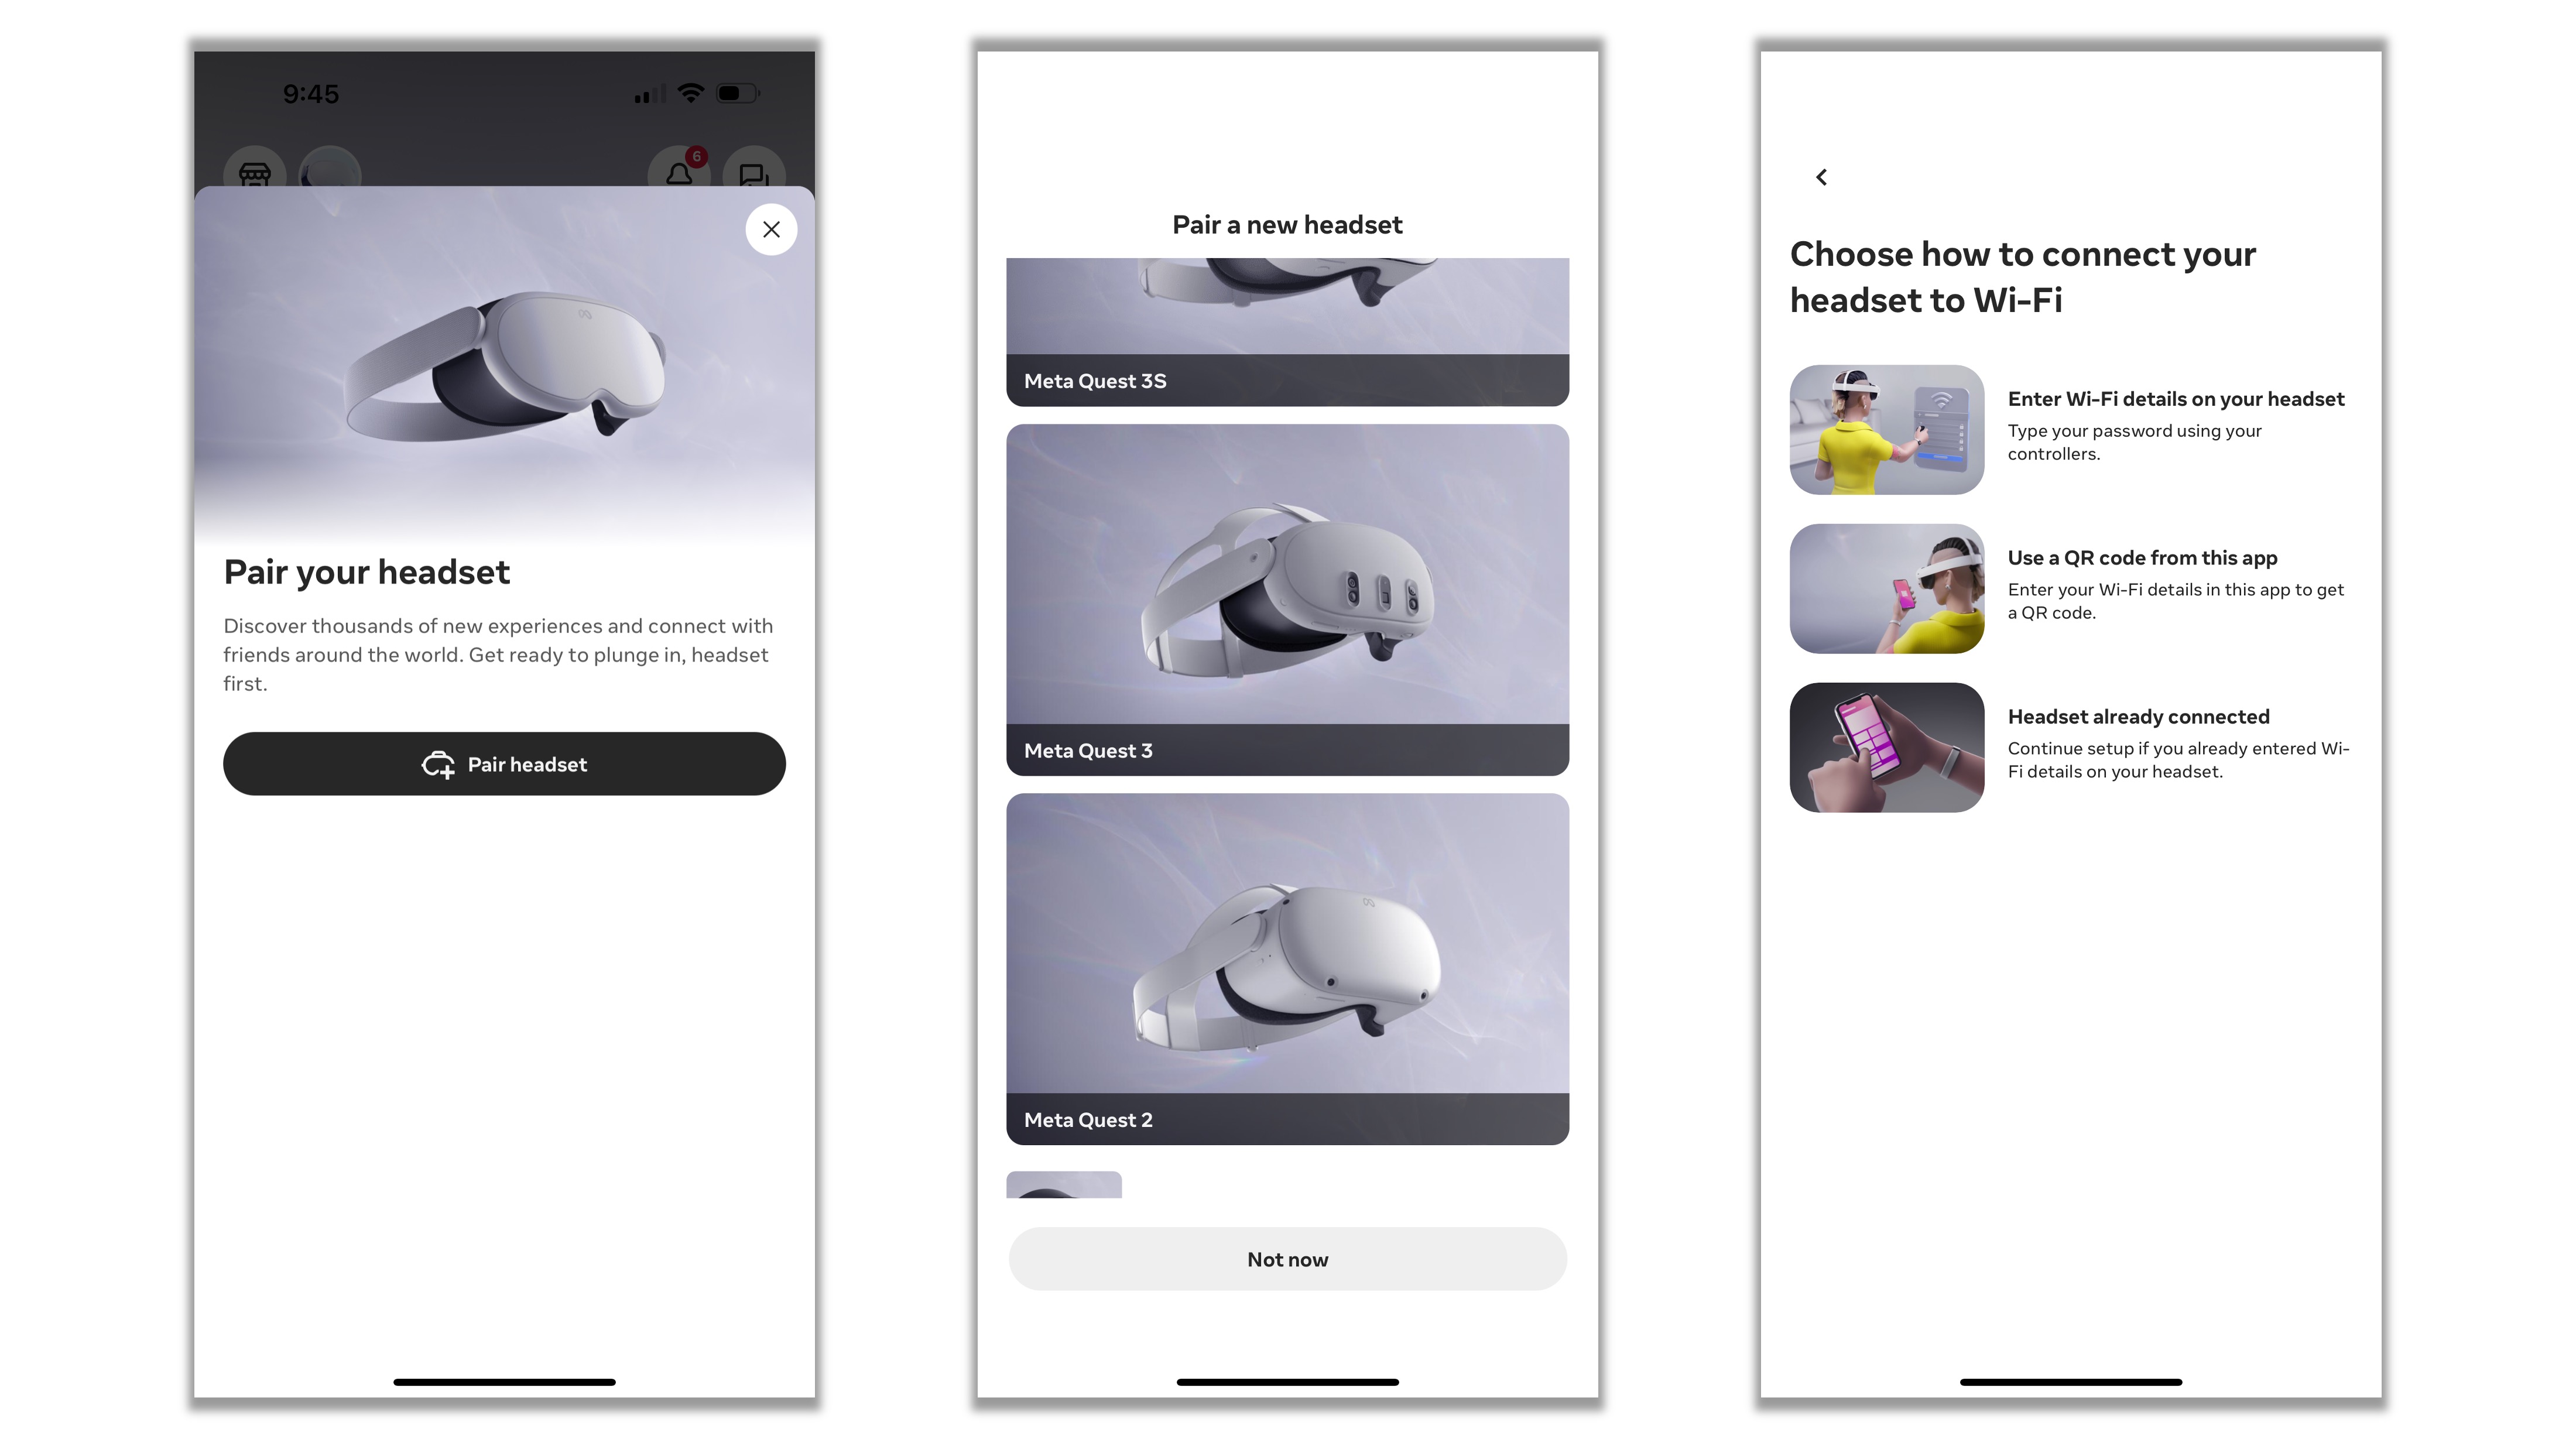
- Install the Meta Quest mobile app (iOS or Android).
- Pair your headset in the app under
Menu > Devices. - Enable
Developer Modeand reboot your headset.
- Install Meta Quest Link (Windows):
- Download and install the Meta Quest Link app following these instructions.
- This supports both USB-C and Air Link connections to your PC.
- Connect Your Device:
- Use a USB-C cable or enable Air Link in the headset.
- Put on the headset and approve the connection when prompted.
For headsets like the HTC Vive or Valve Index, download and install Steam and SteamVR. Launch SteamVR and ensure your headset and controllers are properly recognized and functioning. SteamVR is required for most PC-tethered VR devices that use OpenXR, including HTC and Valve hardware.
Start from the Unity VR Template
- Create a new project:
- Launch Unity Hub and click
New Project. - Choose the VR template.
- Name the project (for example,
XFactoryVR) and save it to your workspace directory.
- Launch Unity Hub and click
- Why use the VR Template:
- The Unity VR Template is preferred because it already includes the core VR project configuration, packages, sample scene, XR interaction setup, locomotion examples, interactables, and spatial UI examples.
- The template is a starting point, not a black box: inspect and understand what it configures before customizing scenes for XFactory.
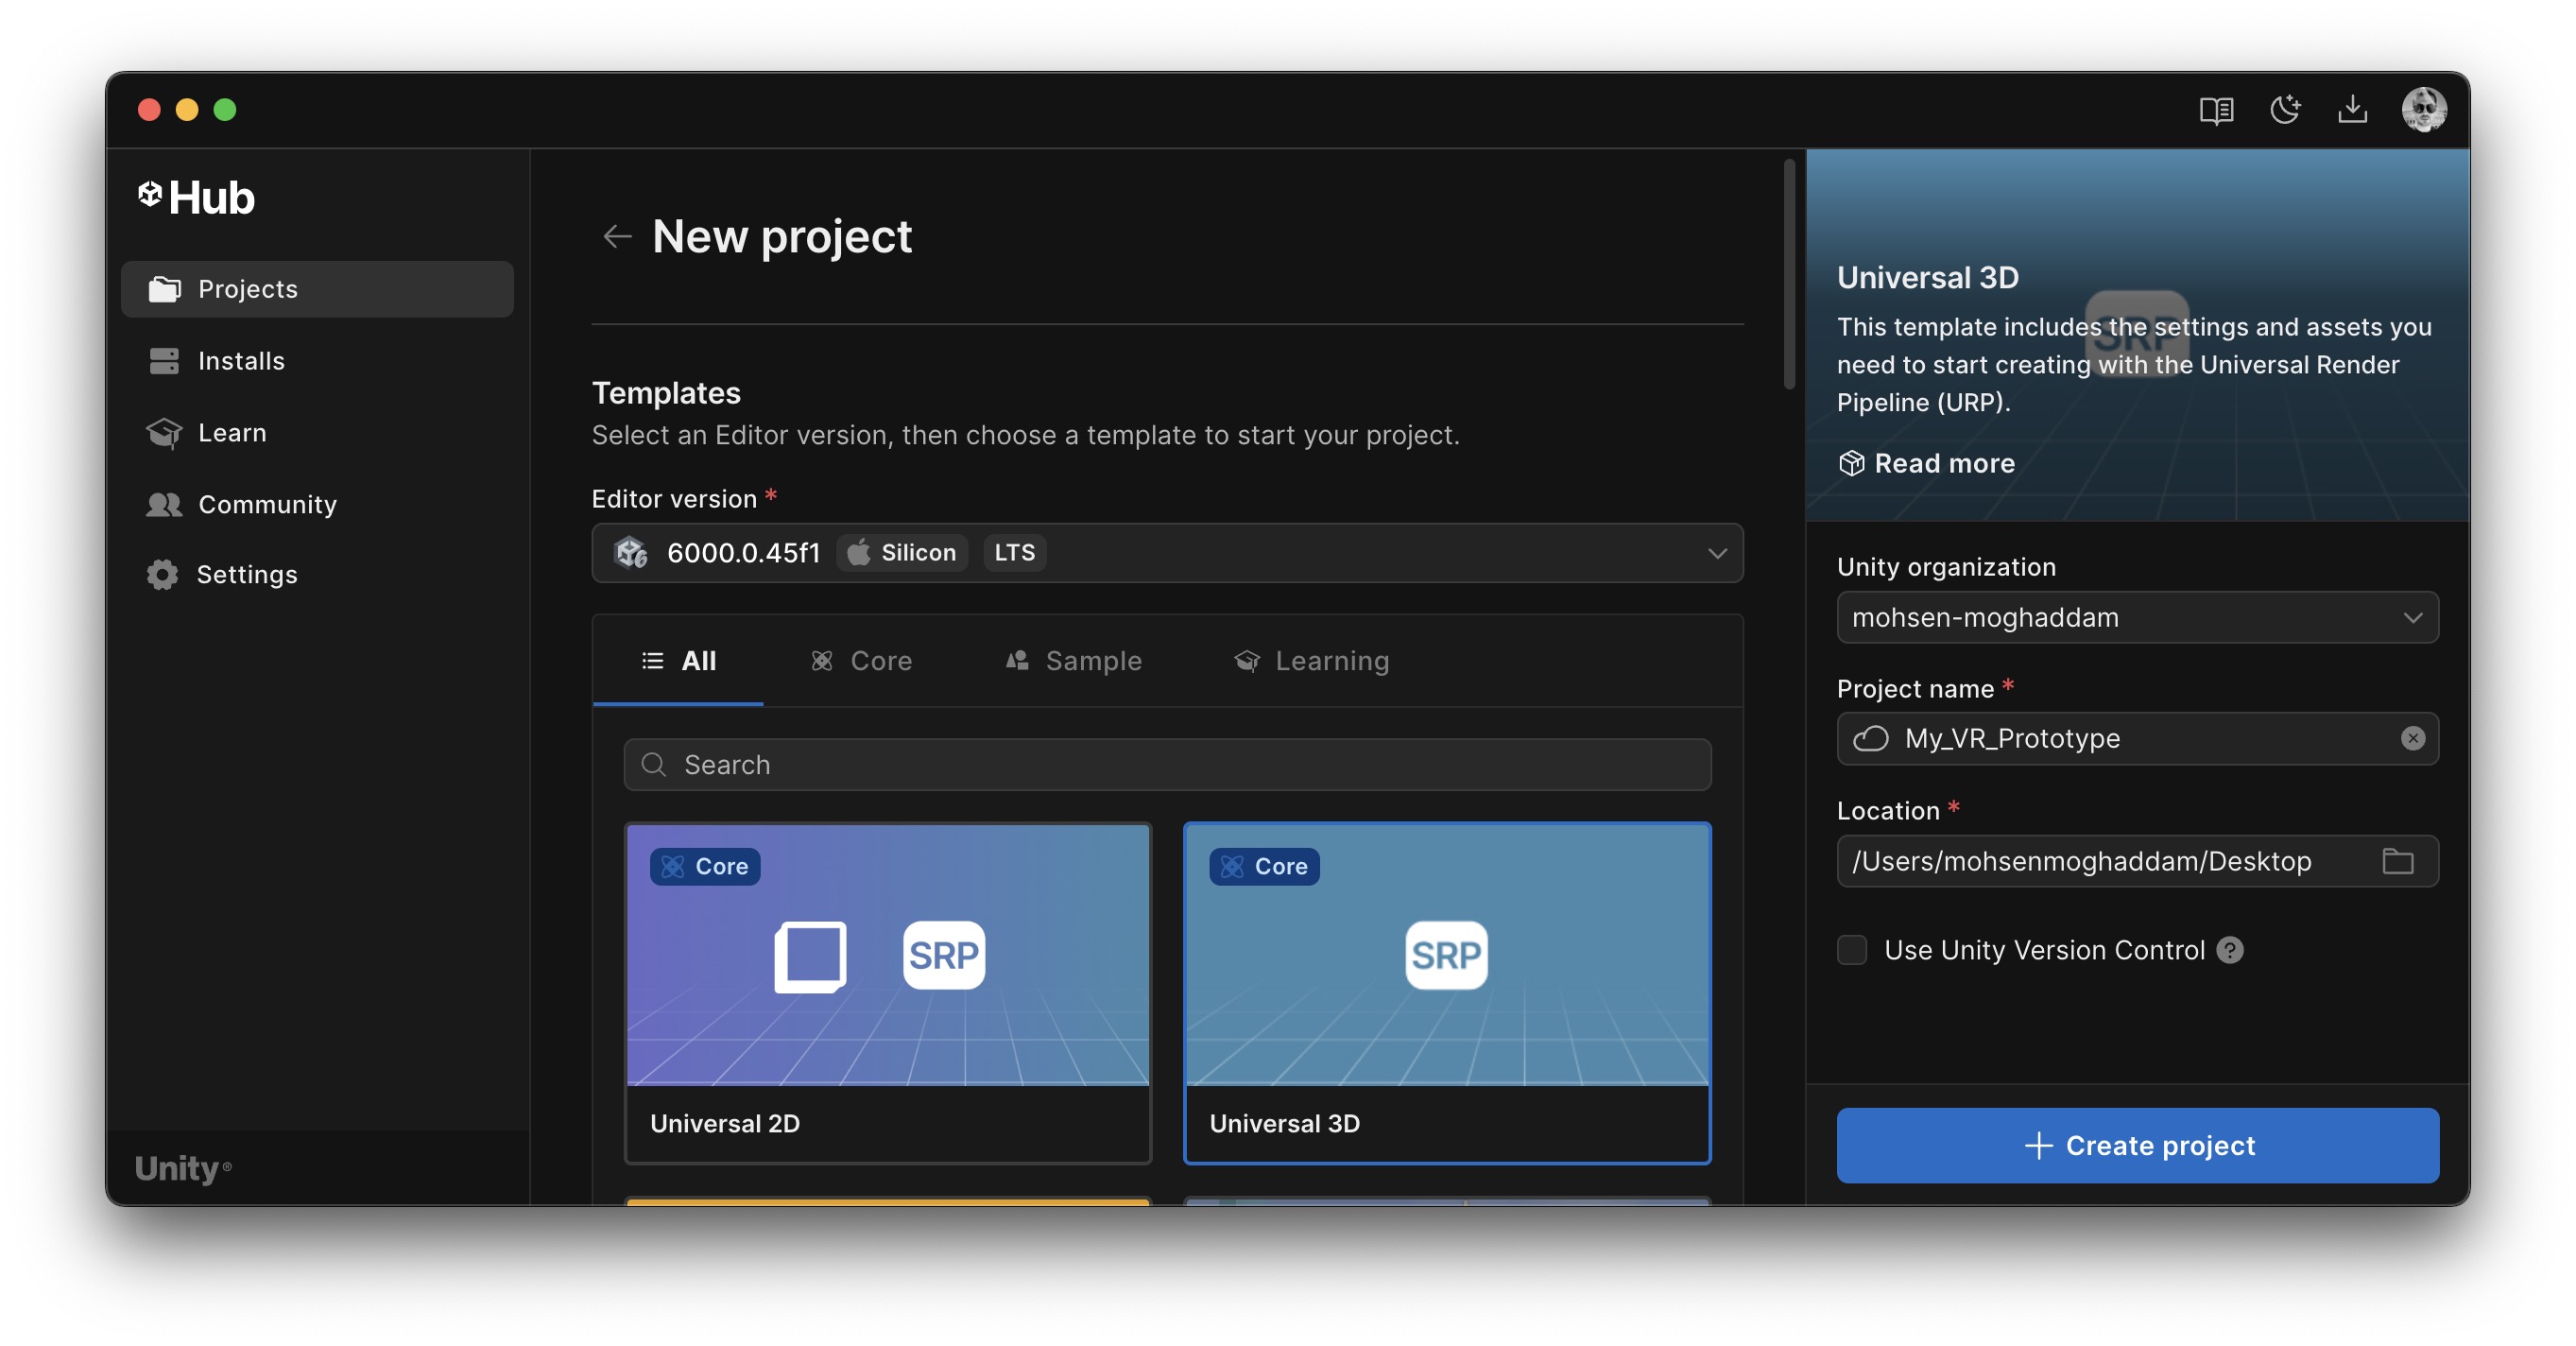
Do not start from a blank Universal 3D project or manually install every XR package unless troubleshooting a specific issue. The VR Template reduces setup errors and keeps projects aligned with Unity’s standard XR workflow.
Inspect the SampleScene
Open Assets/Scenes/SampleScene. This scene is already configured with the main VR objects needed for controller/head tracking, locomotion, object interaction, and spatial UI. Use the sample scene as a reference now. You can remove example objects later when building the XFactory scene.
The Hierarchy groups the main VR setup into these families:
XR Origin (XR Rig): The tracked player rig—camera, controllers, locomotion, and input. See Inspect the XR Origin (XR Rig) below for the child hierarchy.Interactable: XRI interactables—example grab objects users pick up with direct or ray interactors. Grab interactables typically need a Collider and Rigidbody, and may include affordance feedback.UI: World-space spatial UI examples—Canvases with buttons, sliders, toggles, and panels that support near and far XR UI interaction.Environment: Static scene geometry and surfaces that define the demo space, including colliders used for locomotion and interaction.Teleport Area Setup: Teleportation Areas and Teleportation Anchors that designate where the Teleportation Provider can move the user—areas allow any point on a surface; anchors constrain position and rotation.Lighting: Scene lights that illuminate the sample environment.Event Systems: TheEventSystem(withXR UI Input Module) that routes controller, hand, and pointer input to UI elements on world-space Canvases.-
Hand Permissions Manager: Requestsandroid.permission.HAND_TRACKINGon Android and enables hand tracking through the hands subsystem when permission is granted.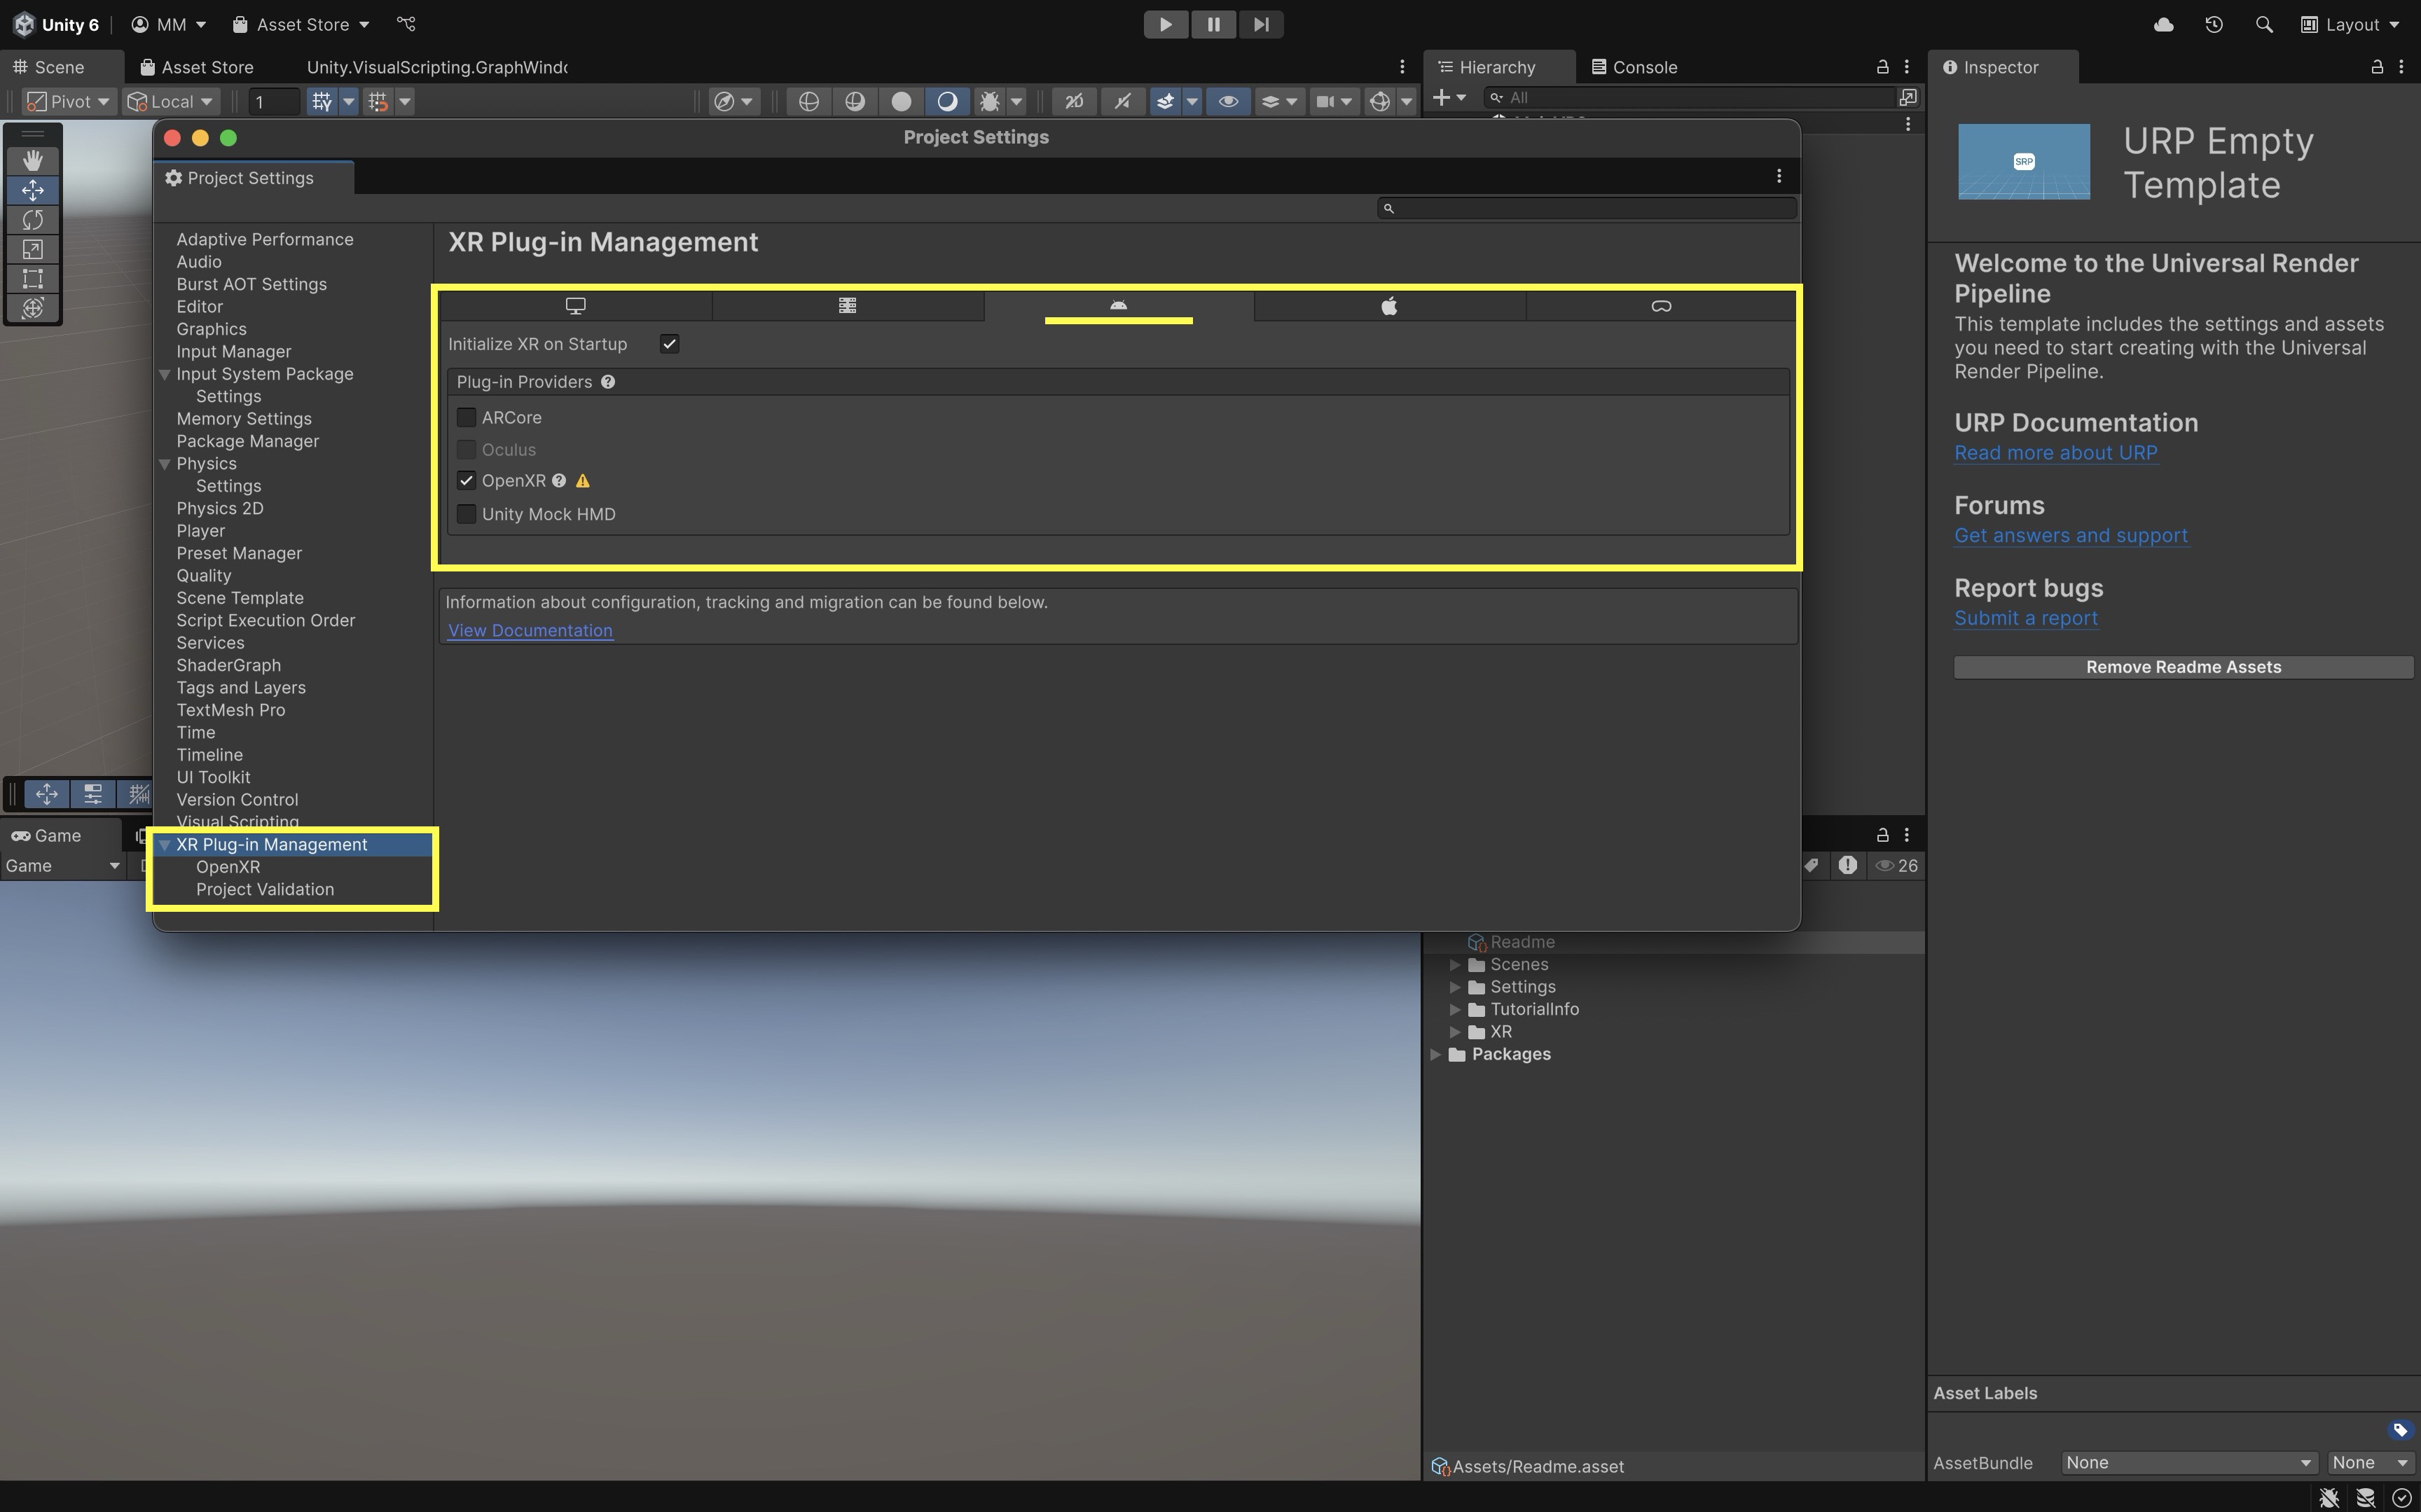
AI-generated XR setup instructions often mix old
XR Rignaming, legacy input paths, the deprecated Oculus XR Plugin, and current XRI/OpenXR workflows. When setup fails, verify the VR Template project settings, OpenXR settings, interaction profiles, input actions, and scene hierarchy before changing scripts.
Inspect XR Plug-in Management
- Go to
Edit > Project Settings > XR Plug-in Management. - This is where Unity enables the active XR provider for each platform.
- For Meta Quest standalone builds: open the Android tab and verify OpenXR / Meta Quest support settings.
- For PC VR preview through Quest Link / Meta Horizon Link: open the Desktop platform tab and verify OpenXR settings.
-
Do not change settings randomly. Inspect them first and only adjust if Project Validation or the instructor’s configuration requires it.
XR Plugin Managementselects the XR runtime for each platform. EnablingOpenXRon Android supports standalone Quest builds; enabling it on Desktop supports Quest Link / Meta Horizon Link testing from the Editor. These are related but different workflows.
Inspect OpenXR Settings
- Go to
Project Settings > XR Plug-in Management > OpenXR. - OpenXR connects Unity’s XR systems to supported runtimes and devices.
- The VR Template preconfigures common OpenXR feature groups and interaction profiles. Verify the Meta Quest / controller profiles relevant to your target platform.
- Run OpenXR Project Validation and fix relevant issues before testing.
-
Do not hardcode exact feature names that may vary across package versions unless your screenshots confirm them.
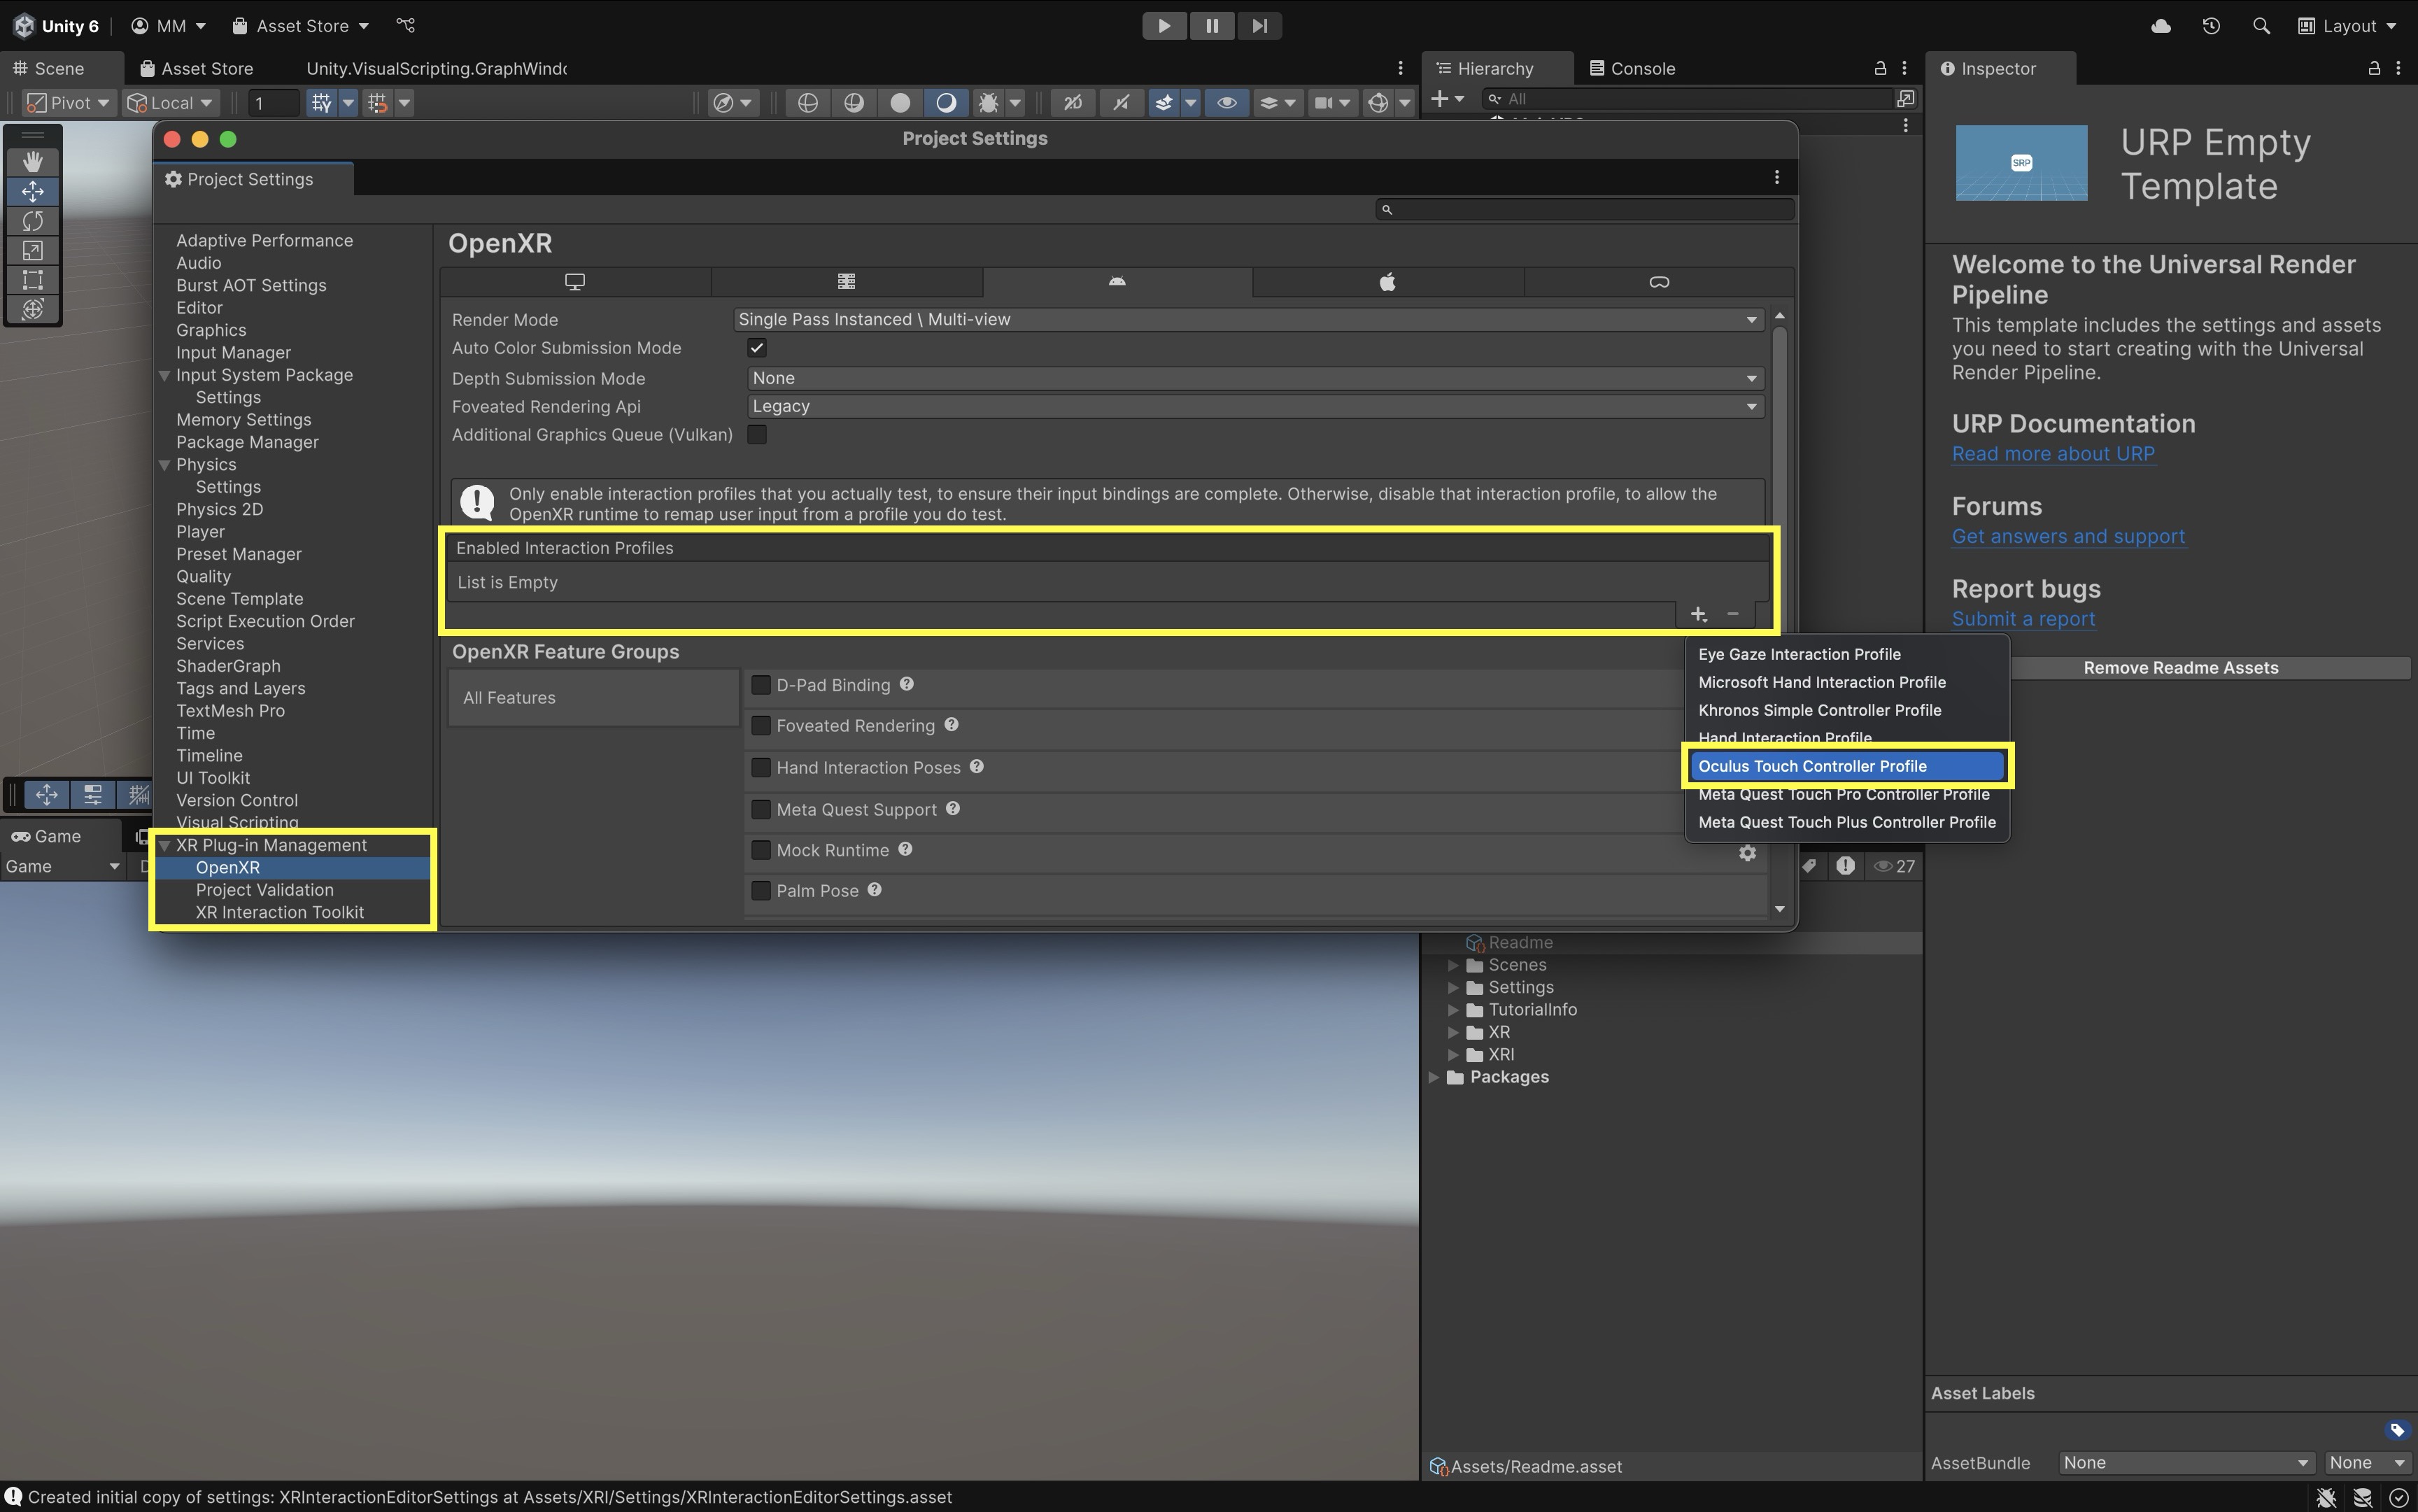
Interaction profiles map controller capabilities to OpenXR. Quest Touch controllers typically use the Oculus Touch Controller Profile in Unity’s OpenXR settings.
Inspect the XR Origin (XR Rig)
XR Origin (XR Rig) is the scene root that represents the user in tracked space—Unity moves this rig (not the world) for locomotion while child objects follow headset and controller/hand tracking. Use XR Origin as the main term; older prefabs may still use XR Rig in the name.
Inside the template rig, inspect:
- Camera Offset > Main Camera: Offsets and holds the tracked headset camera—the view rendered to the HMD and used for
Audio Listenerplacement. - Left/Right Controller: Tracked controller objects with XRI interactors (ray, direct, poke, teleport, and UI) wired to input actions.
- Locomotion (Turn, Move, Teleoperation, Climb, Gravity, Jump): XRI locomotion providers grouped under Locomotion—turn, continuous move, teleport-style movement, climb, gravity, and jump behavior.
-
Hand Smoothing Post Processor: Optional processing that smooths tracked hand motion before it drives hand visuals or hand interactors.
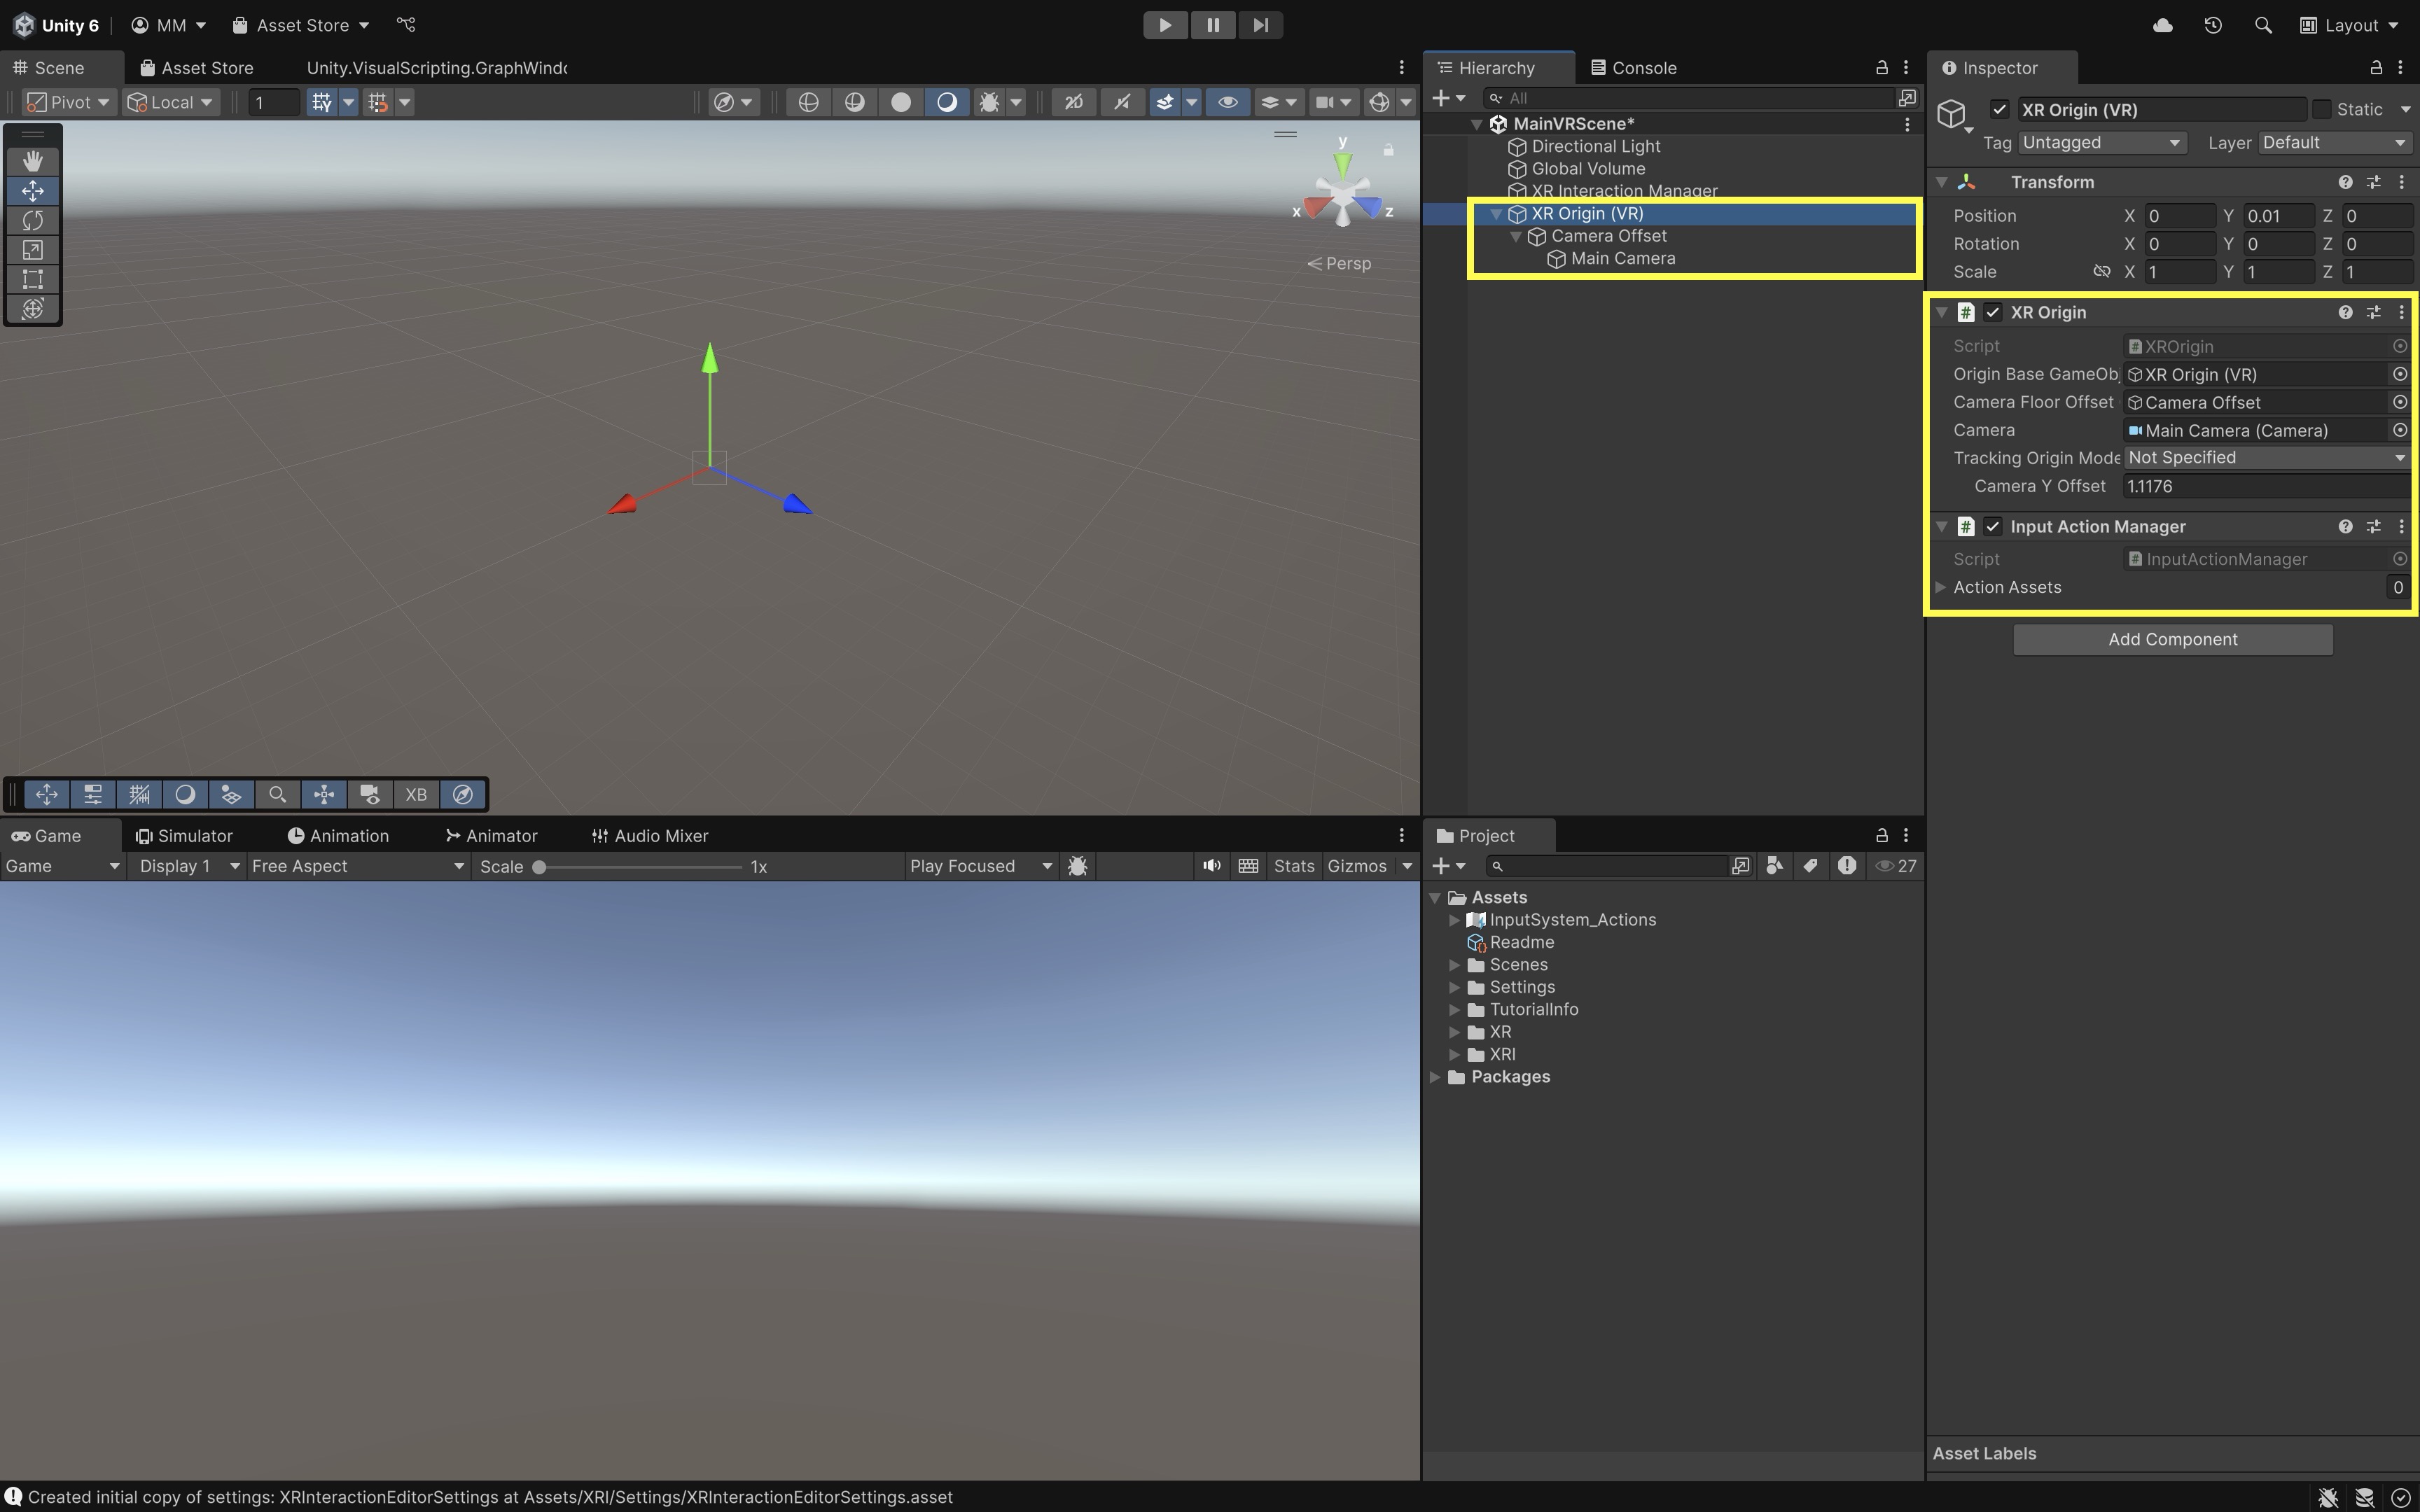
The
XR Interaction Managercoordinates Interactors (controllers, rays, hands) and Interactables (buttons, levers, grabbables).
Inspect Input Actions
The Input System maps physical controller, hand, and UI input to logical input actions (for example, Select, Activate, Move, and Turn). The VR Template and XR Interaction Toolkit Starter Assets use the XRI Default Input Actions asset—a shared InputActionAsset with action maps and bindings for common XR controllers, locomotion, and UI. Interactors and locomotion providers read these actions through Input Action References; the actions must be enabled at runtime before they respond to hardware input.
- Find the input action asset in the
Projectwindow:- Open the
Projectwindow and search forXRI Default Input Actions. - It is usually under
Assets/Samples/XR Interaction Toolkit/<version>/Starter Assets/(exact folder names can vary by package version). - Select
XRI Default Input Actions.inputactions.
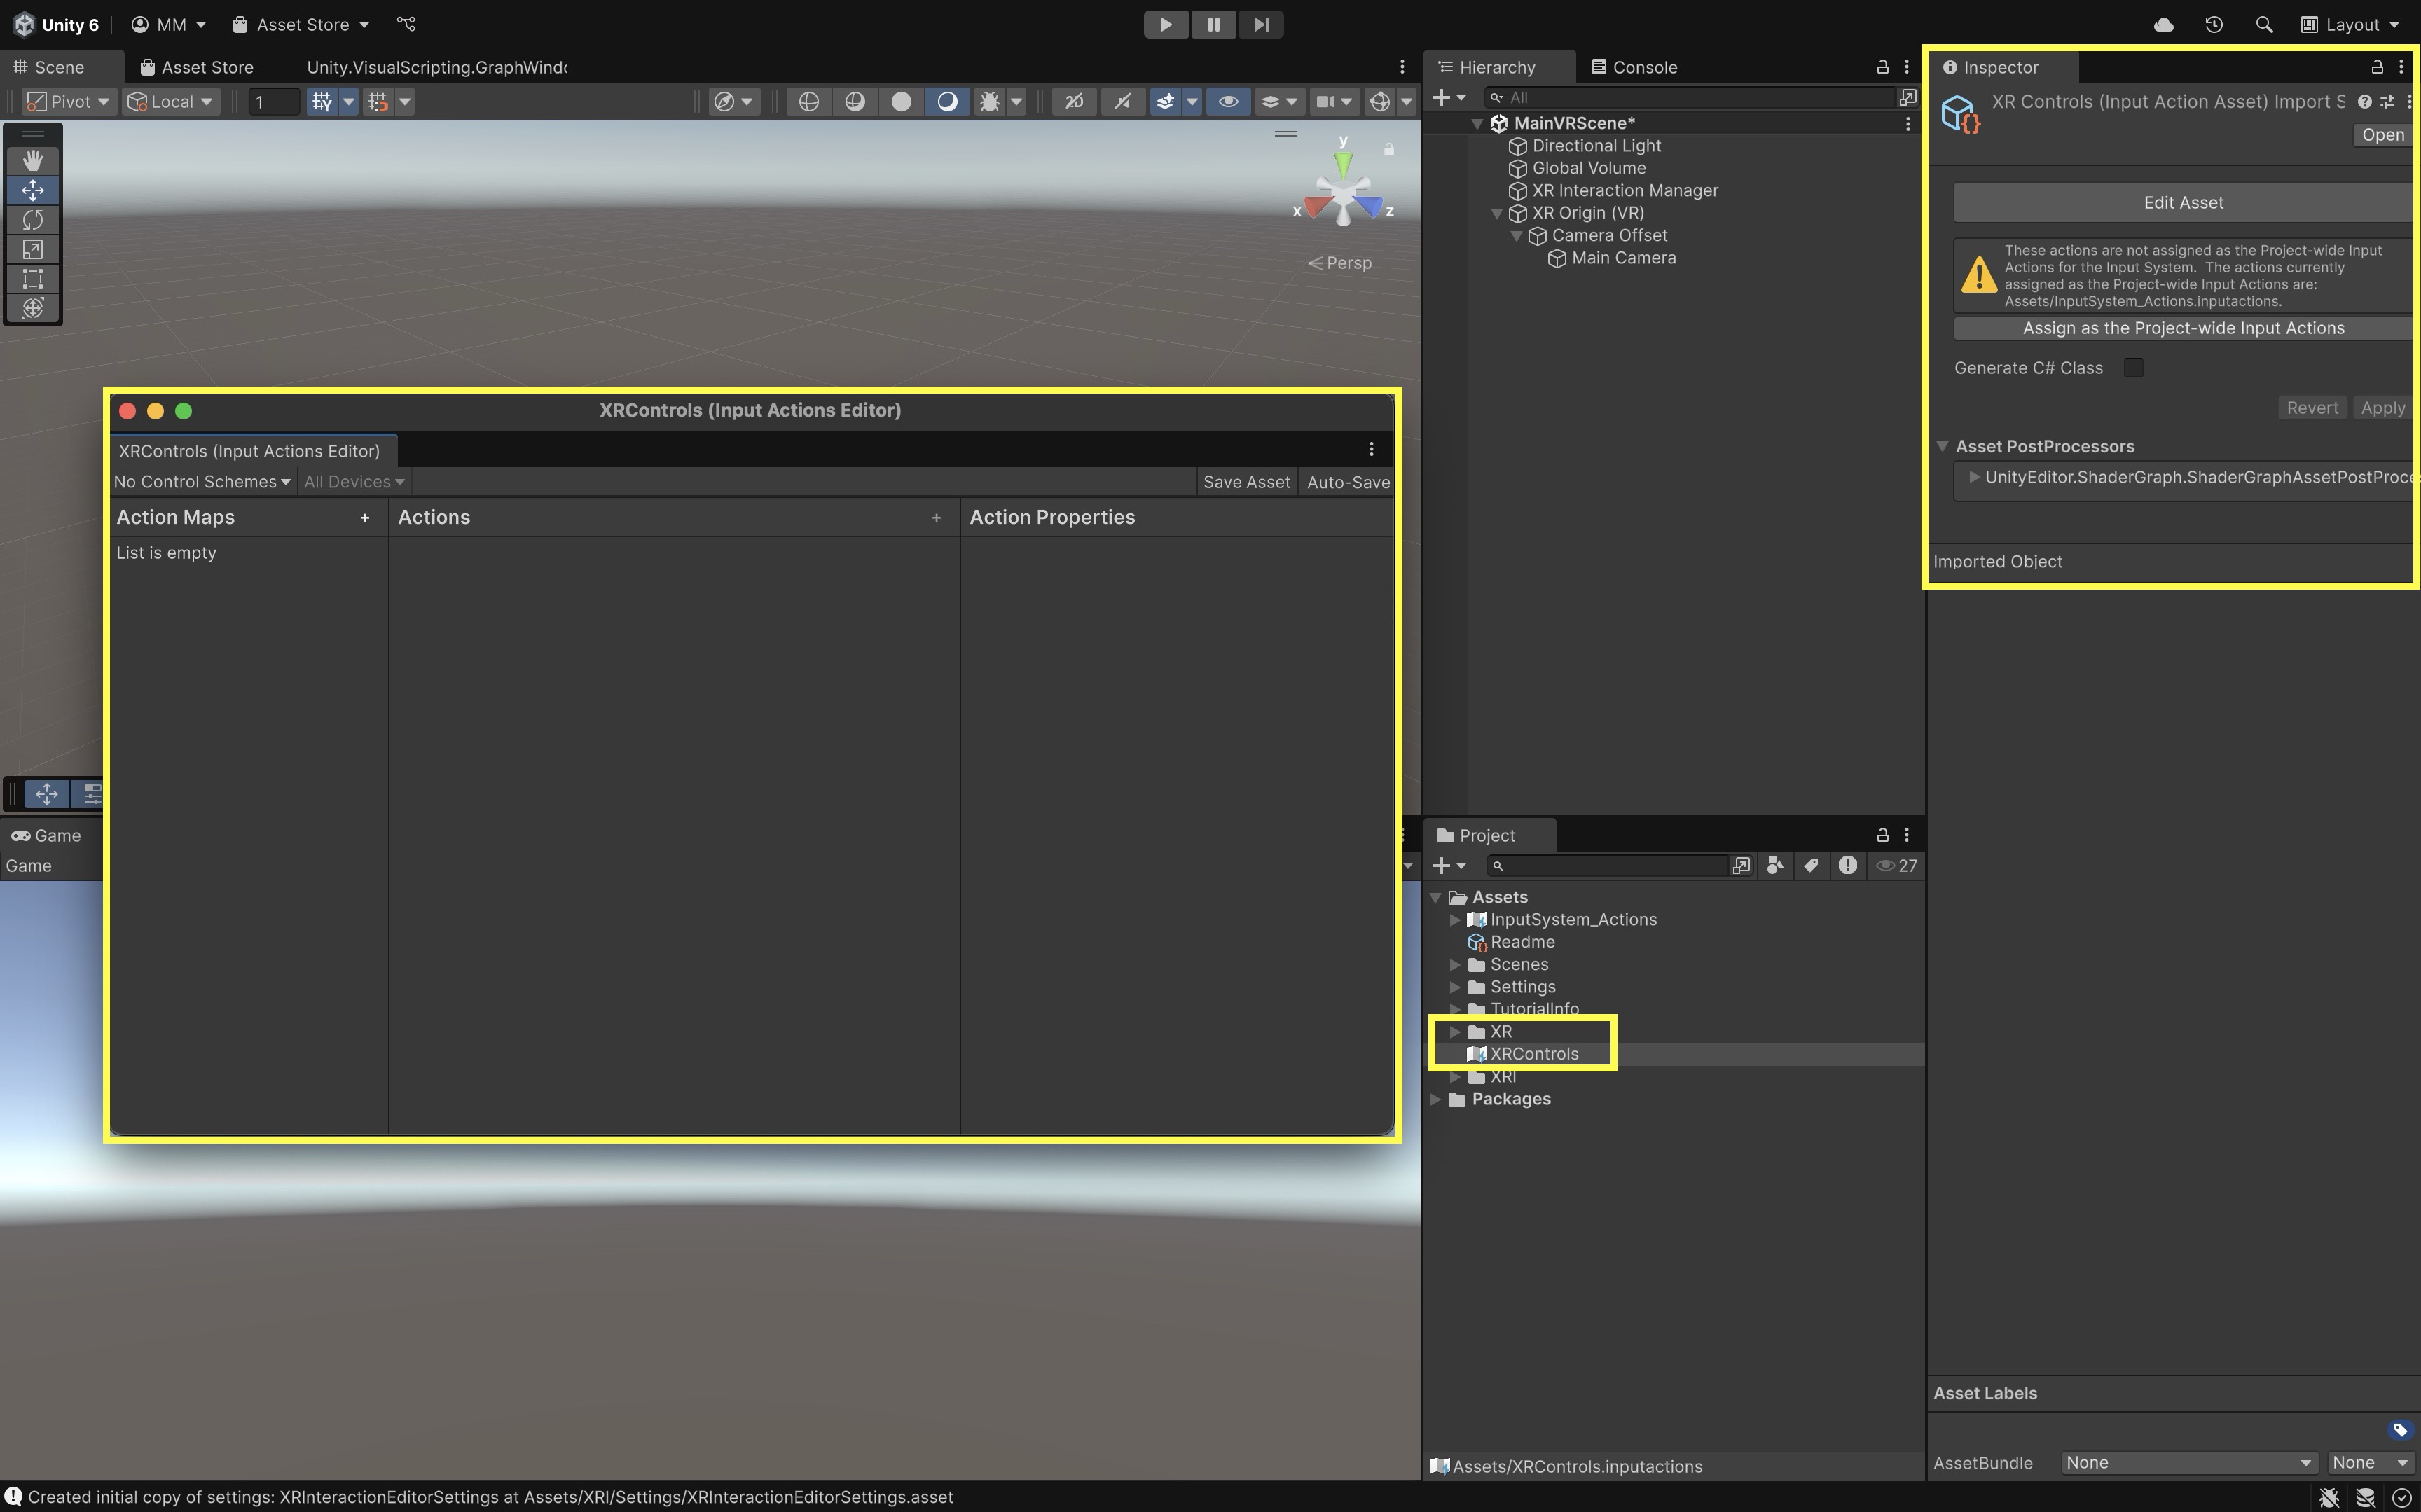
- Open the
- Inspect the asset:
- With the asset selected, review its action maps in the
Inspector—for exampleXRI Left Interaction,XRI Right Interaction,XRI Left Locomotion,XRI Right Locomotion, andXRI UI. - Confirm typical actions exist, such as Select, Activate, UI Press, Move, and Turn, with bindings to OpenXR/controller controls rather than legacy input.
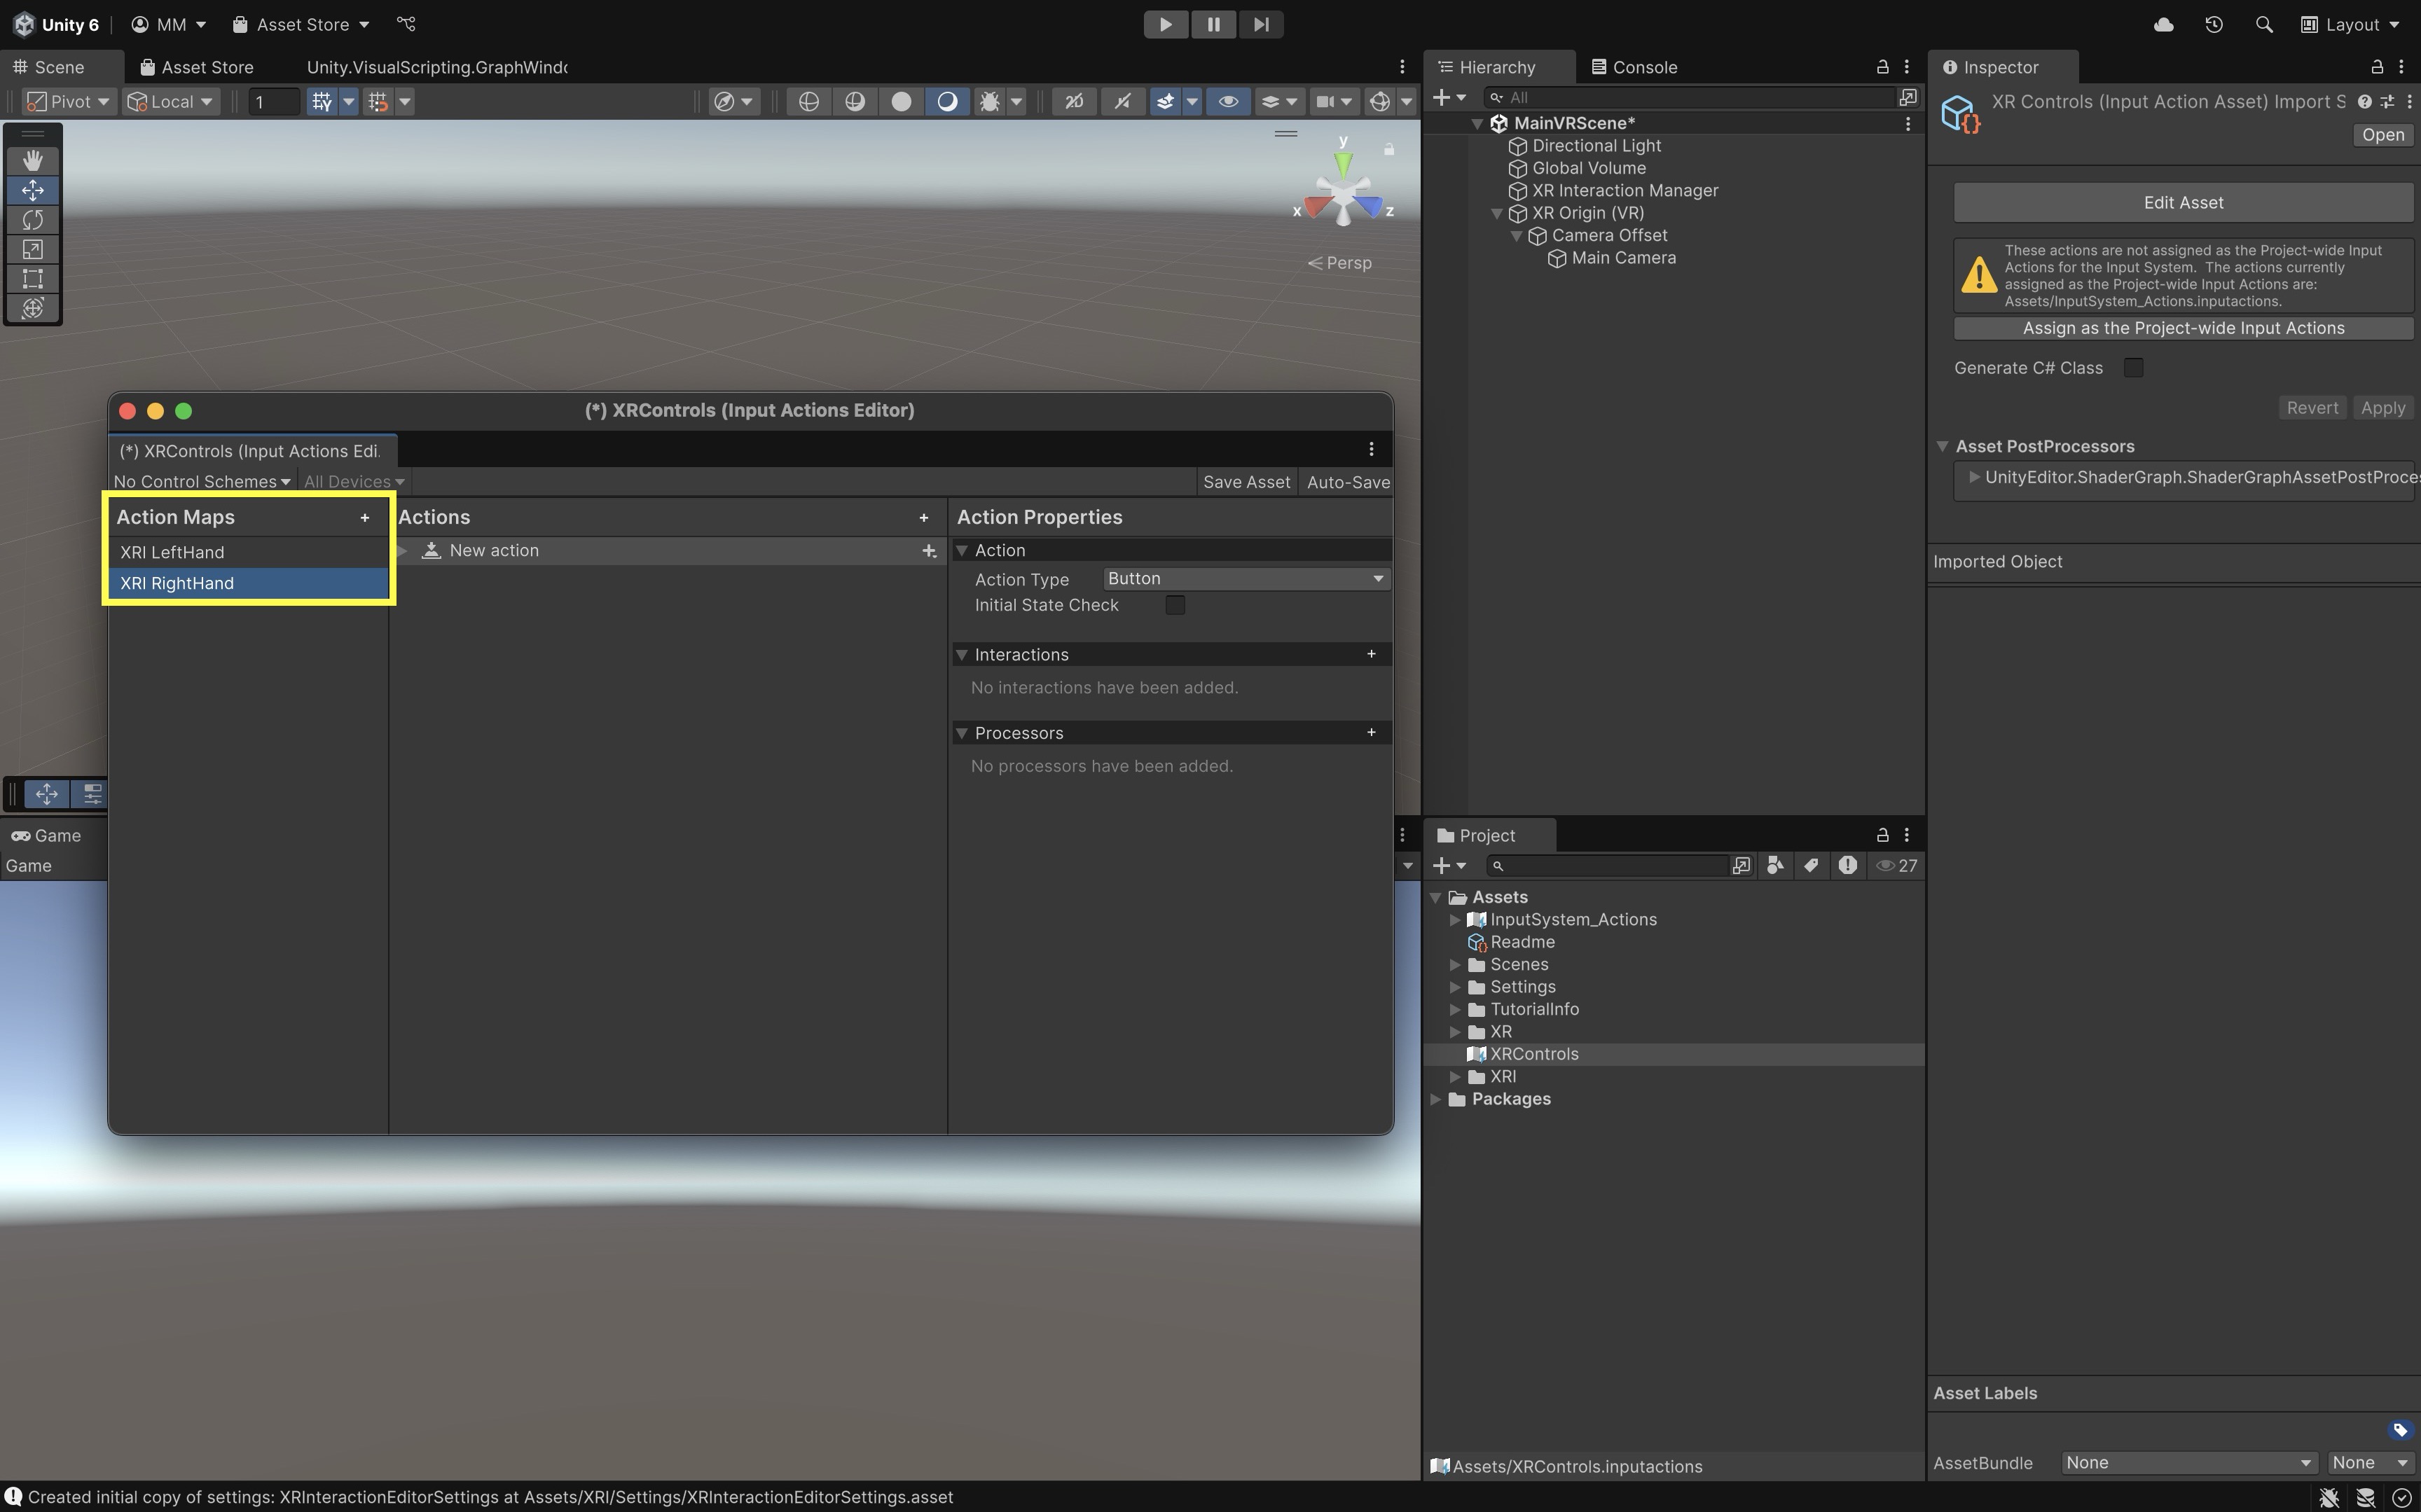
Do not rebind actions unless troubleshooting; the goal is to understand what the template already configured.
- With the asset selected, review its action maps in the
- Confirm runtime enabling in
SampleScene:- In the
Hierarchy, selectXR Origin (XR Rig)(or the template’s equivalent rig root). - Locate the
Input Action Managercomponent (XRI documentation). - In
Action Assets, verify thatXRI Default Input Actionsis assigned. This component enables and disables the asset’s actions when the rig is enabled.
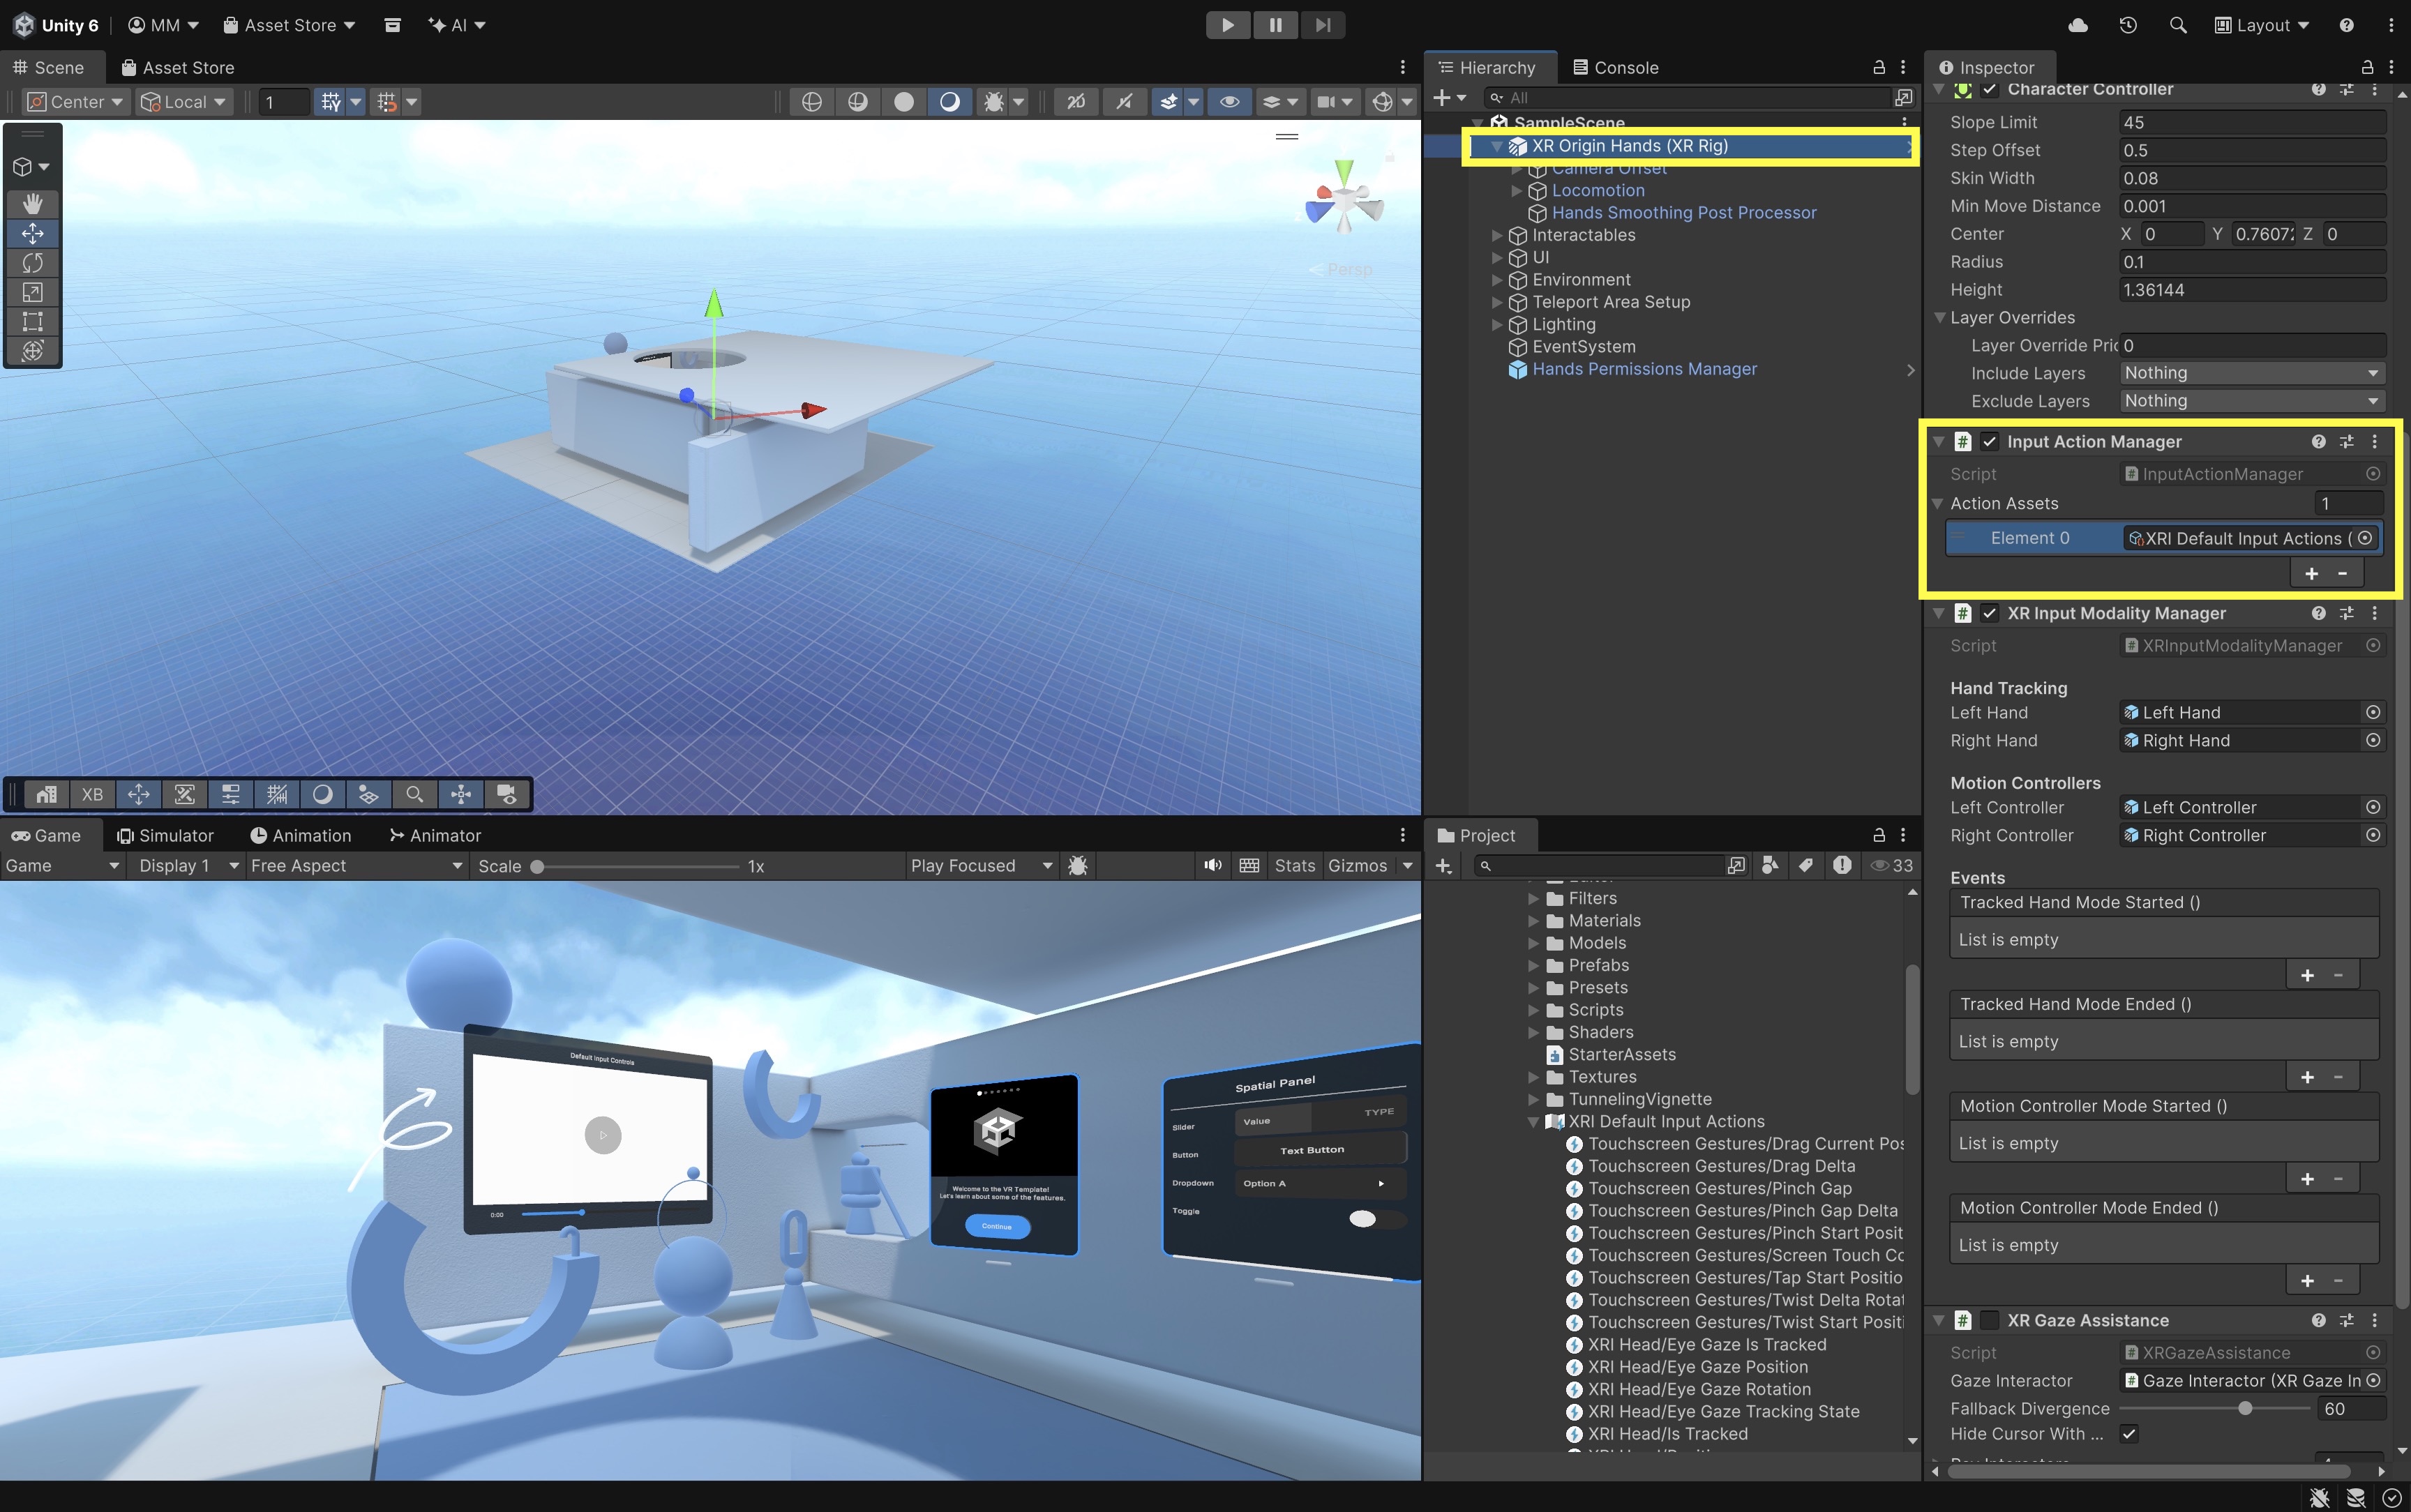
- In the
- Spot-check component references:
- Select
Left Controller/Right Controllerand review theController Input Action Managercomponent. - In the
Inspector, confirmController Actionsare correctly point to actions fromXRI Default Input Actions.
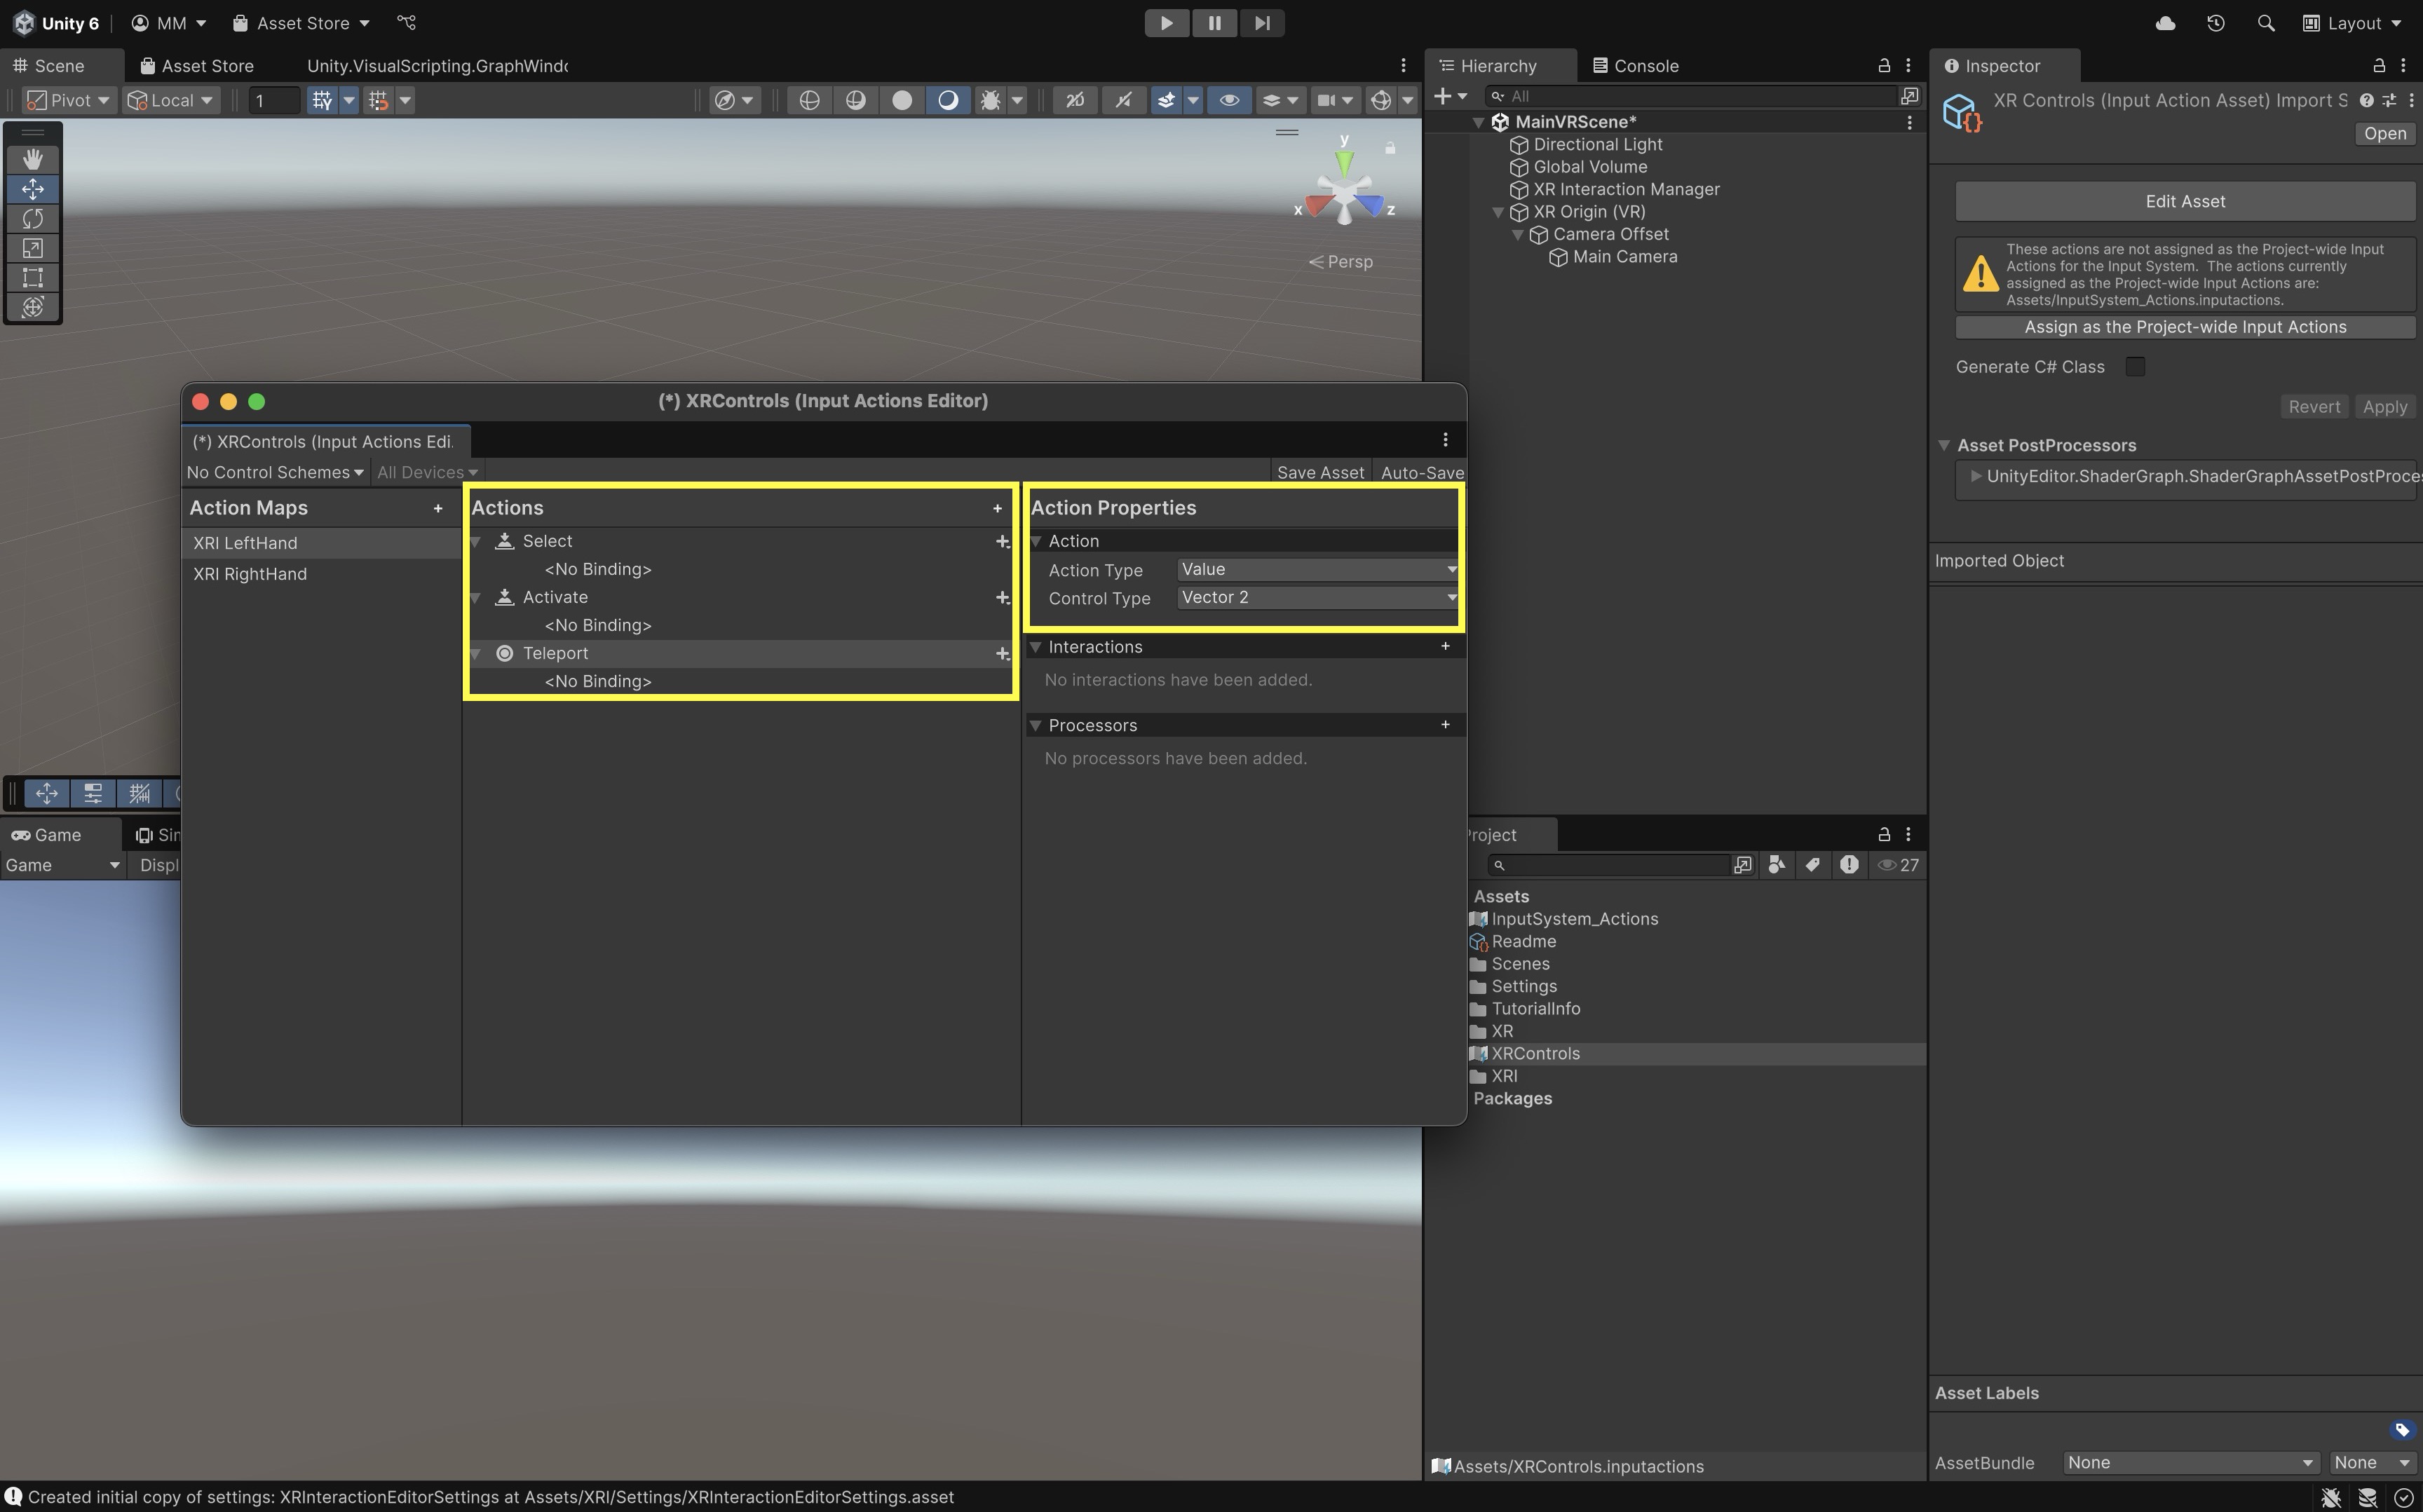
Input actions start disabled until they are enabled at runtime. The VR Template typically relies on an
Input Action Manageron theXR Originrather than manual per-component enabling. If controller input fails in Play Mode, verify the action asset assignment, OpenXR interaction profiles, and that the Game view has focus when testing in the Editor. CustomInputActionAssets are useful later; in D1, inspect the template wiring rather than rebuilding action maps from scratch. - Select
Inspect Locomotion Setup
The VR Template demonstrates locomotion in SampleScene through XR Interaction Toolkit providers that move and reorient the XR Origin, as documented in Unity’s Locomotion overview.
- Turn: Snap or continuous rotation of the user’s view or body in place.
- Move: Smooth forward, backward, and strafe travel through the environment.
- Teleportation: Instant relocation to a point on a valid surface or predefined anchor.
- Climb: Grab-based ascent on climbable interactables using the Climb Provider.
- Gravity: Downward acceleration that keeps the
XR Origingrounded between jumps or drops. -
Jump: Upward impulse for vertical traversal when enabled on the rig.
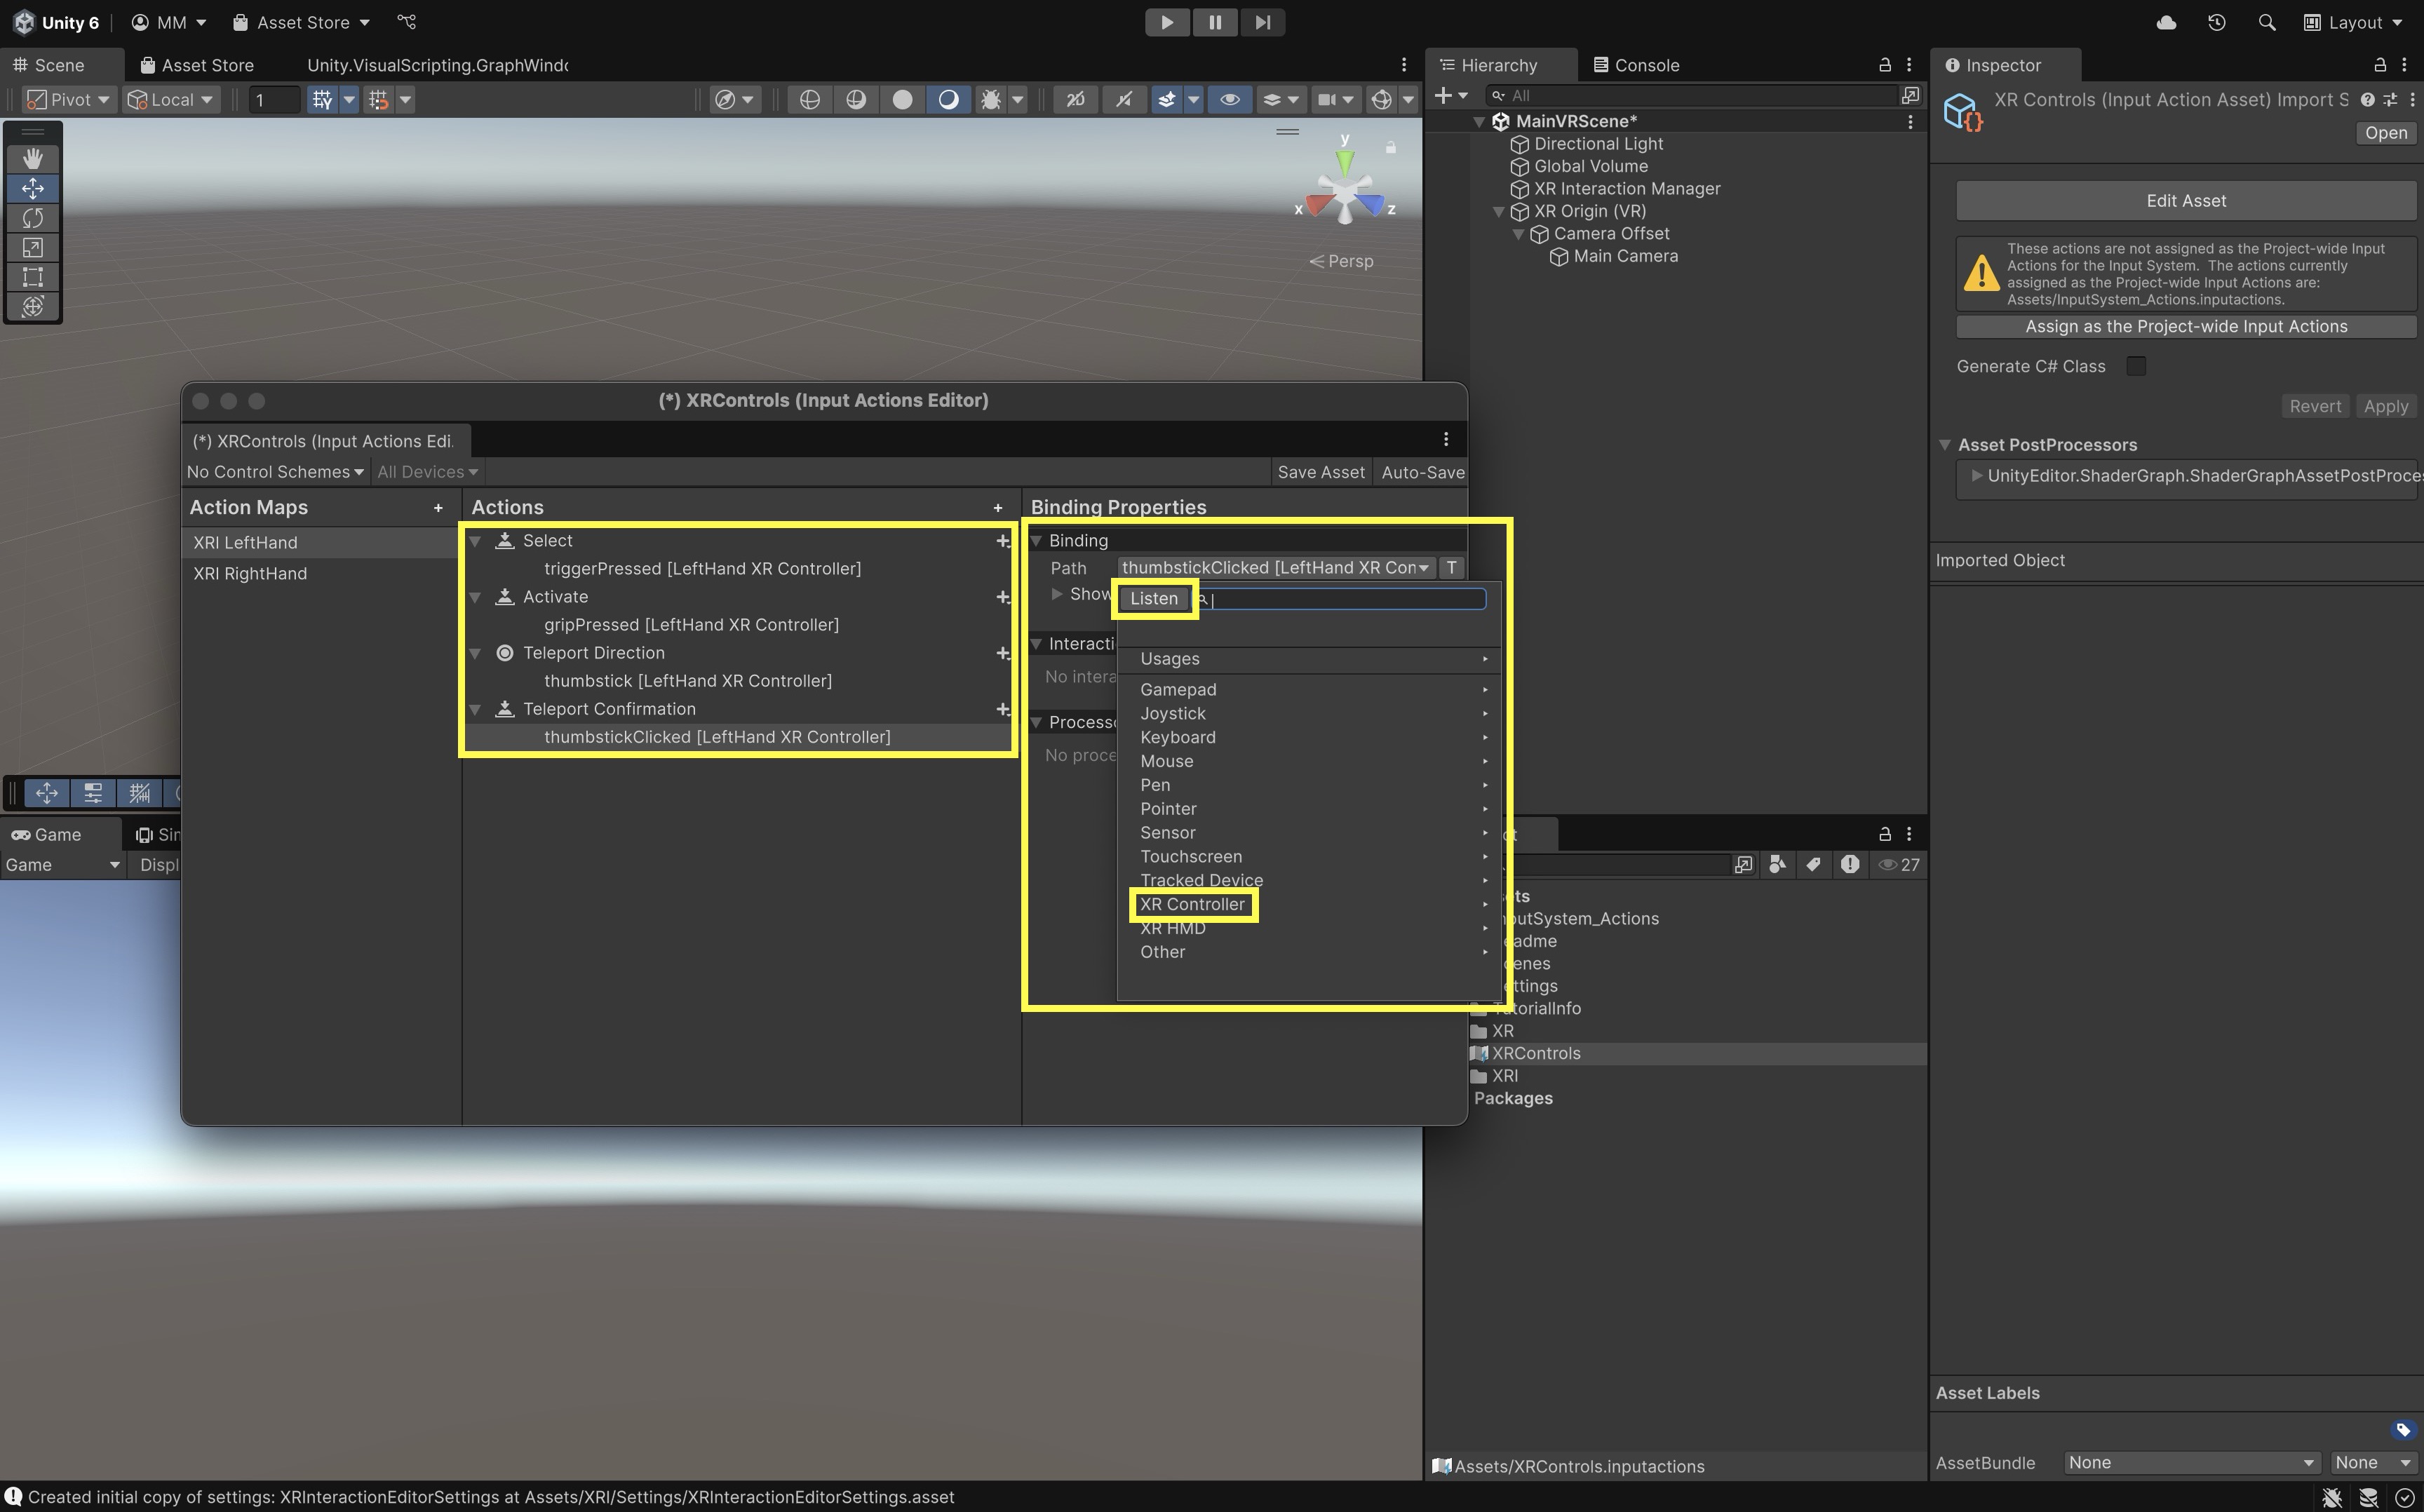
Detailed locomotion teaching is in D2. In D1, only recognize that the template already includes examples you will study more deeply later.
Inspect Interactables
In Unity VR, interactables are scene objects that respond to user input from interactors (direct, ray, or near-far) through the XR Interaction Manager; grab interactables are the subset users can pick up, move, and release. The XR Grab Interactable component implements that behavior when paired with a Collider and Rigidbody, following the interactor via grab transformers and optional throw-on-release settings as described in Unity’s documentation. In SampleScene, expand the Interactable hierarchy to inspect the template’s example grabbables—objects configured for near and ray selection, often with audio and visual affordance feedback on hover and grab.
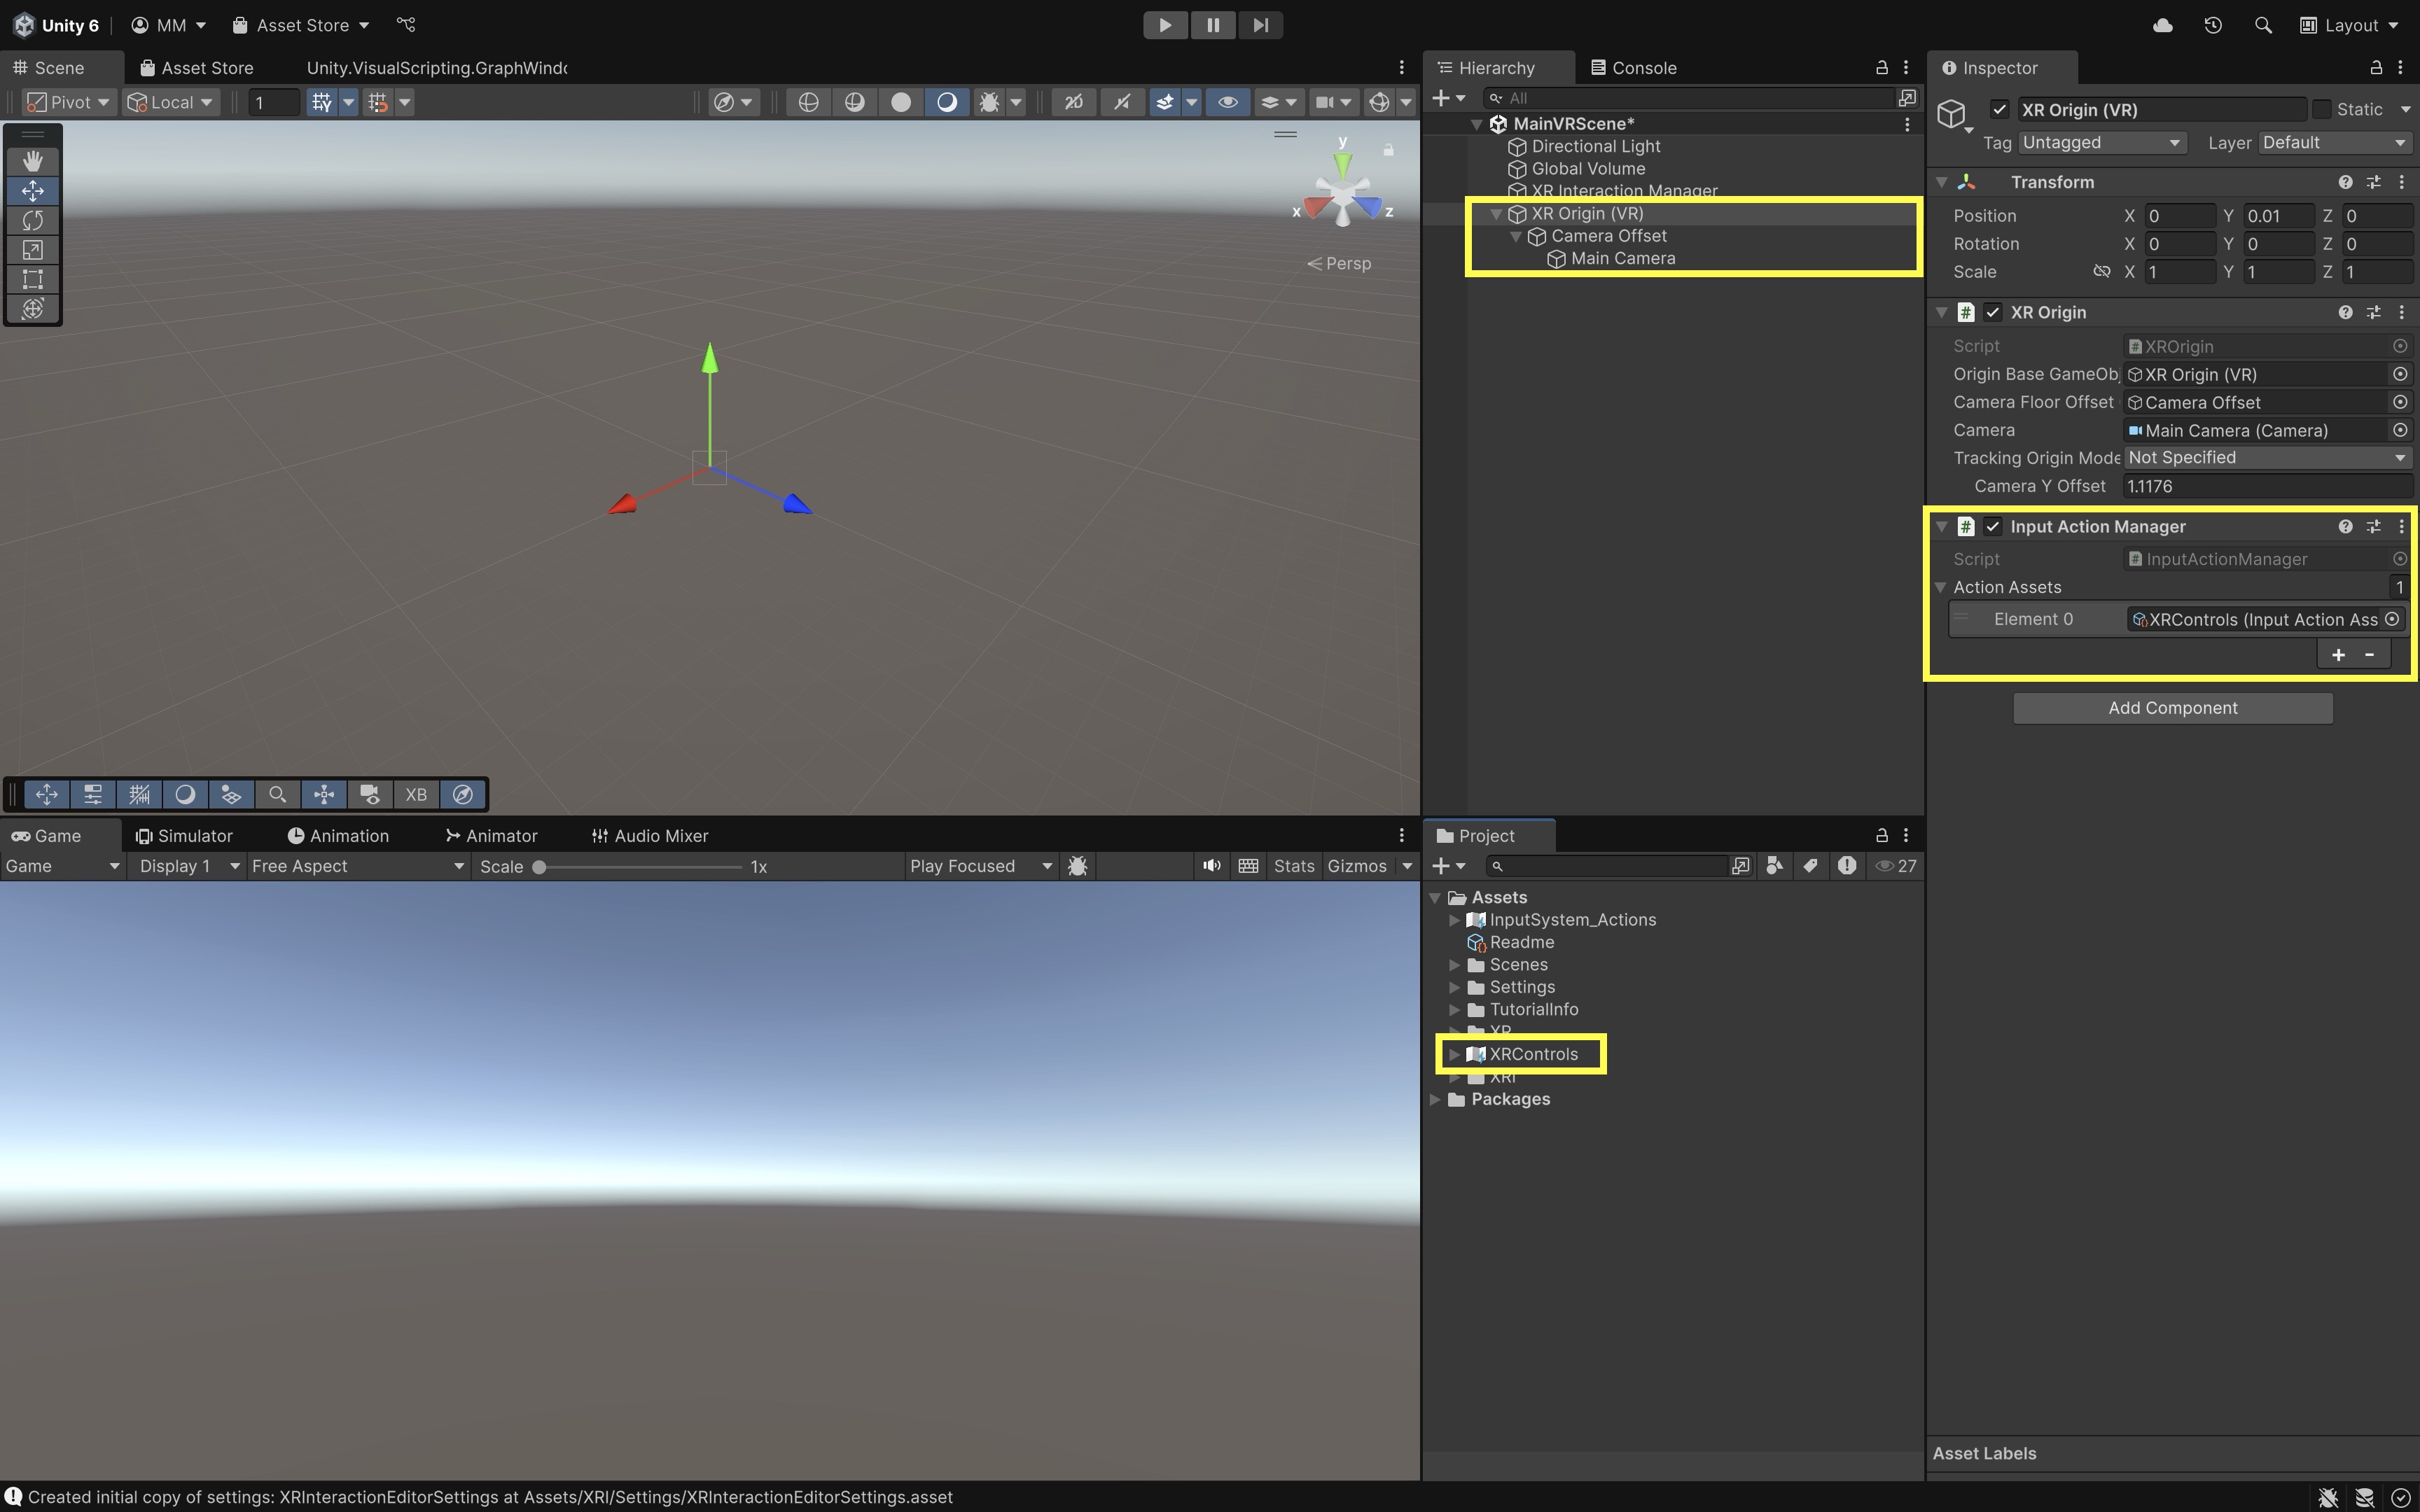
Detailed grabbing behavior is covered in D3.
Inspect Spatial UI
In VR, spatial UI places panels and controls in the 3D scene on world-space Canvases rather than flat screen overlays, so users can point, poke, or grab UI with controllers or hands at natural working distances. Unity routes that input through an EventSystem with XR UI Input Module, a world-space Canvas with Tracked Device Graphic Raycaster, and UI-enabled interactors, as described in Unity’s Set up UI Canvases for XR documentation. In SampleScene, inspect the UI hierarchy for template examples—buttons, sliders, toggles, and movable spatial panels configured for near and far XR interaction.
Detailed VR UI tutorials are in D7.
Test in Editor
Use the XR Device Simulator / XR Interaction Simulator for early layout and input debugging, Quest Link / Meta Horizon Link for rapid headset preview, and Android Build and Run to confirm standalone Quest performance, packaging, permissions, and thermal behavior.
- Connect Your Device:
- Use a USB-C cable to connect your Quest 3 to your PC, or enable Air Link / Meta Horizon Link.
- Put on the headset and click
Allow USB Debuggingwhen prompted if you are also preparing for Android builds. SelectAlways Allowif you want to avoid repeating this. - Make sure
Developer Modeis enabled (via the Meta Quest mobile app). - Launch Quest Link / Meta Horizon Link so Unity Play Mode can stream to the headset.
- Disable Simulator Input When Using a Real Headset:
- If your scene contains an XR Device Simulator or XR Interaction Simulator prefab, disable or remove it while testing with a real headset.
- Ensure the real headset and controllers are driving input rather than keyboard/mouse simulator controls.
- Enter Play Mode and Test:
- Open
SampleSceneand click thePlaybutton in Unity. - Put on your headset. You should see the template scene rendered and be able to move your head; controller interaction depends on the template’s XRI setup.
- Verify your
XR Origin, enabled input actions, interaction profile, and interactors (for example, teleport or grab) are functioning as expected. - Quest Link is useful for rapid prototyping, but it is not a substitute for build-to-device testing.
- Open
If you don’t see the Unity scene in your headset, check:
- OpenXR is enabled for the correct platform tab (
Desktopfor Quest Link testing,Androidfor build-to-device).- Quest Link / Meta Horizon Link is active on your headset.
- The headset is recognized by the runtime and no Console errors are blocking XR initialization.
- The
Main Camerainside your XR Origin is tagged correctly.- XRI input actions are enabled through an
Input Action Manageror template prefab setup.- The correct OpenXR interaction profile for your target controllers is present.
Build to VR Device
- Configure
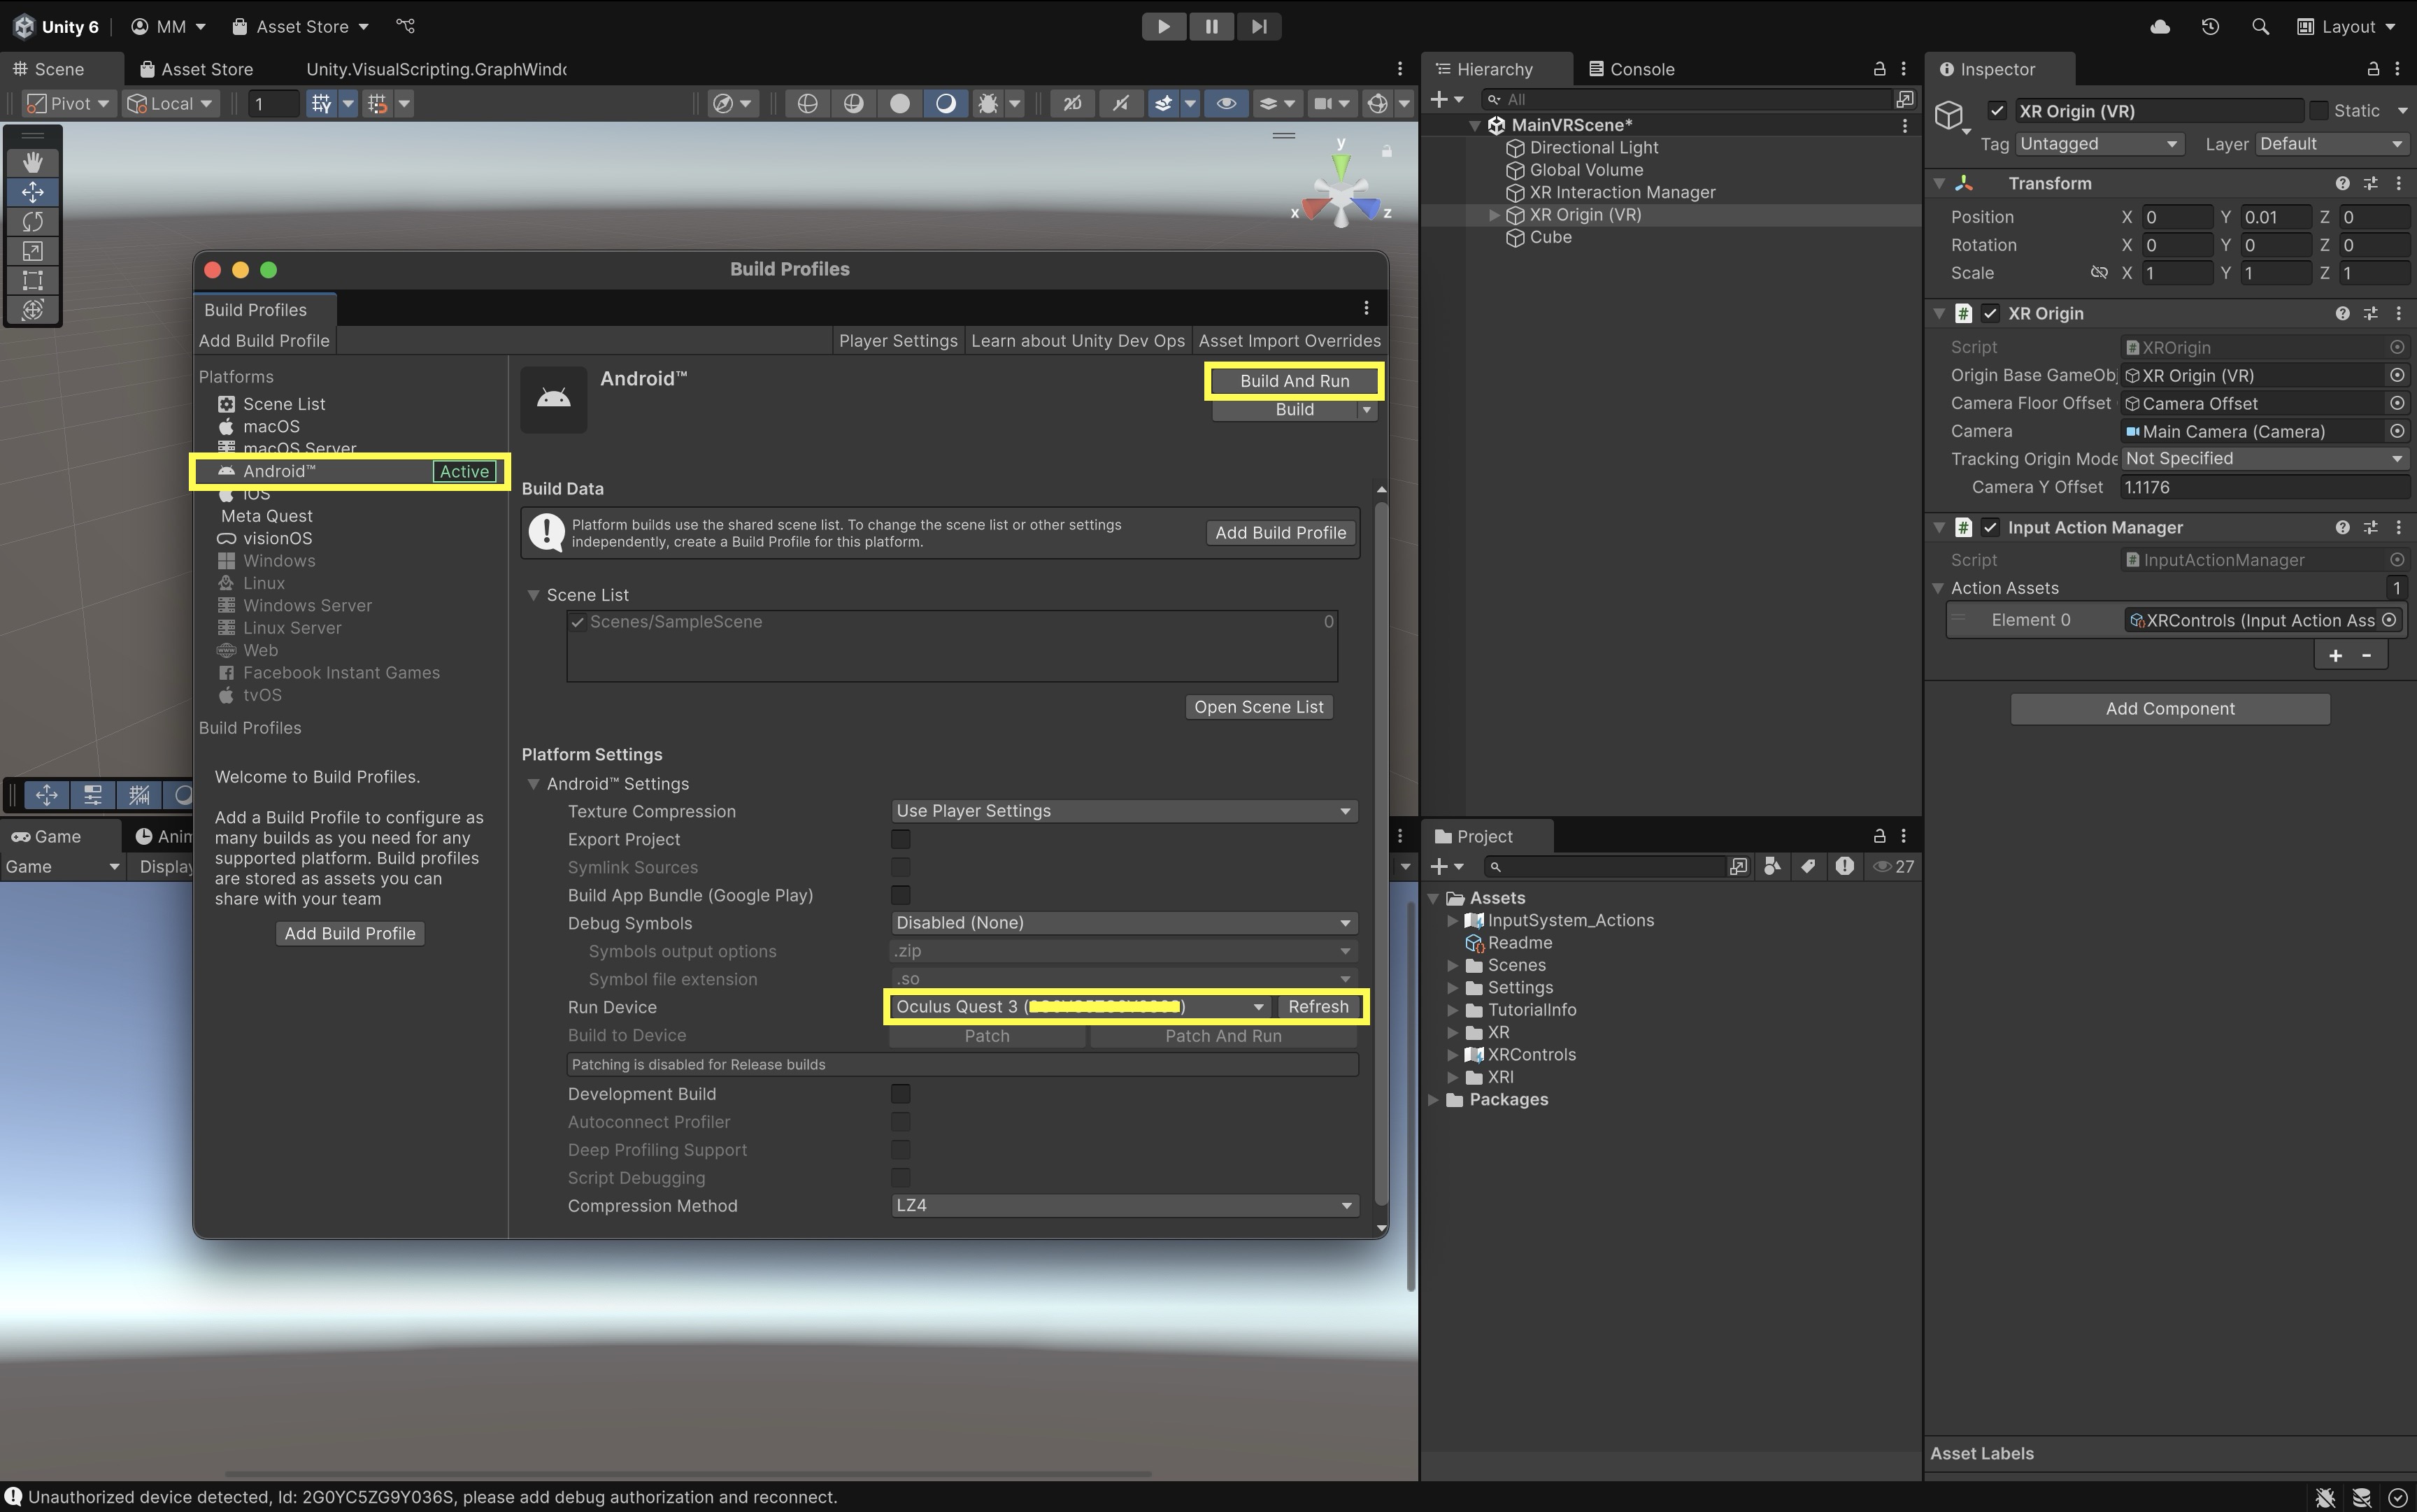
Build Profile:- Go to
File > Build Profiles, then clickSwitch PlatformtoAndroidif it’s not already selected. - In the same window, locate the
Platform Settings. - Under your current profile, ensure the
Platformis set toAndroid, and assign aTarget Device: Oculus Quest 3 (Devide ID).
- Go to
- Build and Deploy to Device:
- Go to
File > Build Profiles, then clickBuild and Run. - Choose an output folder (e.g.,
Builds/Quest) and enter a filename likeXFactoryDemo.apk. - Ensure your Meta Quest 3 is in Developer Mode, connected via USB-C, and authorized for USB debugging (check the headset if prompted).
- Unity will build the APK and automatically install it on the headset.
- On your Quest 3, find the app under
Library > Unknown Sources.
Quest Link Play Mode testing helps iteration; Android Build and Run confirms standalone device performance, permissions, graphics settings, and packaging.
If deployment fails, you can optionally check ADB with
adb devicesif you are comfortable with command-line tools, or reconnect and reauthorize the headset in the Meta Quest app. - Go to
Create an XFactory VR Scene
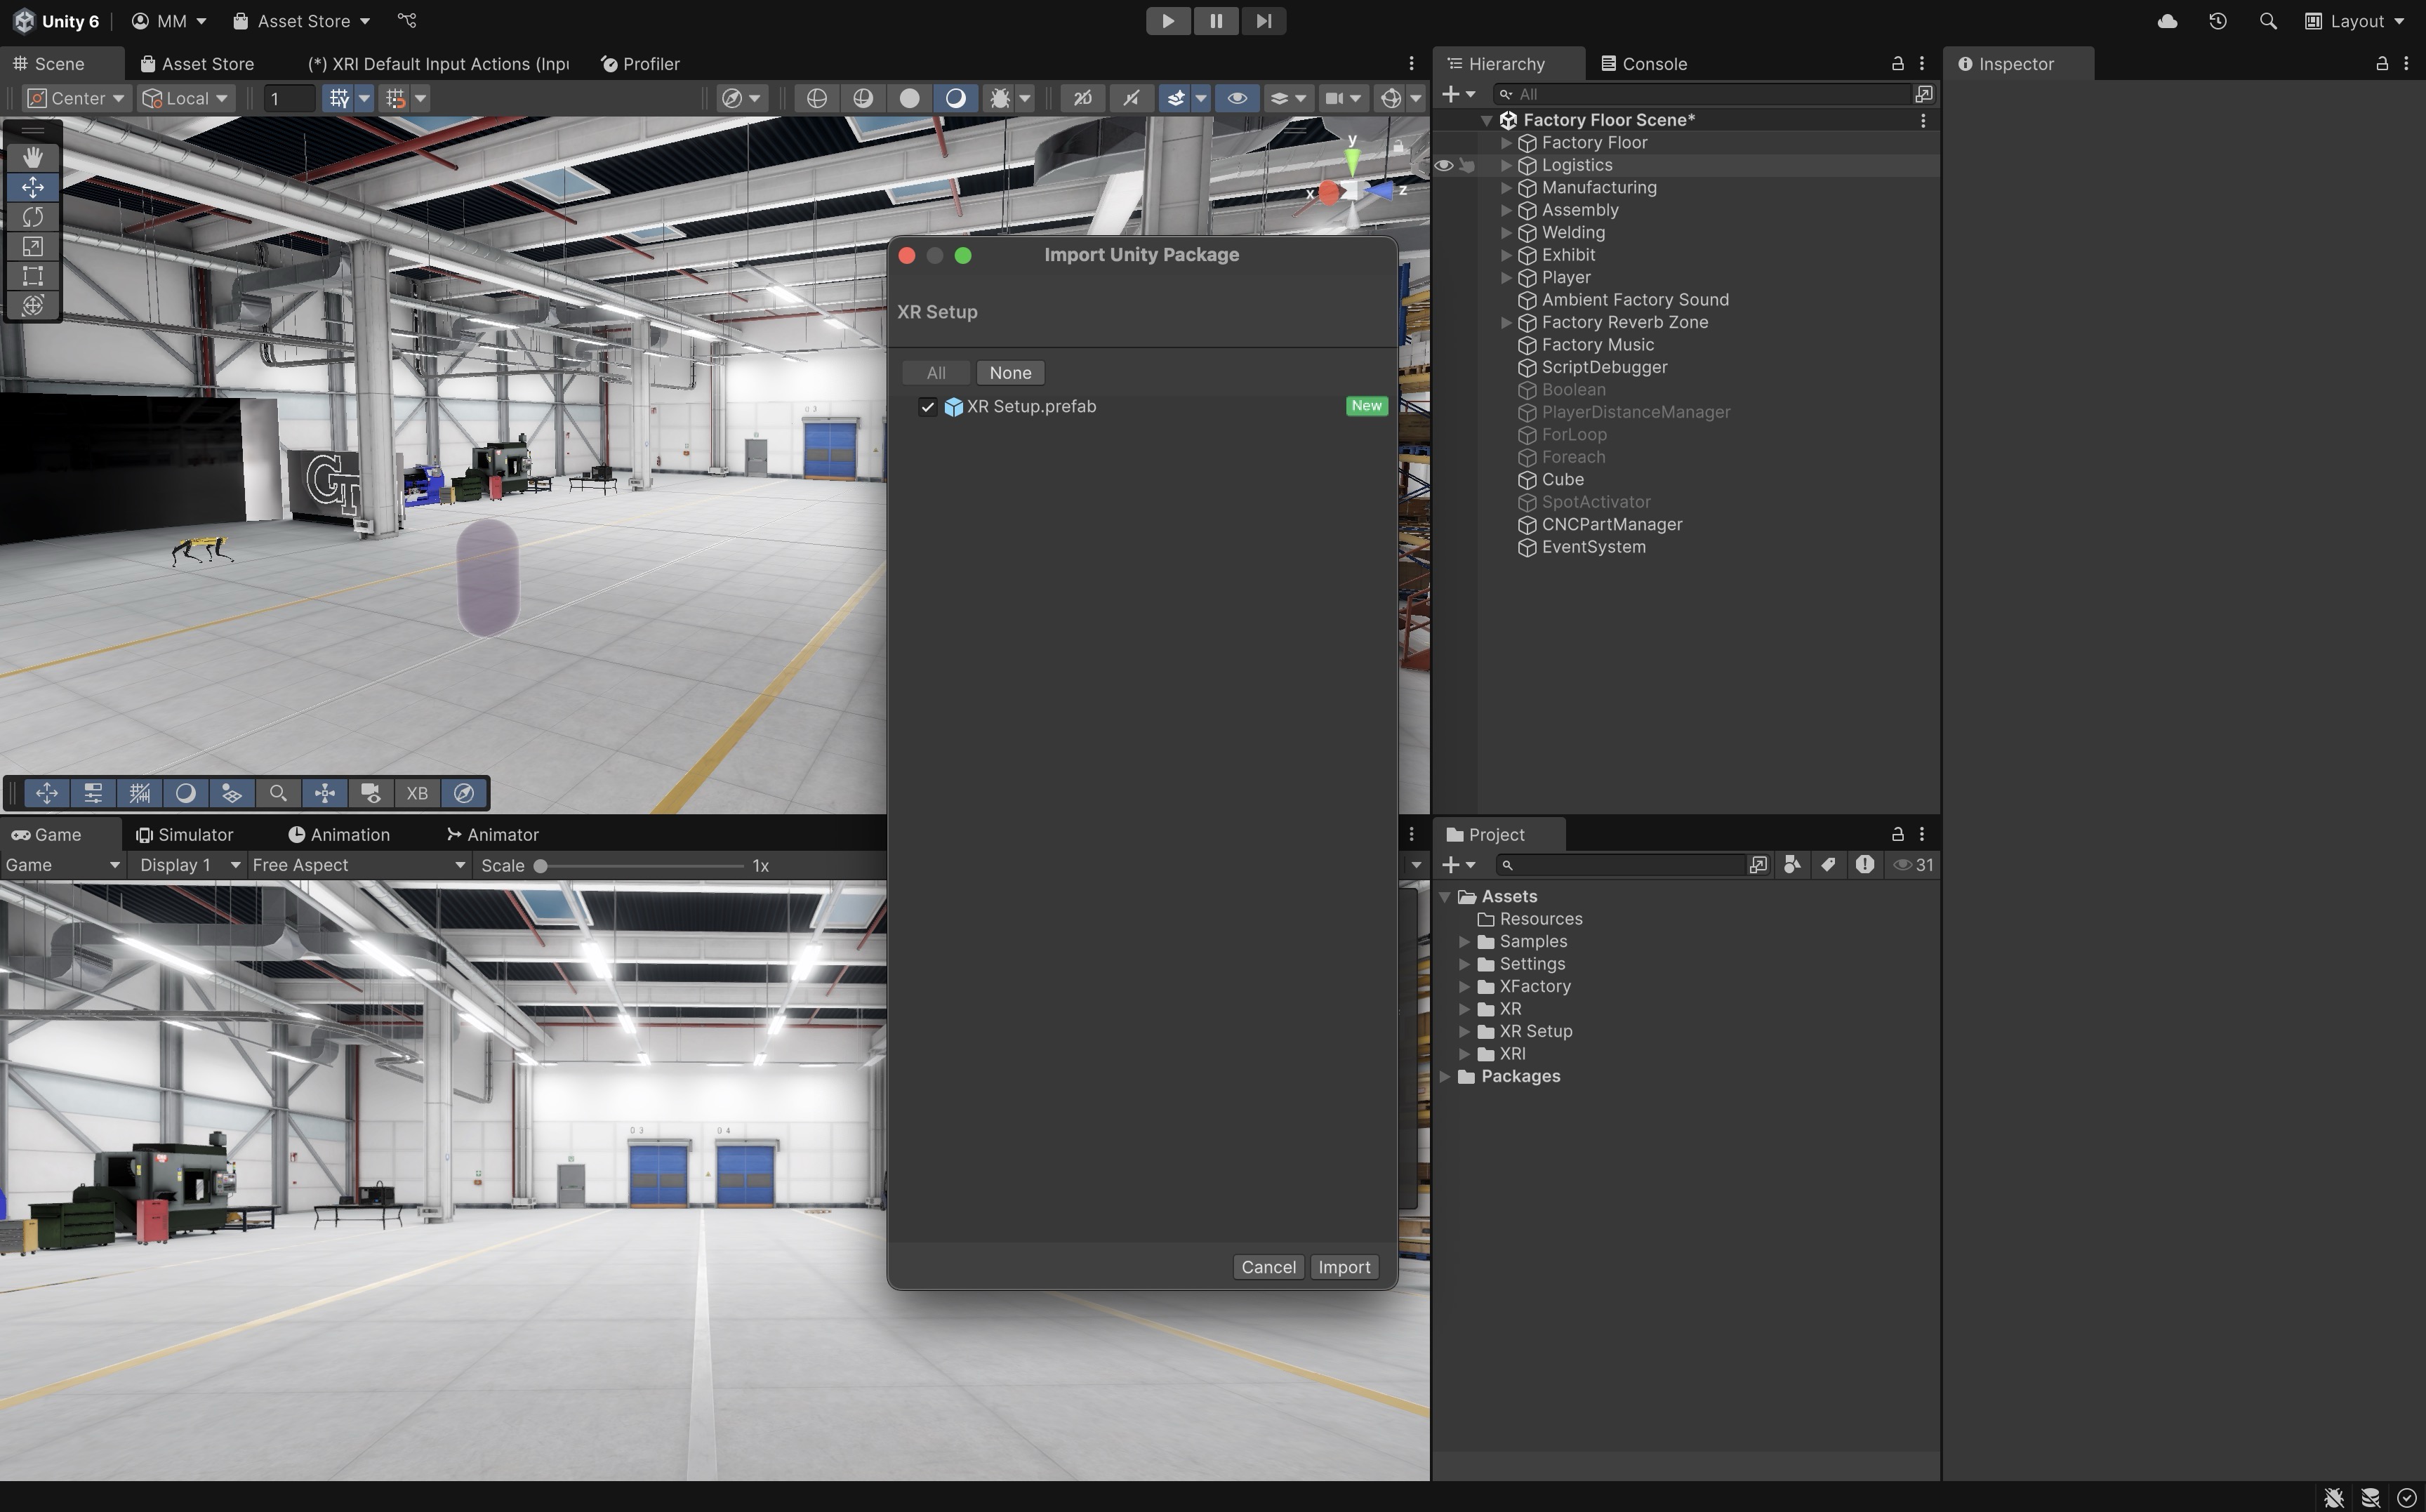
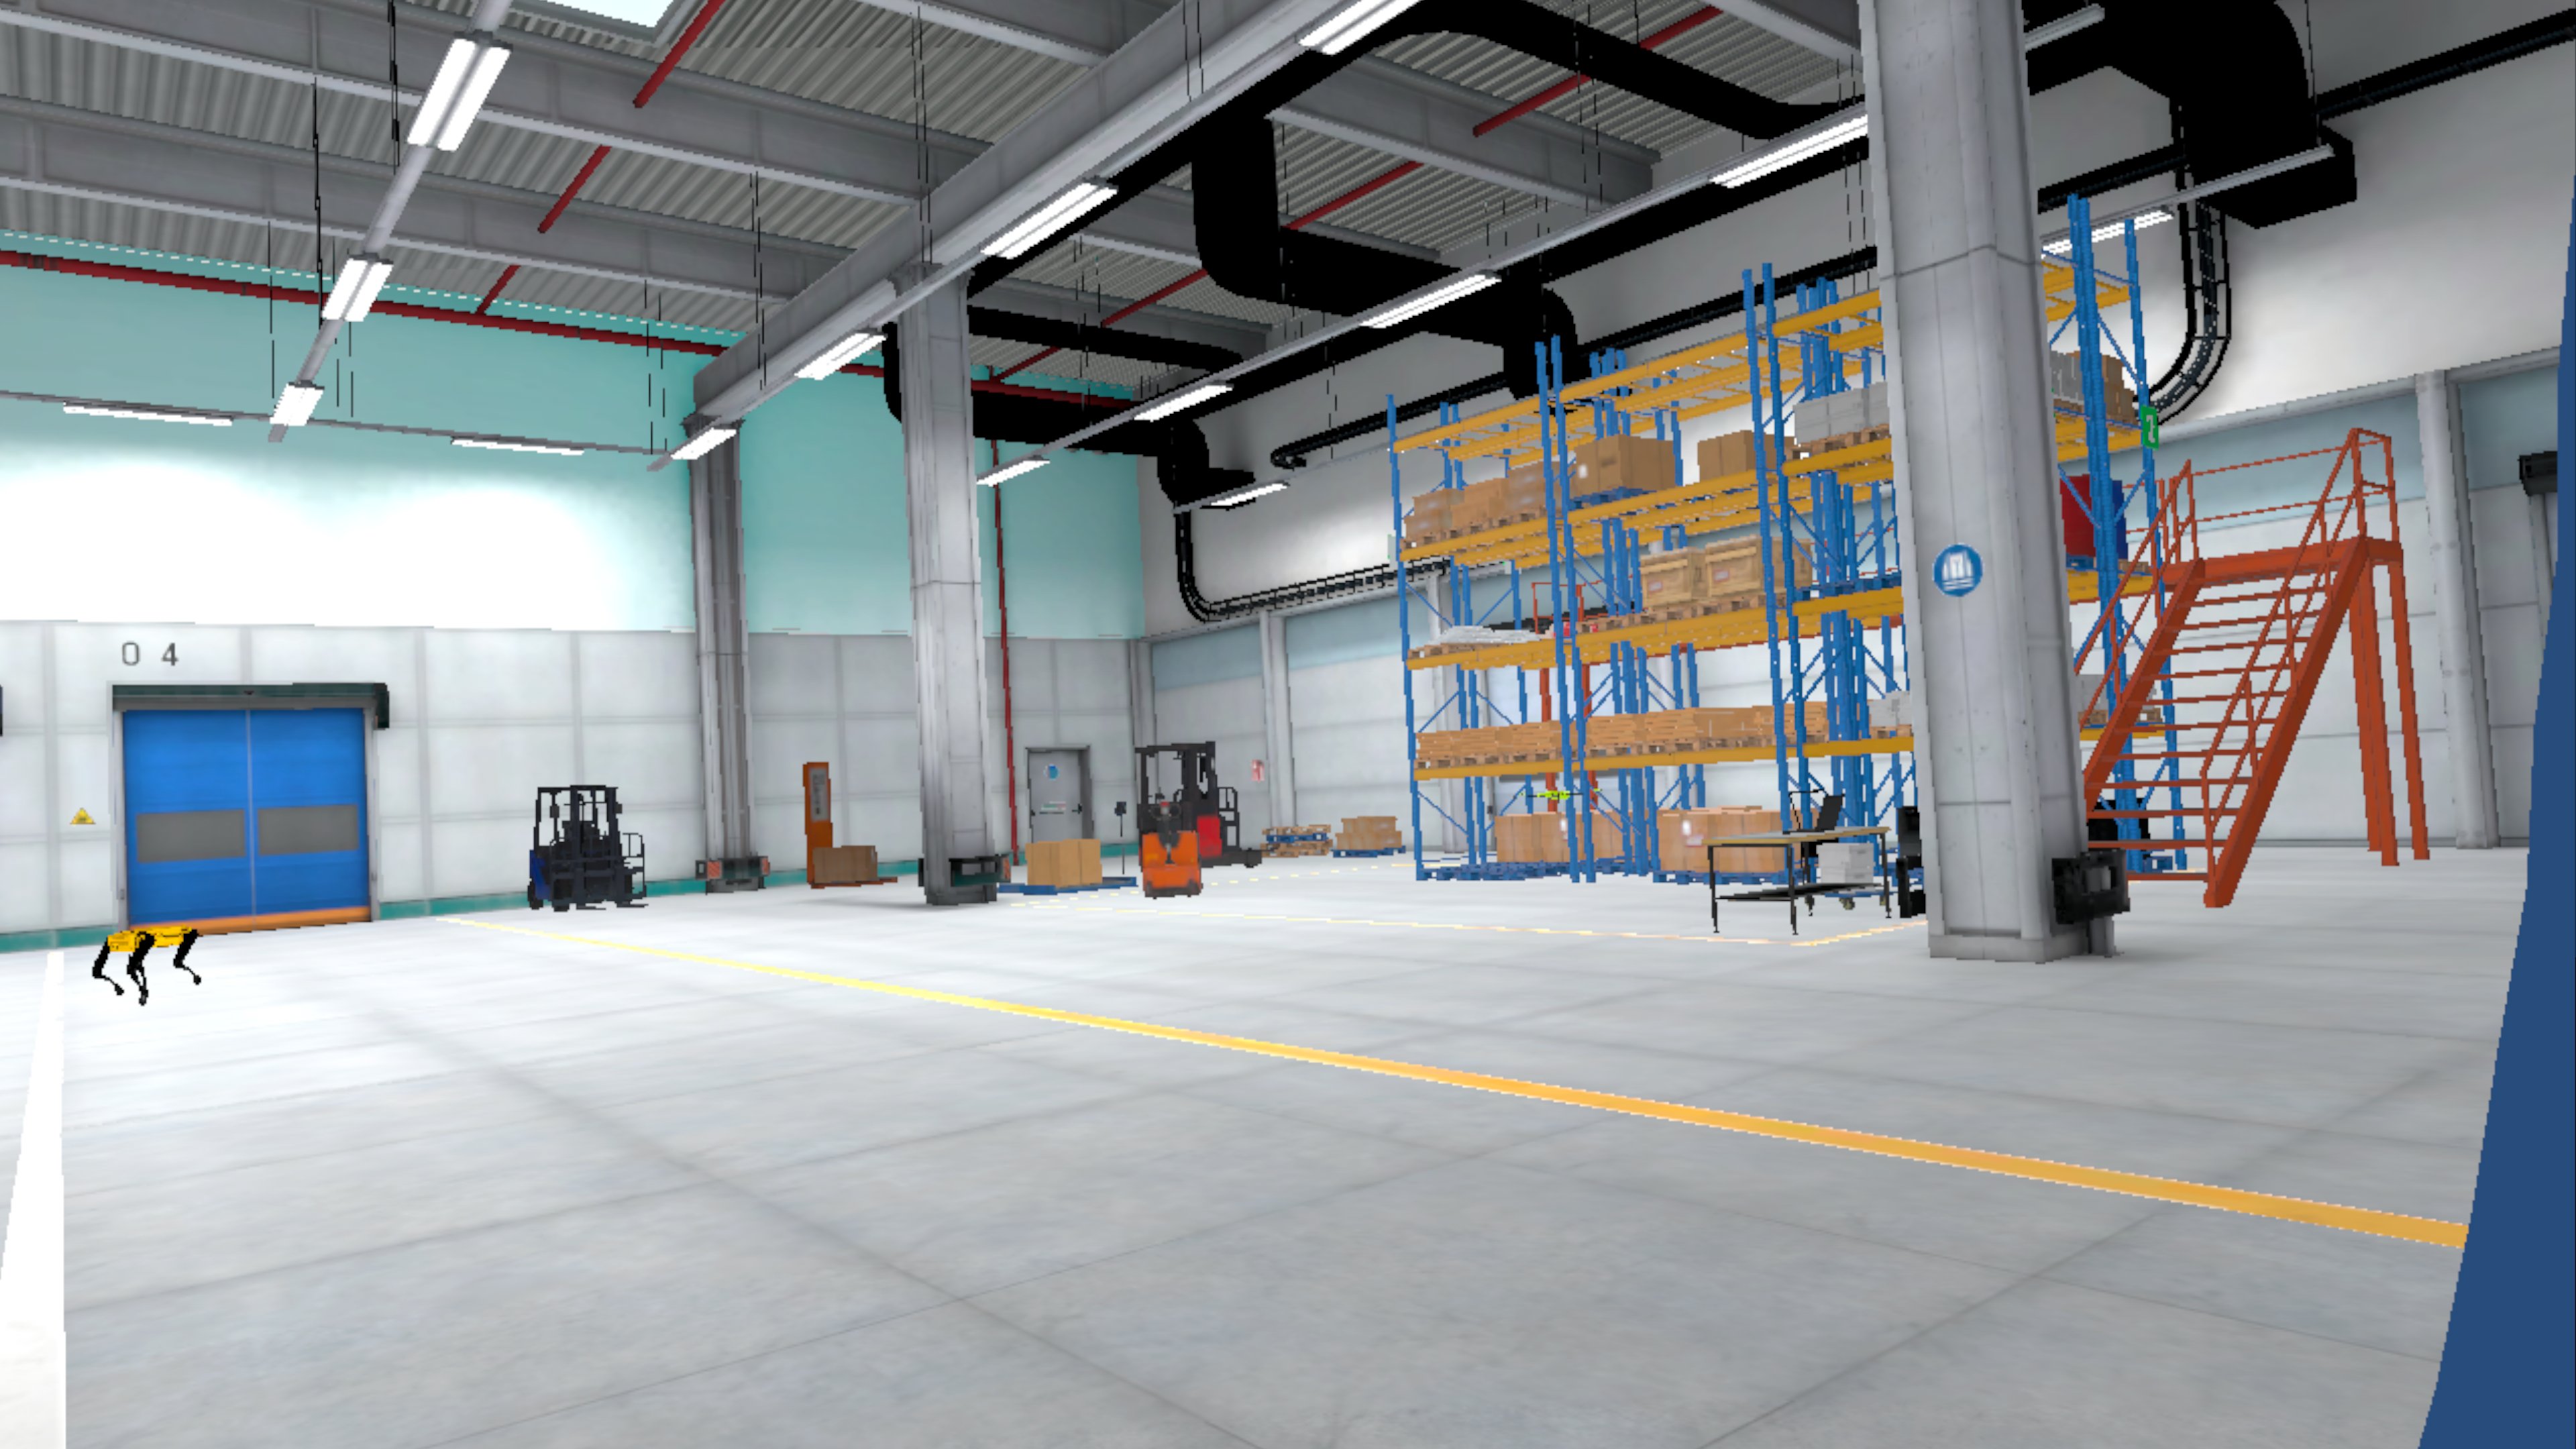
Import XFactory.unitypackage into your VR Template project. Make the factory VR-ready by copying the template’s complete XR setup into a working copy of the XFactory scene—while leaving the original non-VR scene unchanged. SampleScene is your reference for the XR objects and wiring you inspected in D1. Paste that hierarchy into XFactory; copying only the XR Origin often leaves out input actions, locomotion, interactors, or UI support and leads to broken Play Mode behavior.
- Prepare the scene:
- Open the XFactory interior scene in your VR Template project.
- Save a copy as
XFactoryVRso the original XFactory scene remains unchanged. - Delete the default
Main Camera.
- Copy the template XR setup:
- Open the VR Template
SampleScene. - Select and copy the entire XR setup hierarchy into
XFactoryVR—not only theXR Origin. - The copied setup should include, as applicable:
XR Origin (XR Rig)XR Interaction Manager- locomotion objects/providers
- controller/interactor objects
- input action enabling objects such as
Input Action Manager EventSystemwithXR UI Input Module- any required spatial UI / interaction support
- Open the VR Template
- Position the rig and add navigation:
- Move the
XR Originto a natural entry point or station inside the factory. - Add or adjust Teleportation Area and Teleportation Anchor objects so users can move safely between zones.
- Confirm input actions, locomotion, interactors, UI input, and teleportation work in Play Mode.
- Move the
- Test on headset:
- Preview with Quest Link / Meta Horizon Link.
- Run Build and Run to Quest for standalone validation.
Do not copy only the
XR Origininto an XFactory scene unless you also verify the full supporting XR setup: input actions,Input Action Manager,XR Interaction Manager, locomotion objects,EventSystem,XR UI Input Module, OpenXR settings, and interaction profiles.
Key Takeaways
- Unity’s VR Template provides a reliable starting point with XR packages, project settings, and sample interaction scenes already configured.
- For XFactory, copy the VR Template XR setup into a saved copy of the XFactory scene (
XFactory_VR). - Students should inspect XR Plug-in Management, OpenXR settings, XRI objects, input actions, locomotion, interactables, and spatial UI rather than wiring everything manually in D1.
- Quest Link / Meta Horizon Link is useful for rapid preview, but standalone Quest builds are still required for final validation.
- The template is a technical starting point; engineering VR scenes still require scale, comfort, safety, and performance checks on headset.
- Later Module D sessions build on the template by customizing locomotion, grabbing, sockets, activation, feedback, and VR UI for XFactory.
- Presence depends on comfortable visuals, responsive interaction, and believable spatial audio—not polygon count alone.
- Hardware choice (standalone vs tethered) affects performance targets, comfort, and deployment workflow.
- A structured VR lifecycle—from concept through optimization—keeps engineering projects on track.