D5. Object Activation in VR
Learning Outcomes
- Explain how activation events work in Unity’s XR and UI systems. Before class, compare Unity UI
Button.onClick, XRI select events, and XRI activate/deactivate events, and review how they trigger animations, sounds, or state changes.- Apply event-driven design principles in Unity XR projects. In preparation, explore the roles of events, listeners, and handlers, and set up UnityEvents to call specific methods—for example, triggering robot animations in a state-based system.
- Use action-based input for controller activation. Ahead of the session, review Input System actions or XRI Starter Assets actions instead of legacy device polling for controller activation.
- Verify XR UI setup for world-space controls. For pre-class work, confirm that world-space UI uses
XR UI Input ModuleandTracked Device Graphic Raycaster.- Implement feedback mechanisms to enhance user interactions. Experiment with visual, audio, and haptic cues to make system responses clear, using
Simple Haptic Feedbackwith aHaptic Impulse Playeror aRobotFeedbackManagerfor state-dependent feedback.- Design activation logic for industrial state and safety. Come prepared to gate robot commands by readiness, interlocks, and emergency stop conditions, with clear blocked-state feedback.
Activation Events
Activation events in VR refer to specific triggers or signals that are generated when a user interacts with a virtual object or environment in a meaningful way. These activation events typically indicate a change in state or the initiation of an action based on user input.
Common Activation Paths
In current XRI workflows, distinguish three common paths:
- UI click:
Button.onClickfires when an XR UI pointer or other UI input clicks a Unity UI Button. - XRI select:
Select Entered/Select Exitedfire when an interactor selects an interactable, such as grabbing, pressing, or socketing depending on the component. These are select events, not always activation events. - XRI activate:
Activated/Deactivatedfire from an interactor’s Activate input for interactables that support activation behavior. Activation usually depends on the interactor’sActivate Inputaction and the interactable/event setup.
Activation logic in VR should model real operational constraints. A robot command should only execute when prerequisites are satisfied: correct mode, clear e-stop, safe zone, valid part placement, and no conflicting motion. VR feedback should not imply physical safety guarantees—it is a training/simulation cue unless connected to validated control logic.
Use Cases
Activation events are used to provide feedback (e.g., trigger sounds, change indicator lights, or update display panels), initiate processes (e.g., start machinery, toggle system states, or signal a change in a simulation), and decouple actions (e.g., separate the user input from the actions performed, enabling modular programming). Key principles include:
- Event-Driven Design: Activation events follow an event-driven design. When an event is detected (such as a button press), one or more functions execute. This modularity simplifies management and adapts well to complex engineering workflows.
- Feedback Mechanisms: Effective VR systems use both auditory (sounds) and visual (lighting, material changes) feedback. These cues are vital in engineering environments for communicating machine states and ensuring operator awareness.
- Contextual Interactions: Activation events should reflect the current system state, enabling or restricting interactions based on context (e.g., safety conditions, system readiness). This ensures realistic and safe behavior, mirroring industrial safety protocols.
This session assumes your D1
XFactoryVRscene includes the complete VR Template XR setup copied fromSampleSceneand that D1–D4 near/far interaction, grabbing, sockets, and input actions are working in Play Mode.
Event-Driven Design
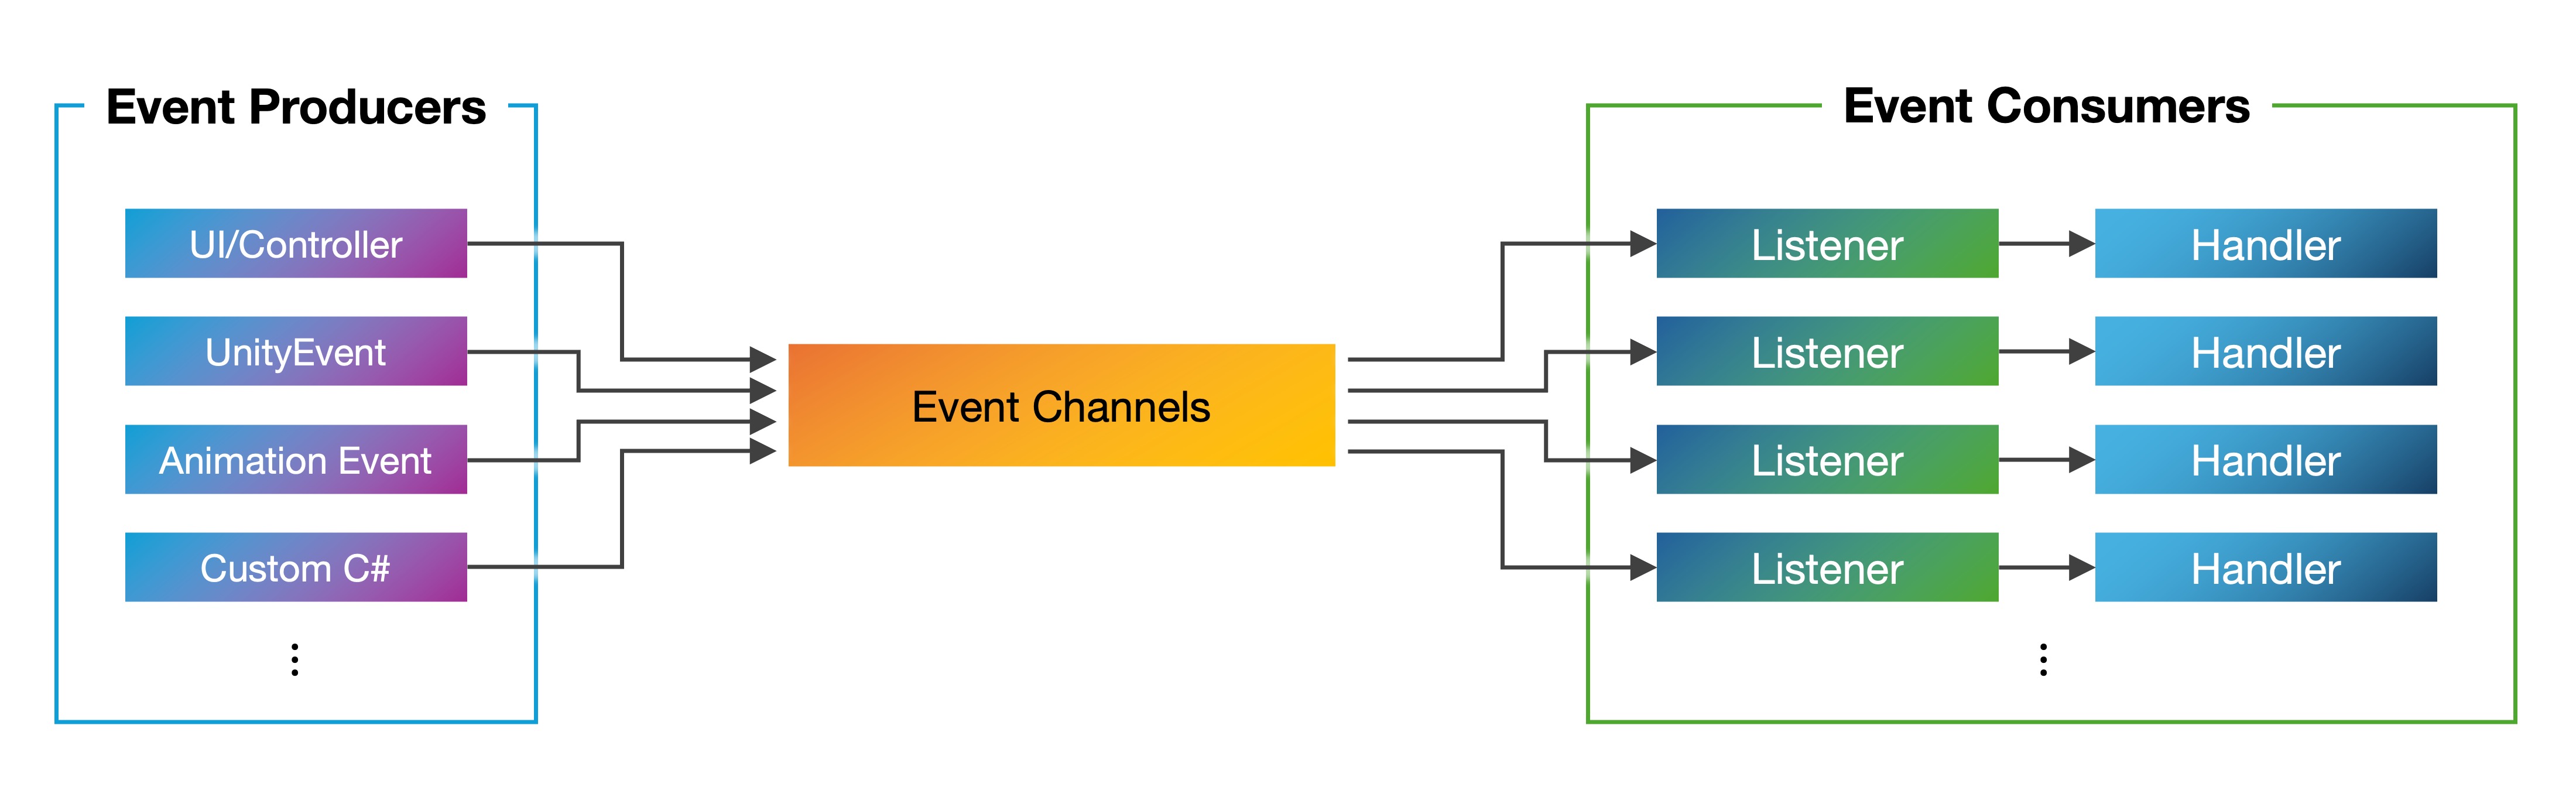
Event-driven design is a software architecture pattern where the flow of control is governed by the occurrence and handling of events rather than a fixed, linear execution path. In immersive VR applications—where user interactions, physics simulations, environmental changes, and external data streams happen simultaneously and often unpredictably—this model is especially effective. It enables real-time responsiveness, modular growth, and maintainable interaction logic. Key concepts to understand:
- Event: A discrete signal that something has happened. In VR, this might be a user squeezing a controller trigger, a collision between two virtual objects, or the player entering a certain zone. Events often include extra data—like a position vector, a timestamp, or a user ID—that helps the system decide what to do next.
- Listener (Subscriber): A piece of code that says, “I care about this type of event.” Listeners register with the event system at startup or during gameplay. When the matching event occurs, the system calls the listener’s handler. This way, components don’t need to constantly check for changes—they just wait until something happens.
- Event Handler: The function that runs when an event occurs. Handlers should be kept lightweight to avoid slowing down the VR experience—for example, they might just request a state change, while a manager decides whether the command is valid and what feedback should play.
- Modularity: By defining a clear set of event types, you can create independent modules (input devices, physics engines, UI panels) that only communicate through events. This makes it simple to swap parts—for example, upgrading from a controller to hand-tracking—without breaking the rest of the app.
- Decoupling: In an event-driven system, no module needs a direct reference to every other subsystem. Avoid tightly coupling every button directly to every robot subsystem; a manager pattern is more maintainable for engineering workflows.
- Best practice: Keep event handlers lightweight. Let events request a state change, then let a manager decide whether the command is valid and what feedback should play.
UI-based Activation
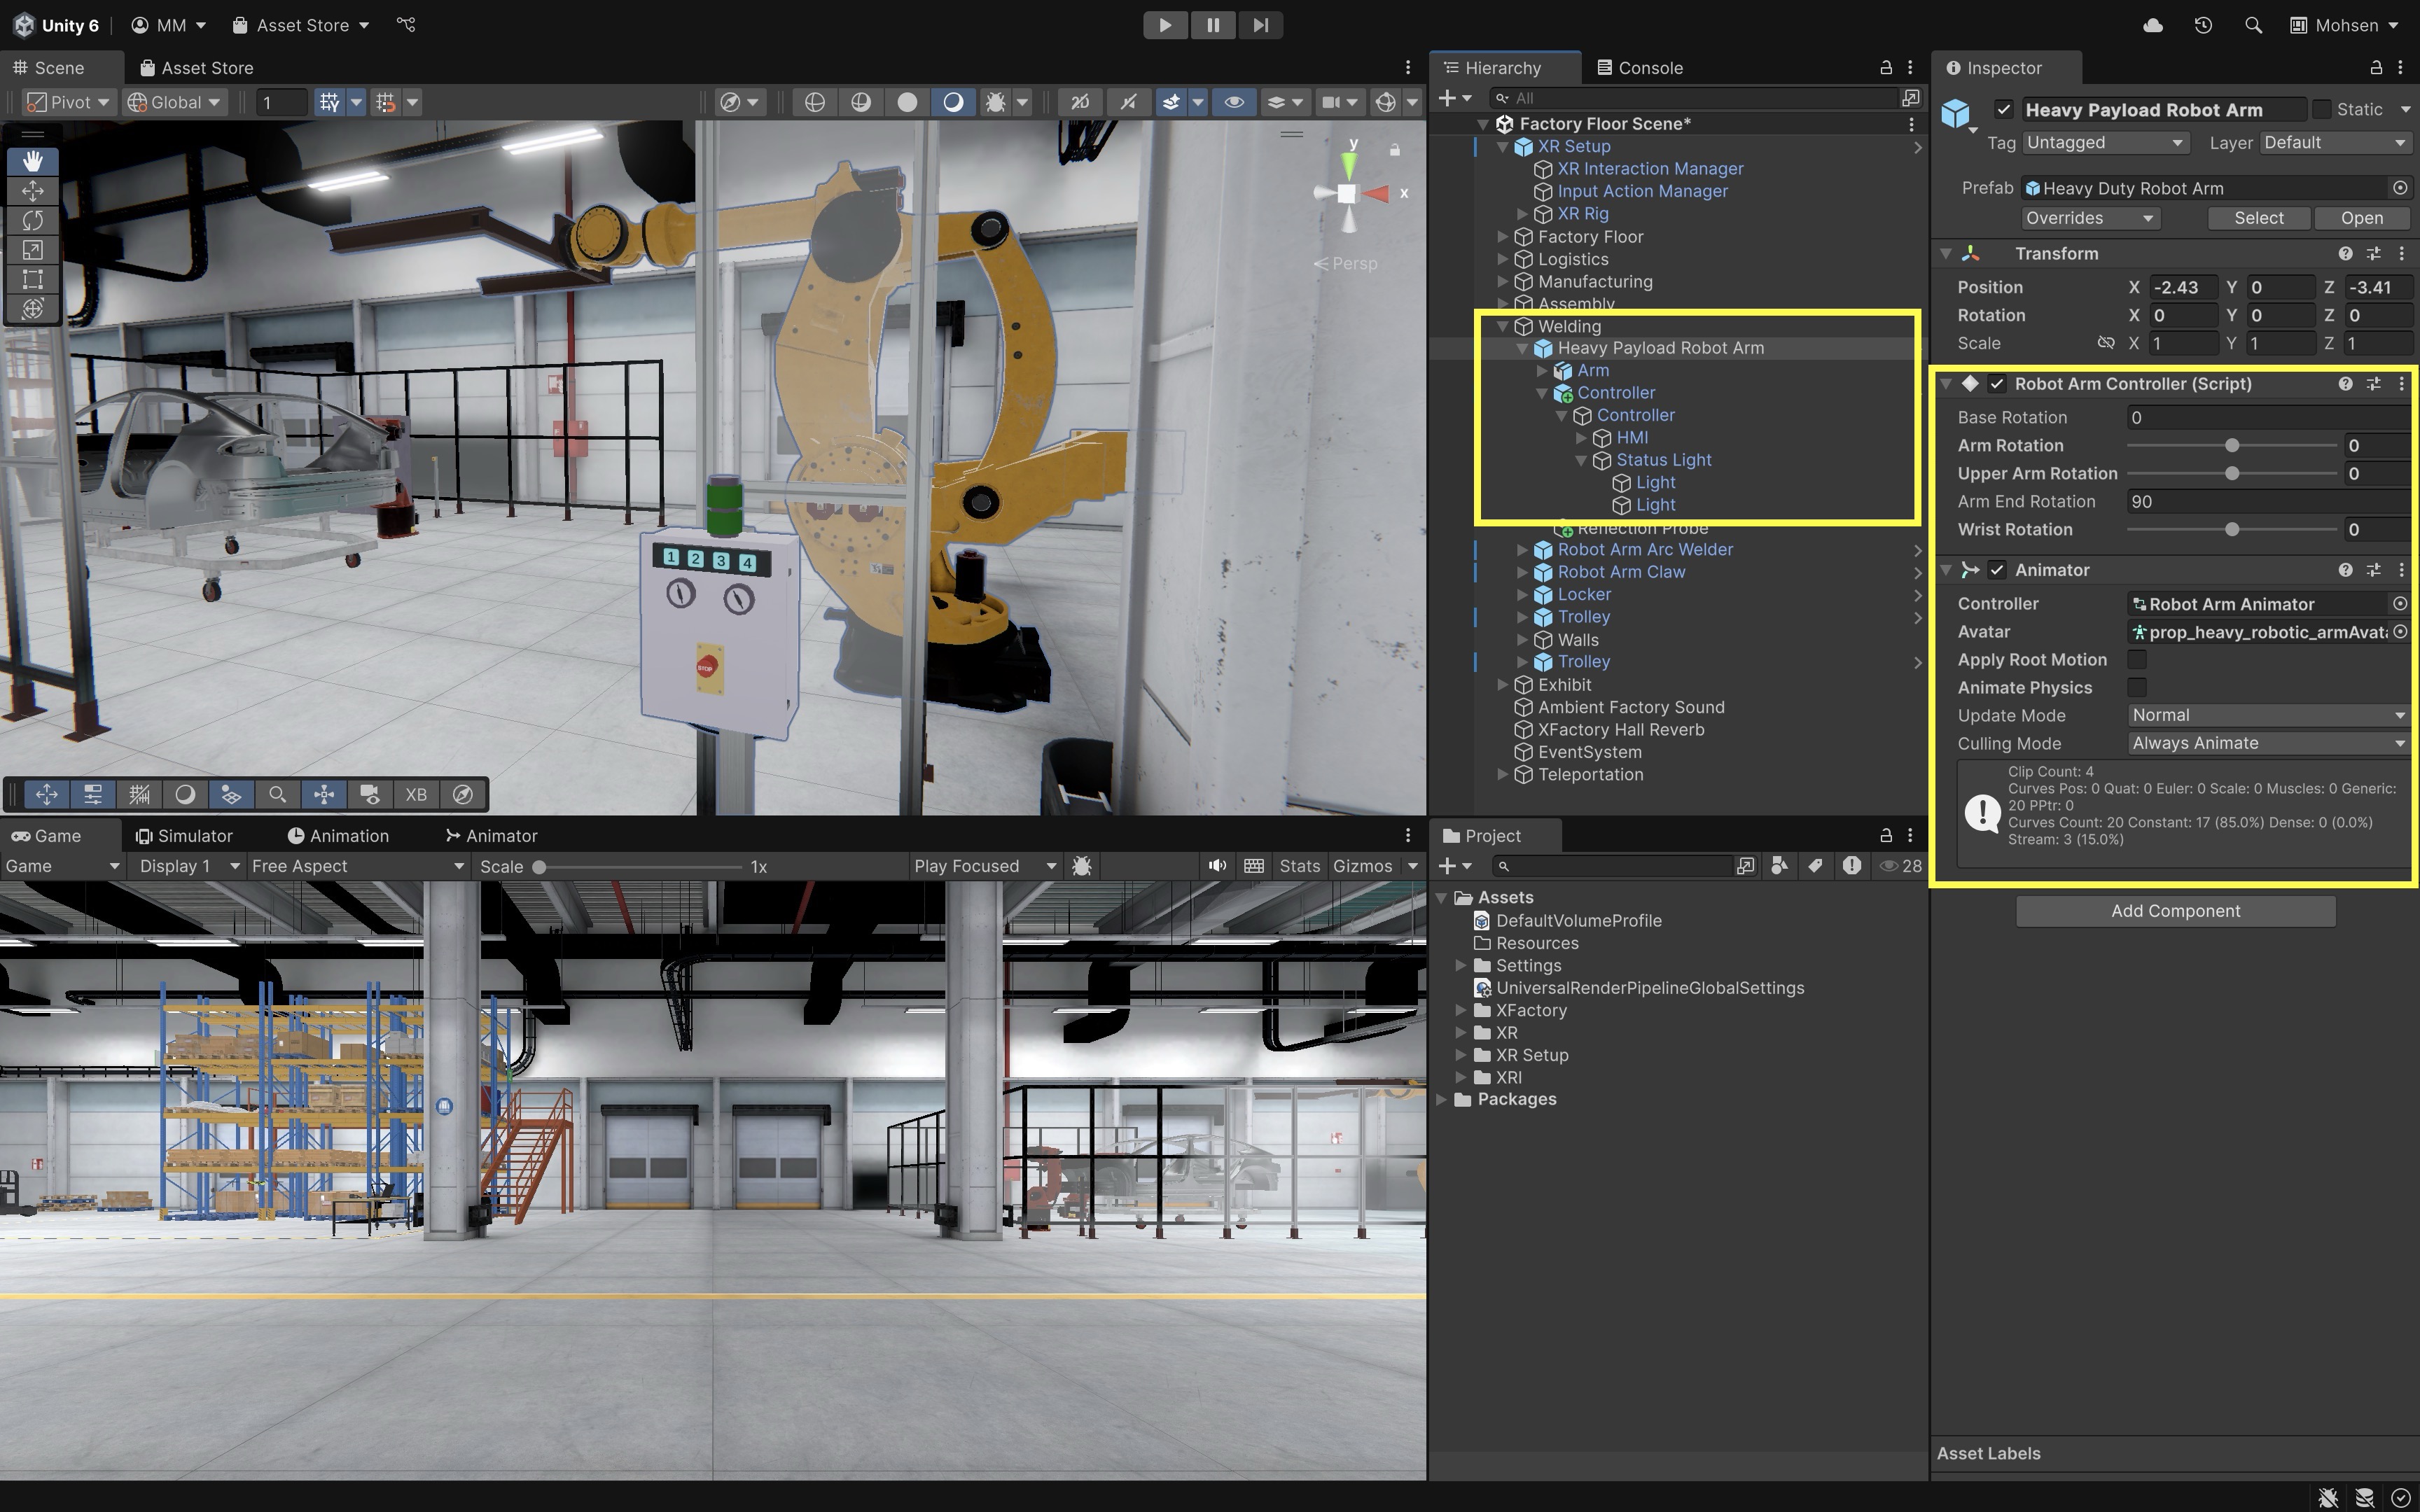
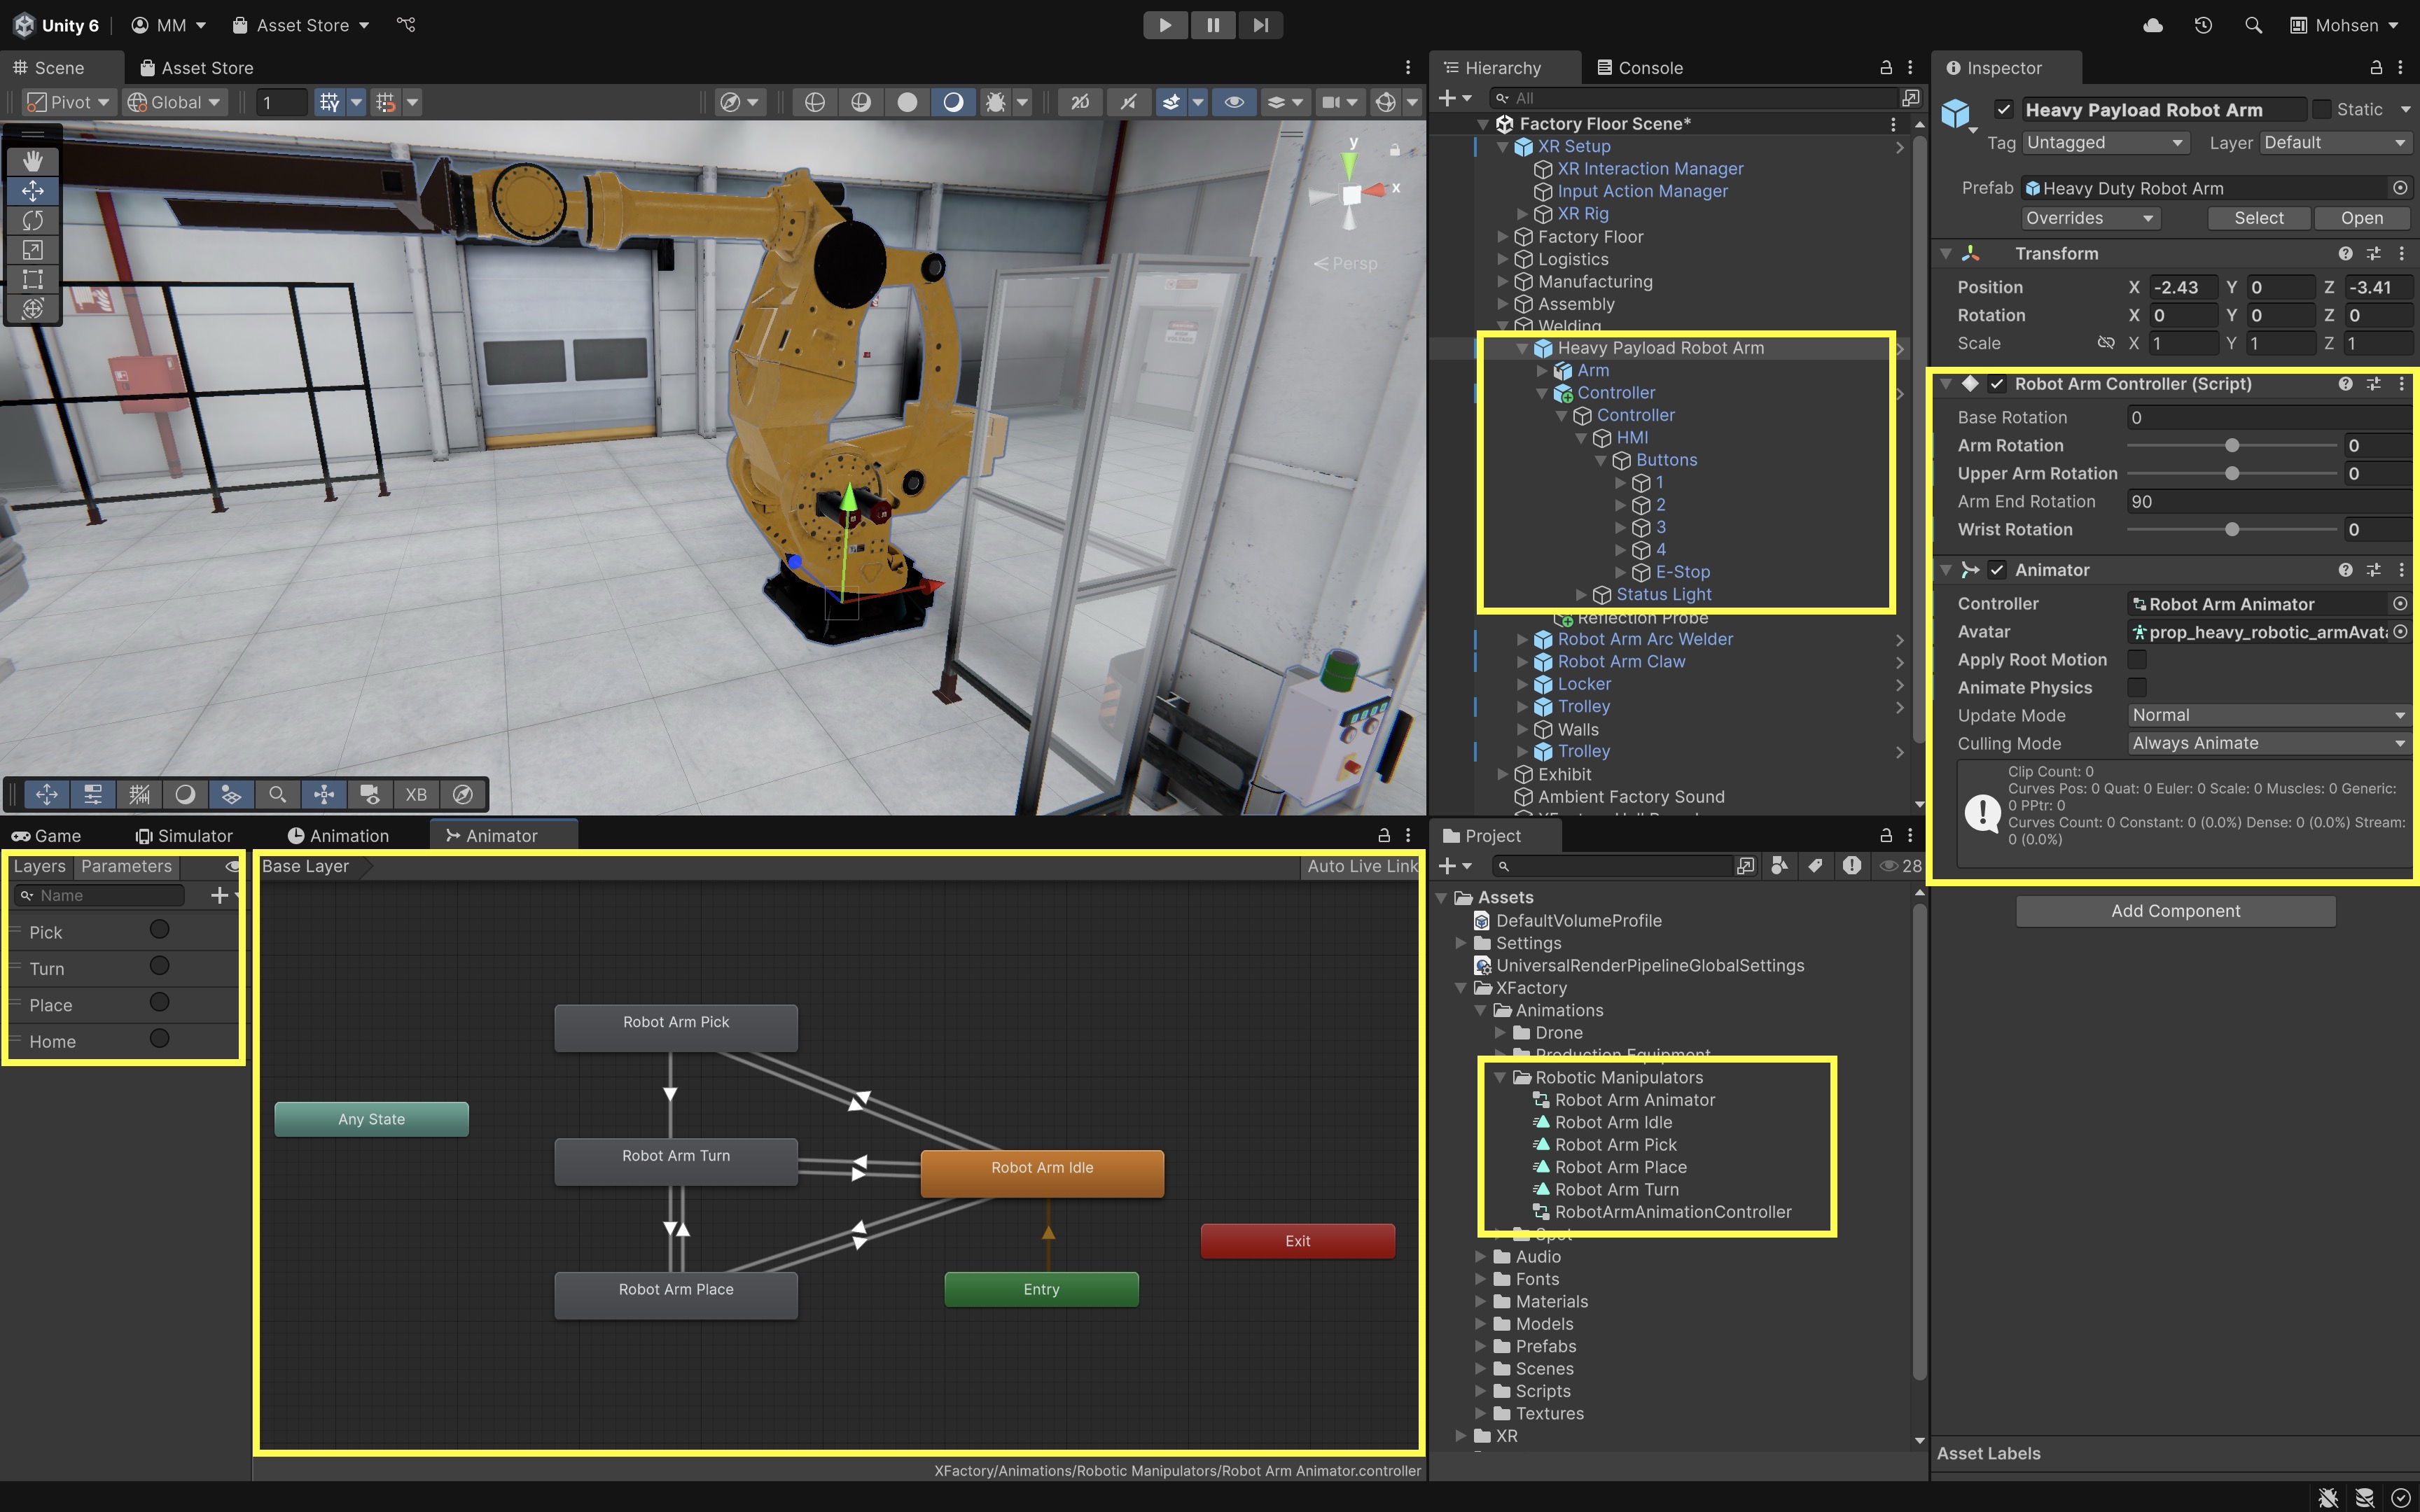
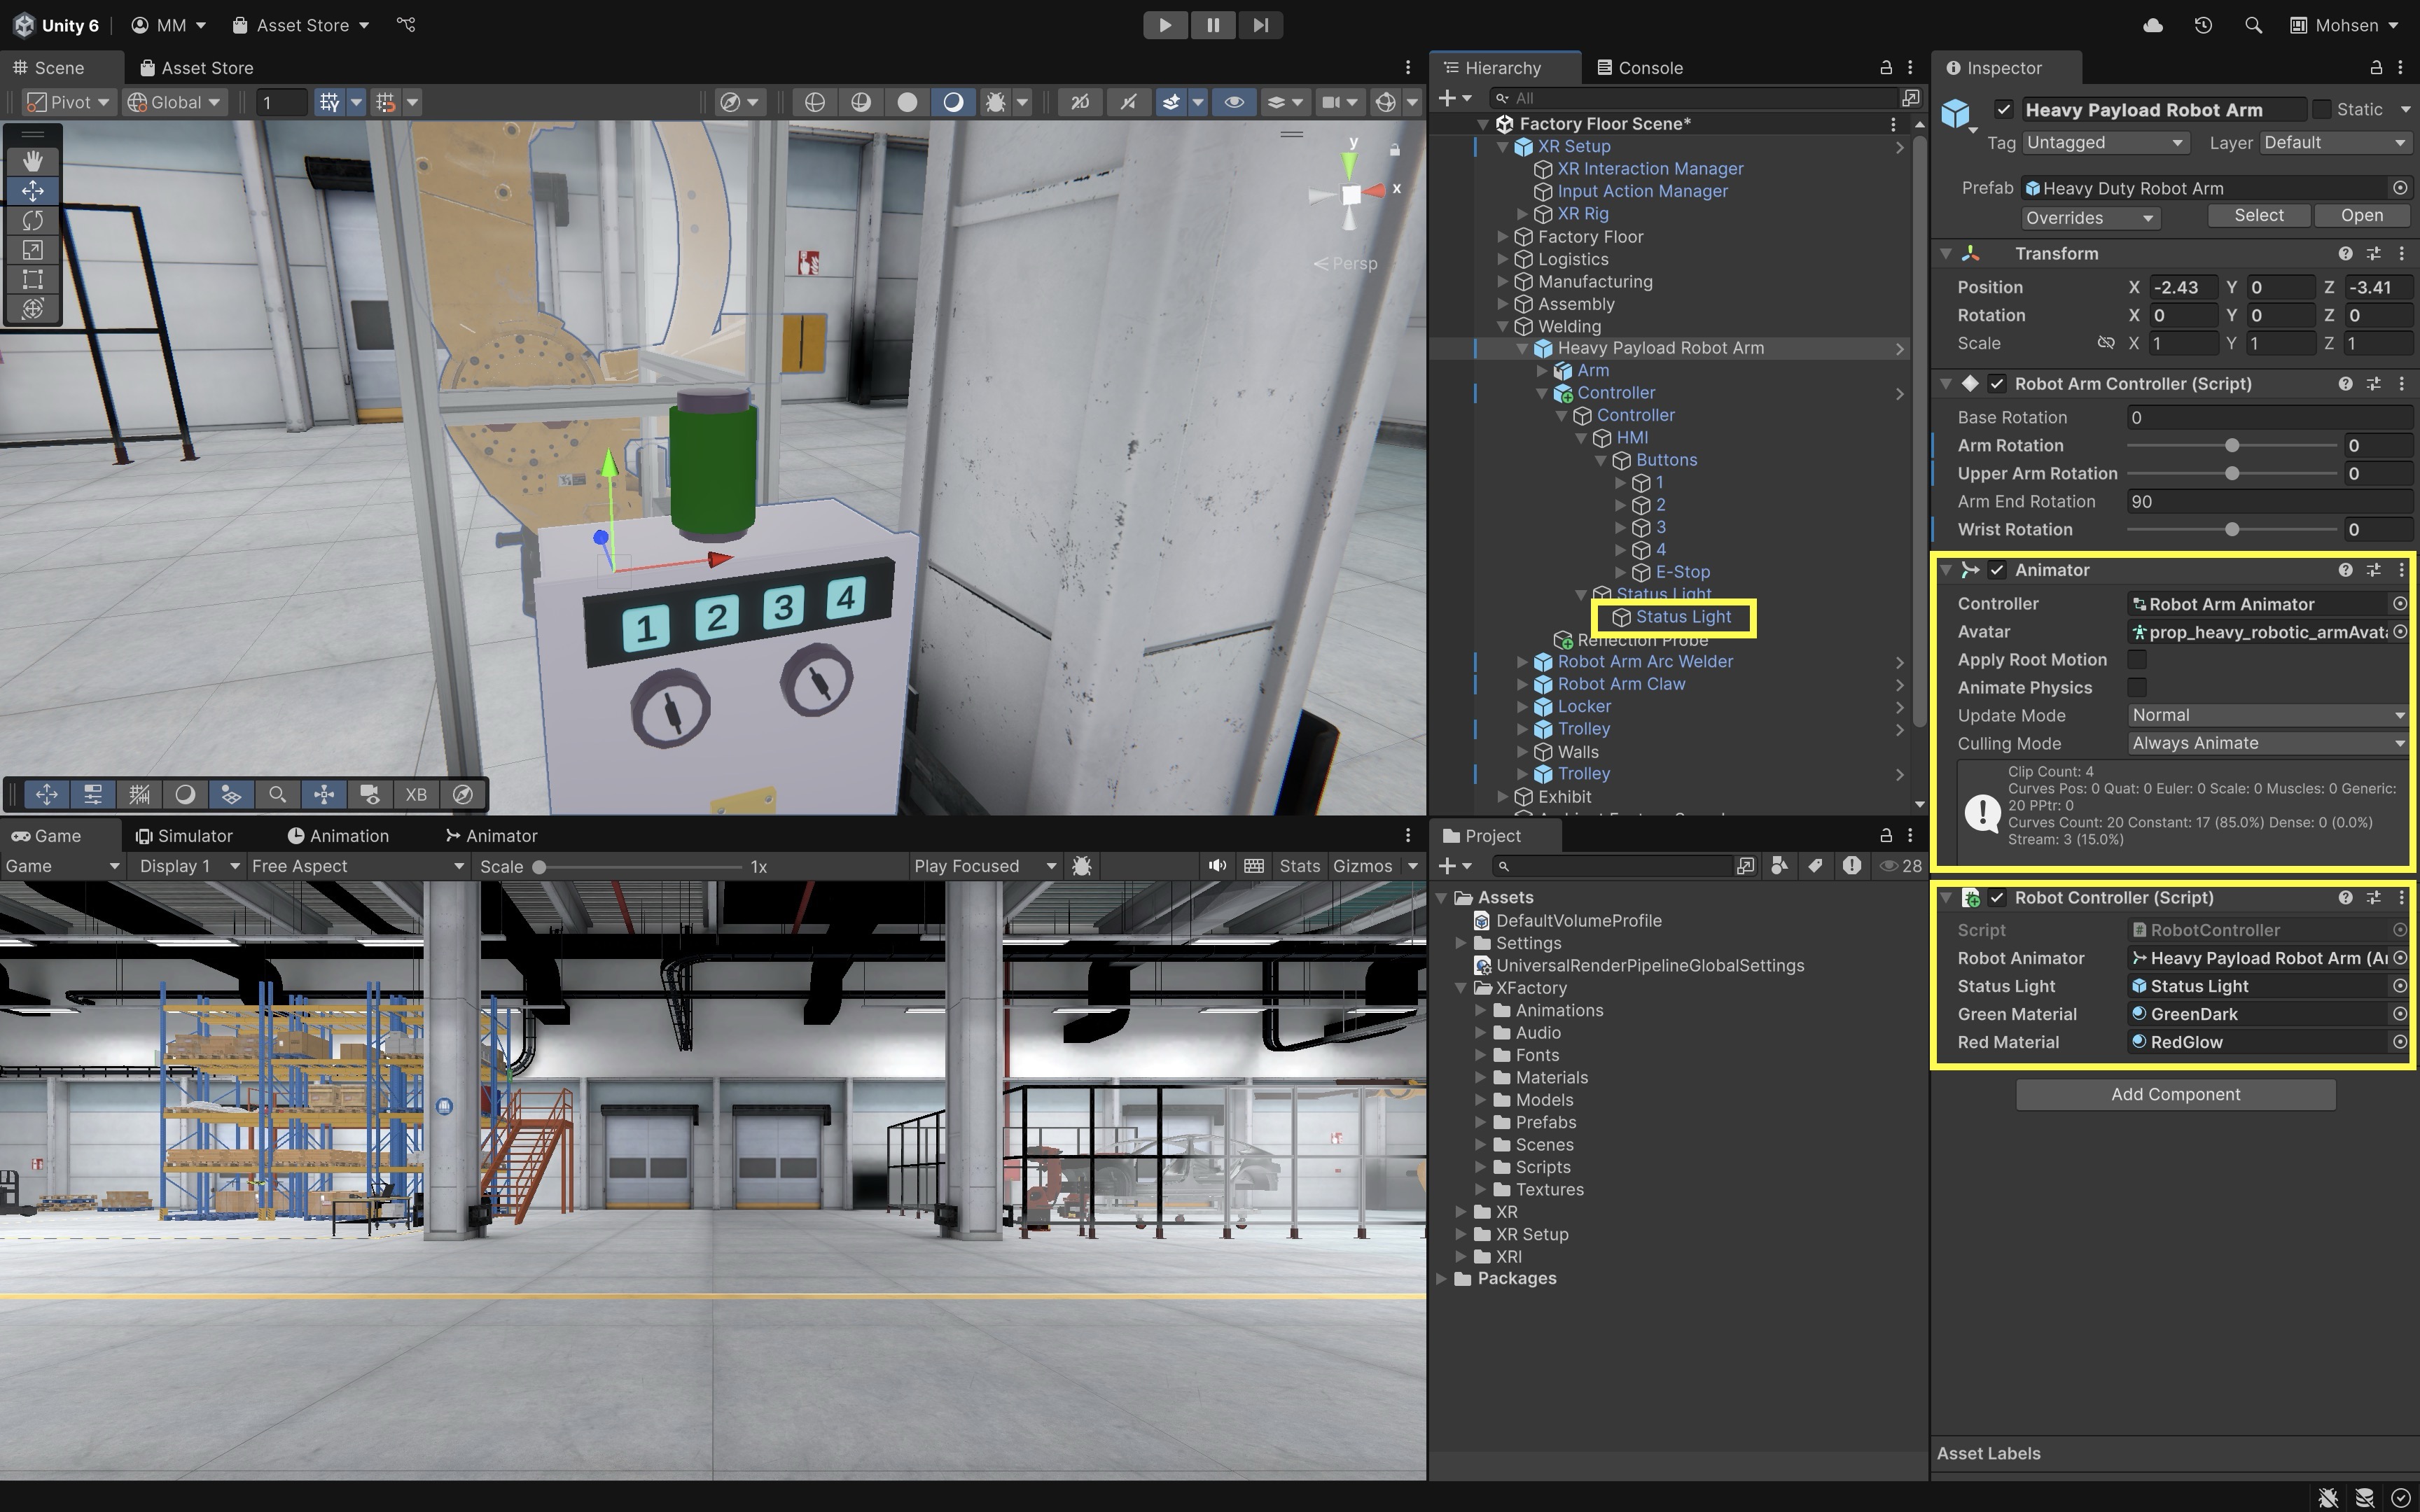
At the welding station of XFactory, the user controls a heavy-duty robot arm using a numpad with four configurable buttons. Each button maps to a different action (e.g., Pick, Turn, Place, Home). These actions trigger the corresponding animation state and update the system’s status indicator. Our goal is therefore to (1) map each numpad button (1–4 GameObjects) to an animation trigger (Pick, Turn, Place, Home) on the robot arm’s Animator, (2) log each activation to the console, and (3) change the status light color based on whether the robot is idle or moving.
- Setup the Animator Triggers:
- Go to the robot arm’s
Animator Controller. - Add or verify states:
Idle,Pick,Turn,Place. - Add or verify transitions using
Trigger Parameters:"Home","Pick","Turn","Place".
- Go to the robot arm’s
- Create the
RobotControllerScript:- Prepare a
RobotController.csscript to manage the robot arm’s animation triggers and updates a status light to reflect whether the robot is active (moving) or idle. A script can help synchronize visual feedback with animation states in a modular, event-driven way.
 using UnityEngine;

 public class RobotController : MonoBehaviour
 {
     [SerializeField] private Animator robotAnimator;
     [SerializeField] private Renderer statusLightRenderer;
     [SerializeField] private Material greenMaterial;
     [SerializeField] private Material redMaterial;

     private const string idleStateName = "Robot Arm Idle";
     private bool wasTrulyIdle = true;

     private void Start()
     {
         UpdateStatusLight(force: true);
     }

     private void Update()
     {
         UpdateStatusLight();
     }

     private void UpdateStatusLight(bool force = false)
     {
         if (robotAnimator == null || statusLightRenderer == null)
             return;

         bool isTrulyIdle = IsRobotIdle();
         if (force || isTrulyIdle != wasTrulyIdle)
         {
             // renderer.material creates an instance; acceptable for one tutorial light
             statusLightRenderer.material = isTrulyIdle ? greenMaterial : redMaterial;
             wasTrulyIdle = isTrulyIdle;
         }
     }

     private bool IsRobotIdle()
     {
         if (robotAnimator.IsInTransition(0))
             return false;

         return robotAnimator.GetCurrentAnimatorStateInfo(0).IsName(idleStateName);
     }

     public void TriggerAnimation(string triggerName)
     {
         if (robotAnimator == null)
         {
             Debug.LogWarning("RobotController: Animator is not assigned.");
             return;
         }

         if (!CanTriggerCommand())
         {
             Debug.Log("Blocked: Robot is already moving.");
             return;
         }

         robotAnimator.SetTrigger(triggerName);
         Debug.Log($"Robot Triggered: {triggerName}");
     }

     private bool CanTriggerCommand()
     {
         return !robotAnimator.IsInTransition(0);
     }
 }
If this script does not compile, first verify the installed XR Interaction Toolkit package version and namespaces before changing the interaction logic.
- Prepare a
- Configure the Script:
- Attach the script to a GameObject representing the robot (e.g.,
Heavy Payload Robot Arm). Robot Animator: Assign theAnimatorcomponent that controls the robot’s state machine.Status Light Renderer: Assign theRendereronStatus Light.Green Material: Assign a status material to show the robot is idle.Red Material: Assign a status material used when the robot is moving.
- Attach the script to a GameObject representing the robot (e.g.,
- Configure the Numpad Buttons:
- From each numpad button, locate the
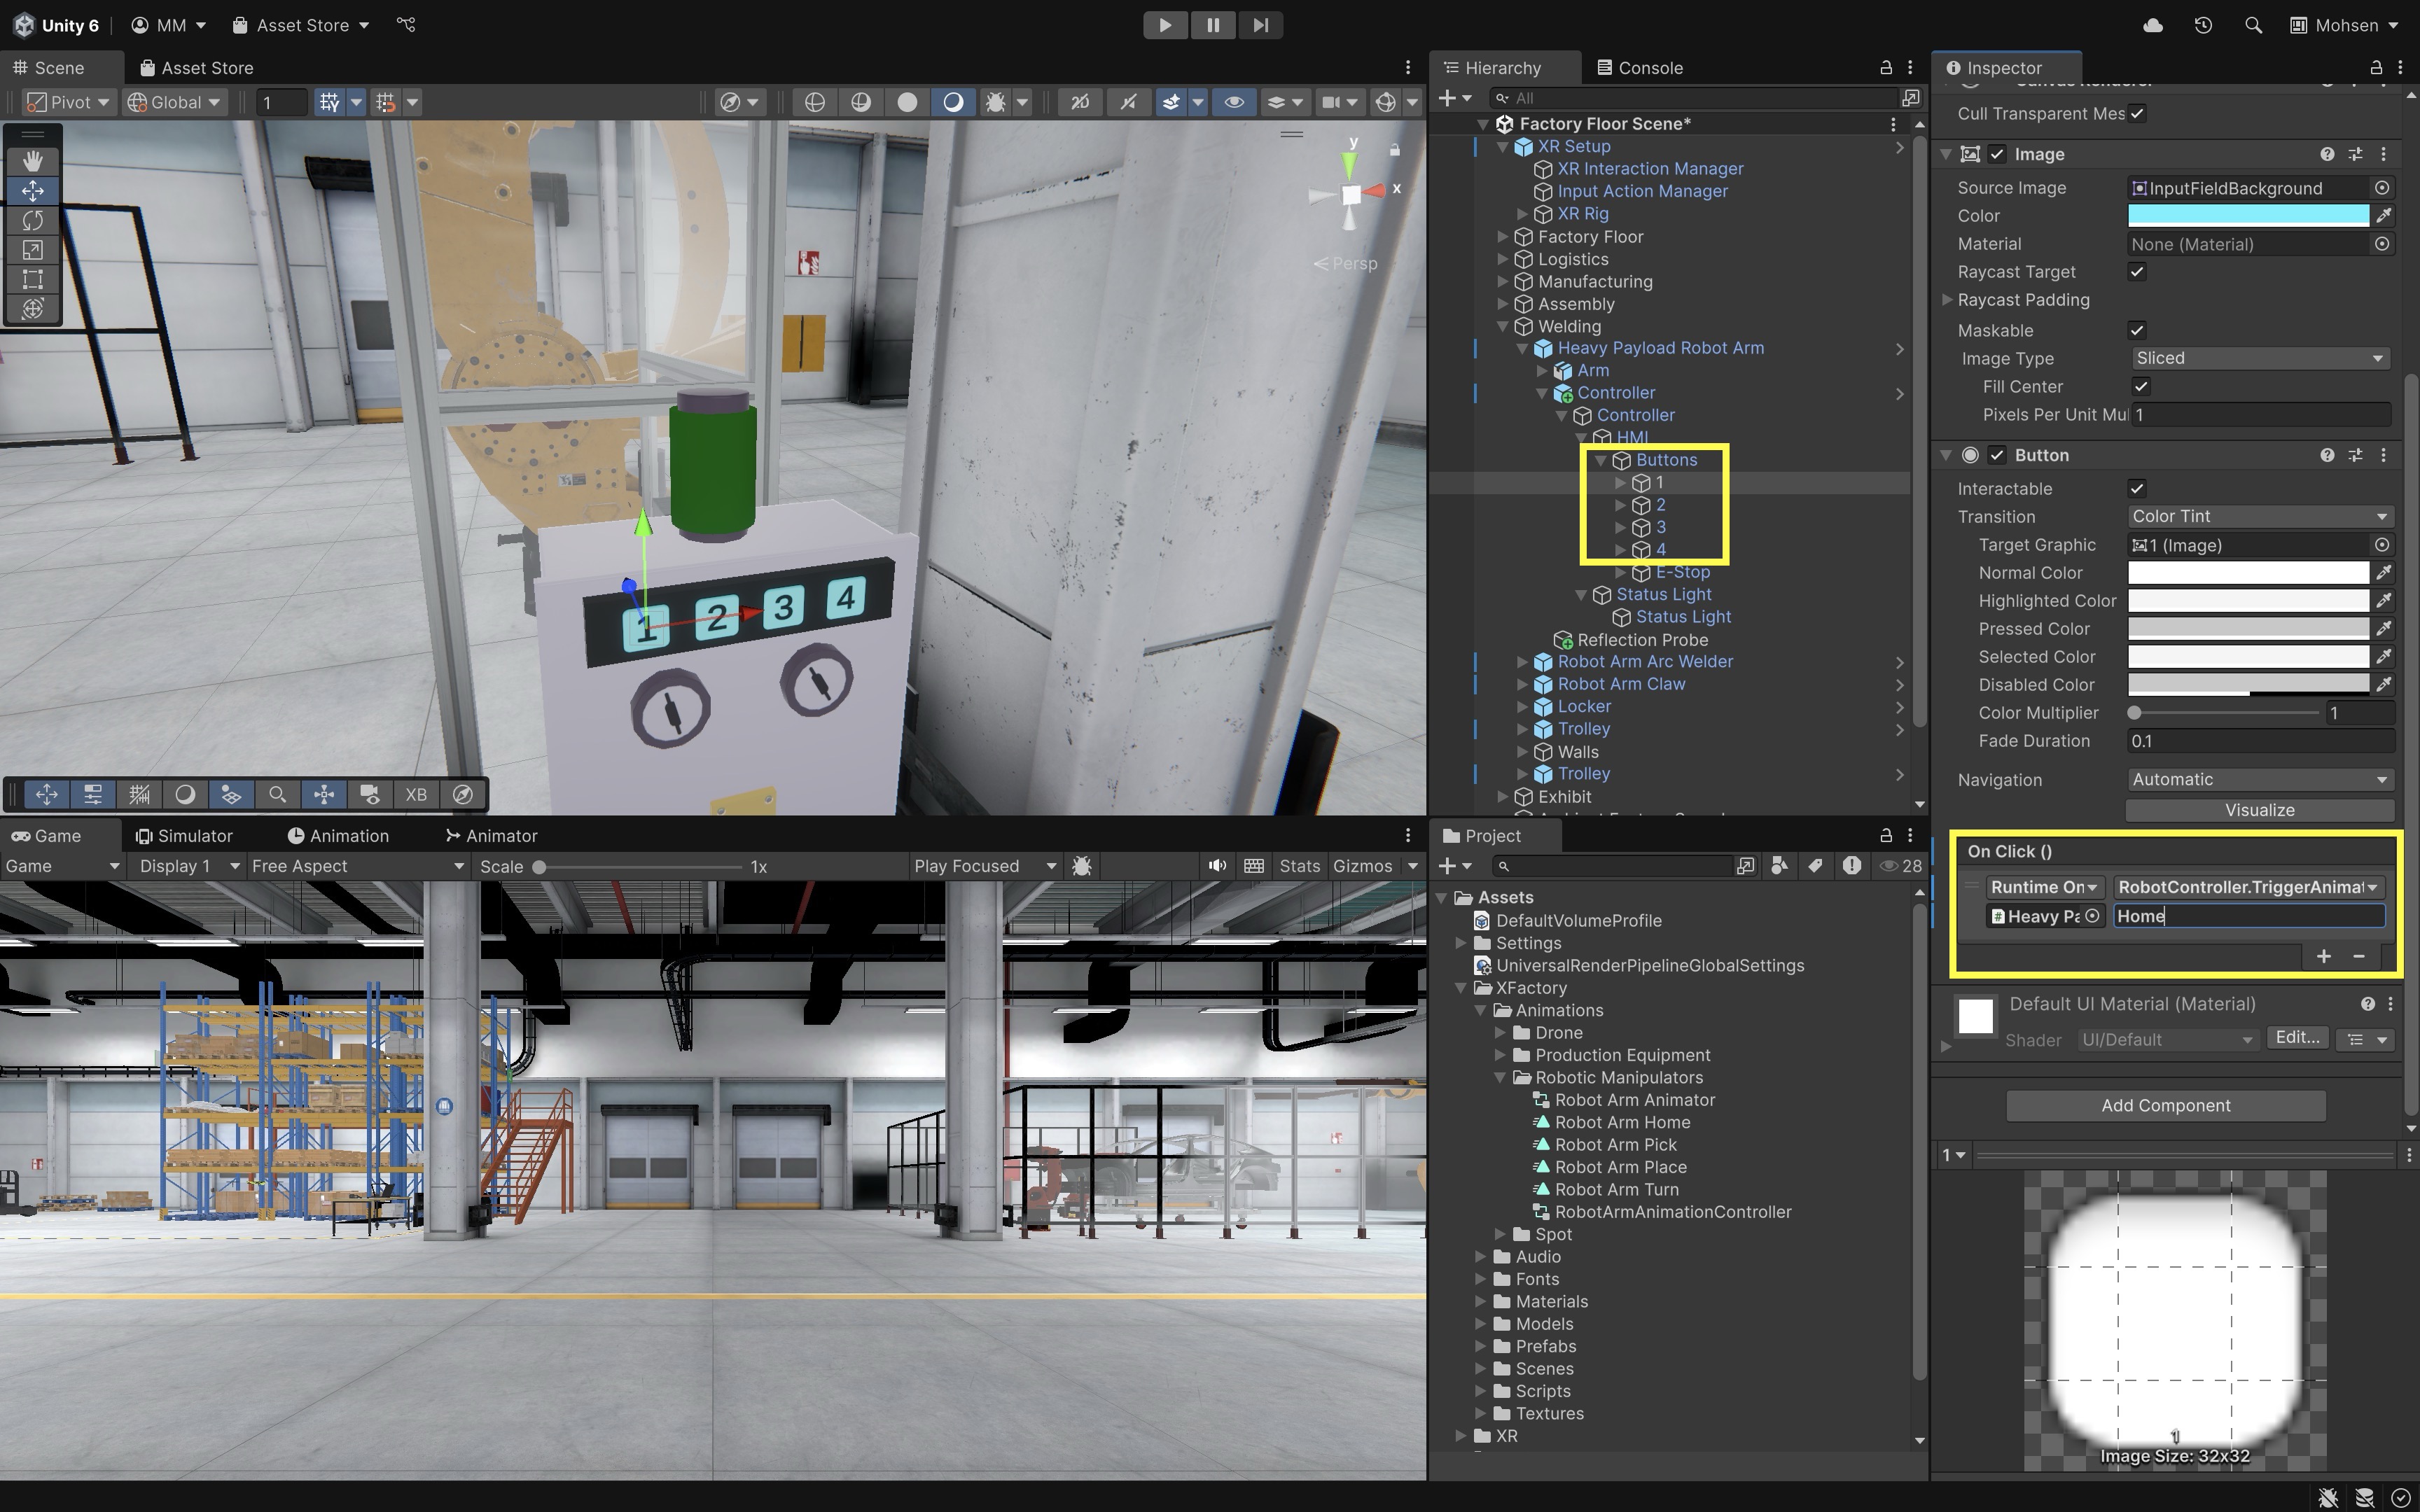
OnClick()event, - Click the
+to add a new event. - Drag the robot GameObject (with the
RobotController.csscript) into the field. - Select
RobotController → TriggerAnimation(string). - Enter the corresponding animation trigger in the string field (e.g.,
Home,Pick,Turn, orPlace). - Repeat this process for each numpad button, assigning the desired trigger to each.
For a VR numpad, use a world-space Canvas. Ensure the scene has an EventSystem with
XR UI Input Module, the Canvas has aTracked Device Graphic Raycaster, and the controller/near-far interactor has UI interaction enabled. Without this setup,Button.onClick()may work with a mouse in the Editor but not with the headset/controller. - From each numpad button, locate the
- (Optional) Use a Configurable Button Mapping:
- To make the system flexible, use a serializable list instead of a plain dictionary. Unity does not serialize plain dictionaries in the Inspector by default, so use a serializable list if students need to configure mappings without code.
- Update your
RobotControllerscript as follows:
using UnityEngine; using System.Collections.Generic; public class RobotController : MonoBehaviour { [System.Serializable] private class ButtonTriggerMapping { public int buttonId; public string triggerName; } [SerializeField] private Animator robotAnimator; [SerializeField] private Renderer statusLightRenderer; [SerializeField] private Material greenMaterial; [SerializeField] private Material redMaterial; [SerializeField] private List<ButtonTriggerMapping> buttonMappings = new List<ButtonTriggerMapping> { new ButtonTriggerMapping { buttonId = 1, triggerName = "Pick" }, new ButtonTriggerMapping { buttonId = 2, triggerName = "Turn" }, new ButtonTriggerMapping { buttonId = 3, triggerName = "Place" }, new ButtonTriggerMapping { buttonId = 4, triggerName = "Home" }, }; private readonly Dictionary<int, string> buttonLookup = new Dictionary<int, string>(); private const string idleStateName = "Robot Arm Idle"; private bool wasTrulyIdle = true; private void Awake() { buttonLookup.Clear(); foreach (var mapping in buttonMappings) buttonLookup[mapping.buttonId] = mapping.triggerName; } private void Start() { UpdateStatusLight(force: true); } private void Update() { UpdateStatusLight(); } private void UpdateStatusLight(bool force = false) { if (robotAnimator == null || statusLightRenderer == null) return; bool isTrulyIdle = IsRobotIdle(); if (force || isTrulyIdle != wasTrulyIdle) { statusLightRenderer.material = isTrulyIdle ? greenMaterial : redMaterial; wasTrulyIdle = isTrulyIdle; } } public void OnButtonPressed(int buttonId) { if (buttonLookup.TryGetValue(buttonId, out string triggerName)) TriggerAnimation(triggerName); else Debug.LogWarning($"Button ID {buttonId} not mapped to any trigger."); } public void TriggerAnimation(string triggerName) { if (robotAnimator == null) return; if (!CanTriggerCommand()) { Debug.Log("Blocked: Robot is already moving."); return; } robotAnimator.SetTrigger(triggerName); Debug.Log($"Robot Triggered: {triggerName}"); } private bool CanTriggerCommand() => IsRobotIdle(); private bool IsRobotIdle() { if (robotAnimator.IsInTransition(0)) return false; return robotAnimator.GetCurrentAnimatorStateInfo(0).IsName(idleStateName); } } - Configure the Script:
- Select the button GameObject in the
Hierarchy(e.g.,1,2, …). - In the
OnClick()event section, click the+button and drag the robot GameObject (which has theRobotController.csscript attached) into the event field. - From the function dropdown, select
RobotController → OnButtonPressed(int). - Enter the appropriate button number into the parameter field: Button 1 →
1, Button 2 →2, etc. - This will call the correct animation trigger for each button based on the Inspector mapping list.
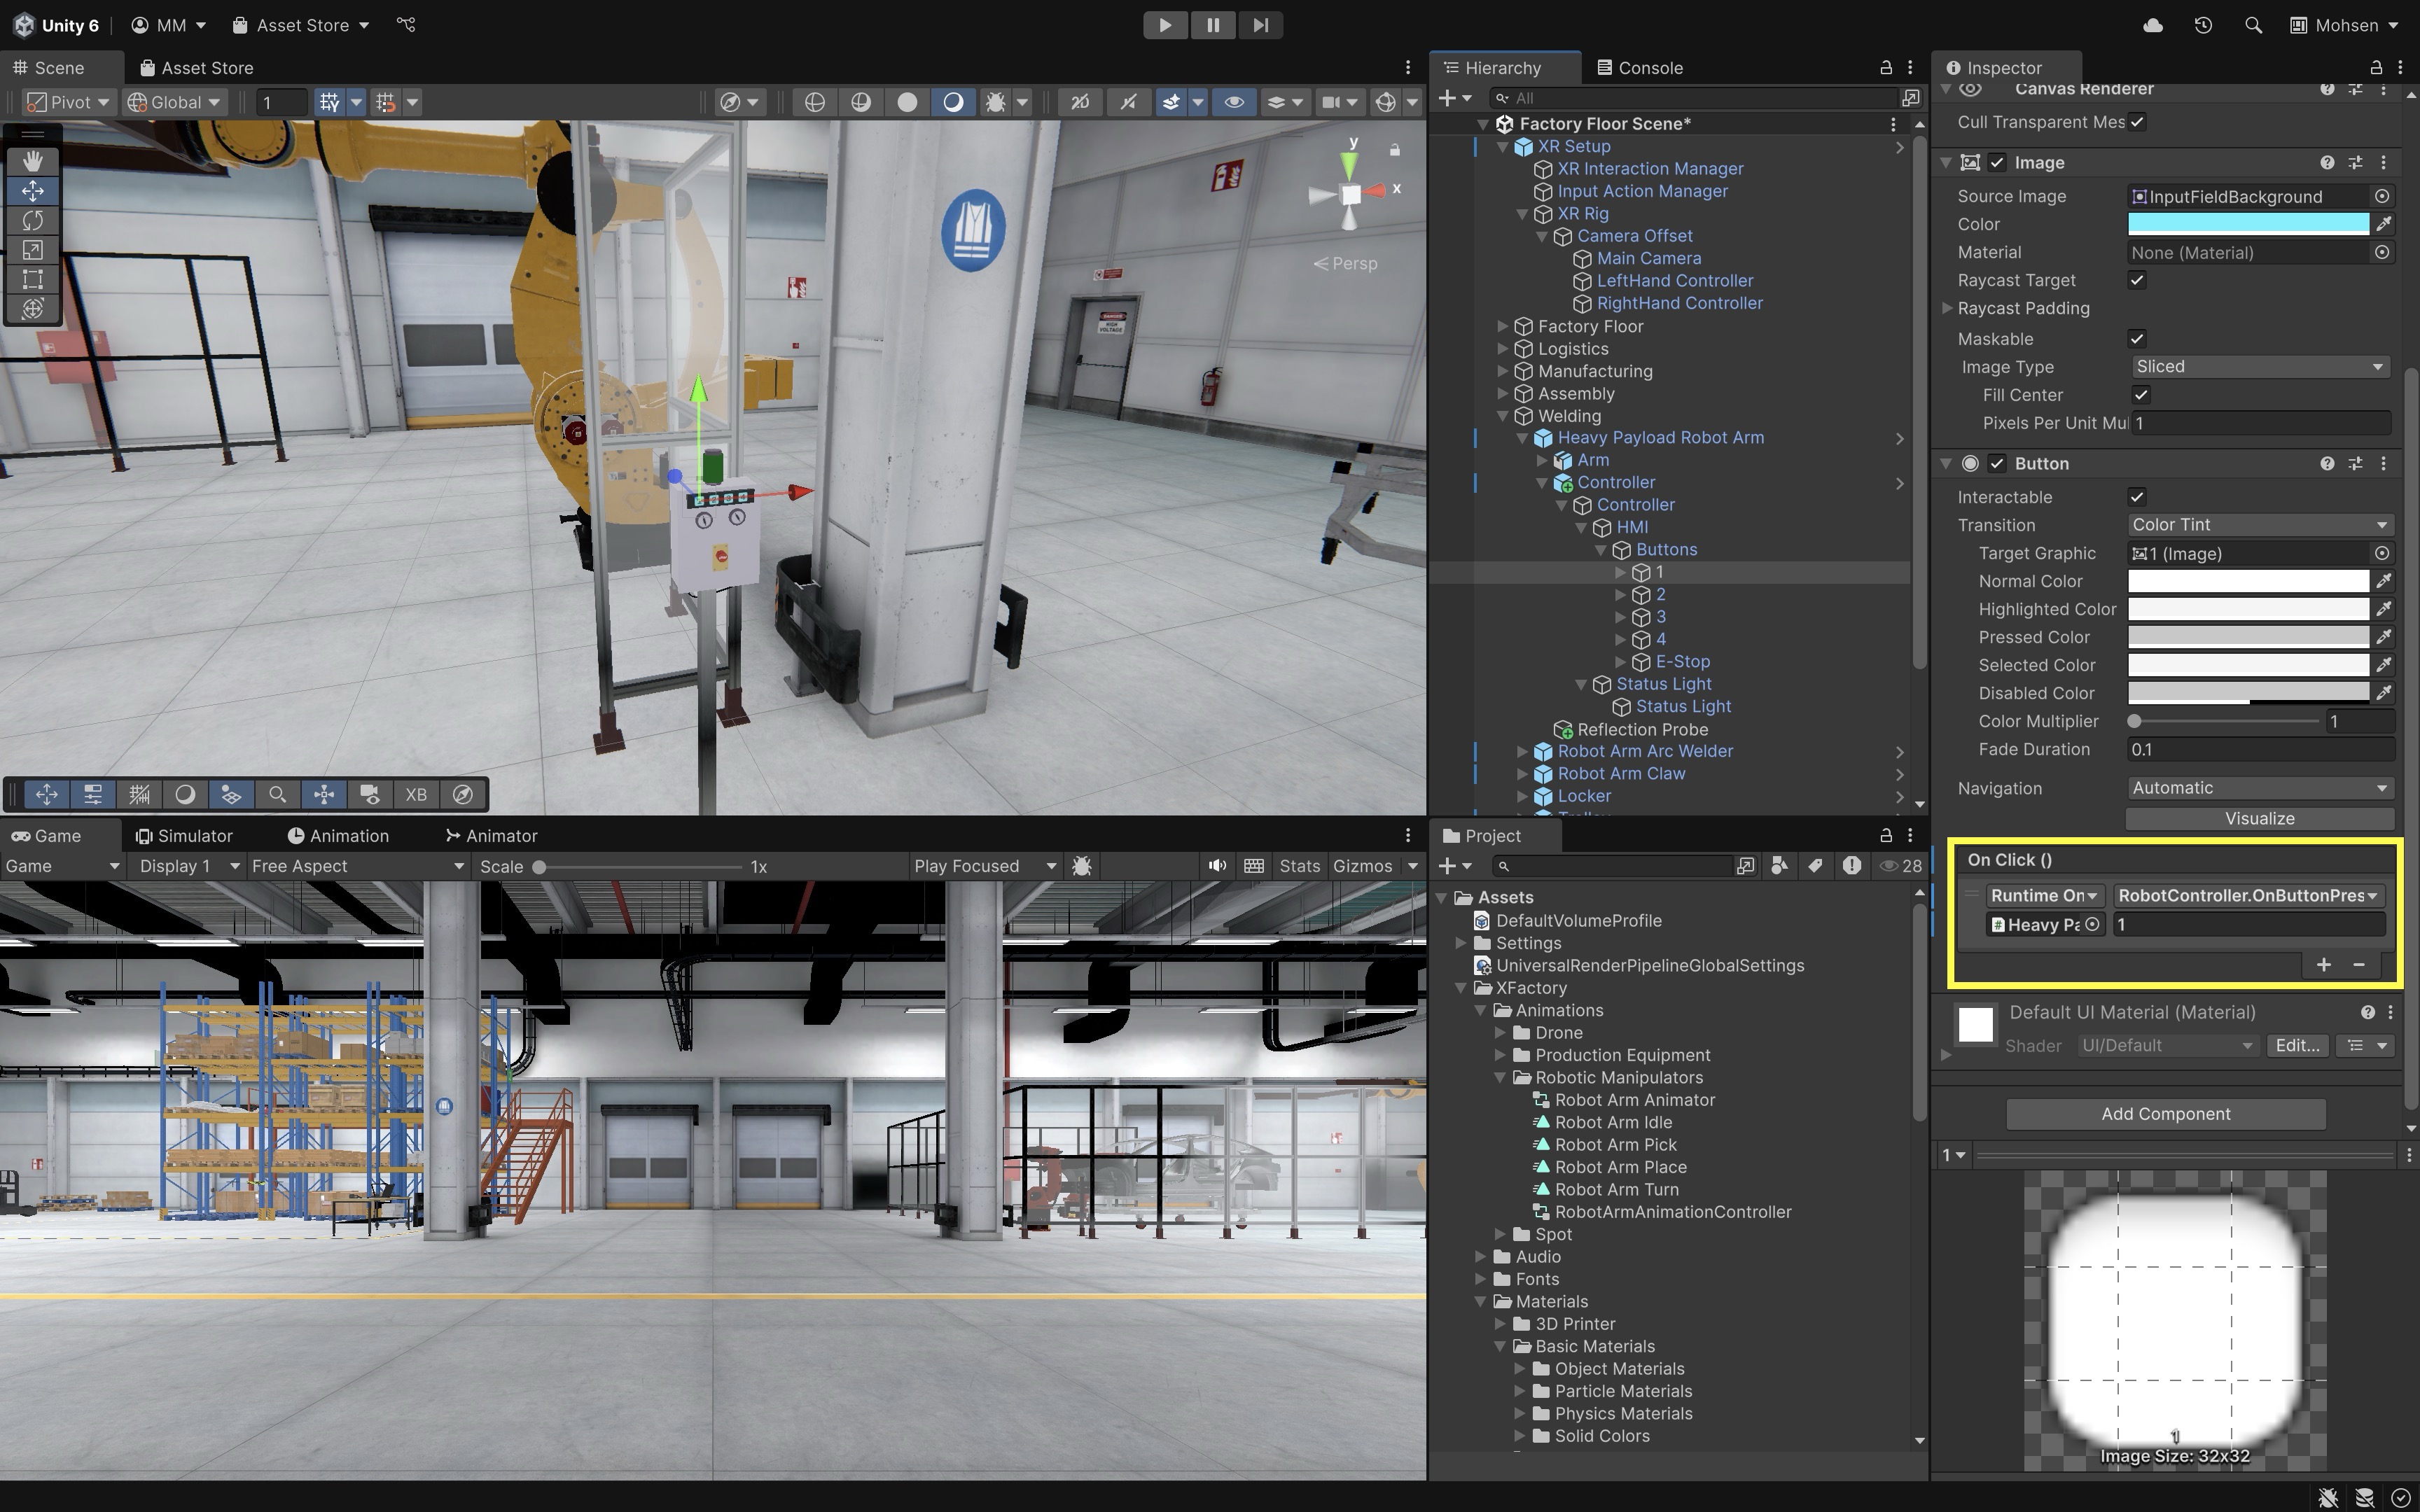
This setup allows you to change button-to-trigger mappings in the Inspector list and easily support reconfiguration via menus or UI tools.
- Select the button GameObject in the
- Deploy and Test:
- Enter Play Mode with the XR Interaction Simulator or Quest Link / Meta Horizon Link (Windows) for rapid preview.
- Build and run to Quest through the Android/Meta Quest pipeline for final standalone validation.
- Each button press on the XR numpad sends a configurable command to the robot.
- The robot’s animation state changes via an
Animatortrigger. - A red or green status light reflects active vs. idle states.
- Console logging supports debugging or monitoring.
- All interactions are modular, extensible, and VR-ready.
Controller & Proximity Activation
In C4. UnityEngine Namespaces, we controlled the door and scene loading using keyboard inputs. Now, update the script to use event-driven activation in VR: the door only responds when the player is within 2 meters and the assigned left-hand activation action is performed, such as an action bound to the X button on Quest controllers. This demonstrates how combining proximity checks with action-based input can create more natural, immersive interactions in virtual environments. Instead of relying on fixed keys or legacy device polling, the system reacts to the player’s presence and actions in 3D space. Physical button names vary by controller. Bind the behavior through an Input Action so the same logic can be remapped for other OpenXR devices.
Alternative XRI Approach
Instead of reading a controller action directly, create an interactable door control and hook its Activated event to the same ToggleDoor() method. This keeps the input mapping inside XRI and lets the scene logic respond only to interaction events. Replace the previous script with the following:
using UnityEngine;
using UnityEngine.InputSystem;
using UnityEngine.SceneManagement;

public class FactoryYardLoader : MonoBehaviour
{
    [Header("Scene")]
    [SerializeField] private string exteriorSceneName = "Factory Yard Scene";

    [Header("Door Settings")]
    [SerializeField] private float rotationSpeed = 60f;
    [SerializeField] private float openAngle = 120f;

    [Header("Interaction")]
    [SerializeField] private InputActionReference activateAction;
    [SerializeField] private Transform player;
    [SerializeField] private float interactDistance = 2f;

    private Quaternion closedRotation;
    private Quaternion openRotation;

    private bool opening;
    private bool closing;
    private bool sceneLoaded;
    private bool isBusy;

    private void Awake()
    {
        closedRotation = transform.rotation;
        openRotation = closedRotation * Quaternion.Euler(0f, -openAngle, 0f);
    }

    private void OnEnable()
    {
        if (activateAction == null || activateAction.action == null)
        {
            Debug.LogWarning("FactoryYardLoader: Activate action is not assigned.");
            return;
        }

        // Assumes Input Action Manager or Starter Assets already enabled project actions.
        activateAction.action.performed += OnActivatePerformed;
    }

    private void OnDisable()
    {
        if (activateAction == null || activateAction.action == null)
            return;

        activateAction.action.performed -= OnActivatePerformed;
    }

    private void OnActivatePerformed(InputAction.CallbackContext context)
    {
        if (player == null)
        {
            Debug.LogWarning("FactoryYardLoader: Player transform is not assigned.");
            return;
        }

        bool inRange = Vector3.Distance(player.position, transform.position) <= interactDistance;
        if (!inRange || isBusy)
            return;

        ToggleDoor();
    }

    public void ToggleDoor()
    {
        if (isBusy)
            return;

        float toOpen = Quaternion.Angle(transform.rotation, openRotation);
        float toClosed = Quaternion.Angle(transform.rotation, closedRotation);

        if (toOpen > toClosed)
            opening = true;
        else
            closing = true;

        isBusy = true;
    }

    private void Update()
    {
        if (opening)
        {
            transform.rotation = Quaternion.RotateTowards(
                transform.rotation, openRotation, rotationSpeed * Time.deltaTime);

            if (!sceneLoaded &&
                Quaternion.Angle(transform.rotation, closedRotation) > openAngle * 0.25f &&
                !IsSceneLoaded(exteriorSceneName))
            {
                SceneManager.LoadSceneAsync(exteriorSceneName, LoadSceneMode.Additive);
                sceneLoaded = true;
                Debug.Log("Factory Yard Scene loaded.");
            }

            if (Quaternion.Angle(transform.rotation, openRotation) < 0.1f)
            {
                opening = false;
                isBusy = false;
            }
        }

        if (closing)
        {
            transform.rotation = Quaternion.RotateTowards(
                transform.rotation, closedRotation, rotationSpeed * Time.deltaTime);

            if (Quaternion.Angle(transform.rotation, closedRotation) < 0.1f)
            {
                closing = false;
                isBusy = false;

                if (sceneLoaded && IsSceneLoaded(exteriorSceneName))
                {
                    SceneManager.UnloadSceneAsync(exteriorSceneName);
                    sceneLoaded = false;
                    Debug.Log("Factory Yard Scene unloaded.");
                }
            }
        }
    }

    private static bool IsSceneLoaded(string sceneName)
    {
        return SceneManager.GetSceneByName(sceneName).isLoaded;
    }
}
In the Inspector, assign the copied XR Origin (XR Rig) from your XFactoryVR scene to the Player field and assign an activation action from XRI Default Input Actions (for example, the left-hand activate action). This lesson assumes Input Action Manager enables actions from the copied VR Template setup; the script only subscribes to performed and does not call Enable() or Disable() on the action. Enter Play Mode with Quest Link / Meta Horizon Link or build to Quest to test proximity and scene loading.
Feedback Mechanisms
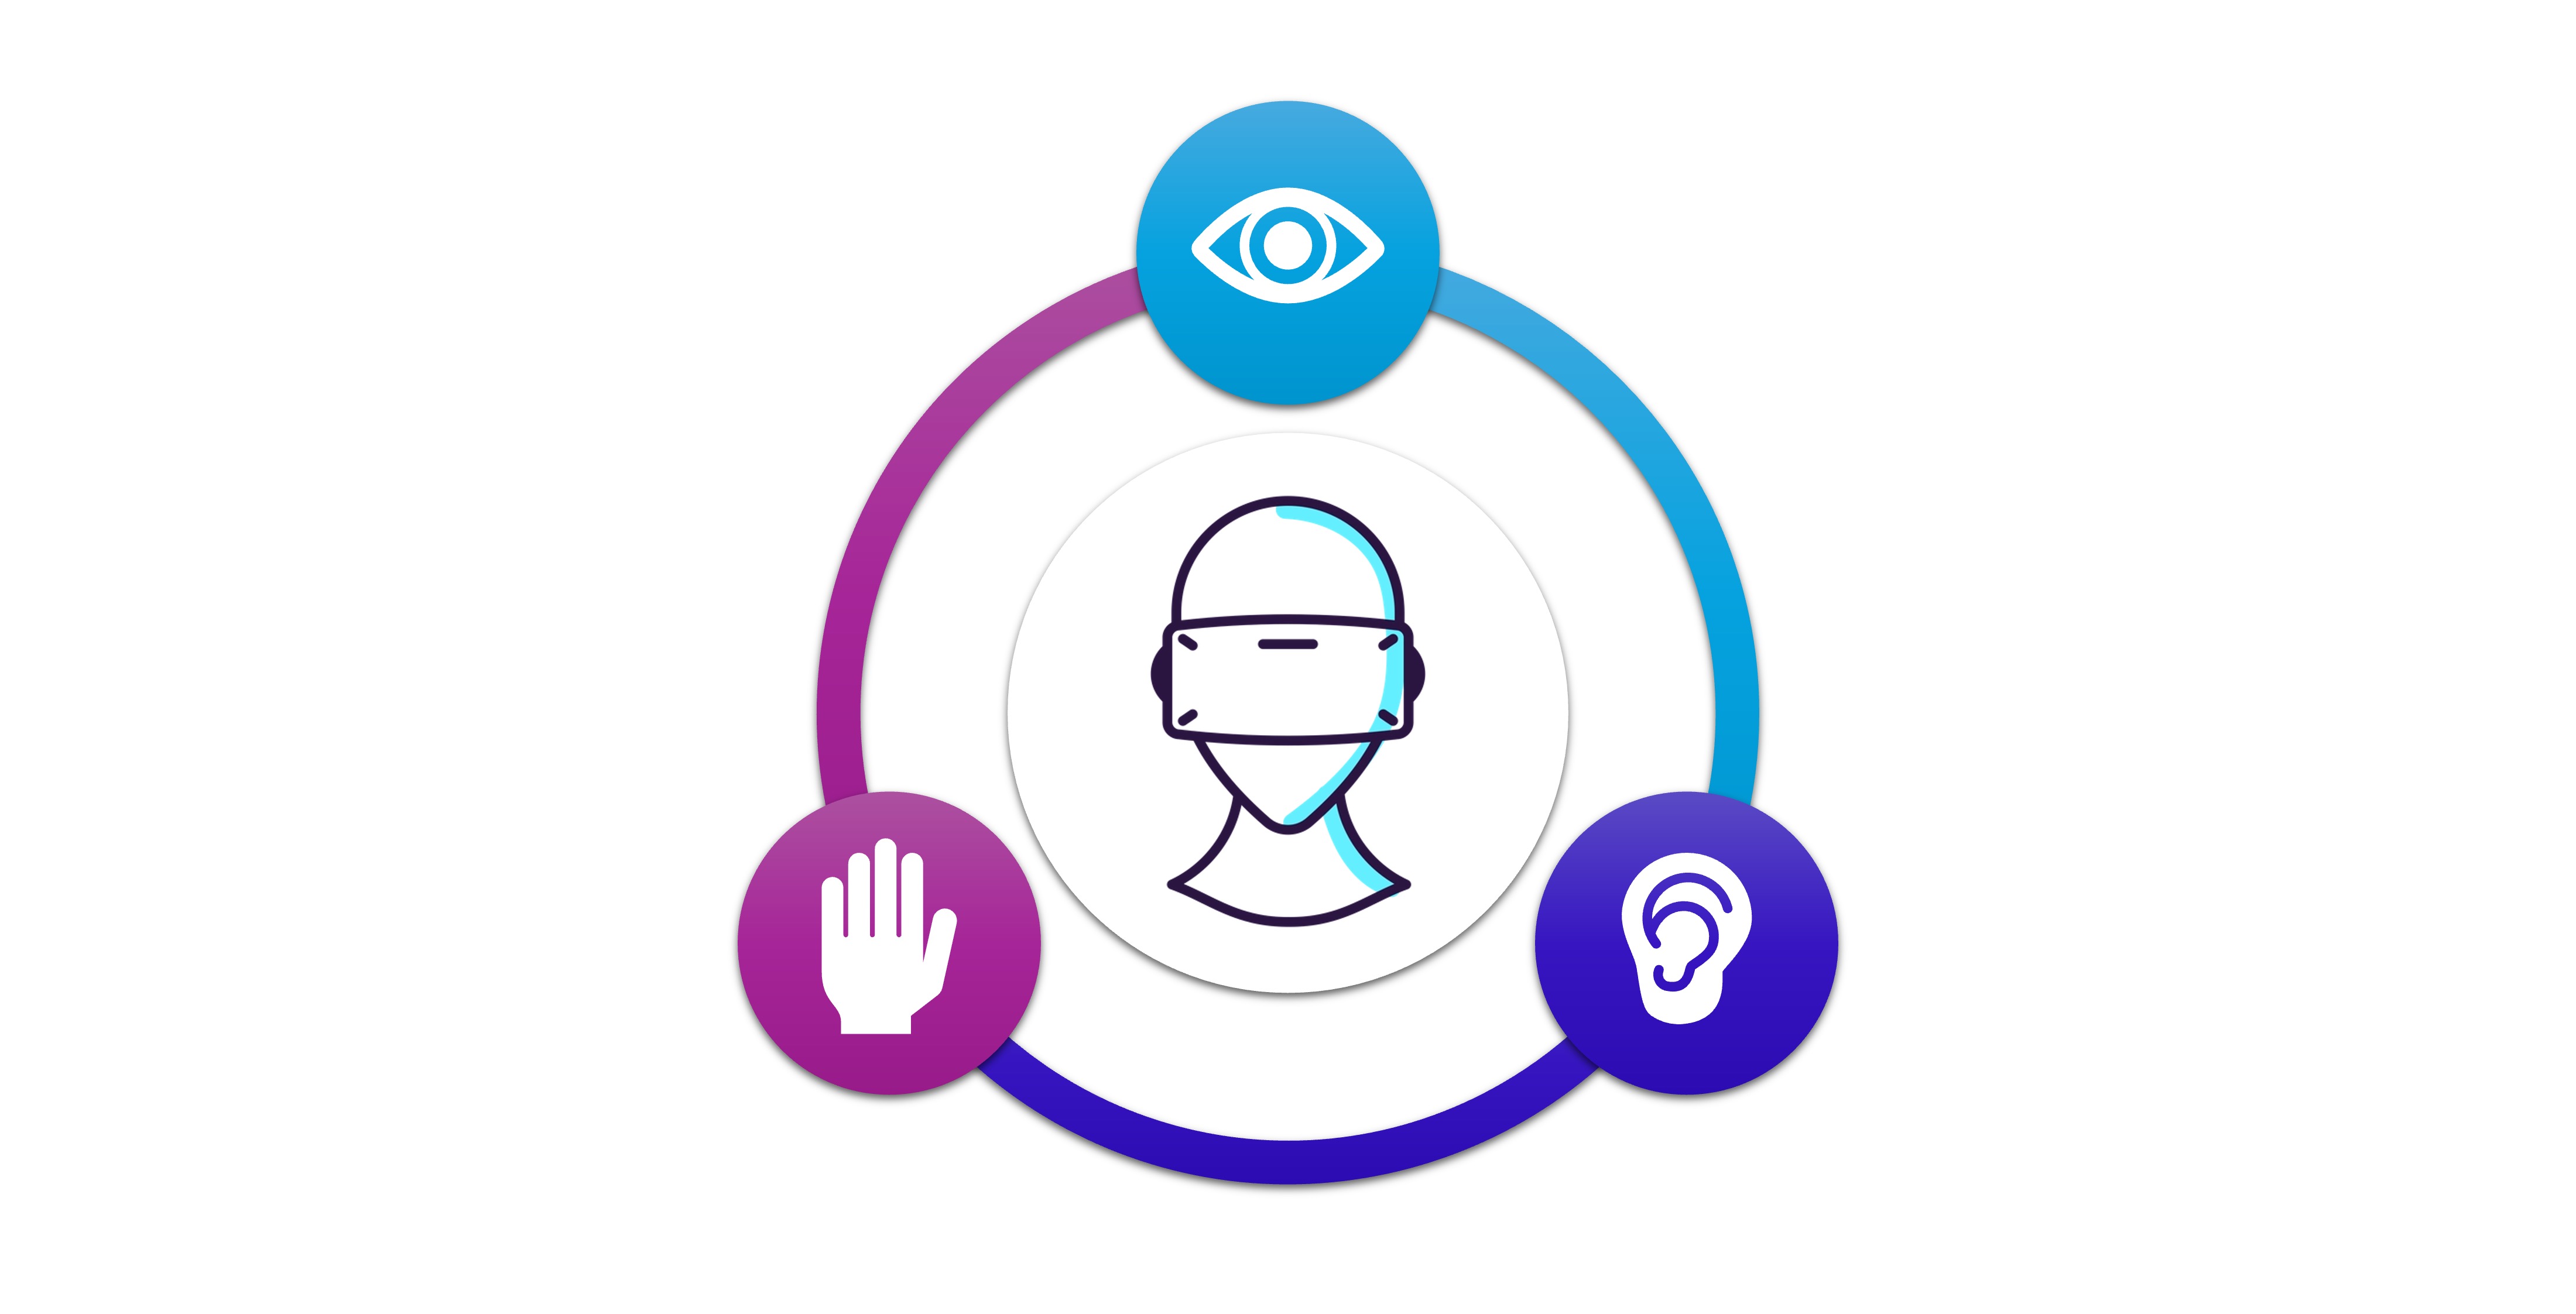
In interactive VR systems—particularly in engineering and industrial contexts—feedback mechanisms deliver critical sensory cues that inform users about system status, guide their actions, and help prevent errors. By mimicking or augmenting real-world signals, these mechanisms boost immersion, build operator confidence, and reduce safety risks. In VR engineering scenarios, feedback should emulate industrial realities: machines emit characteristic sounds when they engage, warning indicators flash during overload conditions, and tools vibrate to signal contact or completion—ensuring users react as they would on a real factory floor.
Key Concepts
- Visual Feedback: Changes in lighting, color, UI elements, or animations that signal state transitions or alerts. For example, a virtual valve might glow green when open and pulse red when overheating; status panels can fade in when a sensor reading crosses a threshold. Visual feedback leverages our spatial vision to highlight important information without breaking immersion.
- Auditory Feedback: Sound cues—such as motor whirrs, warning beeps, confirmation chimes, or verbal prompts—used to reinforce or substitute visual signals. In a VR factory simulation, machinery startup might be accompanied by a deep hum, and an approaching forklift could emit a horn blast. Audio feedback ensures operators notice out-of-view events and can maintain focus on critical tasks even when their gaze is occupied.
- Tactile (Haptic) Feedback: Vibration patterns or force feedback delivered through controllers, gloves, or exoskeletons to simulate touch, resistance, or impacts. For instance, you might feel a sharp pulse when a robotic arm grips a component or a sustained rumble when drilling. Haptics convey weight, texture, and collision in VR, reinforcing hand–eye coordination and improving manipulation accuracy.
- Multimodal Feedback: The coordinated use of visual, auditory, and tactile signals to create redundant and complementary cues. A high-pressure valve might flash a warning light (visual), emit a rising alarm tone (auditory), and trigger a vibration warning in the controller (haptic) simultaneously. By engaging multiple senses, multi-modal feedback minimizes the chance of missed signals and supports faster, more intuitive responses in complex, safety-critical operations.
Audio & Haptic Feedback
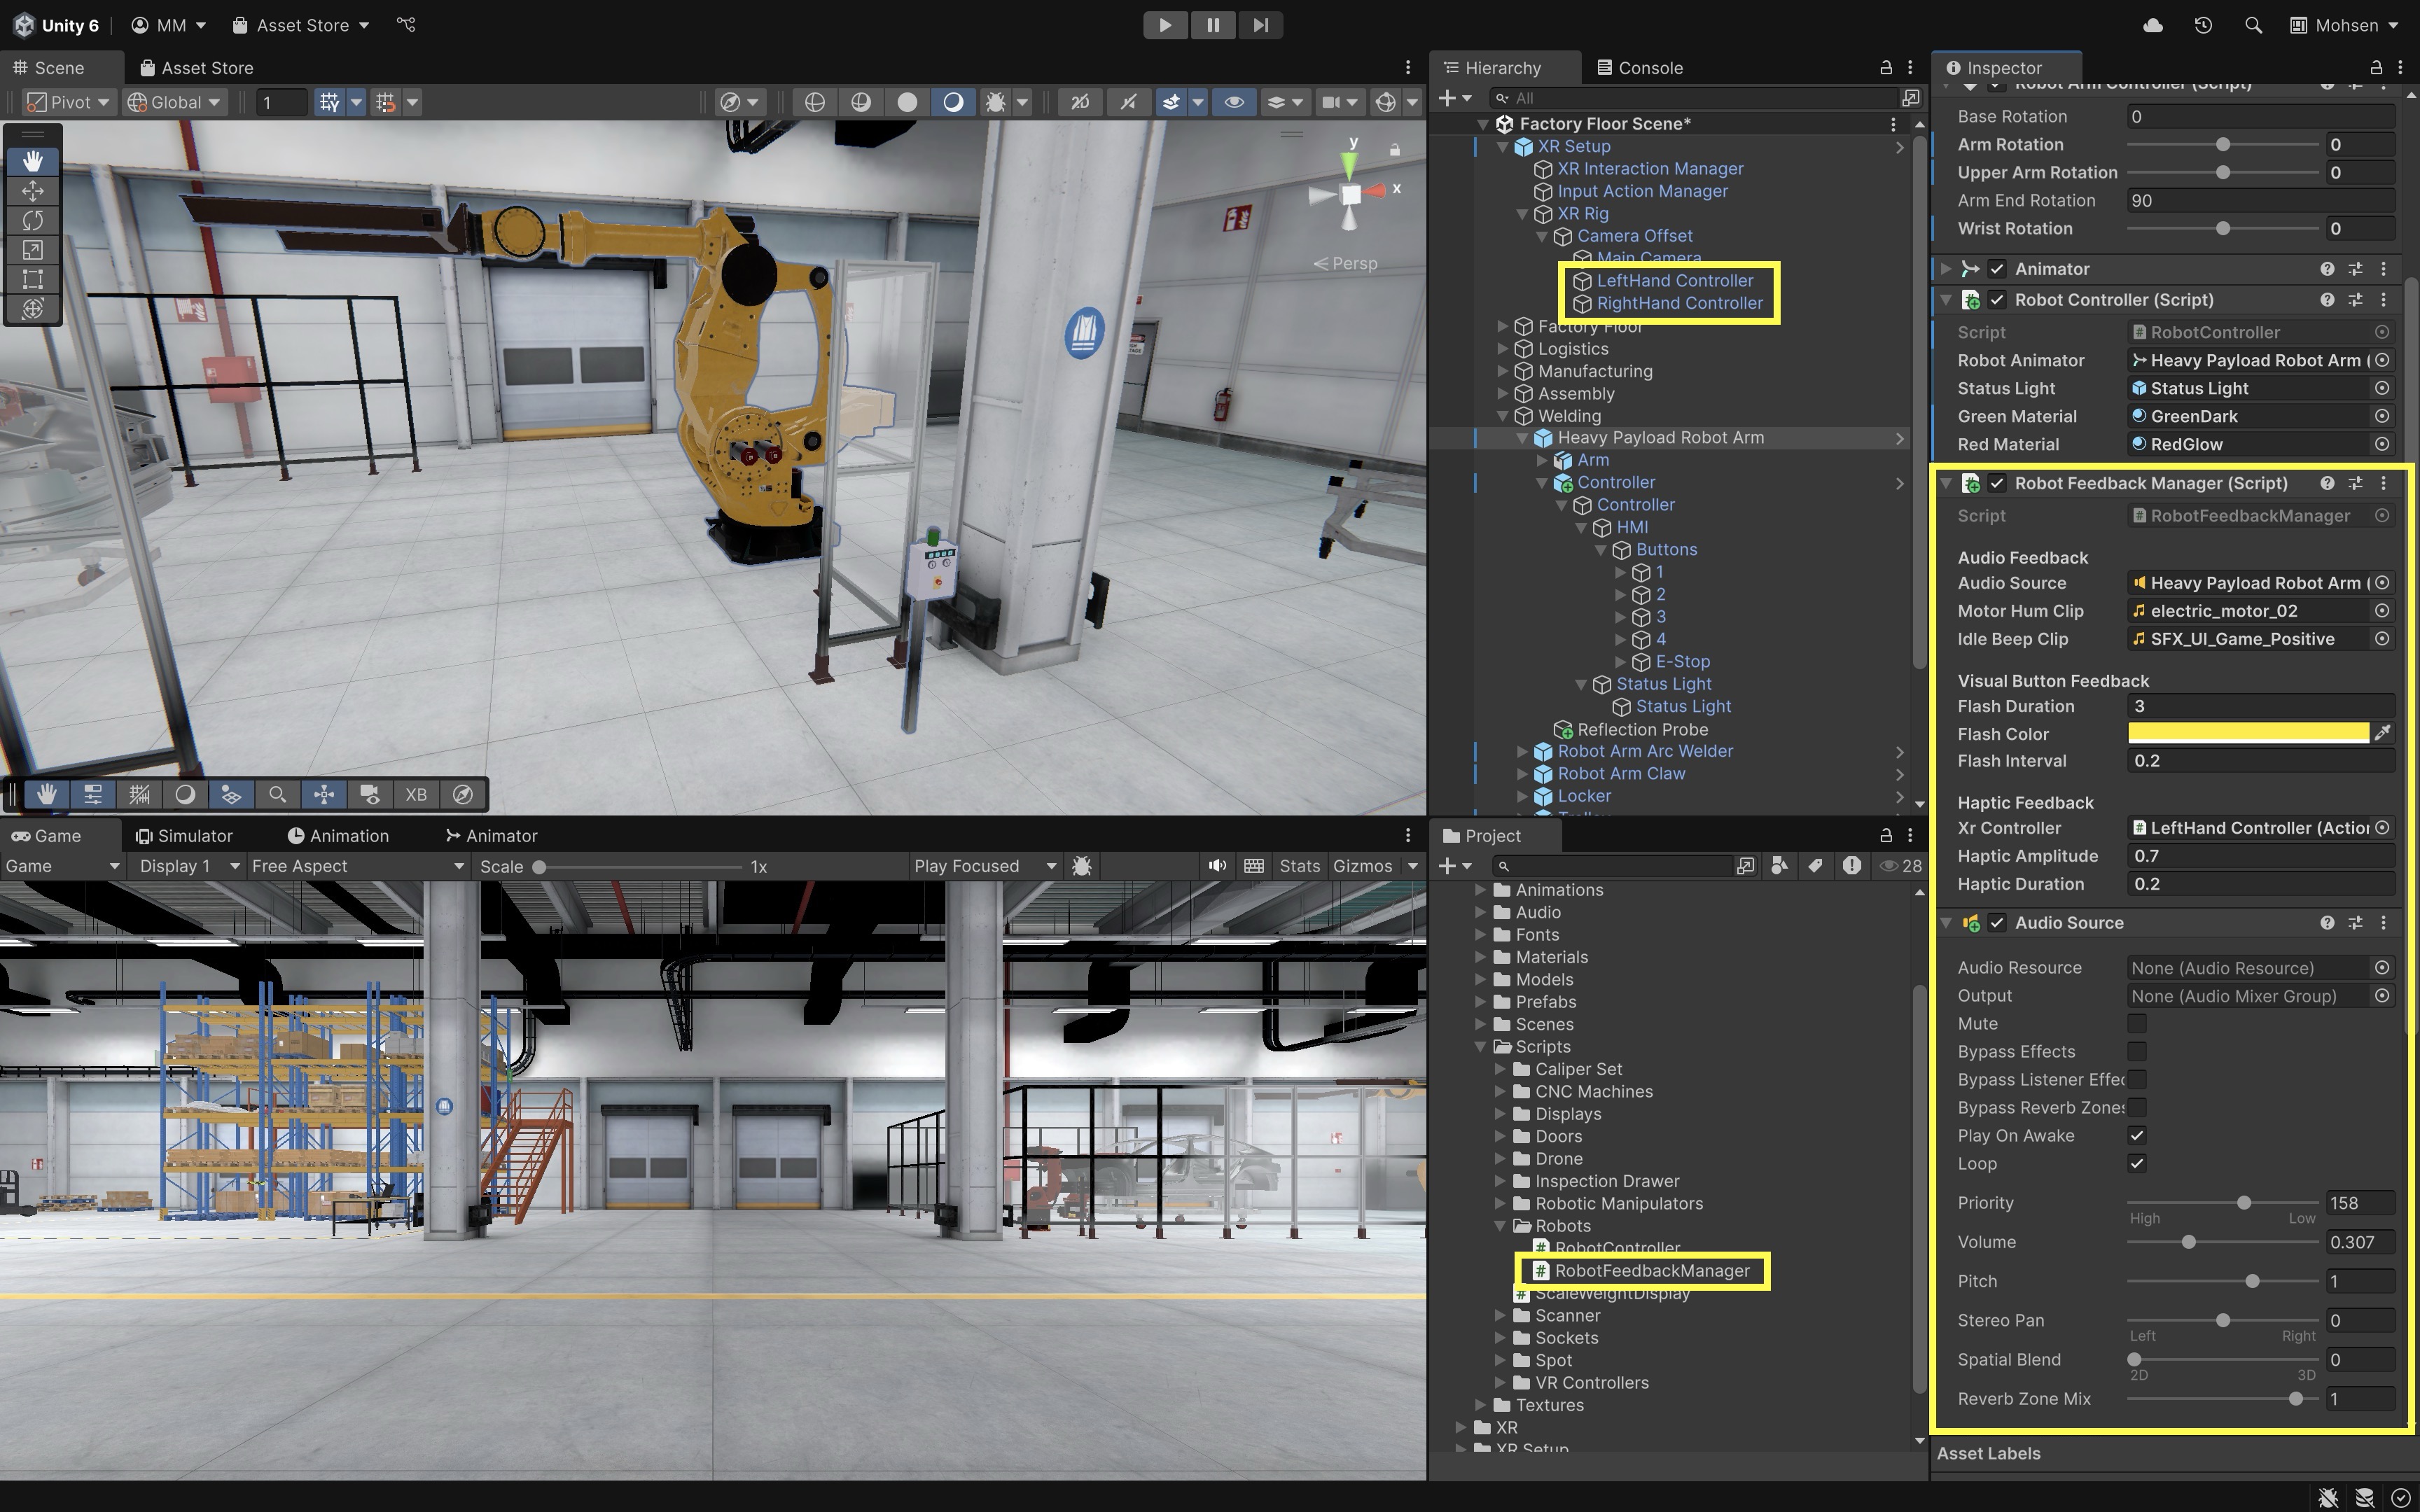
At the welding station of XFactory, the heavy payload robot arm gives the user real-time multi-modal feedback when a robot action is triggered. It includes (1) audio feedback, playing sounds for movement and idle, (2) visual feedback, flashing the button that was last pressed, and (3) haptic feedback, sending a short vibration to the VR controller when the robot begins to move. For basic hover/select feedback on interactables, prefer XRI Simple Haptic Feedback with a Haptic Impulse Player. Custom scripts are useful when feedback depends on robot state or blocked activation. Here is how to implement it:
- Create a Script:
- Add a
RobotFeedbackManager.csscript to a central object in your scene (e.g., an emptyRobotFeedbackManagerGameObject), or to the robot itself (Heavy Payload Robot Arm). - Copy the following script into your IDE.
 using UnityEngine;
 using UnityEngine.UI;
 using System.Collections;
 using UnityEngine.XR.Interaction.Toolkit.Inputs.Haptics;

 public class RobotFeedbackManager : MonoBehaviour
 {
     [Header("Audio Feedback")]
     [SerializeField] private AudioSource audioSource;
     [SerializeField] private AudioClip motorHumClip;
     [SerializeField] private AudioClip idleBeepClip;

     [Header("Visual Button Feedback")]
     [SerializeField] private float flashDuration = 0.5f;
     [SerializeField] private Color flashColor = Color.yellow;
     [SerializeField] private float flashInterval = 0.1f;

     [Header("Haptic Feedback")]
     [Tooltip("HapticImpulsePlayer on the interactor/controller that should vibrate.")]
     [SerializeField] private HapticImpulsePlayer hapticPlayer;
     [Range(0f, 1f)] [SerializeField] private float hapticAmplitude = 0.7f;
     [SerializeField] private float hapticDuration = 0.2f;
     [Tooltip("Optional. Frequency support depends on controller/runtime support.")]
     [SerializeField] private float hapticFrequency = 0f;

     private Coroutine flashRoutine;

     public void OnRobotStartMoving()
     {
         PlaySound(motorHumClip);
         SendHaptics();
     }

     public void OnRobotReturnToIdle()
     {
         PlaySound(idleBeepClip);
     }

     public void FlashButton(GameObject button)
     {
         if (button == null)
             return;

         var img = button.GetComponent<Image>();
         if (img != null)
         {
             if (flashRoutine != null)
                 StopCoroutine(flashRoutine);

             flashRoutine = StartCoroutine(FlashUIRoutine(img));
             return;
         }

         var rend = button.GetComponent<Renderer>();
         if (rend != null)
         {
             if (flashRoutine != null)
                 StopCoroutine(flashRoutine);

             flashRoutine = StartCoroutine(Flash3DRoutine(rend));
         }
     }

     private IEnumerator FlashUIRoutine(Image img)
     {
         Color originalColor = img.color;
         float elapsed = 0f;
         while (elapsed < flashDuration)
         {
             img.color = flashColor;
             yield return new WaitForSeconds(flashInterval);
             elapsed += flashInterval;

             img.color = originalColor;
             yield return new WaitForSeconds(flashInterval);
             elapsed += flashInterval;
         }
         img.color = originalColor;
         flashRoutine = null;
     }

     private IEnumerator Flash3DRoutine(Renderer rend)
     {
         // renderer.material creates an instance; acceptable for one tutorial button,
         // but for many flashing 3D objects use MaterialPropertyBlock instead.
         var mat = rend.material;
         Color originalColor = mat.color;
         float elapsed = 0f;
         while (elapsed < flashDuration)
         {
             mat.color = flashColor;
             yield return new WaitForSeconds(flashInterval);
             elapsed += flashInterval;

             mat.color = originalColor;
             yield return new WaitForSeconds(flashInterval);
             elapsed += flashInterval;
         }
         mat.color = originalColor;
         flashRoutine = null;
     }

     private void PlaySound(AudioClip clip)
     {
         if (audioSource == null || clip == null)
             return;

         audioSource.Stop();
         audioSource.clip = clip;
         audioSource.Play();
     }

     private void SendHaptics()
     {
         if (hapticPlayer == null)
             return;

         if (hapticFrequency > 0f)
             hapticPlayer.SendHapticImpulse(hapticAmplitude, hapticDuration, hapticFrequency);
         else
             hapticPlayer.SendHapticImpulse(hapticAmplitude, hapticDuration);
     }

     private void OnDisable()
     {
         if (flashRoutine != null)
         {
             StopCoroutine(flashRoutine);
             flashRoutine = null;
         }
     }
 }
If a script does not compile, first verify the installed XR Interaction Toolkit package version and namespaces before changing the interaction logic. Common paths include
UnityEngine.XR.Interaction.Toolkitfor event args and core types,UnityEngine.XR.Interaction.Toolkit.Interactorsfor interactor classes,UnityEngine.XR.Interaction.Toolkit.Interactablesfor interactable types, andUnityEngine.XR.Interaction.Toolkit.Inputs.HapticsforHapticImpulsePlayer. - Add a
- Configure the Script:
Audio Source: Assign anAudioSourcecomponent. Leave the “Audio Clip” field in the AudioSource blank. The script will dynamically assign the appropriate clip at runtime.Motor Hum Clip: Assign a sound to play when the robot starts moving (e.g., mechanical hum or activation tone).Idle Beep Clip: Assign a sound to play when the robot returns to idle (e.g., soft beep or chime).Flash Duration: Set how long the button should flash overall (e.g.,3seconds).Flash Color: Choose the color that the button should blink (typically yellow for feedback).Flash Interval: Set how fast the button should blink (e.g.,0.2seconds per on/off cycle).Haptic Player: Assign theHapticImpulsePlayerfrom the interactor/controller that should vibrate.
- Wire Button Events Through
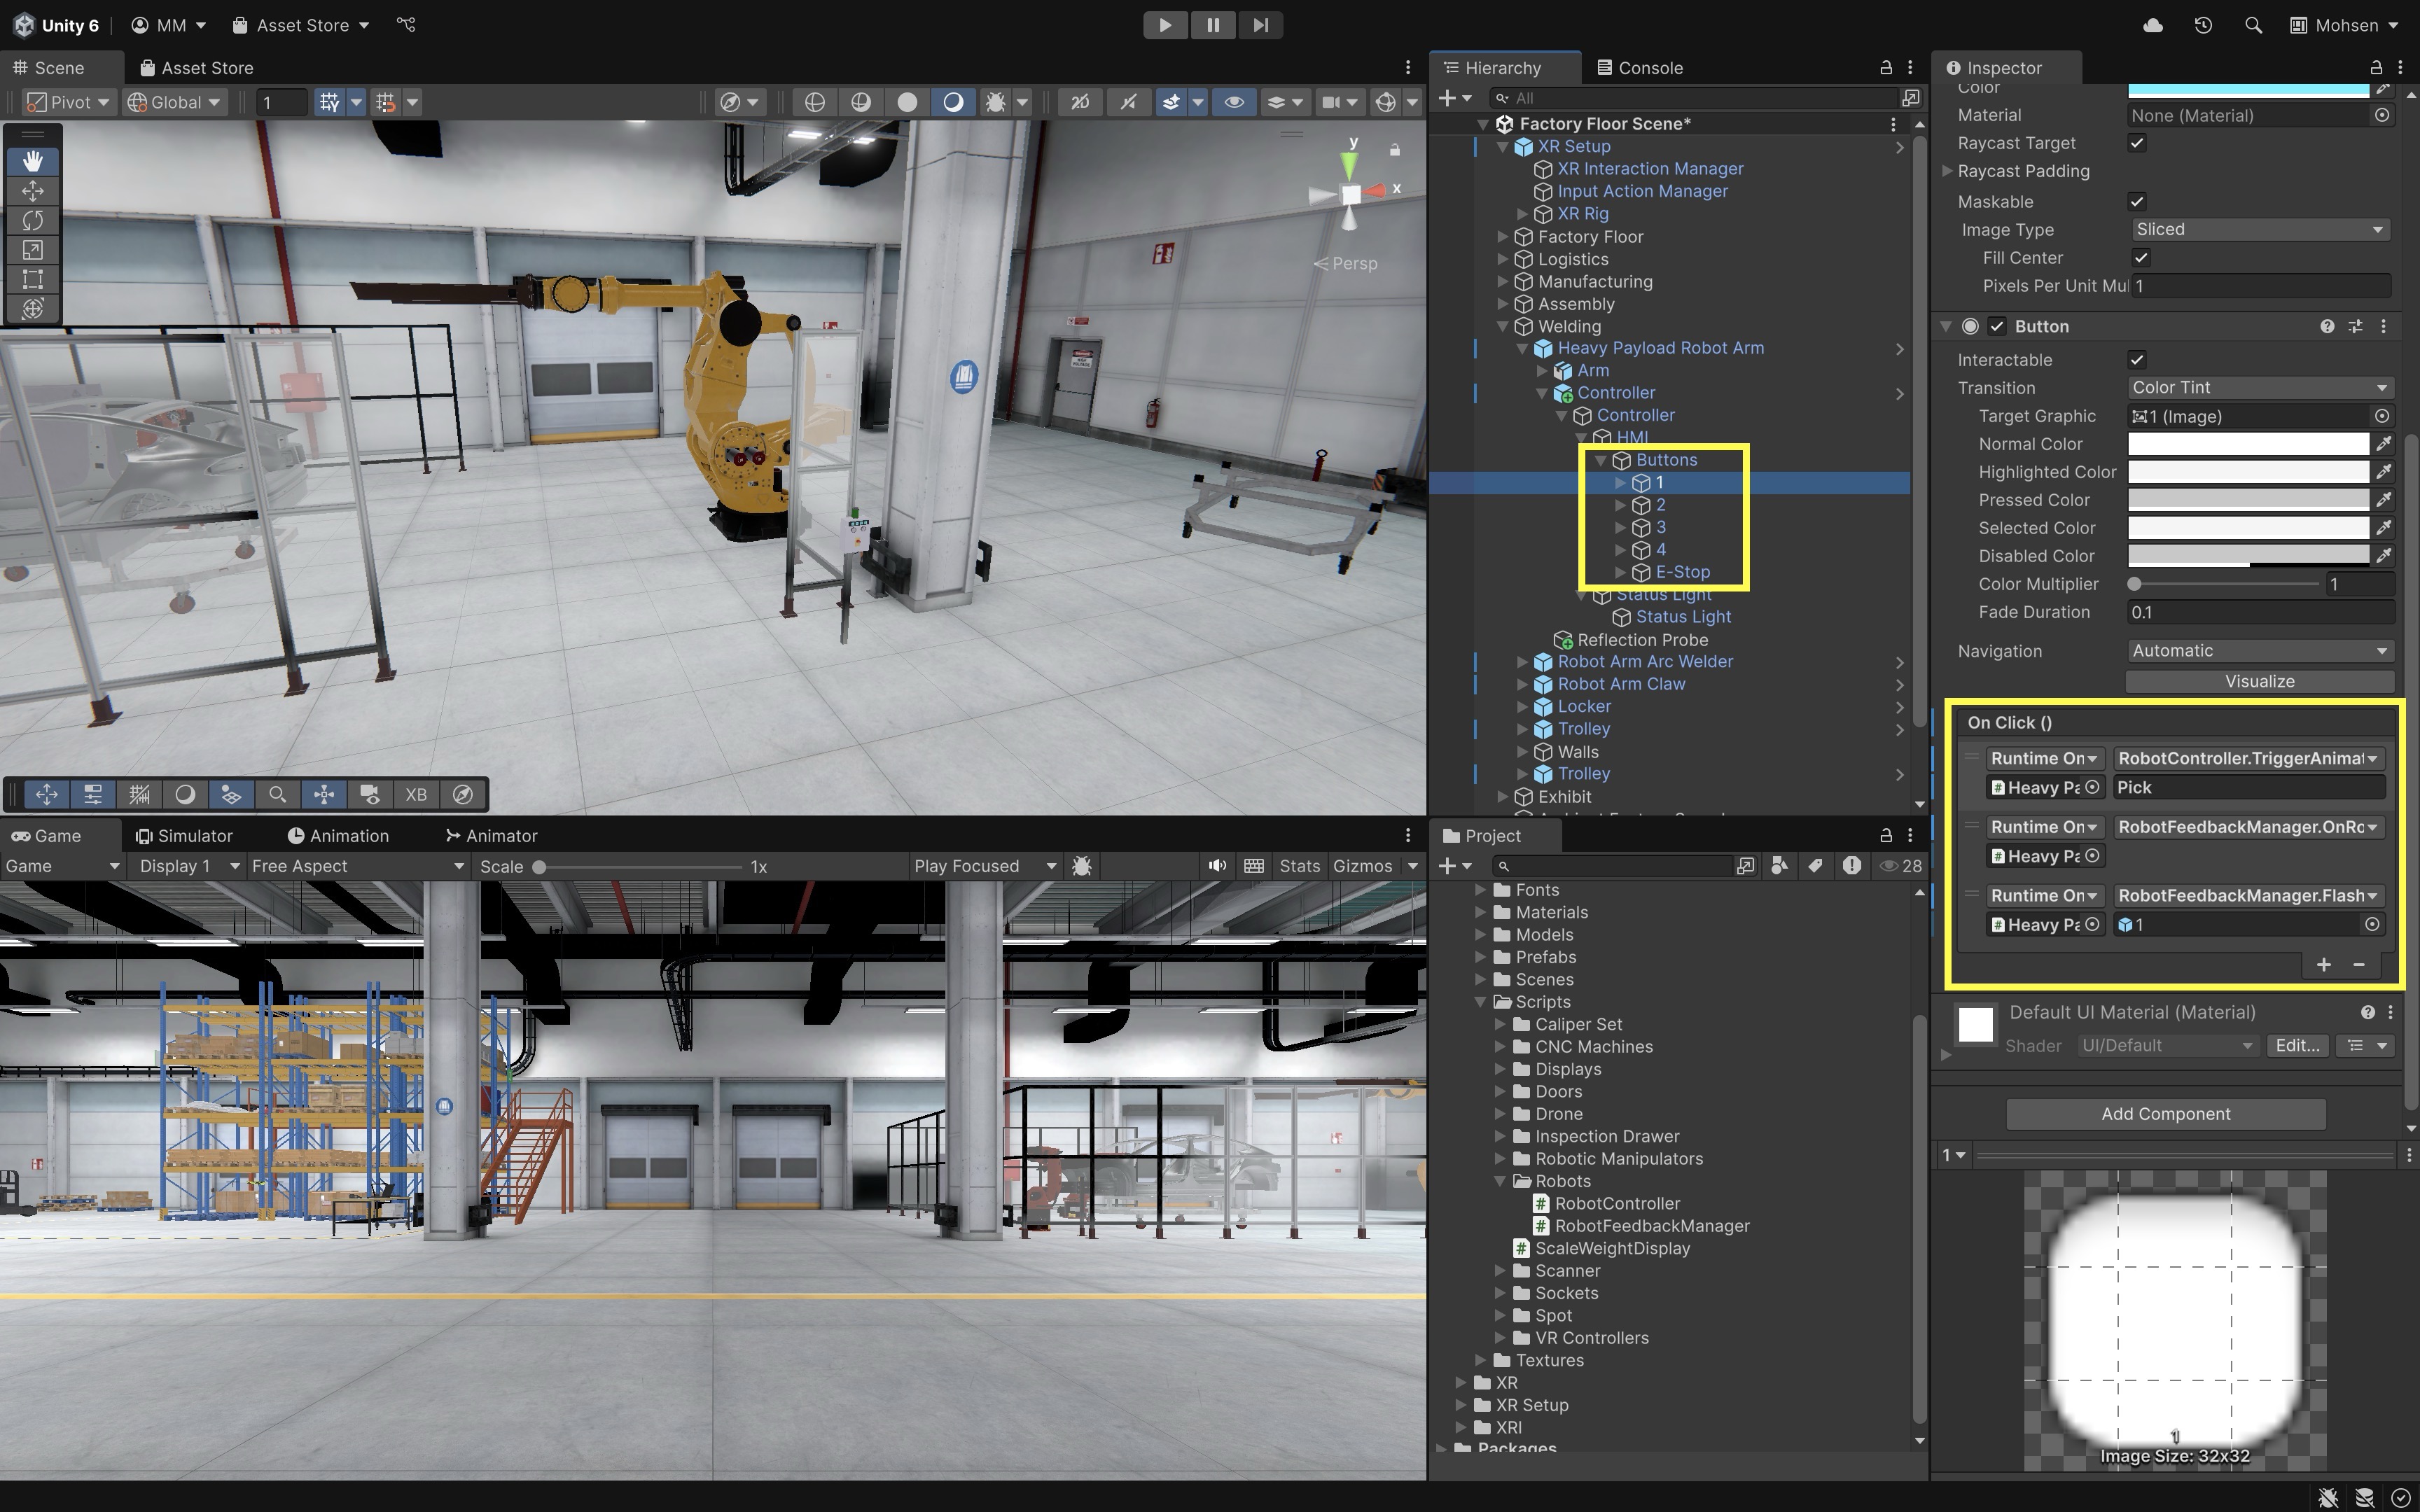
RobotController:- Keep the first
OnClick()entry on each numpad button pointed atRobotController → TriggerAnimation(string)(orOnButtonPressed(int)if using the optional mapping). - Do not call
OnRobotStartMoving()directly from the button ifRobotController.TriggerAnimation()already calls the feedback manager. Route the command throughRobotControllerfirst so e-stop, idle/moving state, and command validity are checked before feedback plays. - (Optional) Click
+to add a second event on the same button for immediate visual feedback:RobotFeedbackManager → FlashButton(GameObject), and drag the same button GameObject into the argument field. - Repeat for all numpad buttons.
- Motor hum and haptic feedback are triggered from
RobotControlleronce the feedback manager is assigned in the contextual interactions section below—not from duplicate button events.
- Keep the first
- Trigger Feedback on Animation Event:
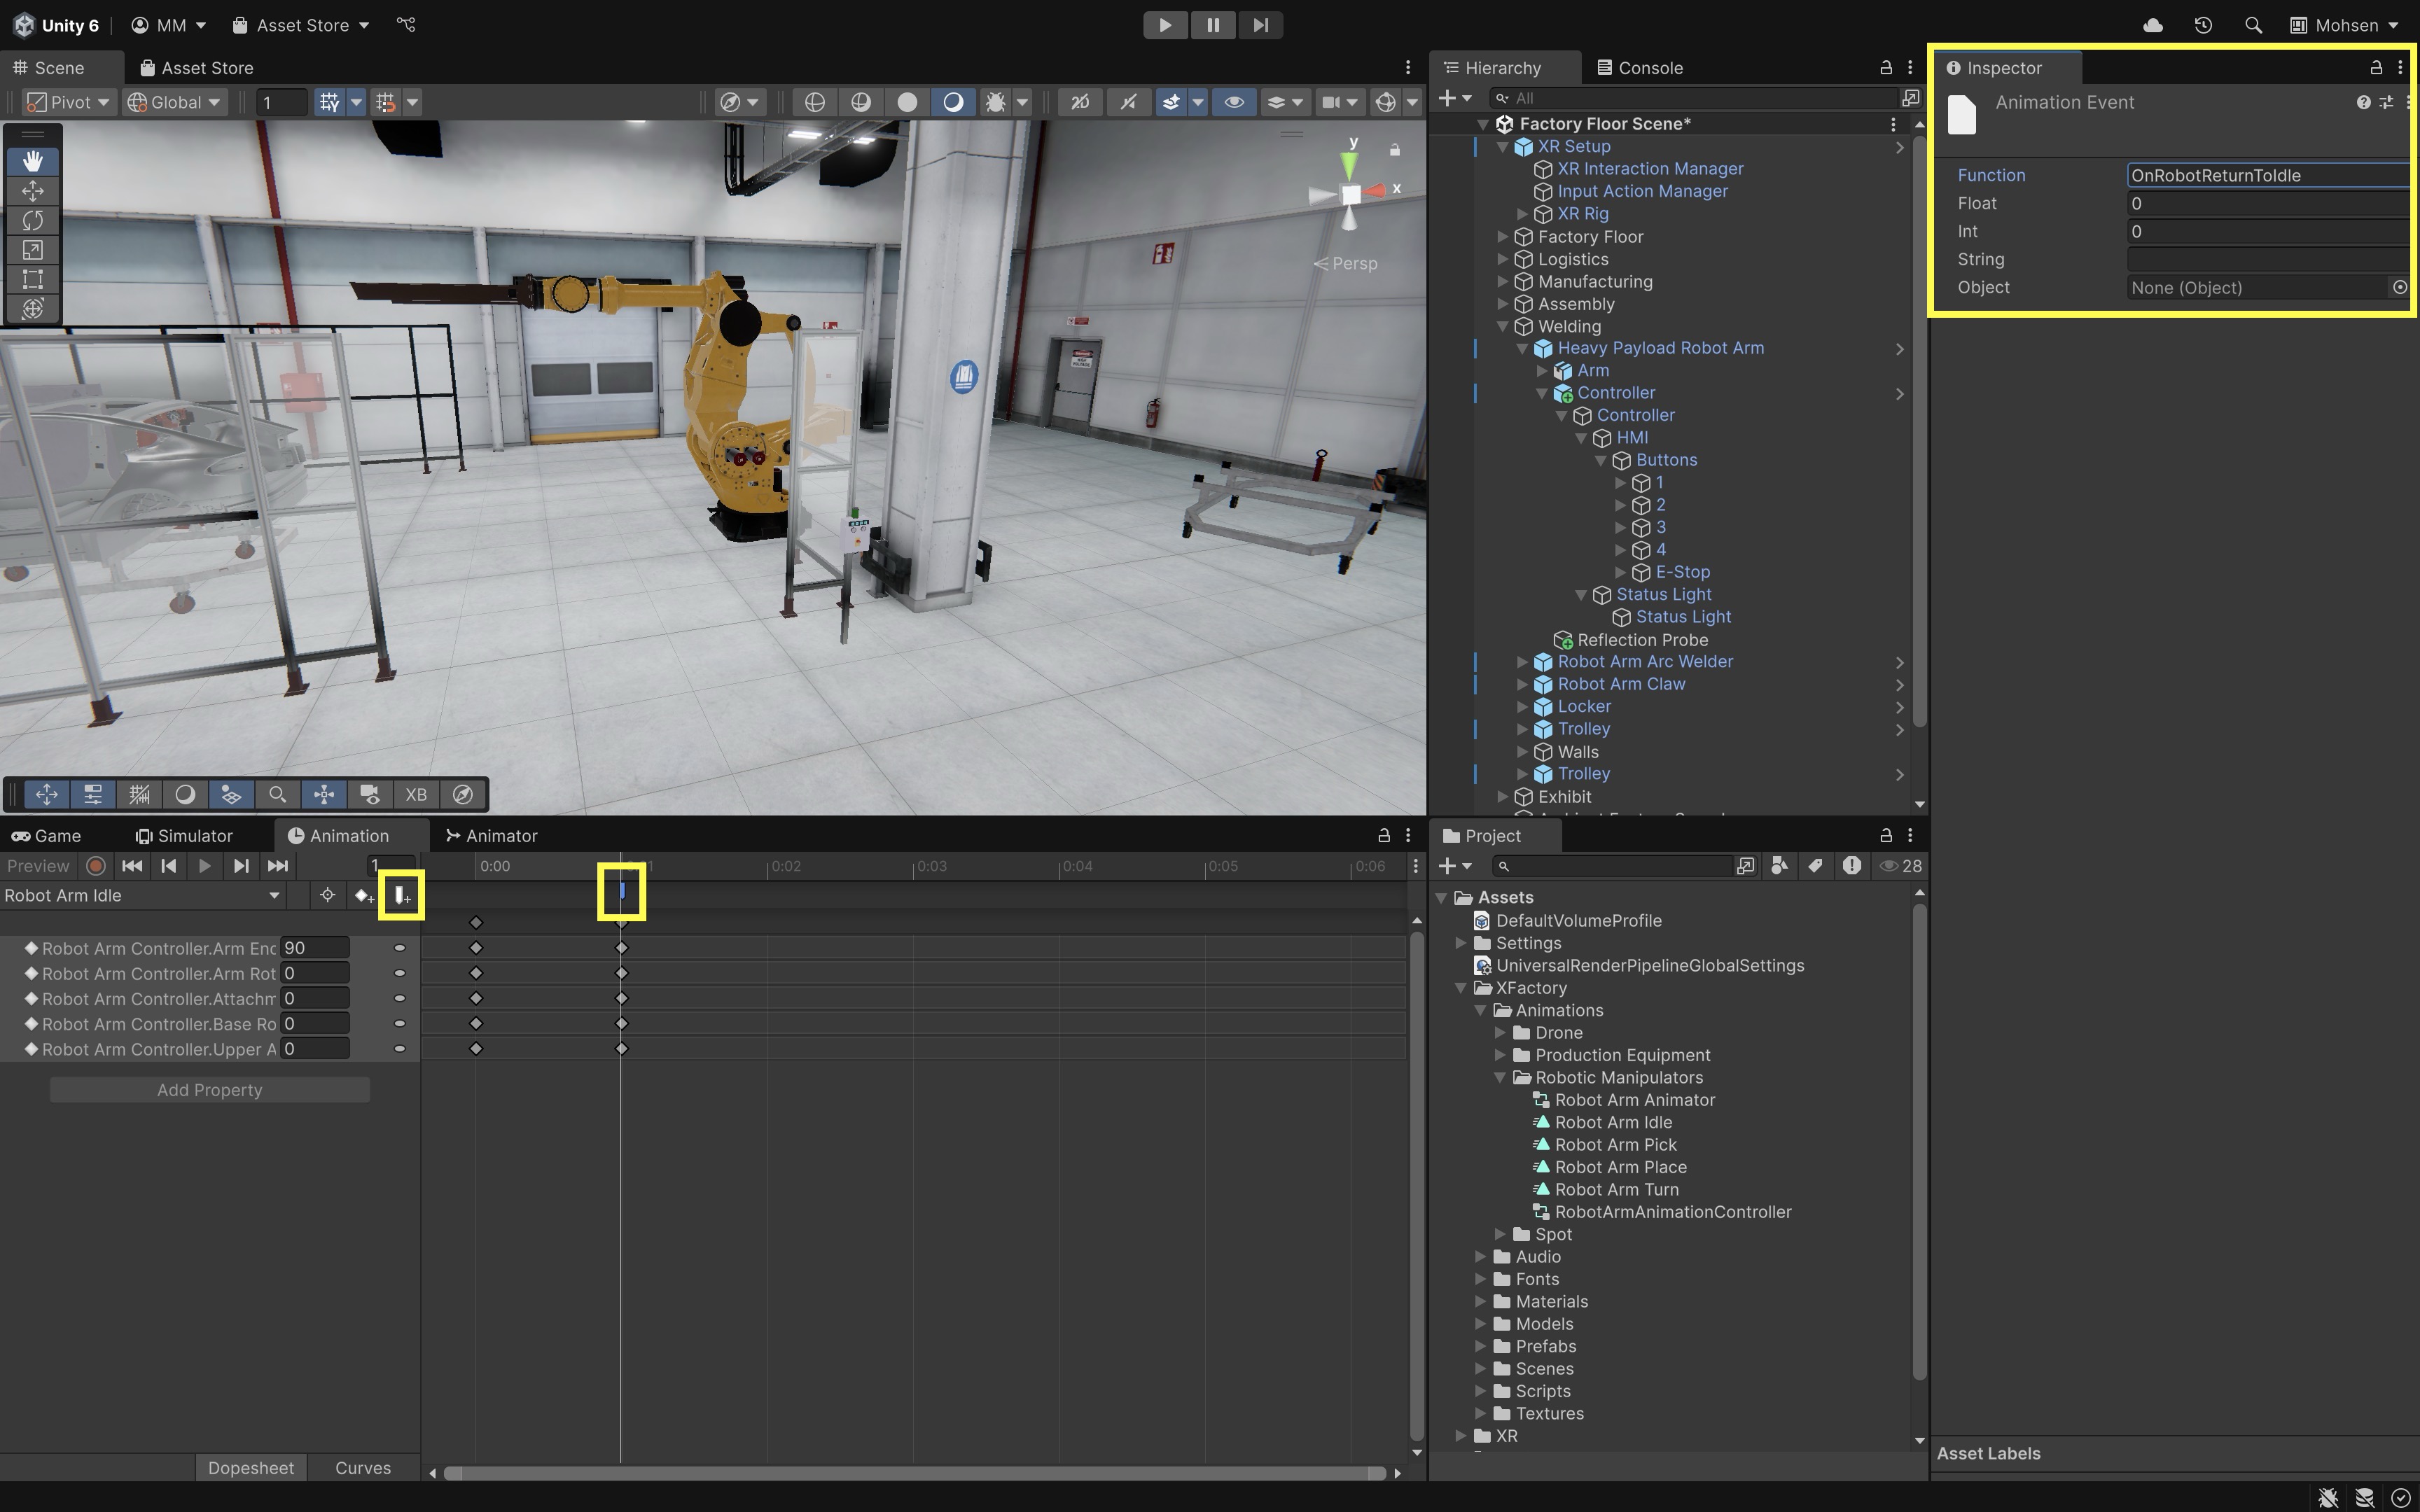
- Add Animation Events near the end of each robot action animation, or call
OnRobotReturnToIdle()when the Animator returns to the idle state. - In the
Animationwindow, select a robot action clip (for example,Pick) and add an event on the last frame that callsOnRobotReturnToIdle. - Animation Event functions must exist on a component attached to the animated GameObject or a suitable object Unity can target.
- Add Animation Events near the end of each robot action animation, or call
- Deploy and Test:
- Enter Play Mode with Quest Link / Meta Horizon Link or build to Quest for final validation.
- When the robot is activated through
RobotController.TriggerAnimation()(once the feedback manager is connected there in the contextual interactions section), the status light turns red, a motor hum sound plays, and the user’s controller vibrates (haptic pulse) if supported. - When the robot returns to idle (triggered by an animation event or idle-state transition), the status light turns green, and a beep (or idle motor) sound plays.
This feedback loop simulates a real-world factory machine’s behavioral cues, enhancing immersion, safety, and real-time situational awareness for learners.
Contextual Interactions
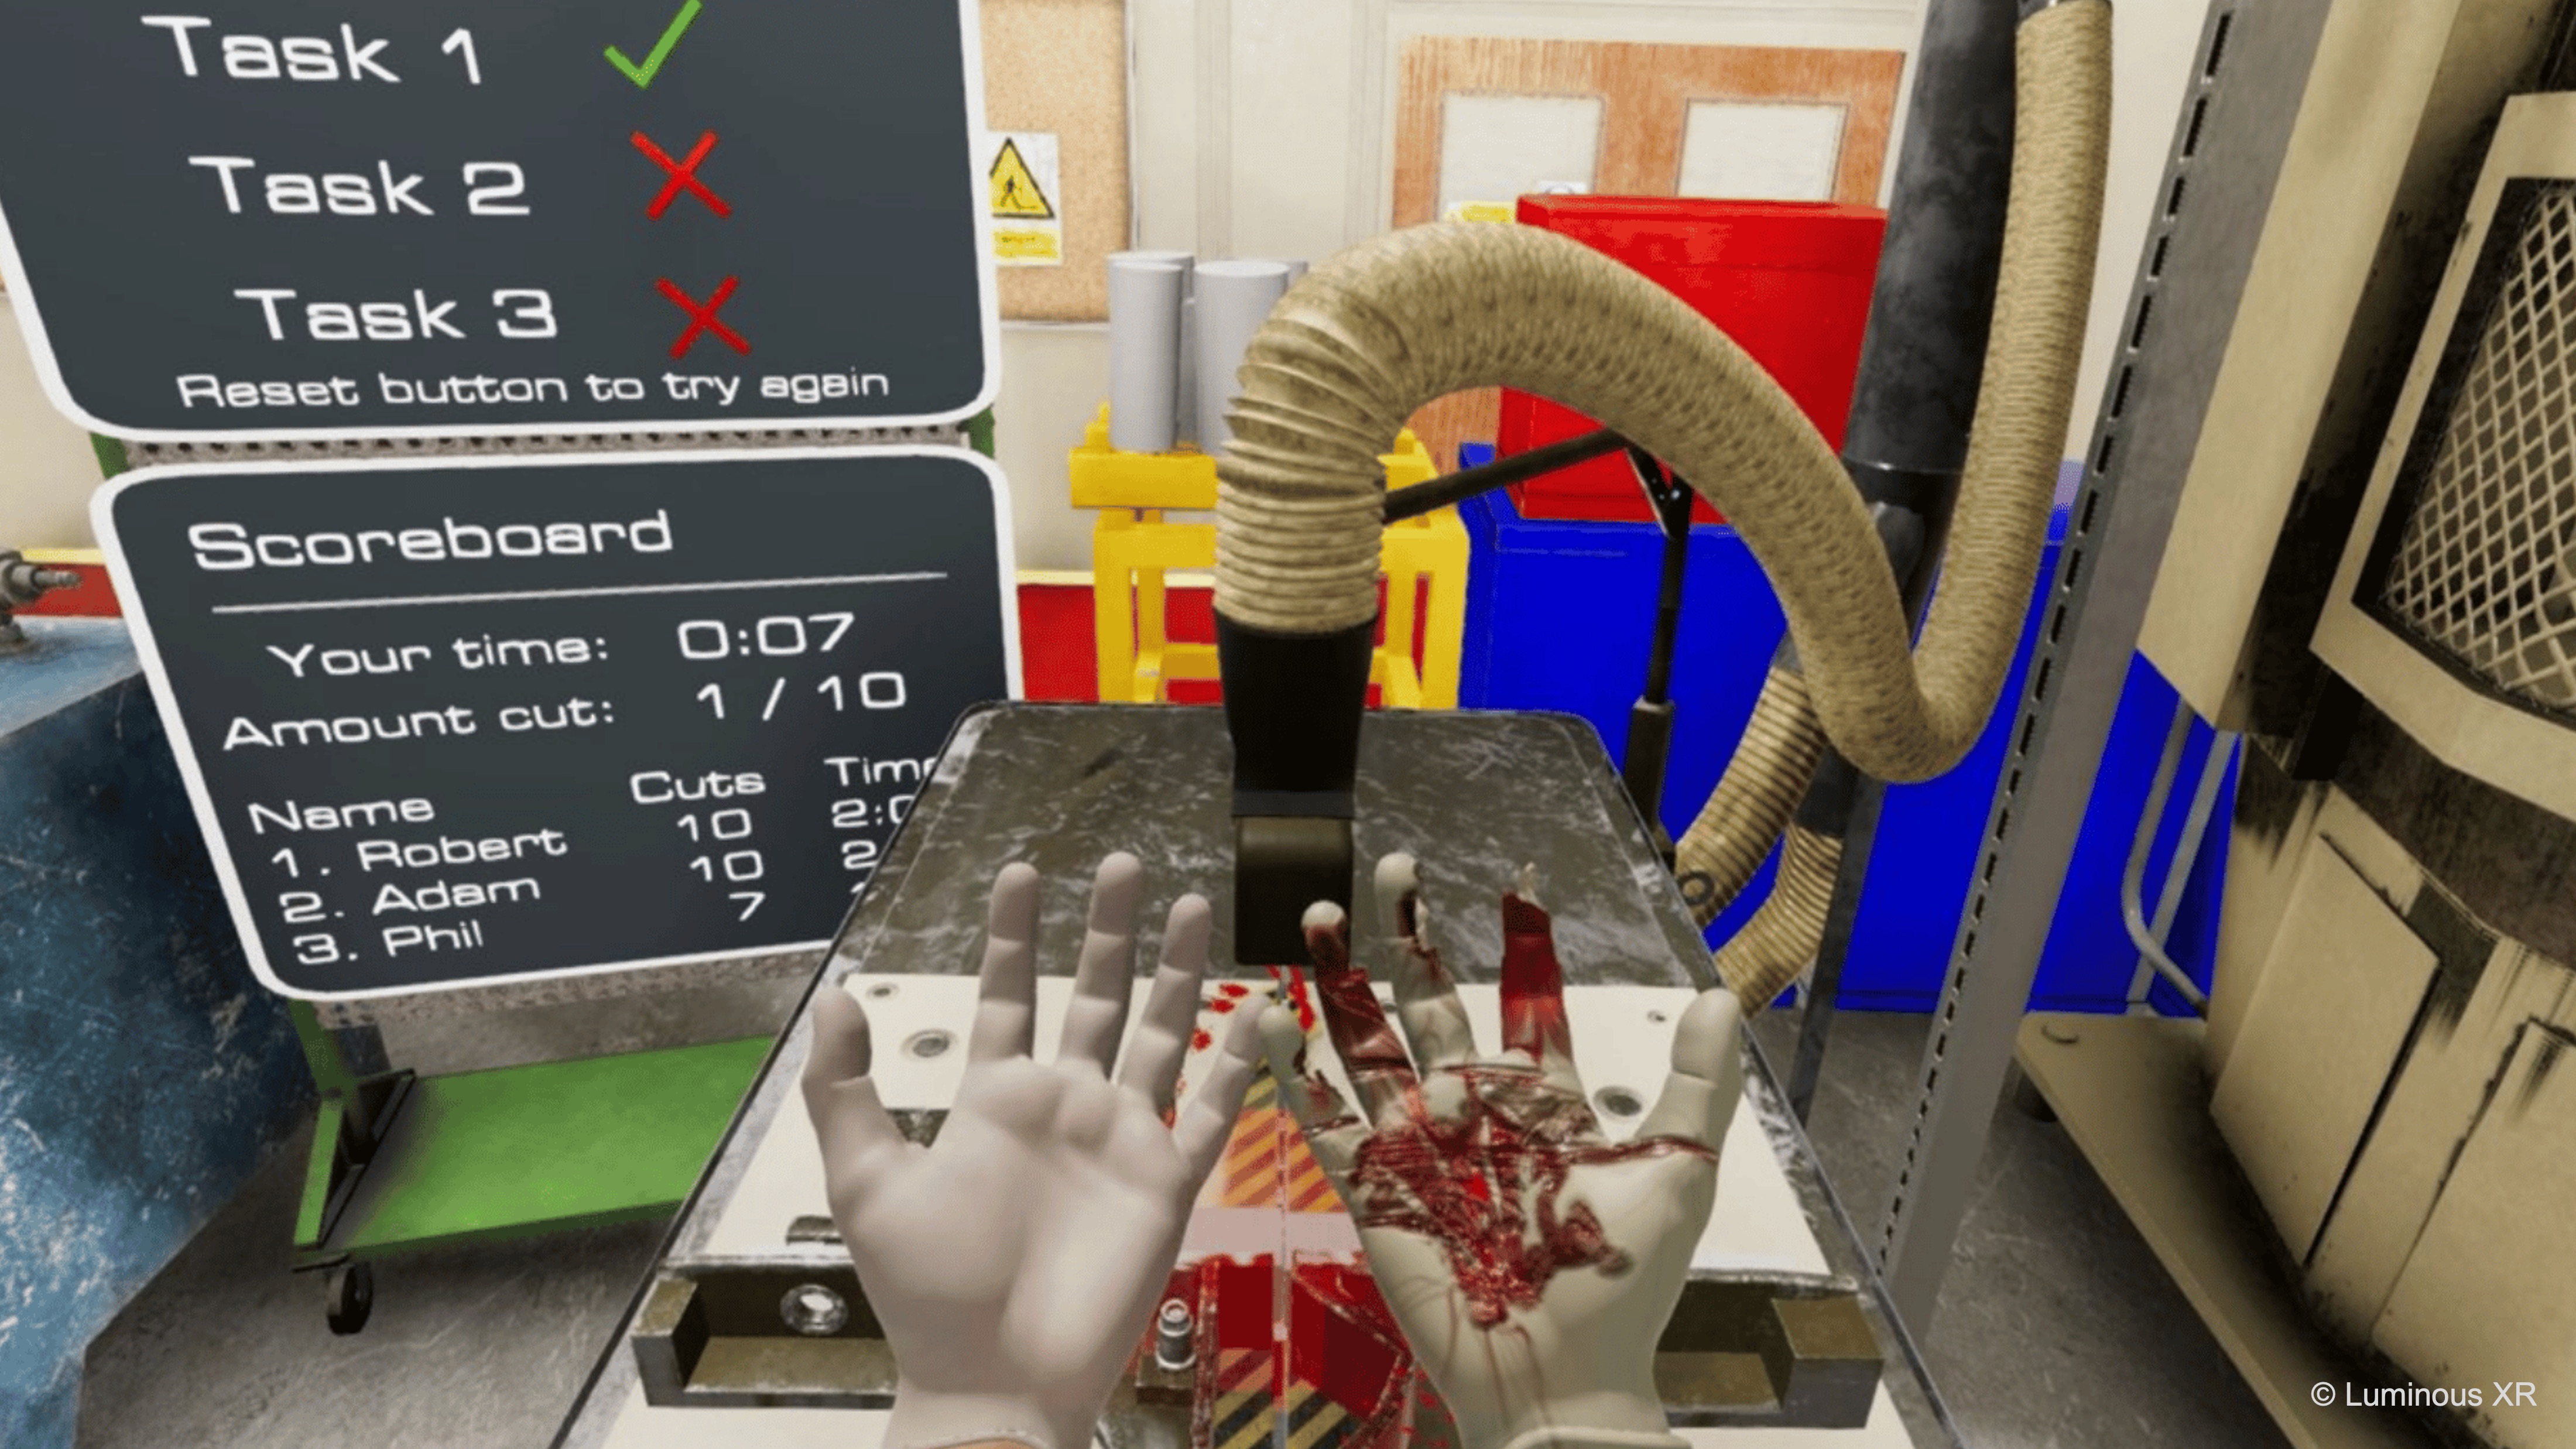
Contextual interactions are dynamic behaviors in which the available actions, controls, or responses adapt to the current state or condition of the virtual system. In engineering scenarios, these interactions enforce safety protocols, guide users through proper sequences, and ensure that every operation reflects real-world constraints. Such contextual interactions reinforce real-world discipline—only allowing users to tighten a virtual valve once the pressure gauge reads safe levels, or preventing tool activation until protective shielding is verified—so that virtual practice mirrors the careful sequence of industrial procedures.
Key Concepts
- System State Awareness: The XR environment continuously monitors key parameters—such as machine power status, emergency-stop flags, or calibration levels—and enables interactions only when conditions are valid. For example, a virtual CNC lathe will lock out its control panel until the spindle is fully stationary and safety guards are in place.
- State-Dependent Behavior: User inputs can be transformed or blocked depending on operational modes. In “maintenance” mode, a virtual robot arm might allow direct joint manipulation, whereas in “production” mode the same gestures instead trigger pre-programmed routines. This ensures users cannot accidentally invoke inappropriate actions for the current context.
- Safety by Design: Contextual rules simulate industrial interlocks, lockouts, and emergency-stop procedures. Attempting to open a virtual control cabinet without first disabling power might trigger an automatic shutdown or require a confirmation sequence—teaching users the importance of procedural compliance and preventing hazardous mistakes.
- Feedback on Invalid Interactions: Whenever an action is blocked or modified, the system provides clear, contextual cues: a red overlay on a disabled button, a “lock” icon appearing on a tool handle, an audible warning tone, or a brief on-screen message explaining why the operation is unavailable. This immediate, informative feedback helps users correct their workflow without confusion.
Custom Unity Events
At the welding station of XFactory, an emergency stop button governs the entire robot operation. If the e-stop is engaged, the numpad is disabled, the status light flashes red, a buzz alarm plays, and robot animations are blocked. Disabled numpad buttons do not fire Button.onClick, so the alarm and flashing feedback occur when the e-stop is engaged—not from pressing disabled buttons. RobotController.TriggerAnimation() still validates e-stop for any non-UI command that tries to bypass the lockout. If the e-stop is cleared, normal operation resumes: the light returns to solid green, sounds reset, and the numpad is re-enabled. Here is how to implement this behavior:
- Create a System Manager Script:
- Create a new empty GameObject (
System Manager) as a child ofHeavy Payload Robot Arm. - Attach the following script to
System Managerto manage the global system state and toggles interaction accordingly.
using UnityEngine; using UnityEngine.Events; public class SystemStateManager : MonoBehaviour { [SerializeField] private bool isEmergencyStopped; public UnityEvent onEStopEngaged; public UnityEvent onEStopCleared; public bool IsEmergencyStopped => isEmergencyStopped; public void ToggleEmergencyStop() { if (isEmergencyStopped) ClearEmergencyStop(); else EngageEmergencyStop(); } public void EngageEmergencyStop() { if (isEmergencyStopped) return; isEmergencyStopped = true; Debug.Log("Emergency Stop Engaged"); onEStopEngaged?.Invoke(); } public void ClearEmergencyStop() { if (!isEmergencyStopped) return; isEmergencyStopped = false; Debug.Log("Emergency Stop Cleared"); onEStopCleared?.Invoke(); } } - Create a new empty GameObject (
- Configure the Script in the
Inspector:- Leave
Is Emergency Stoppedunchecked (default is normal state). - Under
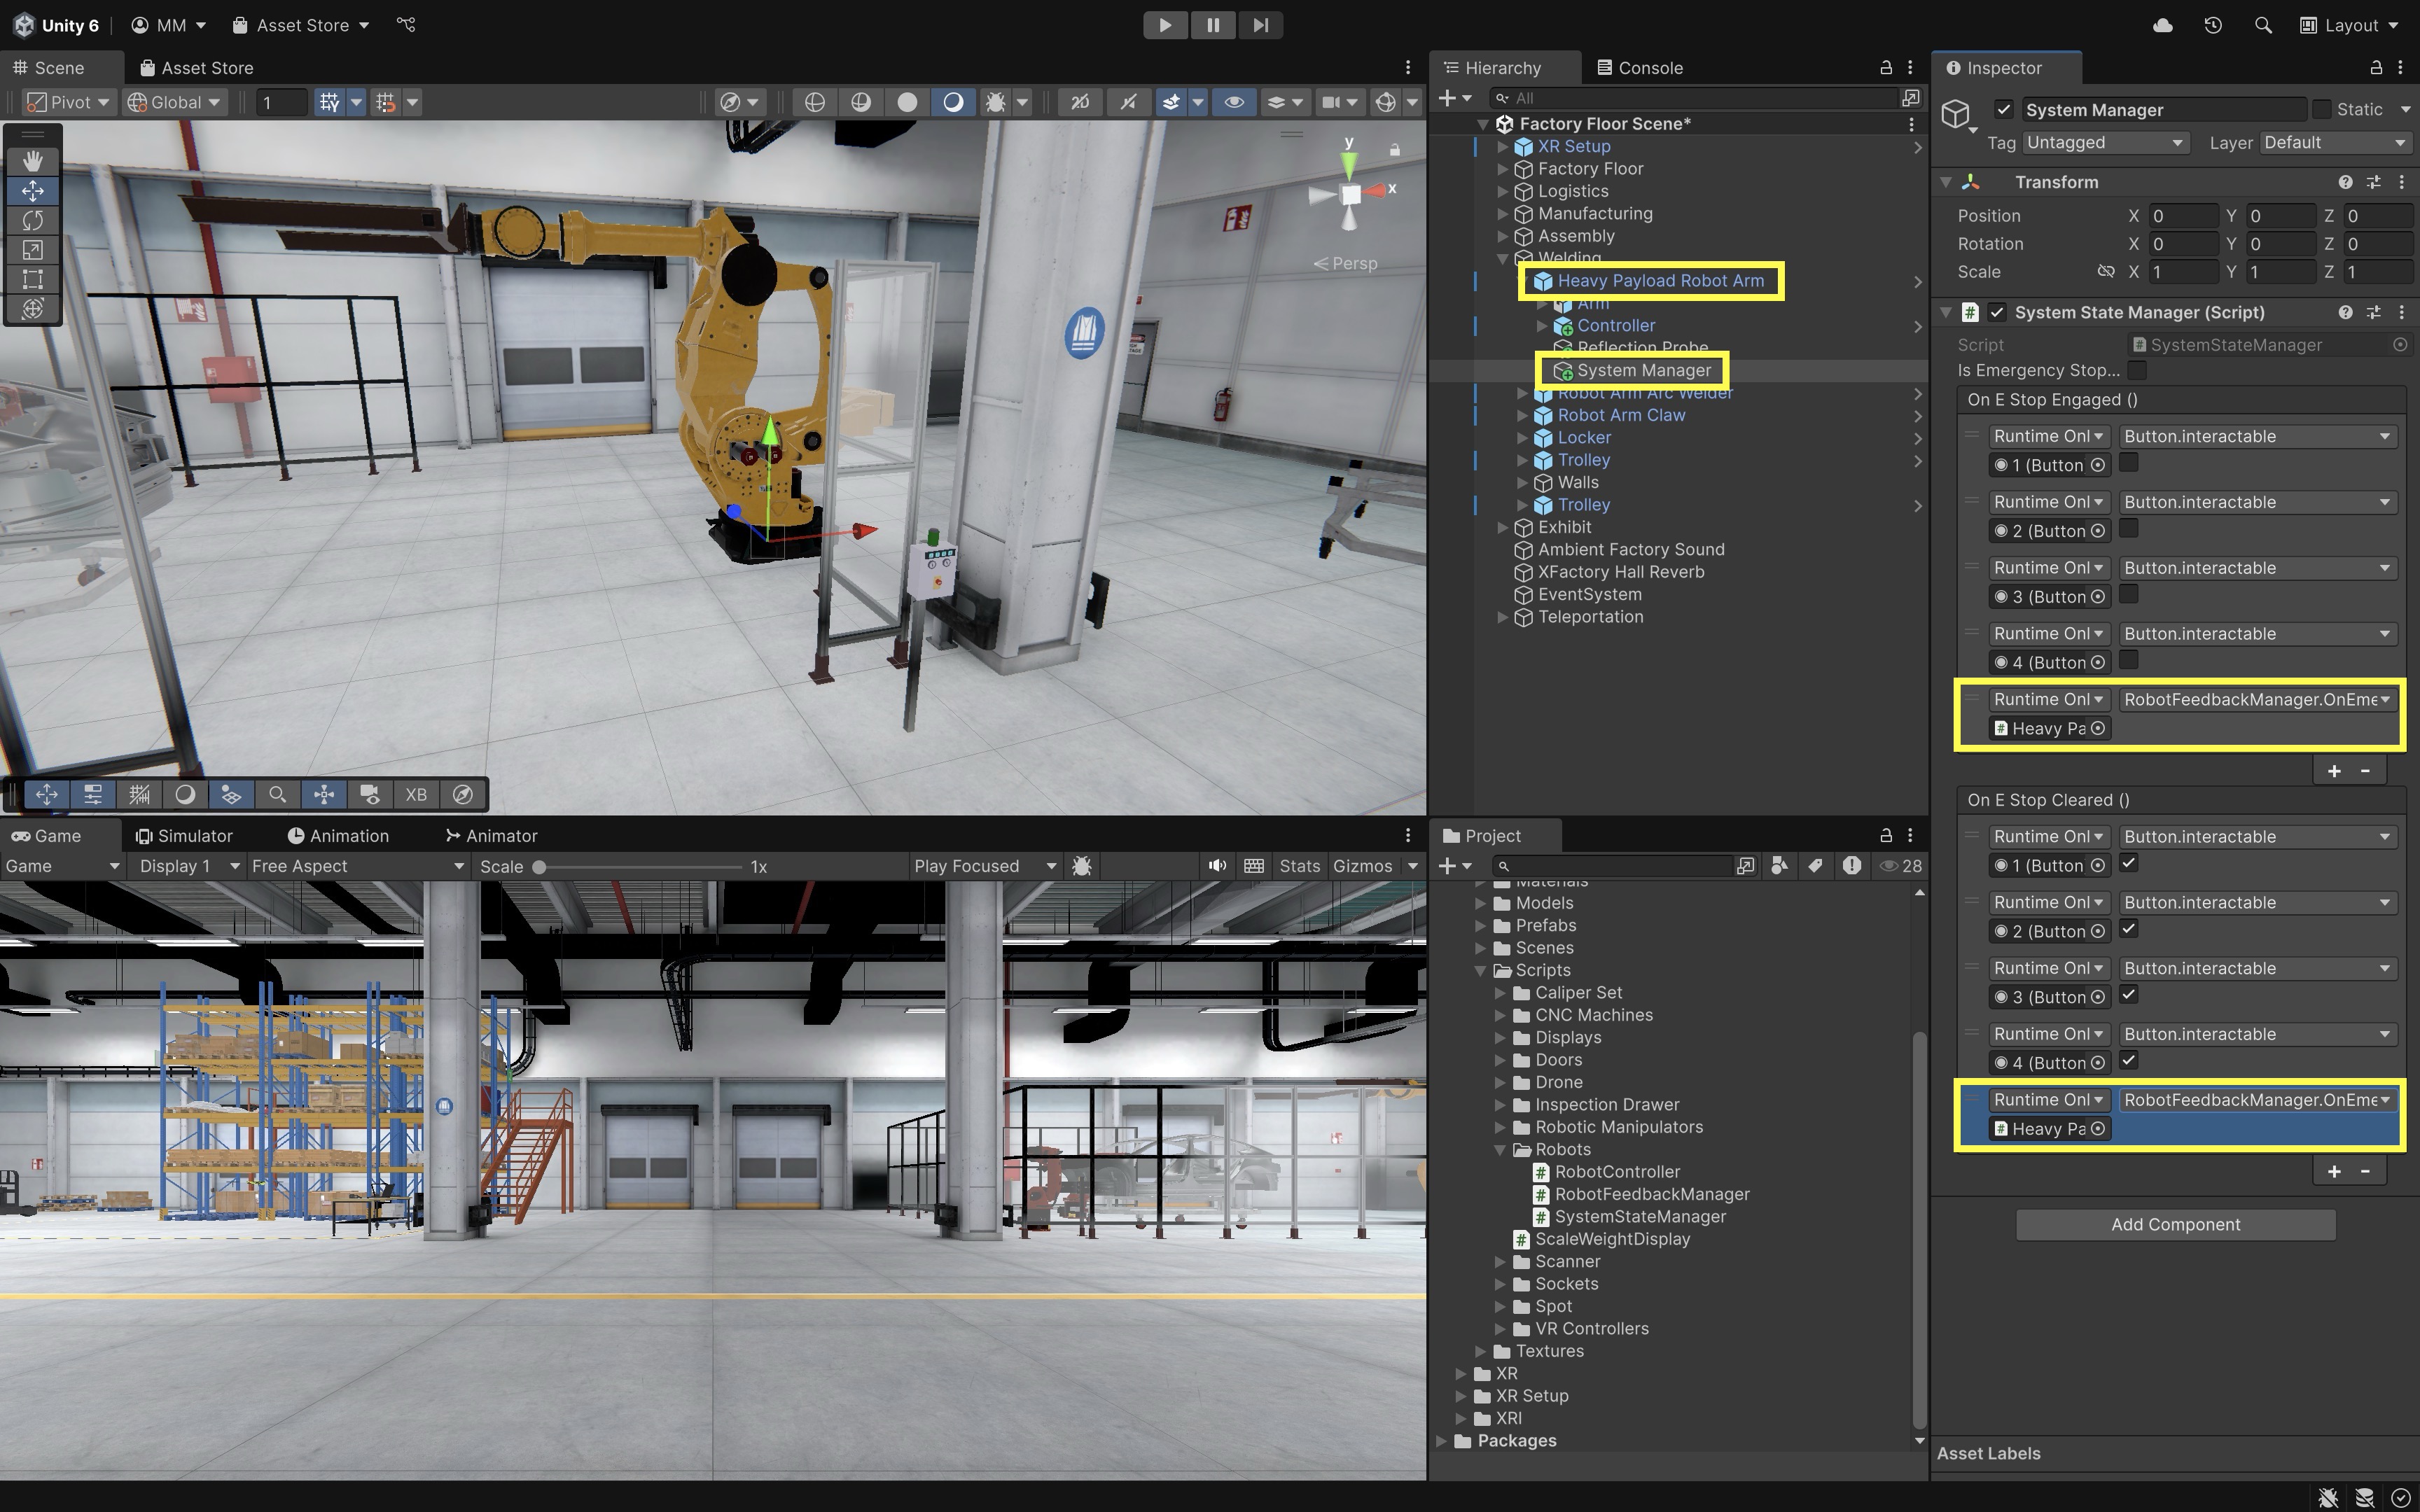
onEStopEngaged(when e-stop is pressed), click the+button. Add each numpad button individually. AssignButton → bool interactableand uncheck the box to disable interaction during emergency stop. Also addHeavy Payload Robot Armand callRobotFeedbackManager → OnEmergencyBlocked()so the buzz and flashing light play when e-stop is engaged. - Under
onEStopCleared(when e-stop is reset), click the+button again. Add the same numpad buttons. AssignButton → bool interactableand check the box to re-enable interaction when normal operation resumes. CallRobotFeedbackManager → OnEmergencyCleared()to stop the alarm and restore the solid green light.
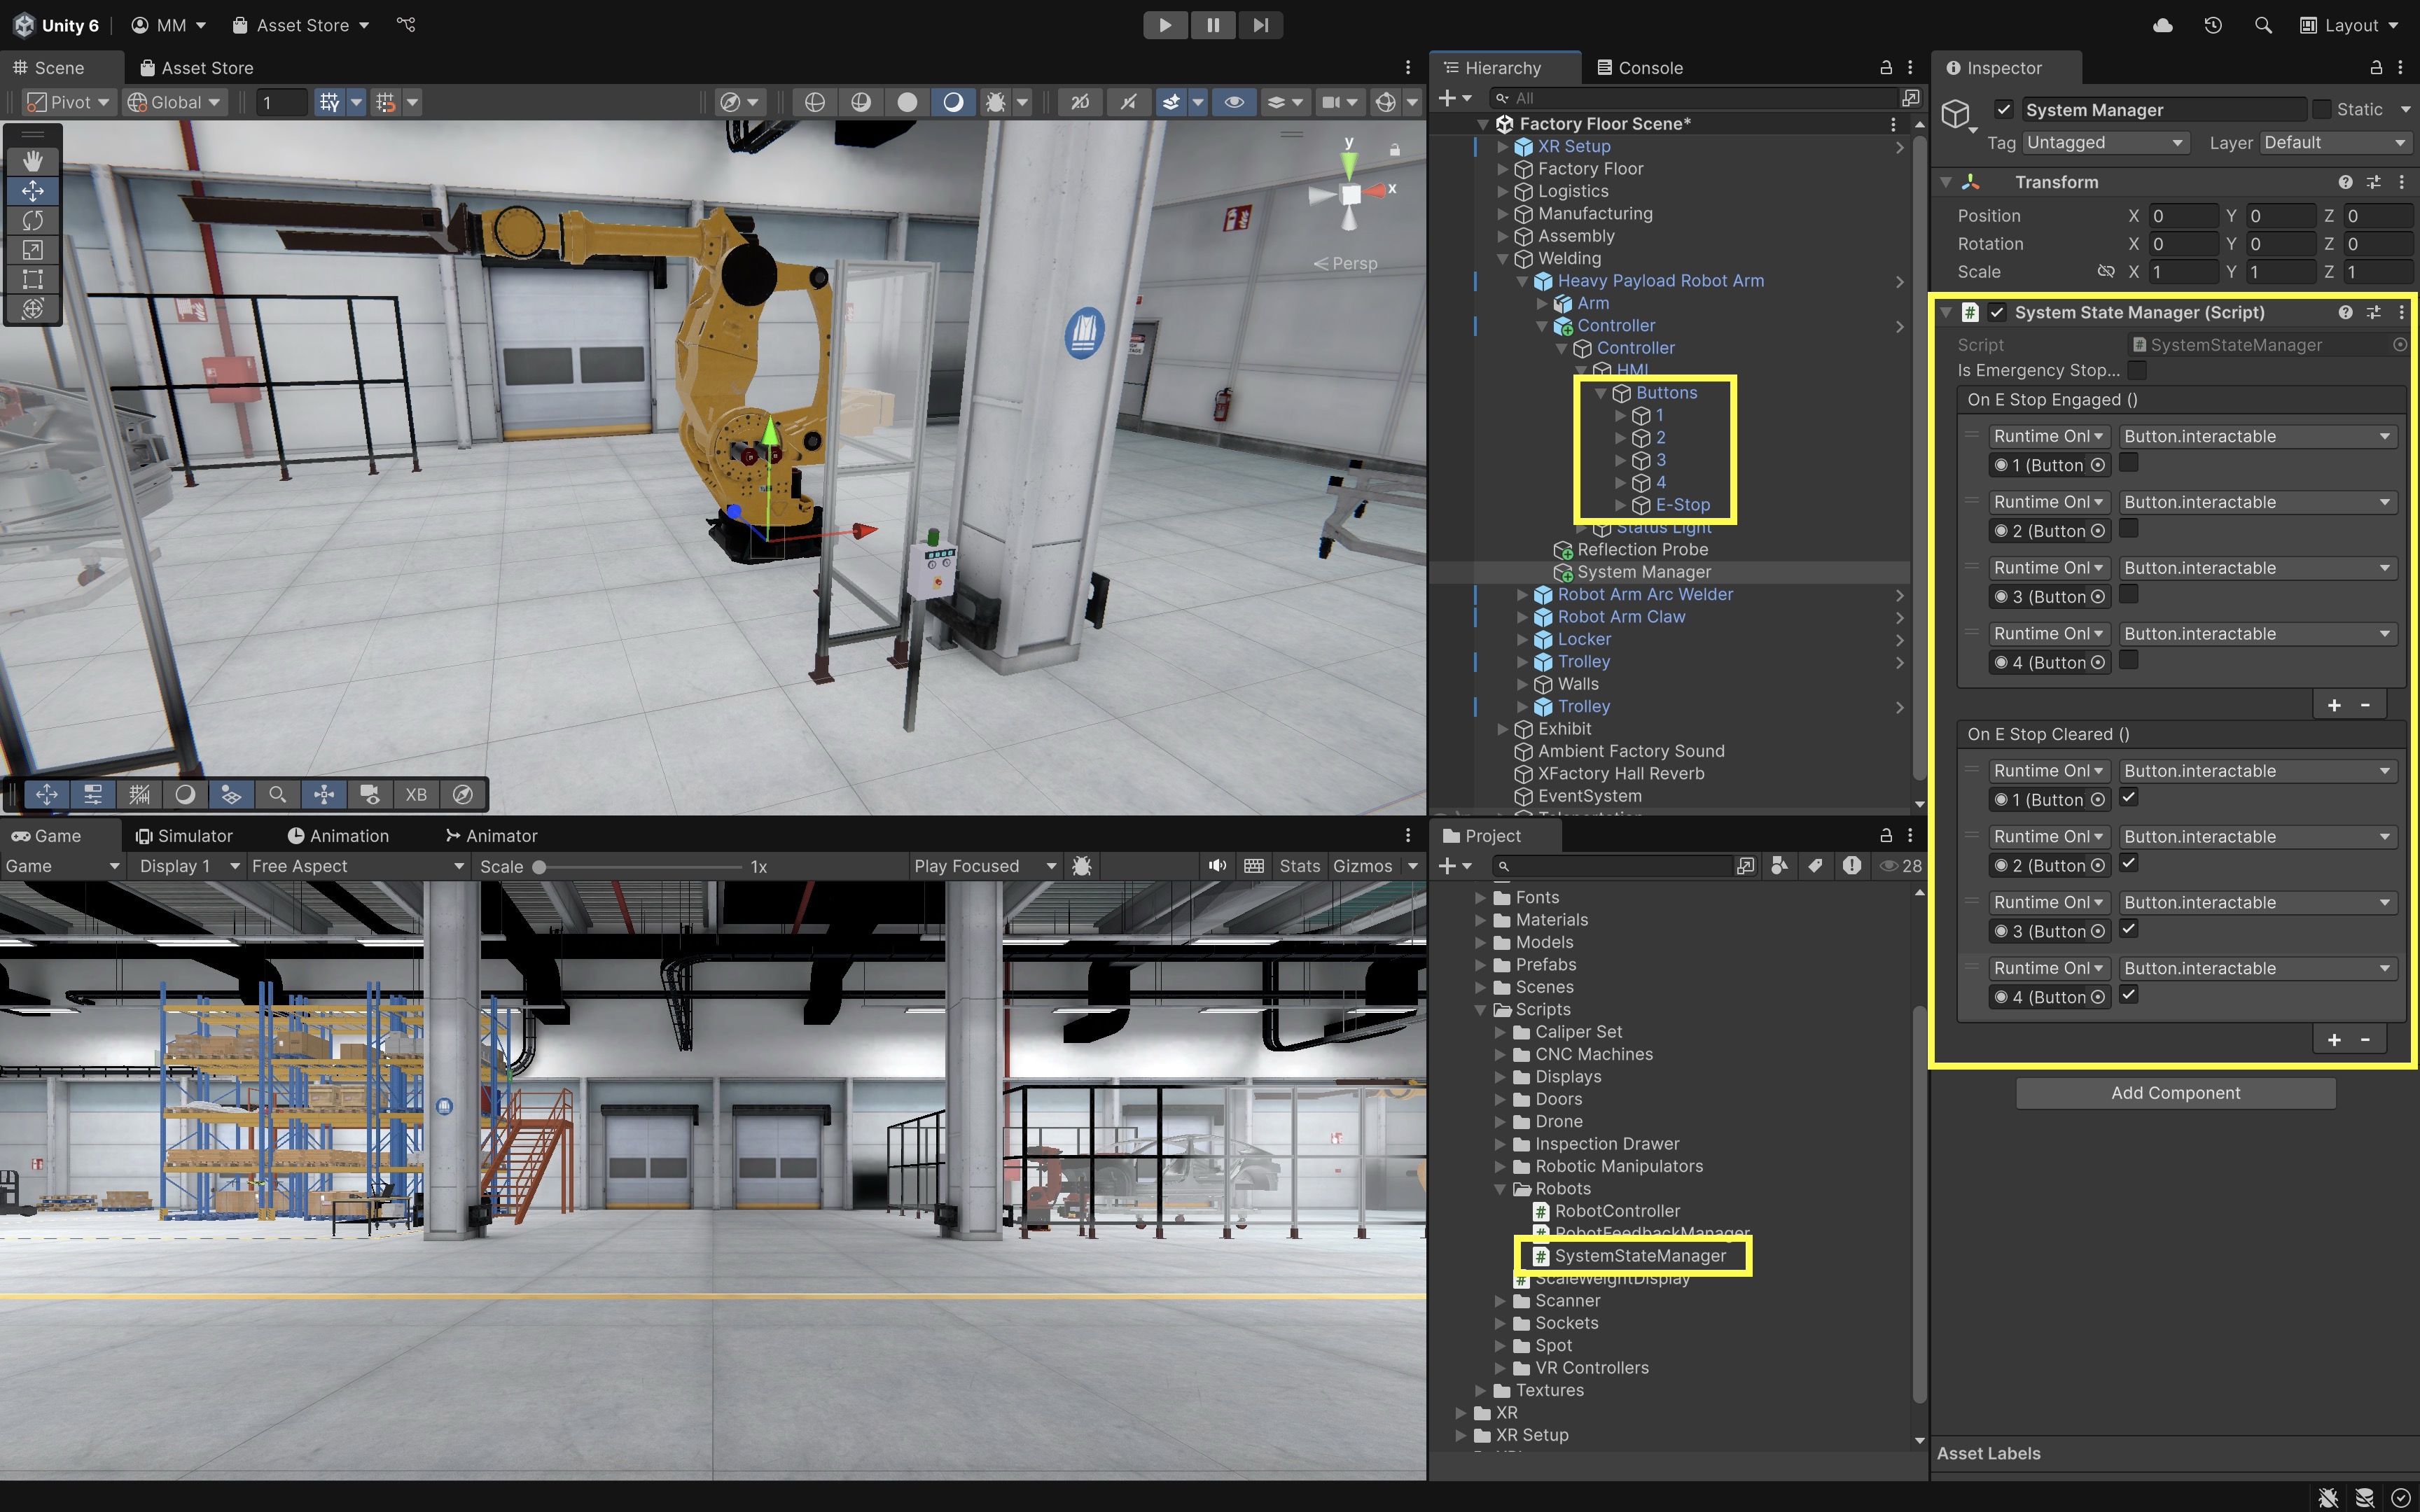
Disabling
Button.interactableprevents normal UI clicks during e-stop. Keep the e-stop check inRobotController.TriggerAnimation()so scripts or other event sources cannot bypass the lockout; that path can still callOnEmergencyBlocked()if a non-UI command is attempted while e-stop is active. - Leave
- Update
RobotController.csto Check State:- Modify your
RobotController.csto respect the emergency stop:
using UnityEngine; public class RobotController : MonoBehaviour { [SerializeField] private Animator robotAnimator; [SerializeField] private Renderer statusLightRenderer; [SerializeField] private Material greenMaterial; [SerializeField] private Material redMaterial; [SerializeField] private SystemStateManager systemStateManager; [SerializeField] private RobotFeedbackManager feedbackManager; private const string idleStateName = "Robot Arm Idle"; private bool wasTrulyIdle = true; private void Start() { UpdateStatusLight(force: true); } private void Update() { UpdateStatusLight(); } private void UpdateStatusLight(bool force = false) { if (robotAnimator == null || statusLightRenderer == null) return; bool isTrulyIdle = IsRobotIdle(); if (force || isTrulyIdle != wasTrulyIdle) { statusLightRenderer.material = isTrulyIdle ? greenMaterial : redMaterial; wasTrulyIdle = isTrulyIdle; } } public void TriggerAnimation(string triggerName) { if (systemStateManager != null && systemStateManager.IsEmergencyStopped) { Debug.Log("Blocked: System is in Emergency Stop"); feedbackManager?.OnEmergencyBlocked(); return; } if (robotAnimator == null) { Debug.LogWarning("RobotController: Animator is not assigned."); return; } if (!CanTriggerCommand()) { Debug.Log("Blocked: Robot is already moving."); return; } robotAnimator.SetTrigger(triggerName); feedbackManager?.OnRobotStartMoving(); Debug.Log($"Robot Triggered: {triggerName}"); } private bool CanTriggerCommand() => IsRobotIdle(); private bool IsRobotIdle() { if (robotAnimator.IsInTransition(0)) return false; return robotAnimator.GetCurrentAnimatorStateInfo(0).IsName(idleStateName); } } - Modify your
- Configure the Script:
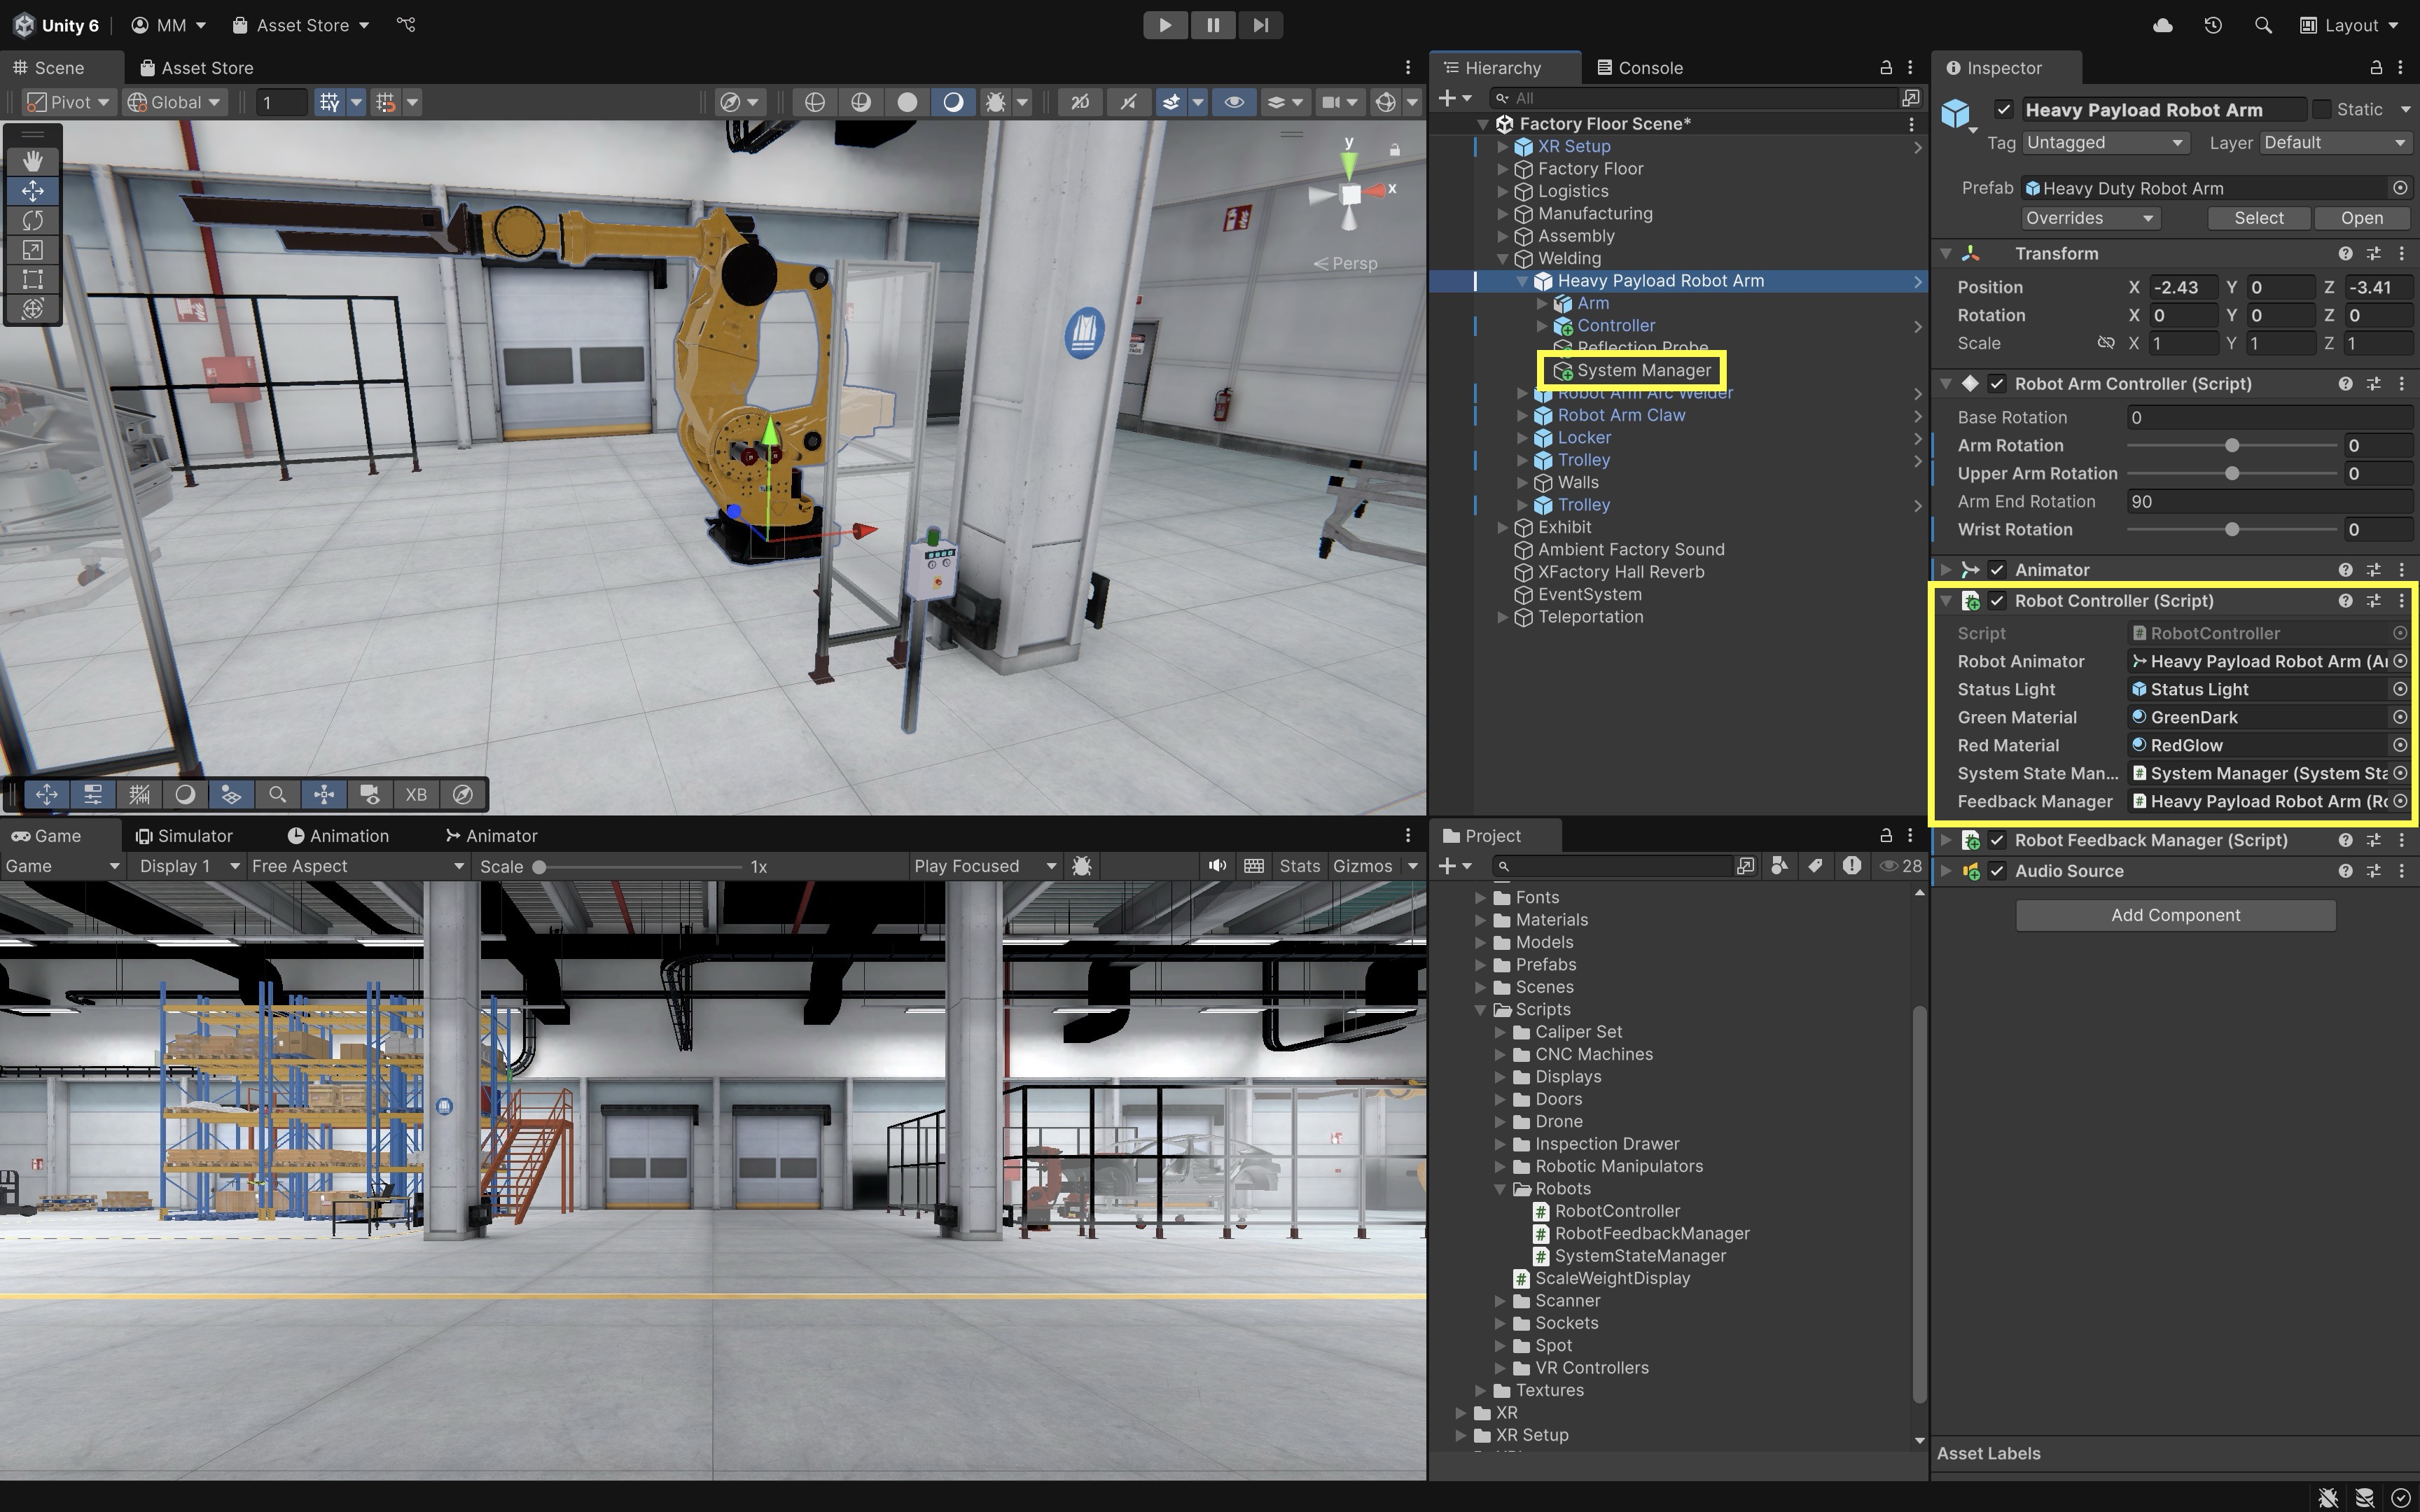
- Select the robot GameObject with
RobotController.cs. - In the
System State Managerfield, drag in theSystem ManagerGameObject (the one with theSystemStateManager.csscript). - In the
Feedback Managerfield, assign the robot itself (which contains theRobotFeedbackManager.csscript).
- Select the robot GameObject with
- Add Emergency Feedback to
RobotFeedbackManager.cs:- Expand the
RobotFeedbackManager.csto support flashing and buzzing.
using UnityEngine; using UnityEngine.UI; using System.Collections; using UnityEngine.XR.Interaction.Toolkit.Inputs.Haptics; public class RobotFeedbackManager : MonoBehaviour { [Header("Audio Feedback")] [SerializeField] private AudioSource audioSource; [SerializeField] private AudioClip motorHumClip; [SerializeField] private AudioClip idleBeepClip; [Header("Visual Button Feedback")] [SerializeField] private float flashDuration = 0.5f; [SerializeField] private Color flashColor = Color.yellow; [SerializeField] private float flashInterval = 0.1f; [Header("Haptic Feedback")] [Tooltip("HapticImpulsePlayer on the interactor/controller that should vibrate.")] [SerializeField] private HapticImpulsePlayer hapticPlayer; [Range(0f, 1f)] [SerializeField] private float hapticAmplitude = 0.7f; [SerializeField] private float hapticDuration = 0.2f; [Tooltip("Optional. Frequency support depends on controller/runtime support.")] [SerializeField] private float hapticFrequency = 0f; [Header("Status Light")] [SerializeField] private Renderer statusLightRenderer; [SerializeField] private Material redMaterial; [SerializeField] private Material greenMaterial; [SerializeField, Tooltip("Blink cadence for the emergency status light.")] private float statusFlashInterval = 0.5f; [Header("Emergency Feedback")] [SerializeField] private AudioClip errorBuzzClip; private Coroutine flashRoutine; private Coroutine statusFlashRoutine; public void OnRobotStartMoving() { PlaySound(motorHumClip); SendHaptics(); } public void OnRobotReturnToIdle() { PlaySound(idleBeepClip); } public void OnEmergencyBlocked() { StartFlashingRed(); PlaySound(errorBuzzClip); } public void OnEmergencyCleared() { StopFlashing(); SetLightMaterial(greenMaterial); if (audioSource != null) audioSource.Stop(); } public void FlashButton(GameObject button) { if (button == null) return; var img = button.GetComponent<Image>(); if (img != null) { if (flashRoutine != null) StopCoroutine(flashRoutine); flashRoutine = StartCoroutine(FlashUIRoutine(img)); return; } var rend = button.GetComponent<Renderer>(); if (rend != null) { if (flashRoutine != null) StopCoroutine(flashRoutine); flashRoutine = StartCoroutine(Flash3DRoutine(rend)); } } private IEnumerator FlashUIRoutine(Image img) { Color originalColor = img.color; float elapsed = 0f; var wait = new WaitForSeconds(flashInterval); while (elapsed < flashDuration) { img.color = flashColor; yield return wait; elapsed += flashInterval; img.color = originalColor; yield return wait; elapsed += flashInterval; } img.color = originalColor; flashRoutine = null; } private IEnumerator Flash3DRoutine(Renderer rend) { // renderer.material creates an instance; acceptable for one tutorial button, // but for many flashing 3D objects use MaterialPropertyBlock instead. var mat = rend.material; Color originalColor = mat.color; float elapsed = 0f; var wait = new WaitForSeconds(flashInterval); while (elapsed < flashDuration) { mat.color = flashColor; yield return wait; elapsed += flashInterval; mat.color = originalColor; yield return wait; elapsed += flashInterval; } mat.color = originalColor; flashRoutine = null; } private void StartFlashingRed() { if (statusFlashRoutine != null) return; statusFlashRoutine = StartCoroutine(FlashRed()); } private void StopFlashing() { if (statusFlashRoutine != null) { StopCoroutine(statusFlashRoutine); statusFlashRoutine = null; } } private IEnumerator FlashRed() { if (statusLightRenderer == null || redMaterial == null || greenMaterial == null) yield break; var wait = new WaitForSeconds(statusFlashInterval); while (true) { statusLightRenderer.material = redMaterial; yield return wait; statusLightRenderer.material = greenMaterial; yield return wait; } } private void PlaySound(AudioClip clip) { if (audioSource == null || clip == null) return; audioSource.Stop(); audioSource.clip = clip; audioSource.Play(); } private void SendHaptics() { if (hapticPlayer == null) return; if (hapticFrequency > 0f) hapticPlayer.SendHapticImpulse(hapticAmplitude, hapticDuration, hapticFrequency); else hapticPlayer.SendHapticImpulse(hapticAmplitude, hapticDuration); } private void SetLightMaterial(Material mat) { if (statusLightRenderer == null || mat == null) return; statusLightRenderer.material = mat; } private void OnDisable() { if (flashRoutine != null) { StopCoroutine(flashRoutine); flashRoutine = null; } StopFlashing(); } } - Expand the
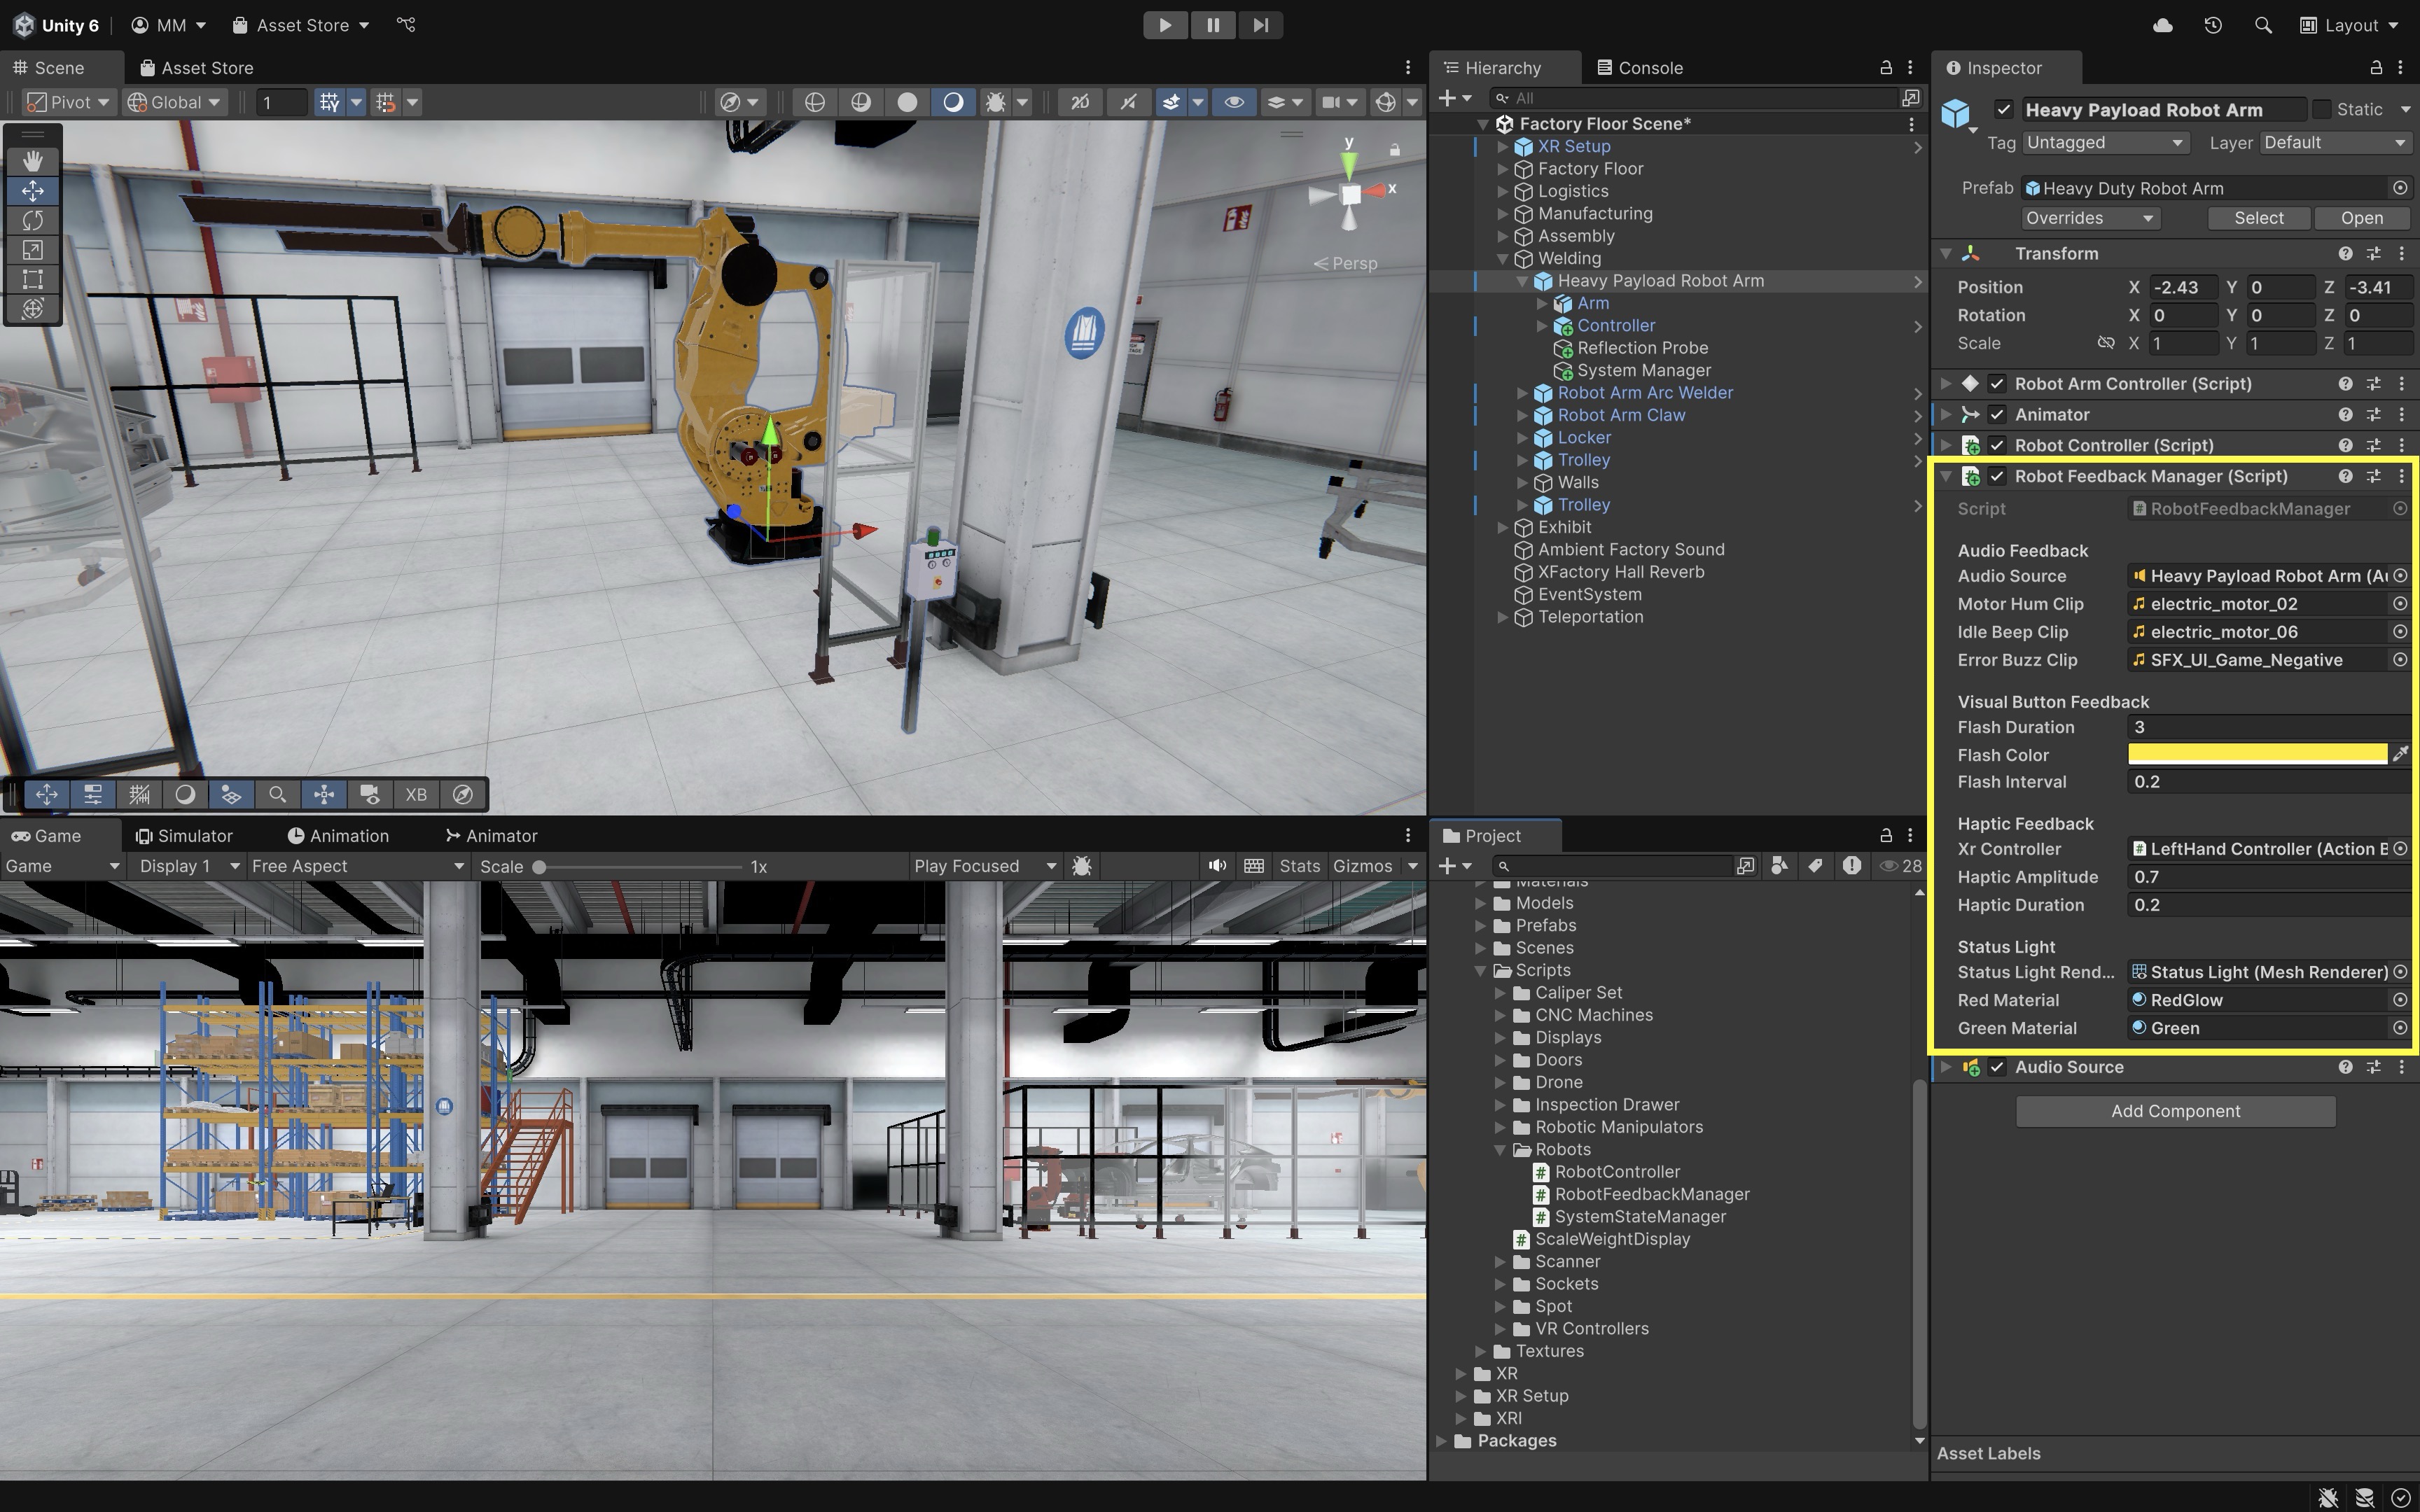
- Configure the Script:
Error Buzz Clip: Assign a short alert/buzzer audio clip.Status Light Renderer: Drag in theRenderercomponent of the robot’s status light (Status Light).Red Material: Assign a red material used to indicate emergency.Green Material: Assign a green material used to indicate normal operation.Haptic Player: Assign theHapticImpulsePlayerfrom the interactor/controller that should vibrate.
- Hook Up the Emergency Stop Button:
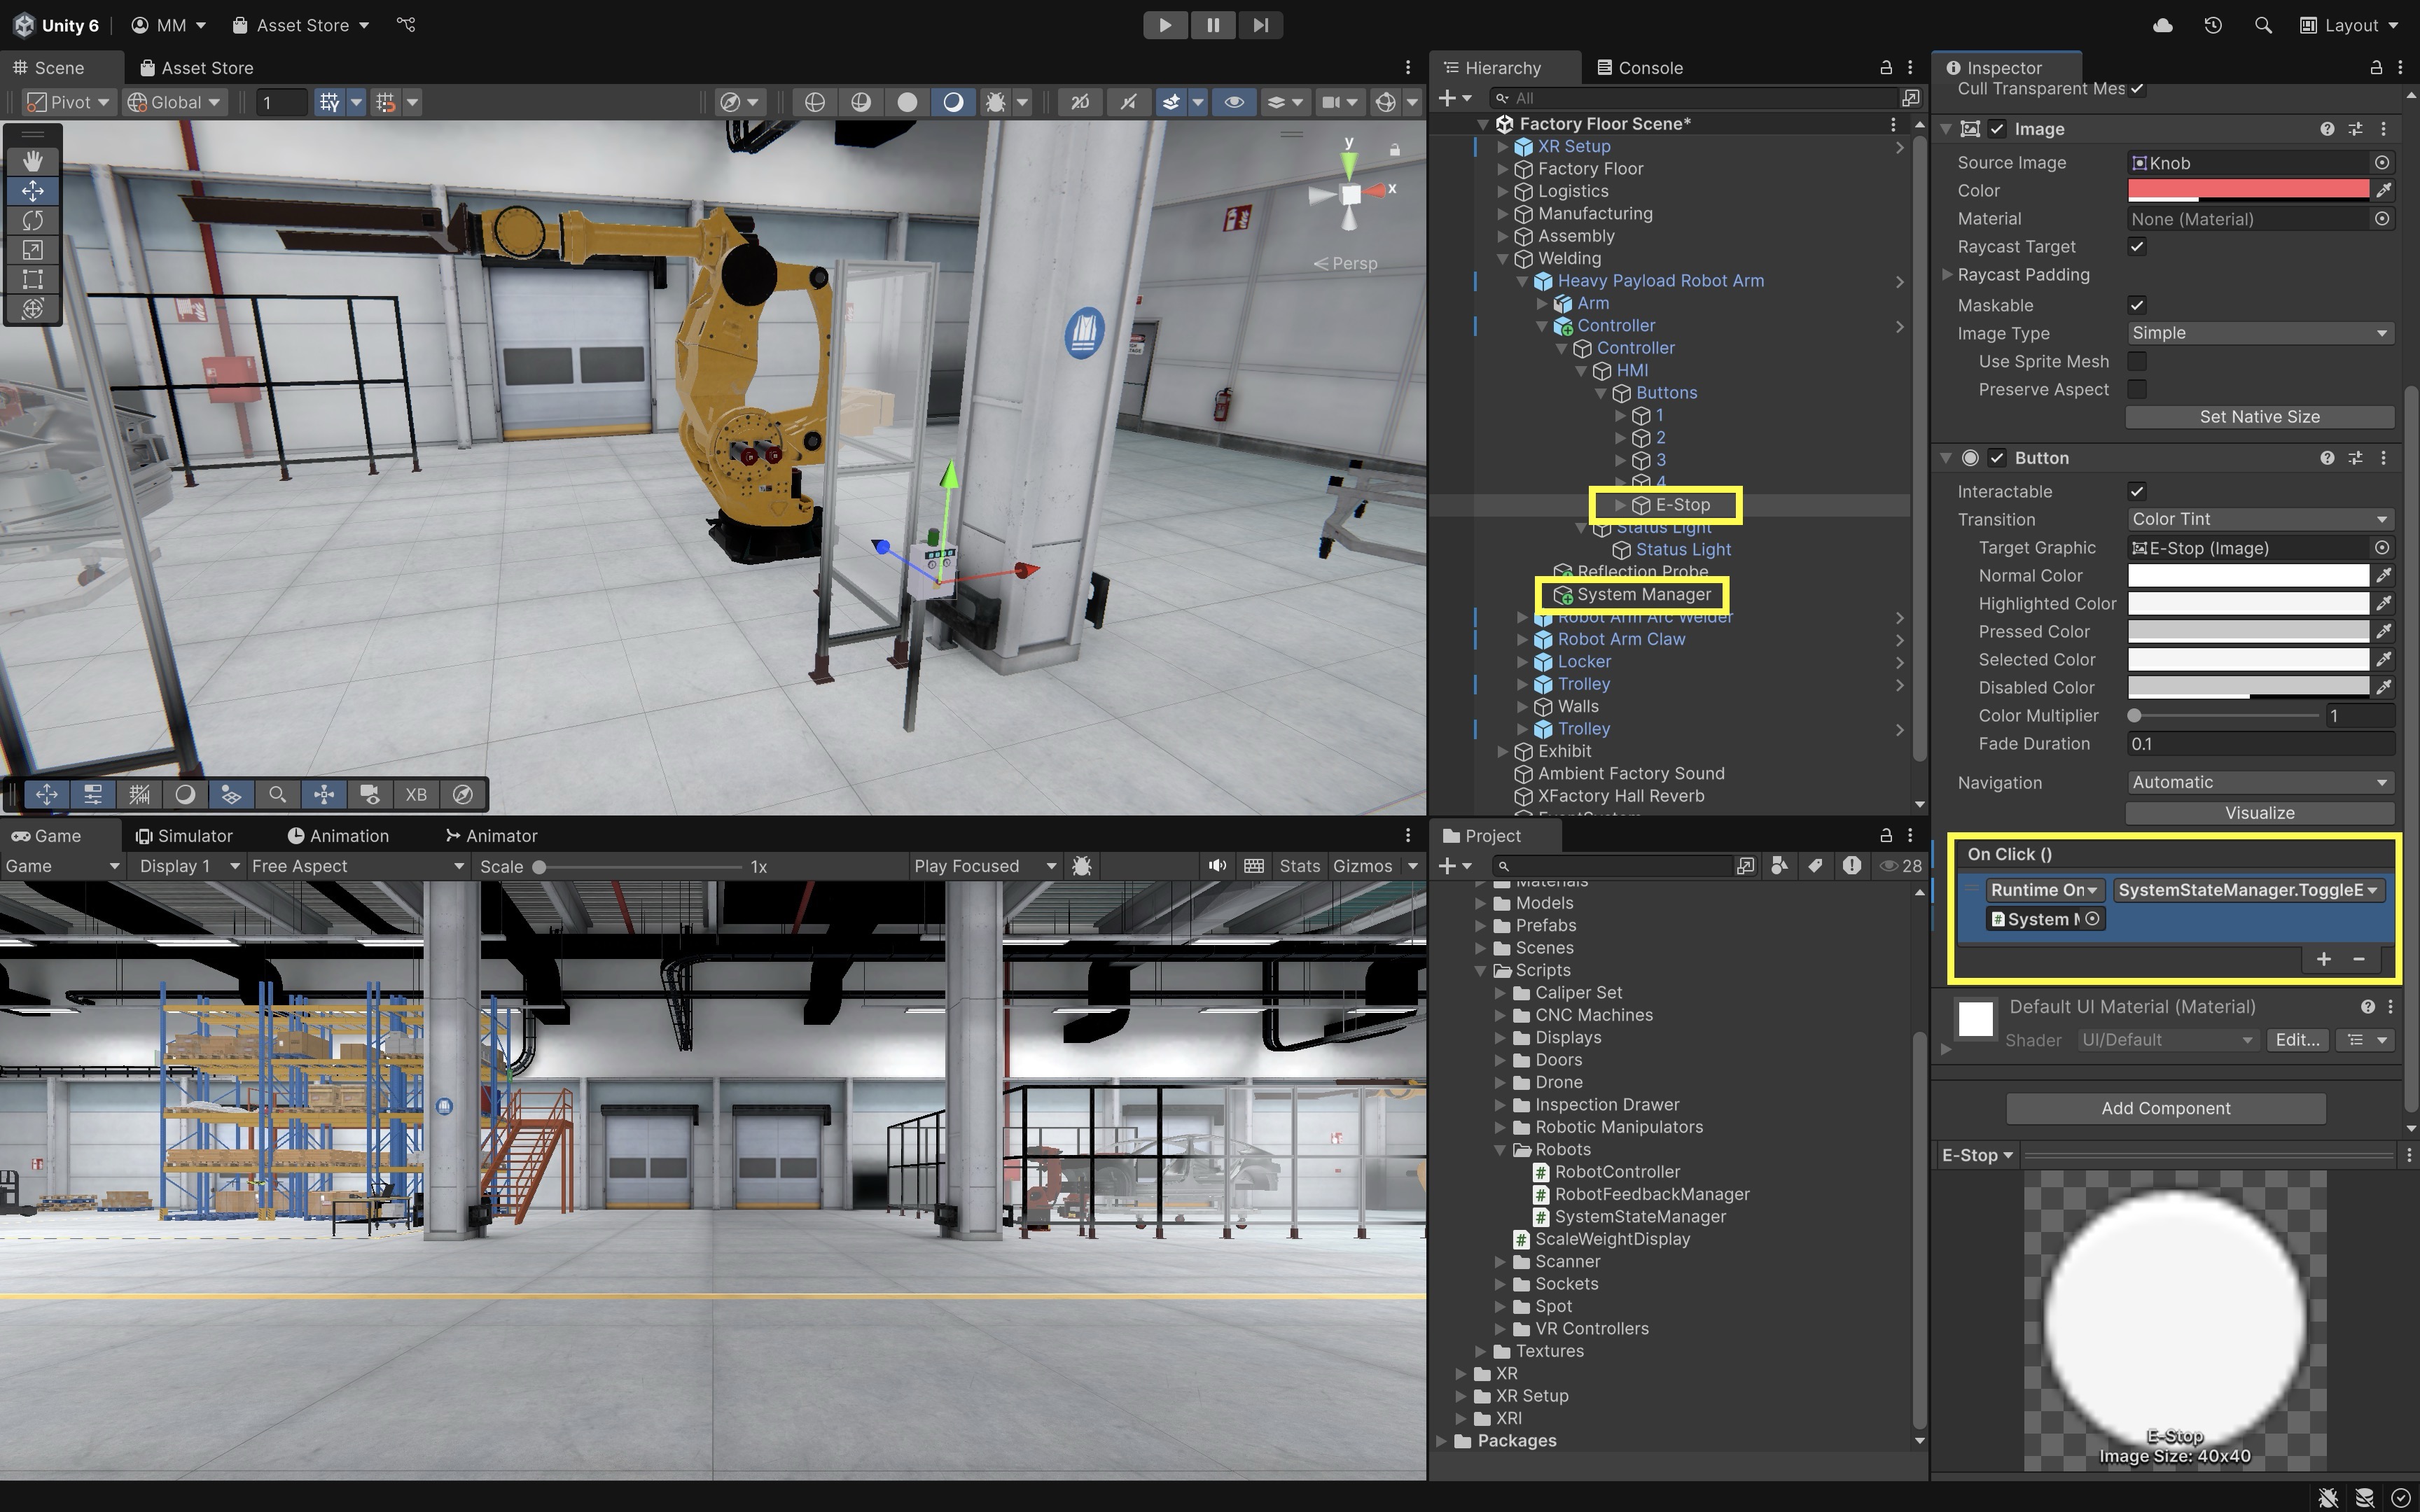
- In the
E-Stopbutton’sInspector, locate theOnClick()event section. - Click the
+to add a new event. - Drag the
System ManagerGameObject (the one withSystemStateManager.cs) into the object field. - From the dropdown, select
SystemStateManager → ToggleEmergencyStop(). This enables toggling the emergency state on and off when the e-stop is pressed.
- In the
- Wire Unity Events in the
Inspector:- Use Unity Events to link state transitions to visual and audio feedback.
- If you wired
OnEmergencyBlocked()andOnEmergencyCleared()in step 2, verify those calls ononEStopEngagedandonEStopCleared. Otherwise, locateOn E Stop Engaged, dragHeavy Payload Robot Arminto the field, and callRobotFeedbackManager.OnEmergencyBlocked(). OnOn E Stop Cleared, callRobotFeedbackManager.OnEmergencyCleared().
- Deploy and Test:
- Enter Play Mode with Quest Link / Meta Horizon Link for rapid preview, then build and run to Quest for final validation.
- When the e-stop is engaged, numpad buttons are disabled and the status light flashes red with a buzz alarm (via
onEStopEngaged). - Disabled numpad buttons do not fire
OnClick;RobotController.TriggerAnimation()still blocks any non-UI command that attempts to bypass the lockout. - Clearing the e-stop returns the system to normal: the status light turns solid green, the buzzing stops, the numpad becomes interactive again, and robot controls are re-enabled.
This reflects real-world industrial safety behavior, where all interactive systems respect current operational context, promoting safety, realism, and reliable user feedback.
Key Takeaways
- Activation is not one thing: UI click, XRI select, and XRI activate follow different input paths.
- Route commands through managers that validate state before playing feedback or animation.
- Input System actions replace legacy device polling for controller and proximity activation.
- Multimodal feedback and e-stop logic should reinforce safe machine states, not bypass them.
- Event-driven wiring with UnityEvents keeps UI, controllers, and machine scripts decoupled.