C4. UnityEngine Namespaces
Learning Outcomes
- Explain the purpose of namespaces in C# and their role in Unity projects. Before class, review how namespaces organize scripts and prevent naming conflicts, using the provided examples as a reference.
- Recognize core UnityEngine classes and lifecycle methods. As preparation, study the roles of
MonoBehaviour,GameObject, andComponent, and note how lifecycle methods likeStart(),Update(),Awake(), andFixedUpdate()are applied in scripts.- Identify common Unity audio APIs, including
AudioSource,AudioClip, and mixer-related types inUnityEngine.Audio. Ahead of the session, explore how audio playback and mixing types are used in Unity’s audio system.- Explore UnityEngine.UI components and hierarchy. For your pre-work, create a Canvas with TextMeshPro text and
Buttonelements in Unity and examine their properties in the Inspector.- Describe scene management capabilities in Unity. Prior to class, review how
SceneManagermethods such asLoadScene(),UnloadSceneAsync(), andsceneLoadedcontrol scene transitions.- Summarize the purpose of XR-related namespaces in Unity. In preparation, study the role of
UnityEngine.XR,XR.Interaction.Toolkit, andARFoundationin XR and AR workflows.
Namespaces
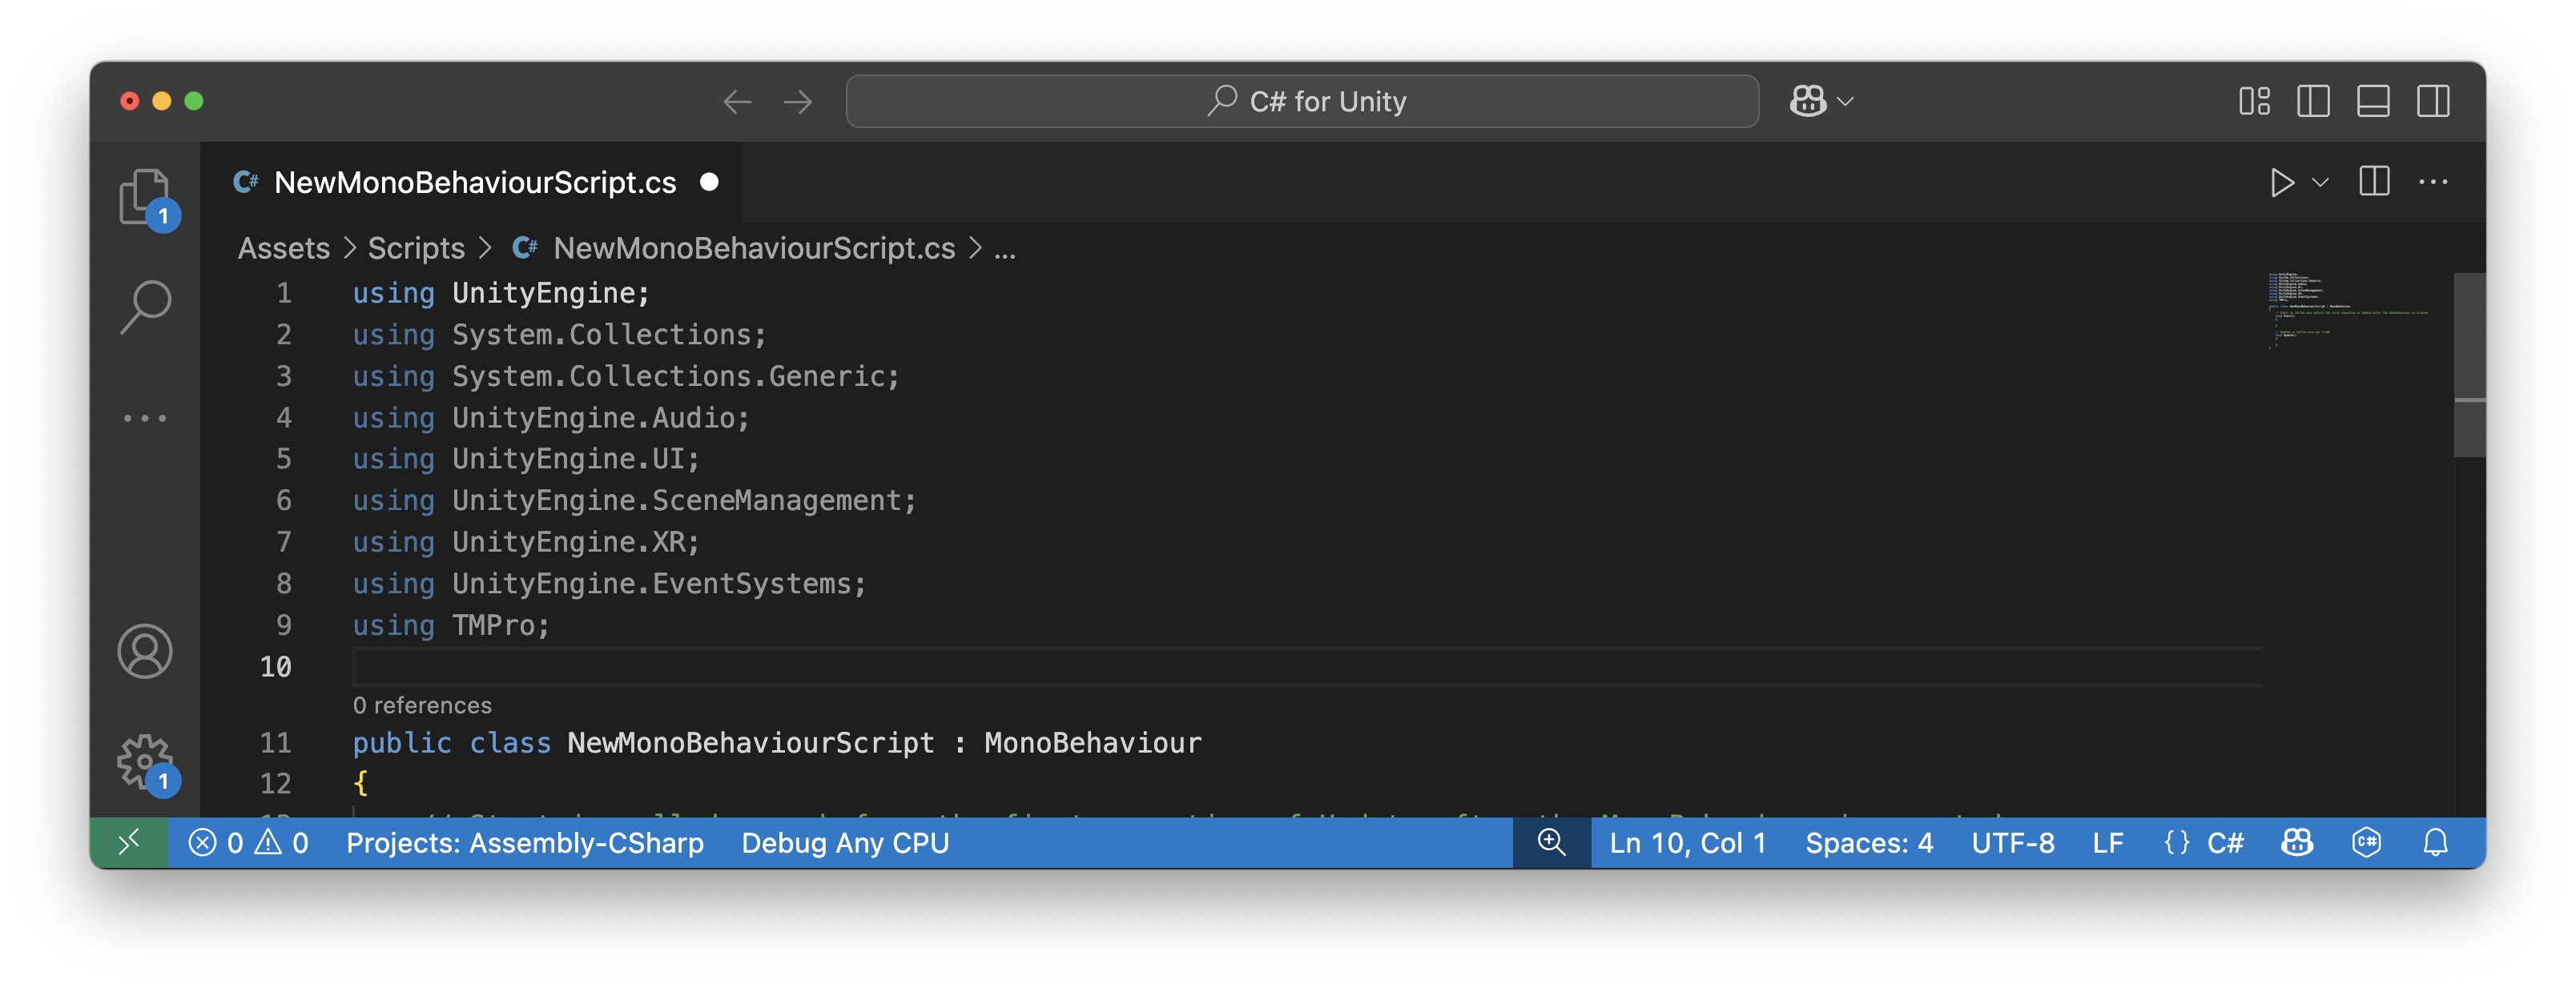
A namespace is a container that groups related types under a unique name, helping organize code and prevent naming conflicts. Think of it like a folder: two classes can have the same name as long as they live in different namespaces. In Unity, namespaces also reflect major areas of engine functionality. For example, UnityEngine.UI contains user-interface types, UnityEngine.SceneManagement contains scene-management types, and UnityEngine.XR contains XR-related APIs. A using directive simply lets you refer to types in a namespace without repeatedly writing their full names. It does not install or enable that functionality. If a namespace belongs to a Unity package, such as UnityEngine.XR.Interaction.Toolkit, that package must already be installed in the project.
Why Namespaces Matter
- Organization and Readability: Unity splits its features into specialized namespaces so you only work with what you need. For example,
UnityEngine.UIcovers uGUI types,UnityEngine.SceneManagementhandles scene loading, andUnityEngine.Audiois mainly used for mixer-related audio types. This makes Unity’s huge API easier to navigate and keeps systems distinct. - Avoiding Naming Conflicts: Namespaces prevent clashes between classes that might otherwise share the same name. For instance, your project can define a
ButtonControllerclass without conflicting with Unity’sButtontype because each can live in a different namespace. - Reusability and Encapsulation: By grouping related functionality, Unity’s namespaces make it possible to reuse systems like UI, audio, or XR across different projects without conflicts. Each namespace acts as a self-contained module you can plug into your work.
- Team Collaboration: Clear namespace boundaries make Unity’s API easier for teams to use. Developers know where to look for features—UI code in
UnityEngine.UI, mixer code inUnityEngine.Audio, XR features in package namespaces such asUnityEngine.XR.Interaction.Toolkit—which reduces confusion and supports parallel work.
Think of
UnityEngineas a company, and specialized namespaces likeUnityEngine.UI,UnityEngine.Audio,UnityEngine.SceneManagement, andUnityEngine.XRas its departments. If everyone in the company had the same job title—say, “Manager”—it would be chaos. By grouping classes into departments, Unity keeps related functionality together, avoids name collisions, and makes the massive API easier to navigate.
UnityEngine Namespaces
Unity groups classes and functions by feature area, helping you structure code in a modular, manageable way. Below are core engine namespaces/modules and common package namespaces used in this course:
Core Engine Namespaces and Modules
UnityEngine: Core engine types includingMonoBehaviour,GameObject,Transform,AudioSource,AudioClip, andAudioListener.UnityEngine.SceneManagement: Scene loading, unloading, and active-scene queries.UnityEngine.EventSystems: UI event interfaces and pointer/input routing for uGUI.UnityEngine.UI: uGUI components such asButton,Image,Toggle, andSlider.UnityEngine.Audio: Mixer-related types such asAudioMixer,AudioMixerGroup, andAudioMixerSnapshot.UnityEngine.XR: Lower-level XR device and subsystem APIs.
Package Namespaces
UnityEngine.InputSystem: Input System package.UnityEngine.XR.Management: XR Plugin Management package.UnityEngine.XR.Interaction.Toolkit: XR Interaction Toolkit package.UnityEngine.XR.ARFoundation: AR Foundation package.TMPro: TextMeshPro package for UI text such asTextMeshProUGUIandTMP_Text.
Package namespaces compile only when their packages are installed in the project.
Namespace Checklist
- Does each script include the required
usingdirectives? - Does the project have the required Unity package installed?
- Is the type from core
UnityEngine, a Unity package, or a third-party package? - Are TextMeshPro types using
TMProrather than legacyUnityEngine.UI.Text? - Are XR namespaces matched to the installed package versions?
- Are UI callback methods
public voidif they need to appear in the Inspector? - Did the AI-generated code invent a namespace or use an outdated API?
If an AI tool generates a script that fails to compile, check namespaces and package availability before changing the logic. Many Unity errors come from missing
usingdirectives, missing packages, legacy APIs, or class names that do not match the installed package version. When in doubt, search the installed package documentation or use your IDE’s autocomplete before trusting an AI-generated namespace.
UnityEngine
The UnityEngine namespace is the cornerstone of Unity development. It provides the essential classes and methods that power the Unity engine, enabling you to create, control, and manipulate game objects and behaviors. The commonly used type APIs in this namespace include MonoBehaviour, GameObject, and Component.
UnityEngine
├── MonoBehaviour
│   ├── Start()
│   ├── Update()
│   └── OnCollisionEnter()
├── GameObject
│   ├── Instantiate()
│   ├── SetActive()
│   └── CompareTag()
└── Component
    ├── GetComponent<T>()
    └── AddComponent<T>()
MonoBehaviour (Messages)
These methods form the backbone of scripting in Unity. They allow you to control the lifecycle of your scripts and react to events during gameplay. Examples of MonoBehaviour methods include:
Start(): Called before the first frame update—ideal for initialization (e.g., robot parameters or sensor states).Update(): Called once per frame—used for frame-based logic (e.g., quadruped or robot arm positioning).Awake(): Called when the script instance is being loaded—often used for registering components.FixedUpdate(): Called on a fixed time interval—perfect for physics calculations (e.g., forklifts or drone movement.).OnCollisionEnter(): Called when thisCollider/Rigidbodyhas begun touching anotherRigidbody/Collider—useful for identifying when a box hits a rack or a robot encounters an obstacle.
MonoBehaviourhas already been discussed in C3.
GameObject (Object Management)
GameObject is the primary building block of a Unity scene. It represents objects in your game world and can have multiple components attached to it. From instantiating and destroying objects to adding components and sending messages, these methods form the backbone of game object management in Unity. These are generally classified into GameObject methods and Component methods:
Instantiate(): Creates a new instance of aGameObjector prefab at runtime. For example,Instantiate(enginePart, new Vector3(2, 0, 0), Quaternion.identity);spawns a new engine part at the given position.Find(): Searches the current scene for aGameObjectby name and returns the first match found. For example,GameObject hmi = GameObject.Find("HMI_Display");locates a control panel named HMI_Display.SetActive(): Activates or deactivates aGameObject, controlling whether it is visible and interactive in the scene. For example,uiPanel.SetActive(false);hides a UI element.CompareTag(): Checks whether theGameObject’s tag matches a specified string for condition-based logic. For example,if (gameObject.CompareTag("Tool"))filters actions to tool-related objects.
Example
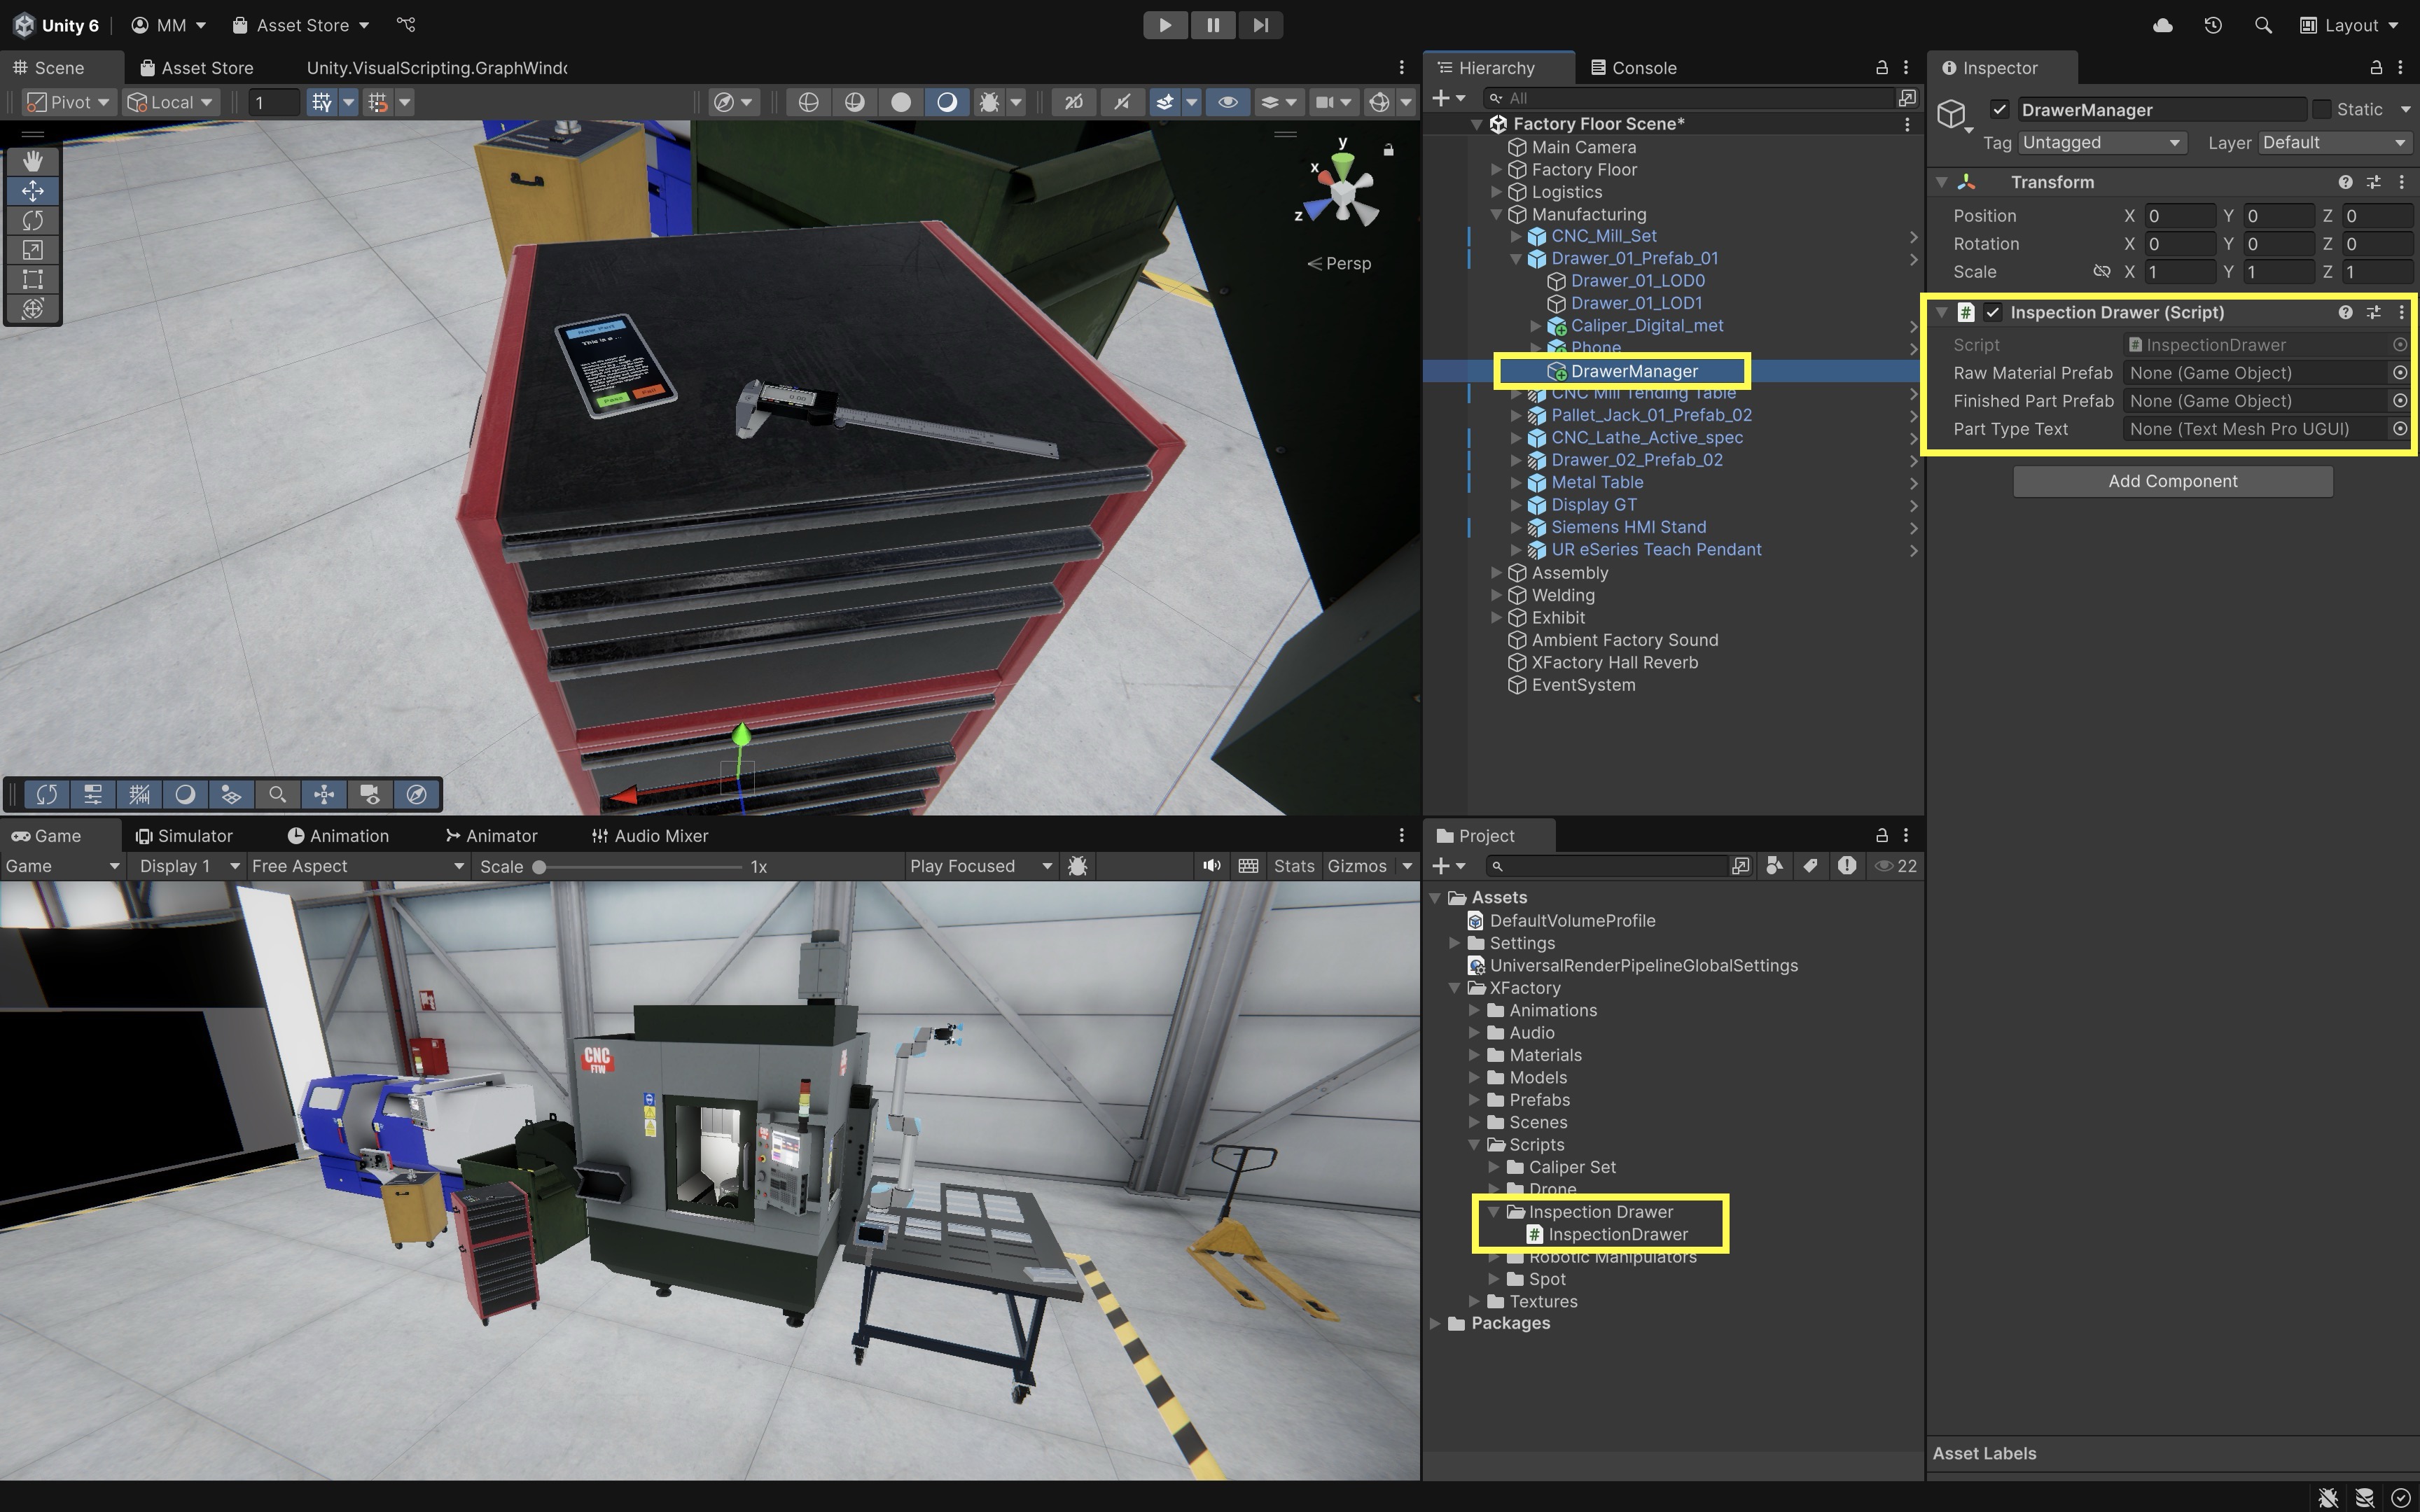
Let’s use GameObject methods to simulate interaction with tools on the drawer next to the CNC machine in XFactory’s manufacturing station. Pressing the “New Part” button on the phone spawns a randomly selected prefab (either a raw material or finished part), attaches physics, and updates the UI with its tag. Pressing “Pass” or “Fail” removes the spawned part. Pressing the on/off button on the digital caliper toggles its display on or off. Create an empty GameObject named DrawerManager under the drawer GameObject and attach the following InspectionDrawer.cs script to it.
using UnityEngine;
using TMPro;

public class InspectionDrawer : MonoBehaviour
{
    [SerializeField] private GameObject rawMaterialPrefab;  // Prefab for raw material
    [SerializeField] private GameObject finishedPartPrefab; // Prefab for finished part
    [SerializeField] private TextMeshProUGUI partTypeText;  // UI text to show part tag
    [SerializeField] private GameObject caliperDisplay;     // Assign Caliper_Digital_Bottom/Display in Inspector

    private GameObject currentPart;

    // Called when "New Part" button is pressed on the phone
    public void SpawnNewPart()
    {
        if (rawMaterialPrefab == null || finishedPartPrefab == null)
        {
            Debug.LogWarning("InspectionDrawer: Assign both prefabs in the Inspector.");
            return;
        }

        if (currentPart != null)
        {
            Destroy(currentPart);
            currentPart = null;
        }

        // Randomly pick a prefab to spawn
        GameObject prefabToSpawn =
            Random.value > 0.5f ? rawMaterialPrefab : finishedPartPrefab;

        // Instantiate the part at a fixed position with random Y rotation
        currentPart = Instantiate(
            prefabToSpawn,
            new Vector3(-13.38f, 1.12f, -13.86f),
            Quaternion.Euler(0, Random.Range(0, 360), 0)
        );

        // Add Rigidbody for physics (only if the prefab does not already include one)
        if (currentPart.GetComponent<Rigidbody>() == null)
            currentPart.AddComponent<Rigidbody>();

        if (partTypeText == null)
        {
            Debug.LogWarning("InspectionDrawer: Assign partTypeText in the Inspector.");
            return;
        }

        // Use tag to update the part type text
        if (currentPart.CompareTag("Raw Material"))
        {
            partTypeText.text = "This is a Raw Material";
        }
        else if (currentPart.CompareTag("Finished Part"))
        {
            partTypeText.text = "This is a Finished Part";
        }
    }

    // Called when "Pass" or "Fail" button is pressed
    public void RemoveCurrentPart()
    {
        if (currentPart != null)
        {
            Destroy(currentPart);
            currentPart = null;
        }
    }

    // Called when caliper on/off button is pressed
    public void ToggleCaliperDisplay()
    {
        if (caliperDisplay == null)
        {
            Debug.LogWarning("InspectionDrawer: Assign caliperDisplay in the Inspector.");
            return;
        }

        caliperDisplay.SetActive(!caliperDisplay.activeSelf);
    }
}
- Create and Attach the Script:
- In the
Hierarchy, right-click and selectCreate Empty. Rename it toDrawerManager. - In the
Inspector, clickAdd Componentand attach theInspectionDrawer.csscript.
- In the
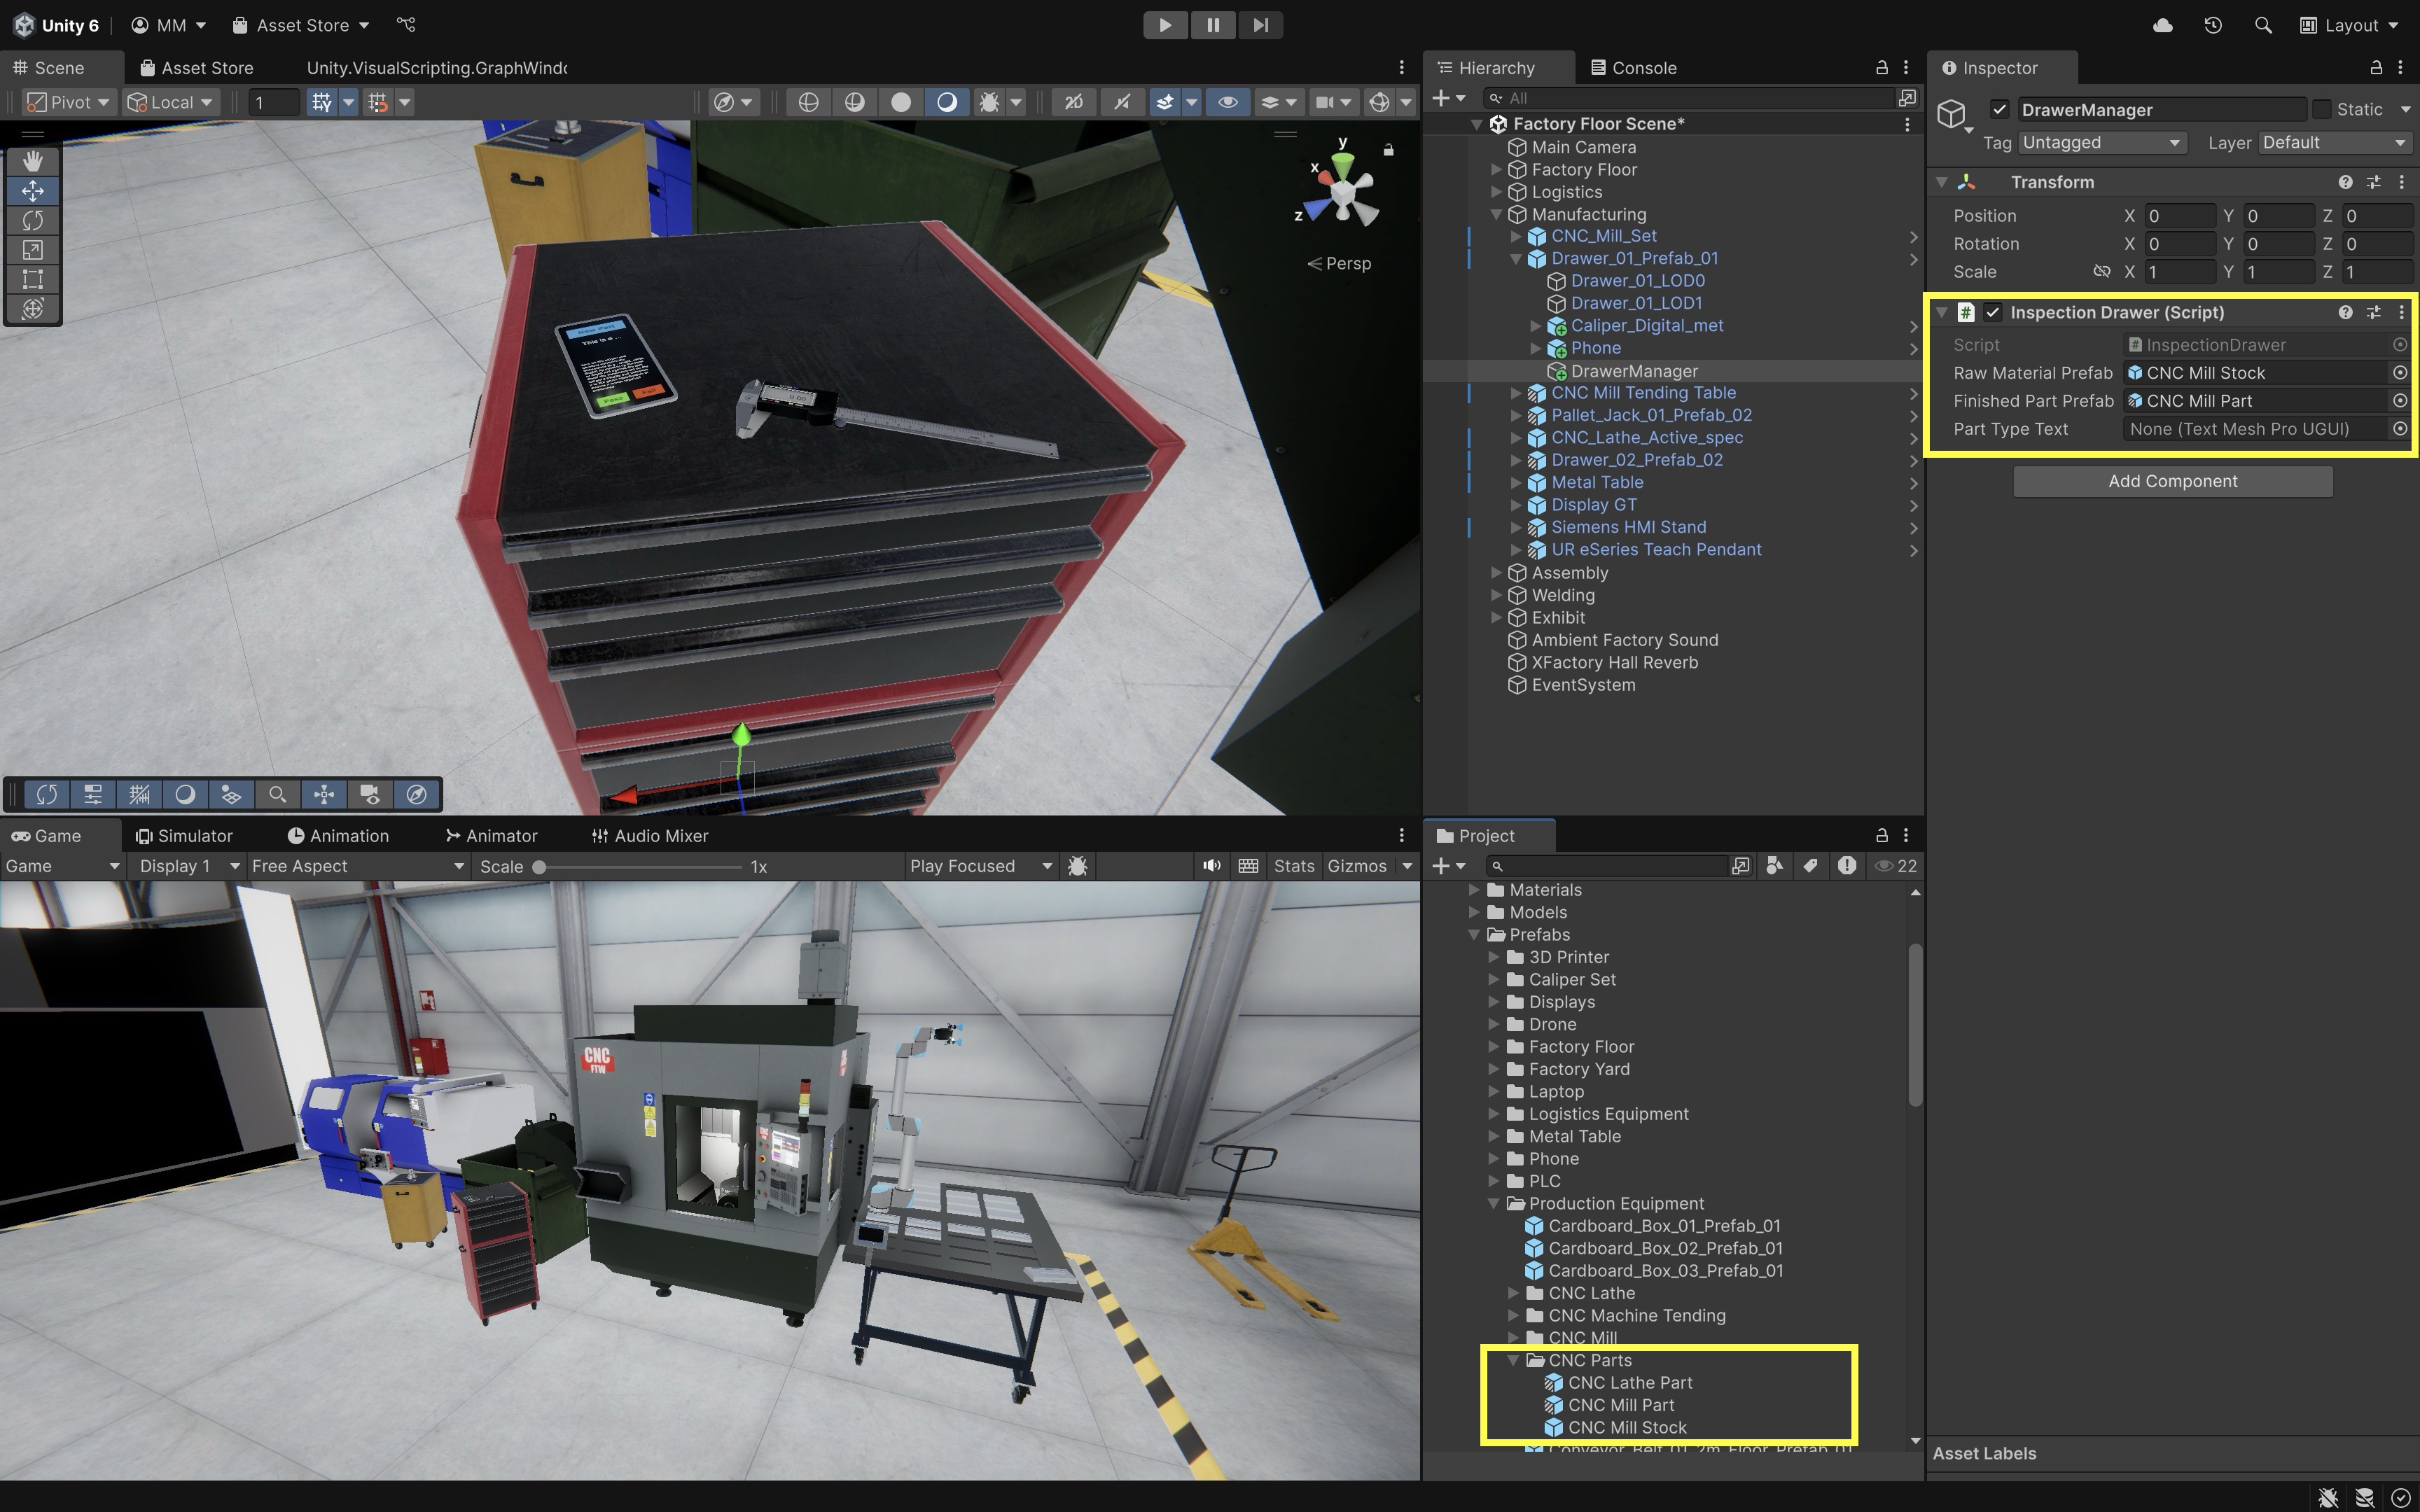
- Assign Prefabs to the Script:
- Select
DrawerManagerin theHierarchy. - Drag and drop the
CNC Mill Stockprefab from theProjectwindow,Assets > XFactory > Prefabs > Production Equipment > CNC Partsinto theRaw Material Prefabfield. Make sure the prefab’sTagis set toRaw Material. - Drag and drop the
CNC Mill Partprefab from theProjectwindow,Assets > XFactory > Prefabs > Production Equipment > CNC Partsinto theFinished Part Prefabfield. Make sure the prefab’sTagis set toFinished Part.
- Select
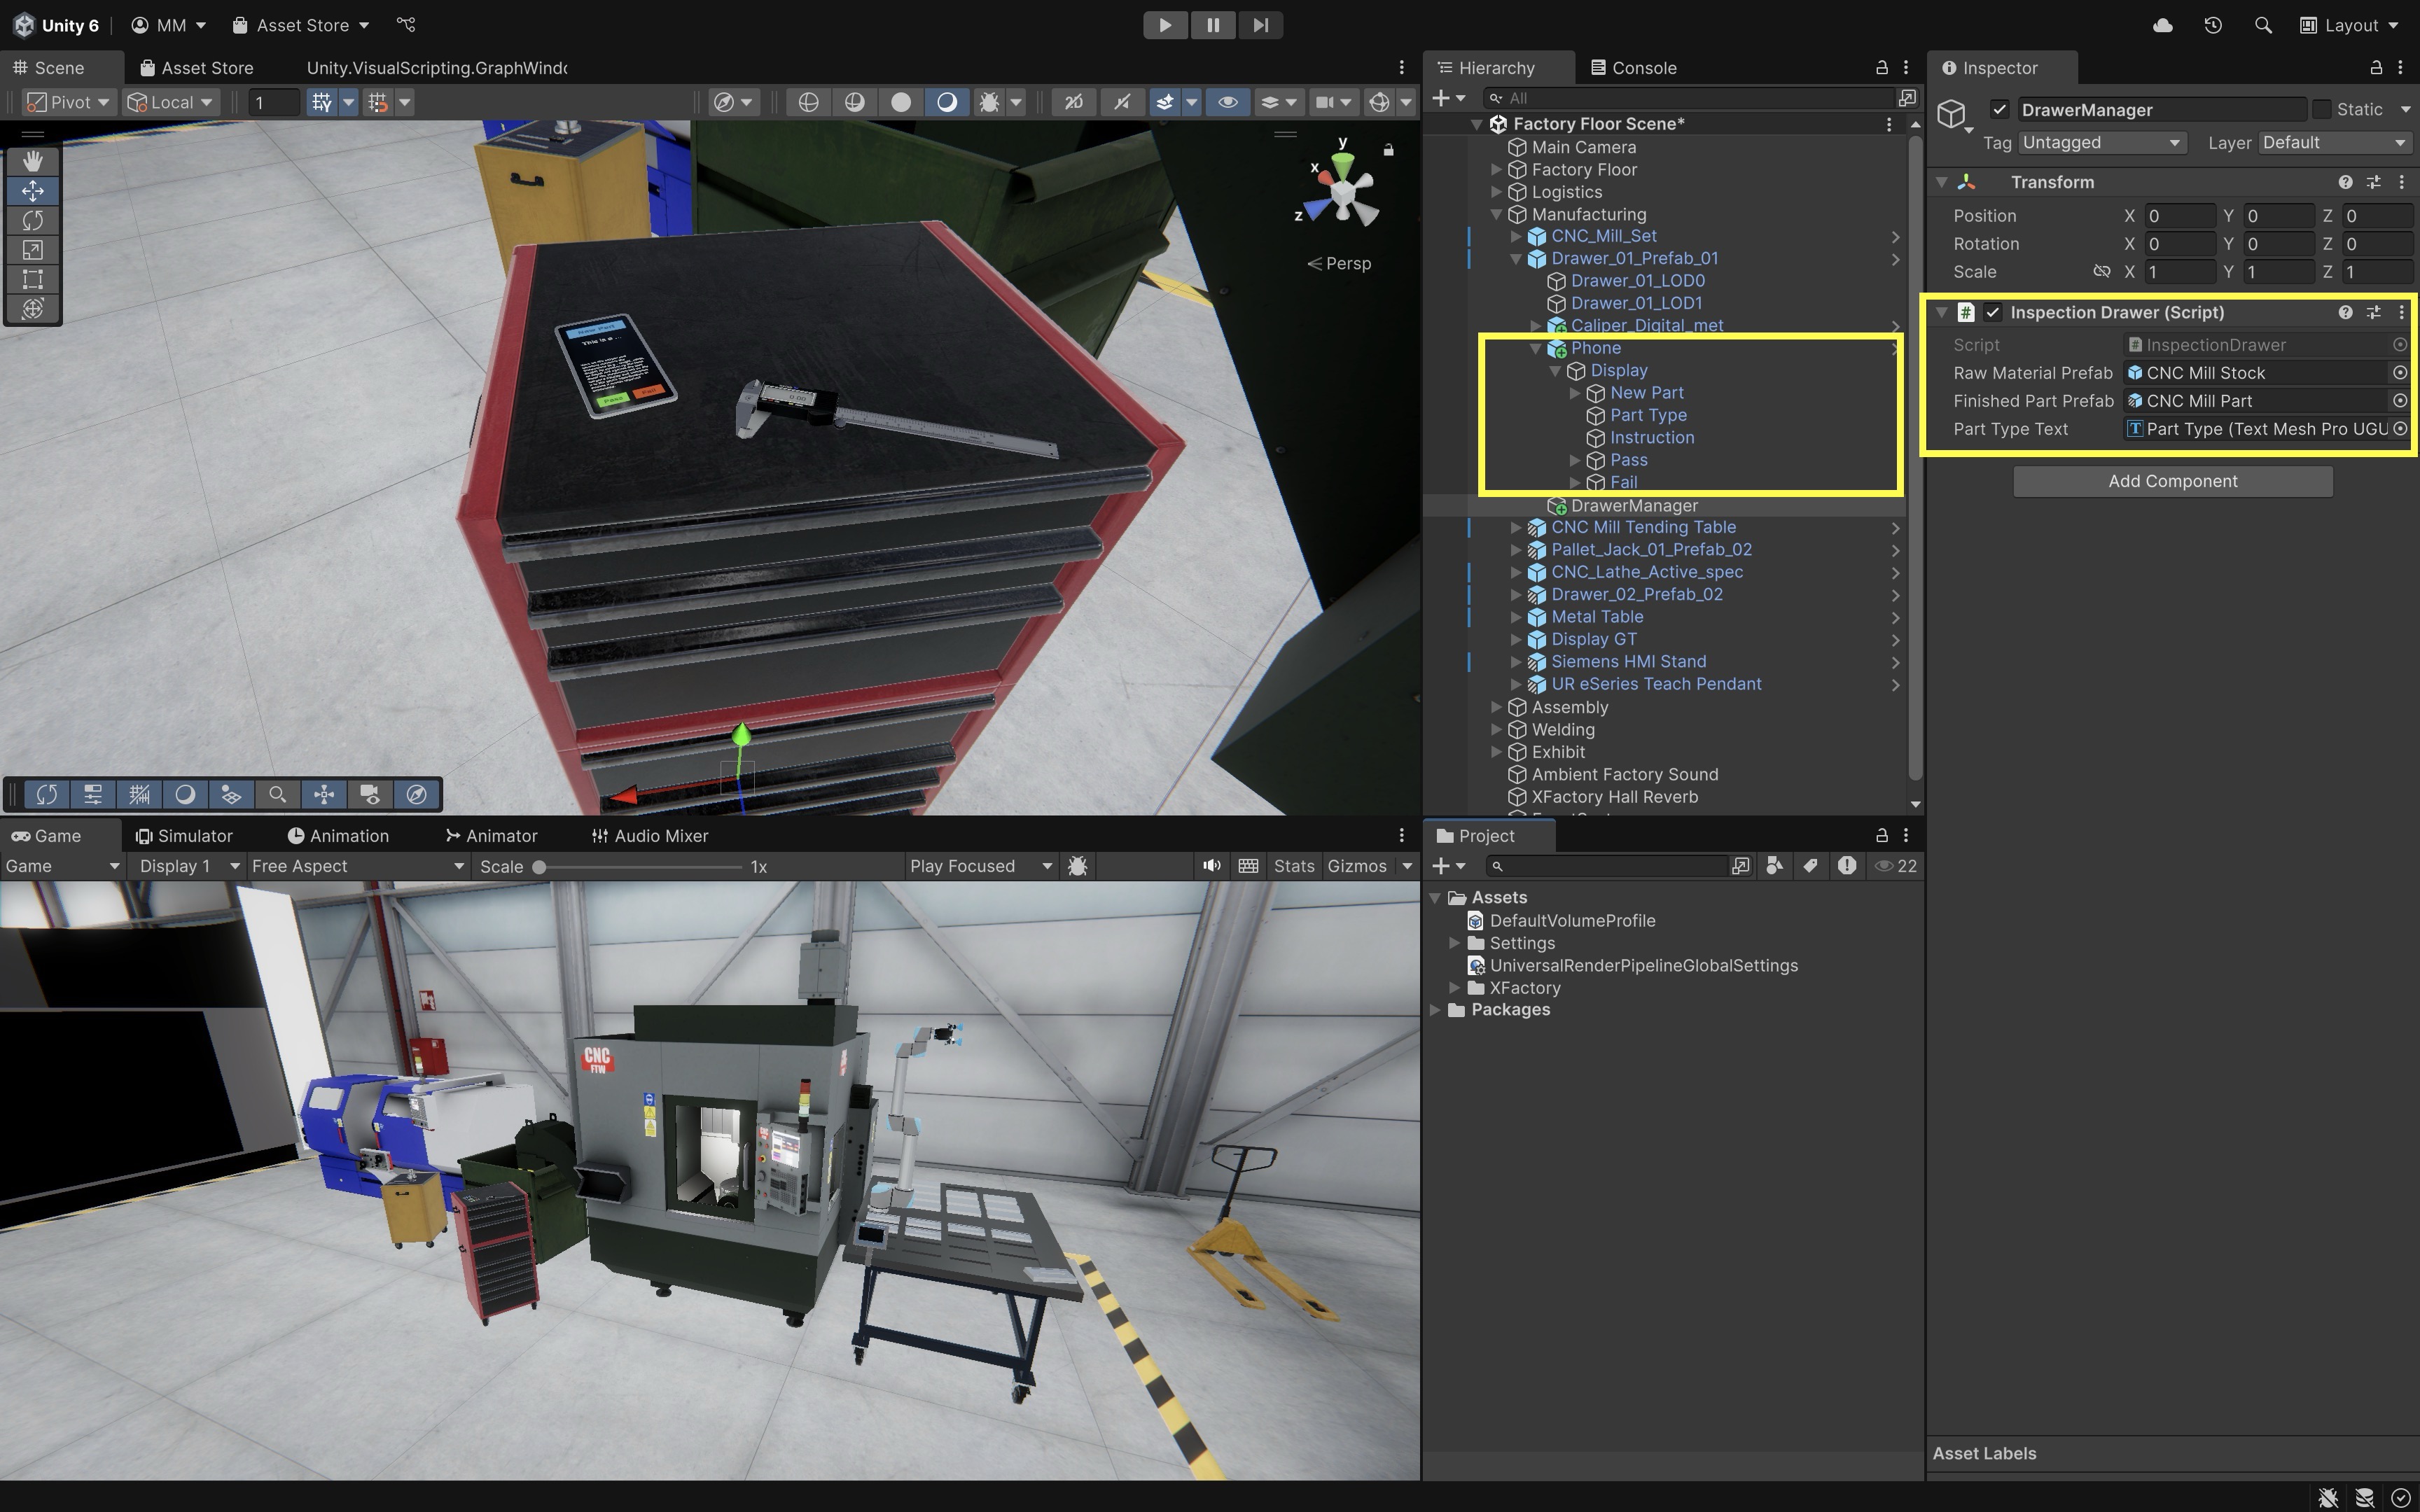
- Assign the UI Text for Part Type:
- Locate the
TextMeshProUGUItext object underPhone/Display/Part Type. - Drag this object into the
Part Type Textfield of theInspectionDrawer.csscript onDrawerManager. - Drag
Caliper_Digital_Bottom/Displayinto theCaliper Displayfield.
- Locate the
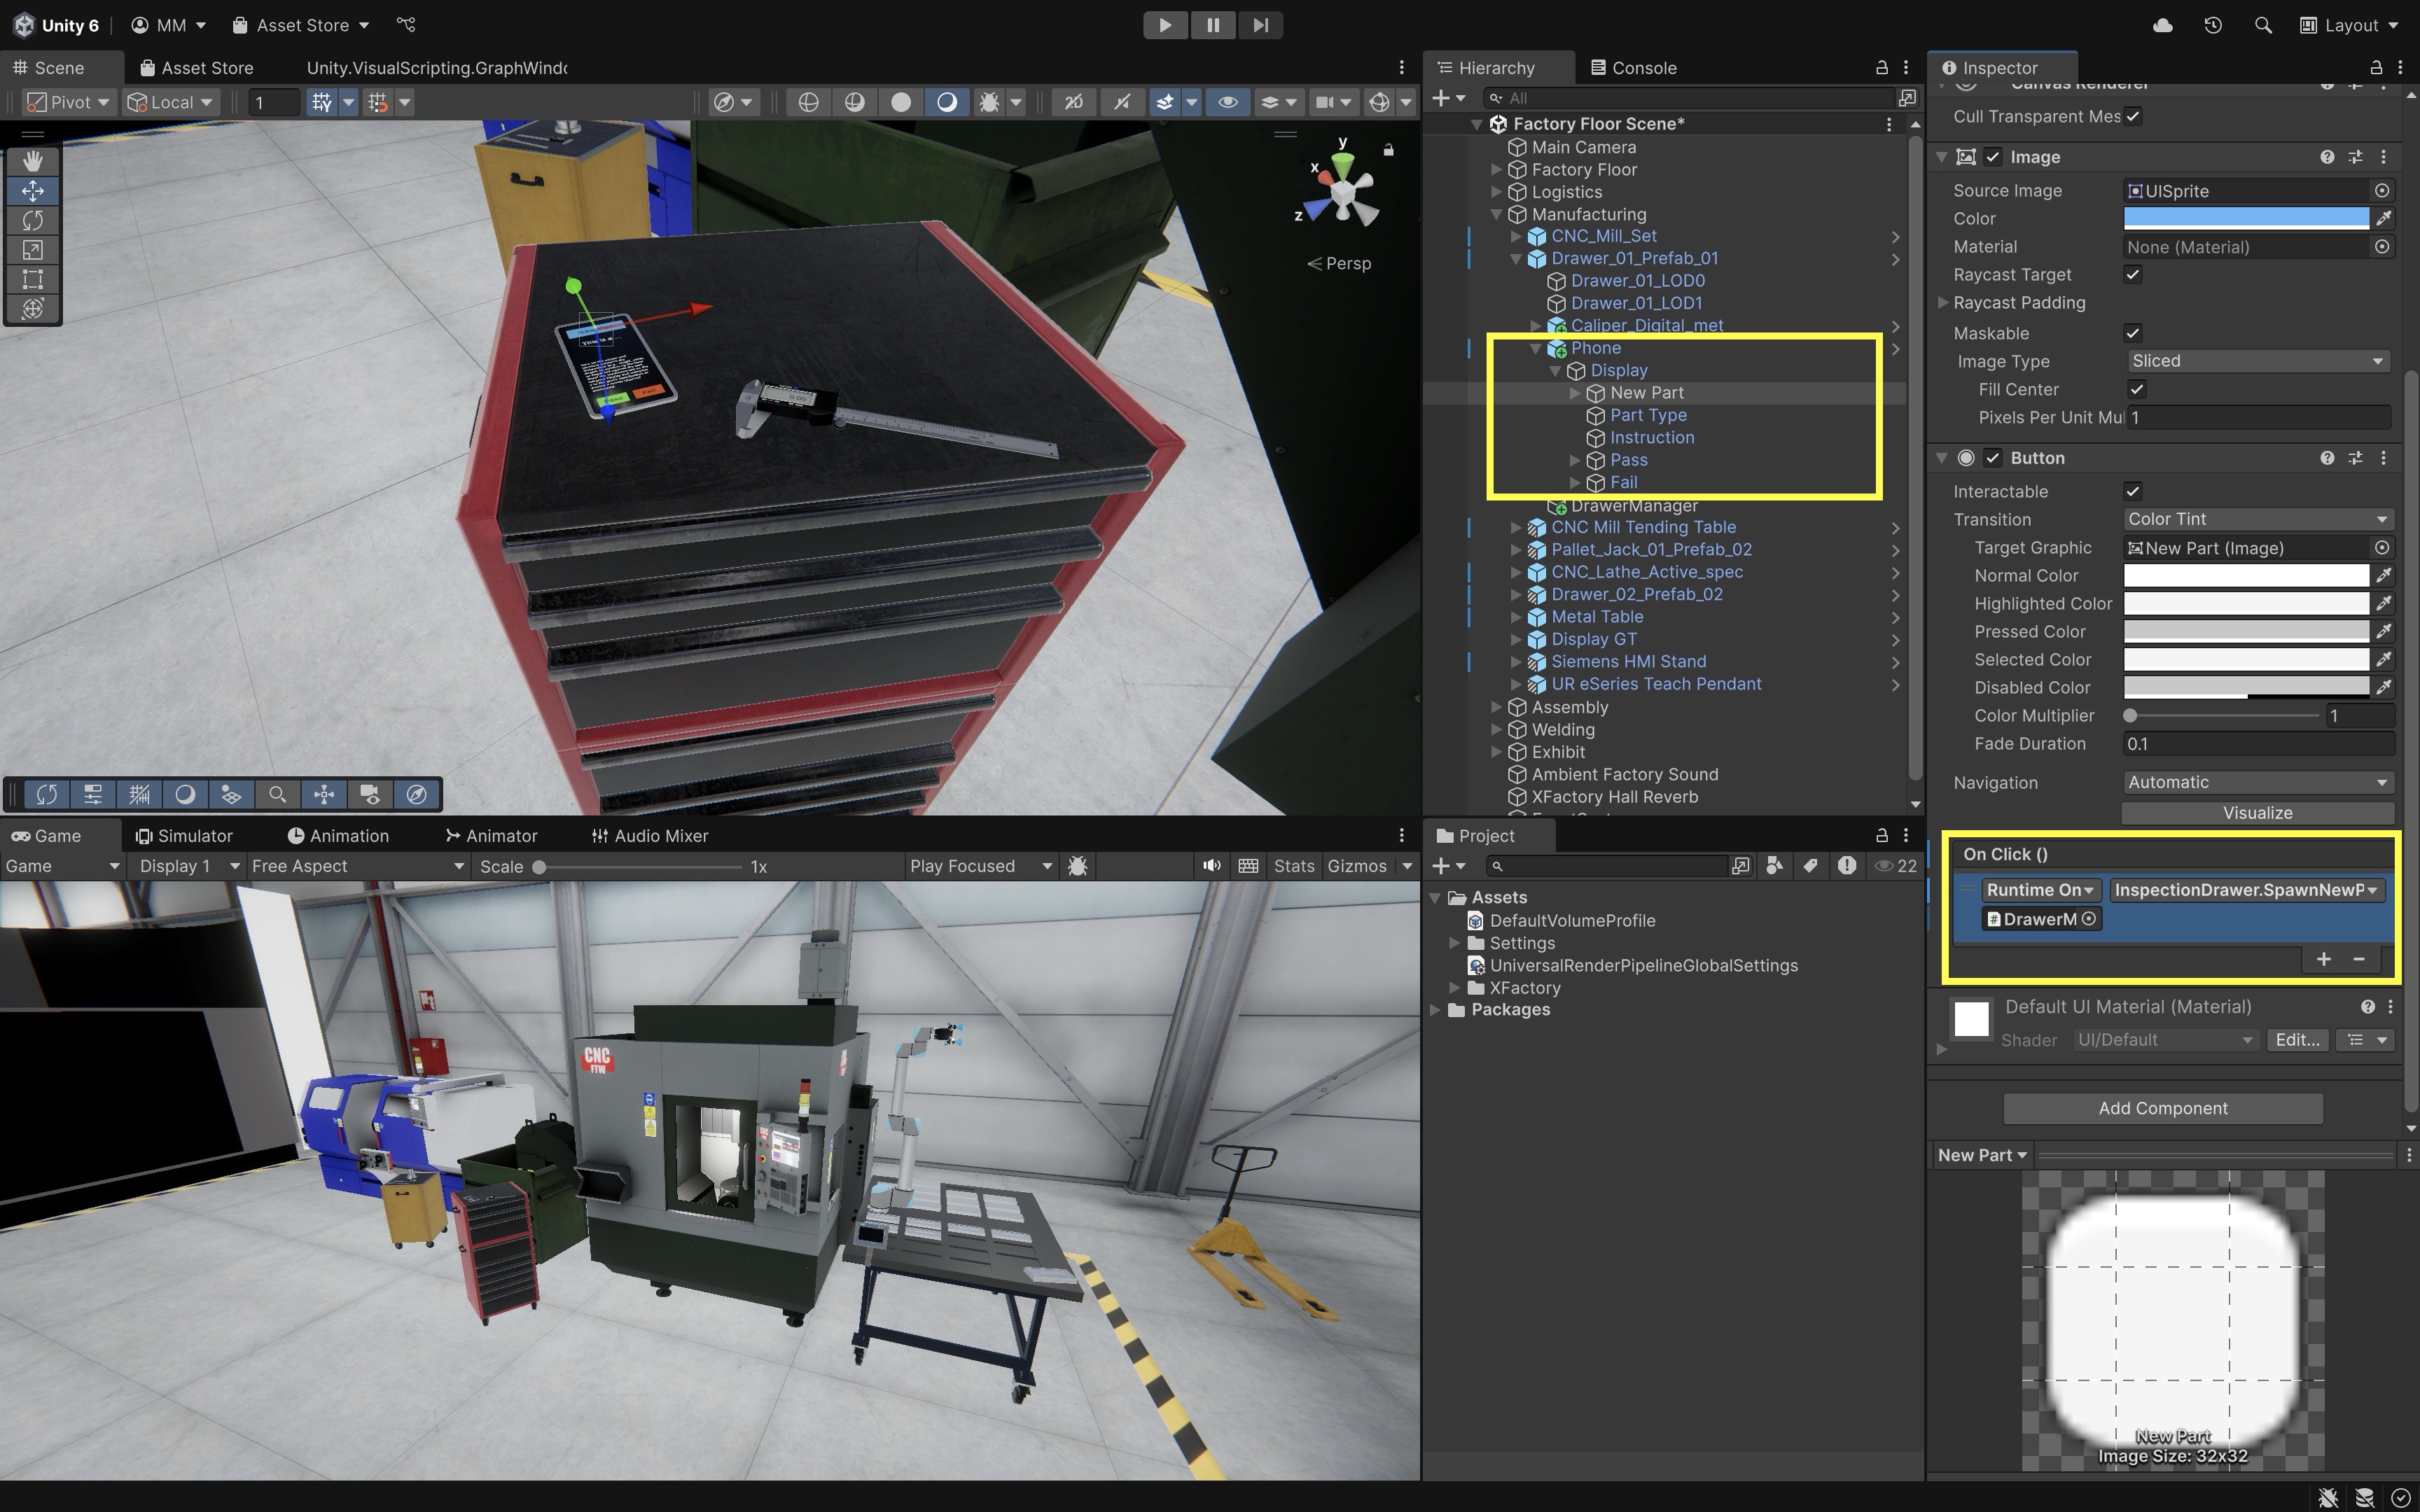
- Connect Phone Button Events:
- Select the
New Partbutton in theHierarchy. - In the
Button (Script)component, click the+in theOn Click()section. - Drag
DrawerManagerinto the object field and selectInspectionDrawer -> SpawnNewPart()from the dropdown. - Repeat this for
PassandFailbuttons, assigning them toRemoveCurrentPart().
- Select the
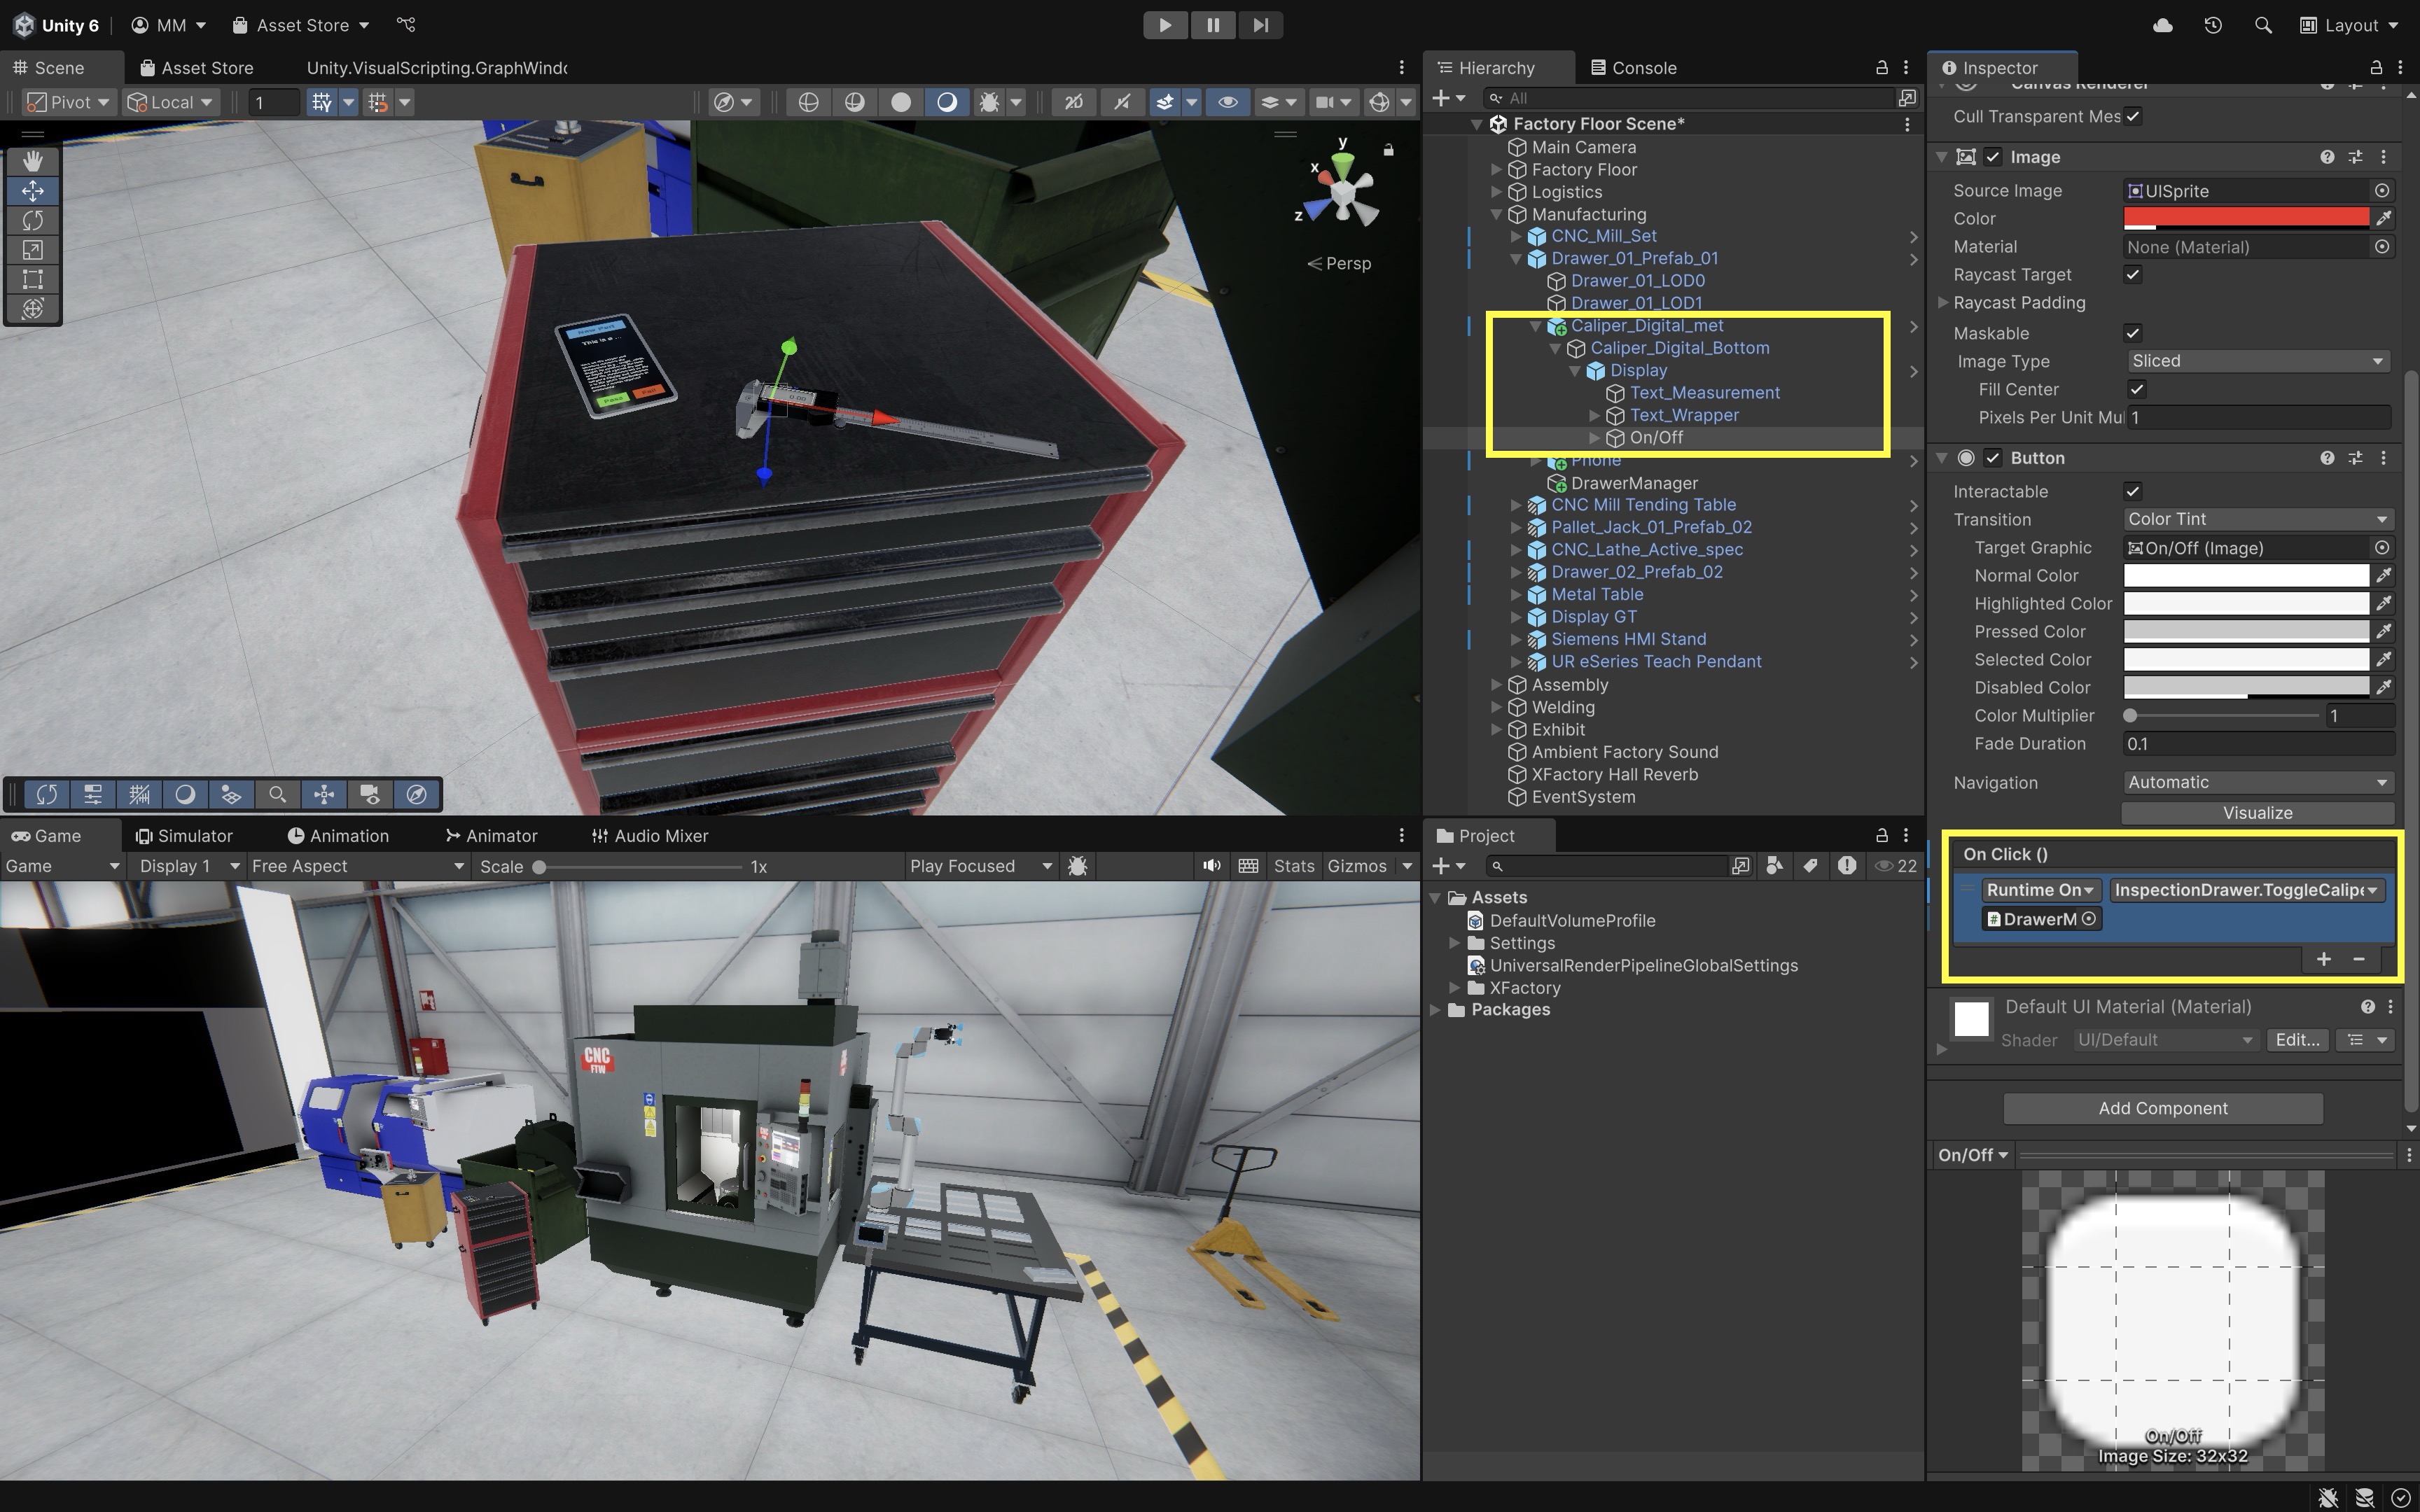
- Connect the Caliper On/Off Button:
- Select the
On/Offbutton under the caliper. - In the
On Click()section, add a new event. - Drag
DrawerManagerinto the object field and assign it toInspectionDrawer → ToggleCaliperDisplay().
- Select the
- Test the Scene:
- Enter
Playmode. - Press
New Partto spawn a random part in the drawer. - Press
PassorFailto remove the part. - Press the
On/Offbutton on the caliper to toggle the digital display. - With Quest Link active, you can run the same drawer test in a connected Meta Quest headset before Module D.
Debugging note: An earlier version of this tutorial used
GameObject.Find("Caliper_Digital_Bottom/Display"). That fails after the display is turned off becauseGameObject.Find()does not locate inactive GameObjects. Once the display is deactivated, the next call cannot find it, so the button appears to work only once. Caching a serialized reference and togglingcaliperDisplay.SetActive(...)avoids this common AI-generated bug.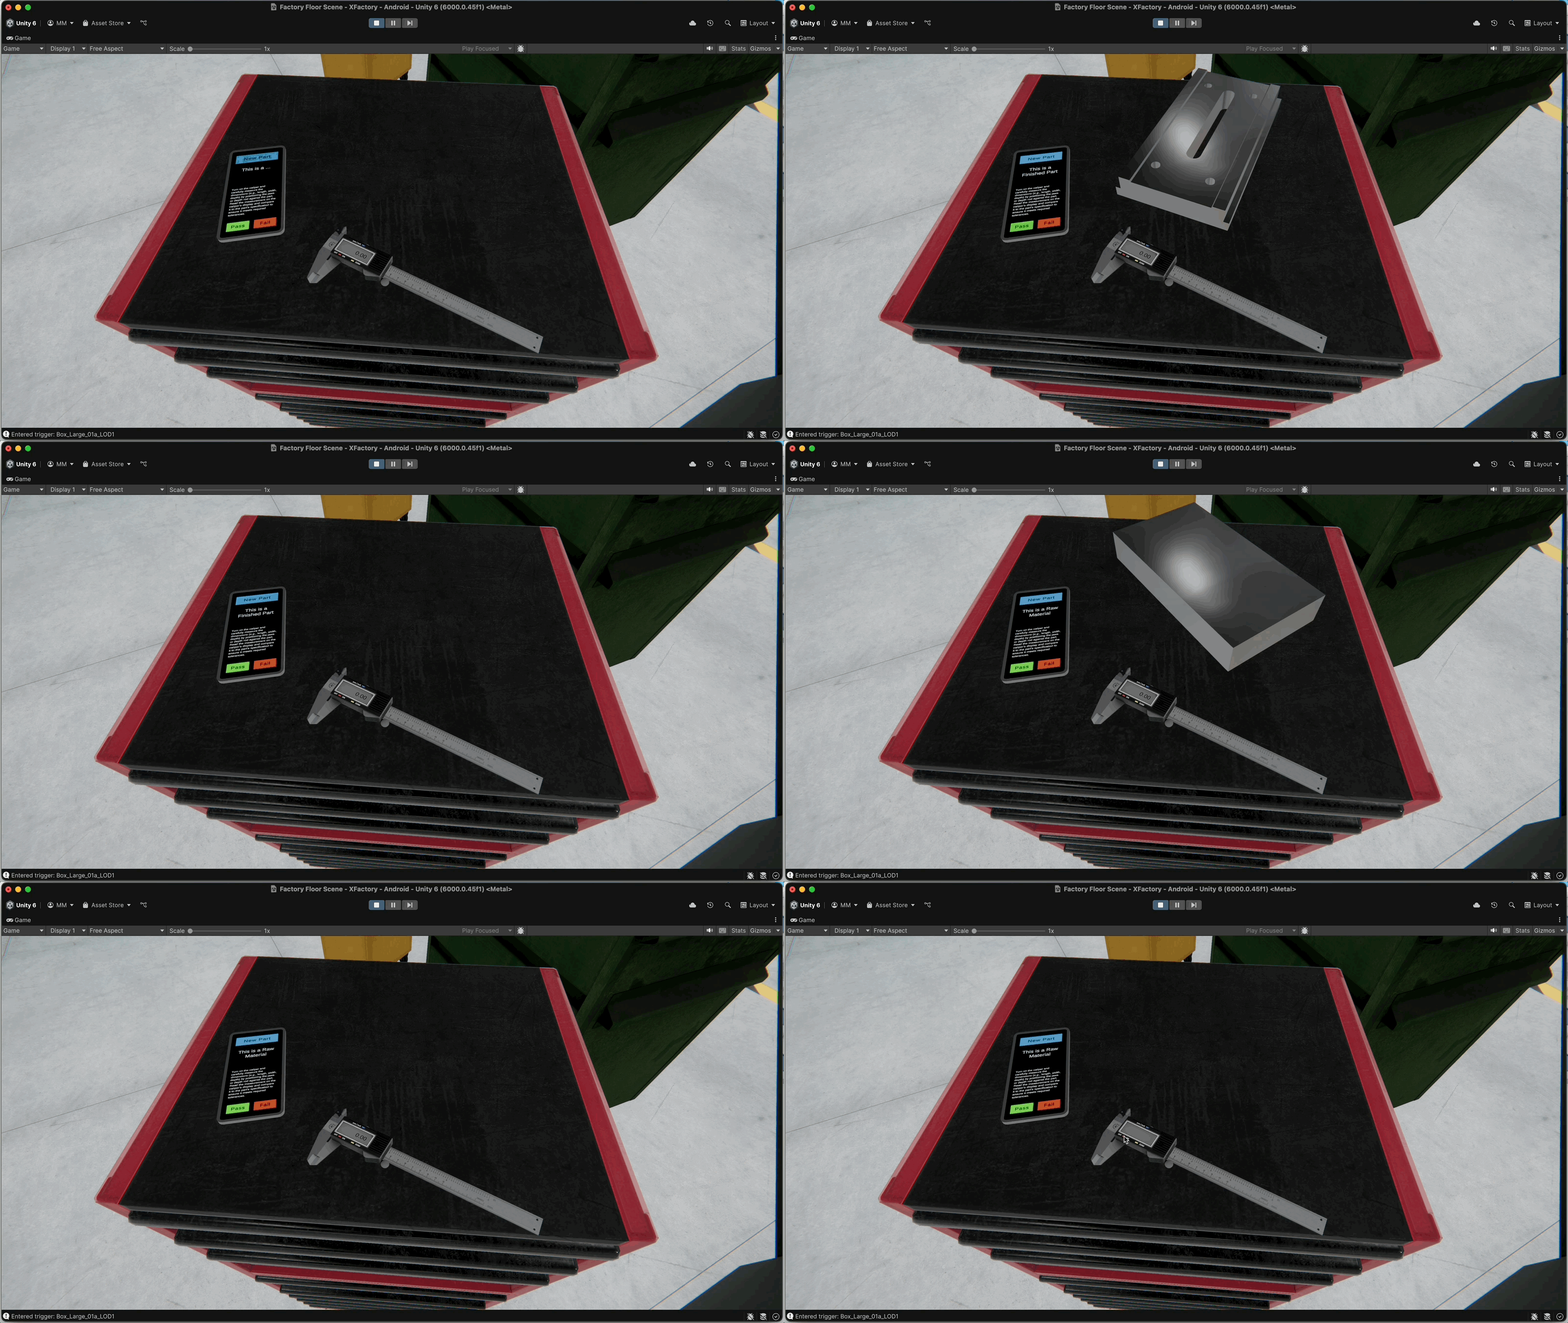
- Enter
Component (Access)
Components add functionality to GameObjects and are a core part of Unity’s component-based architecture. Whether you are retrieving a single component, finding one among children or parents, or invoking methods across multiple components, these methods enable a modular and flexible design approach. Key methods to work with components include:
GetComponent<T>(): Retrieves a component of typeTthat is attached to the same GameObject. For example,Rigidbody rb = currentPart.GetComponent<Rigidbody>();accesses the physics component on the newly spawned part in the example above.GetComponentInChildren<T>(): Searches for a component of typeTon the GameObject or any of its child objects. For example,TextMeshProUGUI displayText = phoneDisplay.GetComponentInChildren<TextMeshProUGUI>();finds the part type text under the phone’s display.GetComponents<T>(): Retrieves all components of typeTattached to the GameObject, returning an array. For example,AudioSource[] alerts = phone.GetComponents<AudioSource>();collects all sound sources from the phone device for control or diagnostics.GetComponentInParent<T>(): Searches the GameObject’s parent hierarchy for a component of typeT. For example,InspectionDrawer manager = GetComponentInParent<InspectionDrawer>();accesses the logic controller from a UI button nested deep in the phone’s hierarchy.AddComponent<T>(): Dynamically adds a component of typeTto theGameObject. For example,gameObject.AddComponent<Rigidbody>();adds physics behavior to the object at runtime.
Example
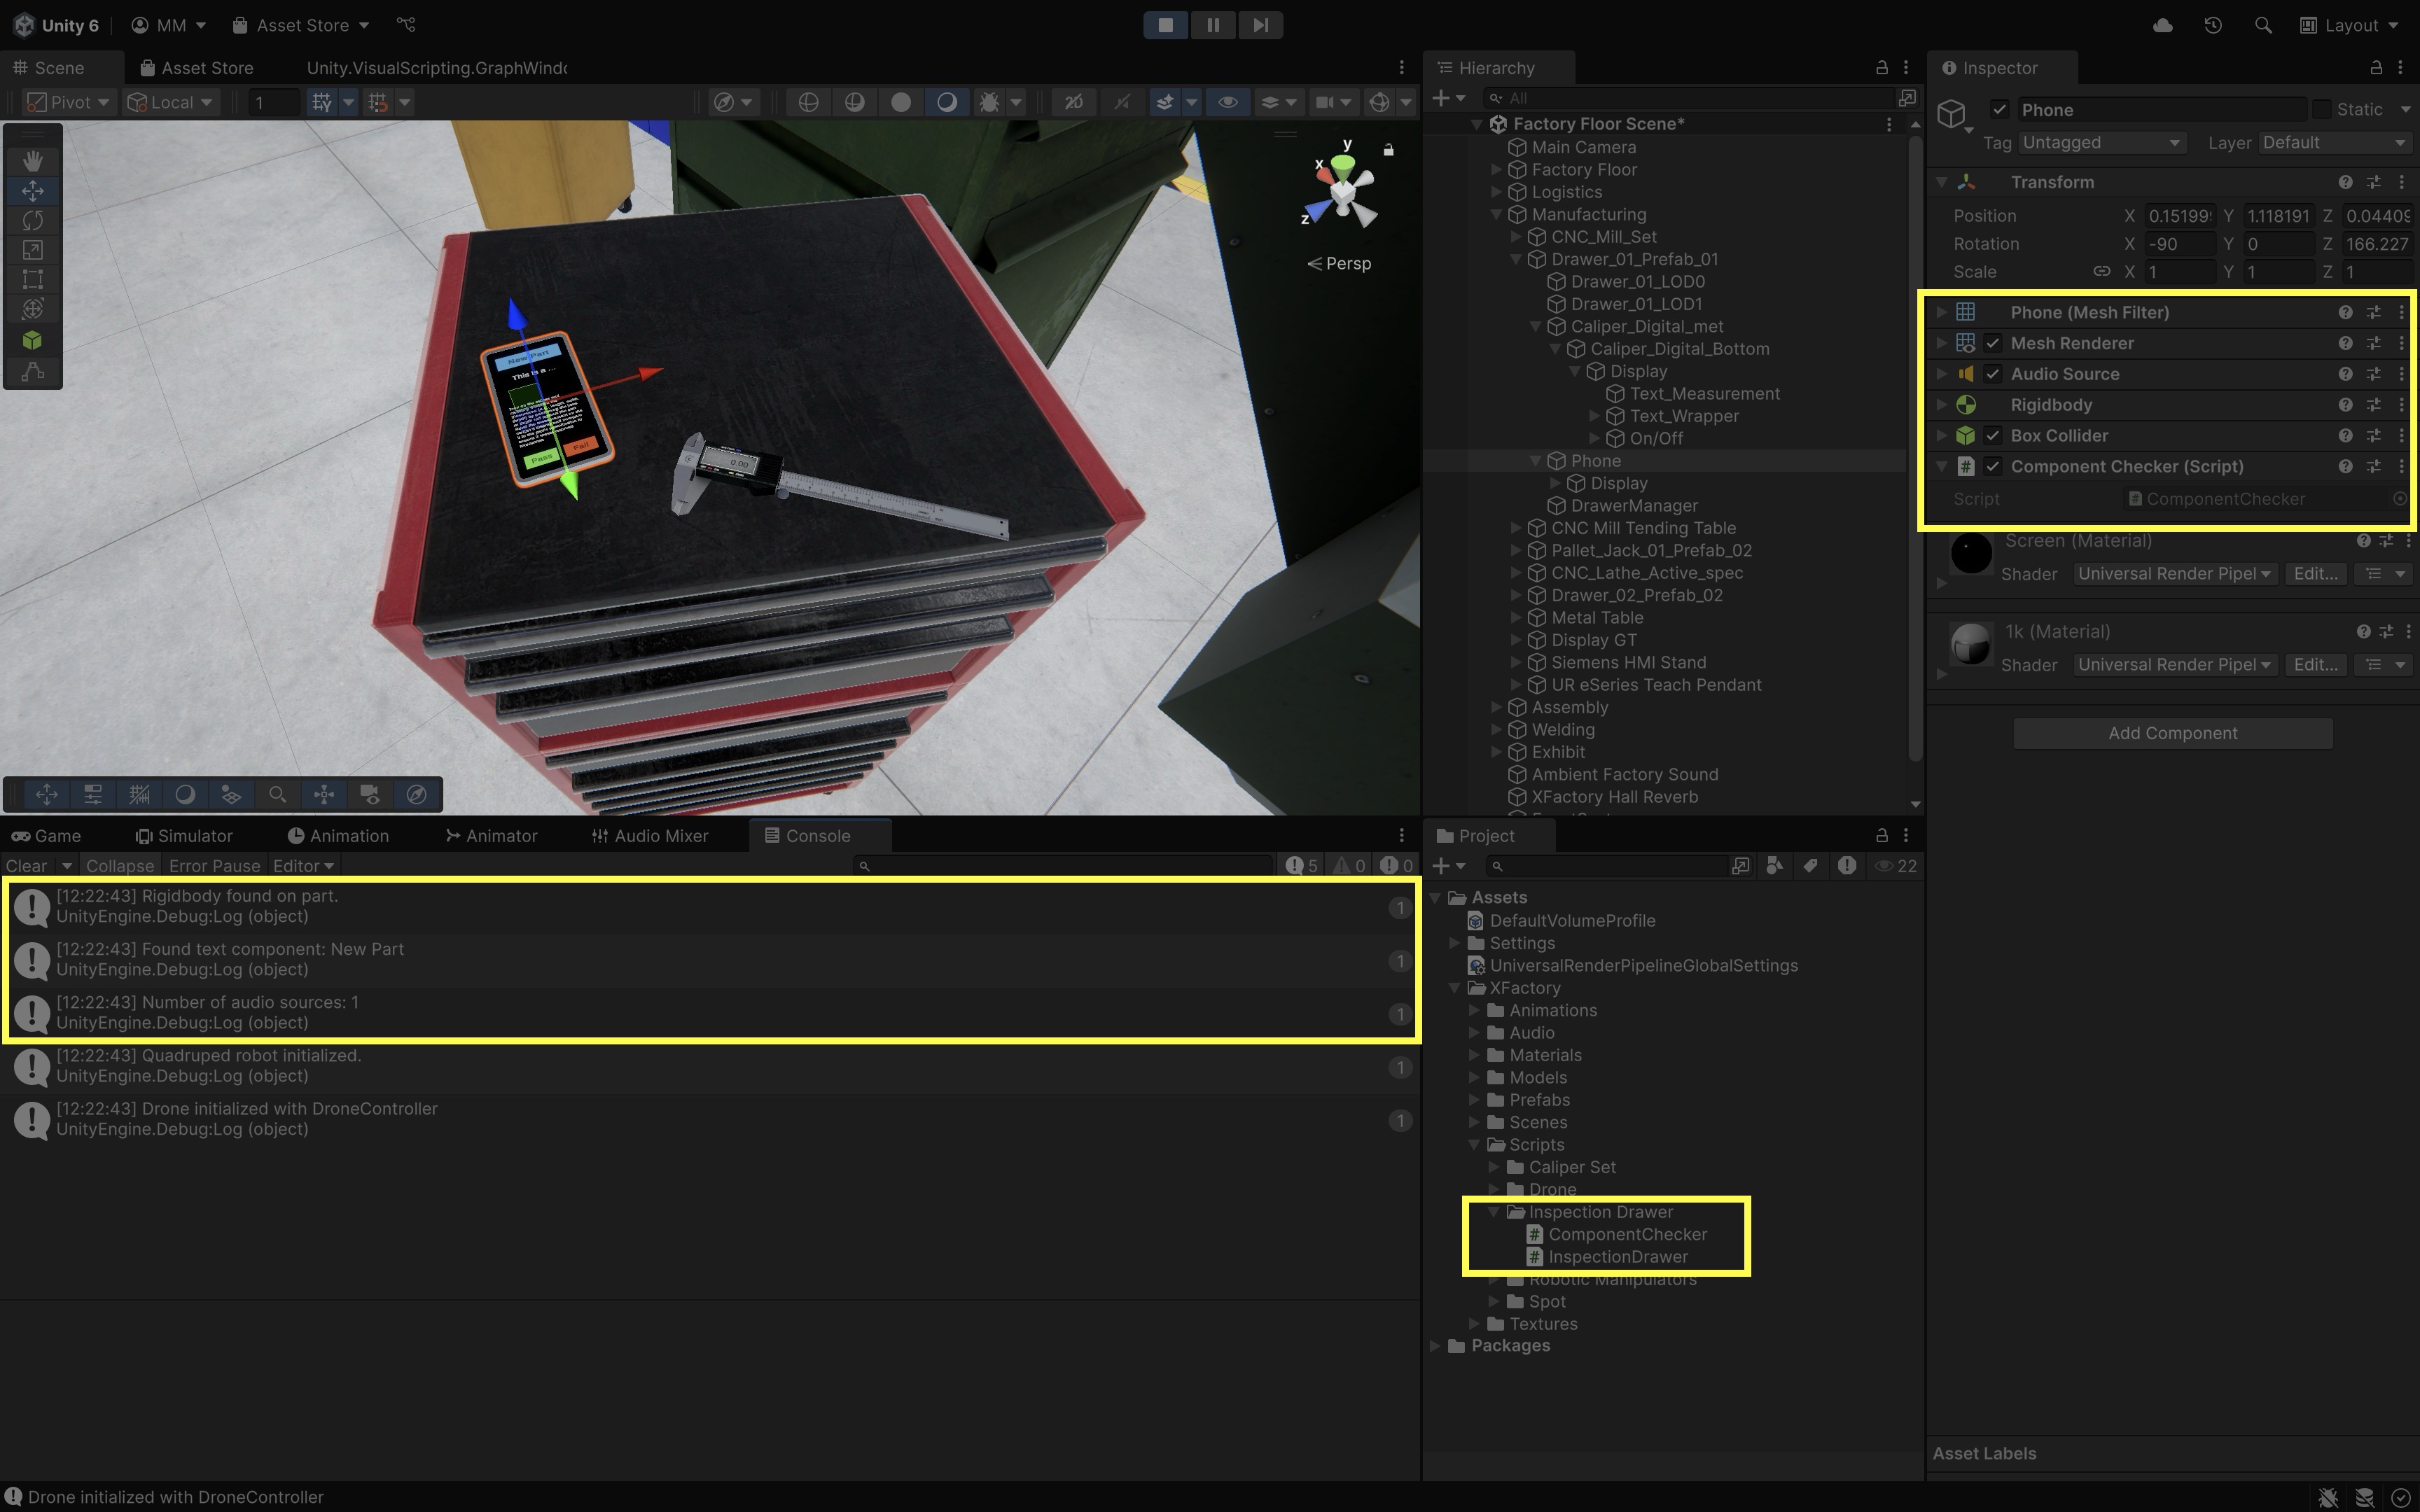
Let’s verify key components attached to drawer-related objects in the XFactory scene, such as parts, the phone, and UI elements. The following script checks for a Rigidbody, reads text from the phone’s display, counts AudioSource components, and locates the main drawer manager script.
using UnityEngine;
using TMPro;

public class ComponentChecker : MonoBehaviour
{
    void Start()
    {
        // Get Rigidbody on the current part
        Rigidbody rb = GetComponent<Rigidbody>();
        if (rb != null)
        {
            Debug.Log("Rigidbody found on part.");
        }

        // Find the TextMeshPro component in the phone display
        TextMeshProUGUI displayText = GetComponentInChildren<TextMeshProUGUI>();
        if (displayText != null)
        {
            Debug.Log("Found text component: " + displayText.text);
        }

        // Get all audio sources on the phone
        AudioSource[] audioSources = GetComponents<AudioSource>();
        Debug.Log("Number of audio sources: " + audioSources.Length);

        // Find the InspectionDrawer script in the parent
        InspectionDrawer manager = GetComponentInParent<InspectionDrawer>();
        if (manager != null)
        {
            Debug.Log("Connected to InspectionDrawer script.");
        }
    }
}
- Attach the Script:
- Create or select a GameObject involved in the drawer interaction (e.g.,
Phone). - In the
Inspector, clickAdd Componentand attach theComponentChecker.csscript.
- Create or select a GameObject involved in the drawer interaction (e.g.,
- Run and Observe:
- Enter Play mode in Unity.
- Watch the
Consolefor log messages confirming which components were found and accessed correctly.
UnityEngine.Audio
AudioSource, AudioClip, and AudioListener are commonly used through the core UnityEngine namespace. The UnityEngine.Audio namespace is mainly needed for mixer-related types such as AudioMixer, AudioMixerGroup, and AudioMixerSnapshot. Do not assume every audio type lives in UnityEngine.Audio—most beginner playback scripts only need using UnityEngine;.
UnityEngine.Audio
├── AudioMixer
│   └── FindSnapshot()
├── AudioMixerGroup
│   └── name
└── AudioMixerSnapshot
    └── TransitionTo()
AudioSource
The AudioSource component plays back assigned audio in your scene. It controls playback through methods that let you start, pause, and stop sounds. This component is essential for integrating sound effects, music, and voice-overs into your game or simulation.
AudioSource (UnityEngine)
├── clip
├── outputAudioMixerGroup
├── Play()
├── Pause()
└── Stop()
Important AudioSource methods include:
-
Play(): Starts playback of the assigned audio clip from the beginning (or resumes if previously paused). -
Pause(): Temporarily halts playback while retaining the current position in the clip. -
Stop(): Completely halts playback and resets the position to the beginning of the clip.
Example
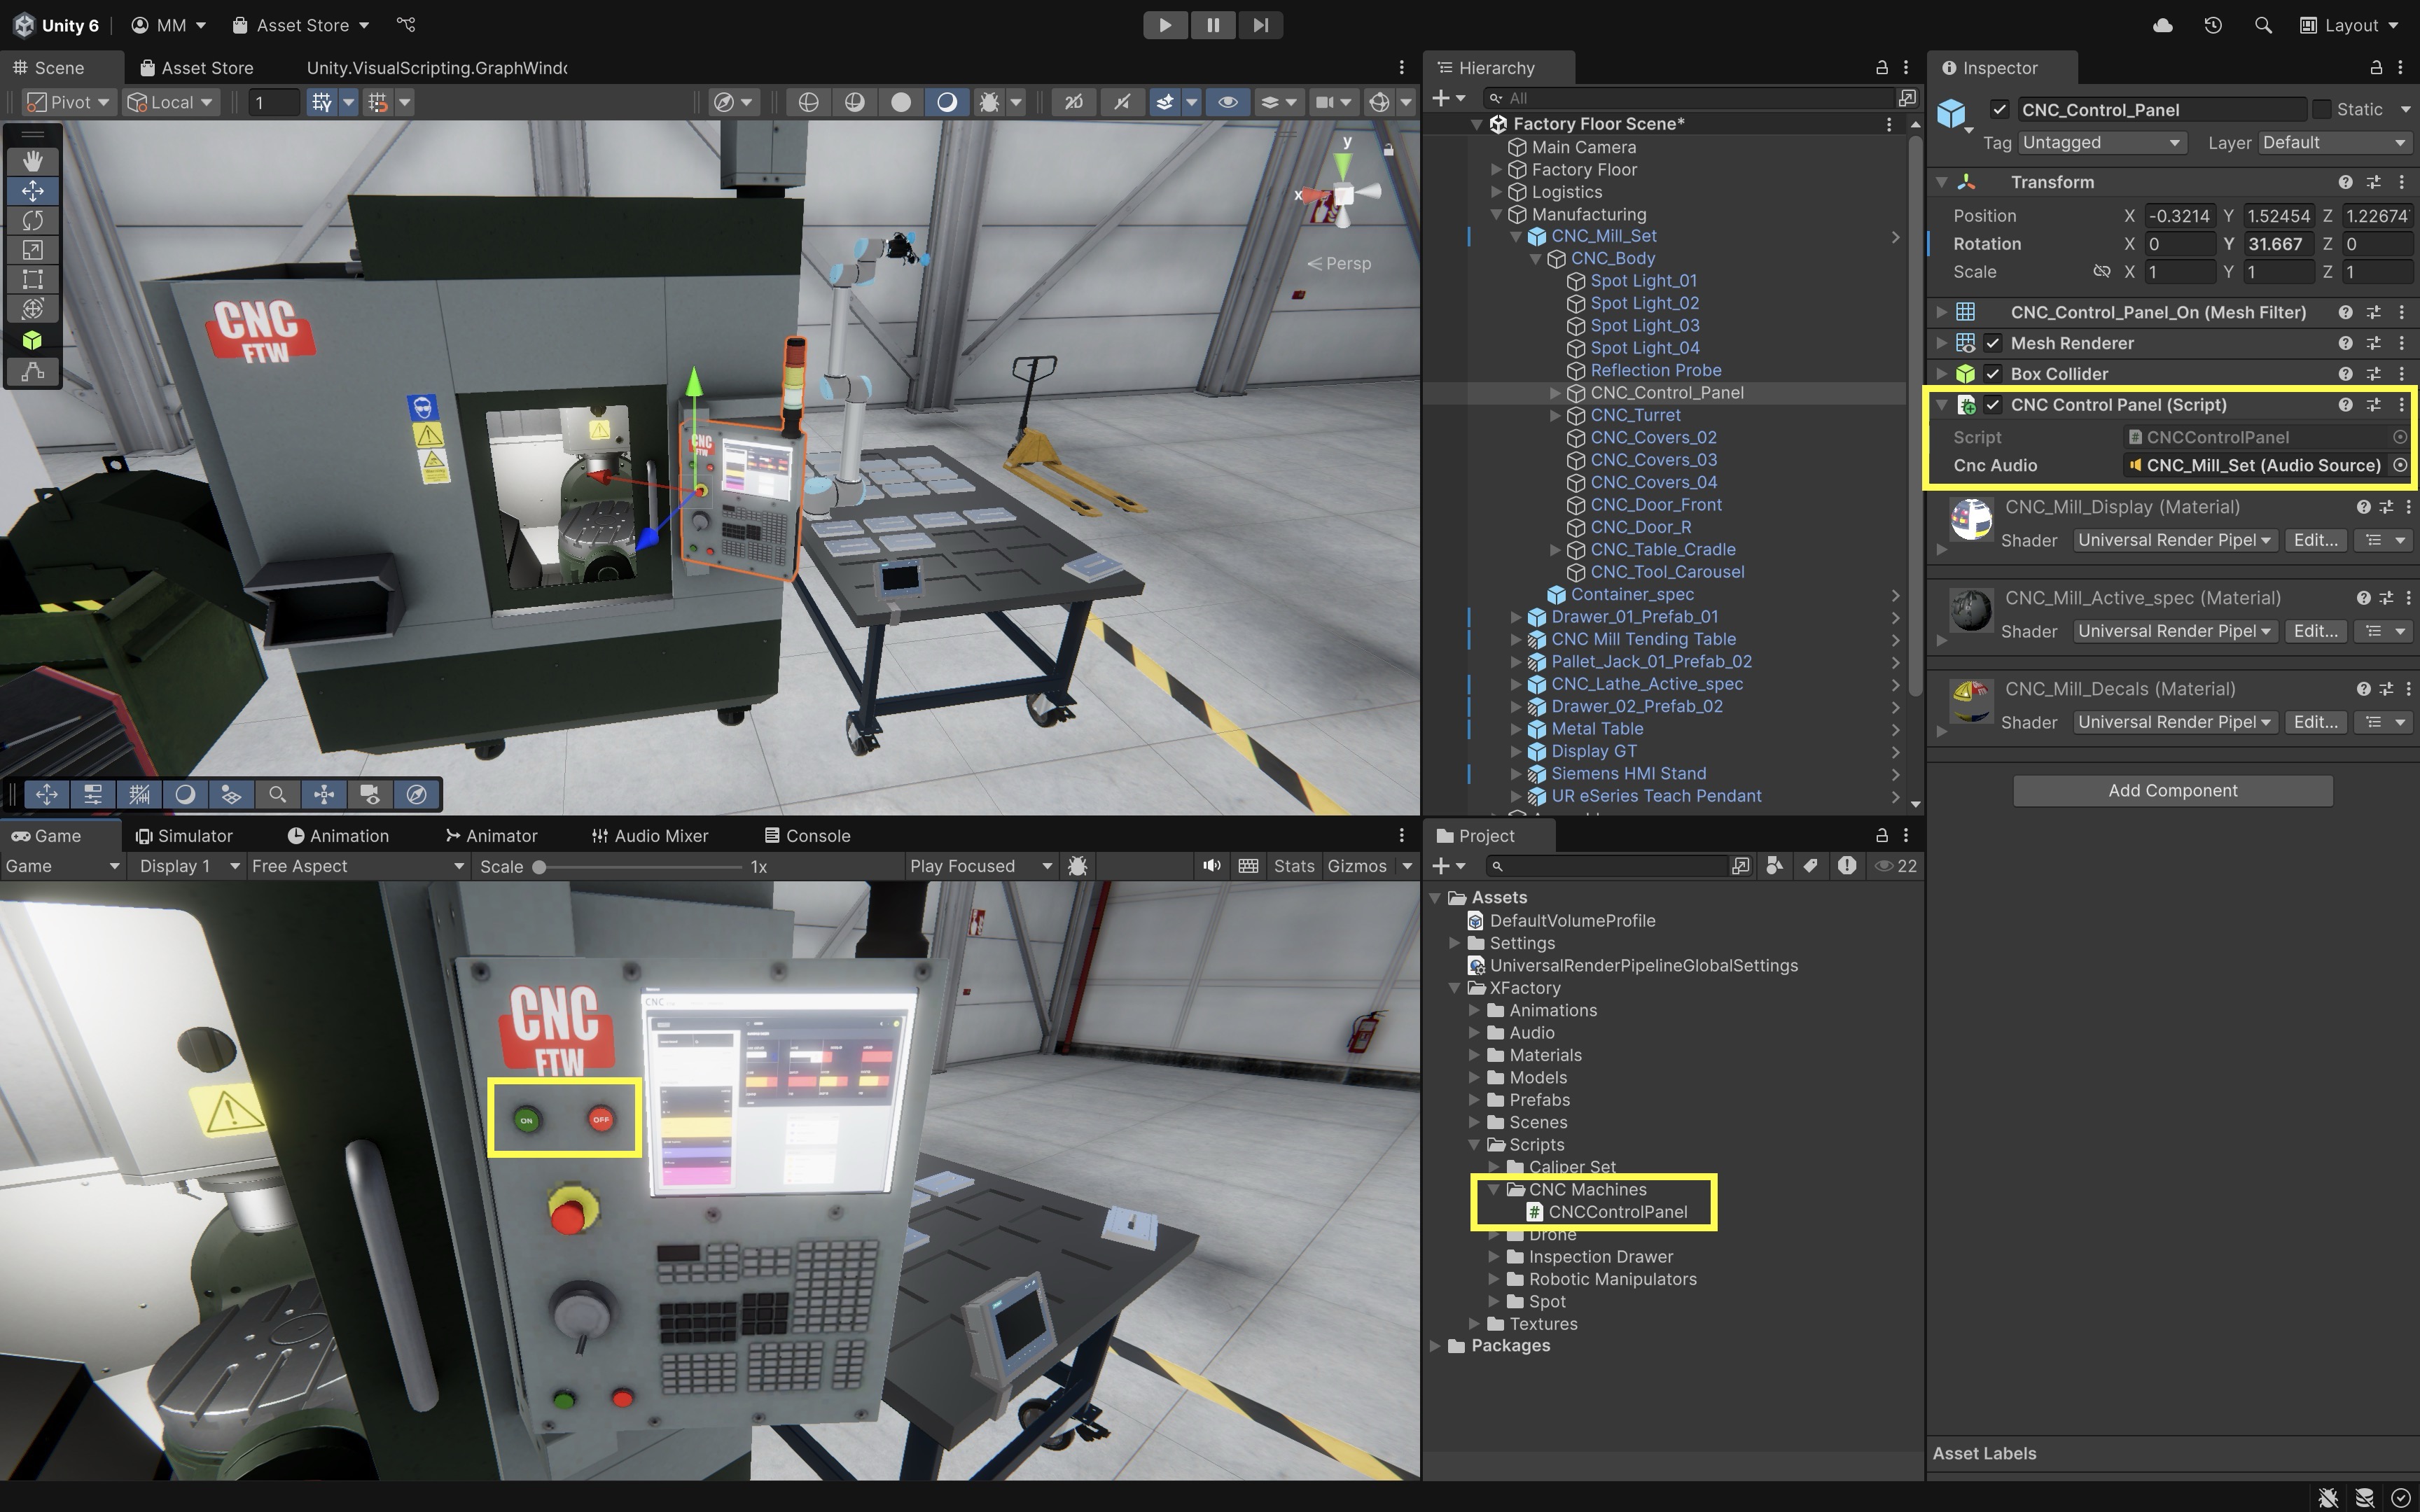
The script below controls the CNC machine using ON and OFF buttons on the HMI mounted to the control panel (CNC_Control_Panel). When the ON button is pressed, the AudioSource on the CNC_Mill_Set GameObject plays the machine sound, simulating the machine being turned on. Pressing OFF stops the machine (i.e., the sound).
using UnityEngine;
using UnityEngine.Audio;

public class CNCControlPanel : MonoBehaviour
{
    // Assign the AudioSource from CNC_Mill_Set in Inspector
    [SerializeField] private AudioSource cncAudio;

    // Optional: assign an AudioMixerGroup in Inspector
    [SerializeField] private AudioMixerGroup outputGroup;

    void Awake()
    {
        // If an output group is assigned, route the audio through it
        if (cncAudio != null && outputGroup != null)
        {
            cncAudio.outputAudioMixerGroup = outputGroup;
        }
    }

    // Called when "On" button is pressed
    public void TurnOnCNC()
    {
        if (cncAudio == null)
        {
            Debug.LogWarning("CNCControlPanel: Assign cncAudio in the Inspector.");
            return;
        }

        if (!cncAudio.isPlaying)
        {
            cncAudio.Play();
            Debug.Log("CNC machine started.");
        }
    }

    // Called when "Off" button is pressed
    public void TurnOffCNC()
    {
        if (cncAudio == null)
        {
            Debug.LogWarning("CNCControlPanel: Assign cncAudio in the Inspector.");
            return;
        }

        if (cncAudio.isPlaying)
        {
            cncAudio.Stop();
            Debug.Log("CNC machine stopped.");
        }
    }
}
- Attach the Script:
- Select the
CNC_Control_PanelGameObject in the hierarchy. - Click
Add Componentand attach theCNCControlPanelscript.
- Select the
- Assign the
AudioSource:- In the Inspector for
CNC_Control_Panel, locate thecncAudiofield in the script. - Drag the
CNC_Mill_SetGameObject (which contains theAudioSource) into this field.
- In the Inspector for
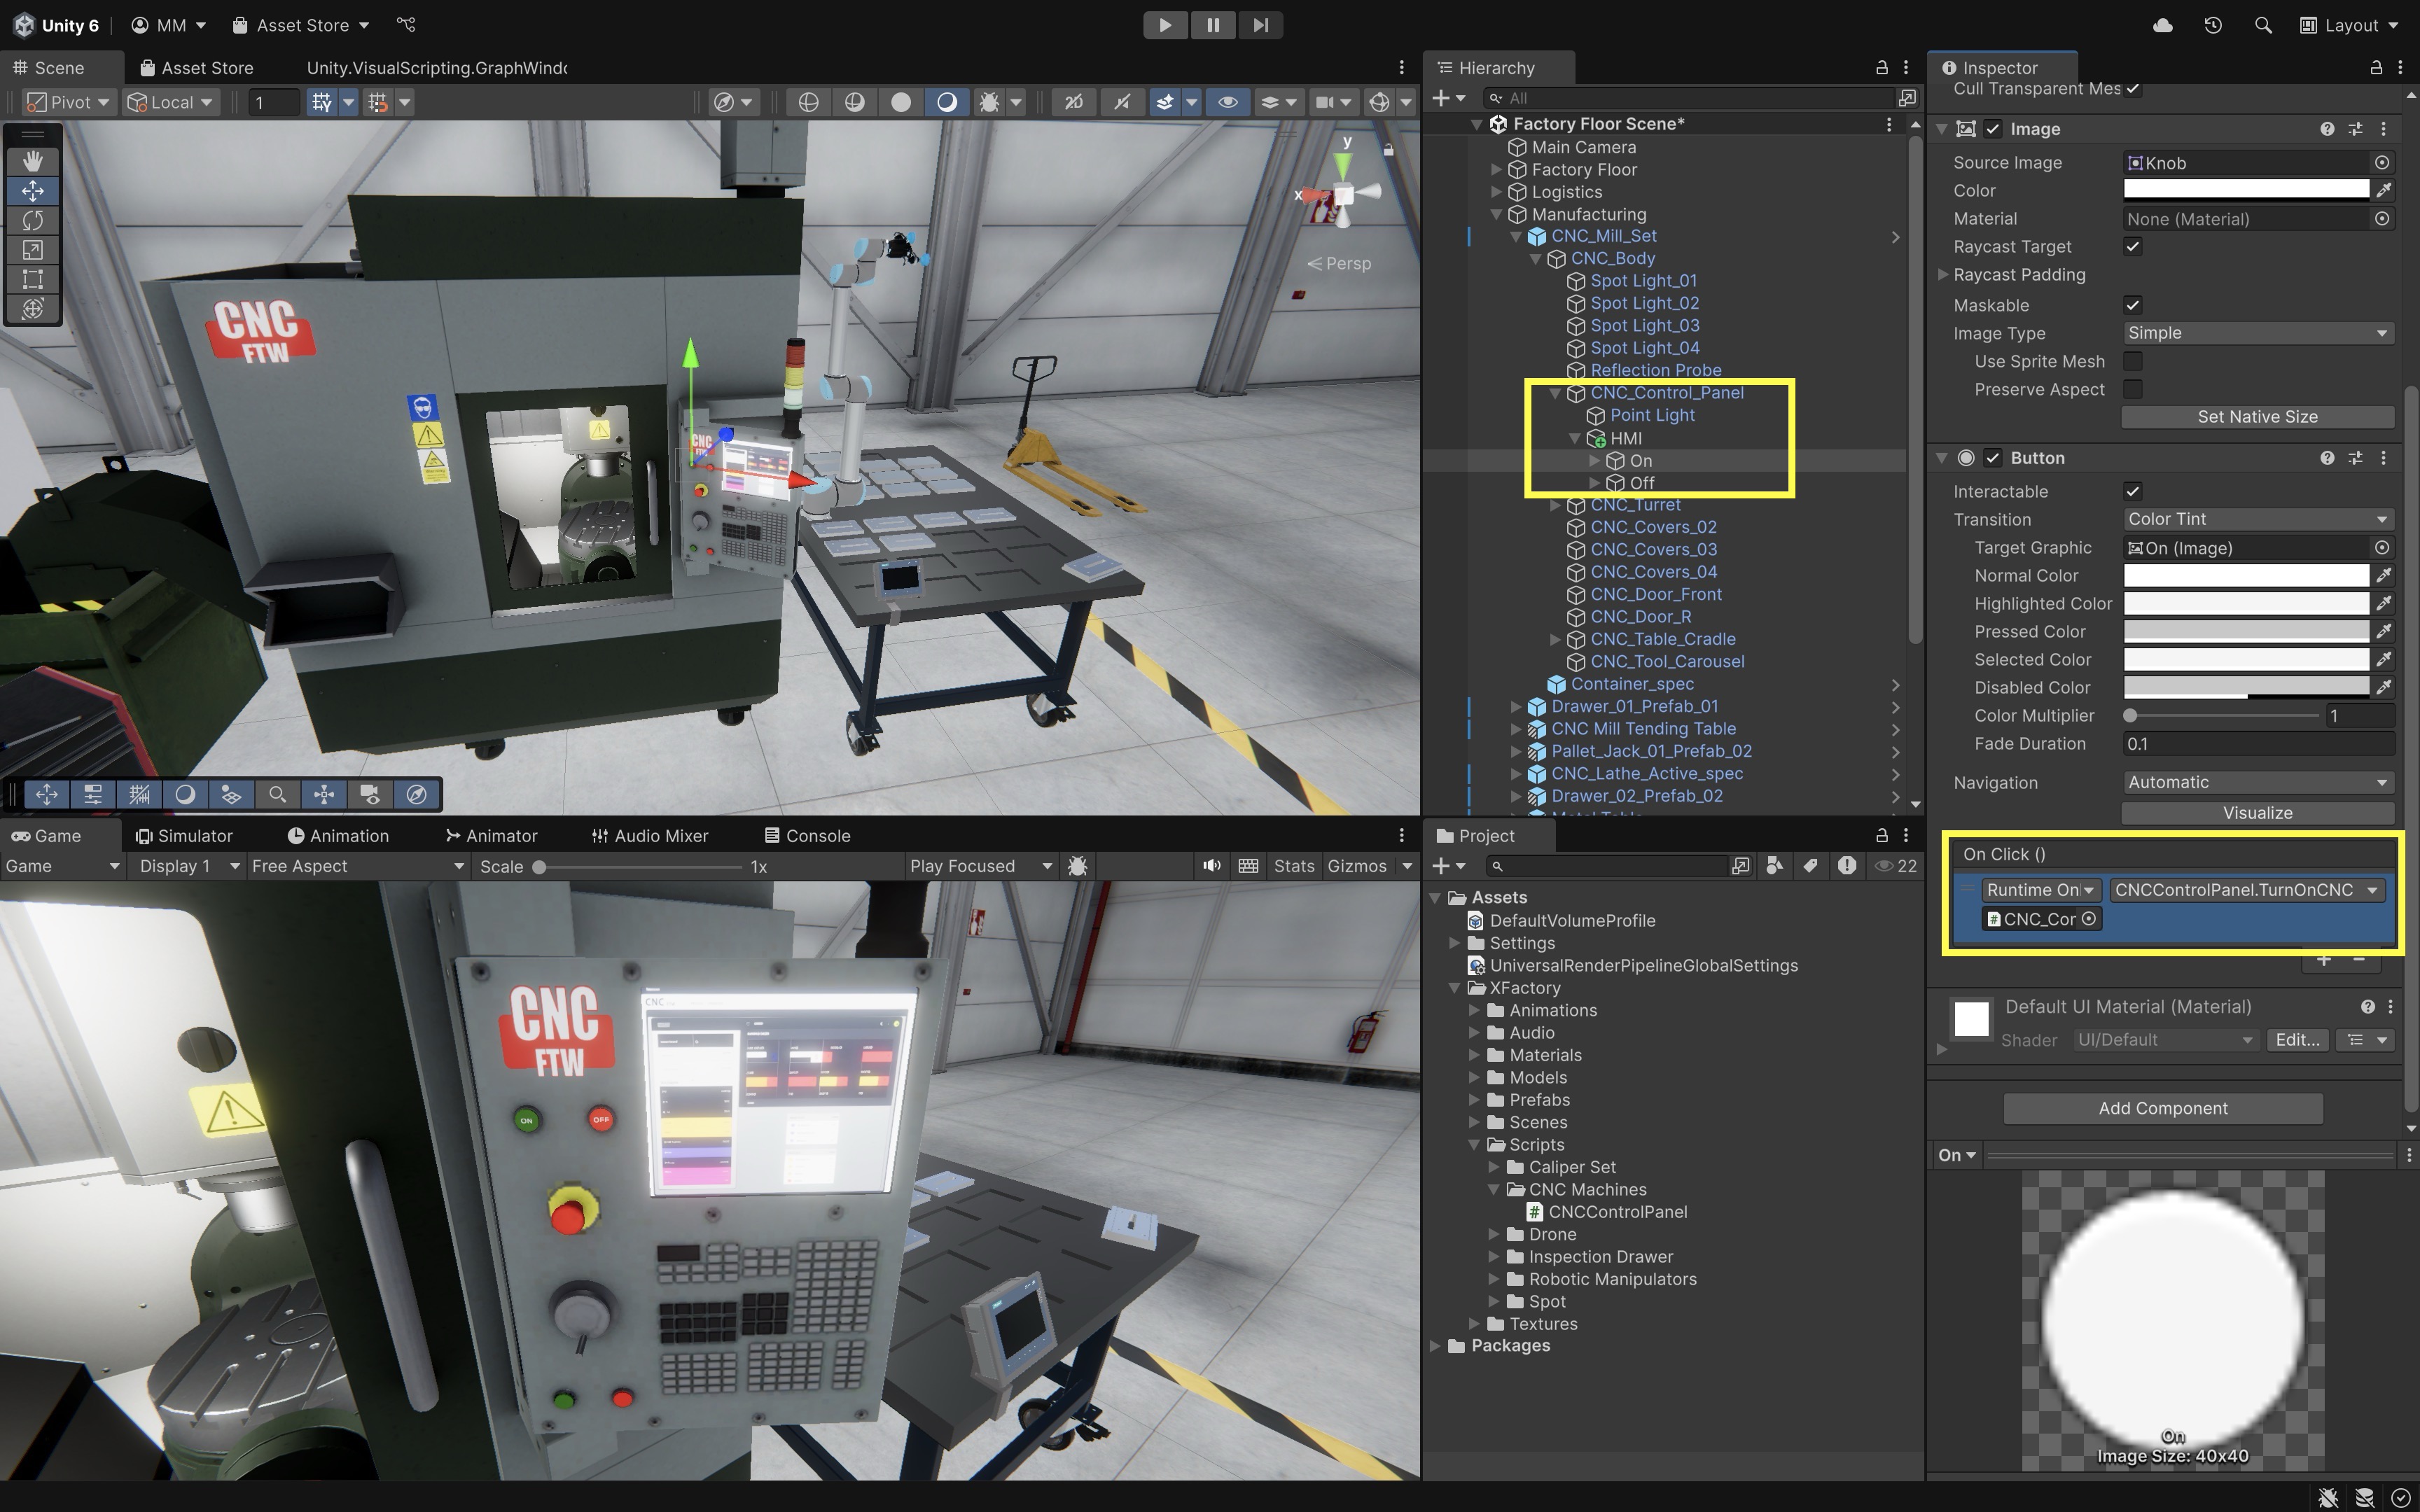
- Wire Up the Buttons:
- In the
Hierarchy, expandCNC_Mill_Set > CNC_Body > CNC_Control_Panel > HMI(Canvas). - Select the
ONbutton. - In the Inspector, under the
Button (Script)component, find theOnClick()event list. - Click the
+button to add a new event. - Drag the
CNC_Control_Panelinto the object field. - From the dropdown, choose
CNCControlPanel → TurnOnCNC(). - Repeat the same steps for the
OFFbutton, but assignTurnOffCNC()instead.
- In the
- Test the Setup:
- Enter
Playmode. - Click the ON button to hear the machine startup sound.
- Click the OFF button to stop the sound.
- The machine audio can also be heard through your Meta Quest headset when Quest Link is connected.
- Enter
AudioClip and Audio Generator
AudioClip remains the common Unity type students will use when importing and scripting audio files. In course-recommended Unity 6.3 LTS, the Audio Source Inspector presents an Audio Generator field, which can reference an Audio Clip or an Audio Random Container. For beginner scripting, it is still appropriate to teach AudioSource playback with assigned audio clips. In the CNC machine control panel example above, an AudioClip is assigned to an AudioSource attached to the CNC_Mill_Set. Playback is triggered by ON/OFF buttons in the HMI, allowing the simulation to respond with realistic feedback when machinery is toggled. In XR engineering applications, audio clips are often used for simulating machine sounds or alarms in training environments, giving auditory feedback for UI interactions, or adding realism to immersive simulations through ambient background sounds.
AudioClip (UnityEngine)
├── loadType
├── length
└── assigned to AudioSource.clip
Important considerations:
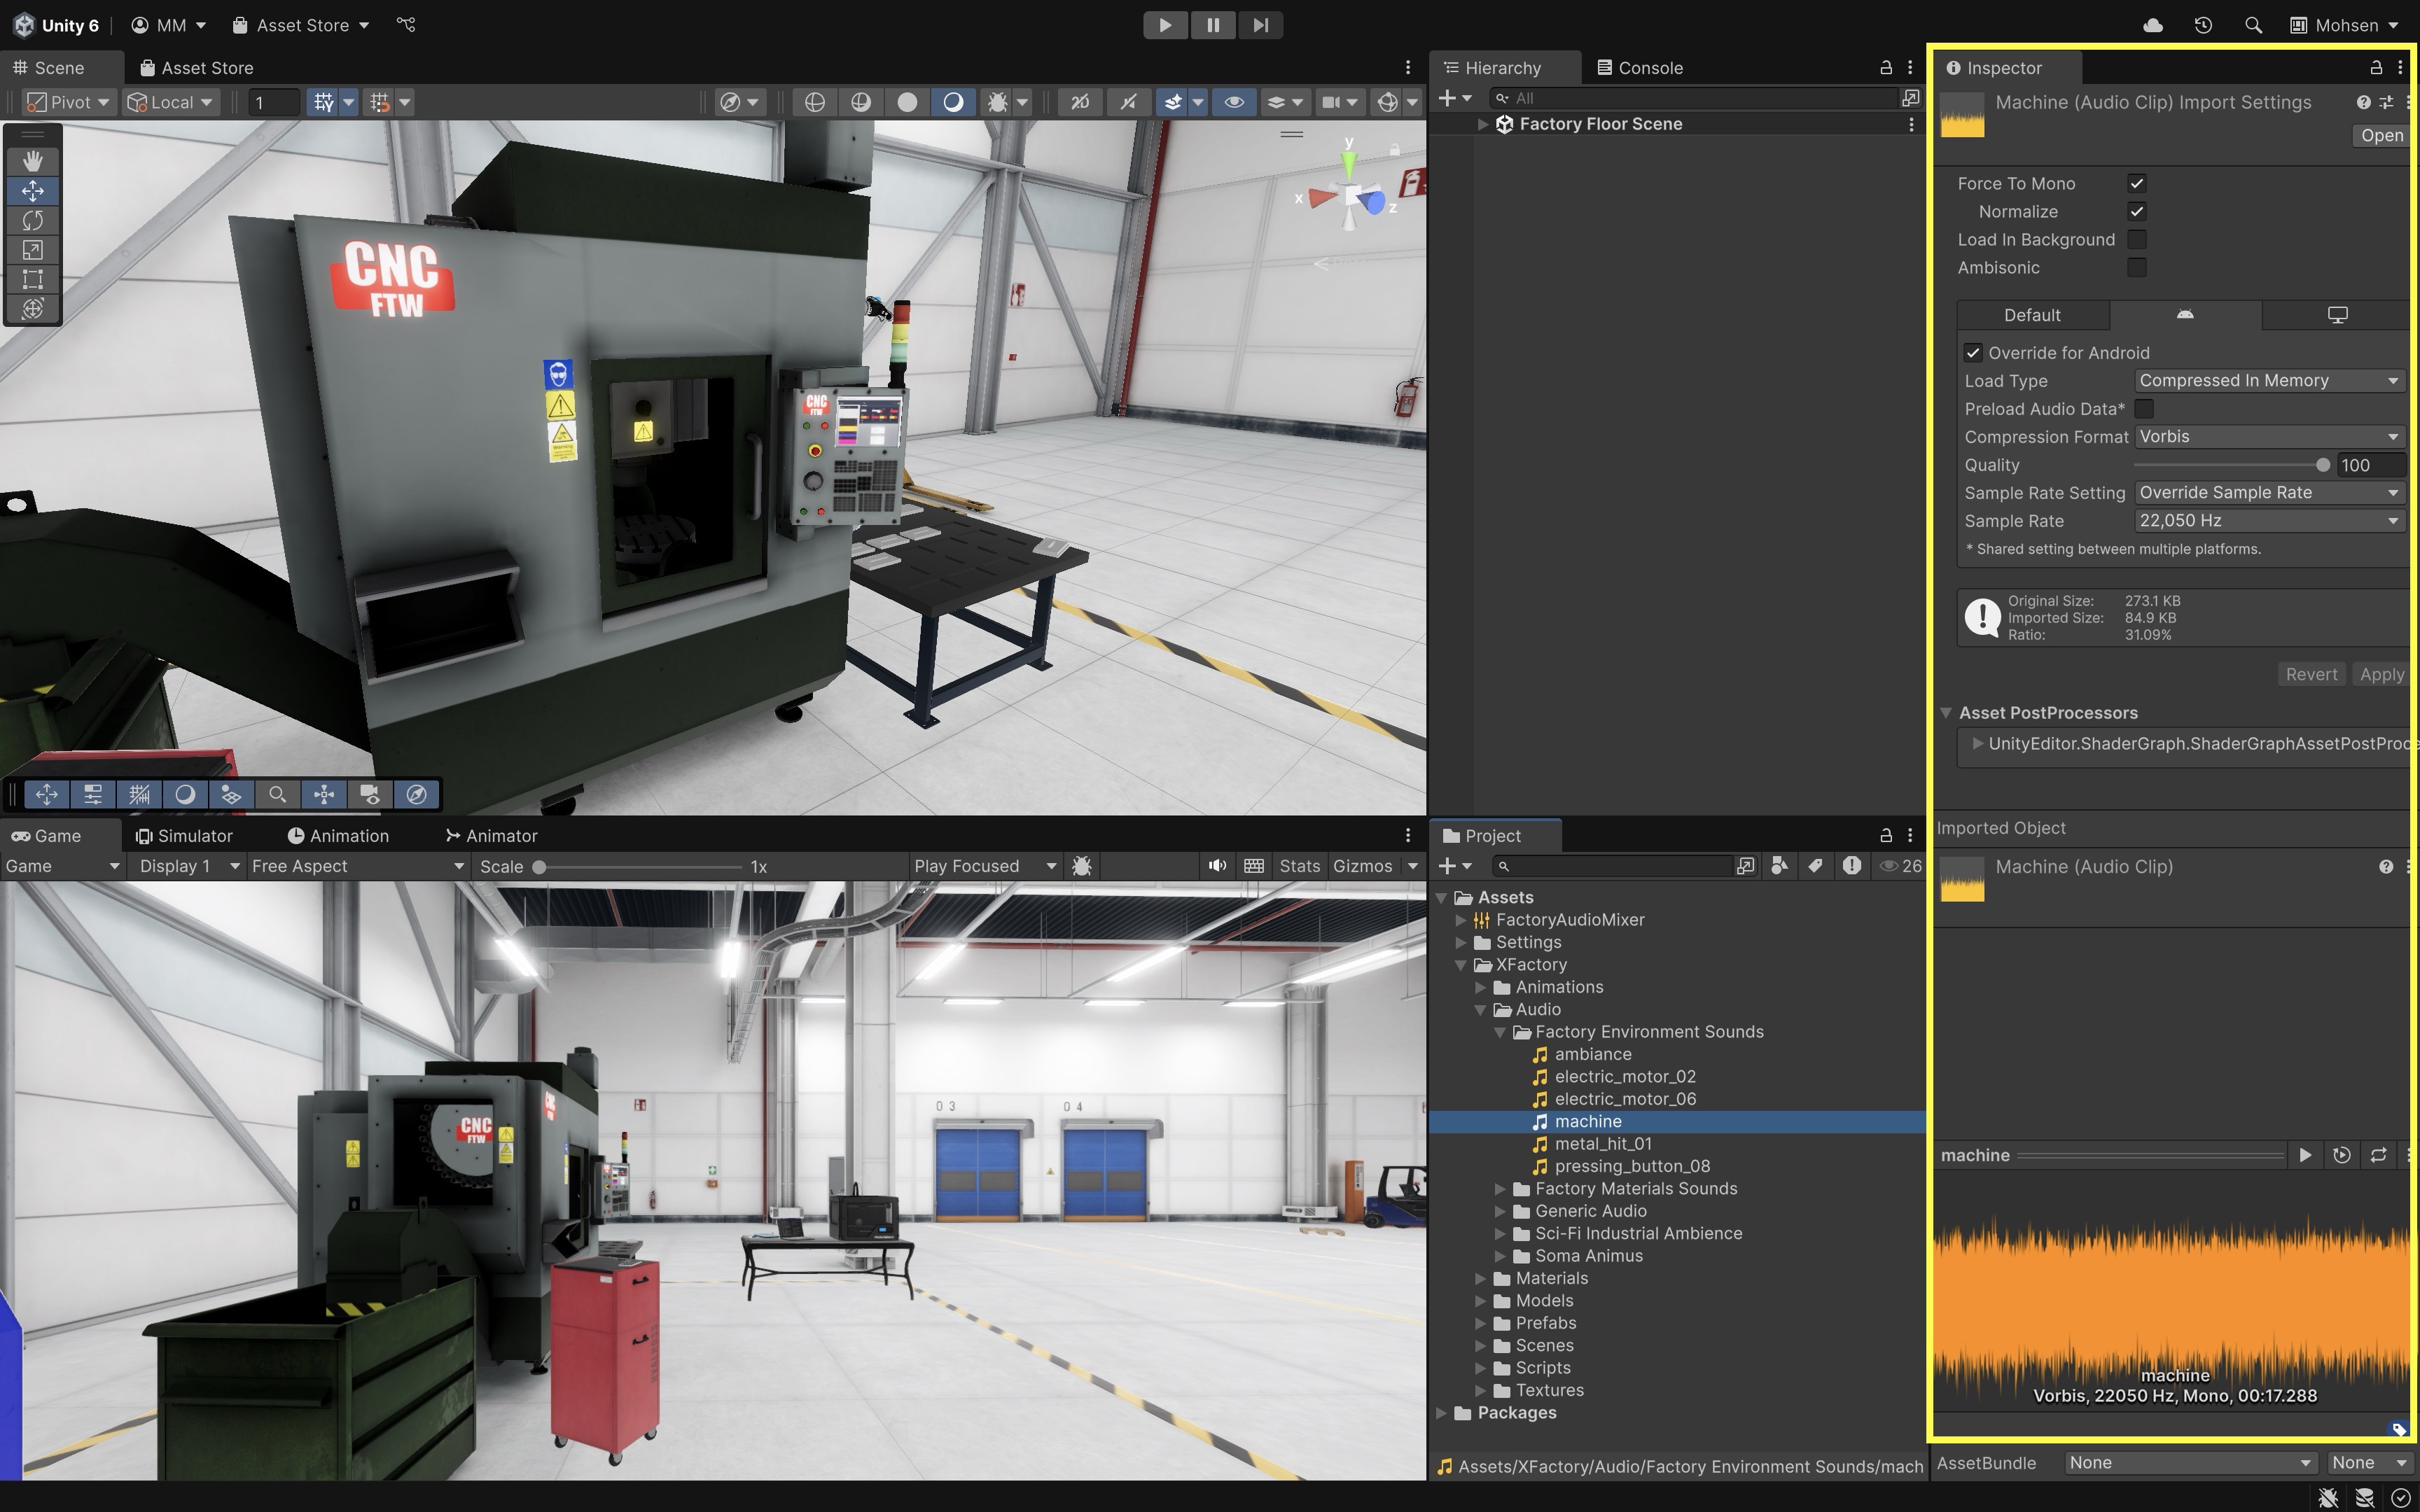
- Import & Storage Settings: Audio files (WAV, MP3, Ogg, etc.) are imported as
AudioClipassets. In the Inspector, you can configure Load Type (Decompress on Load, Compressed in Memory, Streaming), which determines how the audio is stored and accessed at runtime. - Import Checkboxes: Options like Force to Mono (convert stereo to mono to save memory), Normalize (automatically adjust volume levels), Load in Background (allow async loading), and Ambisonic (enable ambisonic audio for VR/AR) provide additional control over how audio is processed and used.
- Compression & Quality: The Compression Format (e.g., PCM, Vorbis, ADPCM) and Quality slider control the tradeoff between file size and playback fidelity. Choosing the right settings helps balance performance with sound realism.
- Sample Rate Settings: Unity allows you to preserve, resample, or optimize the Sample Rate, which directly affects both audio clarity and memory usage.
- Usage in Scenes: Once imported, an
AudioClipis assigned to anAudioSourcecomponent on a GameObject. Playback is triggered by script, animation events, or user interactions. - Runtime Configuration: Playback behaviors such as volume, pitch, spatial blend (2D vs. 3D), looping, and spatialization are handled through the
AudioSource. This is where you fine-tune how the audio is experienced in XR or other applications.
By separating sound assets (
AudioClip) from playback logic (AudioSource), Unity enables a flexible and modular approach to integrating audio into interactive and reactive XR systems.
UnityEngine.UI
The UnityEngine.UI namespace provides a robust framework for building and managing uGUI in Unity. It contains components that let you design interactive and visually engaging UIs for games and XR apps. With these tools, you can create buttons, sliders, images, toggles, and more. For text in this course, prefer TextMeshPro using the TMPro namespace (for example, TextMeshProUGUI or TMP_Text) rather than legacy UnityEngine.UI.Text. This namespace is essential for any project that requires user interaction, as it simplifies the process of connecting UI elements with your game logic. Key uGUI components include Button, Image, and Toggle.
UnityEngine.UI
├── Button
│   └── onClick
│       ├── AddListener()
│       └── RemoveListener()
├── Image
│   ├── sprite
│   └── color
└── Toggle
    ├── isOn
    └── onValueChanged
TextMeshPro types require
using TMPro;and the TextMeshPro package/resources. Import TMP Essentials if Unity prompts you during setup.
TextMeshPro Text
The TextMeshProUGUI component is used for displaying and updating text on the screen. Because this script uses TextMeshPro, include using TMPro; at the top of the file.
TMPro (package)
└── TextMeshProUGUI
    ├── text
    ├── color
    └── fontSize
Important properties include:
text: Property togetorsetthe displayed string.color: Property to change the text color.fontSize: Property to adjust the size of the text.
Example
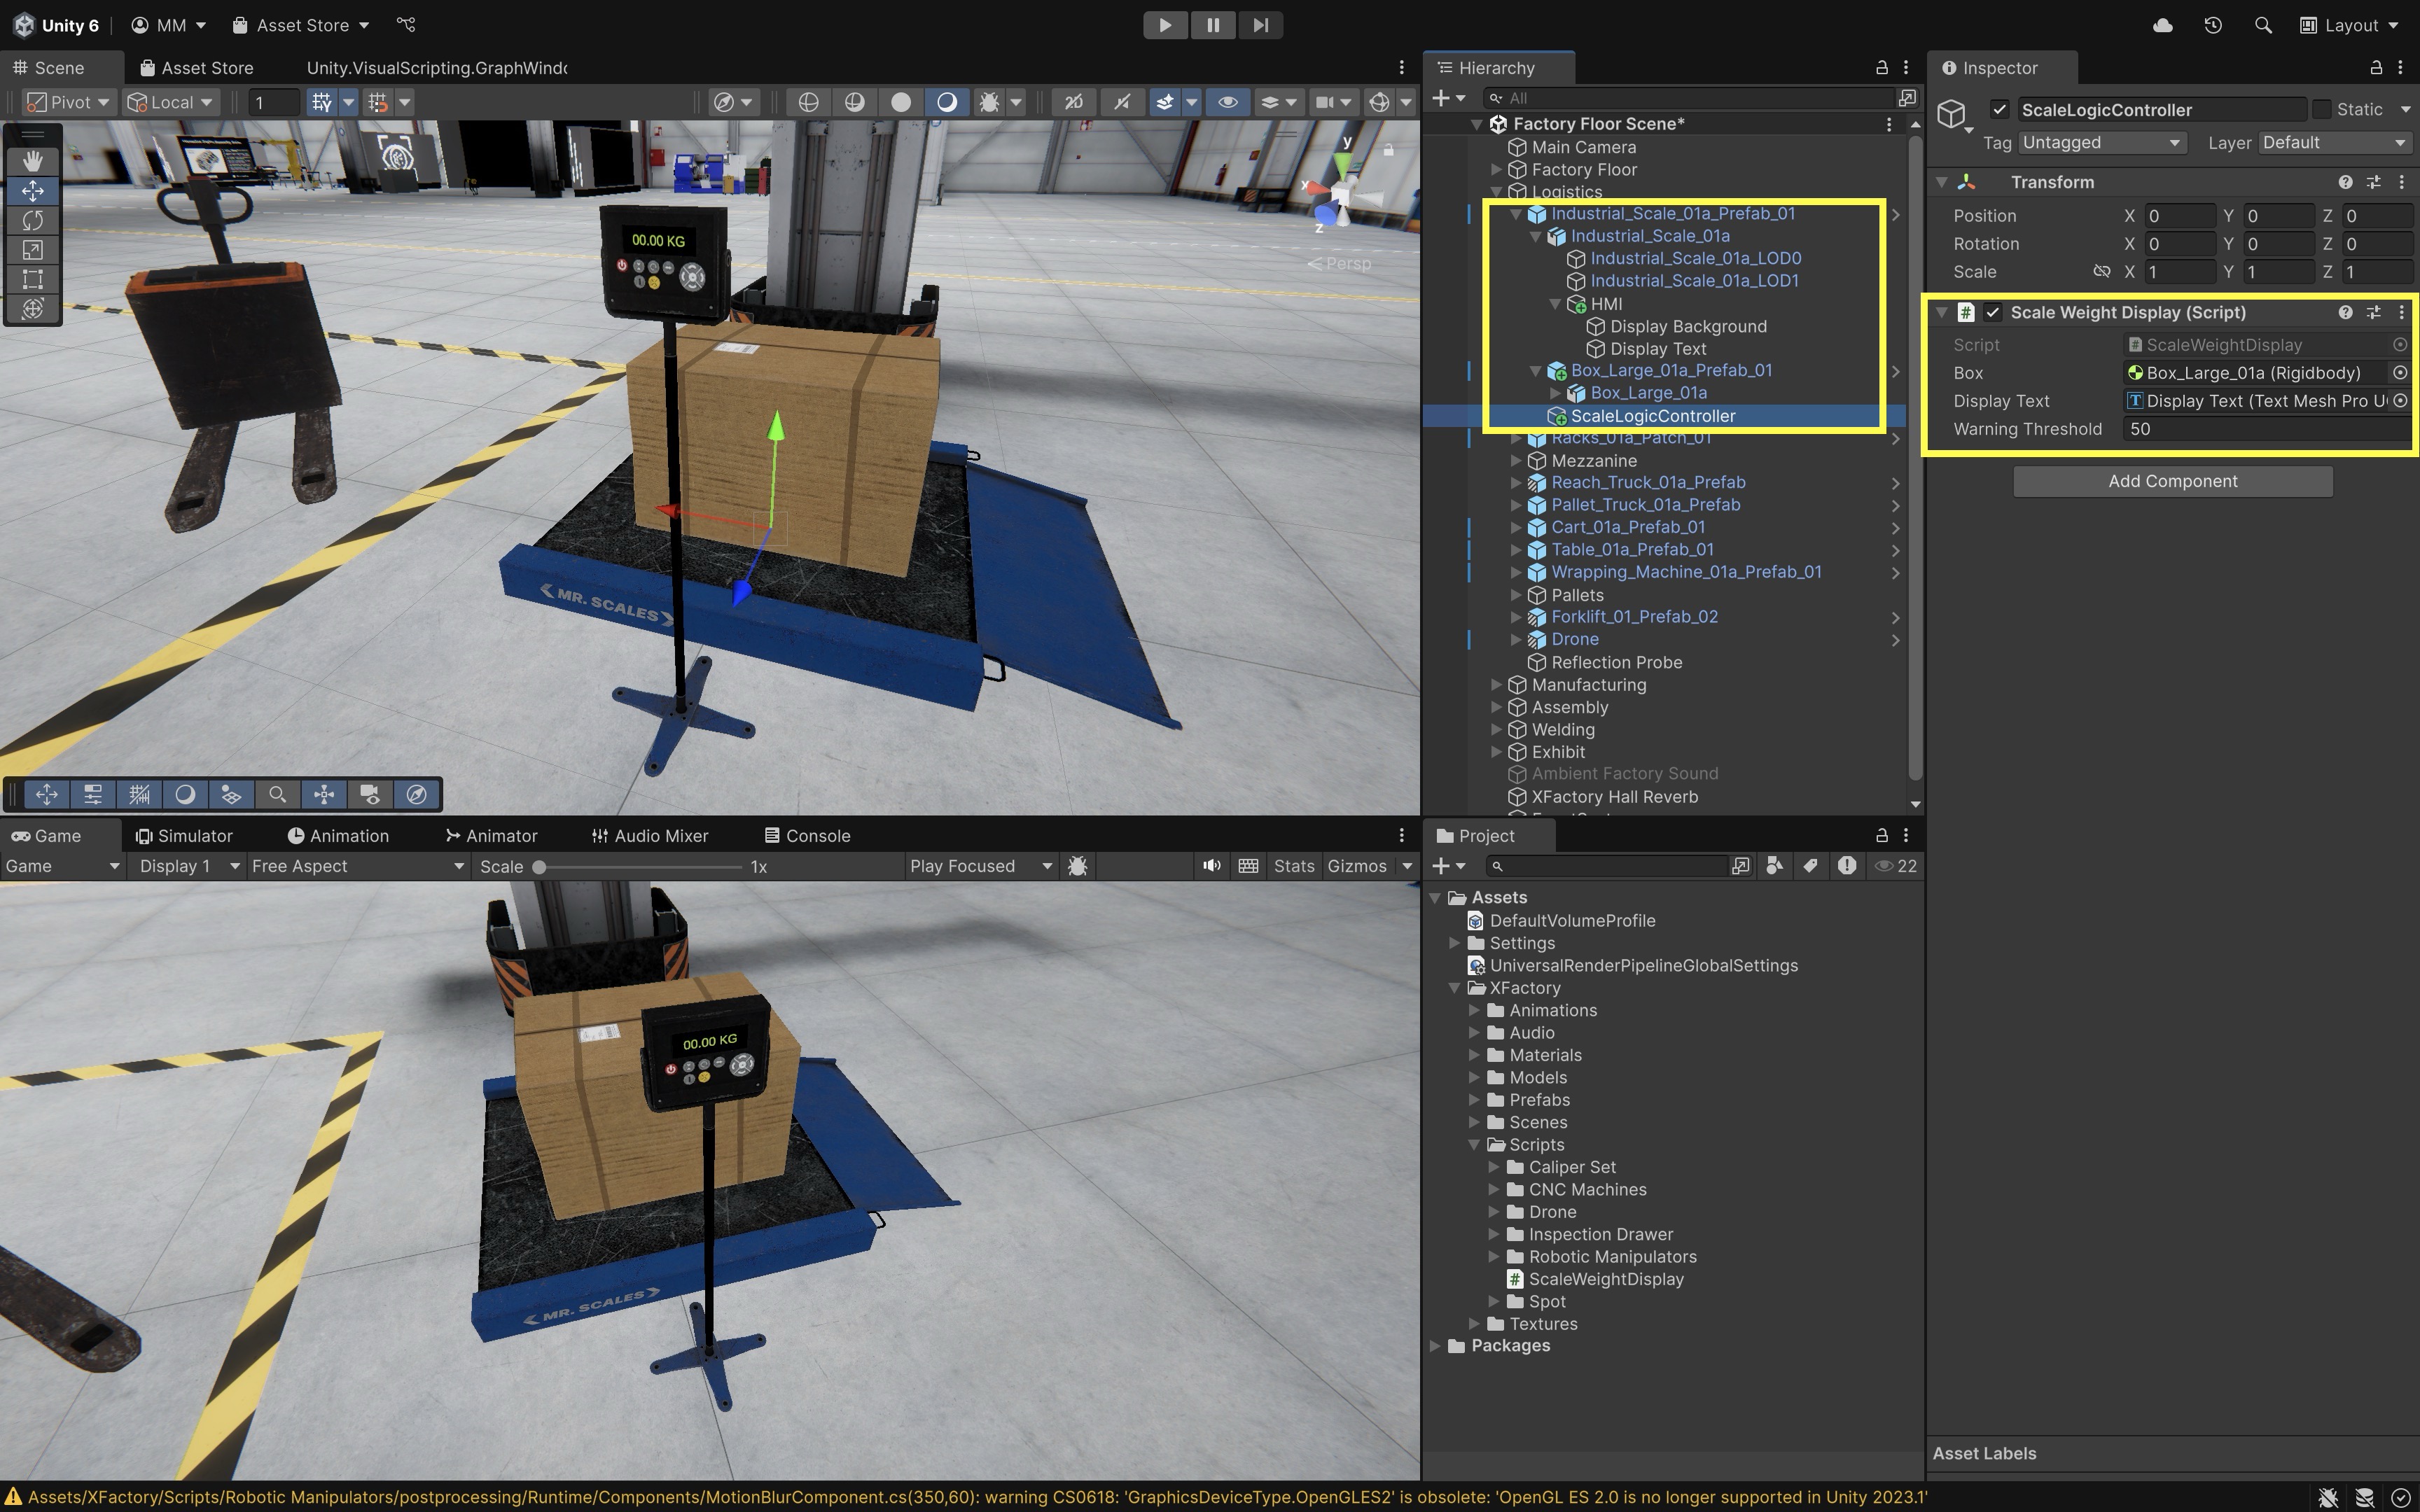
Using TextMeshPro properties, let’s display the real-time mass of a box on an industrial scale. This example uses the box’s Rigidbody.mass as a simplified scale reading. If the mass exceeds 50 KG, the text turns red to signal an overload condition.
using UnityEngine;
using TMPro;

public class ScaleWeightDisplay : MonoBehaviour
{
    [SerializeField] private Rigidbody box;                 // Assign Box_Large_01a in Inspector
    [SerializeField] private TextMeshProUGUI displayText;   // Assign the Display text under HMI Canvas
    [SerializeField] private float warningThreshold = 50f;

    void Update()
    {
        if (box != null && displayText != null)
        {
            float massKg = box.mass;

            displayText.text = massKg.ToString("00.00") + " KG";

            // Change color if mass exceeds threshold
            if (massKg > warningThreshold)
            {
                displayText.color = Color.red;
            }
            else
            {
                displayText.color = Color.green;
            }
        }
    }
}
- Attach the Script:
- Create or select a logic controller under
Industrial_Scale_01a(e.g., an empty GameObject namedScaleLogicController) or use the GameObject itself. - Add the
ScaleWeightDisplayscript to that object.
- Create or select a logic controller under
- Assign References in
Inspector:- Drag the
Box_Large_01aGameObject (with aRigidbody) into theboxfield. - Drag the
TextMeshProUGUIDisplay Textobject (under theHMICanvas of the scale) into thedisplayTextfield. - (Optional) Set the
warningThresholdfield in the Inspector to define the mass (in KG) that triggers a red warning color (default is 50 KG).
- Drag the
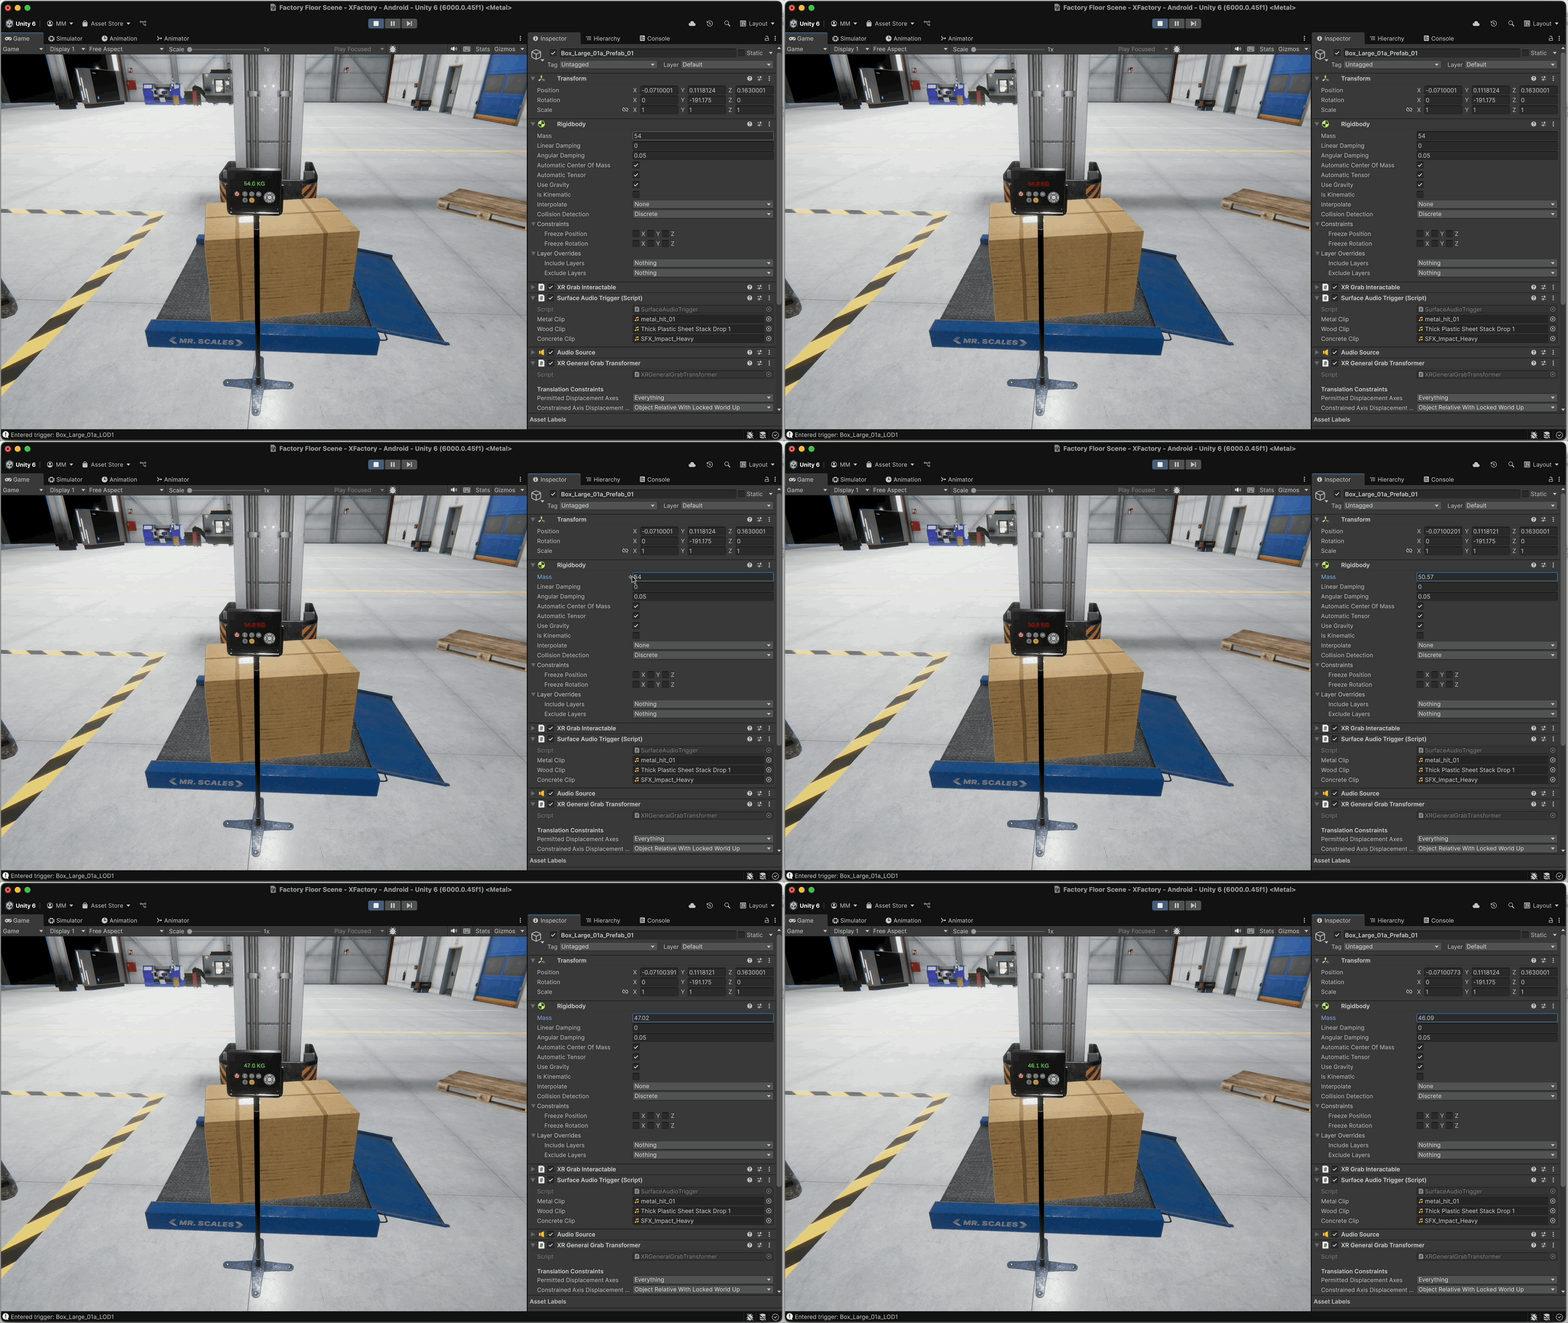
- Test the Setup:
- Enter
Playmode. - In the
Inspector, modify themassvalue of the box’sRigidbody. - Observe the
Displaytext updating in real time and changing color to red when the mass exceeds the threshold (e.g., 50 KG). - The scale readout can also be viewed in a Quest Link–connected Meta Quest during Play Mode.
- Enter
Button
The Button component is used for handling user clicks. It allows you to assign functions to be called when the button is pressed. The most important event related to this component is onClick to which you can add listeners using AddListener().
UnityEngine.UI
└── Button
    └── onClick
        ├── AddListener()
        └── RemoveListener()
Example
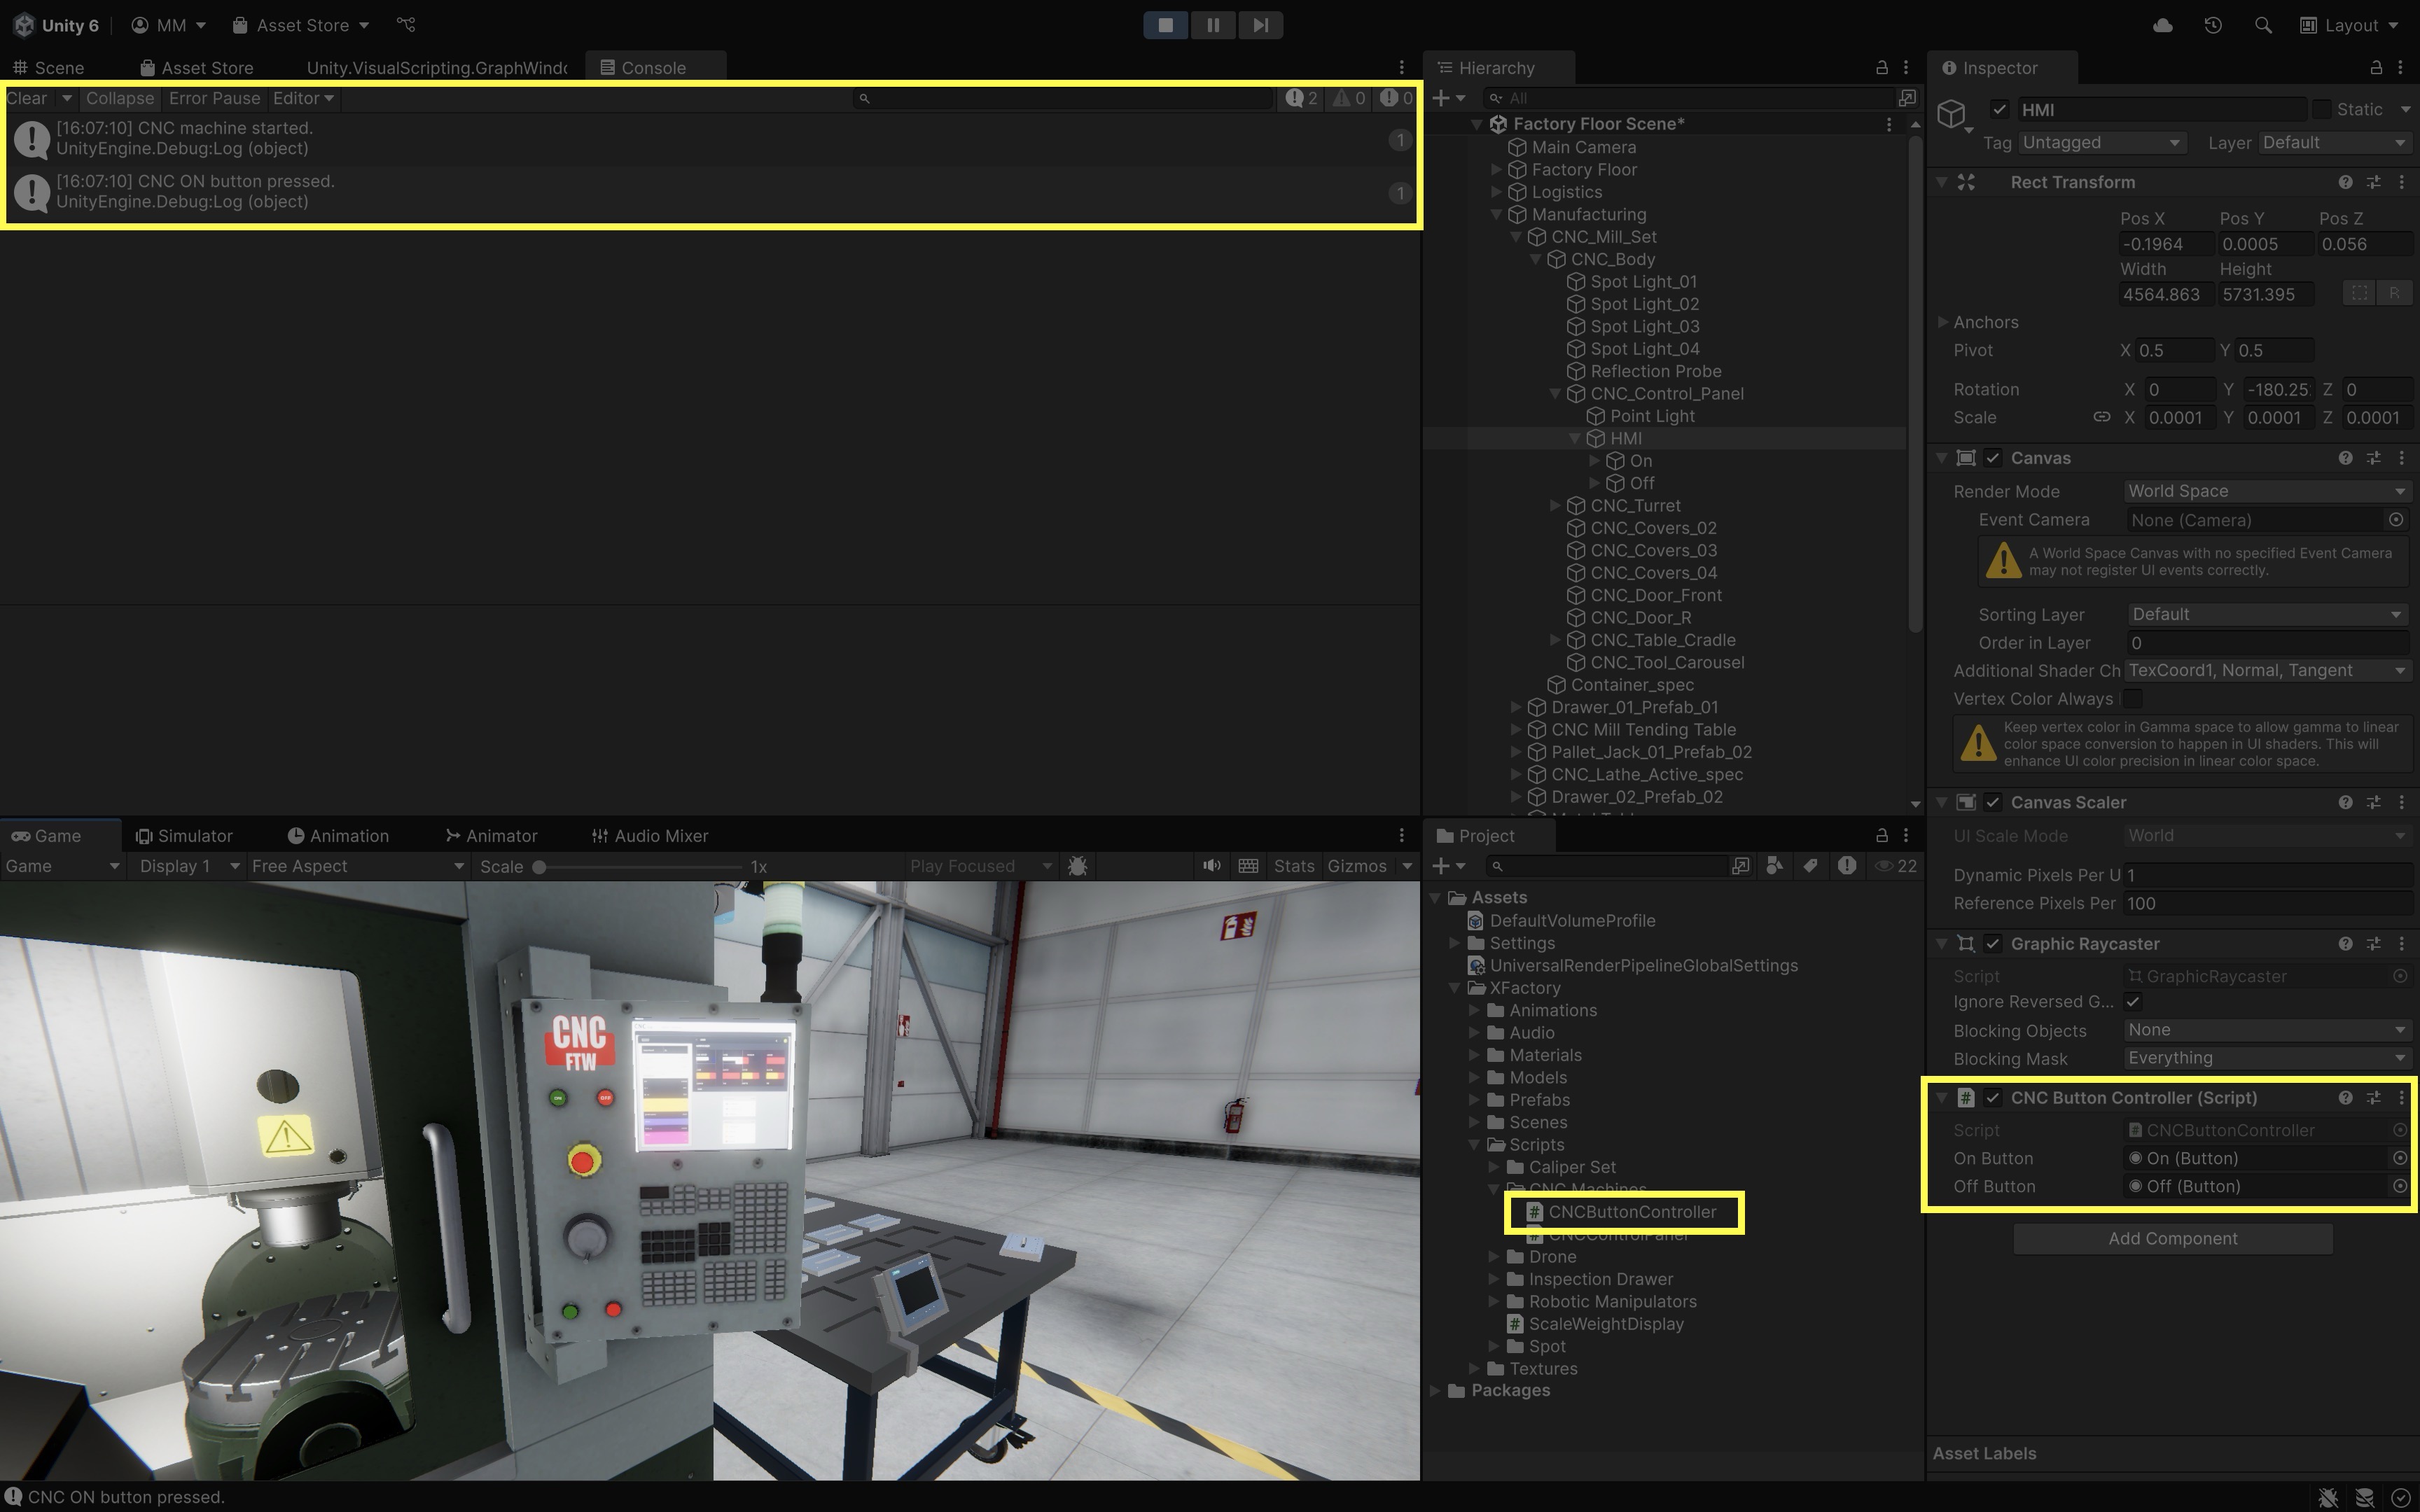
Let’s use Unity’s Button.onClick.AddListener() to handle user input via the HMI panel on the CNC machine, so that the ON and OFF buttons on the HMI log messages when pressed. This mirrors the earlier example where these buttons were wired to play and stop the CNC machine’s sound via an AudioSource on the CNC_Mill_Set. Attach the following script to the HMI GameObject in the Hierarchy. Clicking the ON or OFF button on the CNC machine’s HMI will trigger a debug message in the Console confirming the button press.
using UnityEngine;
using UnityEngine.UI;

public class CNCButtonController : MonoBehaviour
{
    [SerializeField] private Button onButton;   // Assign in Inspector (HMI On button)
    [SerializeField] private Button offButton;  // Assign in Inspector (HMI Off button)

    void Start()
    {
        if (onButton == null || offButton == null)
        {
            Debug.LogWarning("CNCButtonController: Assign both buttons in the Inspector.");
            return;
        }

        onButton.onClick.AddListener(HandleCNCOn);
        offButton.onClick.AddListener(HandleCNCOff);
    }

    void OnDestroy()
    {
        if (onButton != null)
            onButton.onClick.RemoveListener(HandleCNCOn);
        if (offButton != null)
            offButton.onClick.RemoveListener(HandleCNCOff);
    }

    void HandleCNCOn()
    {
        Debug.Log("CNC ON button pressed.");
        // Add logic to start CNC here
    }

    void HandleCNCOff()
    {
        Debug.Log("CNC OFF button pressed.");
        // Add logic to stop CNC here
    }
}
Image
The Image component is used for displaying images (sprites) in the UI. It can be used for icons, backgrounds, or any other visual element.
UnityEngine.UI
└── Image
    ├── sprite
    └── color
Important image properties include:
sprite: Property togetorsetthe current sprite.color: Property to modify the tint of the image.
Example
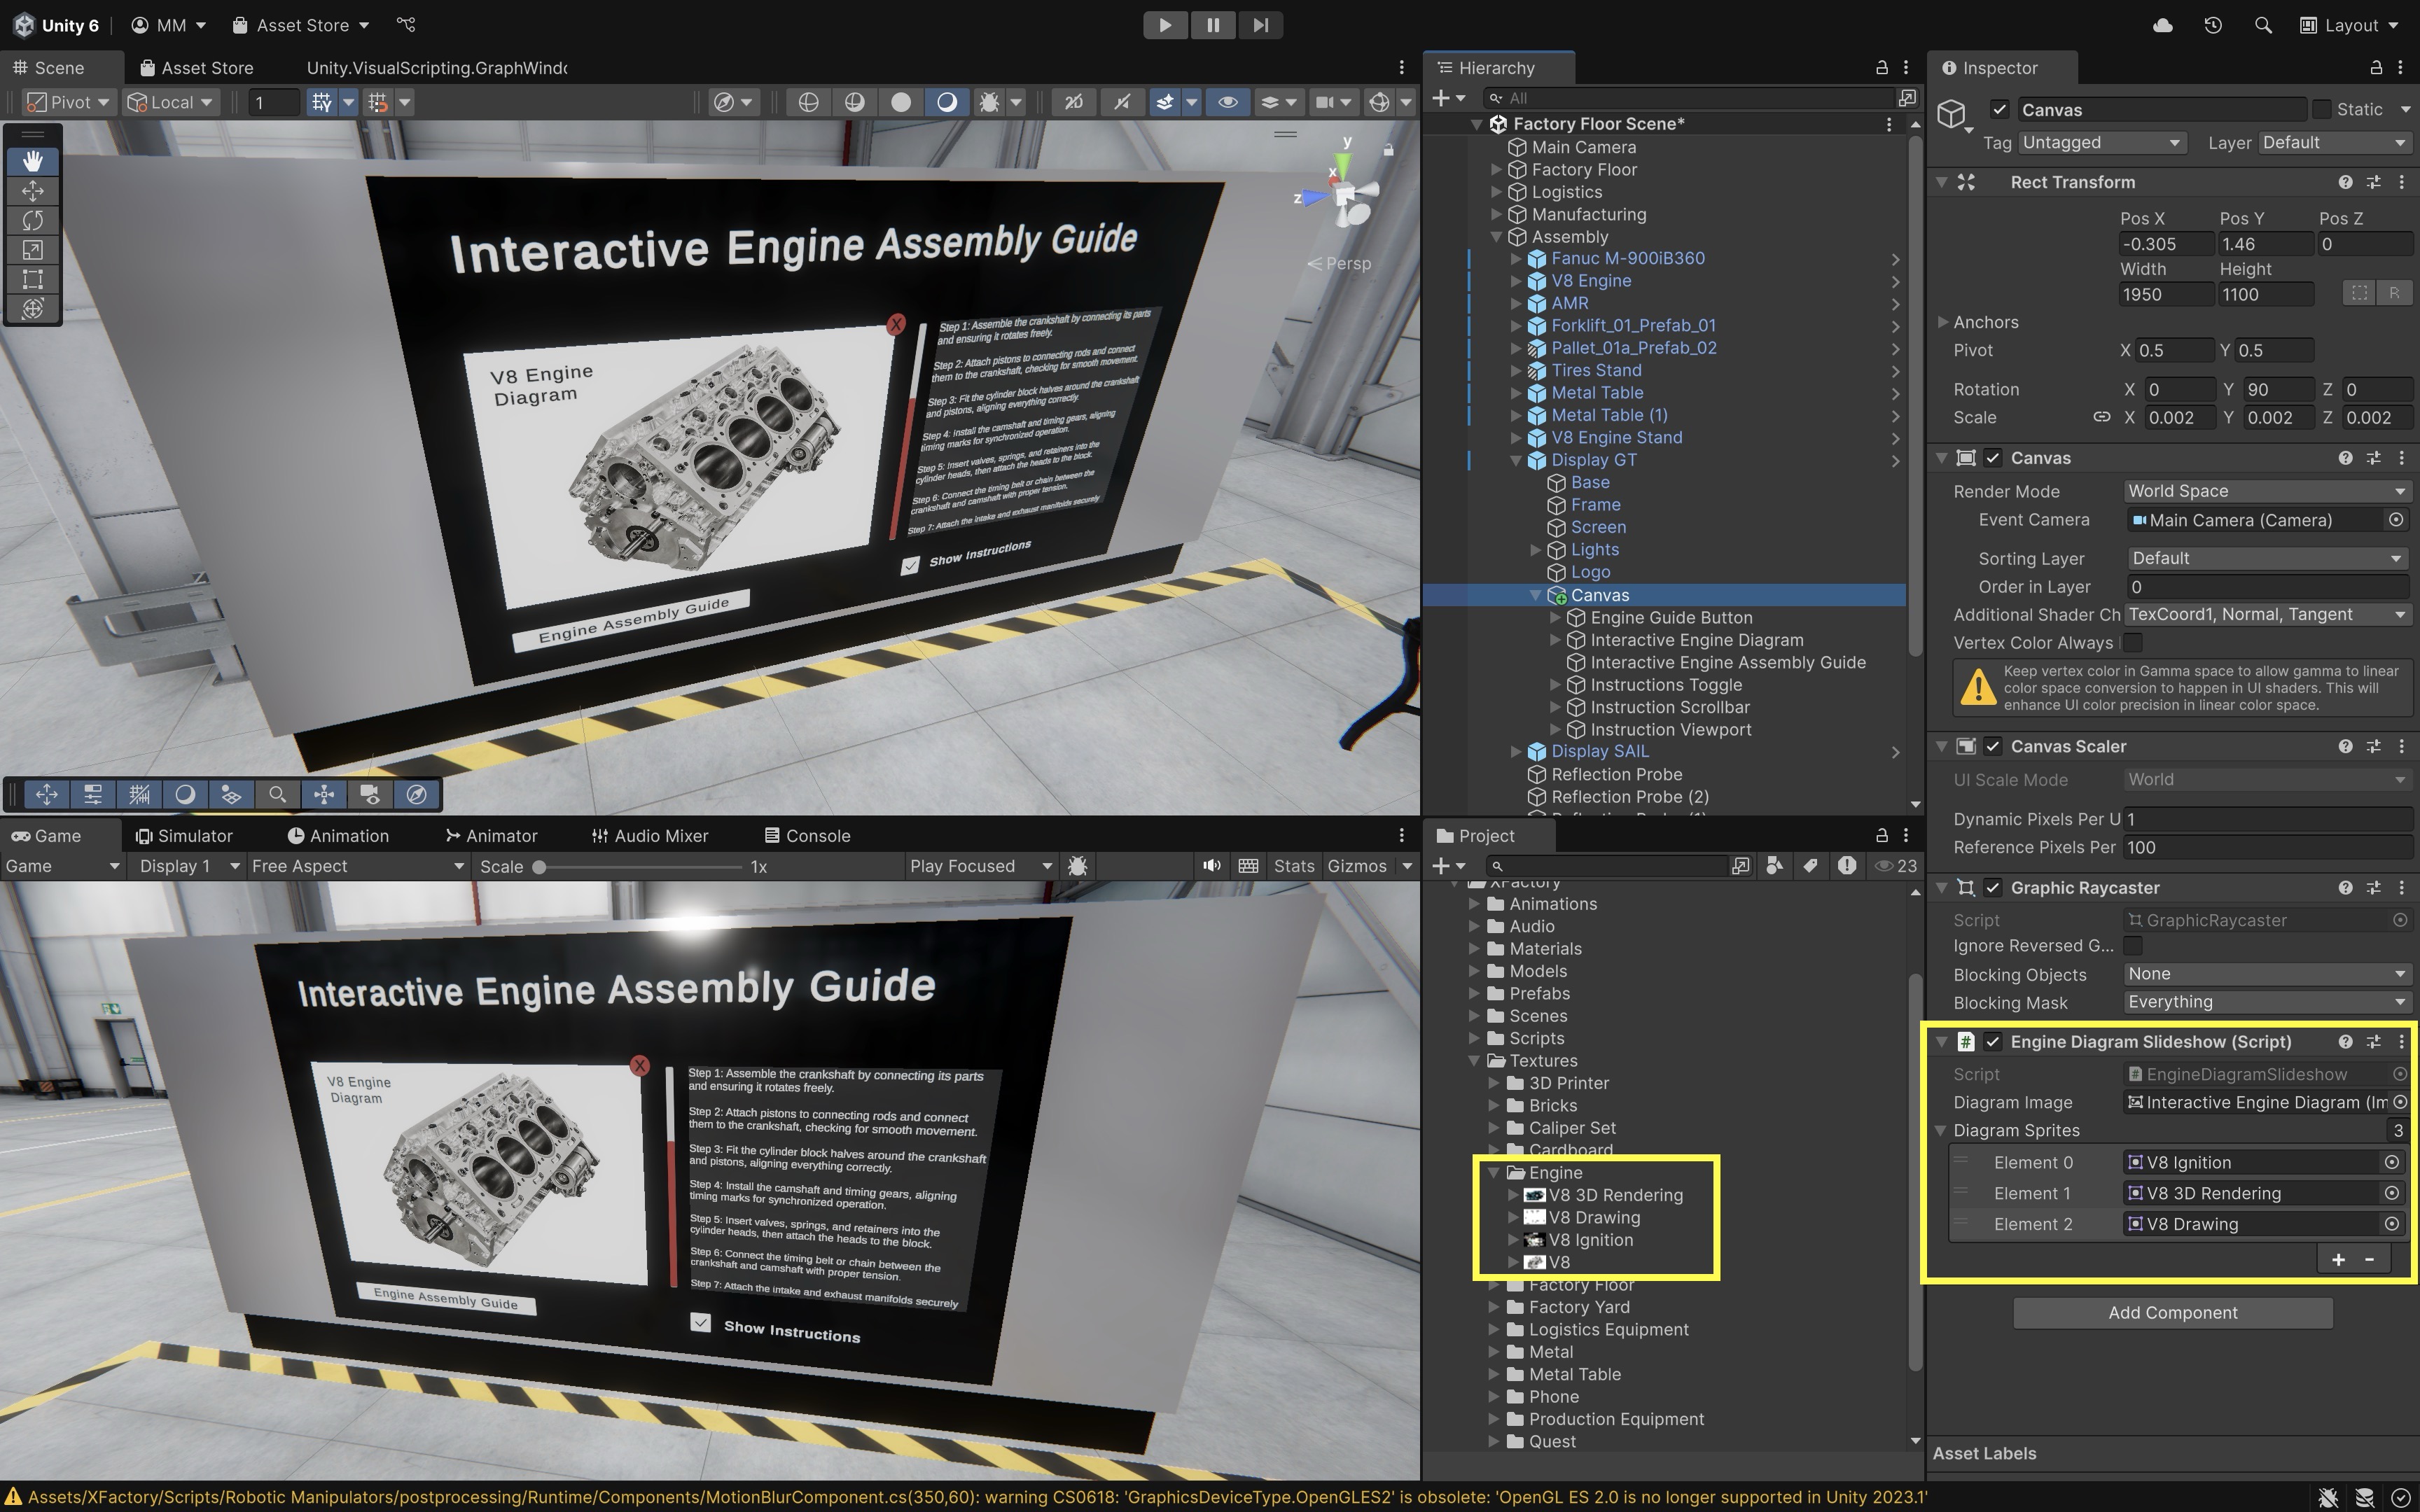
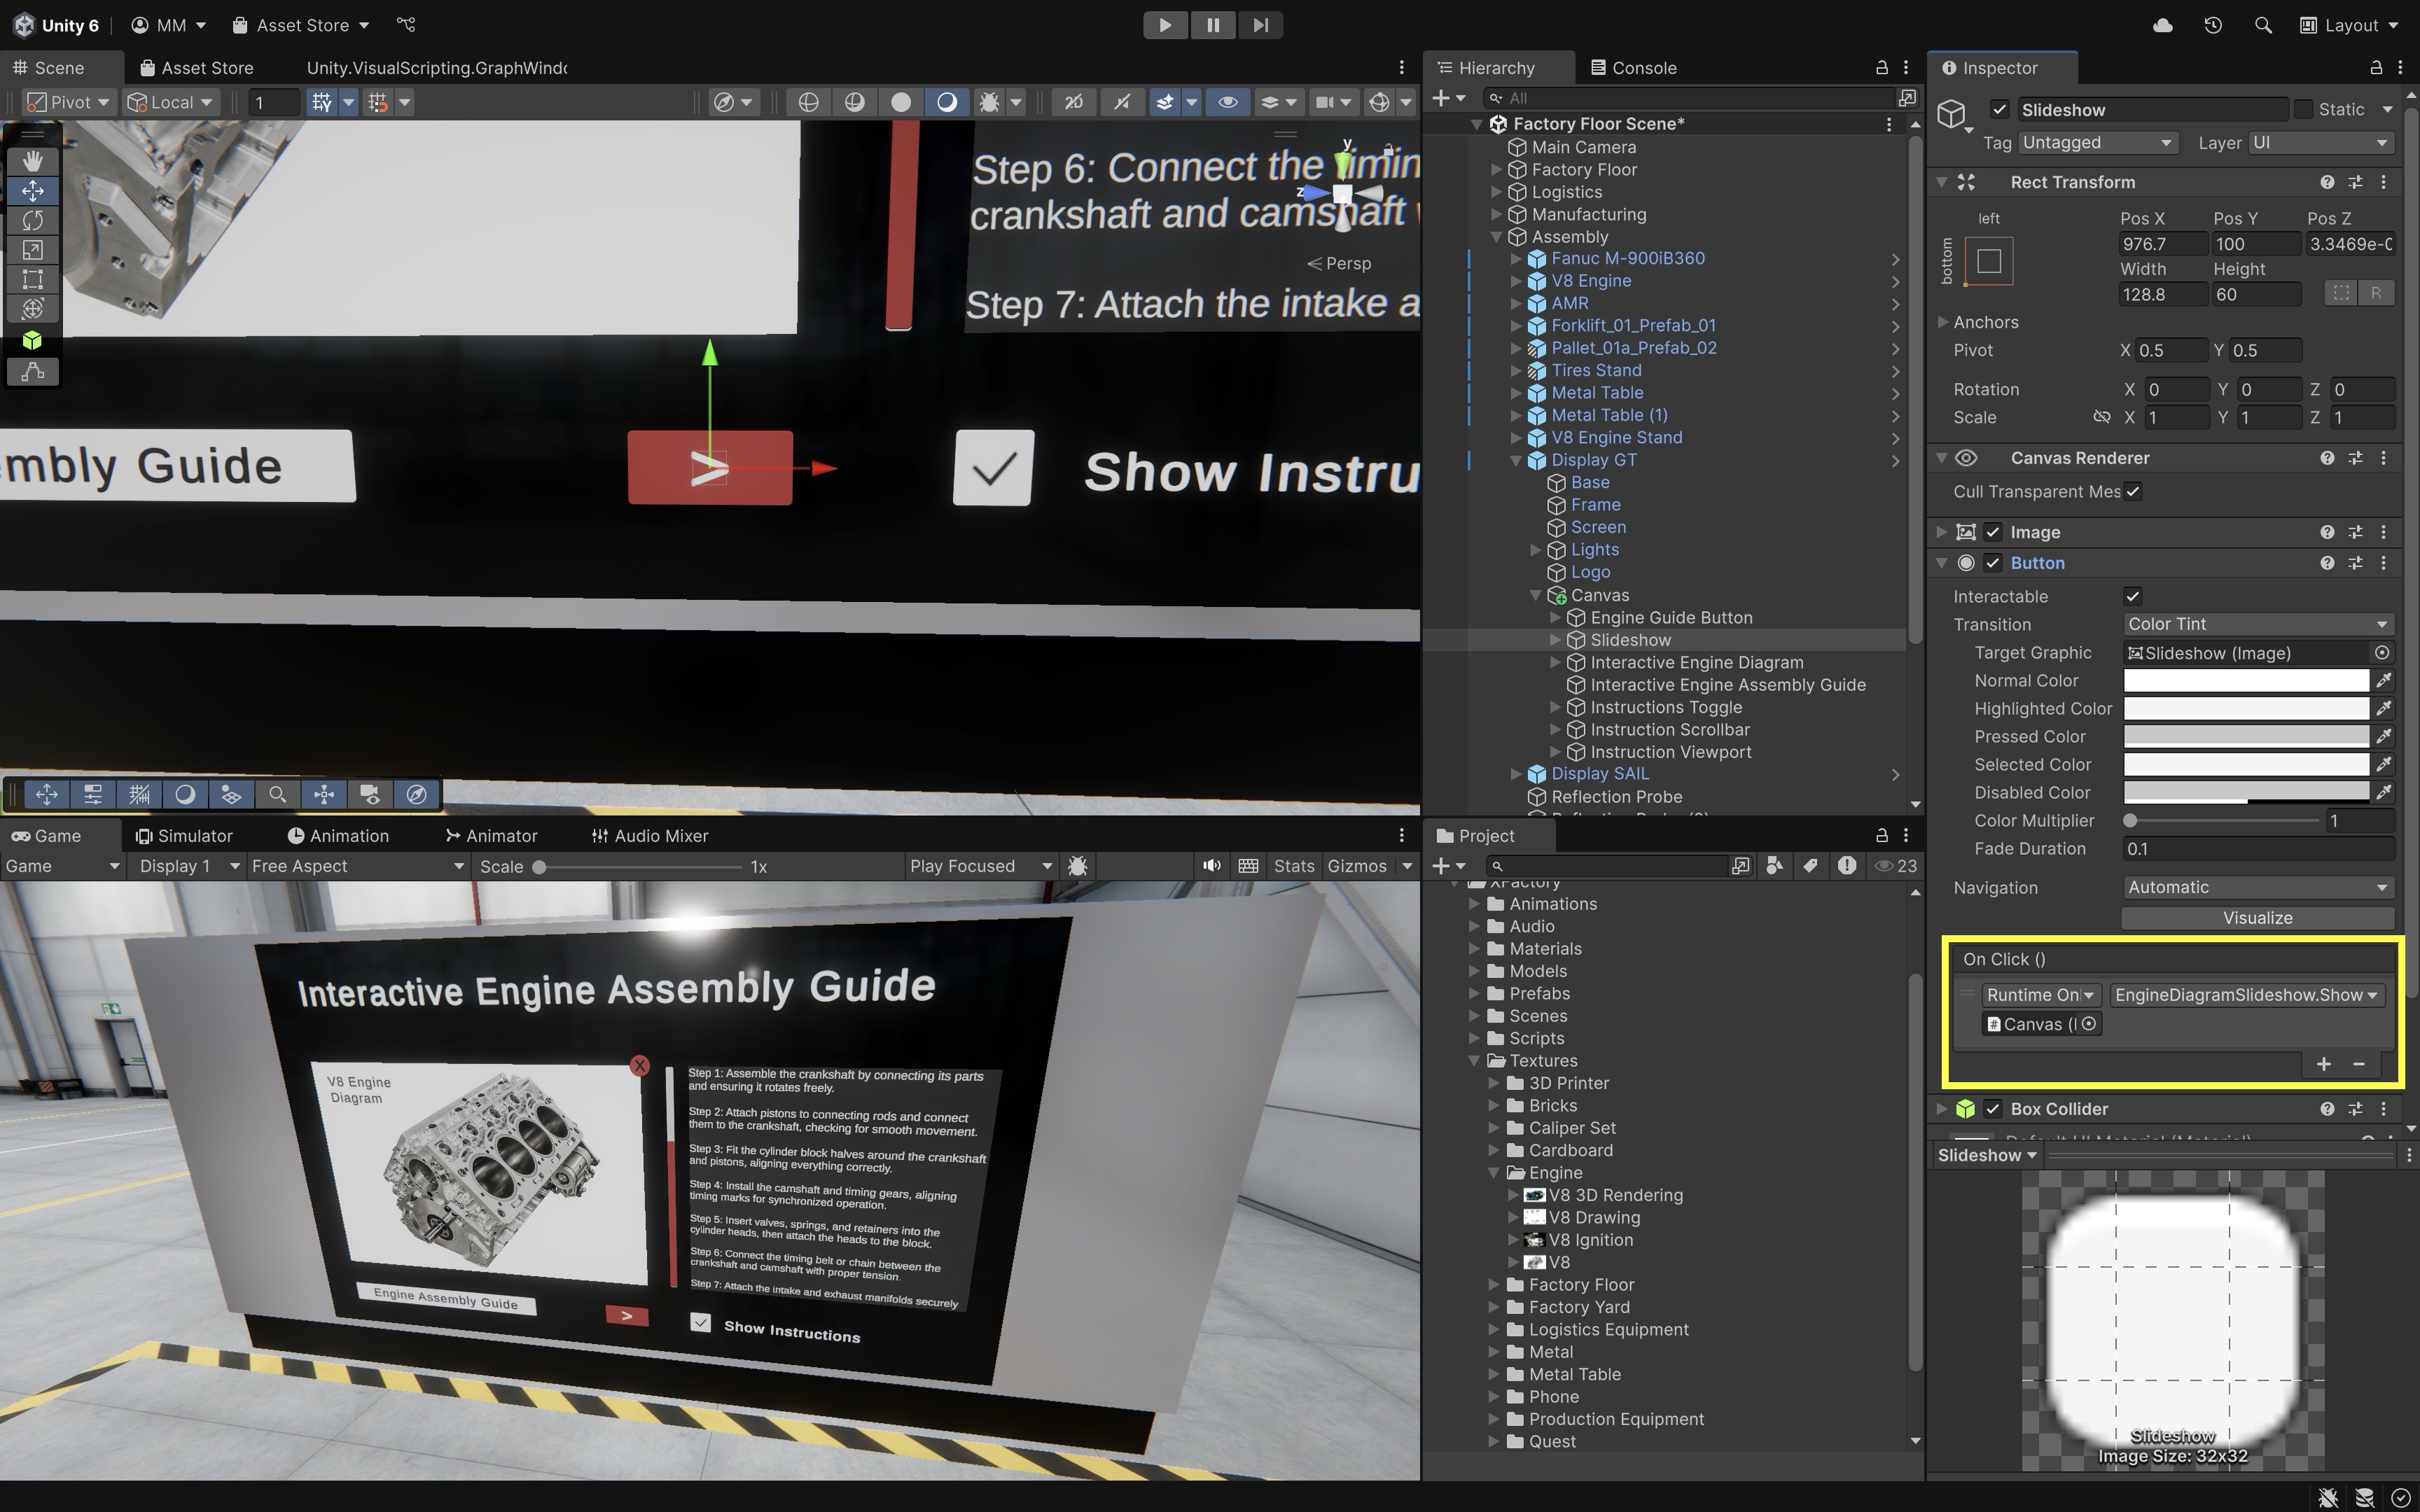
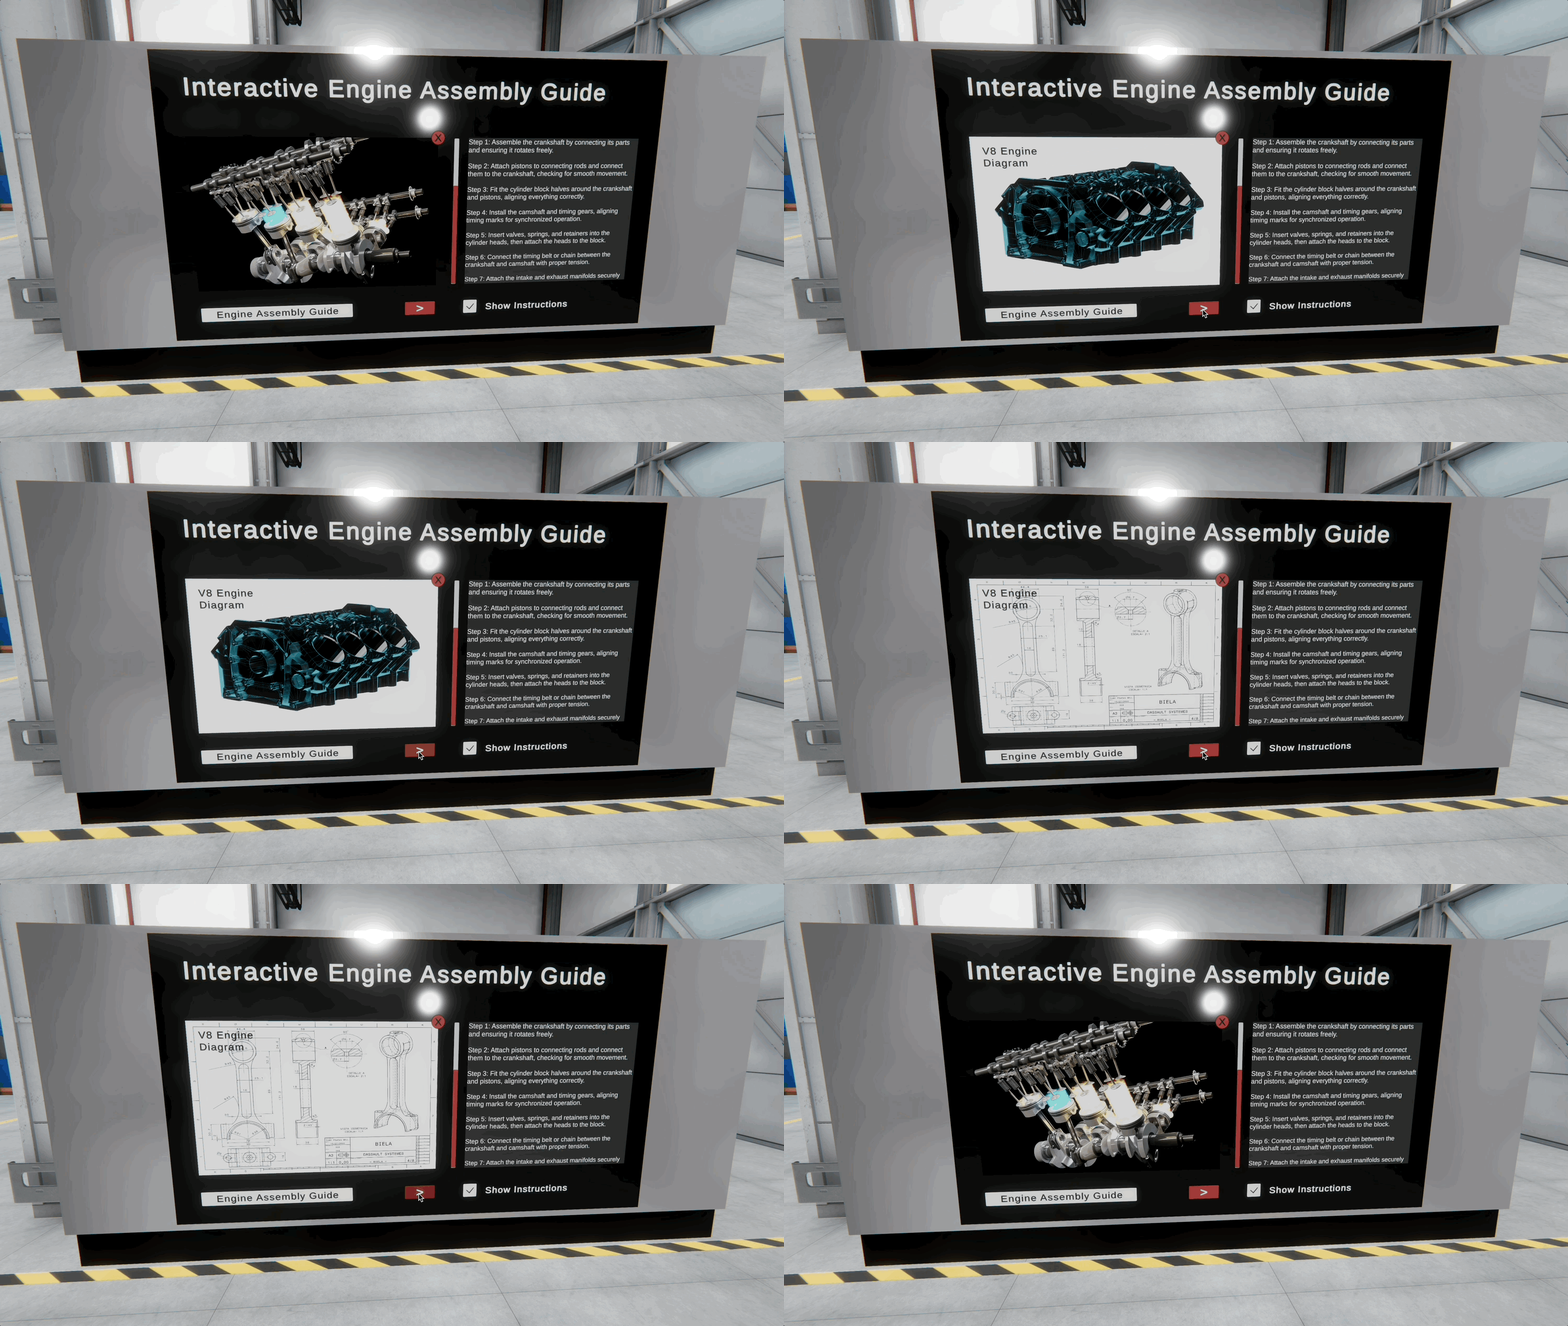
This example demonstrates how to create a simple slideshow of engine diagrams on the Interactive Engine Diagram UI element in the Display GT monitor at the assembly station. It uses the Image.sprite property to cycle through a list of three sprites and the Image.color property to ensure the image is fully visible. A UI button with a > icon is placed below the image, and each click updates the displayed diagram, mimicking an interactive digital manual or display panel.
using UnityEngine;
using UnityEngine.UI;

public class EngineDiagramSlideshow : MonoBehaviour
{
    [SerializeField] private Image diagramImage;
    [SerializeField] private Sprite[] diagramSprites;

    private int currentIndex = 0;

    void Start()
    {
        ShowSlide(currentIndex);
    }

    public void ShowNextSlide()
    {
        if (diagramSprites == null || diagramSprites.Length == 0 || diagramImage == null)
            return;

        currentIndex = (currentIndex + 1) % diagramSprites.Length;
        ShowSlide(currentIndex);
    }

    private void ShowSlide(int index)
    {
        if (diagramSprites == null || diagramSprites.Length == 0 || diagramImage == null)
            return;

        diagramImage.sprite = diagramSprites[index];

        // Ensure the image is fully visible
        // (in case it was tinted or transparent)
        diagramImage.color = Color.white;
    }
}
- Attach the Script:
- Add the
EngineDiagramSlideshowscript to theCanvasGameObject underDisplay GT. - Drag the
Interactive Engine DiagramUI Image into thediagramImagefield. - Add the three diagram slides (as
Spriteassets) to thediagramSpritesarray in theInspector.
- Add the
- Set Up the Button:
- Place a UI Button (with a
>icon) under the image. Name itSlideshowor something similar. - In the button’s
OnClick()list, add the Canvas or GameObject with the script. - Choose
EngineDiagramSlideshow → ShowNextSlide().
- Place a UI Button (with a
- Preview the Result:
- Enter
Playmode. - Click the button to cycle through the slideshow sprites.
- The slideshow can also be viewed on Display GT in a linked Meta Quest through Quest Link.
- Enter
Toggle
The Toggle component is a checkbox-like element that allows users to enable or disable options. It is useful for settings and options menus.
UnityEngine.UI
└── Toggle
    ├── isOn
    └── onValueChanged
        ├── AddListener()
        └── RemoveListener()
Important properties include:
isOn: Property indicating whether the toggle is on (true) or off (false).onValueChanged: An event that gets triggered when the toggle state changes.
Example
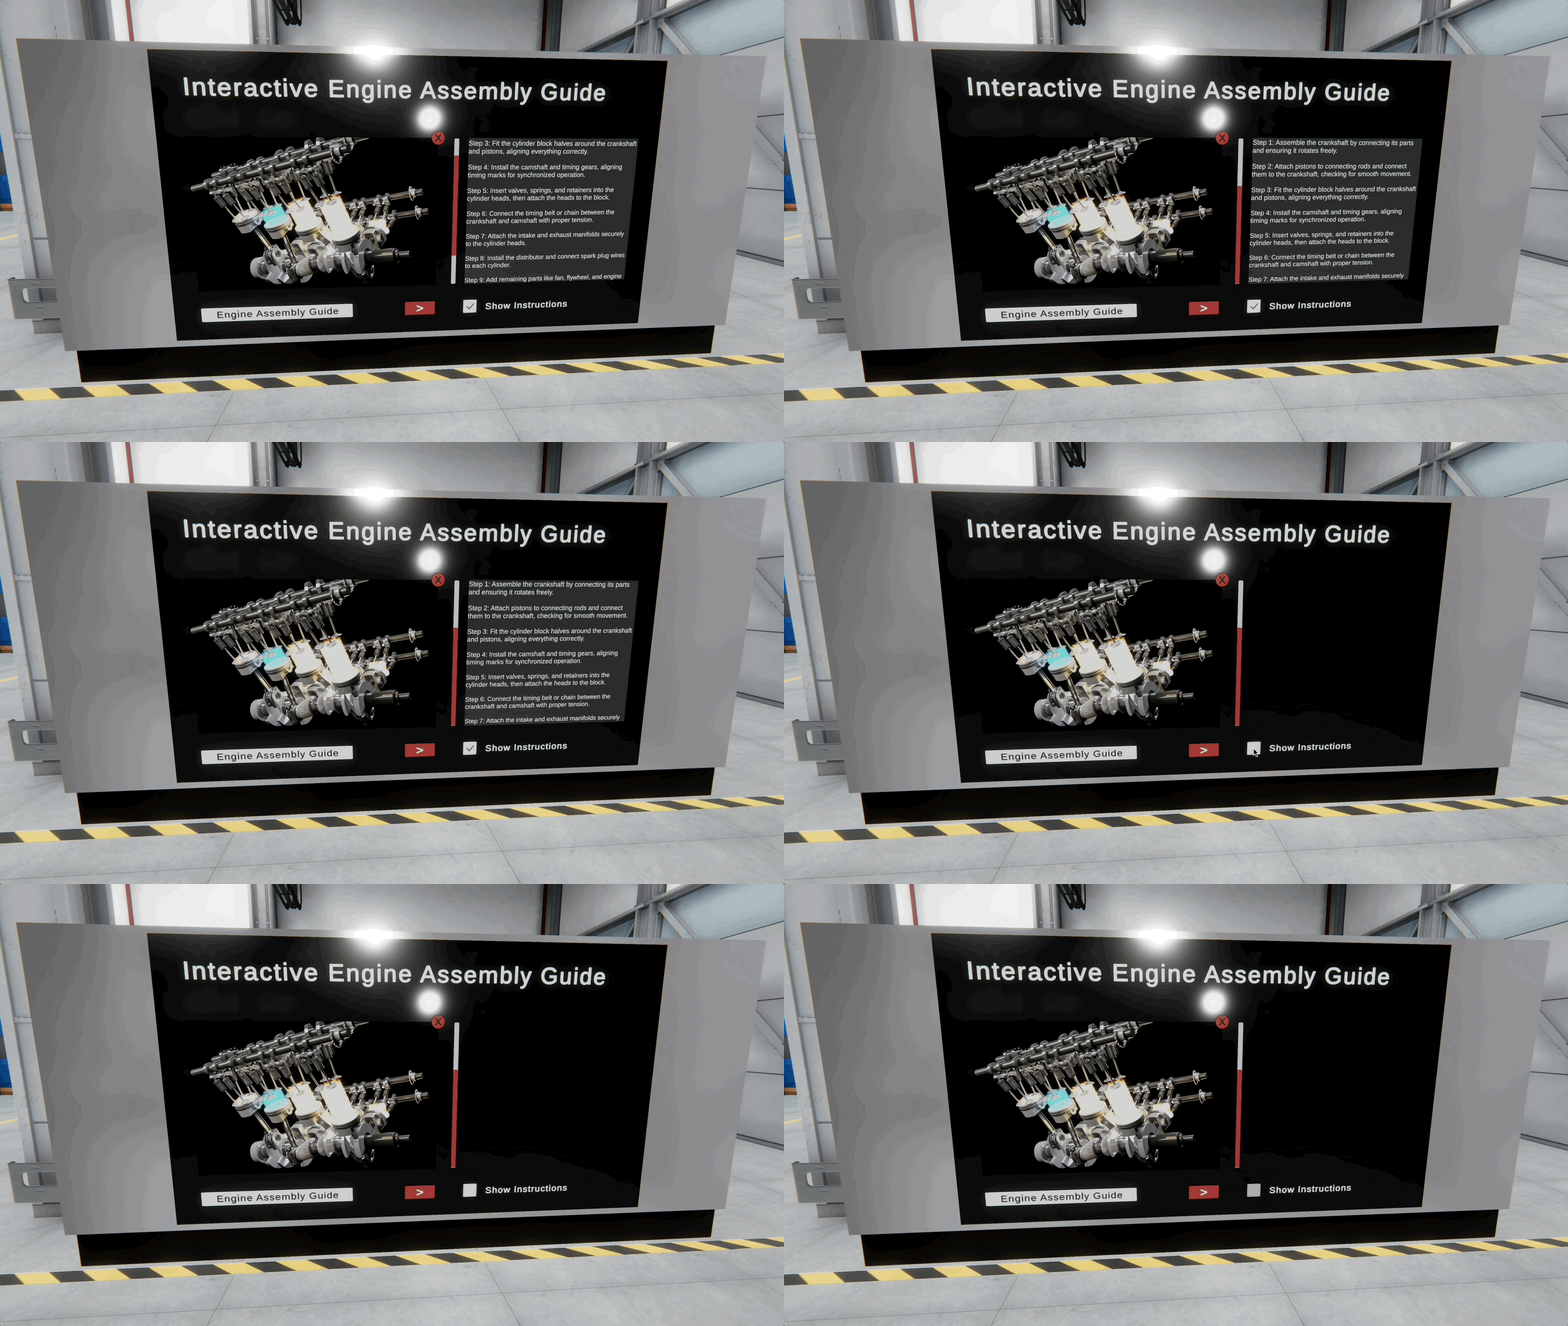
This example demonstrates how to use the Toggle component’s isOn property and onValueChanged event to control the visibility of an instruction panel (Instruction Scrollbar) on the Display GT monitor in the assembly station. When the user interacts with the Instructions Toggle, the script shows or hides the scrollable panel and logs a message to the Console indicating the current state.
using UnityEngine;
using UnityEngine.UI;

public class InstructionToggleController : MonoBehaviour
{
    [SerializeField] private Toggle instructionsToggle;
    [SerializeField] private GameObject instructionPanel;

    void Start()
    {
        if (instructionsToggle == null || instructionPanel == null)
        {
            Debug.LogWarning("InstructionToggleController: Assign toggle and panel in the Inspector.");
            return;
        }

        instructionPanel.SetActive(instructionsToggle.isOn);
        instructionsToggle.onValueChanged.AddListener(SetInstructionsVisible);
    }

    private void SetInstructionsVisible(bool isVisible)
    {
        instructionPanel.SetActive(isVisible);
        Debug.Log(isVisible ? "Instructions panel shown." : "Instructions panel hidden.");
    }

    private void OnDestroy()
    {
        if (instructionsToggle != null)
            instructionsToggle.onValueChanged.RemoveListener(SetInstructionsVisible);
    }
}
- Attach the Script:
- Add the
InstructionToggleControllerscript to theCanvasGameObject underDisplay GT(or any suitable UI controller object in that hierarchy). - Drag the
Instructions Toggle(the UI Toggle element) into theinstructionsTogglefield. - Drag the
Instruction Scrollbar(the scrollable text panel GameObject) into theinstructionPanelfield.
- Add the
- Configure Initial Visibility:
- Ensure the
Instruction Scrollbaris active or inactive in the scene based on your preferred default state. - The script will automatically sync its visibility with the toggle’s
isOnstate at runtime.
- Ensure the
- Test the Toggle:
- Enter
Playmode in Unity. - Click the toggle to show or hide the instruction panel.
- Open the
Consoleto see log messages confirming whether the instructions are shown or hidden. - The instruction panel can also be viewed in a Quest Link–connected Meta Quest during Play Mode.
- Enter
UnityEngine.SceneManagement
The UnityEngine.SceneManagement namespace is essential for managing scenes in Unity. It provides developers with the tools needed to load, unload, and transition between different scenes. Scenes represent different levels, game states, or environments. Using these methods allows you to build fluid game experiences, such as level transitions, dynamic loading of game content, and asynchronous scene management for smoother performance.
UnityEngine.SceneManagement
└── SceneManager
    ├── LoadScene()
    ├── UnloadSceneAsync()
    ├── GetActiveScene()
    └── sceneLoaded
Key SceneManager methods include:
LoadScene(): TheSceneManager.LoadScene()method loads a new scene by name or index. This is commonly used to switch between levels or restart a game.UnloadSceneAsync(): TheSceneManager.UnloadSceneAsync()method unloads a scene asynchronously, freeing up resources. This method is useful when you need to remove a scene without causing a frame rate drop or interruption.GetActiveScene(): TheSceneManager.GetActiveScene()method returns the currently active scene. This is useful for obtaining scene-specific information, such as the scene name or build index.sceneLoaded: TheSceneManager.sceneLoadedevent is triggered once a scene has finished loading. It allows you to perform additional actions immediately after a scene transition, such as initializing game objects or setting up UI elements.
Example
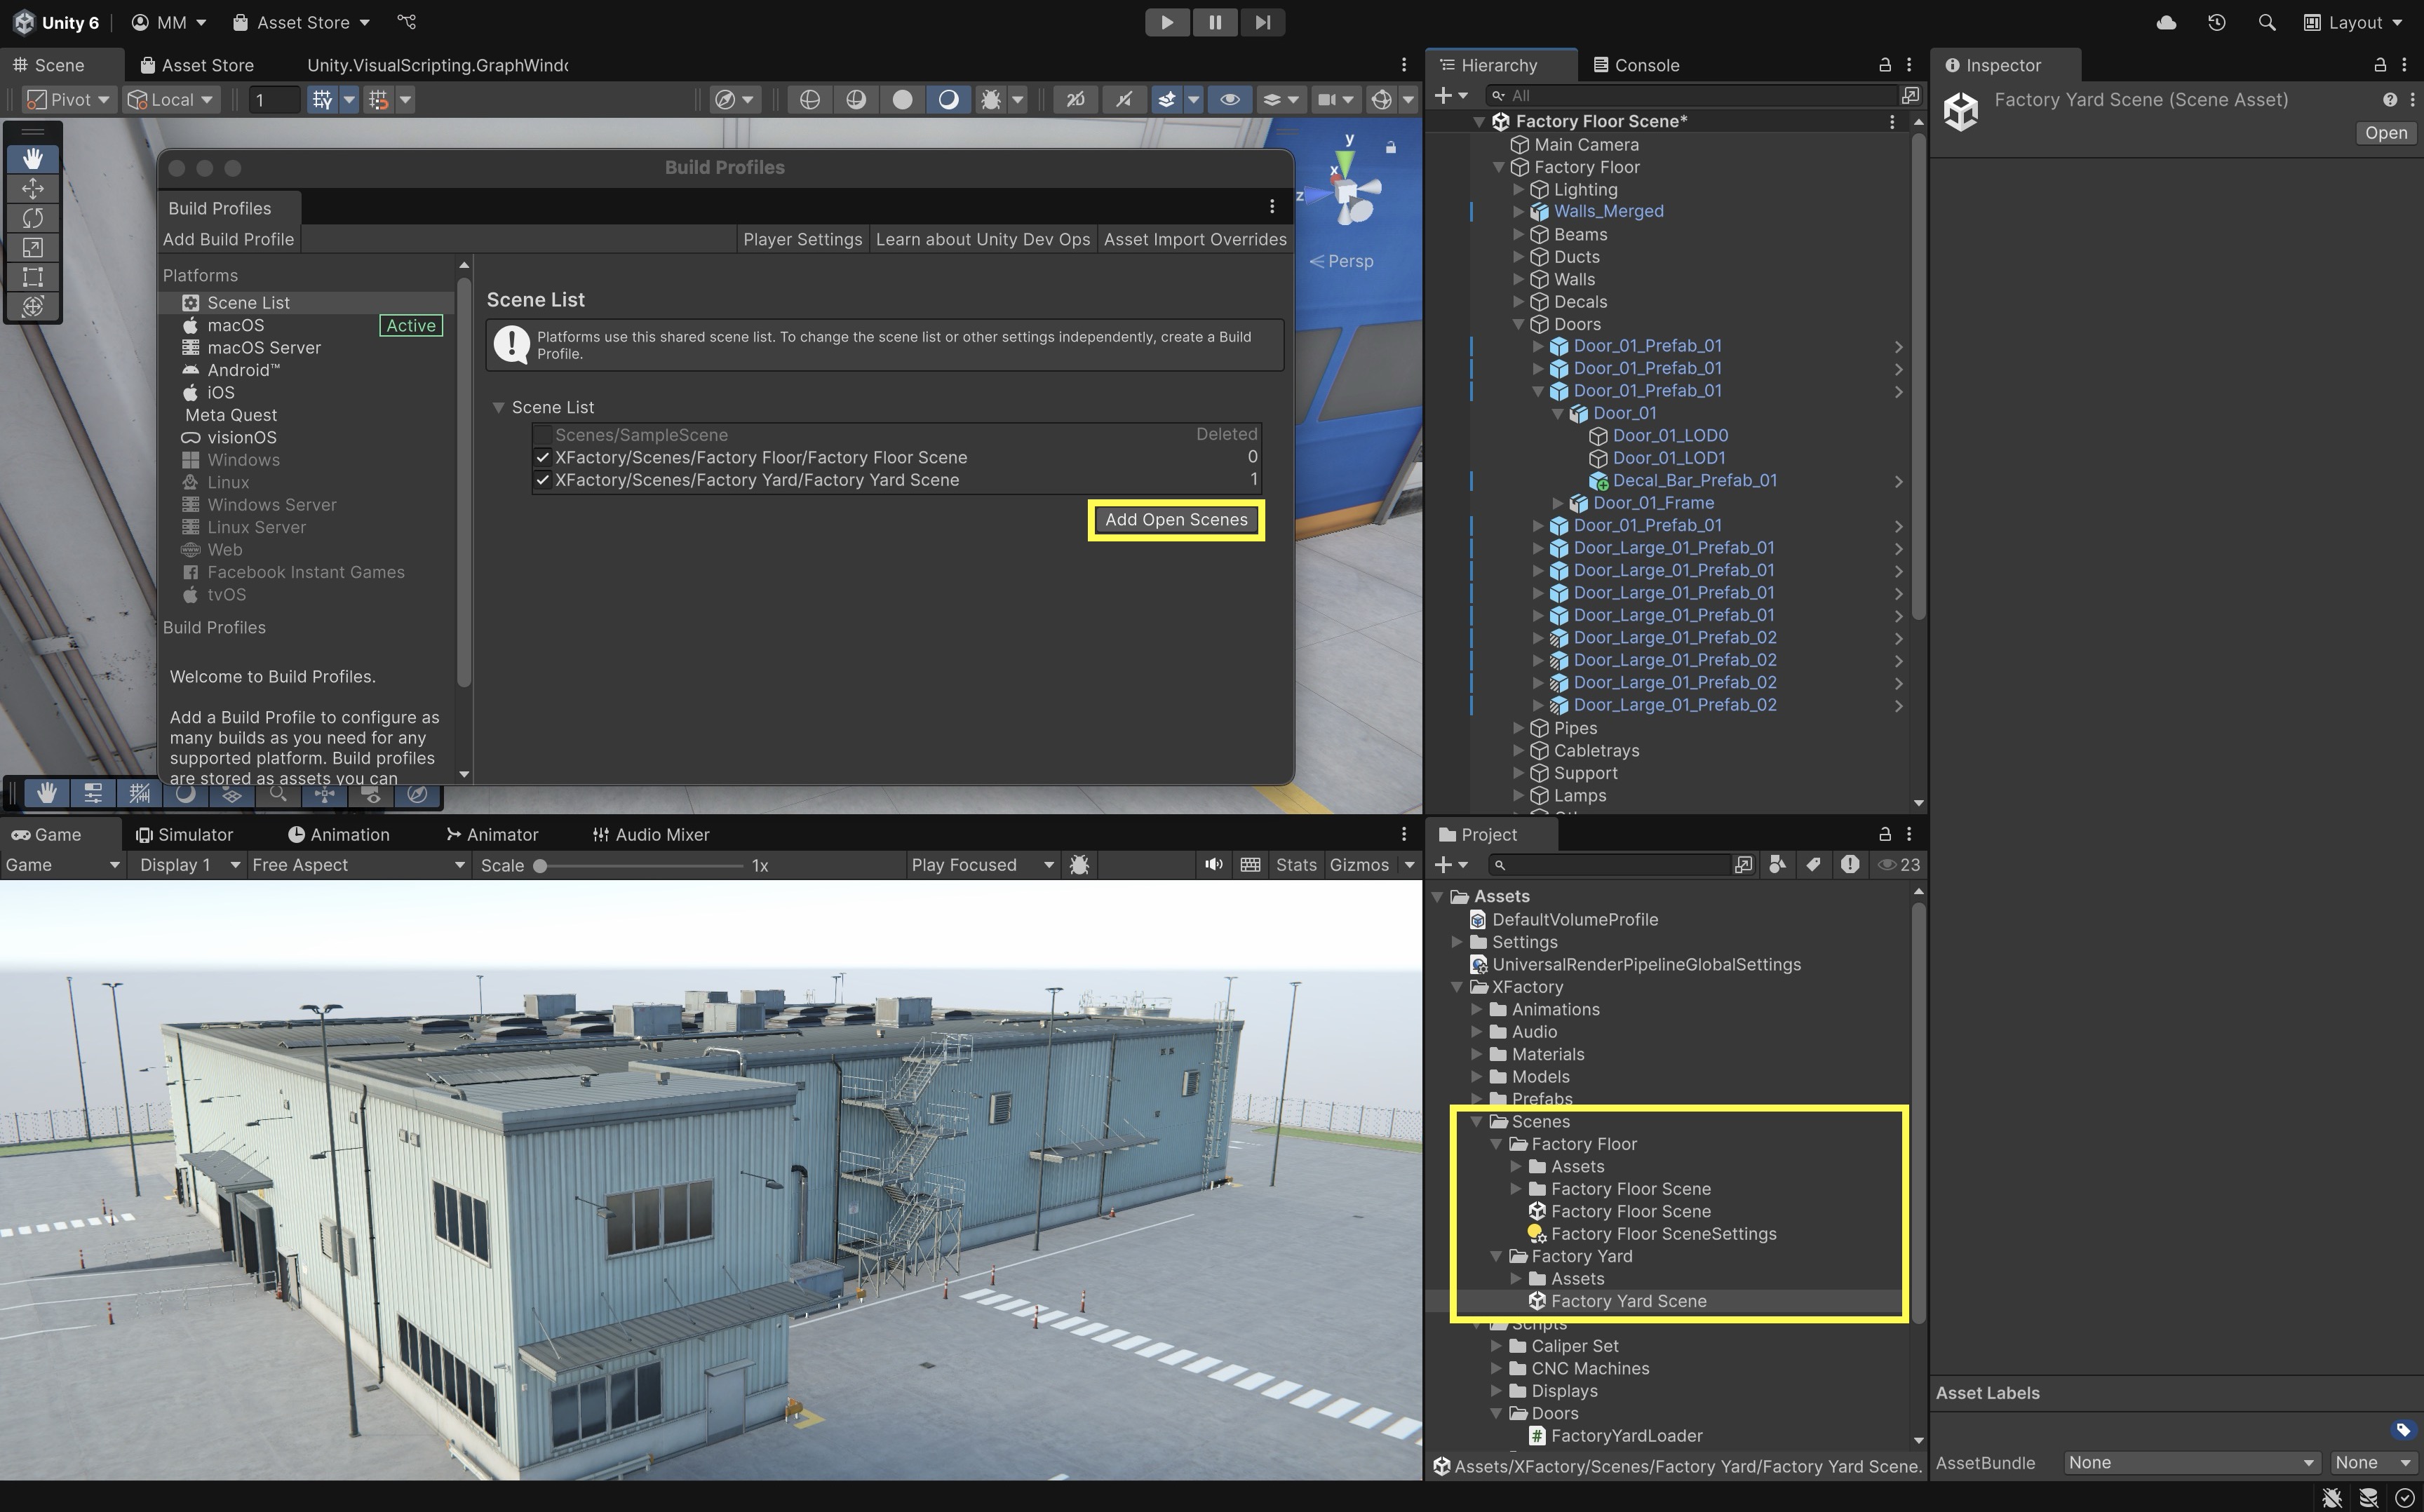
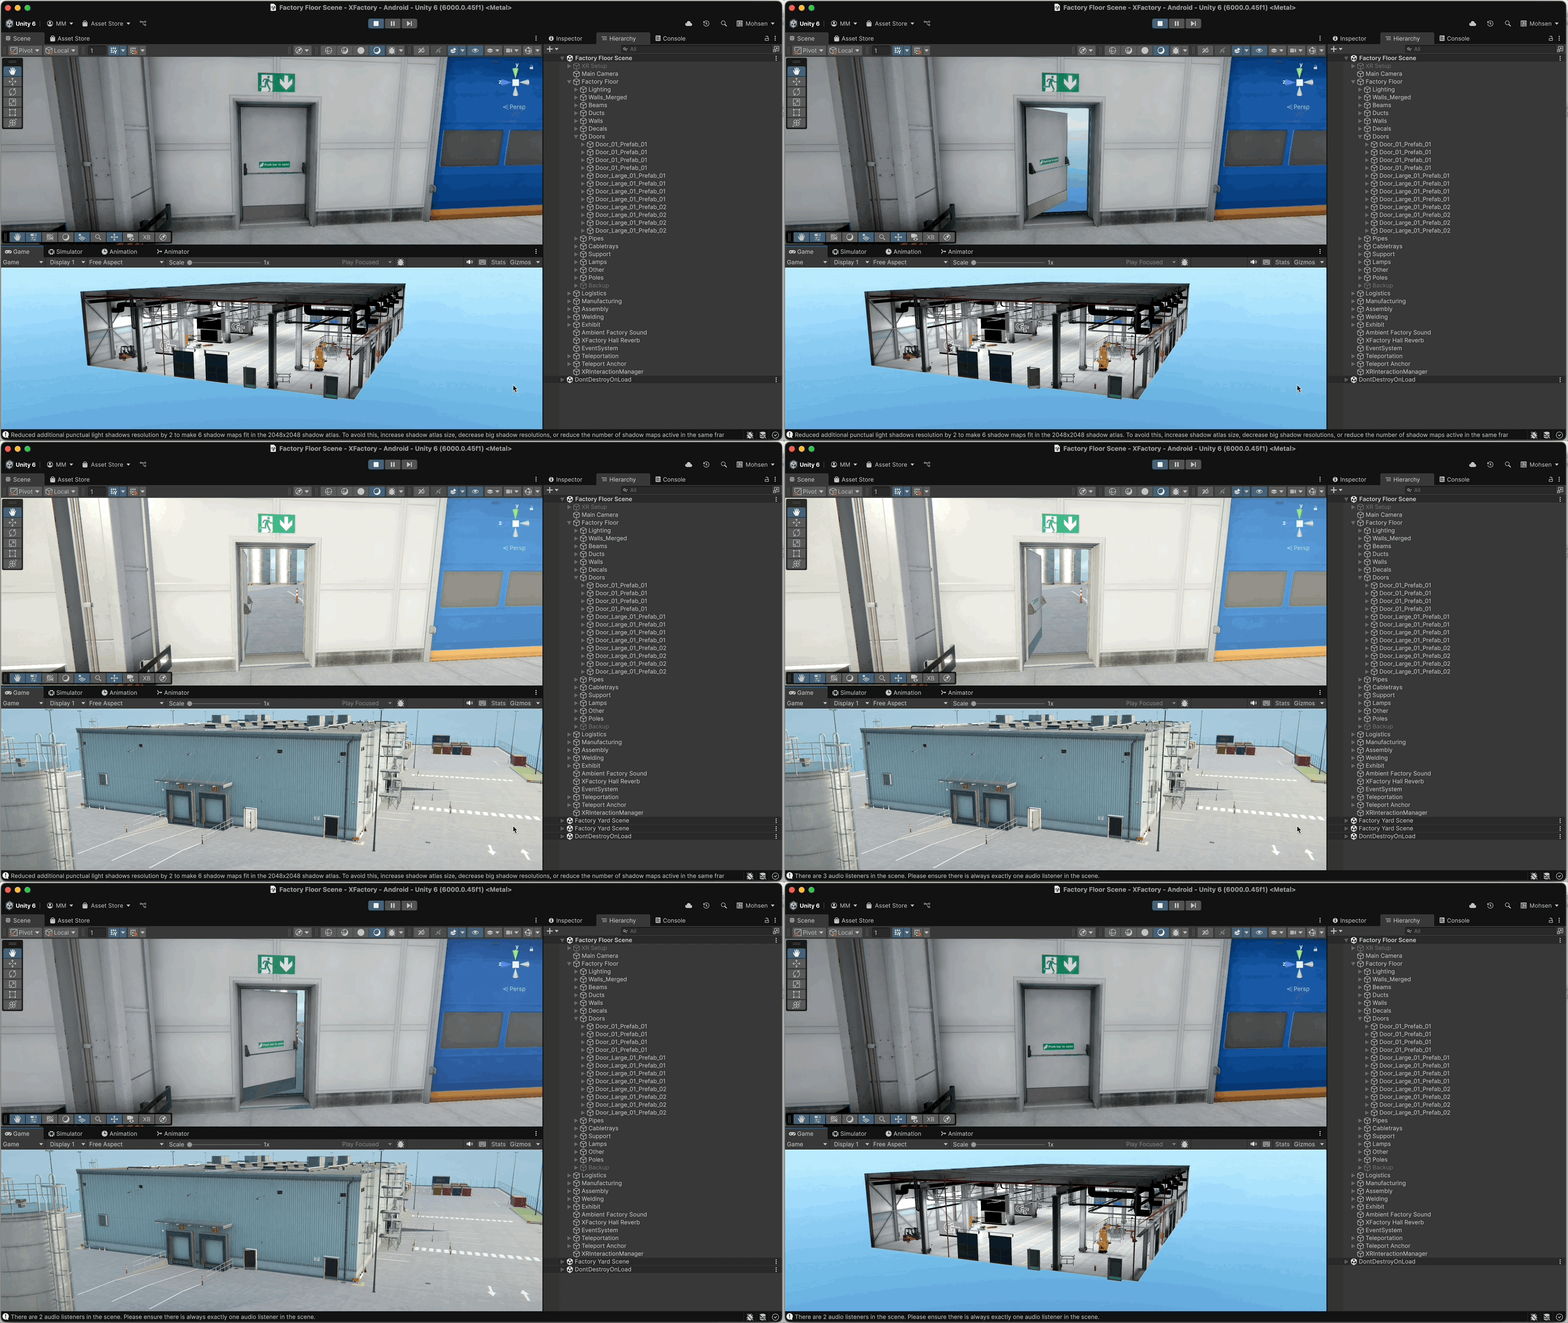
Let’s trigger both loading and unloading the XFactory yard scene (exterior) by opening and closing a door in the XFactory using keyboard input. Pressing the O key gradually rotates the door open on the Y-axis from 0° to -120°. As soon as the door’s Y rotation dips below 0°, the Factory Yard Scene begins loading additively using SceneManager.LoadSceneAsync(). Pressing the C key closes the door by rotating it back to 0°, and once fully closed, the scene is unloaded using SceneManager.UnloadSceneAsync(). This simulates spatially-aware scene streaming, improving performance and immersion in large environments. The scene must be included in the active Build Profile’s Scene List or loading by name will fail. String scene names are fragile—a typo or renamed scene asset can break loading at runtime.
using UnityEngine;
using UnityEngine.SceneManagement;

public class FactoryYardLoader : MonoBehaviour
{
    [Header("Scene")]
    [SerializeField] private string exteriorSceneName = "Factory Yard Scene";

    [Header("Door Settings")]
    [SerializeField] private float rotationSpeed = 60f;
    [SerializeField] private float openAngle = 120f; // how far to rotate counter-clockwise

    private Quaternion closedRotation;
    private Quaternion openRotation;

    private bool opening = false;
    private bool closing = false;
    private bool sceneLoaded = false;
    private bool sceneLoading = false;

    void Start()
    {
        closedRotation = transform.rotation;
        openRotation = closedRotation * Quaternion.Euler(0f, -openAngle, 0f);
    }

    void Update()
    {
        if (Input.GetKeyDown(KeyCode.O)) opening = true;
        if (Input.GetKeyDown(KeyCode.C)) closing = true;

        if (opening)
        {
            transform.rotation = Quaternion.RotateTowards(
                transform.rotation,
                openRotation,
                rotationSpeed * Time.deltaTime
            );

            if (!sceneLoaded && !sceneLoading &&
                Quaternion.Angle(transform.rotation, closedRotation) > openAngle * 0.25f)
            {
                Scene targetScene = SceneManager.GetSceneByName(exteriorSceneName);
                if (!targetScene.isLoaded)
                {
                    SceneManager.LoadSceneAsync(exteriorSceneName, LoadSceneMode.Additive);
                    sceneLoading = true;
                    Debug.Log("Factory Yard Scene loading...");
                }
            }

            if (Quaternion.Angle(transform.rotation, openRotation) < 0.1f)
                opening = false;
        }

        if (closing)
        {
            transform.rotation = Quaternion.RotateTowards(
                transform.rotation,
                closedRotation,
                rotationSpeed * Time.deltaTime
            );

            if (Quaternion.Angle(transform.rotation, closedRotation) < 0.1f)
            {
                closing = false;

                Scene targetScene = SceneManager.GetSceneByName(exteriorSceneName);
                if (sceneLoaded && targetScene.isLoaded)
                {
                    SceneManager.UnloadSceneAsync(exteriorSceneName);
                    sceneLoaded = false;
                    sceneLoading = false;
                    Debug.Log("Factory Yard Scene unloaded.");
                }
            }
        }
    }

    void OnEnable()
    {
        SceneManager.sceneLoaded += HandleSceneLoaded;
    }

    void OnDisable()
    {
        SceneManager.sceneLoaded -= HandleSceneLoaded;
    }

    void HandleSceneLoaded(Scene scene, LoadSceneMode mode)
    {
        if (scene.name == exteriorSceneName)
        {
            sceneLoaded = true;
            sceneLoading = false;
            Debug.Log("Factory Yard Scene loaded.");
        }
    }
}
- Attach the Script:
- Add the
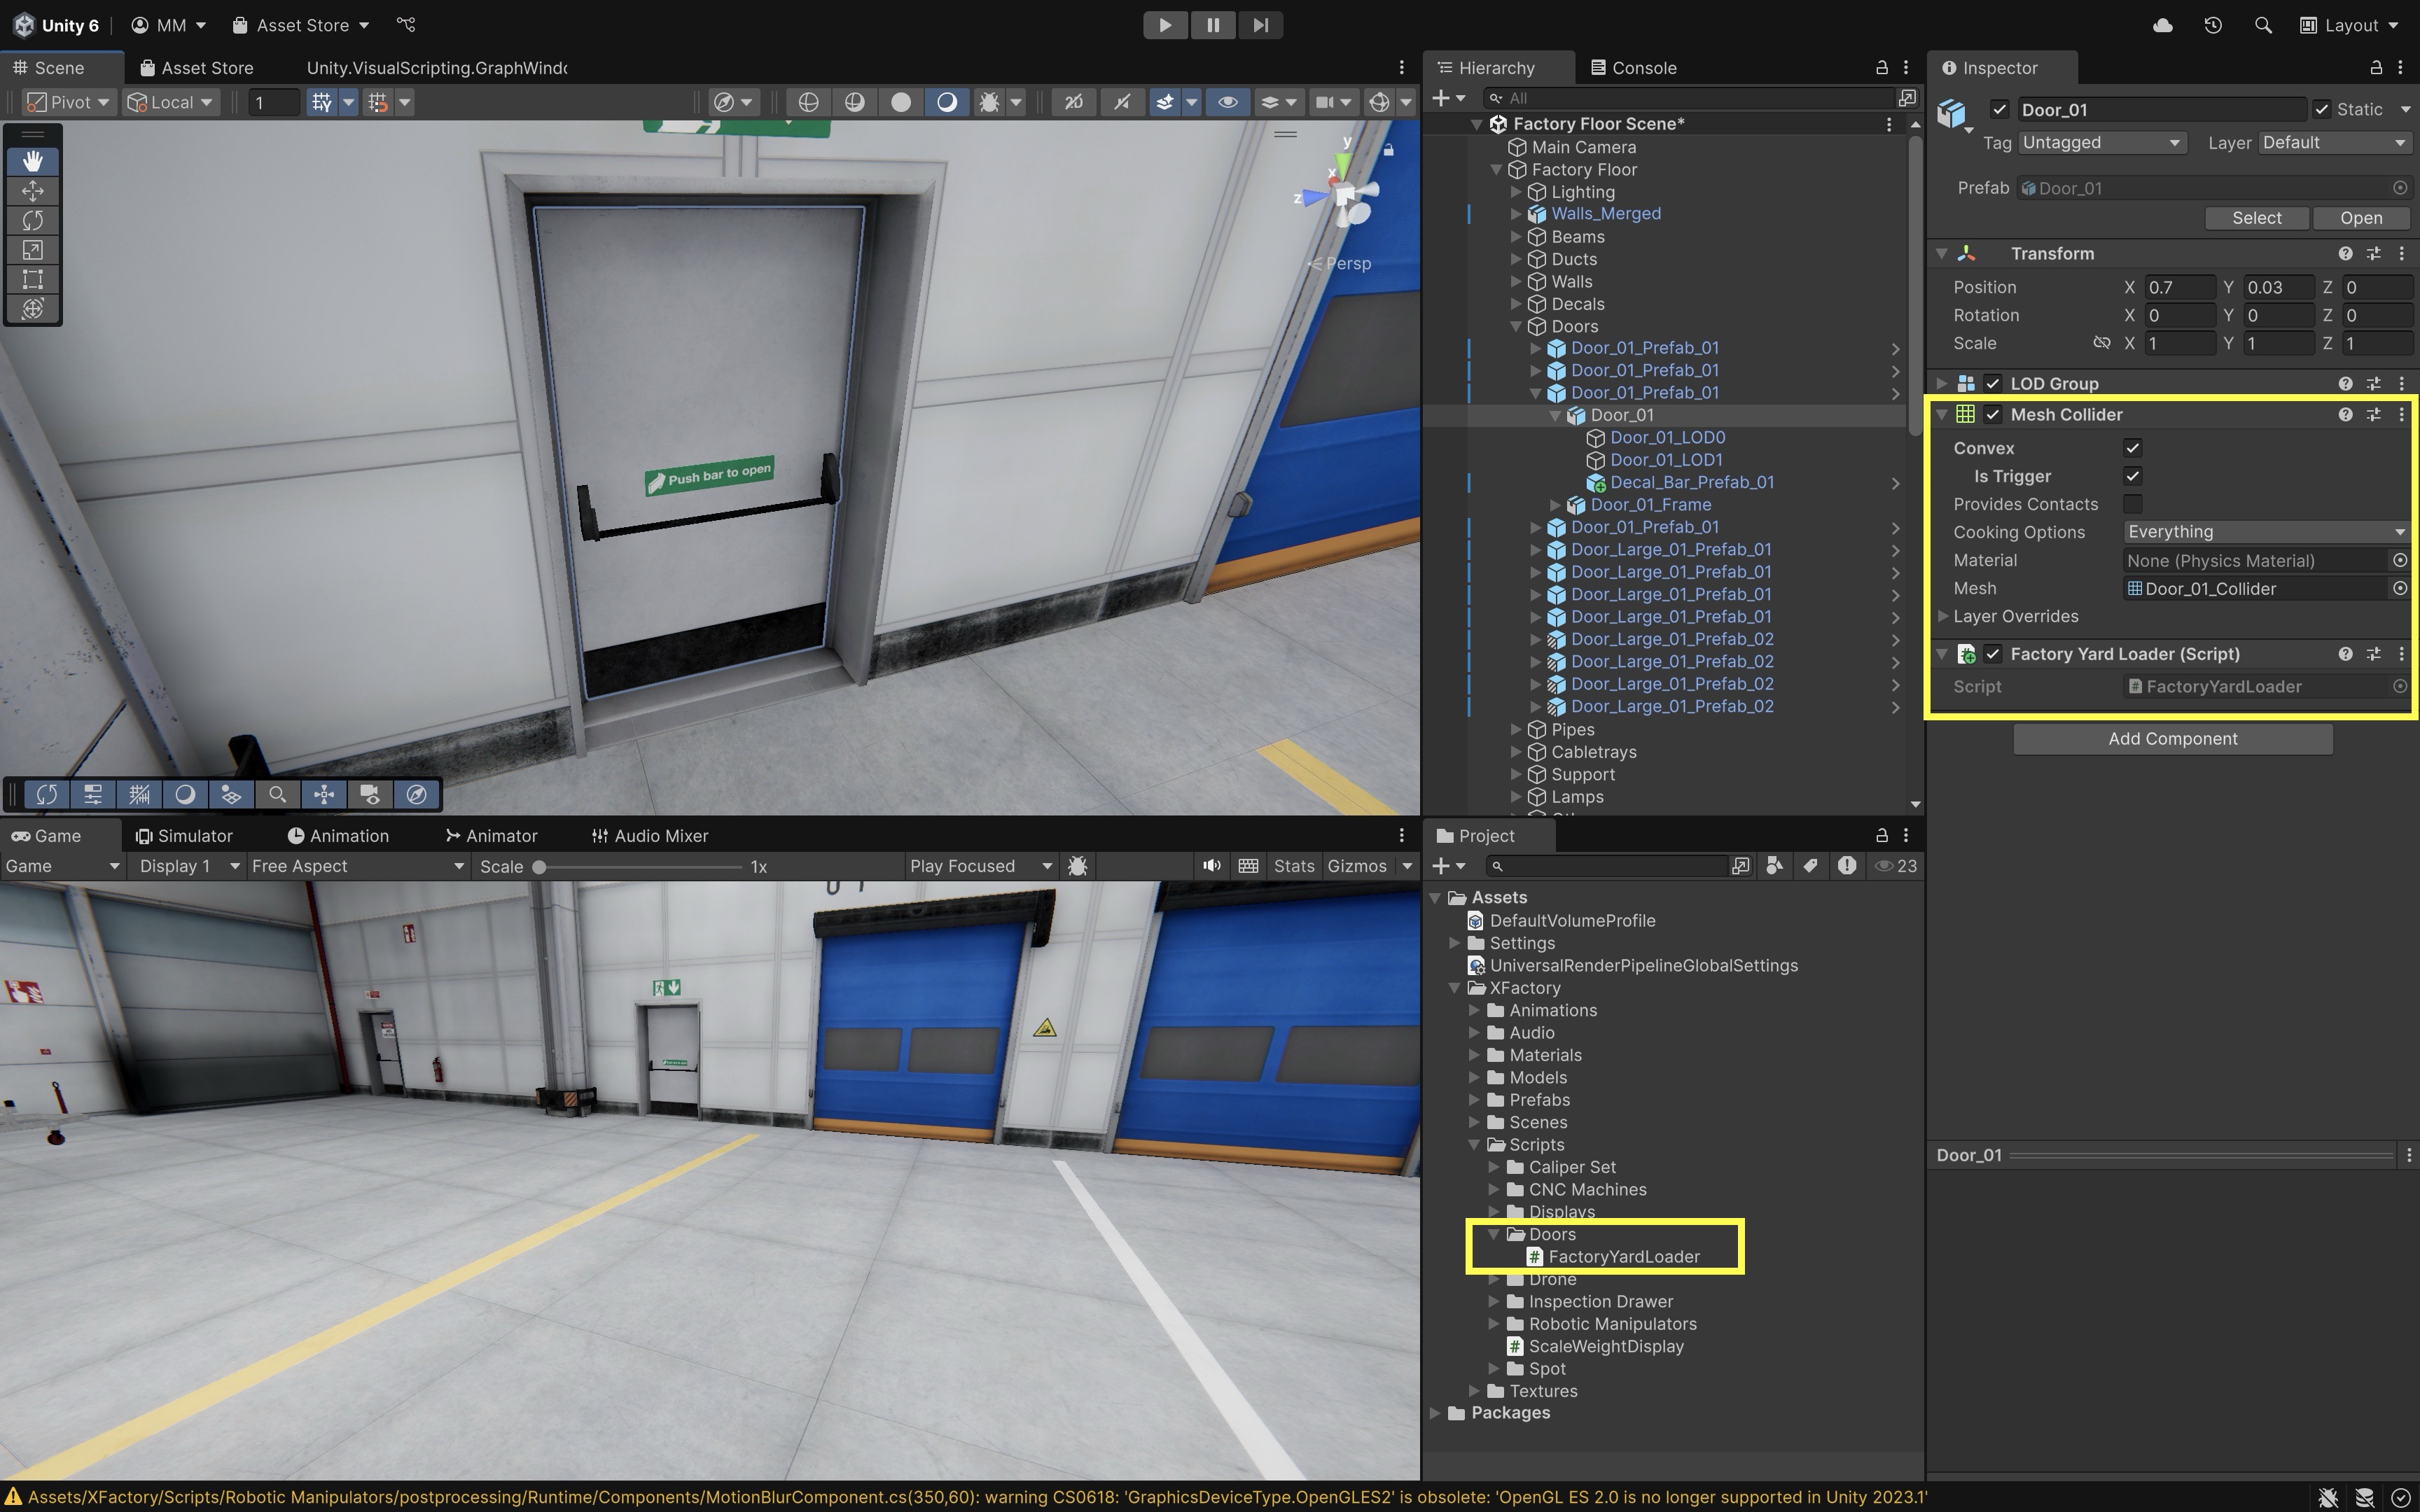
FactoryYardLoaderscript to the door GameObject (e.g.,Door_01). - Ensure the door GameObject has a
Collidercomponent (it does not need to be a trigger).
- Add the
- Configure Scene Reference:
- In the script’s
exteriorSceneNamefield, type the exact name of your scene asset (e.g.,Factory Yard Scene). - Go to
File > Build Profilesand open your active build profile. - In the profile’s
Scene List, clickAdd Open Sceneafter additively opening theFactory Yard Scenein the Editor (right-click >Open Scene Additive).
- In the script’s
- Testing in Play Mode:
- Enter
Playmode in the Unity Editor. - Press O to open the door. Once its
Yrotation passes below0°, theFactory Yard Sceneloads additively. - Press C to close the door. Once it fully returns to
0°, theFactory Yard Sceneis unloaded automatically. - Opening the door and loading the yard can also be previewed in a Quest Link–connected Meta Quest headset.
- Enter
UnityEngine.XR
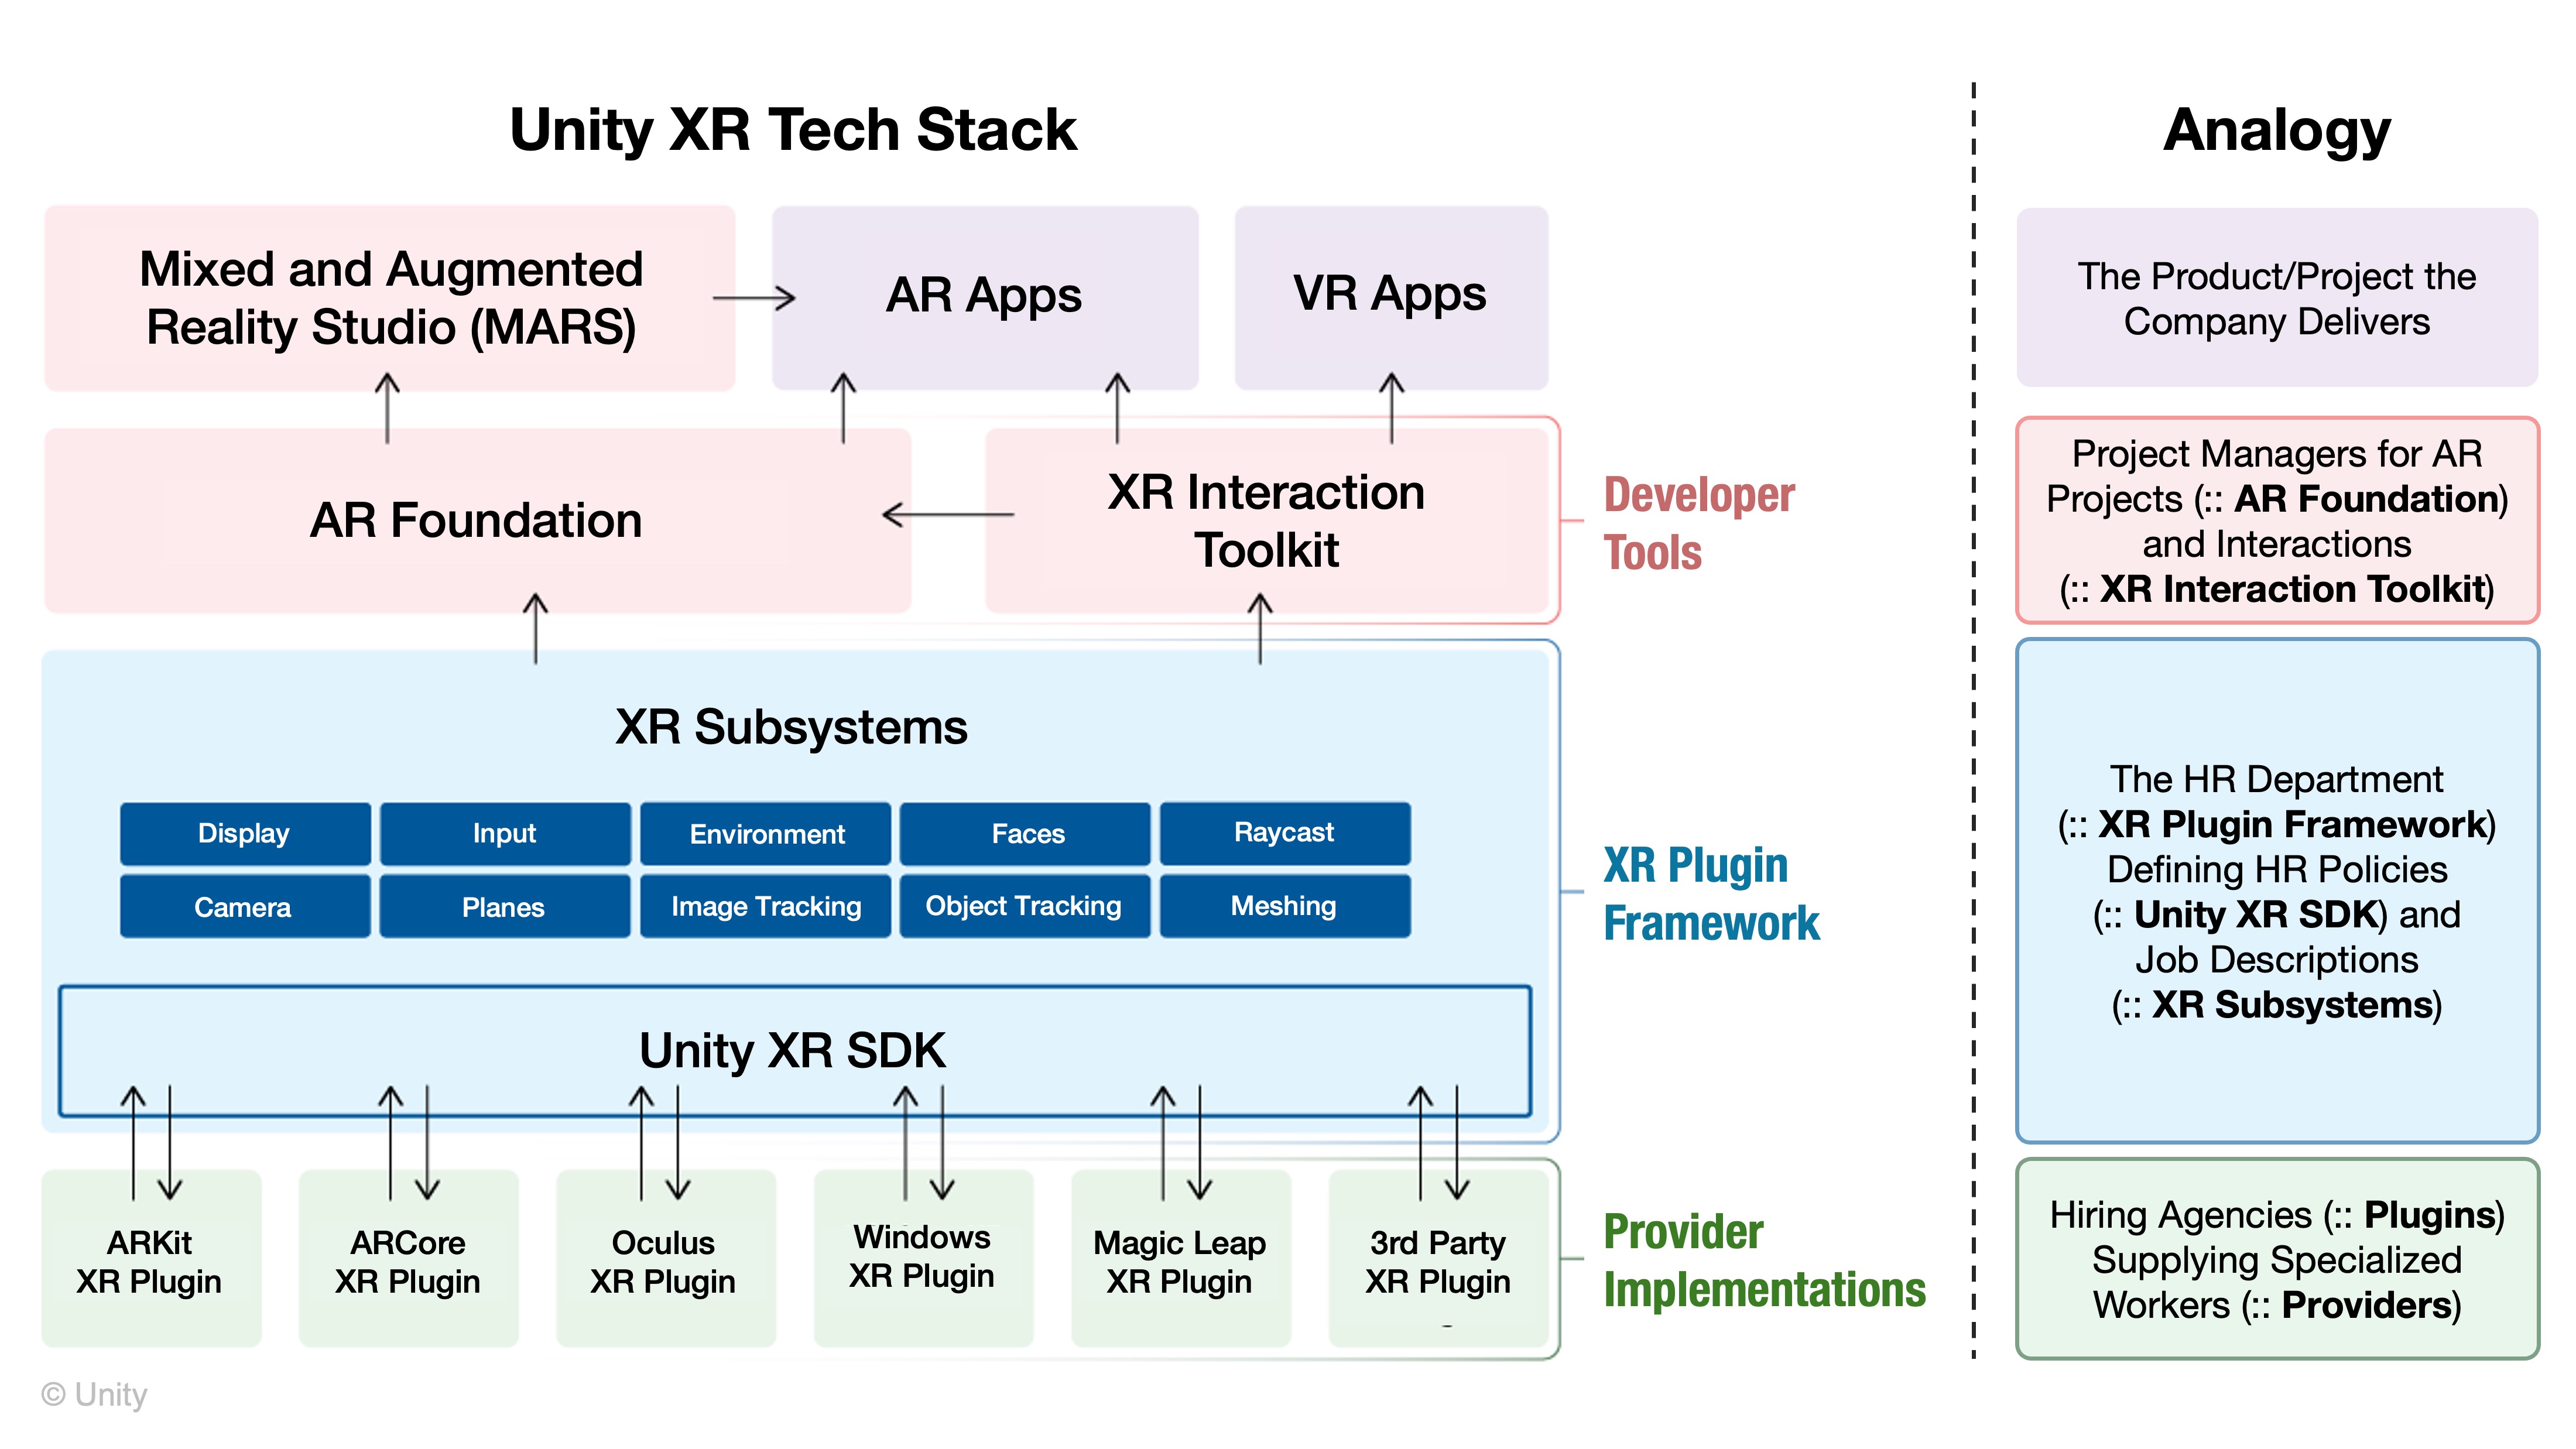
The UnityEngine.XR namespace is Unity’s lower-level base XR API, giving you access to XR device and subsystem data, including tracking information and device presence for VR/AR hardware. Even when you later use higher-level systems such as XR Interaction Toolkit, understanding this foundation helps you troubleshoot and read AI-generated scripts. Package namespaces such as UnityEngine.XR.Management, UnityEngine.XR.Interaction.Toolkit, and UnityEngine.XR.ARFoundation compile only when their packages are installed.
UnityEngine.XR
├── InputDevices
│   └── TryGetFeatureValue()
├── XRSettings
│   └── enabled
└── XRDisplaySubsystem
    └── running
UnityEngine.XR– Lower-level XR device/subsystem APIs in the core engine module.UnityEngine.XR.Management– From the XR Plugin Management package; initializes and manages XR loaders/subsystems.UnityEngine.XR.Interaction.Toolkit– From the XR Interaction Toolkit package; higher-level interaction components for VR.UnityEngine.XR.ARFoundation– From the AR Foundation package; cross-platform AR features such as plane detection and anchors.- OpenXR – Usually configured through Project Settings > XR Plug-in Management and OpenXR project settings rather than direct beginner scripting.
UnityEngine.XRis the lower-level base layer. Package namespaces such asXR.Management,XR.Interaction.Toolkit, andARFoundationbuild on top of XR plug-in management and installed package versions.UnityEngine.InputSystemrequires the Input System package. These namespaces compile only when the corresponding package is installed.
XR Management
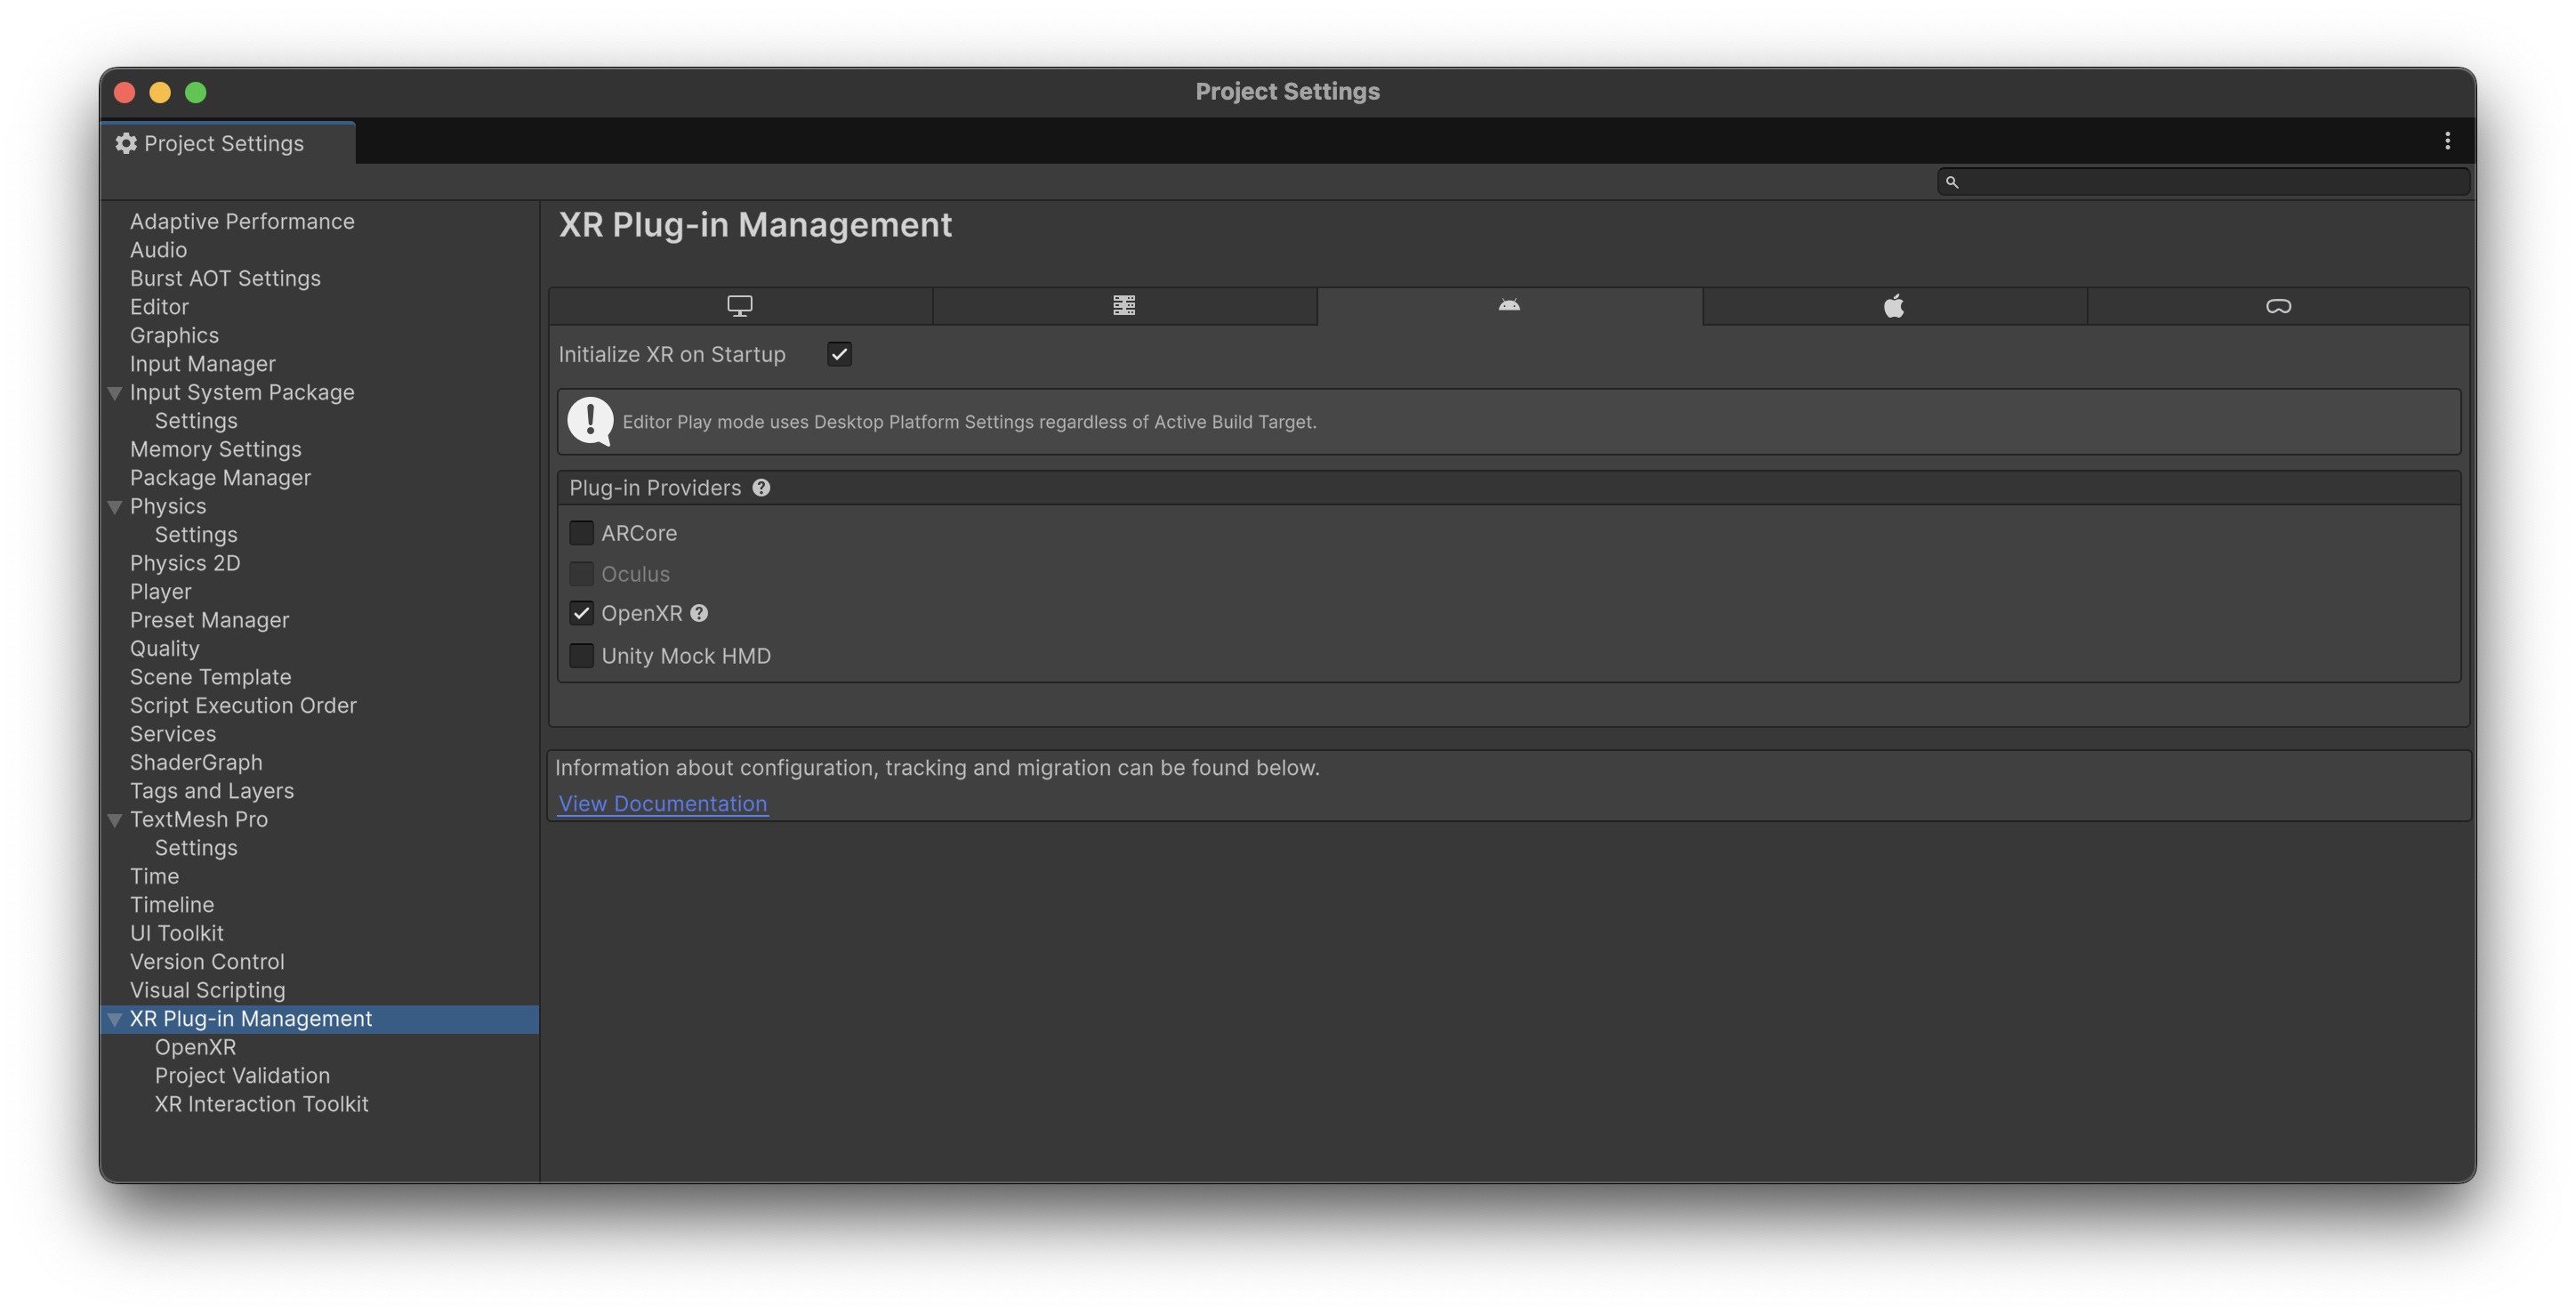
This namespace extends UnityEngine.XR by managing the lifecycle and configuration of XR subsystems through the XR Plugin Management system. It allows Unity to initialize and manage XR loaders such as OpenXR or other installed XR provider plugins. Without this namespace, Unity wouldn’t know which XR runtime to launch or how to configure it. You will work with it when setting up your project to use OpenXR for both VR and AR platforms. It is essential for building cross-platform apps that automatically load the right XR environment at runtime. Key components include:
XRGeneralSettings: Stores global XR configuration and determines how and when XR initializes during app startup.XRManagerSettings: Controls startup/shutdown of XR subsystems (e.g., input, rendering, tracking).XRLoader: Each XR plugin provides a loader that handles initializing that specific platform’s features.
XR Interaction Toolkit

The XR Interaction Toolkit builds on UnityEngine.XR and XR Plugin Management to offer a high-level, component-based framework for common VR interactions. This namespace comes from the XR Interaction Toolkit package and will be a primary toolset during the VR development module. Common XRI concepts include interactors, interactables, interaction managers, locomotion providers, and line visuals. Specific class names may vary by XR Interaction Toolkit package version, so verify against the installed package before copying AI-generated code. Examples you may see include XRGrabInteractable, XRRayInteractor, and line-visual components, but always confirm the exact API for your course-recommended Unity 6.3 LTS package versions.
UnityEngine.XR.Interaction.Toolkit (package)
├── XRInteractionManager
├── XRGrabInteractable
│   └── selectEntered
└── XRRayInteractor
    └── uiHoverEntered
AR Foundation
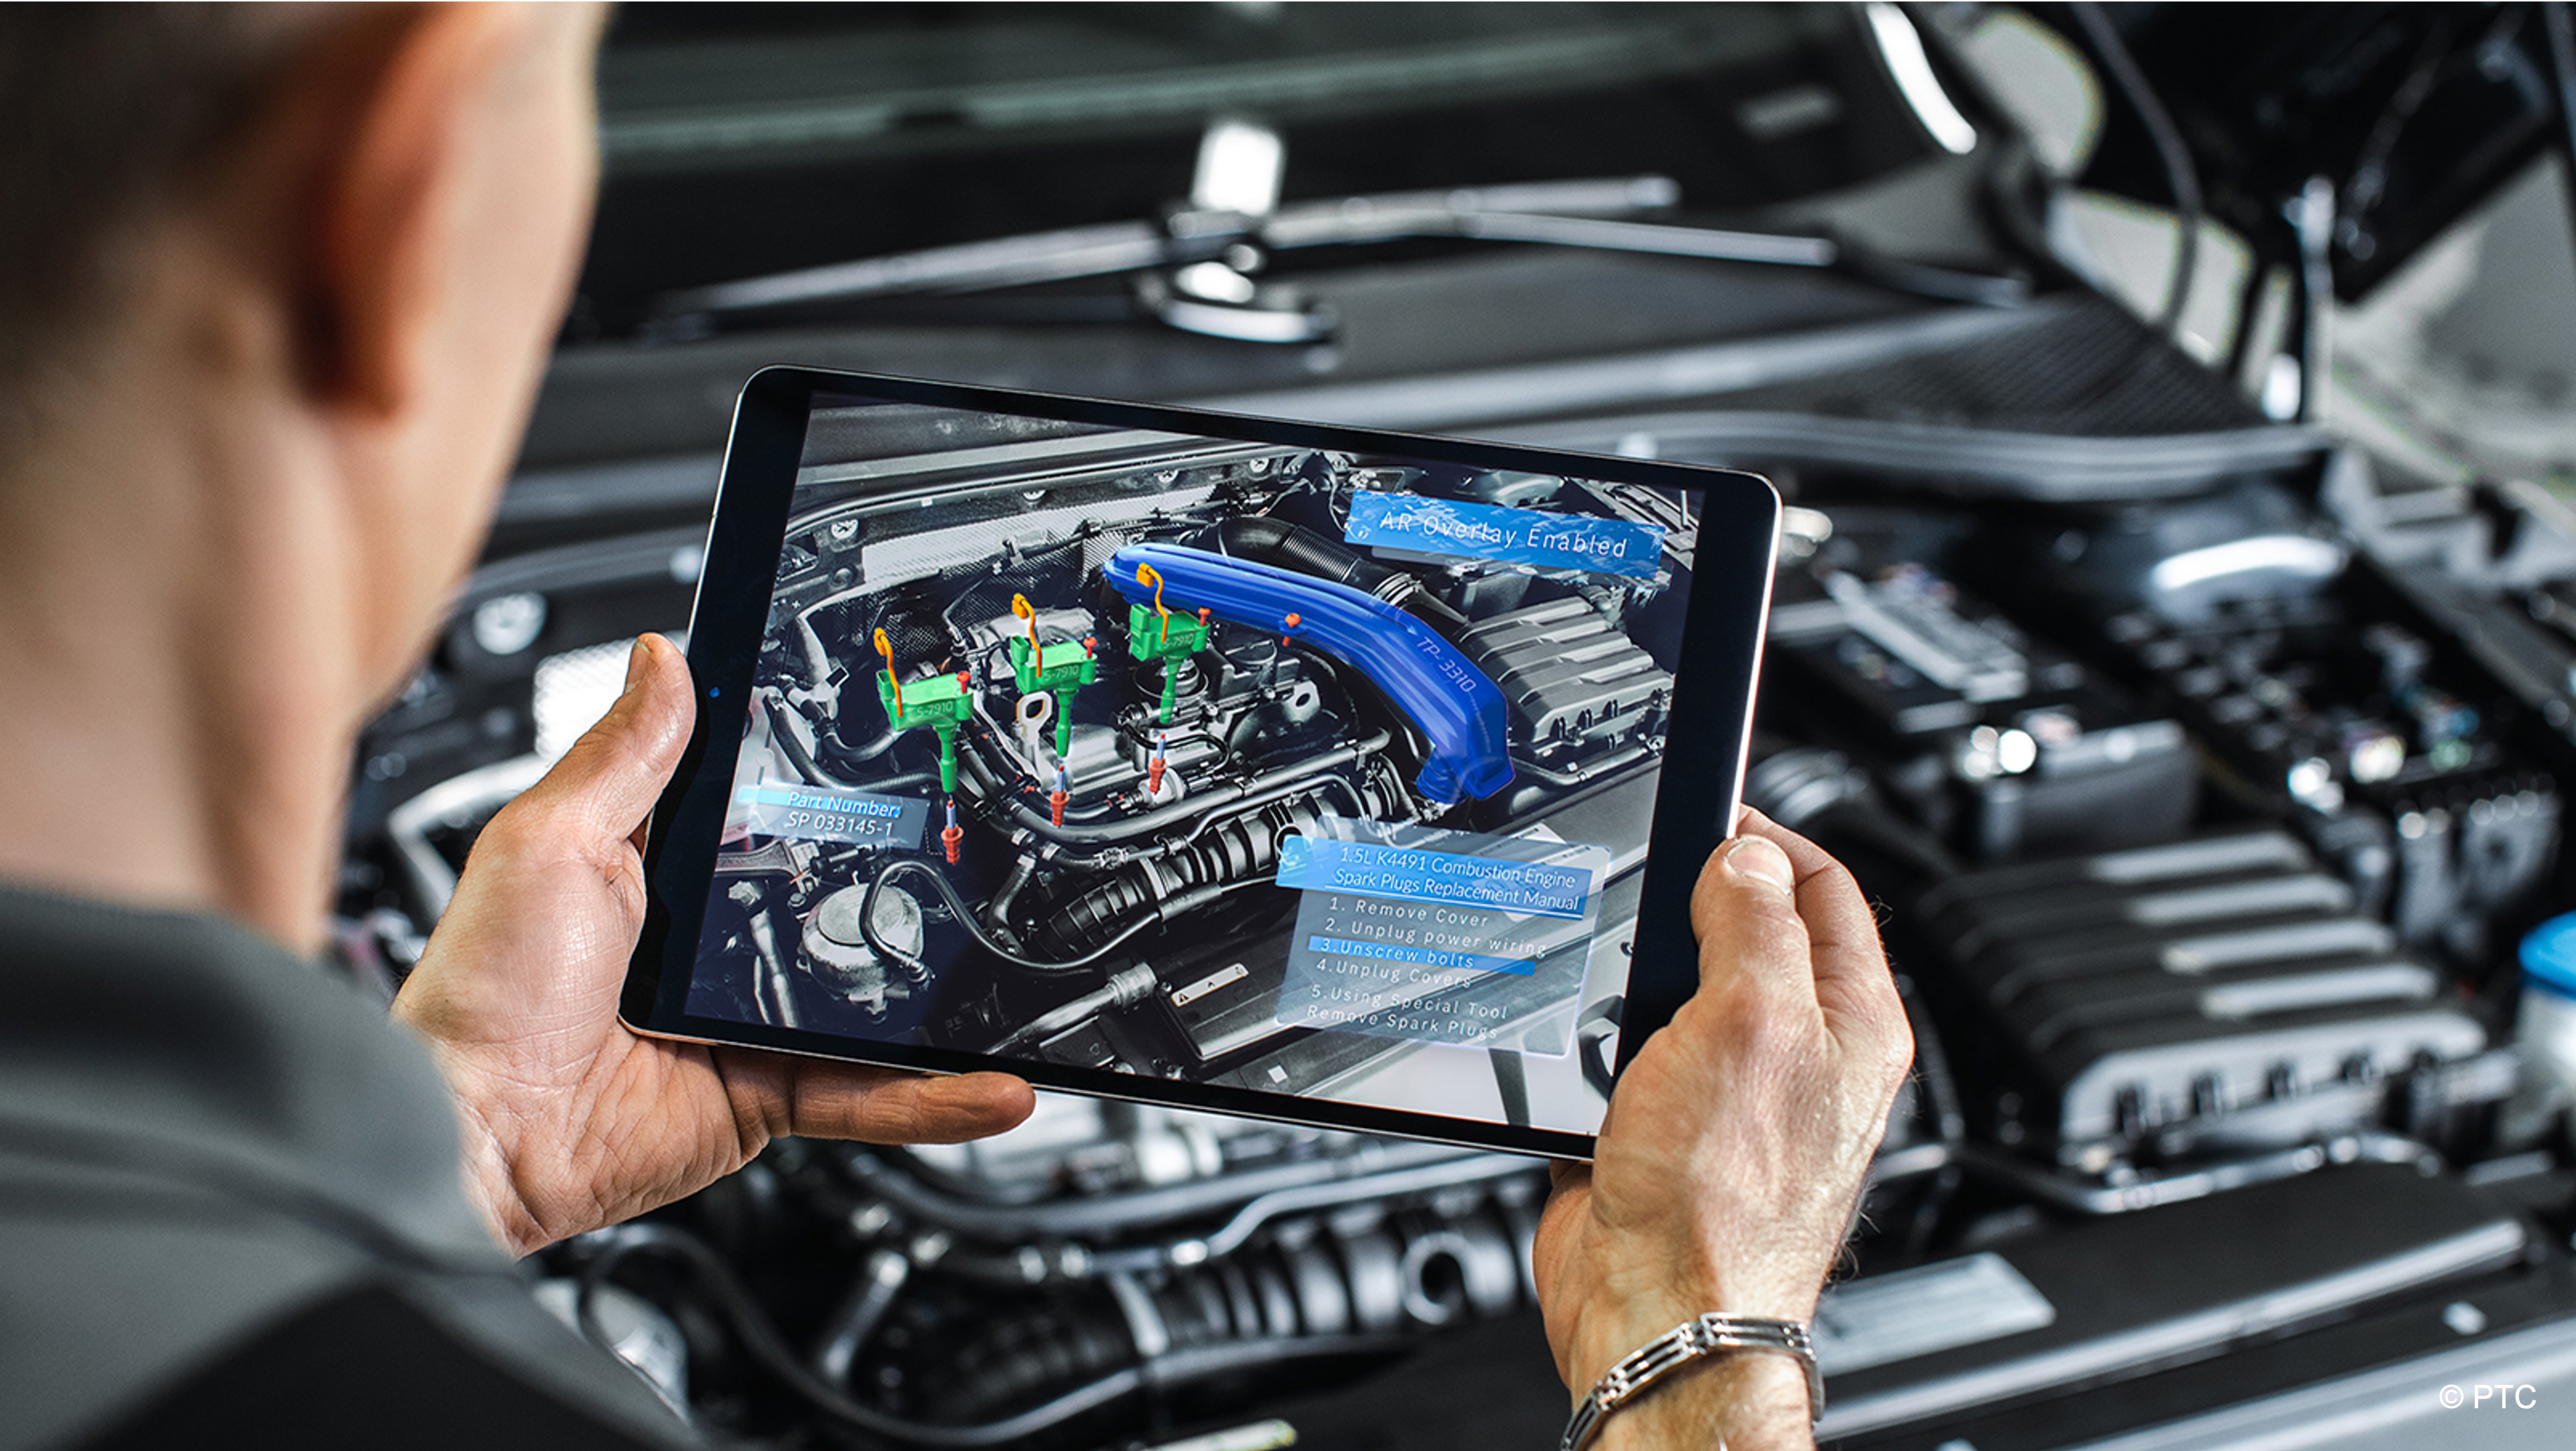
AR Foundation extends Unity’s XR support to AR through the AR Foundation package, abstracting differences between ARKit (iOS), ARCore (Android), and platforms such as Magic Leap. It builds on lower-level XR support by introducing AR-specific features like plane detection, light estimation, and anchors. This namespace will power your AR development module, enabling real-world spatial understanding and overlaying virtual content.
UnityEngine.XR.ARFoundation (package)
├── ARSession
│   └── Reset()
├── ARPlaneManager
│   └── trackablesChanged
└── ARCameraManager
    └── requestedLightEstimation
Key components include:
ARSession: Manages the AR lifecycle, including reset and pause/resume behavior.ARPlaneManager: Detects and tracks real-world flat surfaces using device sensors and camera input.ARCameraManager: Accesses and controls camera features such as light estimation, focus modes, and exposure.
OpenXR

OpenXR support is configured primarily through Project Settings > XR Plug-in Management when the OpenXR loader/plugin is selected. Students should understand OpenXR conceptually as a vendor-neutral runtime layer, but most beginner projects interact with XR Interaction Toolkit and AR Foundation at the scripting level before directly scripting OpenXR APIs. OpenXR enables broad device compatibility, and advanced features such as hand tracking or passthrough are often exposed through package-specific settings and extensions rather than everyday MonoBehaviour scripts.
OpenXR (Project Settings)
└── XR Plug-in Management
    ├── OpenXR loader
    └── Feature groups
        ├── Meta Quest support
        └── Controller profiles
Key Takeaways
- Namespaces organize code and prevent naming conflicts as projects grow beyond single-scene prototypes.
- Core Unity namespaces cover scene management, UI, audio, and TextMeshPro text rendering.
- XR functionality comes from package namespaces that must be installed and imported correctly.
- Knowing where a type lives speeds debugging—especially when reviewing AI-generated scripts.
- Modular namespace use supports scalable, multi-scene engineering projects like XFactory.