E4. Mobile AR: Tracking
Learning Outcomes
- Explain how AR Foundation performs image tracking on mobile devices. Before class, review how 2D reference images are detected and tracked in real space, and think through AR responses when an image is recognized or when tracking is lost.
- Create and configure a Reference Image Library in Unity. In preparation, import a sample image, set its physical size, verify it has strong visual features, and compare feature richness across candidate markers when possible.
- Set up an AR Tracked Image Manager and respond to lifecycle events in code. Ahead of the session, add
ARTrackedImageManagerto your scene, assign your reference image library, and plan how marker-specific content will be spawned and parented toARTrackedImageobjects.- Interpret AR tracked image states and respond accordingly. Prior to class, study the
None,Limited, andTrackingstates, and explore howtrackingStateshould control visibility, UI, and interaction—not just initial detection.- Understand image tracking as mainly a mobile AR workflow in this course. Be ready to explain why marker-based image tracking is the primary Module E path for phones and tablets, not for Meta Quest passthrough AR in the current provider support table.
- Identify which target platforms support AR Foundation image tracking and choose alternate tracking strategies when image tracking is unavailable. Study the platform support table and know when to use planes, anchors, scene data, QR-style workflows, or custom detection instead.
- Evaluate marker quality, physical size, lighting, viewing angle, occlusion, and tracking state before trusting marker-anchored overlays. Come ready to discuss real print tests and engineering validation, not Editor-only assumptions.
What Is Image Tracking?
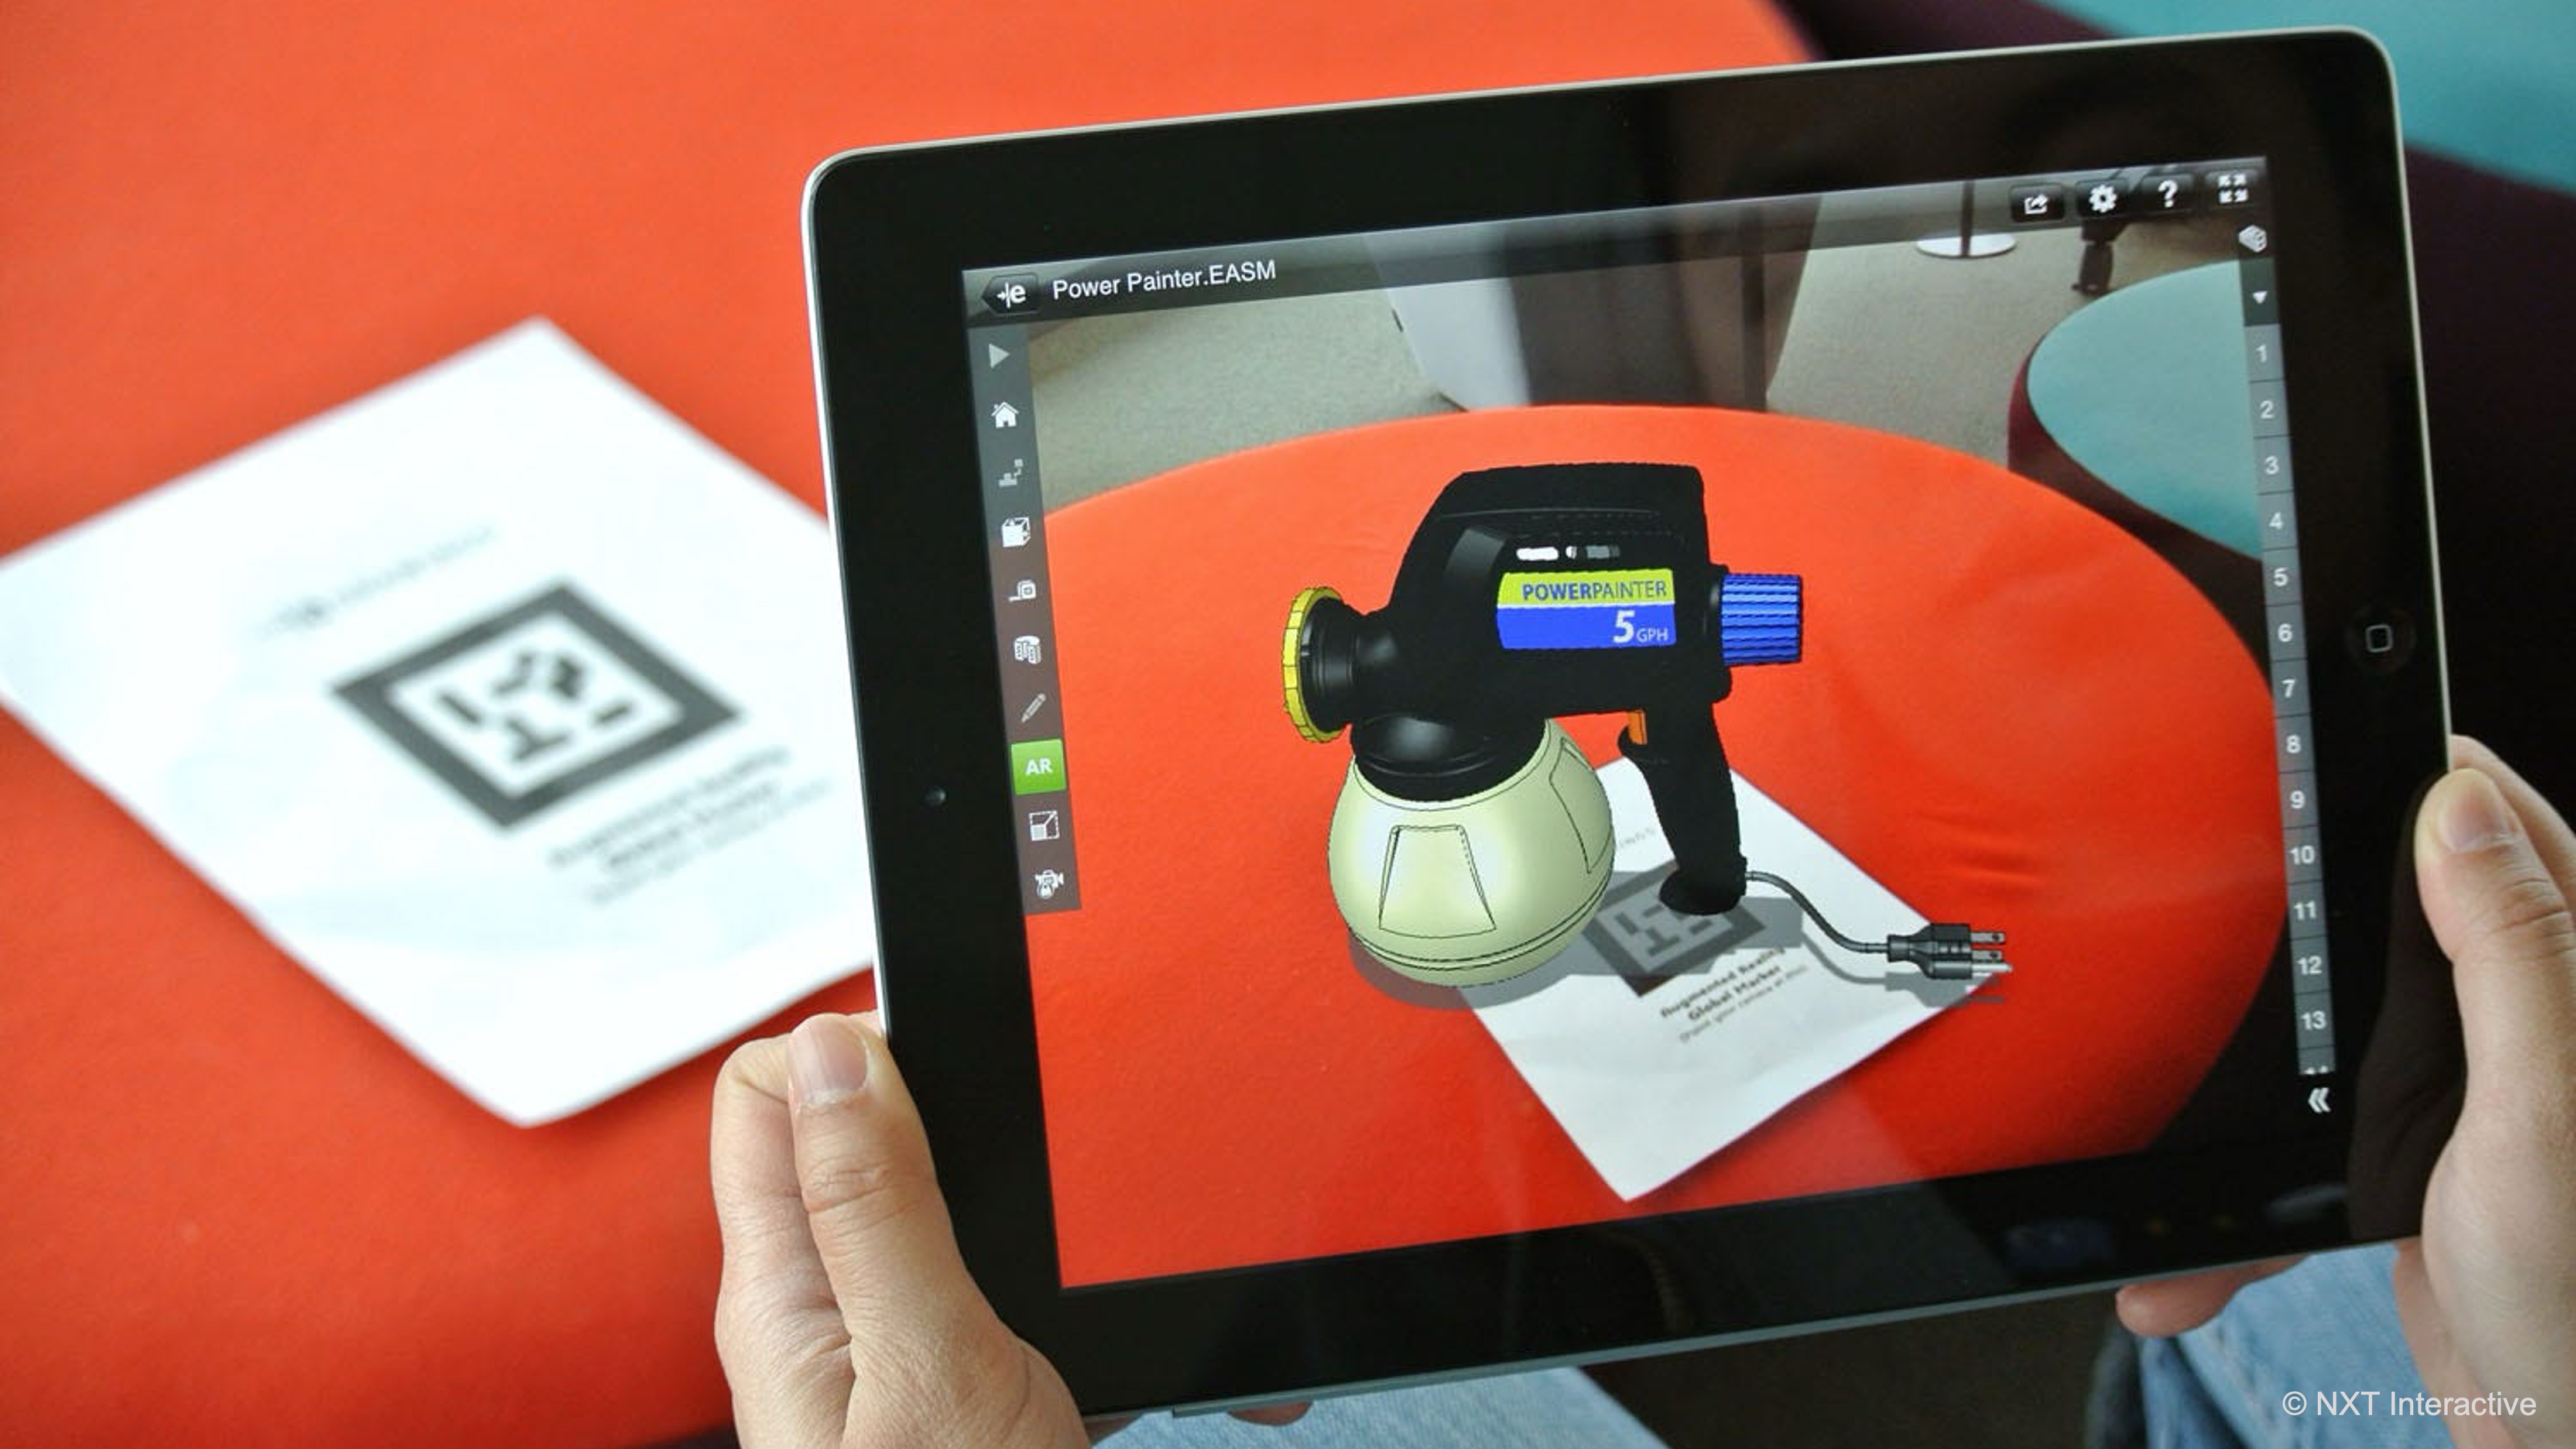
Image tracking is a core AR Foundation feature that enables applications to recognize, locate, and continuously track 2D images (called reference images) in the user’s environment. It depends on the active provider plug-in and physical device support through the XRImageTrackingSubsystem. On supported mobile devices, image tracking lets virtual content align with printed markers in the real world. The process consists of three key functions:
- Detect: The AR system scans the environment for an image that matches one from a reference image library packaged with the app. Detection depends on image quality, lighting, physical size, and distance from the camera.
- Track: Once detected, the system continuously estimates the image’s position and orientation (pose) in 3D space as the camera moves. Virtual content parented to the tracked image can follow the marker while tracking remains valid.
- Notify: The app receives lifecycle notifications when images are added, updated, or removed. Use these events—and
trackingStateon every update—to spawn content, pause interactions, or hide overlays when alignment is no longer trustworthy.
A marker can align content to equipment, but the overlay is only as trustworthy as the marker placement, print quality, size calibration, and tracking state. Image tracking provides marker-relative alignment while the image is tracked; persistence across sessions depends on app logic and provider behavior—it is not the same as a durable spatial anchor unless you add anchor workflows in a later session.
Principles of Image Tracking
To understand how image tracking works and how to apply it effectively, it is helpful to grasp the underlying principles. These principles ensure the smooth operation of AR systems and improve the user experience by providing high-quality, reliable tracking:
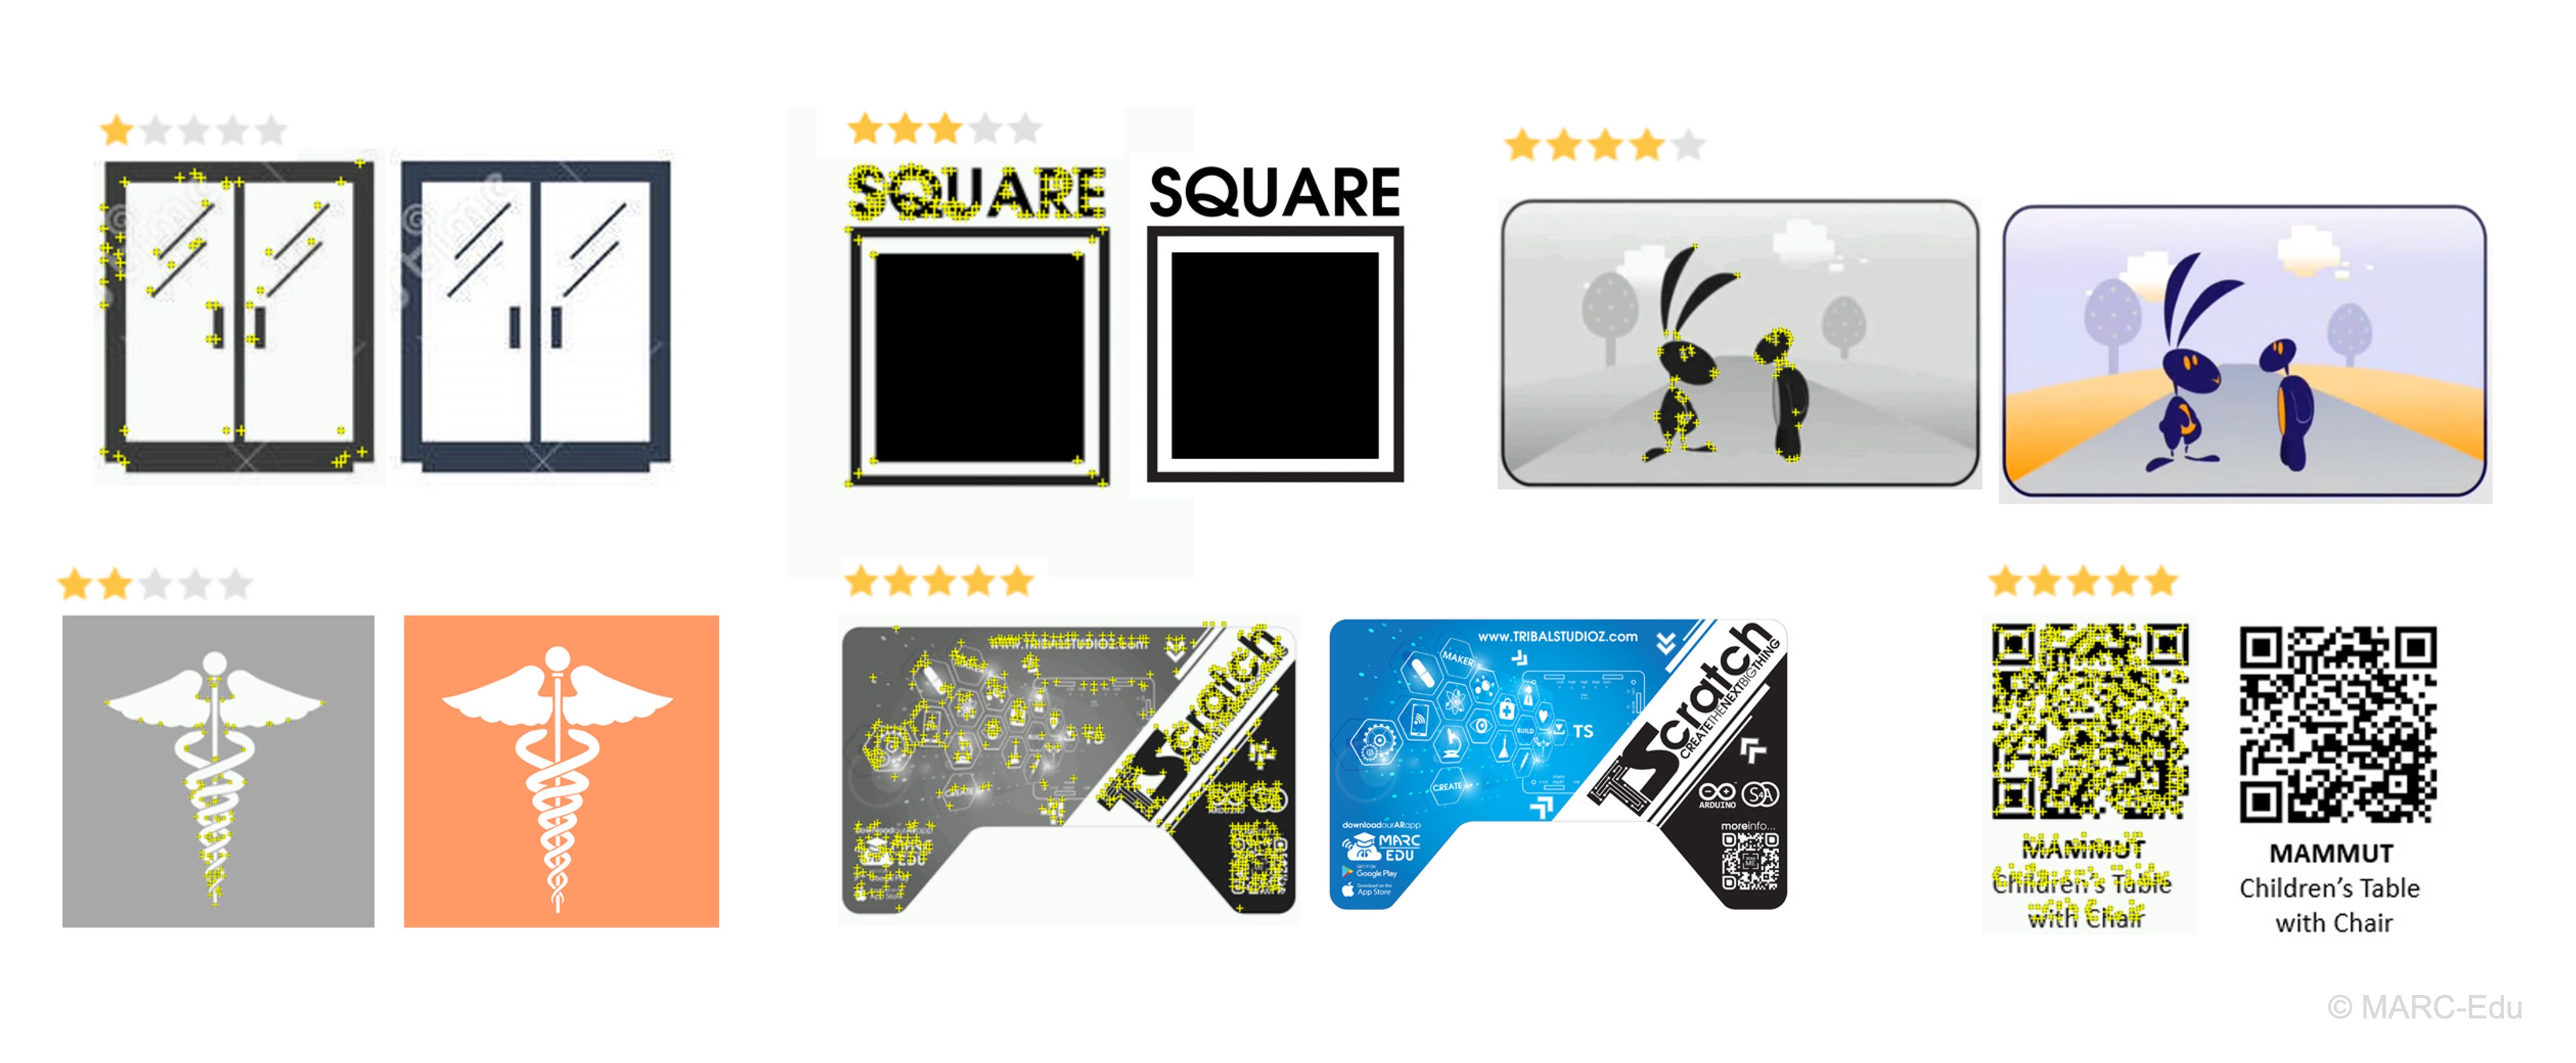
- Image Recognition: A reference image must have high contrast, distinct visual features, and clarity for optimal detection and recognition. The AR system uses computer vision algorithms to extract feature points from the image, such as edges, corners, and distinct patterns, which act as “landmarks” for the tracking process. These extracted features are then compared to the live camera feed to identify the image. The better the quality and clarity of the image, the more accurate the detection will be, especially in dynamic or low-light environments. Images with repetitive patterns or low contrast can lead to detection failures or unreliable tracking.
- Pose Estimation: Once the reference image is recognized, the system computes its 6 degrees of freedom (6DoF) pose, which includes both its position and orientation in 3D space relative to the camera. The pose allows the system to place digital content (such as holograms) precisely on top of or next to the physical reference image, ensuring that the virtual objects remain anchored to the real-world image, regardless of the viewer’s perspective or movement. The accuracy of pose estimation directly impacts how well virtual content aligns with the reference image, making it crucial for a seamless AR experience.
- Tracking Lifecycle: Images are continuously evaluated during the tracking process, which can be divided into three main stages. The system’s ability to effectively handle all stages of the lifecycle ensures smooth transitions and actions within the app:
- Added: This stage occurs when the image is first detected, and tracking begins. The system acknowledges the image as a valid reference and starts tracking its position and orientation.
- Updated: Once the image is tracked, any changes in its pose (position or orientation) are updated in real-time. This allows virtual content to follow the image accurately as the user moves.
- Removed: Some providers remove the trackable when the image is no longer visible; others keep the trackable and set
trackingStatetoLimitedorNone. Do not rely only on removed events to detect loss of tracking—always checktrackingStateduring updates.
- Size and Scale: Providing a physical width (in meters) for each reference image helps improve both accuracy and scale estimation in AR applications. The physical width allows the system to better estimate the image’s actual size in the real world, improving the alignment and scaling of virtual objects relative to the image. Without a physical width, the system may have to guess the image’s size, which can result in misaligned or incorrectly scaled virtual content, especially if the camera is positioned too close or too far from the image.
- Environmental Factors: Lighting, angle, occlusion, and image quality all play a significant role in the reliability of image tracking.
- Lighting: Consistent and well-distributed lighting is essential for the system to detect the image clearly and track it reliably. Too much backlighting or low-light conditions can confuse the system.
- Angle: The image should be positioned in a way that ensures the camera can view its features clearly. Extreme angles or distorted perspectives can hinder recognition and pose estimation.
- Occlusion: Any obstruction between the camera and the image (such as objects blocking parts of the image) can disrupt tracking, leading to interruptions in virtual content rendering.
- Image Quality: The image itself must be printed clearly and without distortion. Poor quality prints, such as blurry or pixelated images, can cause detection failures or poor tracking accuracy.
Why Image Tracking Matters
Image tracking unlocks powerful and intuitive AR experiences by tying virtual content to specific real-world images. Not only does it enhance learning and interactivity, but it also bridges the gap between virtual simulations and physical industrial environments, supporting productivity, safety, and innovation across sectors. Common applications include:
- Contextual Experiences: Enhance content based on what the user is looking at. Pointing a tablet or AR device at a marker placed near a physical robot can bring up an interactive control panel. Users can trigger specific animations to visualize the robot’s operational cycle virtually overlaid on its physical twin.
- Marker-Anchored Overlays: Use reference images to launch contextual UI and animations near physical equipment. The robot marker can align a control panel and animation overlays while tracking is valid, but alignment must be revalidated whenever
trackingStatechanges. - Interactive Games & Navigation: Reference images can serve as checkpoints or directional cues in interactive AR experiences. In an industrial environment, printed markers placed in various stations can trigger contextual information or tutorials. For the robot arm, this could include maintenance instructions or safety guidelines appearing automatically when the robot’s marker is scanned.
- Training and Skill Development: Image tracking supports guided training modules where each marker represents a specific task or process step. Scanning a marker next to the equipment could launch AR instructions on proper equipment operation, troubleshooting, safety protocols, or common fault diagnosis.
- Maintenance and Inspection: Maintenance staff can scan reference images affixed to machines to reveal real-time data, part specifications, or last maintenance records. A marker on a CNC machine could show AR overlays indicating lubrication points, wear-prone components, or interactive checklists for preventive maintenance.
- Digital Twins Integration: Image tracking can help align virtual digital twins with their physical counterparts on the shop floor. A marker on an industrial 3D printer enables operators to overlay real-time process data like temperature, build progress, or upcoming tasks directly onto the printer in AR.
- Marketing and Exhibits: In showrooms or industrial exhibitions, image tracking can bring static displays to life with animations, data visualizations, or exploded views. Scanning a printed schematic of an engine can present an animated breakdown of each subsystem—pistons, valves, crankshaft—enhancing understanding for both technical and non-technical audiences.
Platform Support
Not all AR Foundation providers support image tracking. Platform support changes over time. Always verify the current provider documentation before designing a marker-based workflow. Before relying on image tracking, verify that an XRImageTrackingSubsystem is loaded or that ARTrackedImageManager remains enabled after startup. On unsupported providers, the manager may disable itself when enabled.
| Provider / Platform | Image Tracking Support | Course Role / Notes |
|---|---|---|
| Google ARCore XR Plug-in | Supported | Mobile Android tutorial path |
| Apple ARKit XR Plug-in | Supported | Mobile iOS/iPadOS tutorial path |
| Apple visionOS XR Plug-in | Supported | Comparison/context unless later assigned |
| XR Simulation | Supported | Editor testing only |
| Microsoft HoloLens via OpenXR | Not supported in current AR Foundation support table | Context only |
| Unity OpenXR: Meta Quest | Not supported in current AR Foundation support table | Use other passthrough AR tracking strategies |
| Unity OpenXR: Android XR | Not supported in current AR Foundation support table | Verify future provider updates |
Understanding
ARTrackedImagelifecycle andtrackingStateis key to stable mobile AR experiences. Next, explore how to combine tracking events with UI interactions for marker-anchored robot control.
Reference Image Library
A Reference Image Library in Unity is a ScriptableObject that contains a collection of 2D images your AR app can recognize and track. You build and package this library with your Unity project to enable image tracking functionality.
What Is a Reference Image?
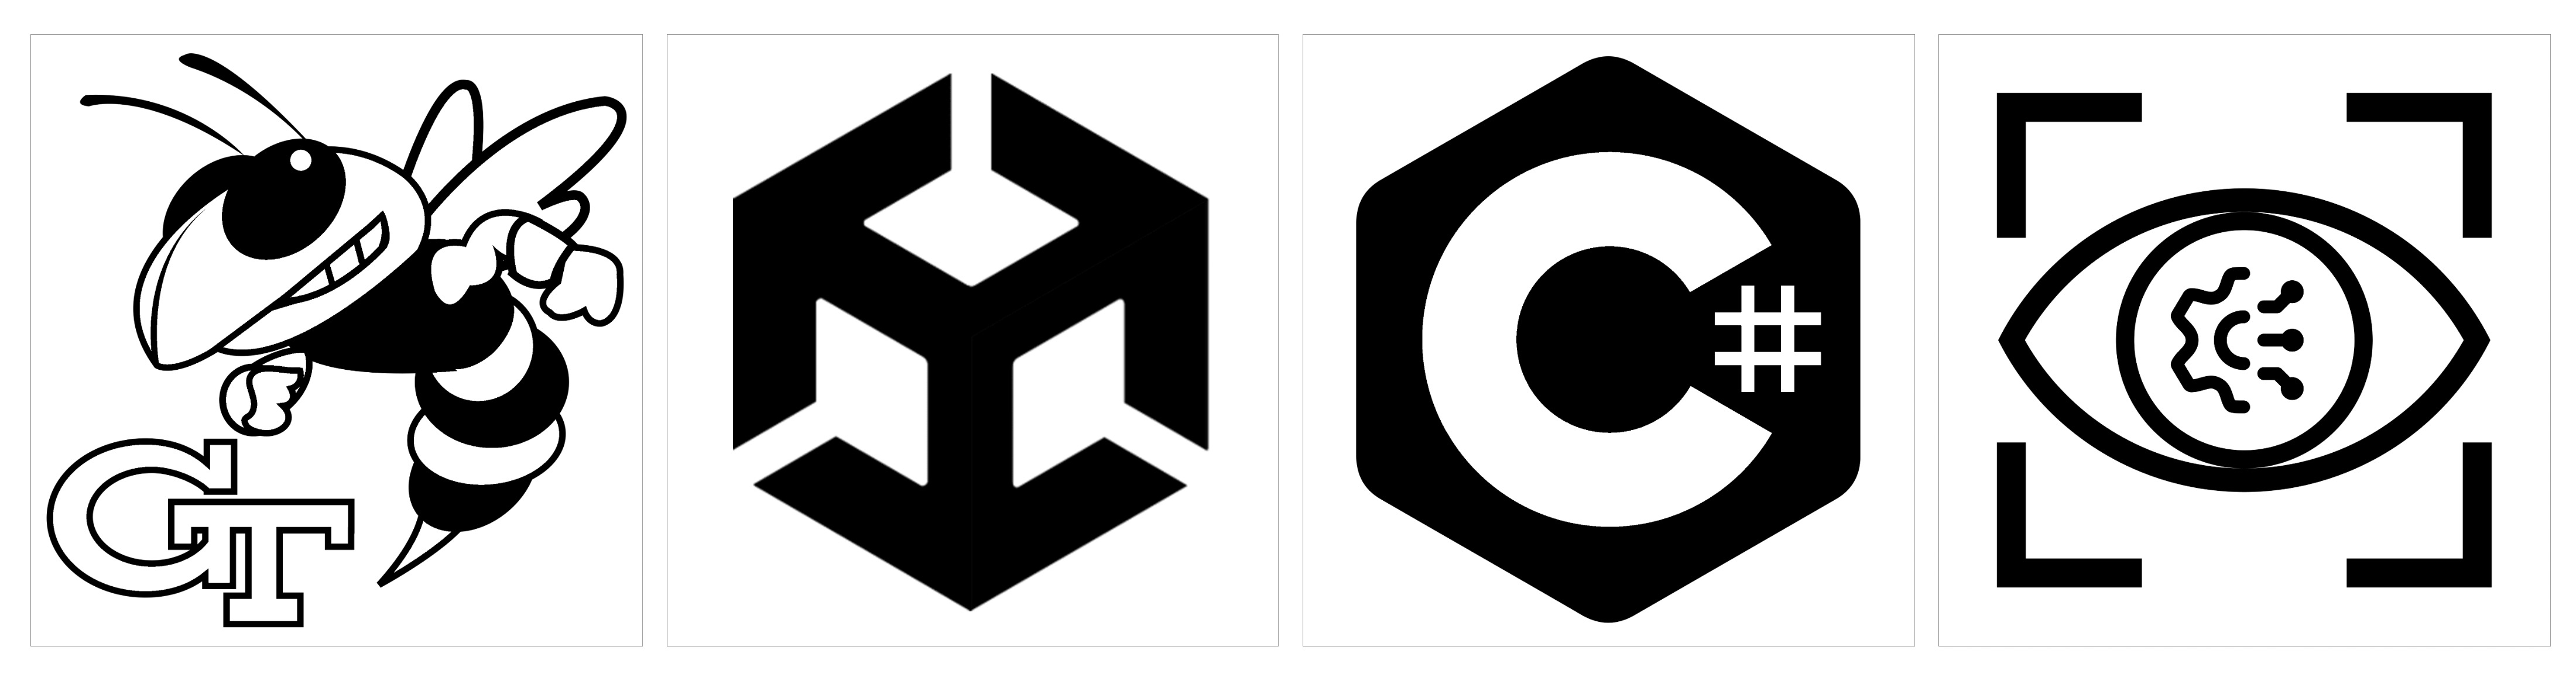
A reference image is a pre-defined 2D visual asset (such as a poster, sign, or schematic) that the AR system is trained to recognize. Each image can include an optional physical width (in meters), improving tracking accuracy and scale fidelity. For basic AR apps, start by choosing images that already have distinct, recognizable features—such as company logos, equipment schematics, or instructional diagrams. Avoid images with repetitive textures or overly simplistic designs. Use Unity’s AR Foundation feature point visualization tools during development to verify that your selected image offers enough detectable features for reliable tracking. An effective reference image should be:
- High-Resolution: The image should contain ample pixel data for the AR system to extract and compare visual features. Low-resolution images may blur or pixelate, reducing detection reliability and precision.
- Feature-Rich: Rich details like unique shapes, corners, and contrasting areas enable the computer vision algorithms to differentiate the image from others in the environment. Repetitive patterns (like grids or textures) can confuse tracking algorithms, leading to false detections or unstable tracking.
- High-Contrast: Sharp differences between light and dark regions enhance the system’s ability to identify and anchor feature points under varying lighting conditions. Low-contrast images may blend into the background or become difficult to detect in dim or bright environments.
- Displayed on a Flat, Matte Surface: Glossy or curved surfaces can cause reflections or distortions, which impede consistent tracking. A matte finish avoids glare from lighting, ensuring that the image is reliably visible to the device camera from different angles.
- Real-World Dimensions: Specifying the actual physical width of the image allows the AR system to scale virtual objects proportionally. Measure the printed marker after printing, not only the intended digital size. Without accurate size data, holographic overlays may appear misaligned or incorrectly scaled.
Avoid images with large blank regions, repeated grid patterns, glossy lamination, transparent backgrounds, or strong symmetry. For engineering use, place the marker where it will not move independently from the equipment or workspace it represents.
Click here to download the example reference image library shown above.
Static and Mutable Libraries
- Static Library: A static library is created in Unity’s editor and packaged directly into the application build. The set of images cannot change at runtime. This is the most widely supported method across AR platforms (ARKit, ARCore, etc.) and is recommended when your set of target images is predefined. For most AR applications where the target environment and markers are known ahead of time, a static image library is sufficient. Always ensure that the reference images are high-resolution and correctly sized (e.g., specifying a real-world width like
0.2m) to maintain accurate detection and proper alignment of virtual content with the physical world. - Mutable Library: Allows adding images dynamically at runtime through
MutableRuntimeReferenceImageLibrary. On supported providers, useScheduleAddImageWithValidationJobwhen validation is available. Mutable-library support is provider-dependent. Runtime-added images can be computationally expensive and may take a few frames to become available. Images generally cannot be removed individually from a runtime library; switch libraries if you need a different active set. This session focuses on static libraries unless a later lesson needs runtime image addition.
Creating an Image Library
To enable image tracking in your AR project, start by creating a dedicated AR scene and then set up a Reference Image Library to store the images the app will recognize.
- Create the Image Tracking Scene:
- Open your
XFactoryARproject. - Save the scene via
File > Save As, naming itImage Tracking.unity. If you already have an AR scene set up, duplicate it and rename it to Image Tracking for reuse.
- Open your
- Create the Reference Image Library:
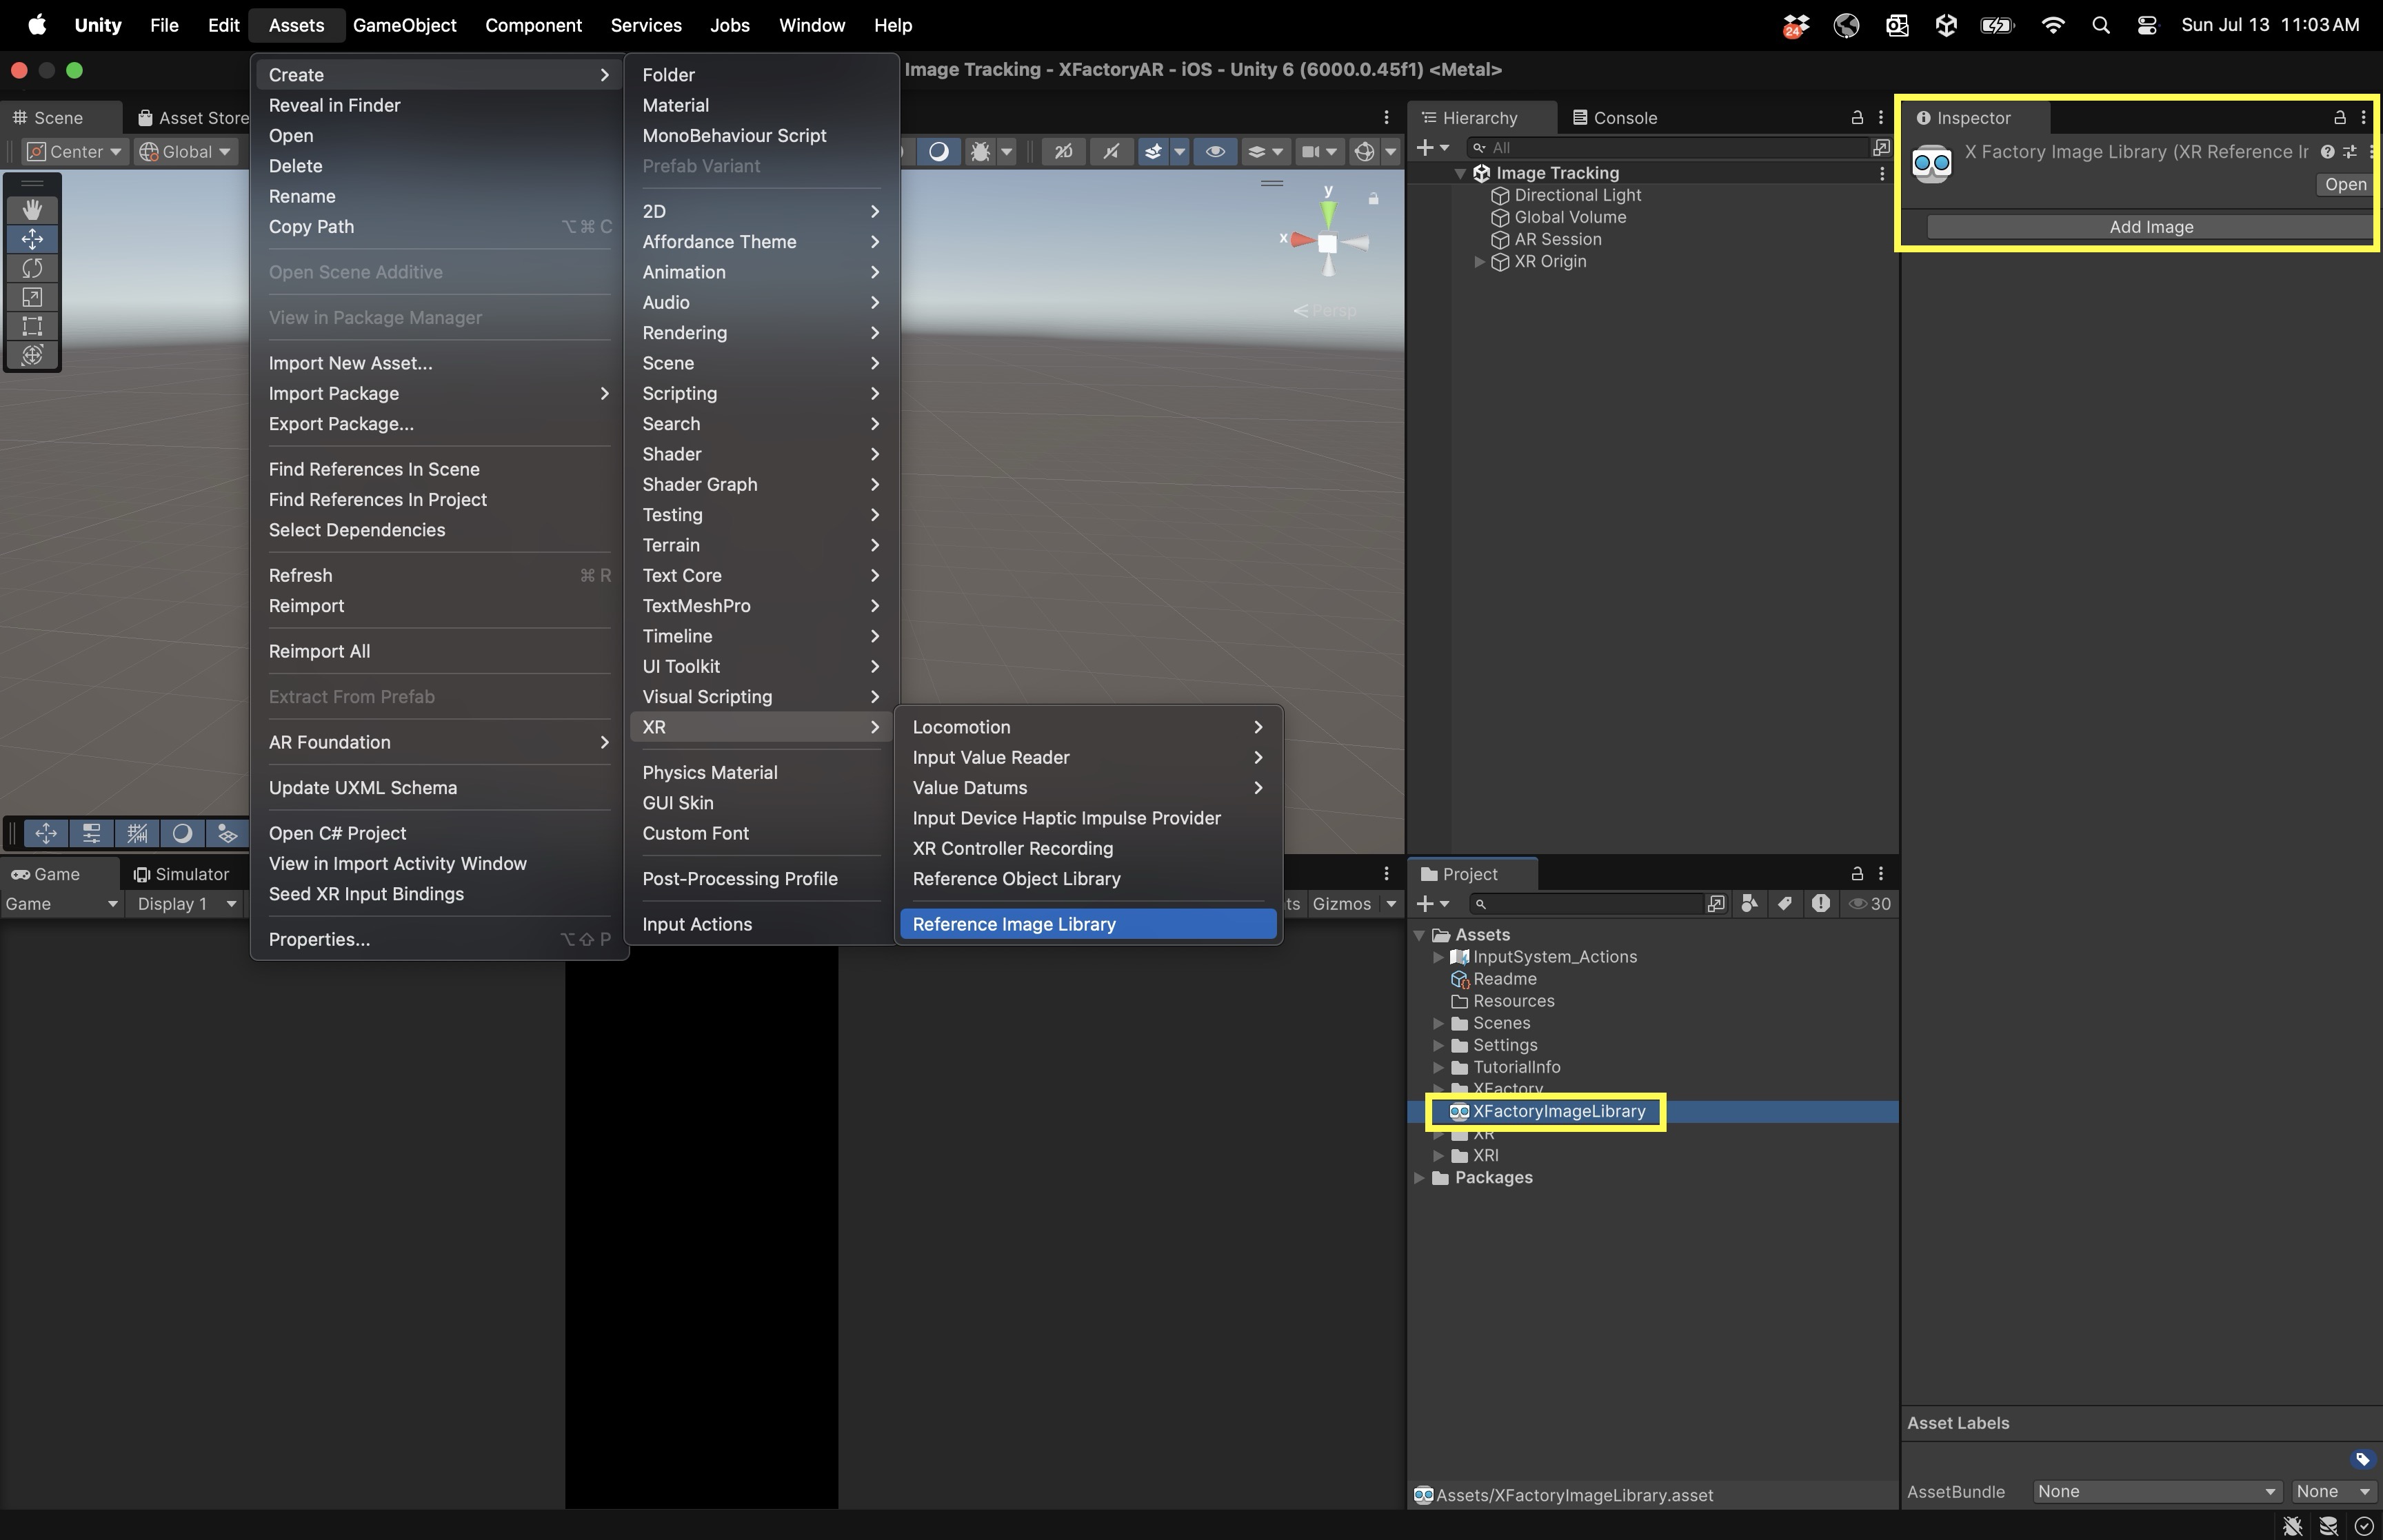
- In the top menu, navigate to
Assets > Create > XR > Reference Image Library. - A new asset will appear in the
Projectwindow (default name:ReferenceImageLibrary.asset). - Rename the asset to something descriptive, such as
XFactoryImageLibrary. - Optionally, move it to an appropriate folder to keep your
Assetsfolder organized.
- In the top menu, navigate to
- Import the Marker Image:
- Navigate to
Assets > Import New Asset…. - Select the image file(s) you want to use as reference markers (e.g., PNG, JPG).
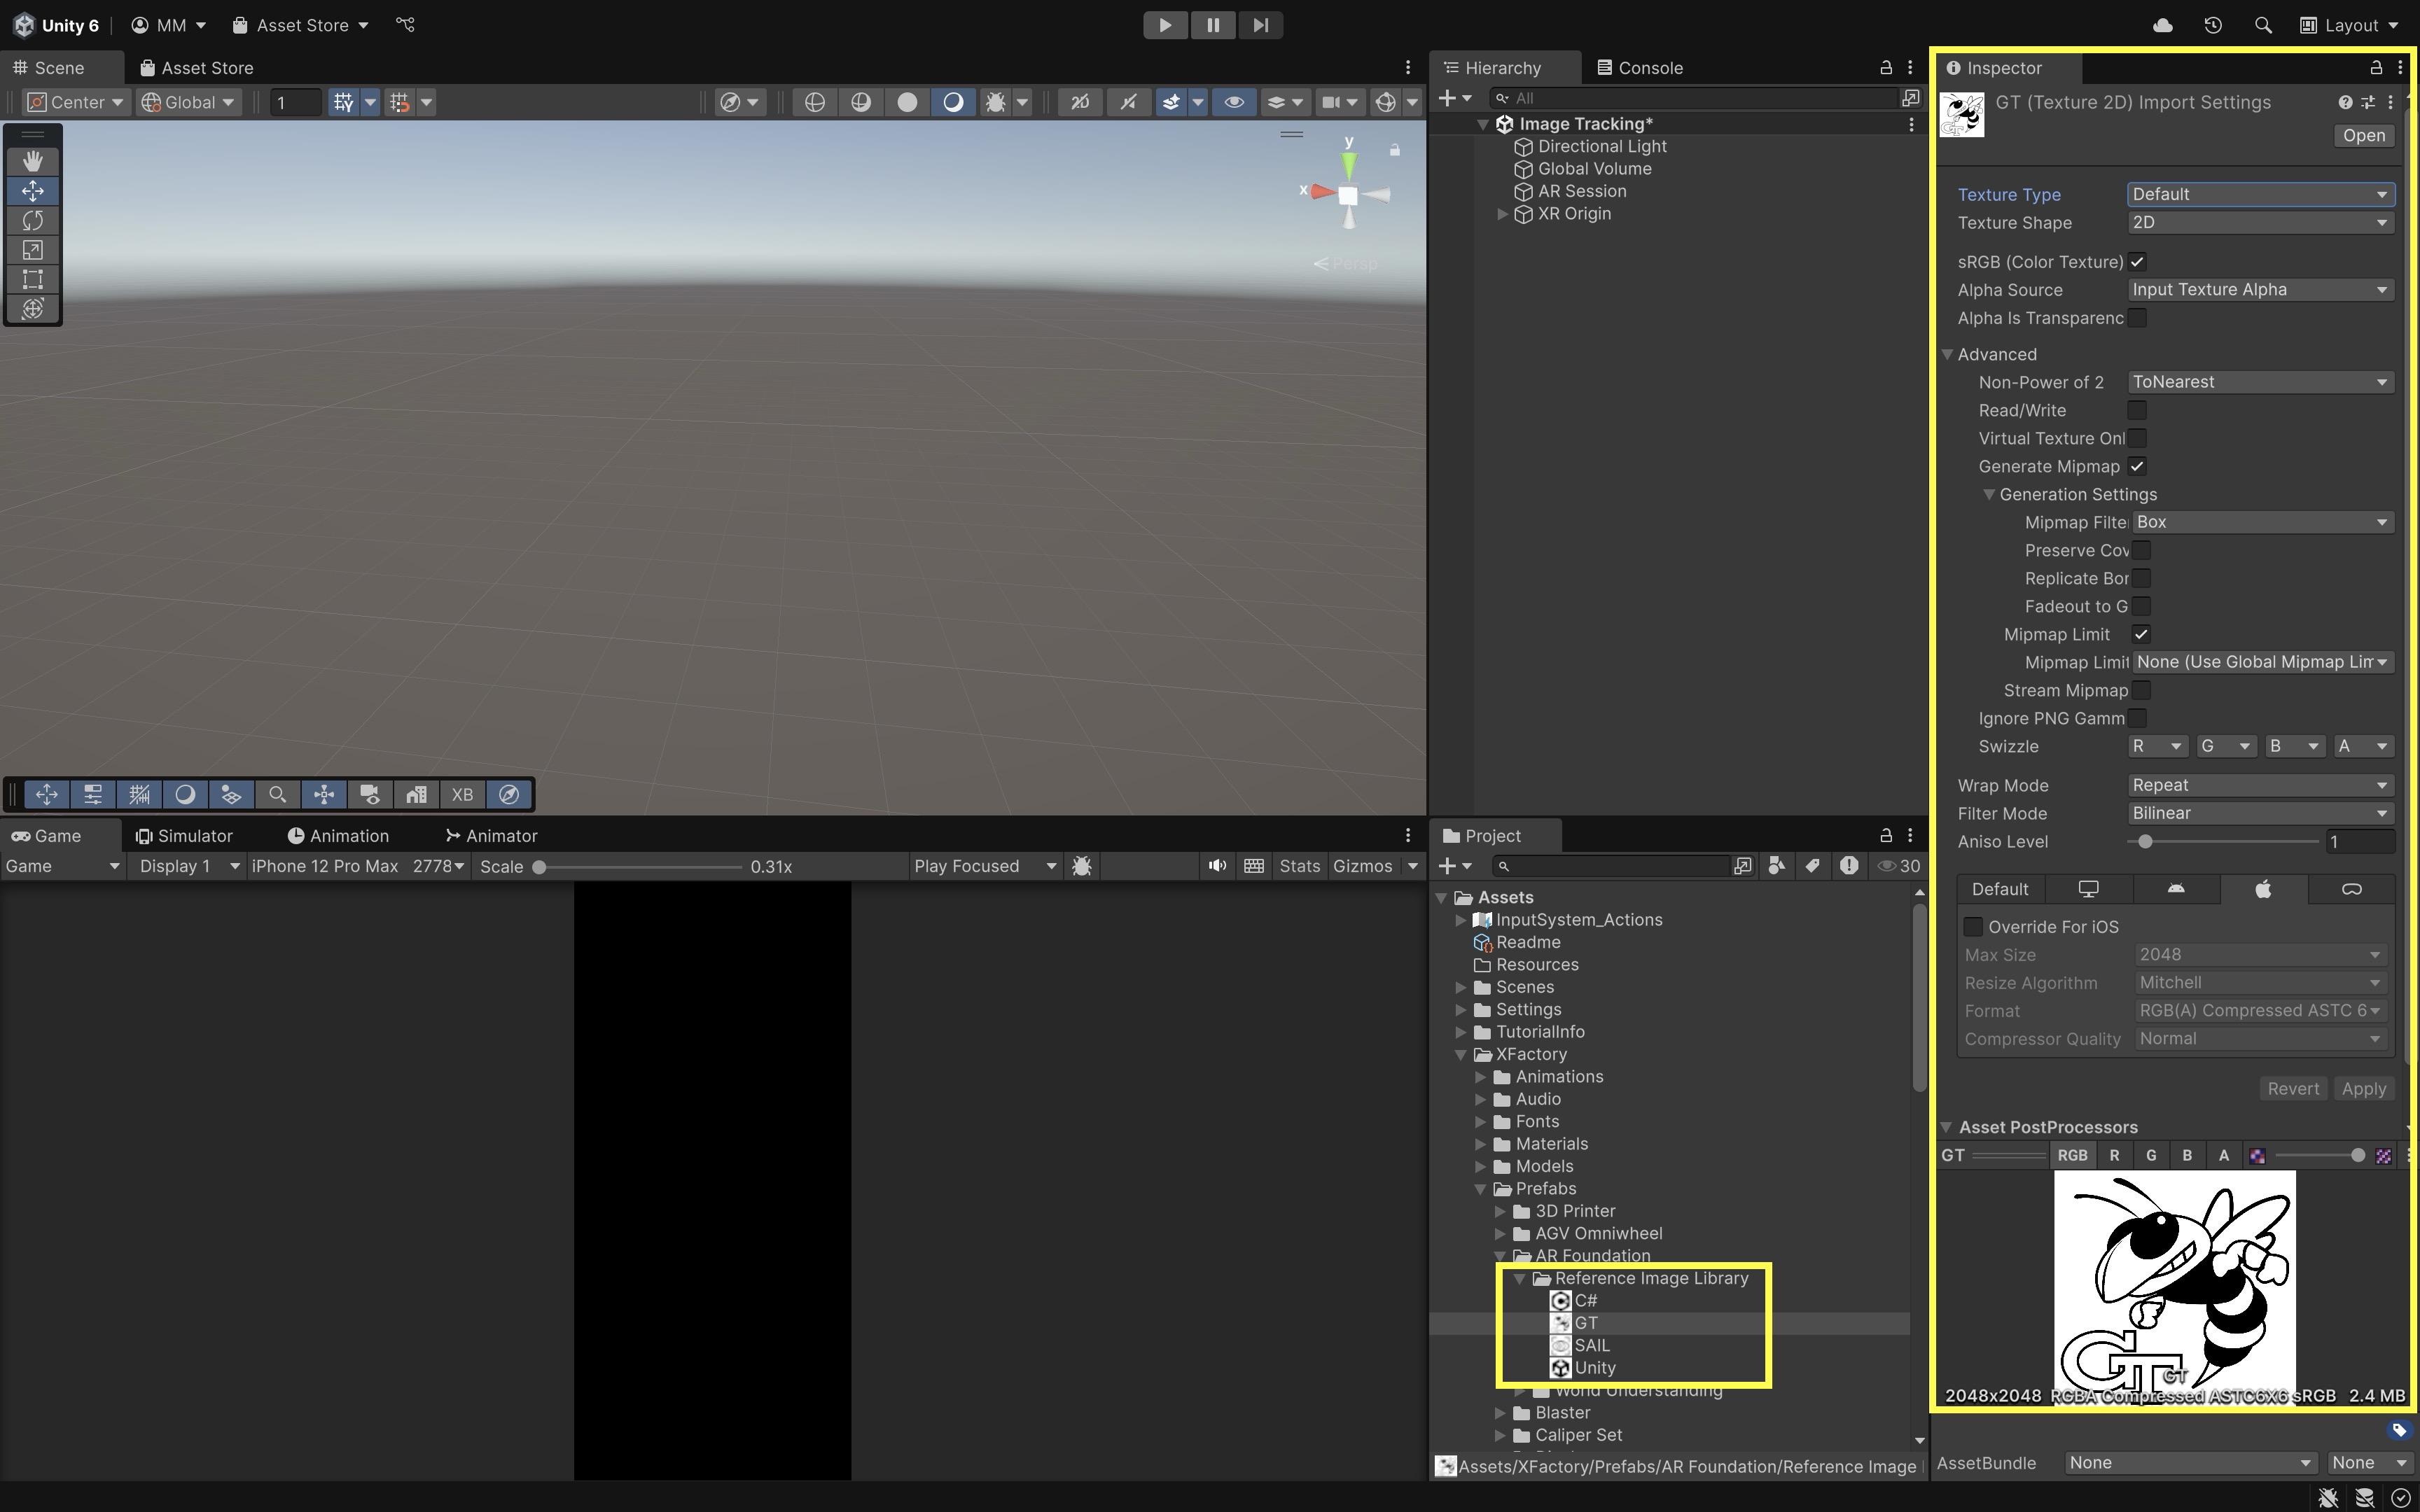
- After importing, select each image and check its
Inspector. - Confirm
Texture Typeis set toDefault. - Ensure the image is high-resolution, has sharp contrast, and distinct features.
- For non-power-of-two marker images, verify import settings so the aspect ratio is not altered. A distorted texture can reduce tracking accuracy.
- Navigate to
- Add Images to the Reference Image Library:
- Select the
XFactoryImageLibraryasset in theProjectwindow. - In the
Inspector, clickAdd Imageto create a new entry for each image. - Click
SelectunderTexture2D Assetto assign the imported marker image. - Enter a
Namefor easy identification in scripts (for example, match the name used inTrackedImageRobotController). - Enable
Specify Sizeand input thePhysical Size (meters)of the printed marker, e.g.,0.2for 20 cm. - Leave
Keep Texture at Runtimeunchecked unless you need runtime access to the texture.
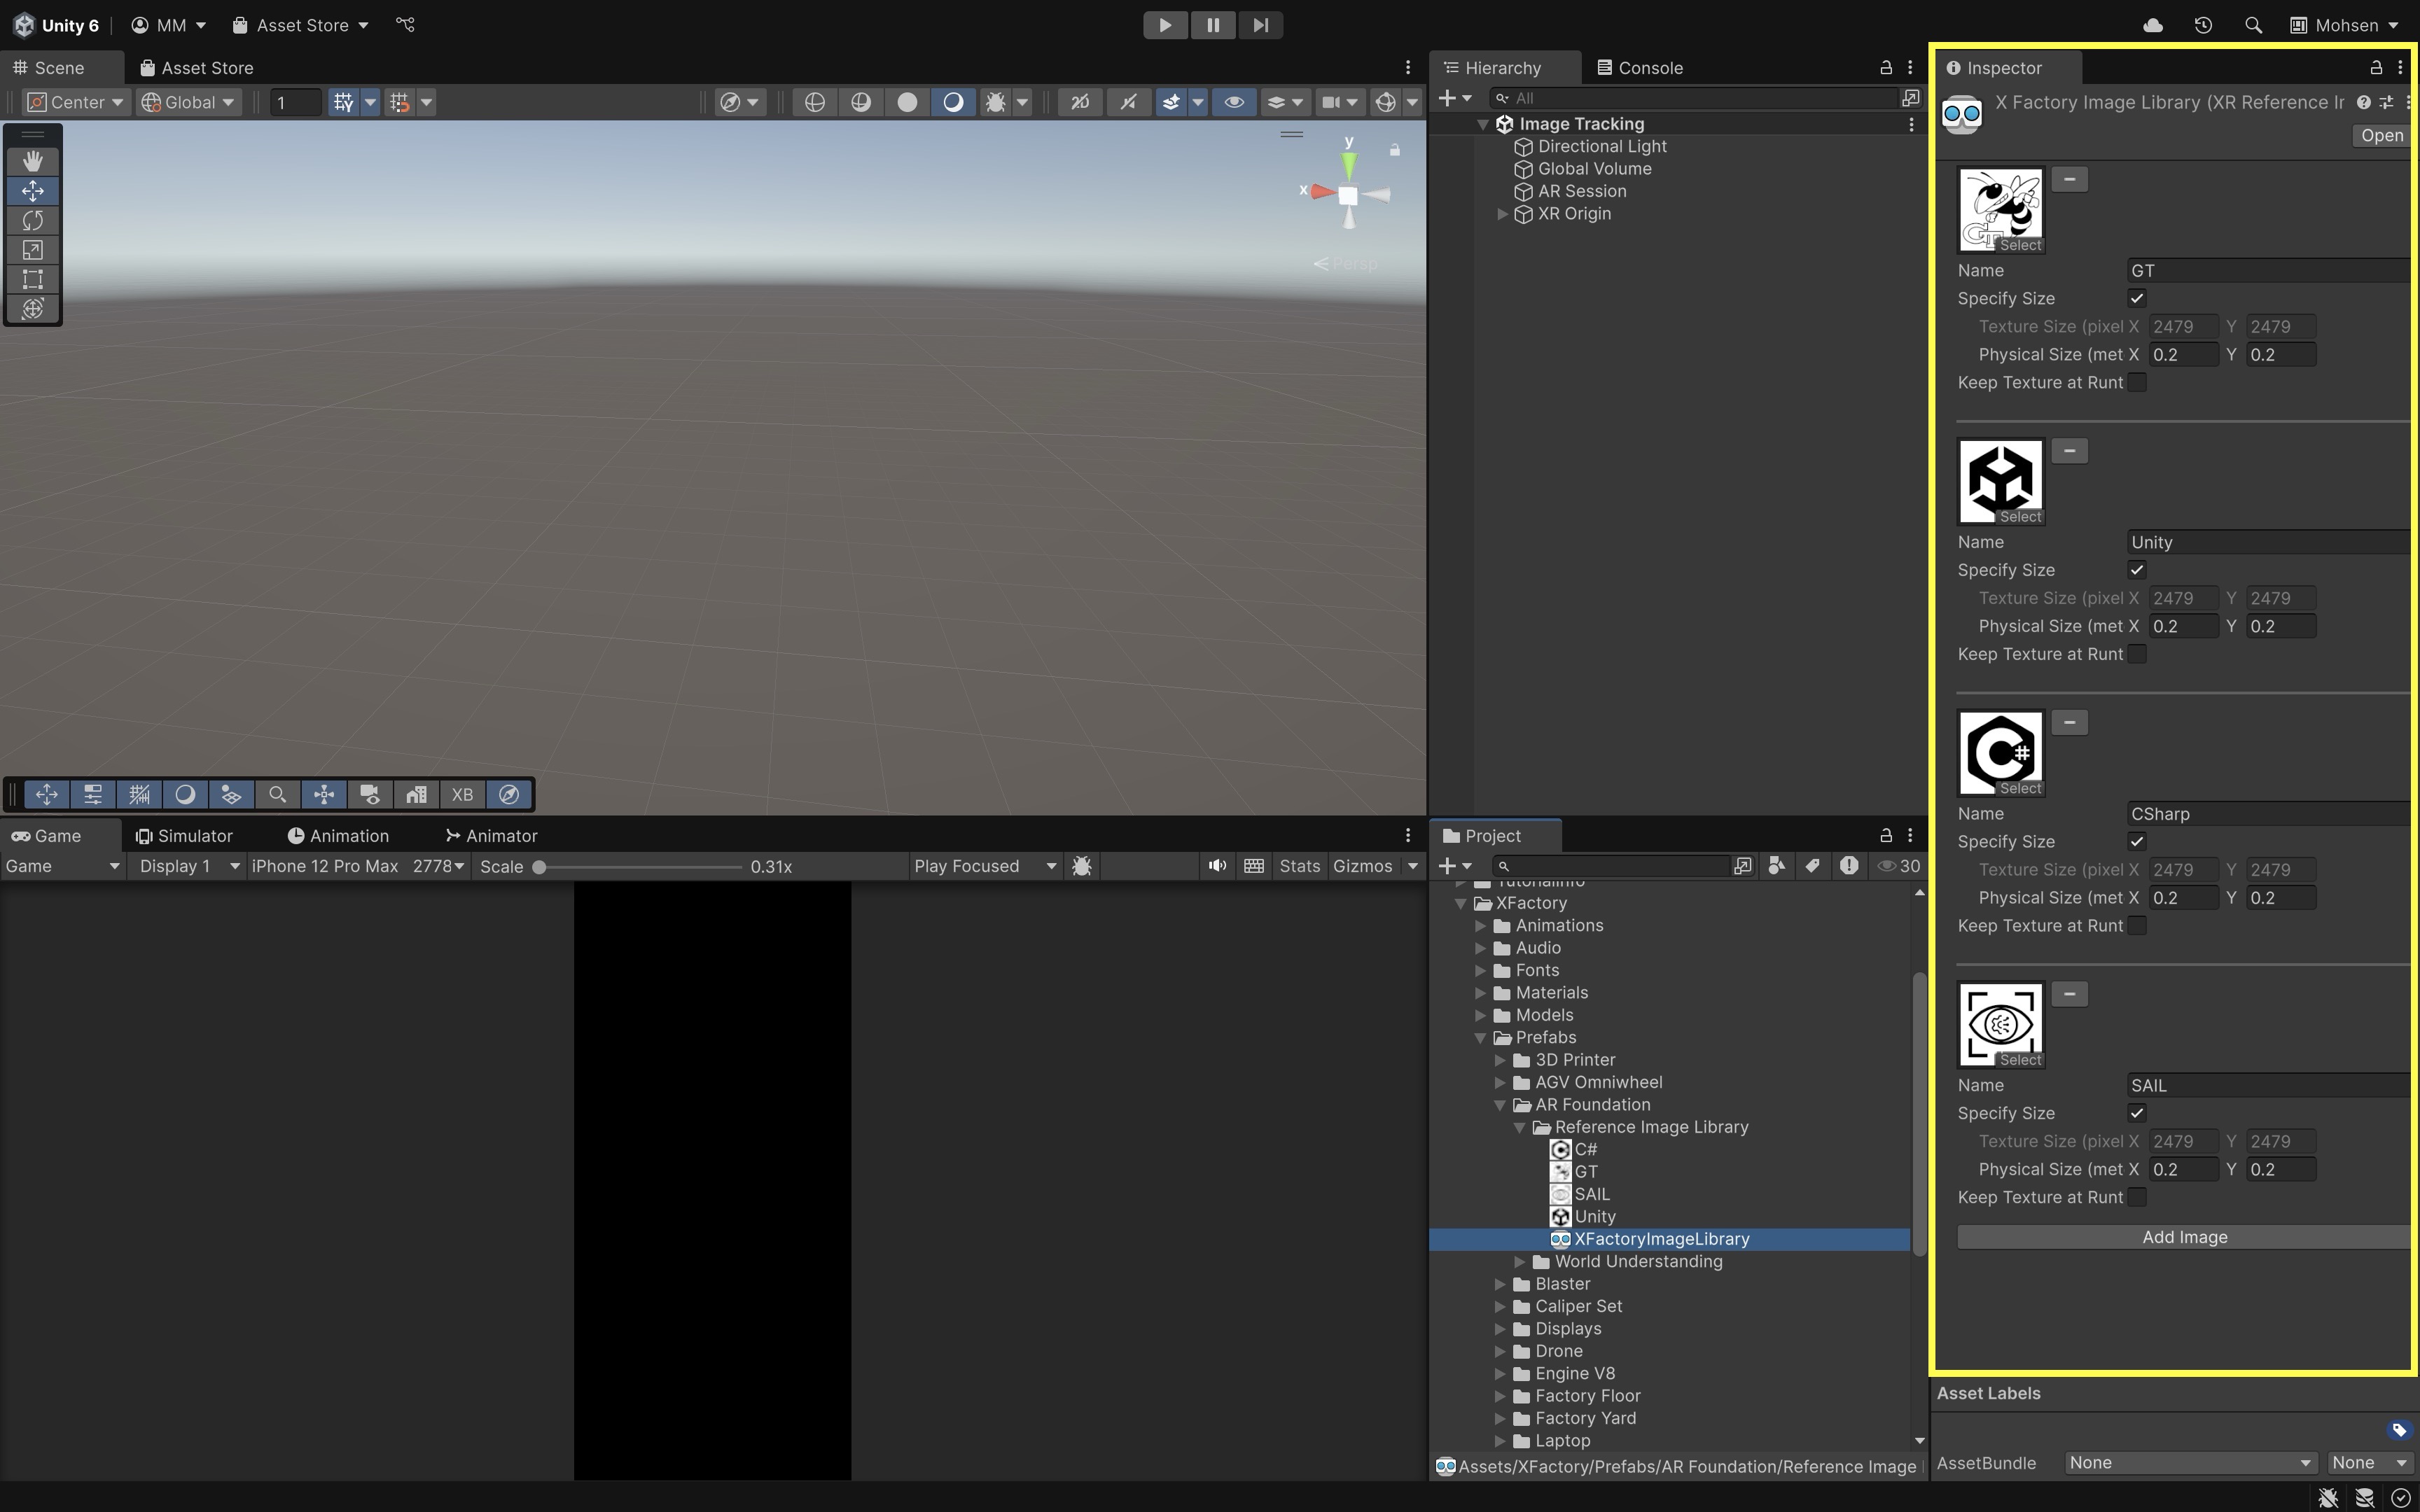
Properly configuring these settings supports reliable detection, accurate scaling, and stable tracking on supported mobile devices. With the scene and
Reference Image Libraryconfigured, integrateARTrackedImageManagerand a manager script to spawn marker-anchored robot content. - Select the
AR Tracked Image Manager
In AR Foundation, the AR Tracked Image Manager component detects 2D images in the real world and spawns an ARTrackedImage GameObject when a match is found from your Reference Image Library. The ARTrackedImage acts as the anchor that keeps the spawned model aligned with the physical marker. This allows for the creation of interactive augmented reality experiences where virtual content is anchored to physical objects based on image tracking.
Core Concepts
- Reference Image Library: The
ARTrackedImageManageruses this library to detect markers in the real world. AReference Image Libraryis essentially a collection of images that the AR system can recognize and track. Each image in the library must be unique and provides vital information to the system. This includes a unique name for the image, the physical size (usually in meters) of the image, and the image data itself. The library can be manually created and managed within Unity, enabling the addition of various reference images for dynamic tracking within the AR app. - Image Detection and Recognition: The
ARTrackedImageManagercontinuously scans the camera feed for images that match the ones in theReference Image Library. It uses computer vision algorithms to analyze the camera feed and identify markers from the library. When a match is found, the system triggers the creation of anARTrackedImageGameObject that is anchored to the real-world position of the detected image. This allows virtual content to remain accurately aligned with the image, even as the user or the camera moves around the scene. - ARTrackedImage GameObject: The
ARTrackedImageGameObject represents the detected image and serves as an anchor for placing virtual content. TheARTrackedImagecontains essential information such as the image’s position, rotation, and tracking state. Any virtual objects, like 3D models, UI panels, or holographic elements, should be parented to theARTrackedImageto ensure they remain properly aligned with the physical marker. This anchoring ensures that virtual content behaves naturally and remains stable as users interact with it. - Tracked Image Prefab: The
Tracked Image Prefabcan add components or default visuals to each tracked-image GameObject. It is not the recommended way to place full content for every marker. For marker-specific content, subscribe totrackablesChanged, identify the image byreferenceImage.name, instantiate the appropriate content, and parent it to theARTrackedImage. Leave this field empty or assign a lightweight debug prefab for this tutorial. - Pose Tracking: The
ARTrackedImageManagercontinuously updates the position and rotation of eachARTrackedImagebased on the camera’s view of the marker. Virtual content parented under the tracked image follows the marker while tracking remains valid. - Tracking States: Each
ARTrackedImagereports tracking quality throughtrackingState. Use it on every update—not only on first detection:- Tracking: The image is tracked successfully; show content normally and allow interactions.
- Limited: Tracking is degraded—common when the image is occluded, partially visible, too far away, or seen at a bad angle. Keep content visible if helpful, but pause precision-critical interactions.
- None: The image is not tracked; hide content or disable interactions. When tracking is
LimitedorNone, do not allow safety-critical or precision-critical interactions to continue as if alignment is valid.
- Lifecycle Events: Subscribe to
ARTrackedImageManager.trackablesChanged(ARTrackablesChangedEventArgs<ARTrackedImage>) to respond when tracked images are added, updated, or removed. Prefer this manager-level pattern for multi-marker apps.ARTrackedImage.updatedremains useful for object-level callbacks, but this session uses the manager event as the main workflow.
Implementation
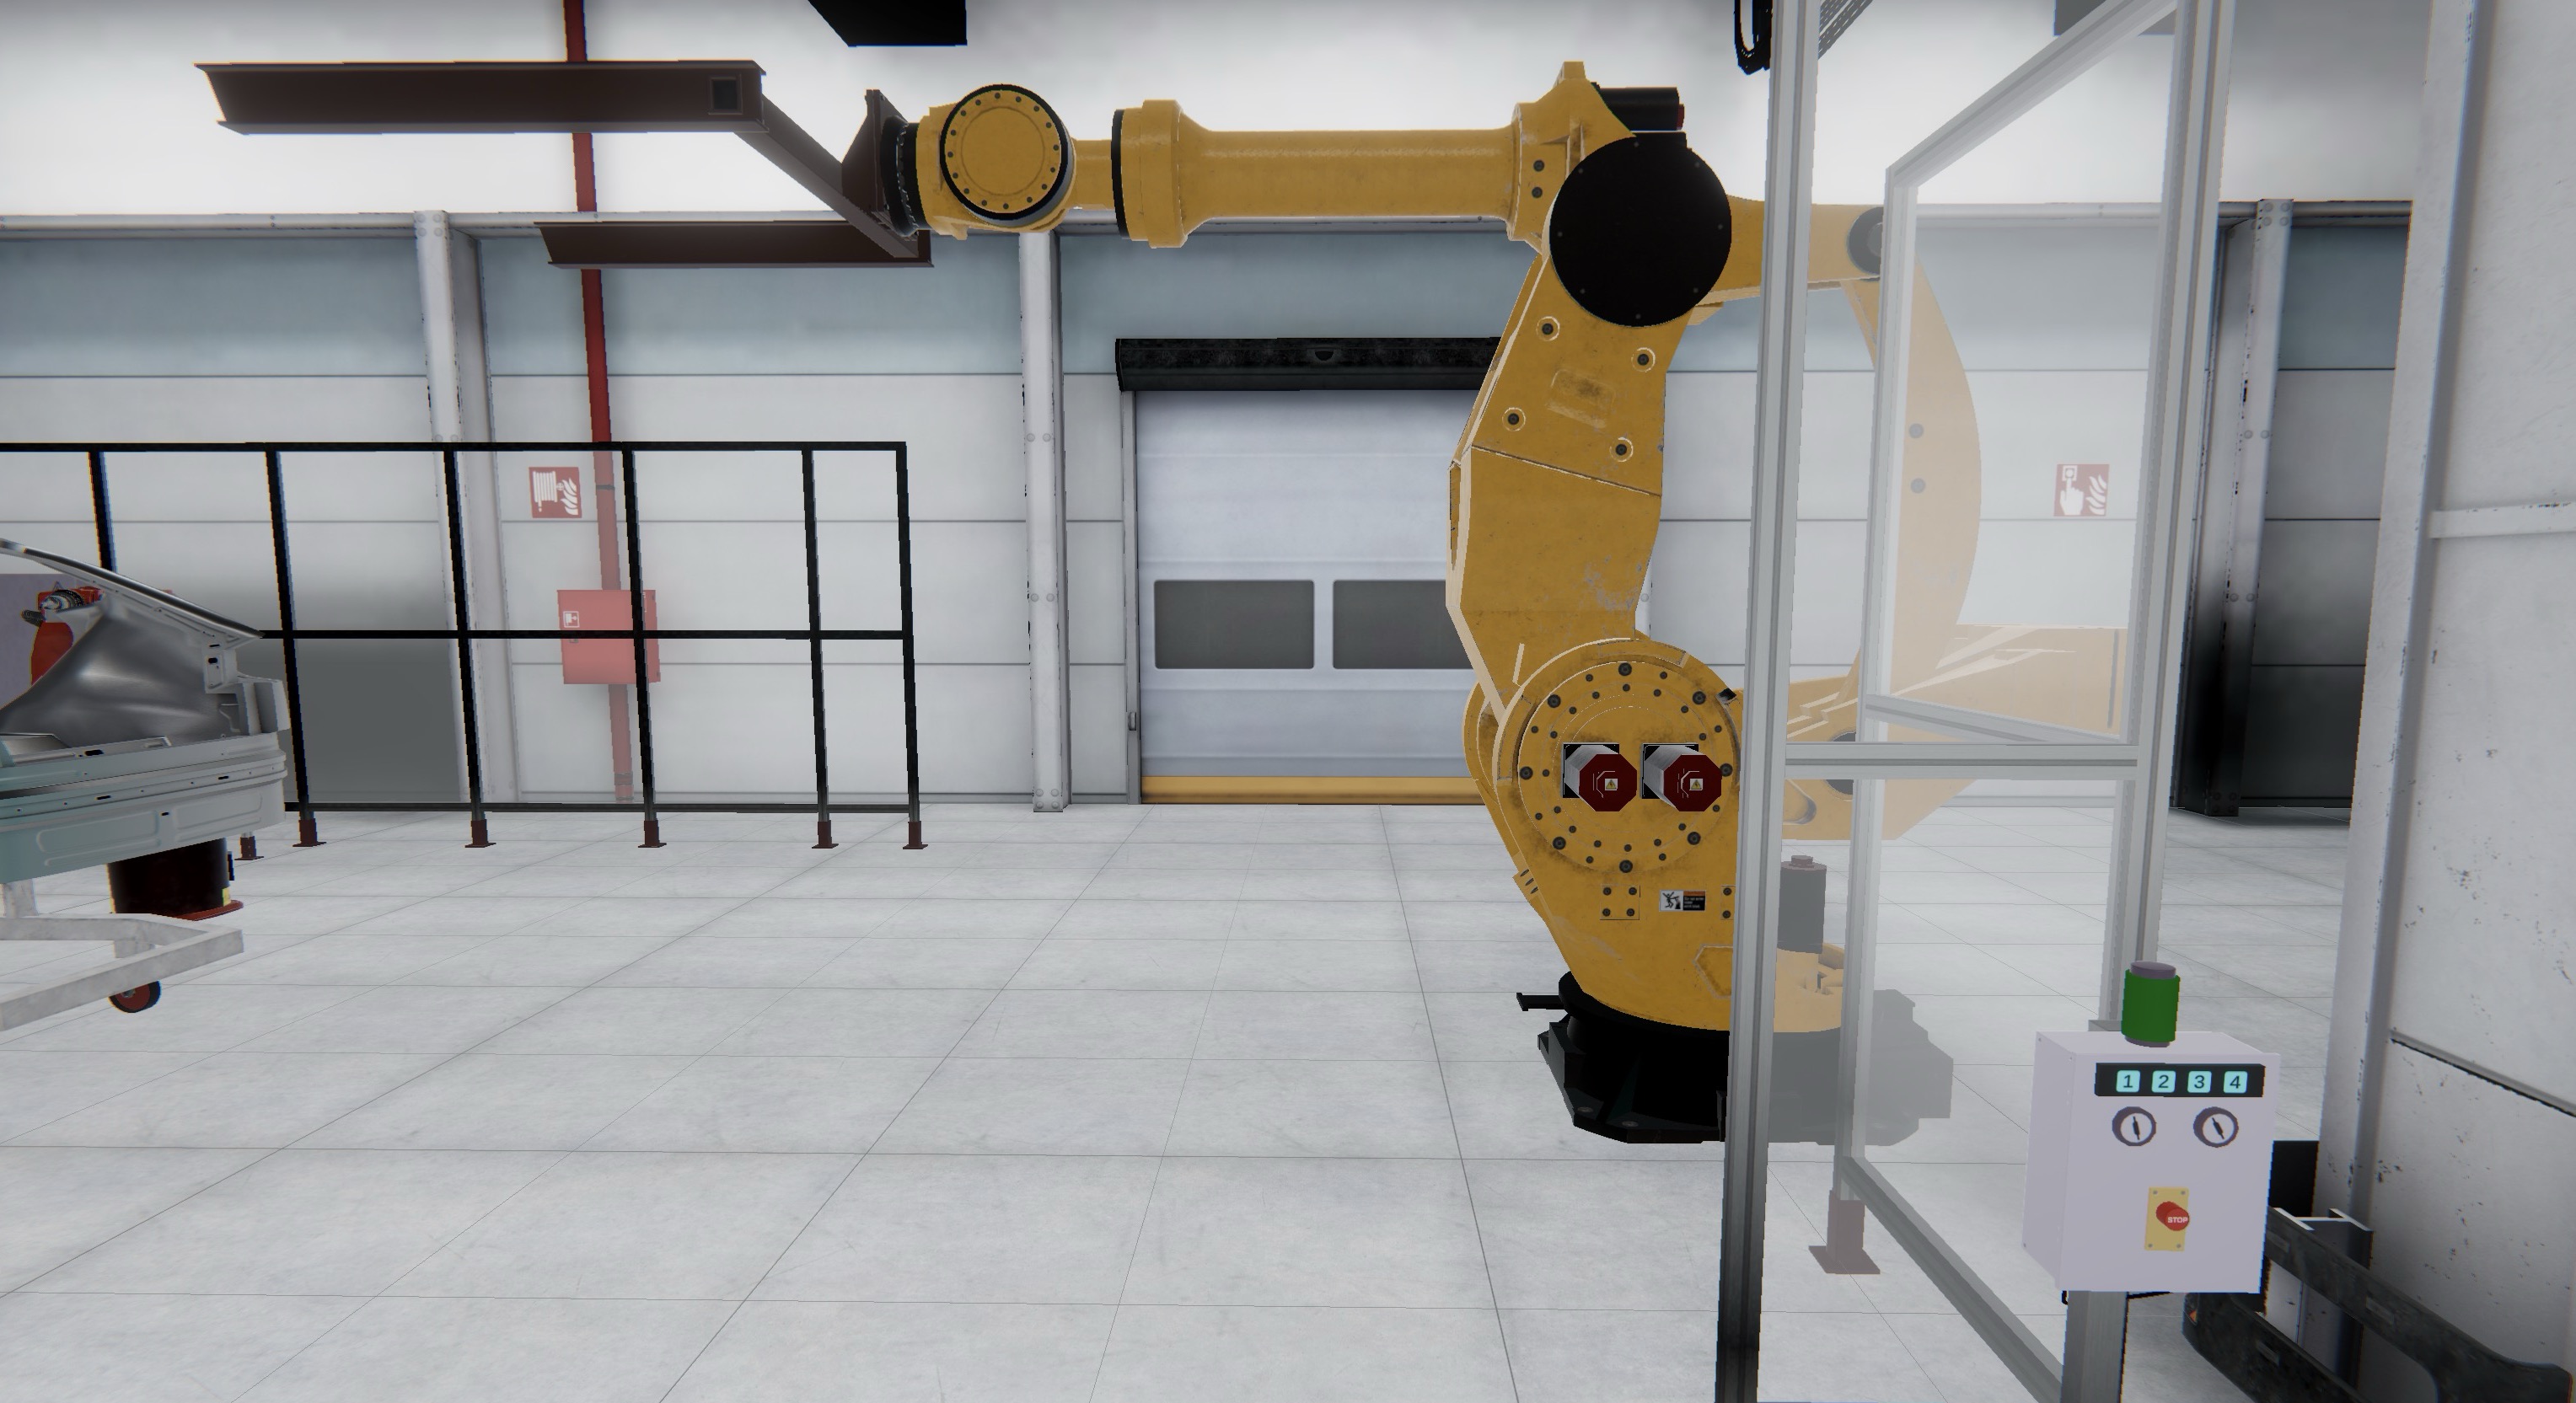
Let’s use XFactory’s Heavy Duty Robot Arm prefab to showcase mobile AR image tracking. When a specific marker is detected and tracked, the robot appears anchored to the marker. A screen-space Canvas in the scene provides touch controls for Pick, Turn, Place, and Home animations. The robot prefab’s local position, rotation, and scale should be adjusted relative to the ARTrackedImage, not globally in the scene. Use the marker’s physical size and the robot’s intended real-world scale to choose scale. Do a real print test—PDF scaling or printer margins can break alignment.
- Add and Configure
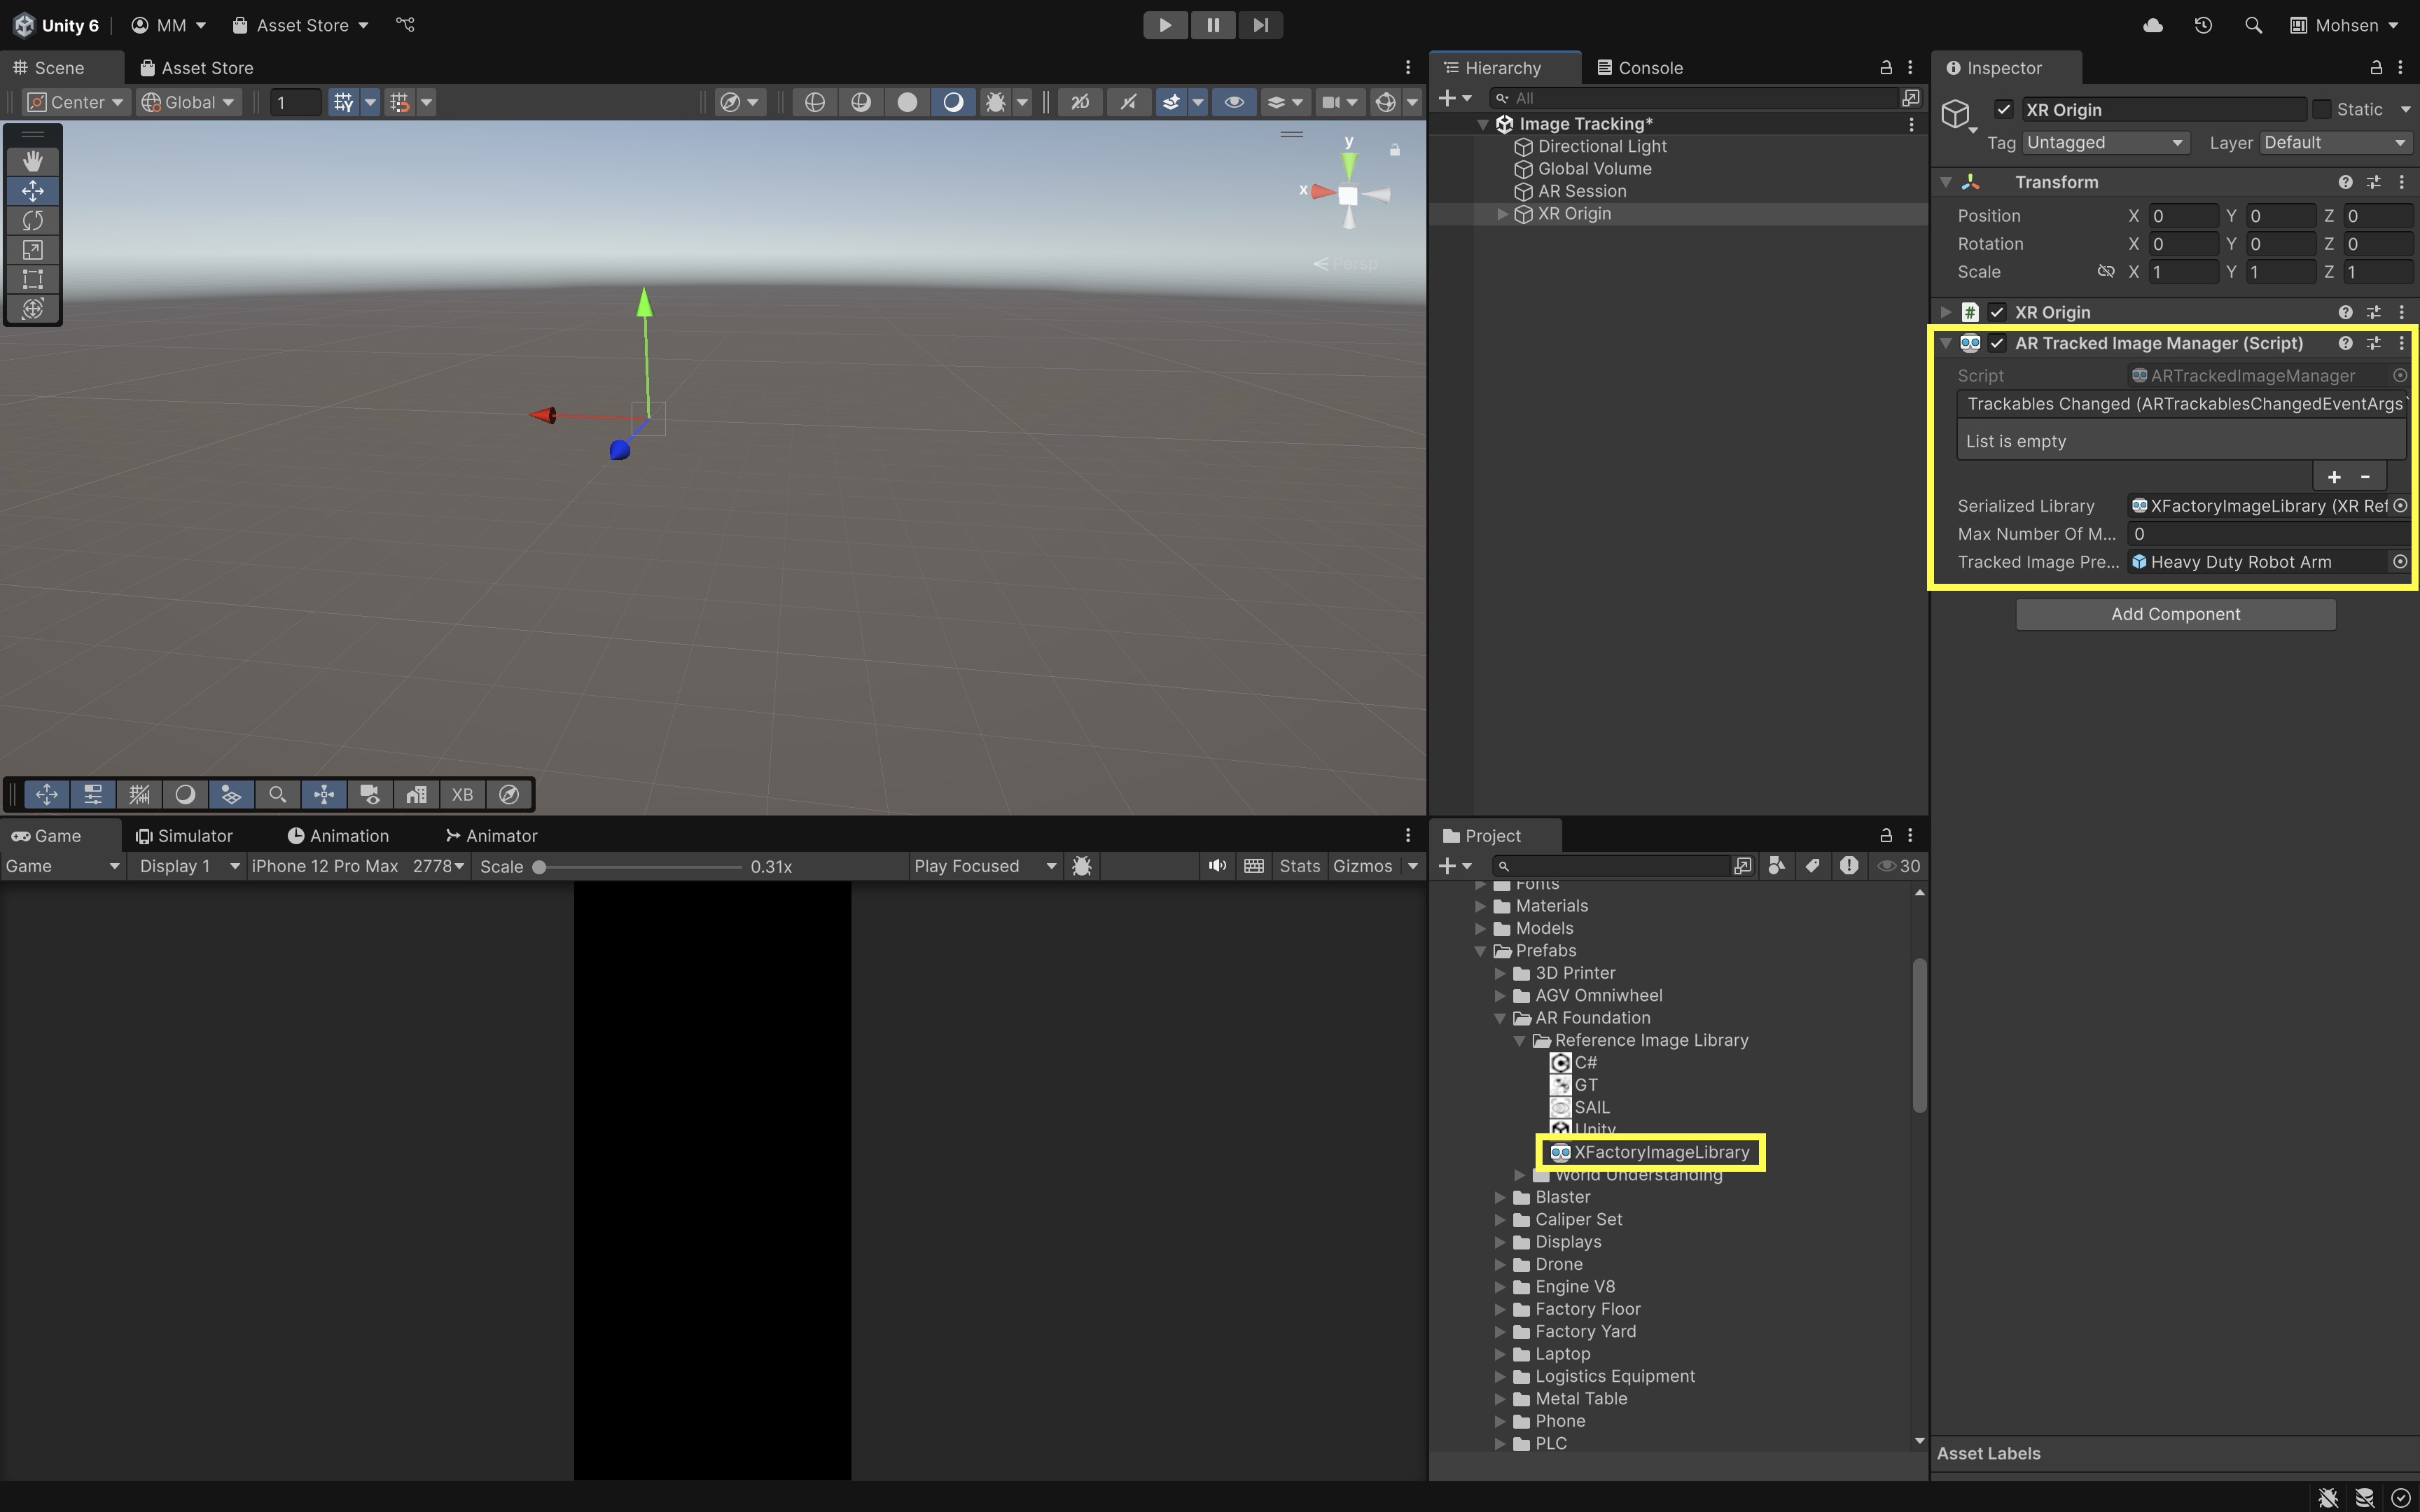
ARTrackedImageManager:- Select
XR Originand go to itsInspector. - Click
Add Component > AR Tracked Image Manager. Serialized Library: AssignXFactoryImageLibrary.Max Number Of Moving Images: Leave at default unless you need moving-image tracking and have confirmed provider support.Tracked Image Prefab: Leave empty or assign a lightweight debug prefab. Do not assign the full robot arm here—the manager script will spawn marker content.
- Select
- Create a Scene UI Canvas for Robot Control:
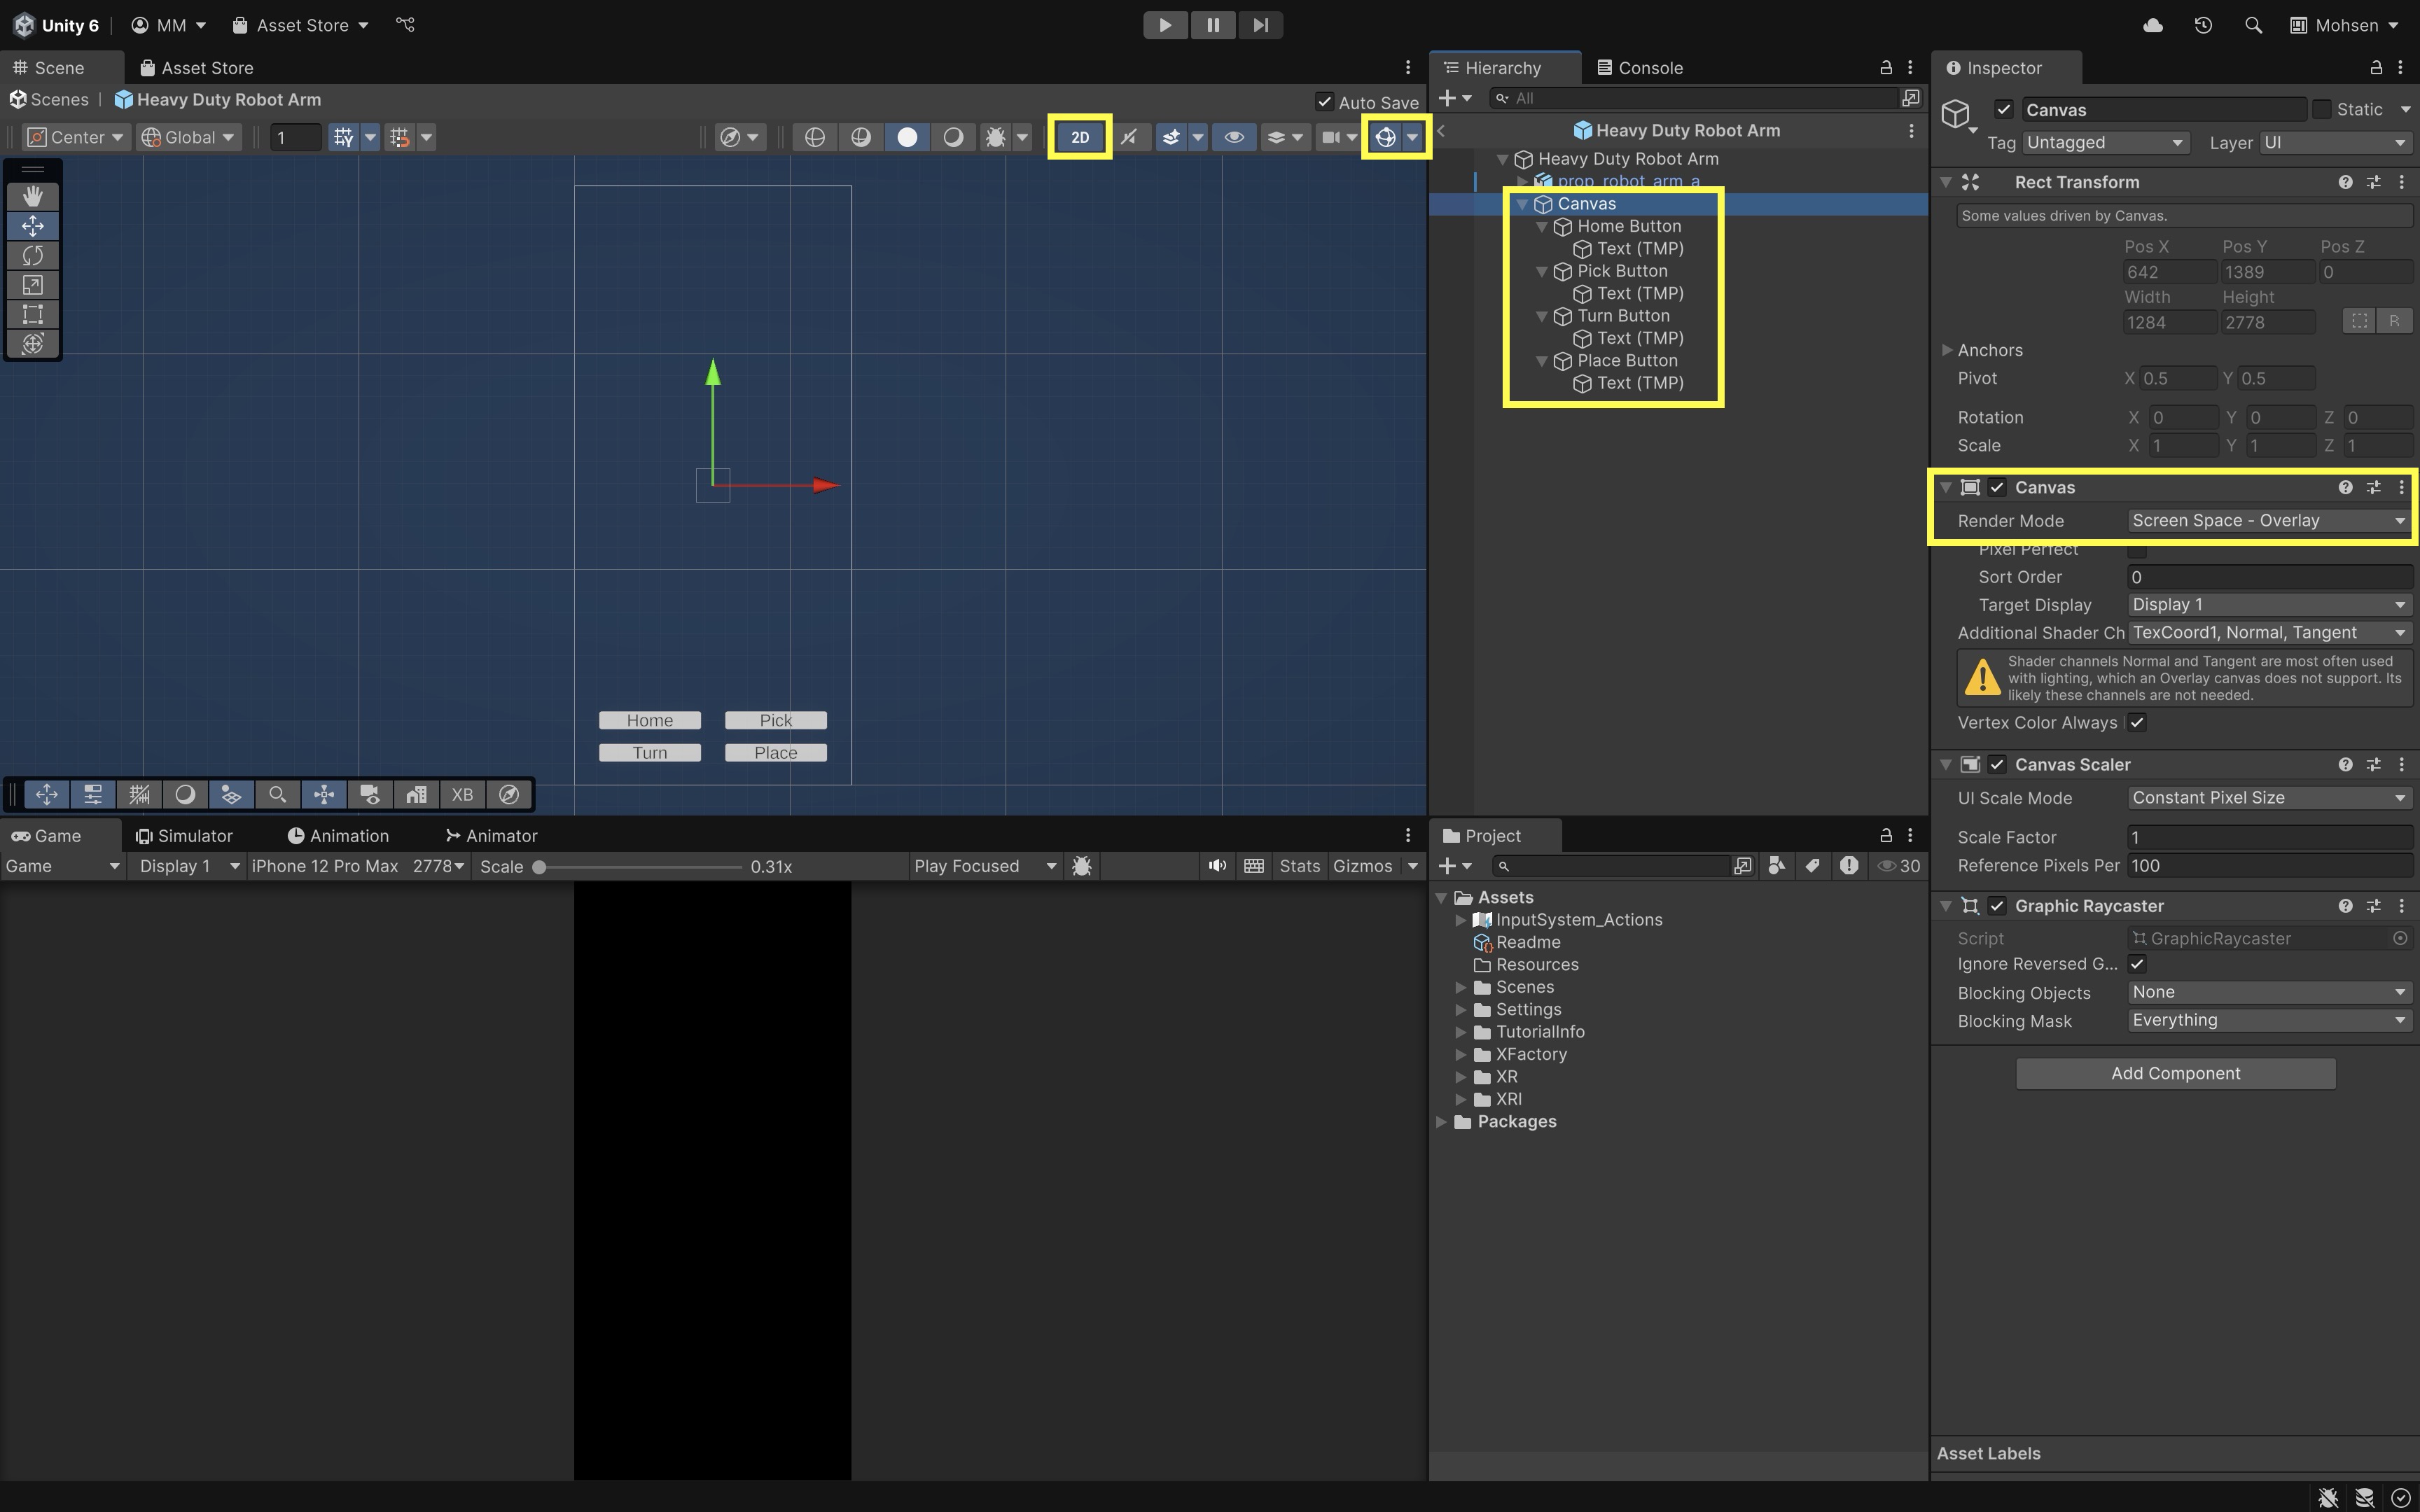
- In the scene
Hierarchy, right-click and selectUI > Canvas. - Set
Render Modeto Screen Space - Overlay. - Add four
Button - TextMeshProcontrols:HomeButton,PickButton,TurnButton, andPlaceButton. - Use
RectTransformto position the buttons for comfortable thumb reach on a phone or tablet. - Do not place a
Screen Space - OverlayCanvas inside the robot prefab if you want scene-level mobile controls tied to tracking state. A world-space Canvas parented to the tracked image is an alternative when UI should appear physically near the marker—validate scale and readability on device.
- In the scene
- Create
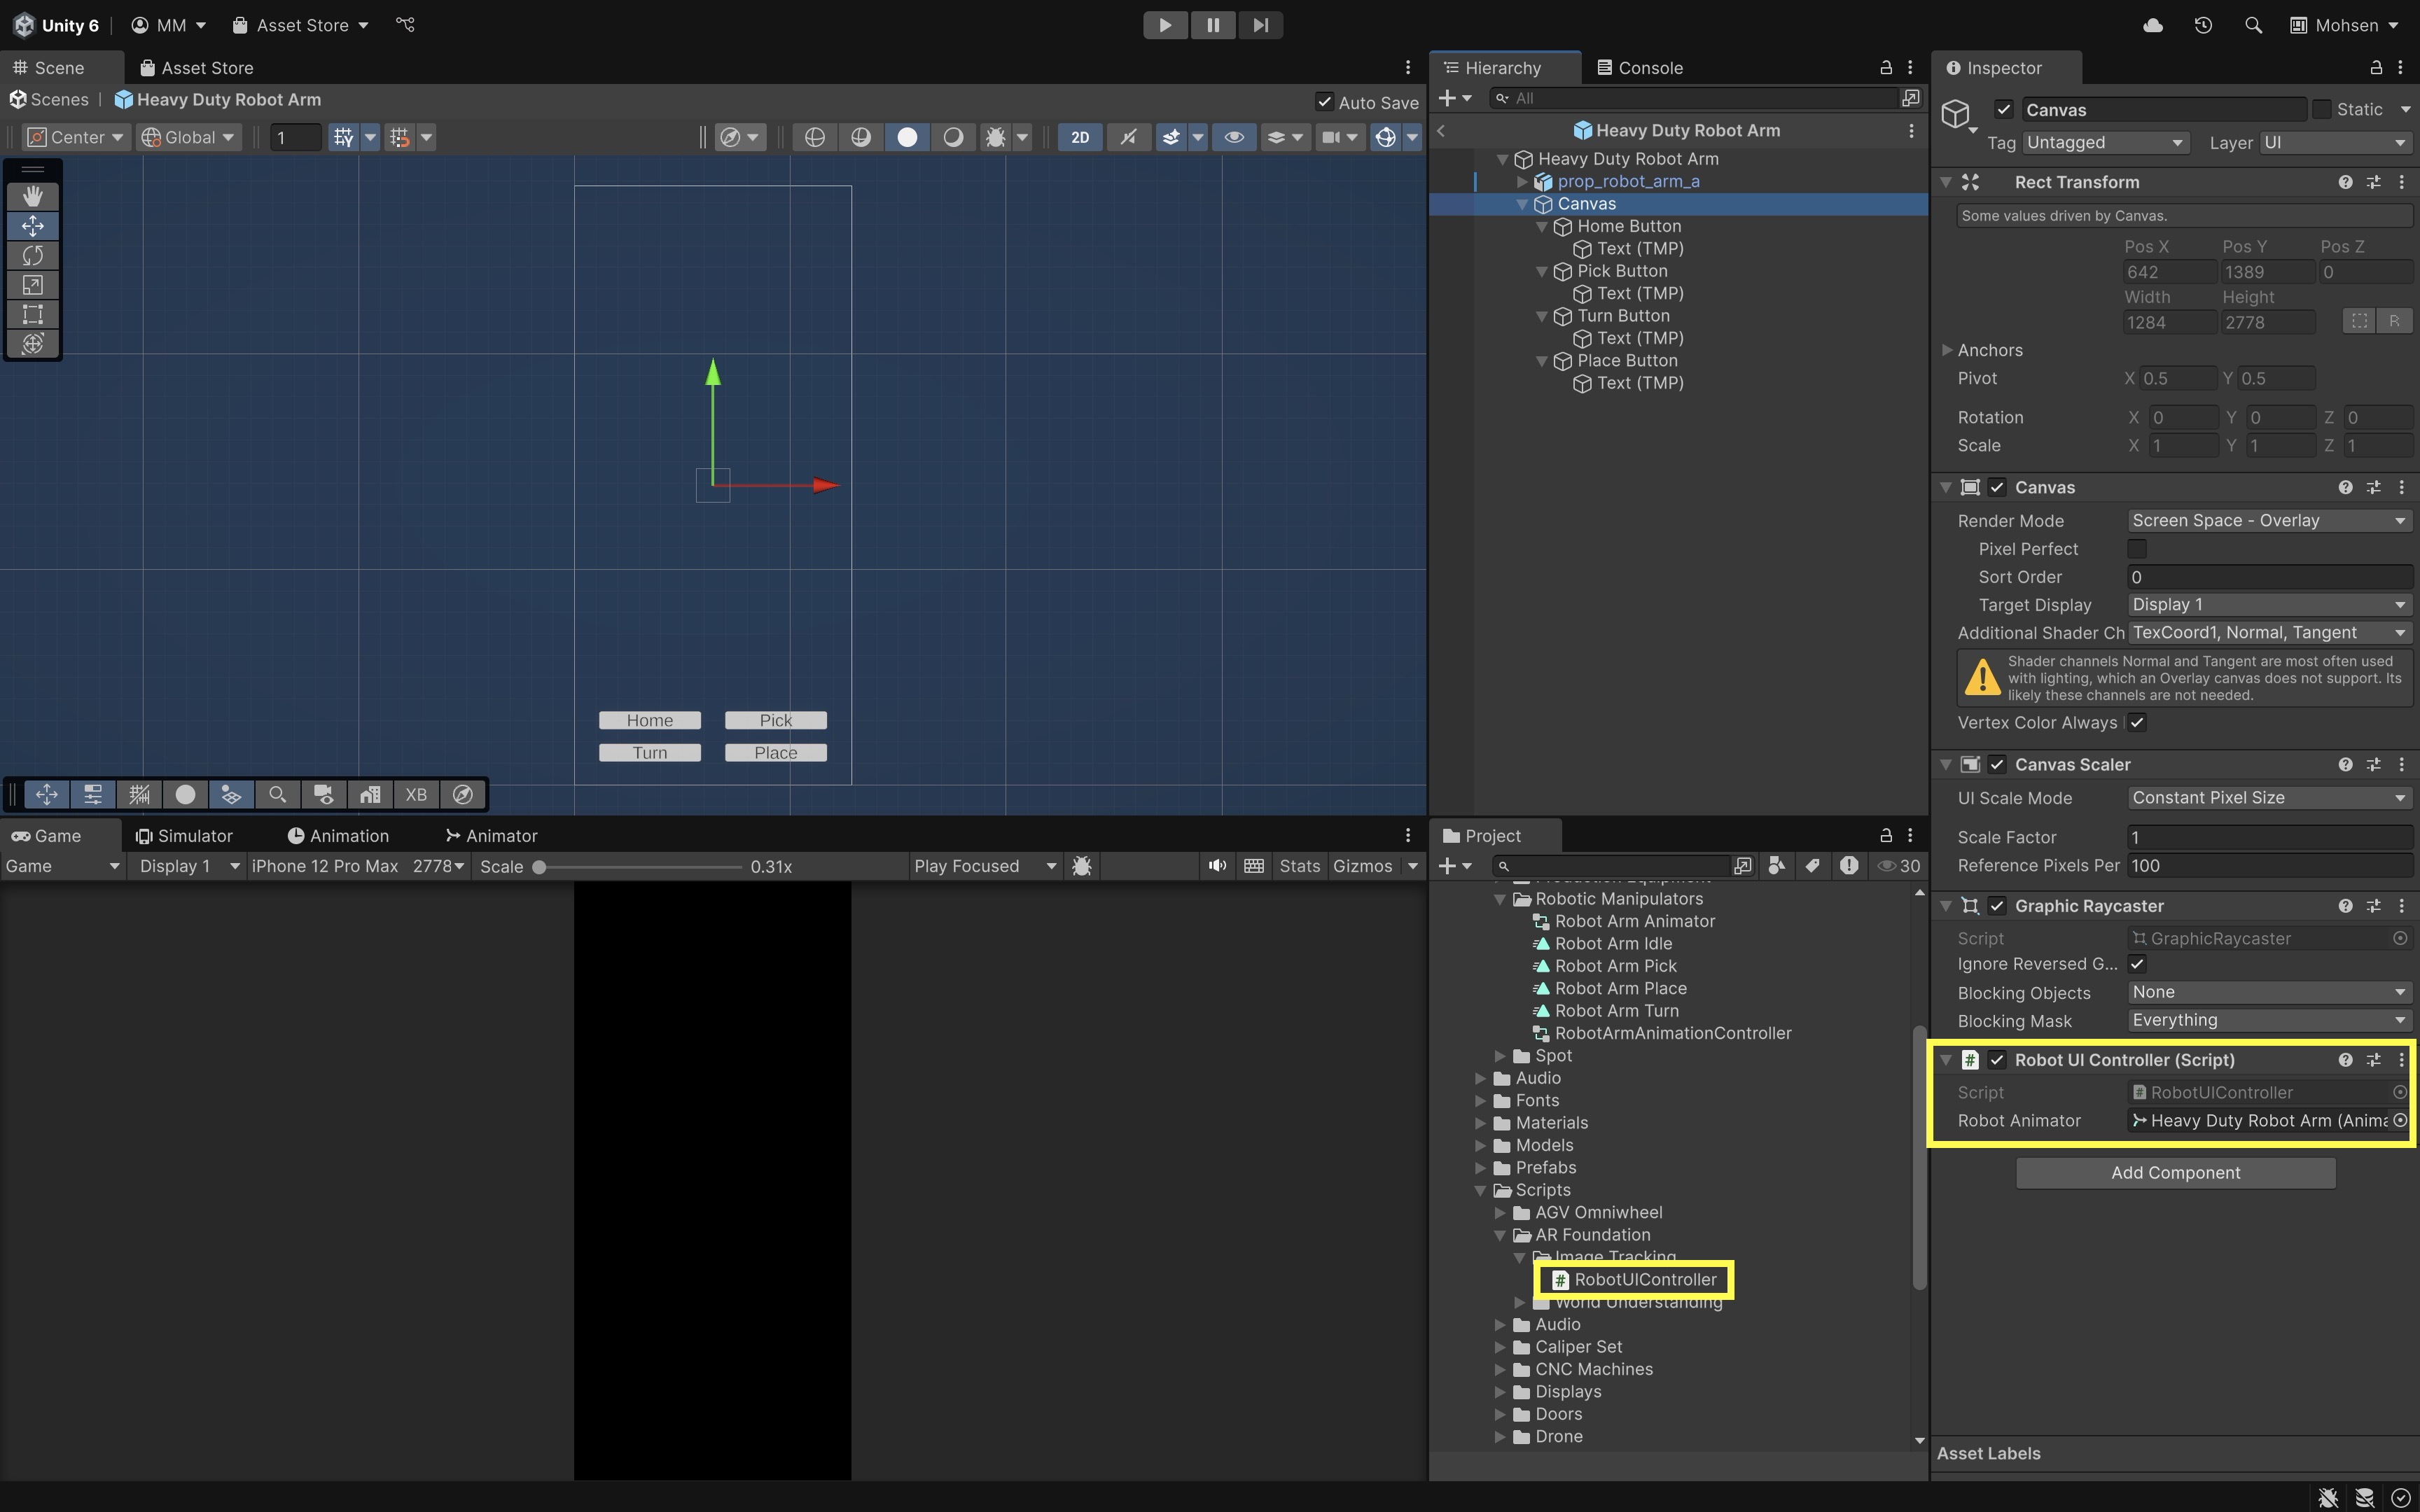
RobotUIController:- Create a C# script named
RobotUIController.csand attach it to the sceneCanvas.
using UnityEngine; using UnityEngine.UI; public class RobotUIController : MonoBehaviour { [SerializeField] private Animator robotAnimator; public void SetTargetAnimator(Animator animator) { robotAnimator = animator; } public void SetControlsInteractable(bool value) { foreach (var button in GetComponentsInChildren<Button>(true)) button.interactable = value; } public void TriggerAnimation(string triggerName) { if (robotAnimator == null) { Debug.LogWarning("RobotUIController: no target animator assigned."); return; } robotAnimator.SetTrigger(triggerName); } } - Create a C# script named
- Wire UI Buttons:
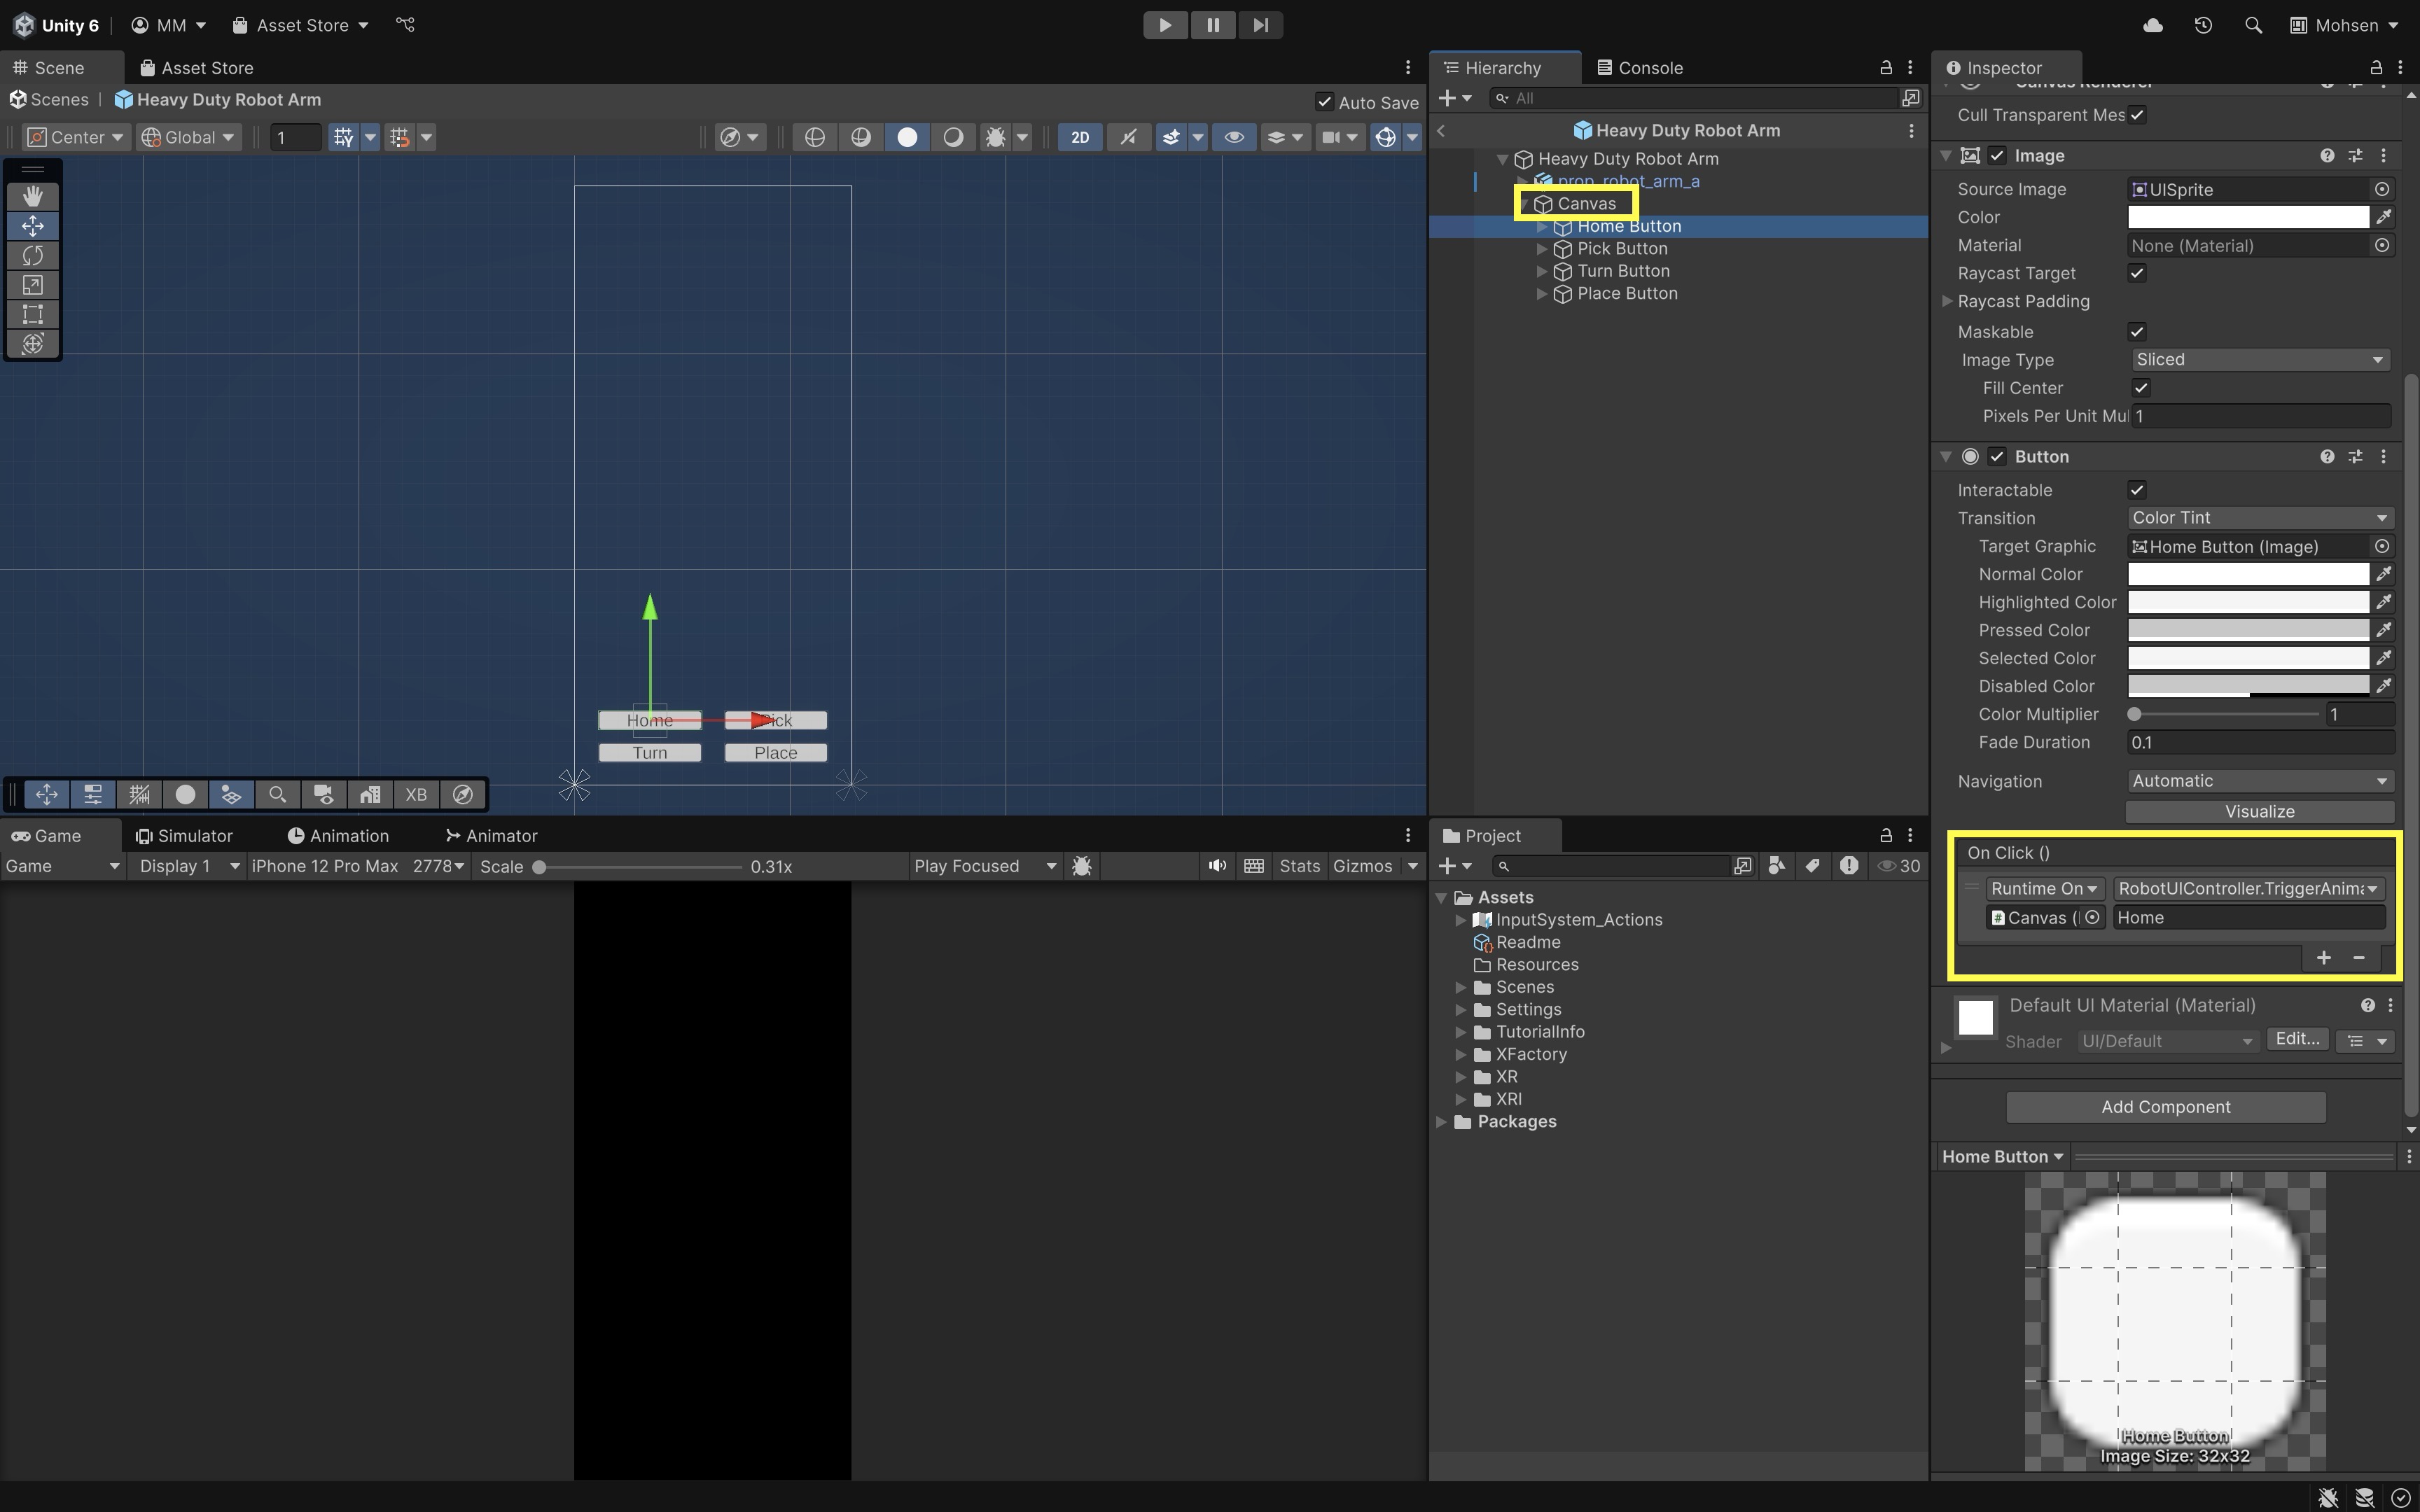
- Select each button and add
On Click()events targetingRobotUIController.TriggerAnimation(string). - Use trigger names:
Home,Pick,Turn, andPlace. - Leave buttons disabled until tracking is stable—the tracked-image script enables them when
trackingStateisTracking.
- Select each button and add
- Create
TrackedImageRobotController:- Create an empty GameObject named
Image Tracking Managerin the scene. - Add a script named
TrackedImageRobotController.cs.
using System.Collections.Generic; using UnityEngine; using UnityEngine.XR.ARFoundation; using UnityEngine.XR.ARSubsystems; public class TrackedImageRobotController : MonoBehaviour { [SerializeField] private ARTrackedImageManager trackedImageManager; [SerializeField] private GameObject robotPrefab; [SerializeField] private string targetImageName = "RobotMarker"; [SerializeField] private RobotUIController uiController; private readonly Dictionary<TrackableId, GameObject> spawnedByTrackable = new Dictionary<TrackableId, GameObject>(); void OnEnable() { if (trackedImageManager == null) { Debug.LogWarning("TrackedImageRobotController: manager not assigned."); return; } trackedImageManager.trackablesChanged += OnTrackablesChanged; } void OnDisable() { if (trackedImageManager != null) trackedImageManager.trackablesChanged -= OnTrackablesChanged; } void OnTrackablesChanged(ARTrackablesChangedEventArgs<ARTrackedImage> args) { foreach (var trackedImage in args.added) HandleAdded(trackedImage); foreach (var trackedImage in args.updated) HandleUpdated(trackedImage); foreach (var trackedImage in args.removed) HandleRemoved(trackedImage); } void HandleAdded(ARTrackedImage trackedImage) { if (trackedImage.referenceImage.name != targetImageName) return; if (robotPrefab == null) { Debug.LogWarning("TrackedImageRobotController: robotPrefab not assigned."); return; } var robot = Instantiate(robotPrefab, trackedImage.transform); robot.transform.localPosition = Vector3.zero; robot.transform.localRotation = Quaternion.identity; spawnedByTrackable[trackedImage.trackableId] = robot; ApplyTrackingState(trackedImage, robot); } void HandleUpdated(ARTrackedImage trackedImage) { if (!spawnedByTrackable.TryGetValue(trackedImage.trackableId, out var robot)) return; ApplyTrackingState(trackedImage, robot); } void HandleRemoved(ARTrackedImage trackedImage) { if (!spawnedByTrackable.TryGetValue(trackedImage.trackableId, out var robot)) return; Destroy(robot); spawnedByTrackable.Remove(trackedImage.trackableId); if (uiController != null) { uiController.SetTargetAnimator(null); uiController.SetControlsInteractable(false); } } void ApplyTrackingState(ARTrackedImage trackedImage, GameObject robot) { switch (trackedImage.trackingState) { case TrackingState.Tracking: robot.SetActive(true); if (uiController != null) { uiController.SetTargetAnimator(robot.GetComponent<Animator>()); uiController.SetControlsInteractable(true); } break; case TrackingState.Limited: robot.SetActive(true); if (uiController != null) uiController.SetControlsInteractable(false); Debug.Log("Tracking Limited — interactions paused."); break; case TrackingState.None: robot.SetActive(false); if (uiController != null) uiController.SetControlsInteractable(false); break; } } } - Create an empty GameObject named
- Configure the Scripts:
- On
Image Tracking Manager, assignXR Origin’sARTrackedImageManager, theHeavy Duty Robot Armprefab, and the sceneRobotUIController. - Set
Target Image Nameto match the reference imageNameinXFactoryImageLibrary. - Adjust the robot prefab’s local scale under the tracked image for your printed marker size.
- Open the robot prefab and remove any embedded screen-space Canvas if you moved UI to the scene.
- On
- Test the Behavior:
- Build and deploy to a supported iOS or Android device.
- Point the camera at the printed robot marker.
- When
trackingStateisTracking, the robot appears anchored to the marker and UI buttons become interactable. - Move the marker out of view or occlude it—content should pause or hide when tracking is
LimitedorNone. - Tapping each enabled button triggers the associated animation:
- Home: Home pose
- Pick: Pick animation
- Turn: Turn motion
- Place: Place animation
This workflow keeps marker content, tracking state, and mobile UI responsibilities separate—making it easier to support multiple markers and visible tracking-loss feedback later.
ARTrackedImage
When a marker image is detected in AR Foundation, Unity spawns ARTrackedImage. The AR Tracked Image component contains essential information about the detected image and its tracking status, allowing your AR content (like the Heavy Duty Robot Arm) to stay properly anchored and responsive to tracking conditions. Its key properties include:
destroyOnRemoval: Iftrue, the GameObject is destroyed when the image is no longer tracked. This property is particularly useful for cleanup and to avoid clutter in the scene when an image disappears. For the robot, keep thisfalseto prevent the model from disappearing during brief tracking interruptions, ensuring a smoother user experience.referenceImage: Contains metadata (name, size, GUID) about the detected image from the Reference Image Library. This property is valuable when your app tracks multiple images, as it allows you to easily identify which image was recognized and respond accordingly. By using this data, you can perform specific actions or trigger unique behaviors for different images.trackingState: Indicates tracking reliability:None,Limited, orTracking. Check this on every update—not only when images are first added. Pause or hide interactions when alignment is not trustworthy.sessionRelativePose: Provides the current pose of the tracked image relative to the AR session space for aligning virtual content with the physical marker.updated(event, optional): Object-level callback when pose or tracking state changes. This session usesARTrackedImageManager.trackablesChangedas the main pattern;updatedcan supplement per-object logic when needed.
Tracked Image Lifecycle
Tracked images managed by ARTrackedImageManager pass through three main lifecycle phases:
- Added: The first time an image is detected. Instantiate or enable marker-specific content and parent it to the
ARTrackedImage. - Updated: Triggered when pose or tracking quality changes. Always check
trackingStatebefore updating visuals or enabling interactions. If tracking isLimited, pause buttons and show tracking-lost feedback rather than continuing precision-critical actions. - Removed: Called when the provider removes the trackable. Some providers instead keep the object and downgrade
trackingStatetoLimitedorNone. Do not rely only on removed events—handle tracking loss inupdatedcallbacks too.
Managing these phases with explicit tracking-state feedback keeps marker-anchored content predictable as conditions change.
Best Practices
- Always parent your AR content under the
ARTrackedImageGameObject so it moves, rotates, and scales with the physical marker. - Avoid manually destroying tracked image GameObjects. Let
ARTrackedImageManagermanage trackable lifecycle and use your manager script to destroy spawned content you created. - Do not use the tracked-image prefab as the main content strategy for multi-image apps. Use
trackablesChangedandreferenceImage.nameinstead. - Check
trackingStatebefore updating visuals or enabling interactions. Only allow precision-critical actions when tracking isTracking. - Disable or reduce moving-image tracking unless needed—it costs CPU on mobile devices.
- Use small, high-quality reference libraries for faster detection.
- Design visible tracking-lost feedback so users know when alignment is no longer valid.
- Test markers at the expected real task distance and angle on physical devices.
- Avoid glossy markers and moving markers unless moving-image support is confirmed on the target provider.
- Cache references to spawned content or controllers for quick updates without unnecessary reinstantiation.
- For maintenance/training markers, control marker placement so the marker cannot be accidentally moved relative to the machine.
Testing and Validation
Validate image tracking on the hardware and environments your app targets:
| Test target | What to verify |
|---|---|
| XR Simulation | First check image detection and lifecycle logic |
| iOS/ARKit device | Marker detection, physical-size alignment, camera permission, lighting, angle, and tracking state |
| Android/ARCore device | Marker detection, tracking loss, moving-image behavior if used, thermal/performance |
| Meta Quest passthrough AR | Do not assume AR Foundation image tracking; use alternate tracking strategies unless provider support is verified |
| Real workspace | Printed marker quality, glare, vibration, occlusion, distance, safety, and equipment alignment |
AI-generated image-tracking examples often assign full content directly to
Tracked Image Prefab, ignoretrackingState, use outdated event signatures, or assume Quest passthrough AR supports the same image-tracking path as mobile AR. When tracking fails, verify provider support, image library setup, physical size, marker quality, camera permission,ARTrackedImageManager, event subscription, and real-device lighting before rewriting the scene.
Key Takeaways
- Image tracking works best when markers are feature-rich, matte, correctly sized, and tested at the real task distance.
ARTrackedImageManagerreports marker lifecycle changes, buttrackingStateis the key signal for whether anchored content should remain interactive.- The tracked-image prefab should be used carefully; marker-specific content is usually managed by script and parented to the
ARTrackedImage. - Mobile AR image tracking is useful for training, maintenance, labels, and equipment-linked overlays, but feature support varies by provider.
- Engineering overlays must be validated for marker placement, scale, alignment, lighting, occlusion, and tracking loss behavior.