E2. AR Foundation

Learning Outcomes
- Explain the role of AR Foundation in cross-platform AR development. Before class, review how AR Foundation provides a shared Unity layer that depends on provider plug-ins for ARKit, ARCore, OpenXR, and platform-specific AR features.
- Set up a Unity project with AR Foundation and a compatible provider. Ahead of the session, create a new 3D project, install AR Foundation with at least one provider plug-in for your target platform, review URP configuration steps, and—if possible—deploy a basic AR scene (e.g., the XFactory drone) to a mobile device.
- Describe the architecture of Unity’s AR Foundation. To get ready, read up on subsystems, descriptors, and managers, focusing on how providers implement features and how managers expose real-world trackables as GameObjects.
- Distinguish mobile AR and Quest passthrough AR provider paths. Mobile AR uses ARKit or ARCore; headset passthrough AR on Meta Quest uses OpenXR with Unity OpenXR: Meta. Feature support depends on the selected provider and physical device—not every manager works on every platform.
What Is AR Foundation?
AR Foundation is a high-level framework developed by Unity that lets you build AR experiences across multiple AR platforms. Rather than working directly with platform-specific SDKs like ARKit (Apple) or ARCore (Google), AR Foundation provides a unified API and a set of manager components that handle underlying AR functionality—session tracking, plane detection, anchors, environment probes, light estimation, and more. AR Foundation provides common Unity components and APIs, but it does not implement AR features by itself. The selected provider plug-in determines which features are actually available on the target device. When deployed, AR Foundation connects your Unity code to the active native AR SDK through that provider, abstracting platform differences while still requiring per-device validation. One AR Foundation scene can reuse much of the same Unity scene and code, but behavior is not identical across all hardware. Key benefits include:
- Multi-Platform Deployment: Reuse much of the same Unity scene and code while still validating each provider and device. This shared codebase approach reduces development time, but build targets, permissions, and feature checks remain platform-specific.
- Simplified Development: AR Foundation unifies the AR workflow by abstracting platform differences. Developers can focus on designing compelling user experiences instead of managing low-level device-specific logic—while still checking provider support at runtime.
- Extensibility: AR Foundation plays well with Unity’s broader ecosystem—including XR Interaction Toolkit, Shader Graph, and URP/HDRP—allowing you to extend functionality and tailor experiences to different hardware capabilities.
- Access to Native Features: While AR Foundation simplifies development, it also allows access to underlying platform-specific features through subsystem extensions or conditional logic when the active provider supports them.
- OpenXR Compatibility: OpenXR-based providers are especially important for headset-based passthrough AR such as Meta Quest. OpenXR helps align headset AR development with an industry standard and supports emerging device workflows.
- Toolchain Integration: Unity’s integration with popular version control systems, CI/CD pipelines, and asset management tools makes AR Foundation projects easier to collaborate on in large teams.
- Rapid Prototyping: Unity’s real-time editor combined with AR Foundation and XR Simulation enables fast iteration cycles, making it easier to test, debug, and refine AR interactions early in the development process.
- Active Ecosystem & Support: Backed by Unity’s documentation, tutorials, and community support, AR Foundation benefits from continuous updates and a robust knowledge base for troubleshooting and learning.
This broad support makes AR Foundation a powerful tool for immersive AR experiences on mobile devices and passthrough AR headsets used in engineering, manufacturing, healthcare, education, and beyond.
Required Packages
AR Foundation depends on provider plug-in packages that connect Unity to native AR SDKs on each target platform. Install only the providers needed for your target build—mobile AR tutorials in this course typically need ARKit or ARCore; Meta Quest passthrough AR needs OpenXR with Unity OpenXR: Meta.
- AR Foundation: Common AR layer and shared manager APIs.
- Apple ARKit XR Plug-in: iOS/iPadOS handheld AR.
- Google ARCore XR Plug-in: Android handheld AR.
- OpenXR Plug-in: OpenXR runtime support for headset workflows.
- Unity OpenXR: Meta: Meta Quest passthrough AR provider and features.
- Apple visionOS XR Plug-in: Apple Vision Pro context—not a main course tutorial path.
AR Foundation does not implement AR features by itself. The selected provider plug-in determines which features are actually available on the target device. When planning a project, verify feature availability for your target platform(s), install the corresponding provider plug-ins, and review Unity and manufacturer documentation before configuring managers in the scene.
Key Features
Several key features are provided by AR Foundation, forming the essential building blocks for AR applications—from simple demonstrations to complex interactive experiences. Not every provider supports every AR Foundation feature. Plane detection, image tracking, occlusion, meshing, anchors, face/body tracking, and environment probes vary by platform and device. Treat the list below as a conceptual inventory; confirm support on your target provider before relying on a feature in a tutorial or engineering workflow.
- Session: Manages the AR experience by enabling, disabling, and configuring AR sessions on the device.
- Device Tracking: Tracks the position and orientation of the device within the physical space.
- Camera: Renders images from the device’s camera while providing light estimation to integrate virtual content with real-world lighting conditions.
- Plane Detection: Identifies flat surfaces such as floors, tables, or walls—core to mobile tap-to-place workflows in this course.
- Bounding Box Detection: Detects and tracks bounding boxes around 3D objects (provider-dependent).
- Image Tracking: Recognizes and tracks 2D images in the real world for marker-based content.
- Object Tracking: Recognizes and tracks physical 3D objects (provider-dependent).
- Face Tracking: Detects and monitors human faces (provider-dependent; more common on supported mobile devices).
- Body Tracking: Captures and follows human body pose (advanced; provider-dependent).
- Point Clouds: Detect feature points in the environment that help map spatial structure.
- Ray Casts: Cast virtual rays to interact with detected surfaces and objects—used for tap-to-place mobile AR.
- Anchors: Attach virtual objects to fixed points in the physical world for stable placement.
- Meshing: Generates a mesh representation of the physical environment for occlusion or collision (provider-dependent).
- Environment Probes: Capture environmental lighting and reflections (provider-dependent).
- Occlusion: Renders virtual content behind physical objects using depth data (provider-dependent).
- Participants: Support multi-user shared sessions (advanced; provider-dependent).
Most AR scenes need an
AR Sessionand anXR Origin. Add AR Foundation managers such asAR Plane Manager,AR Raycast Manager,AR Camera Manager, orAR Tracked Image Managerto theXR Originas needed. Managers enable corresponding subsystems when supported by the active provider. Install the required platform provider packages via the Package Manager before configuring components.
Setting Up an AR Project
Now, let’s configure a Unity project for AR development using AR Foundation. This involves installing required packages and settings, setting up the Universal Render Pipeline (URP), creating an AR-ready scene, and deploying your project to an iOS or Android device. To make this concrete, let’s bring the virtual drone from XFactory into the (physical) room via AR. This session focuses on handheld mobile AR setup; Quest passthrough AR uses the same AR Foundation concepts but requires OpenXR/Meta provider settings and device-specific validation covered in later Module E sessions.
AI-generated AR Foundation instructions often mix older
AR Session Originworkflows, mobile-only setup, provider-specific SDK steps, and Quest passthrough/OpenXR settings. When AR fails, verify target platform, provider plug-in, XR Plug-in Management,AR Session,XR Origin, AR camera background/passthrough, permissions, and physical device support before rewriting scripts.
Install AR Foundation
AR Foundation is available via the Unity Package Manager and provides the common interfaces to access AR features. This package allows you to develop AR apps in a standardized way across multiple devices. It acts as the core framework to which platform-specific providers are attached. To install:
- Create a new project using the
Universal 3Dtemplate. Name itXFactoryAR. Click+ Create projectto open it. - Open Unity Editor and navigate to
Window > Package Manager. - In the
Package Manager, locate and installAR FoundationinUnity Registry.
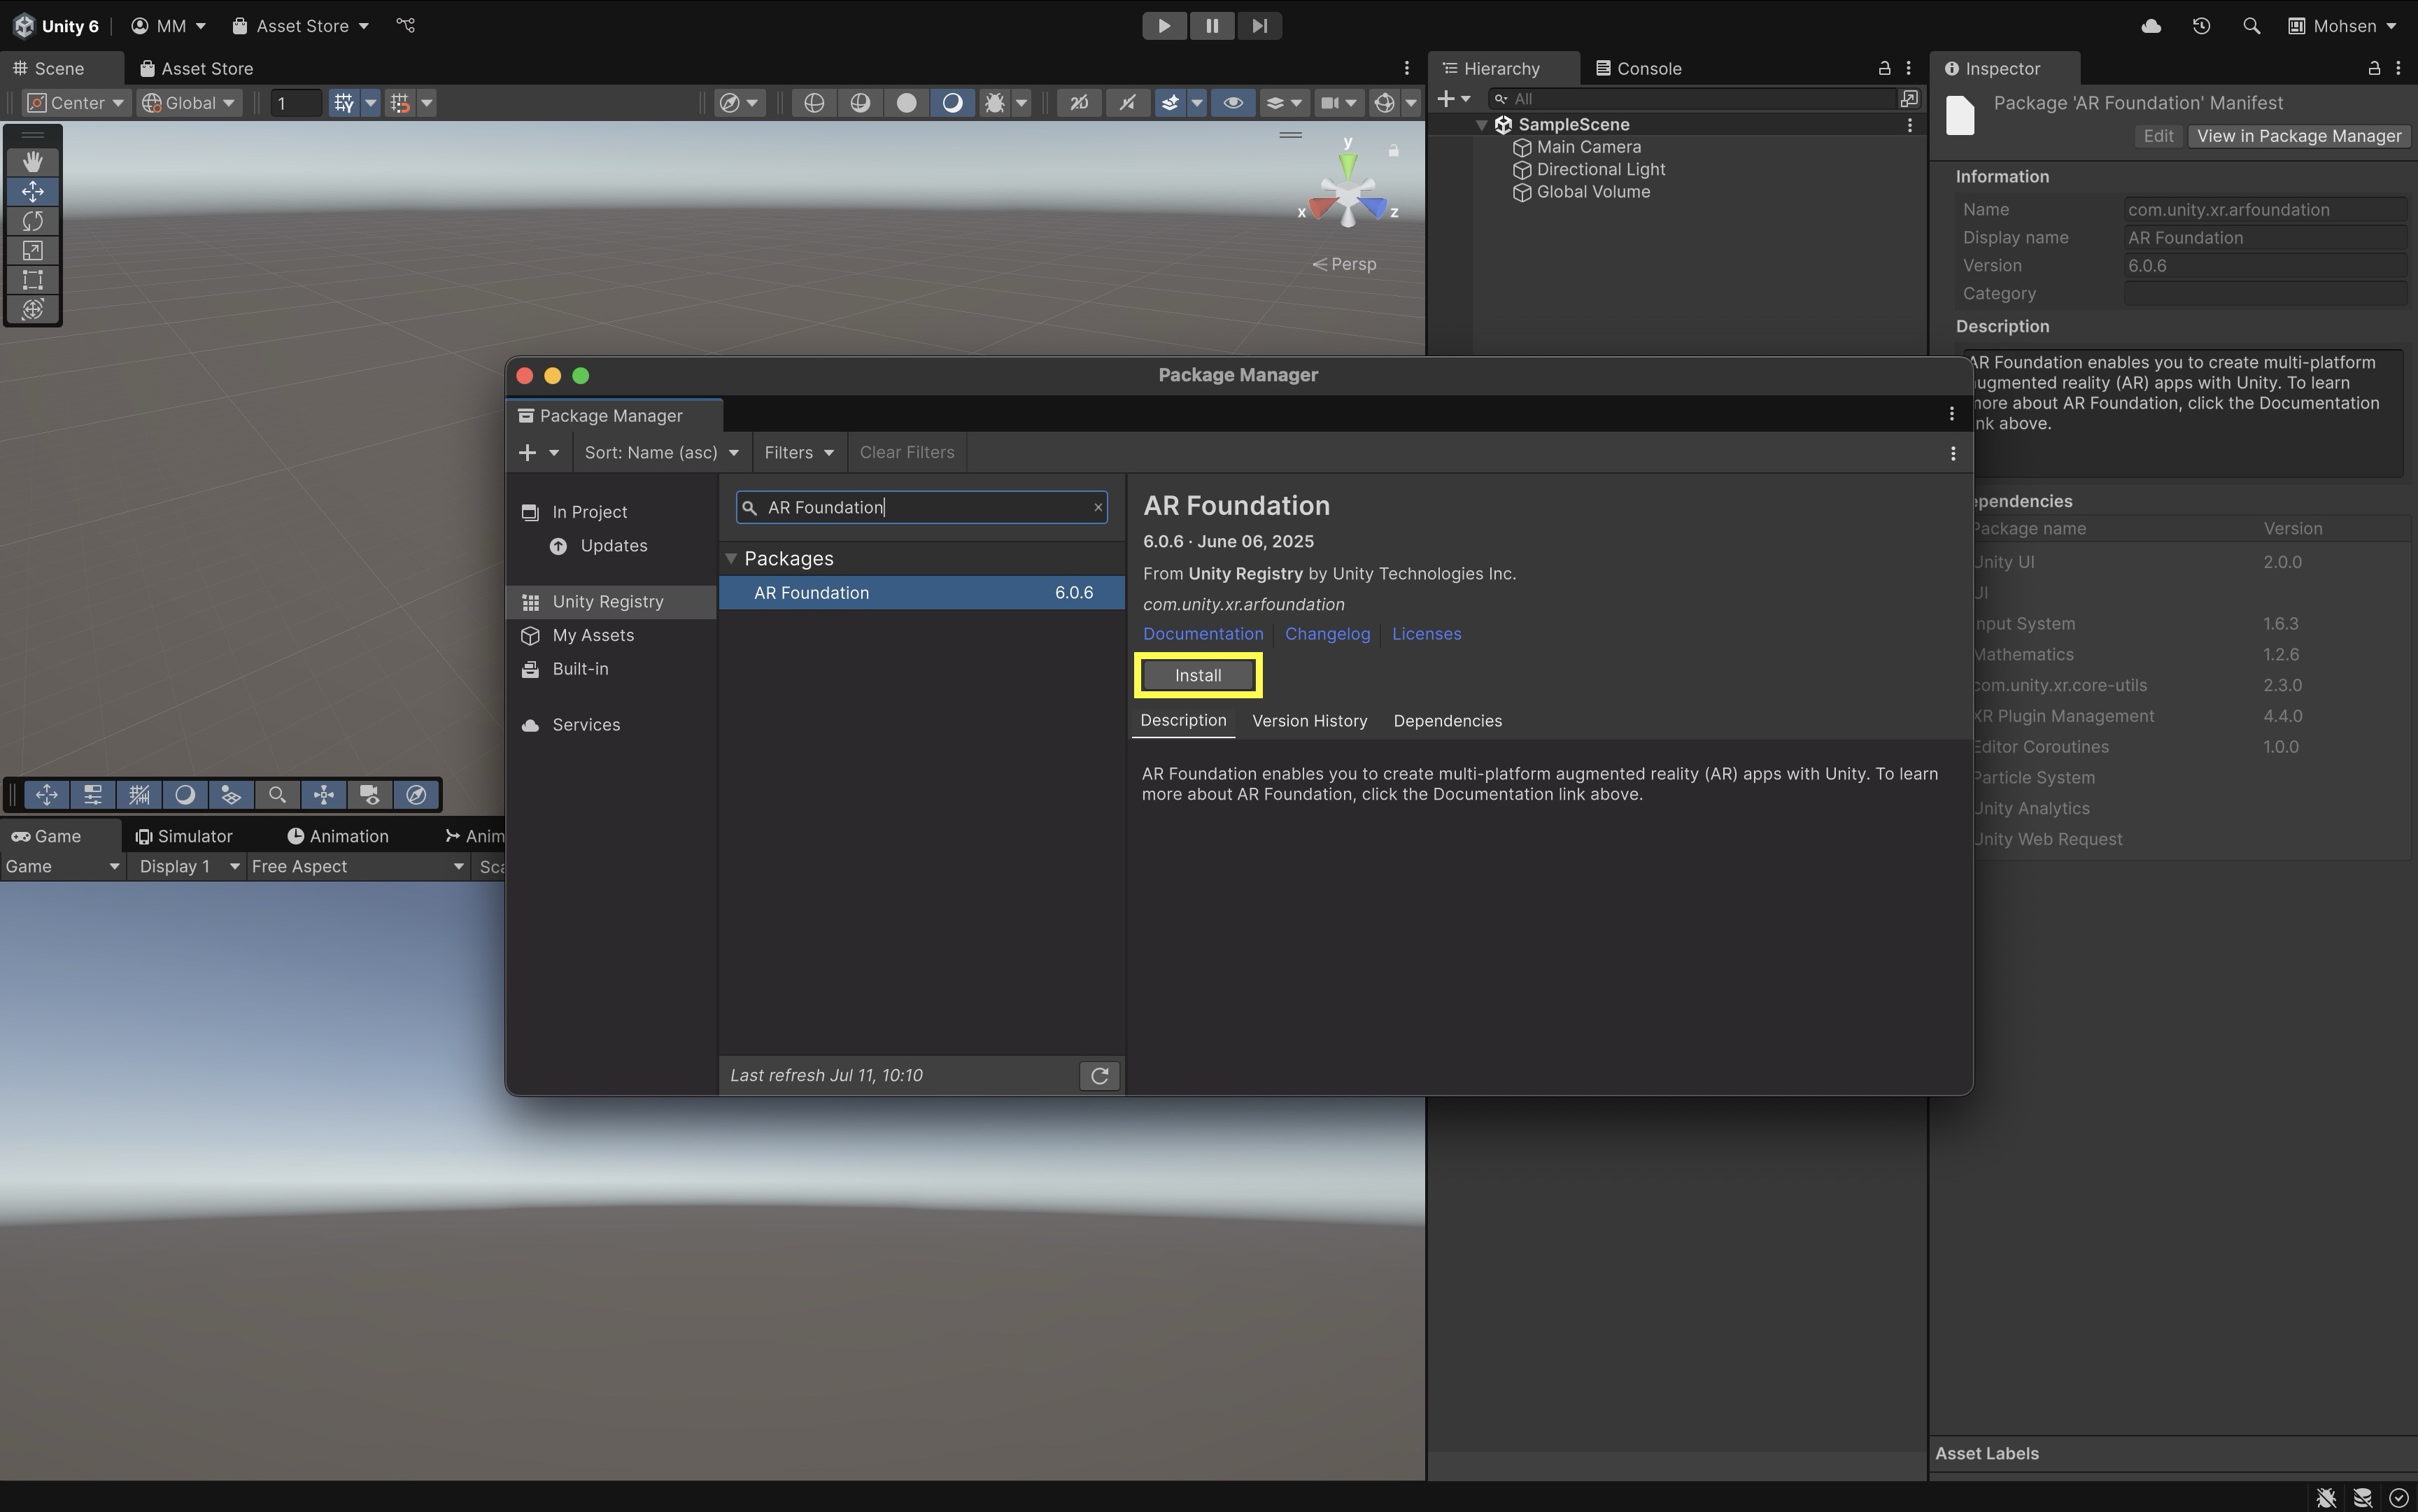
Installing AR Foundation is critical for building the basic AR framework and functionalities in your project.
Install Provider Plug-ins
The provider plug-ins implement AR features for specific target platforms. Each plug-in bridges AR Foundation calls to the native AR SDK of the device, ensuring compatibility and optimal performance. They are essential for unlocking the full functionality of AR on each respective platform. Some plug-ins require extra project configuration to enable optimal performance and functionality. Proper project settings ensure that all AR features work seamlessly across devices. It also helps prevent runtime issues by aligning project configurations with each provider’s requirements. To install:
- Navigate to
Edit > Project Settings > XR Plug-in Management. - If prompted, click
Install XR Plug-in Management. - Once installed, choose your target platform tab. If iOS, check
ARKit. If Android, checkARCore. - Unity will now automatically install the required provider packages:
ARKit XR Pluginfor iOS orARCore XR Pluginfor Android.
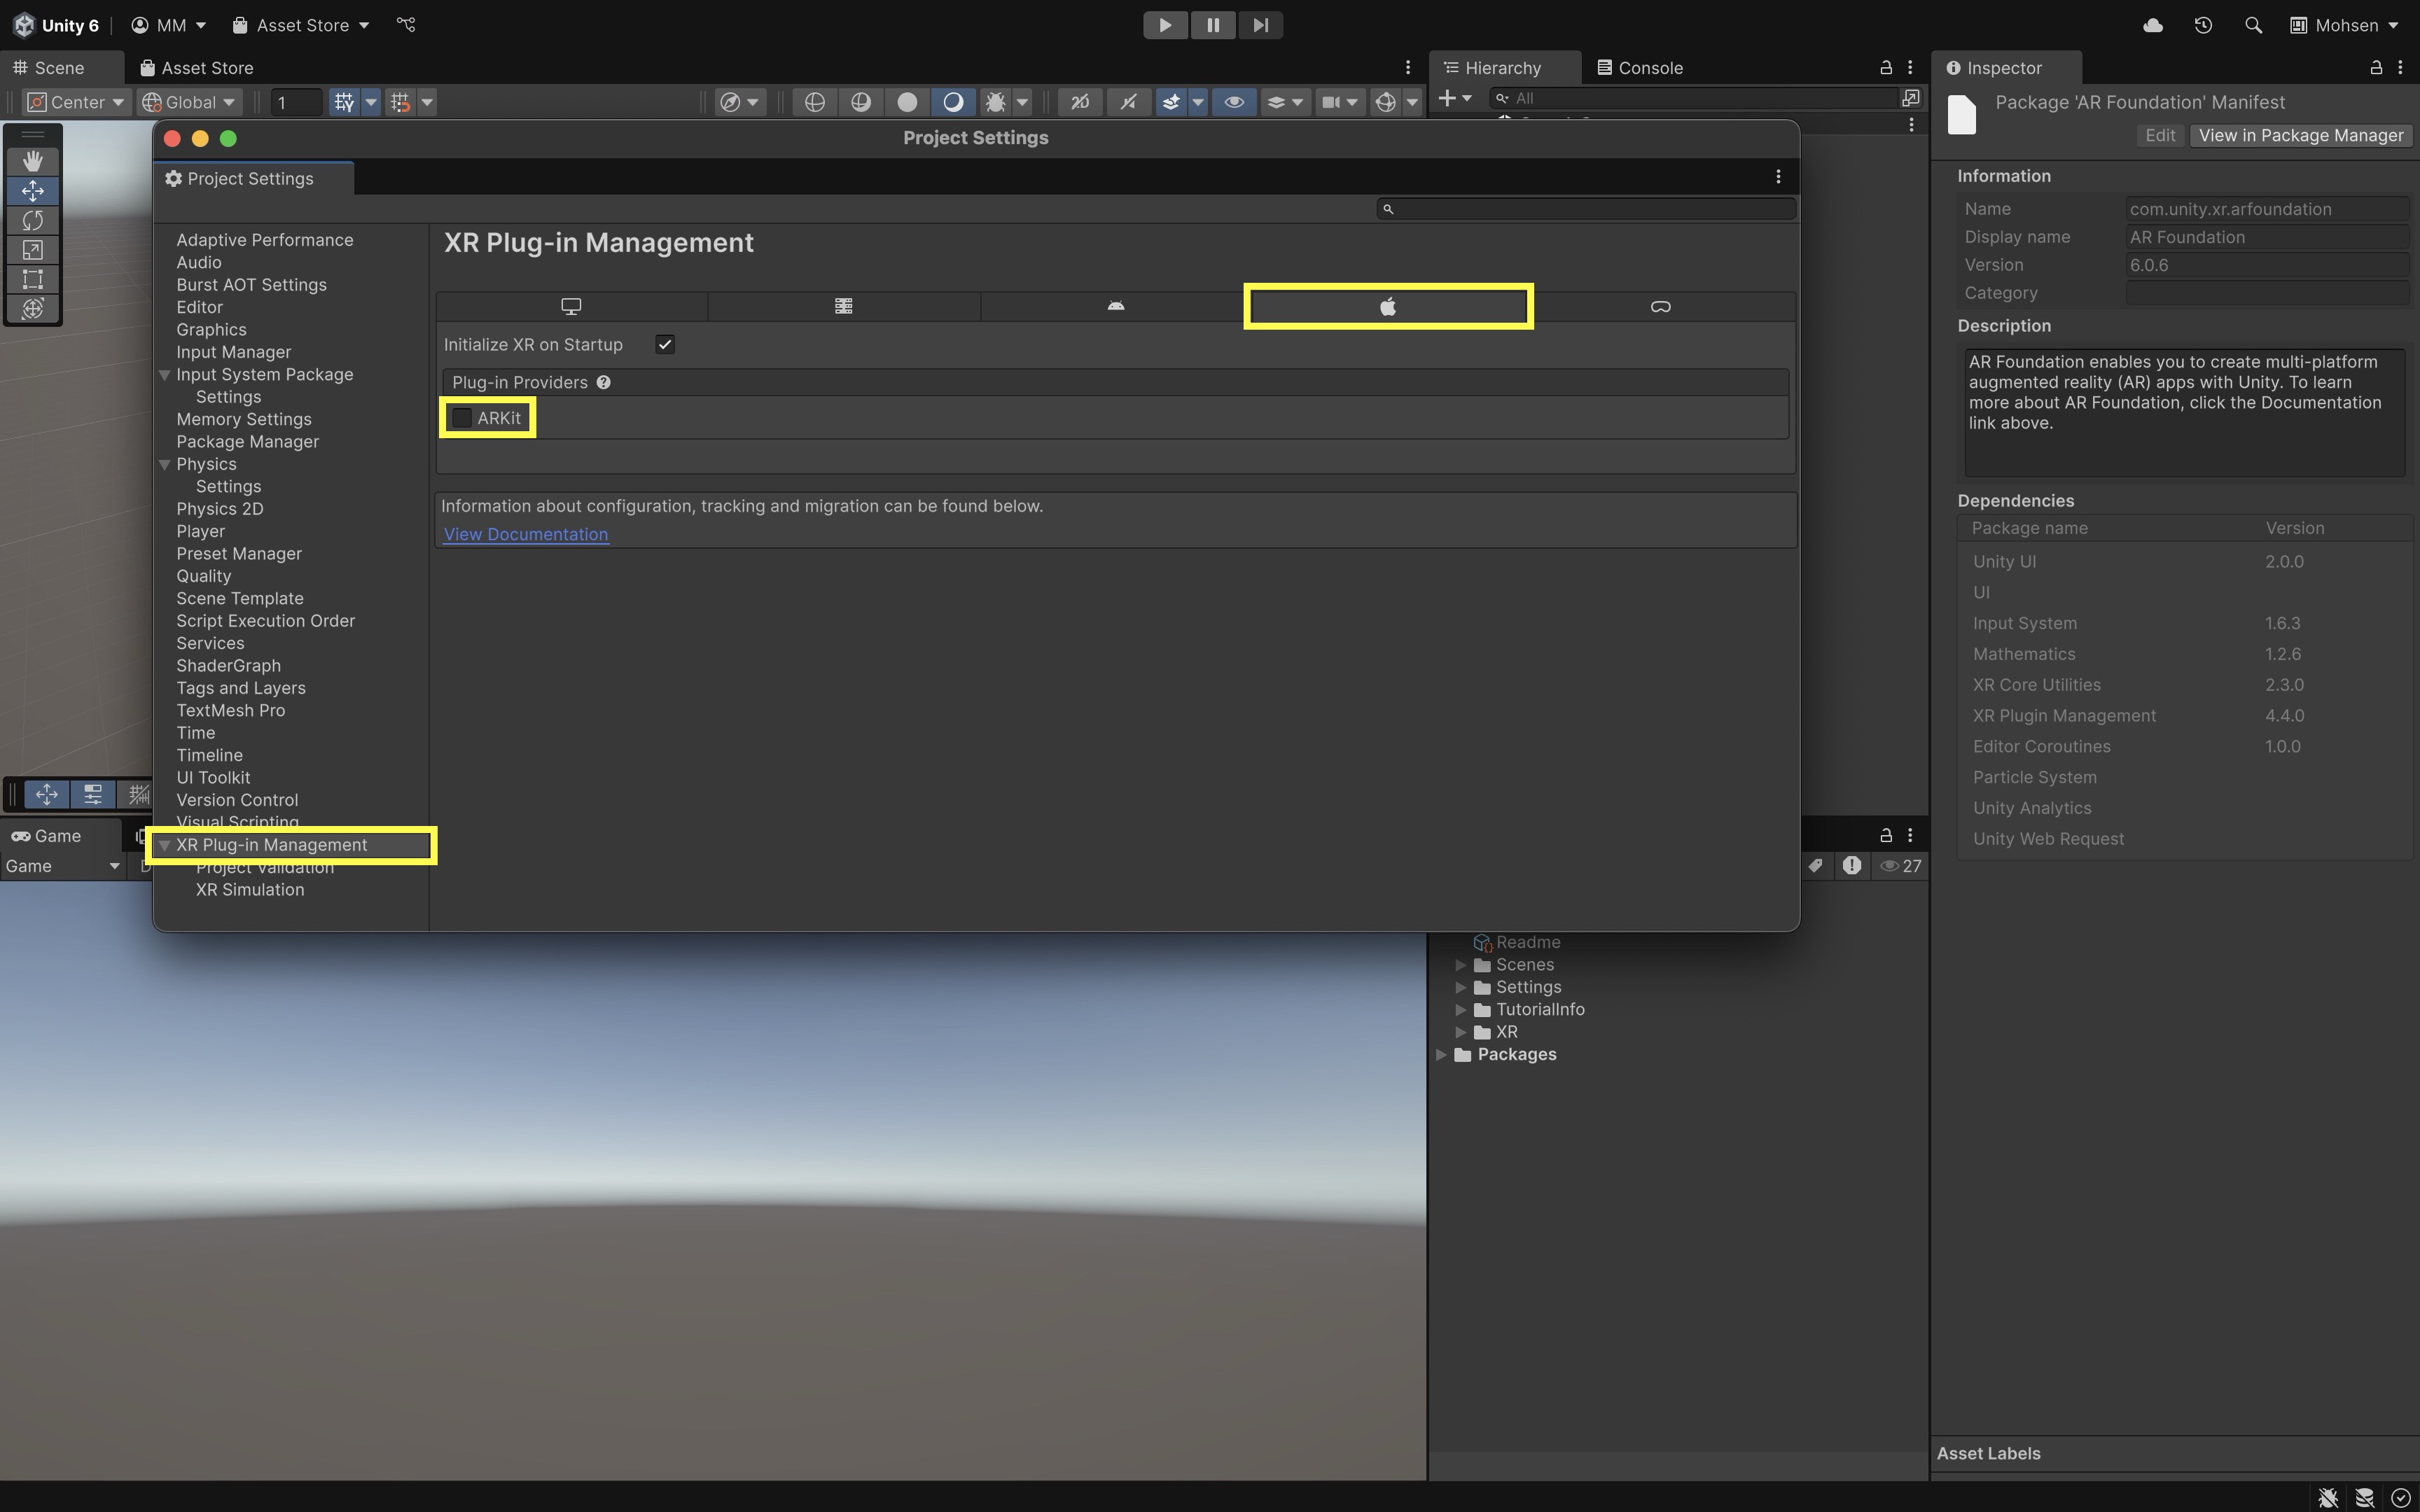
For Meta Quest passthrough AR, the provider path differs from ARCore. Use the Android build target plus OpenXR and Unity OpenXR: Meta provider features—not ARKit or ARCore. Configure passthrough camera/background support, then validate passthrough, input, occlusion, anchors, and performance on a physical Quest device.
Set Up an AR Scene
Correctly setting up your AR scene ensures that virtual objects align with the physical world, that tracking works reliably, and that AR content is rendered from the device’s perspective.
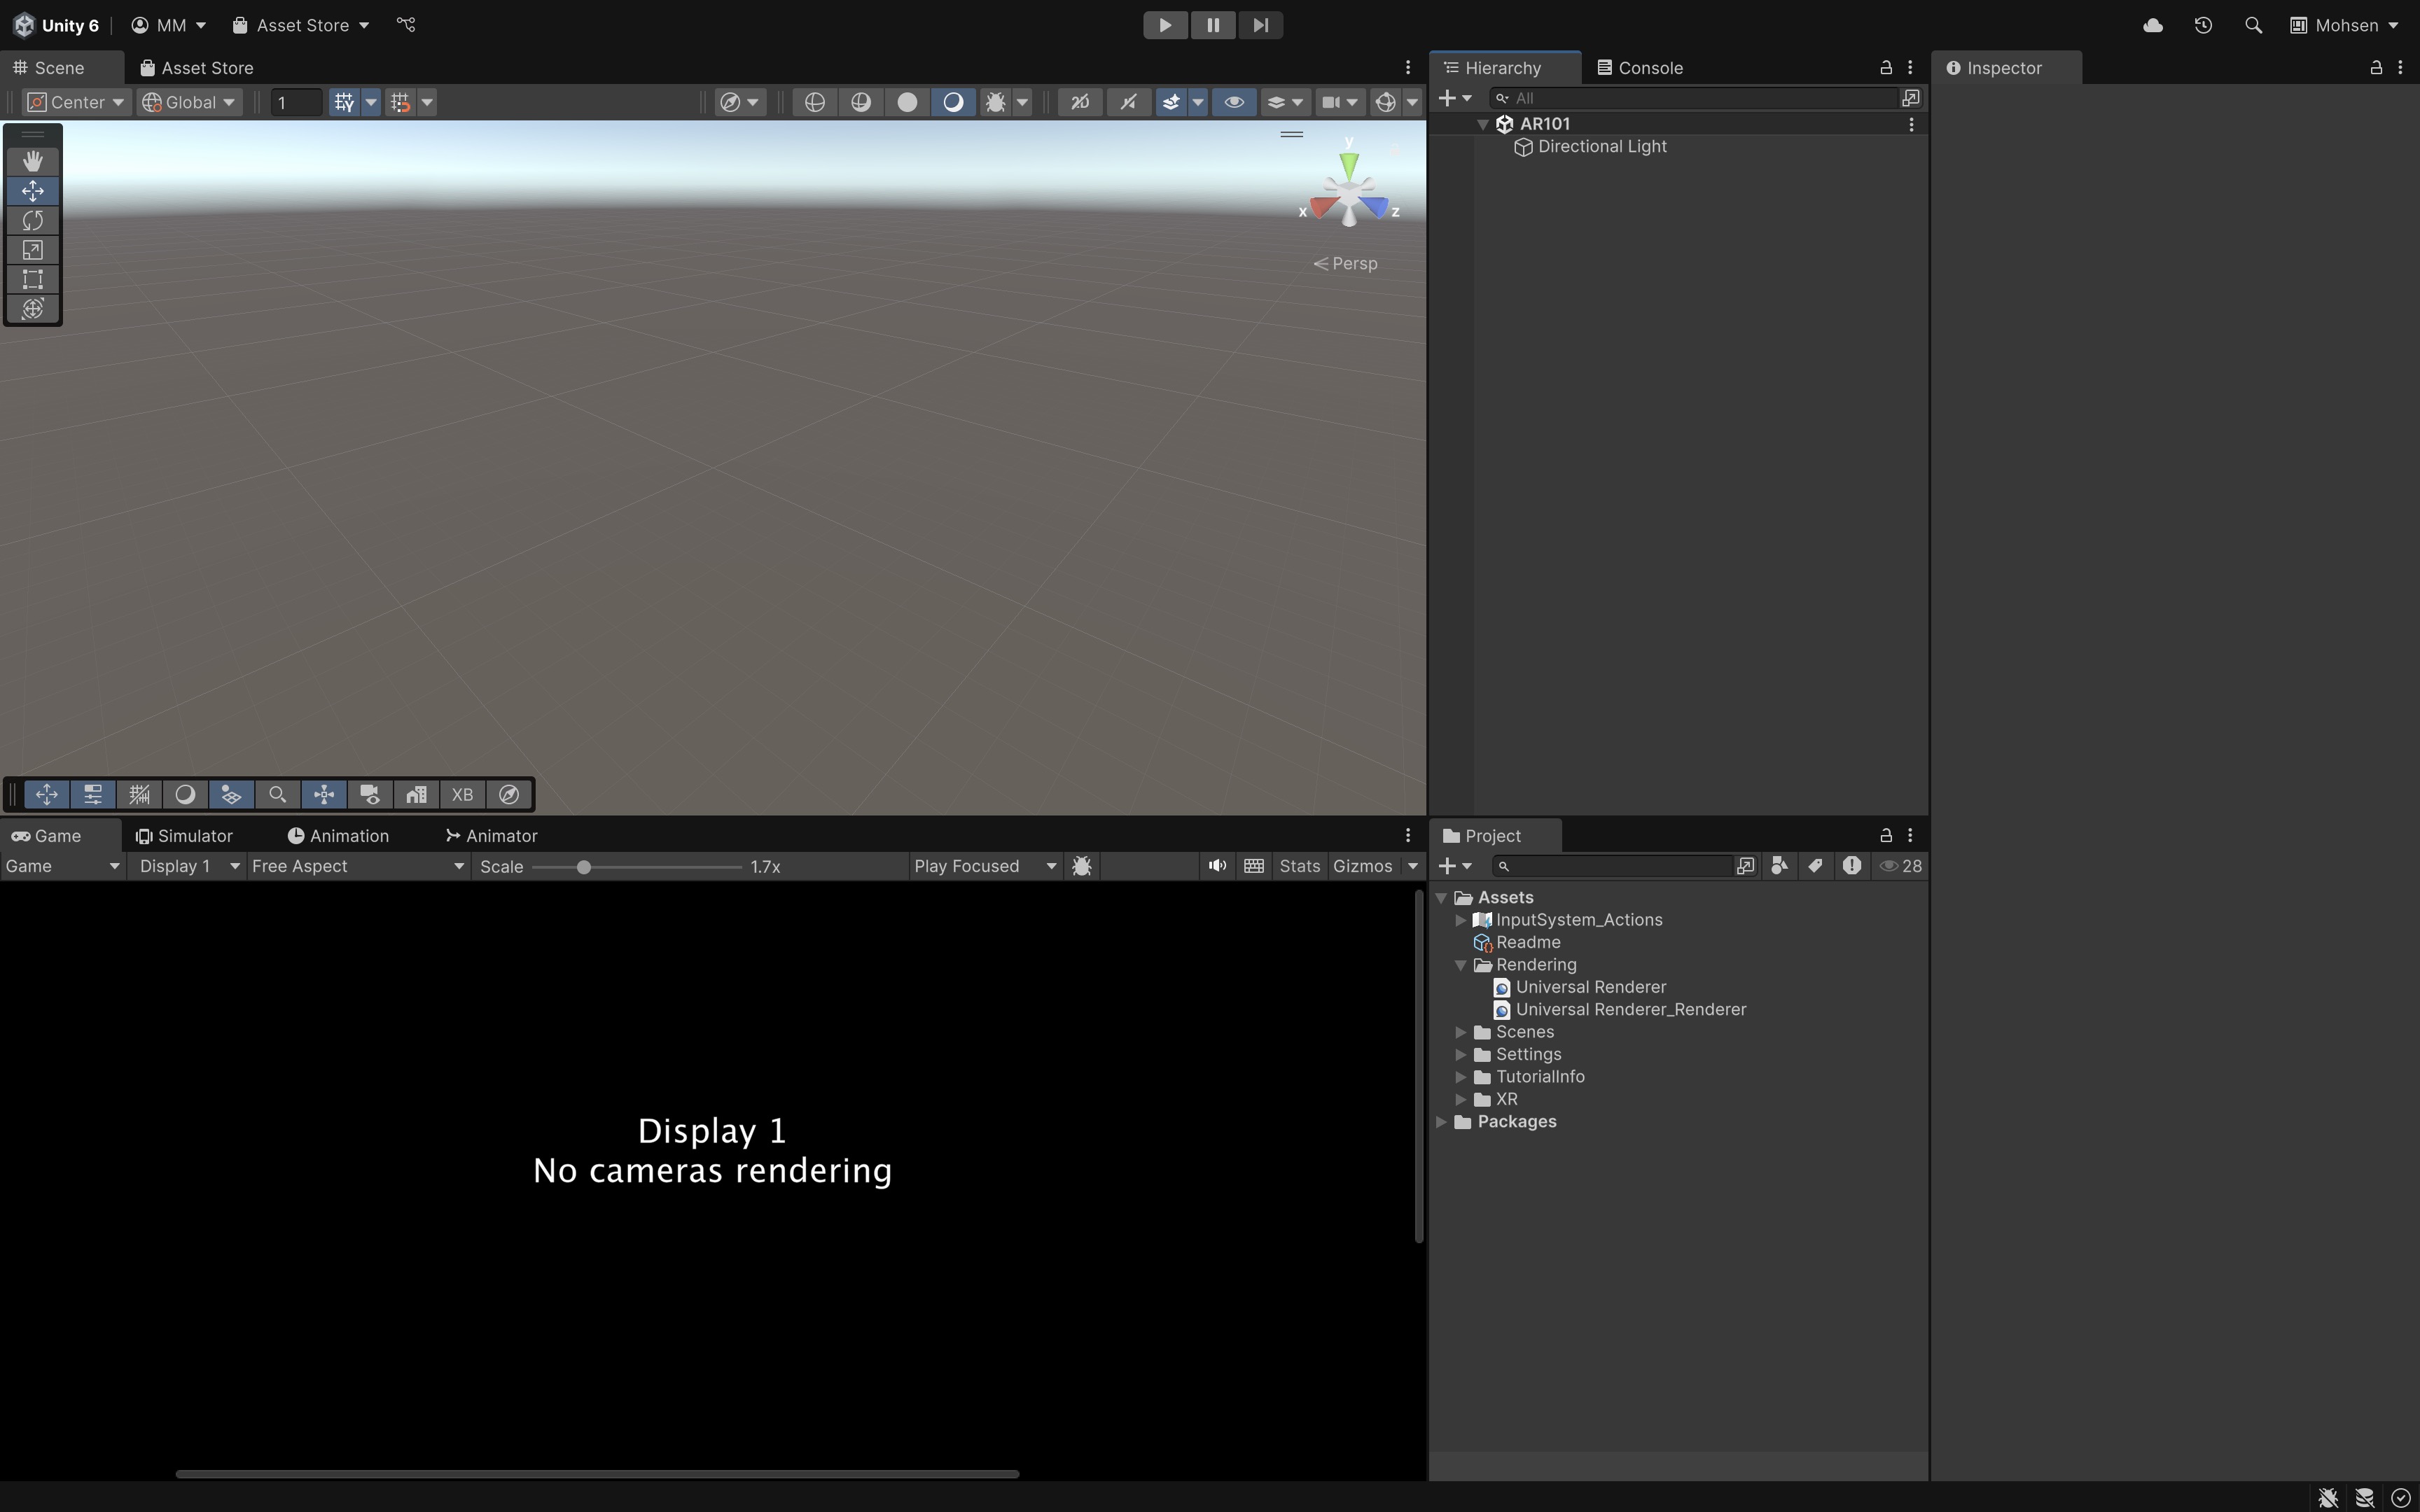
- Start with a Clean Scene:
- Delete the default
Main Camera. This is replaced by the camera inside theXR Originprefab. - Keep or customize the default
Directional Light. Delete it only if you plan to use environmental lighting or AR light estimation. - Delete the default
Global Volume(if present), unless you are intentionally using post-processing effects compatible with URP and AR. These can often interfere or add unnecessary complexity in early AR prototyping. - Save it as
AR101scene.
- Delete the default
- Add
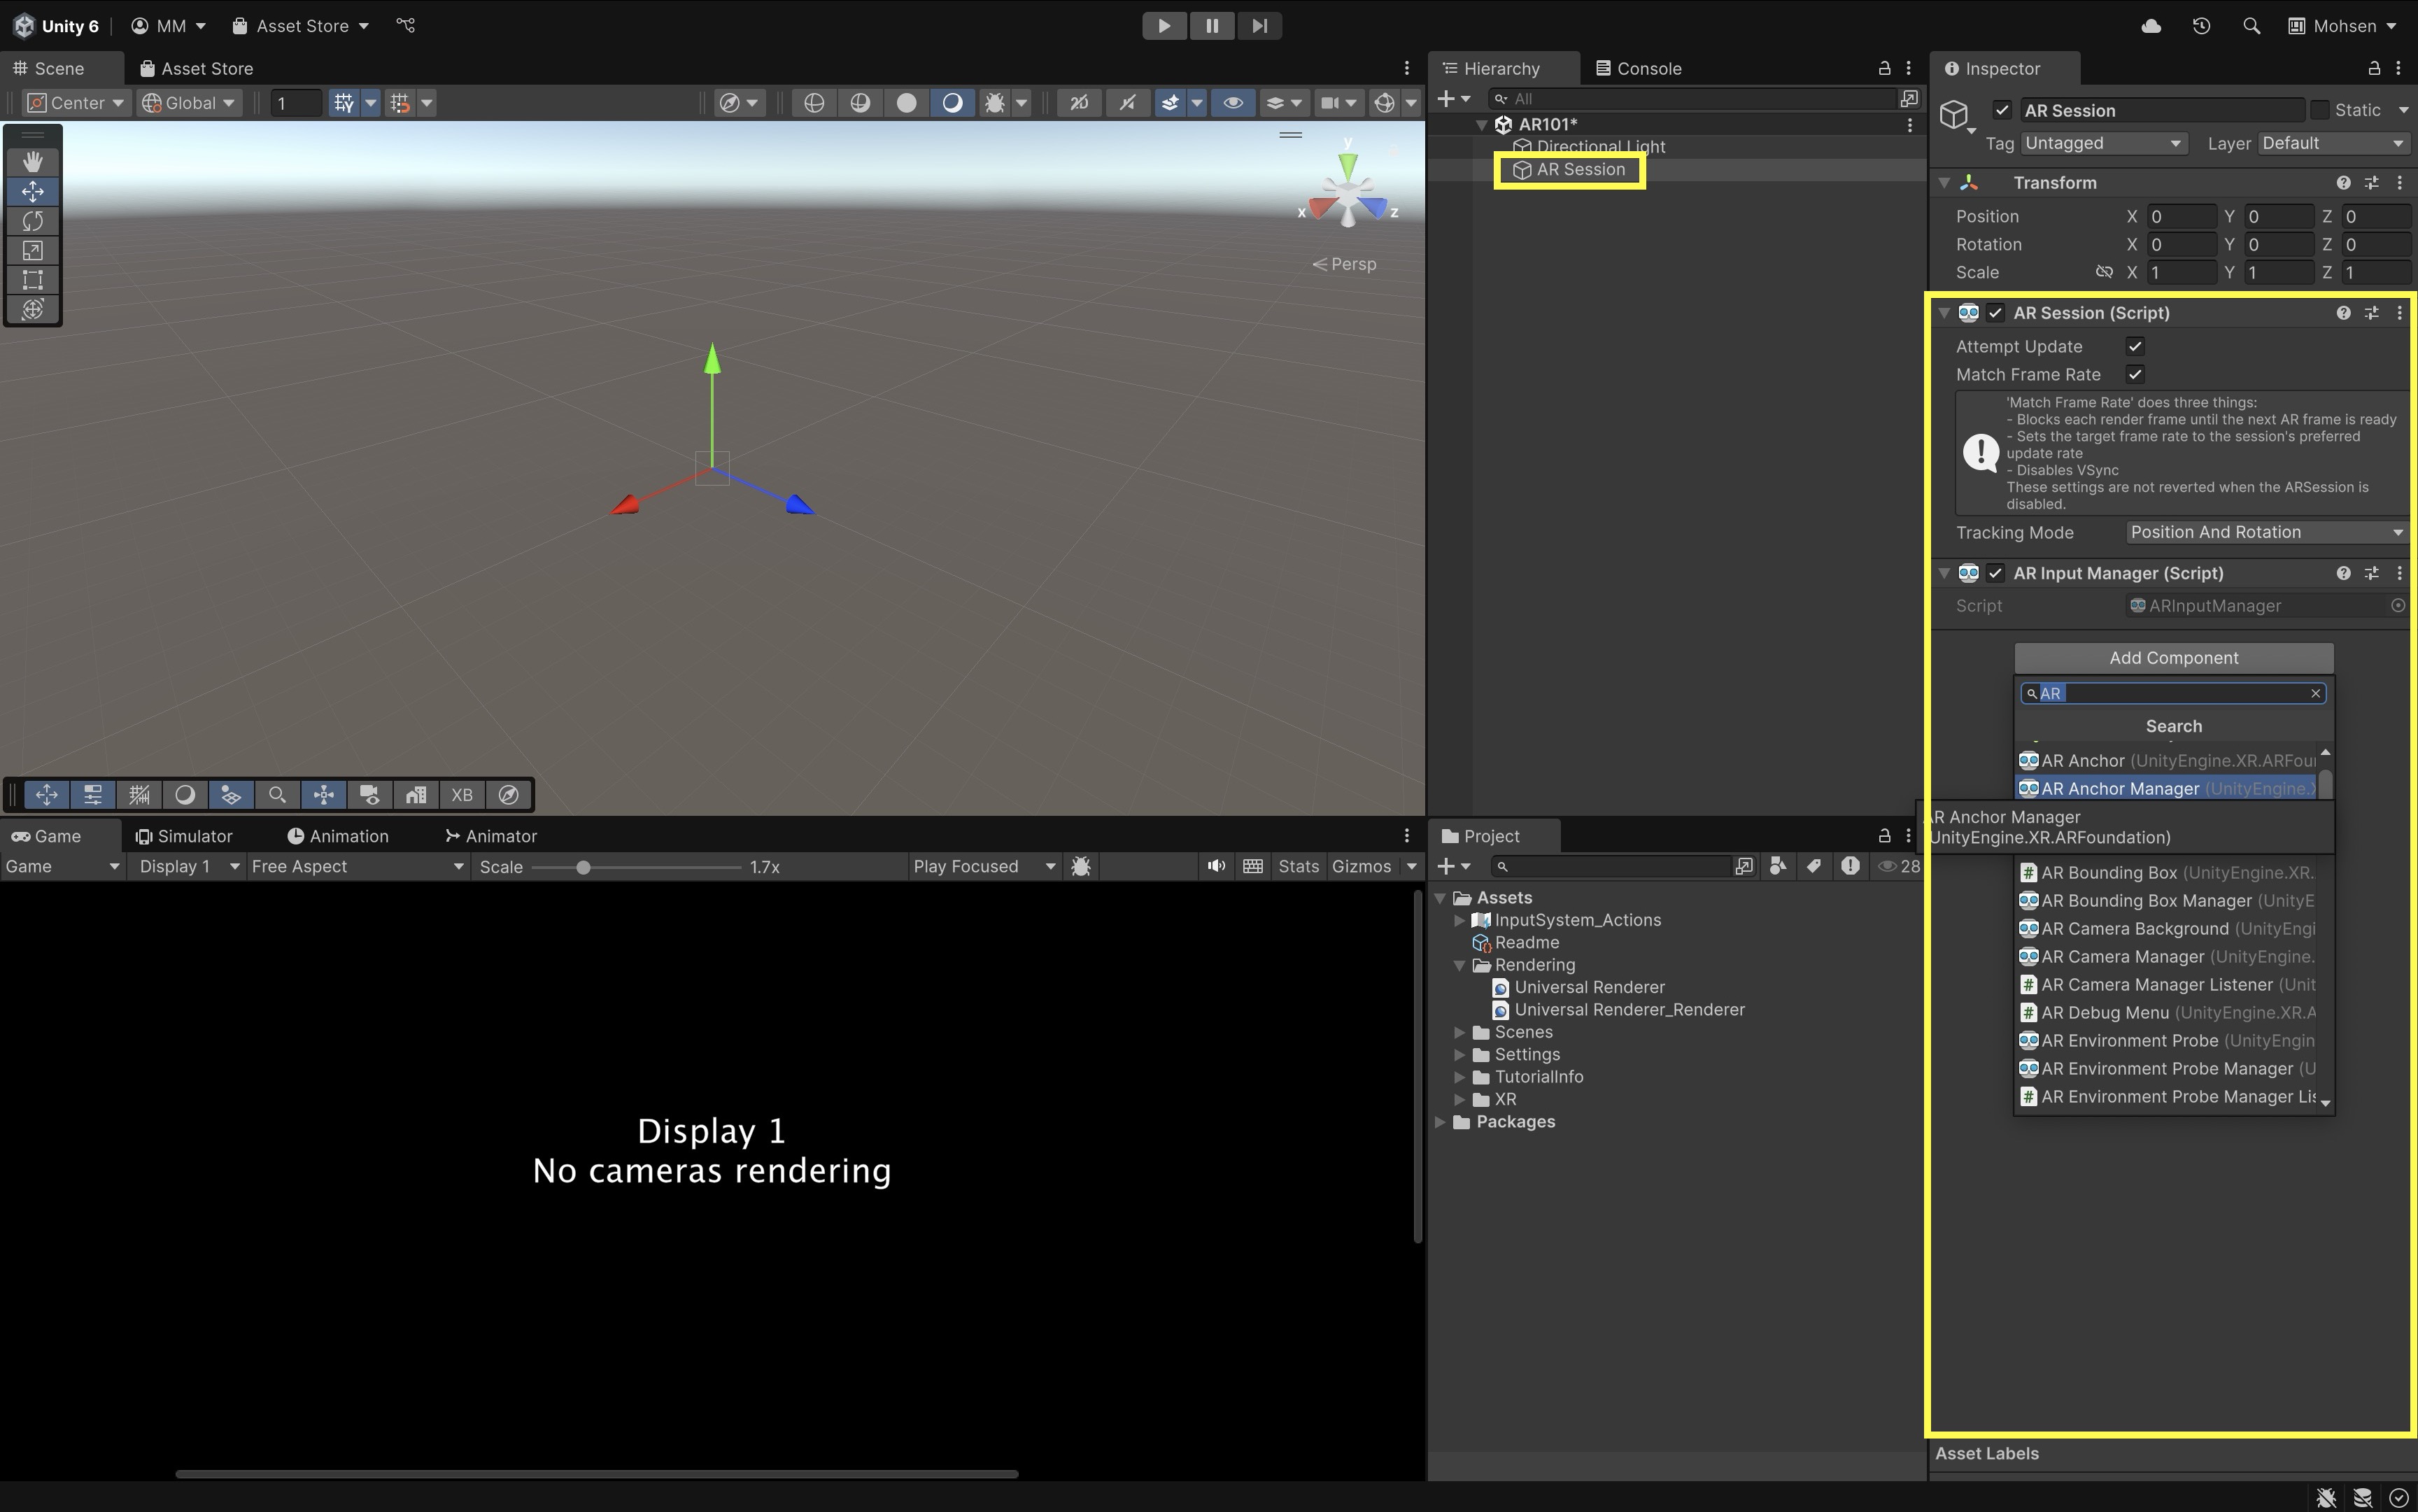
AR Session:- In the
Hierarchy, right-click and go toXR > AR Session. This creates theAR Sessionobject, which initializes and manages the AR system. It is essential for tracking and accessing features like plane detection and light estimation using various managers (components).
- In the
- Add
XR Origin (Mobile AR):- Right-click again and select
XR > XR Origin (Mobile AR). This adds theXR Originprefab, which includes an AR-compatible camera and the proper spatial hierarchy to reflect the user’s device in the virtual space. - Confirm the
XR Originstructure. It should containCamera Offset > Main Camera(tagged asMainCamera).
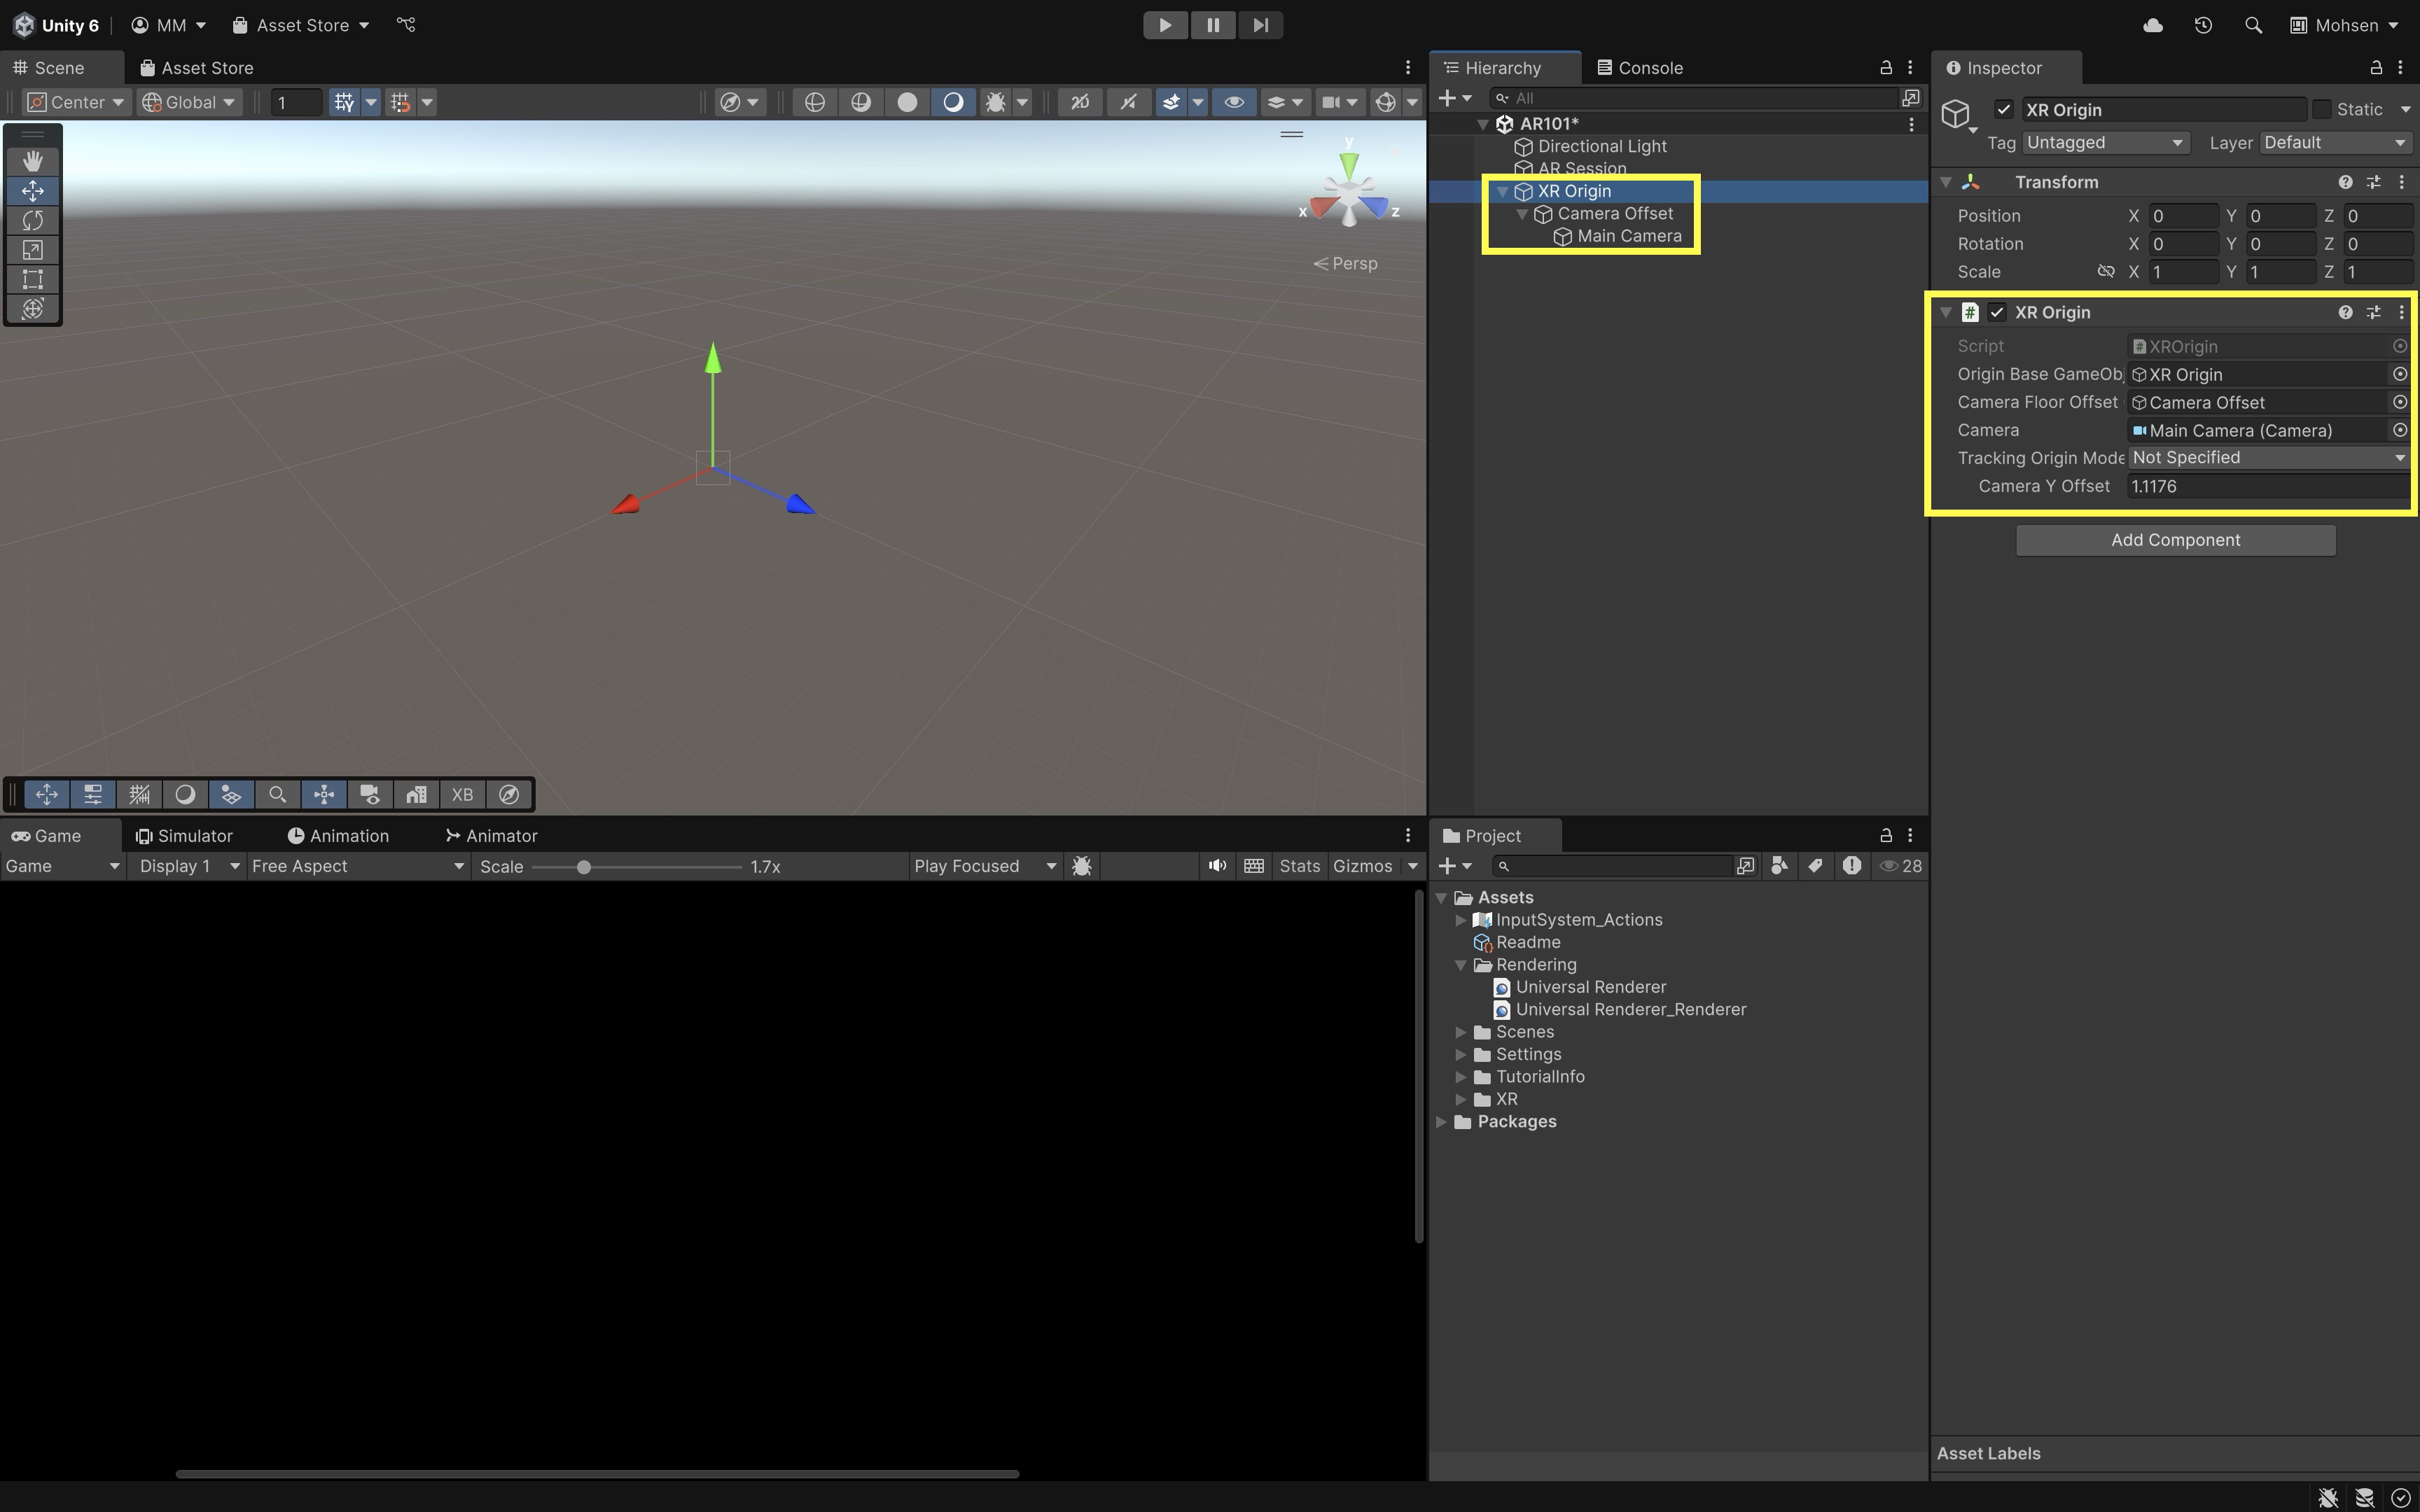
This
Main CameraunderXR Originwill automatically follow the device’s position and orientation in the real world. - Right-click again and select
- Configure AR Camera Settings:
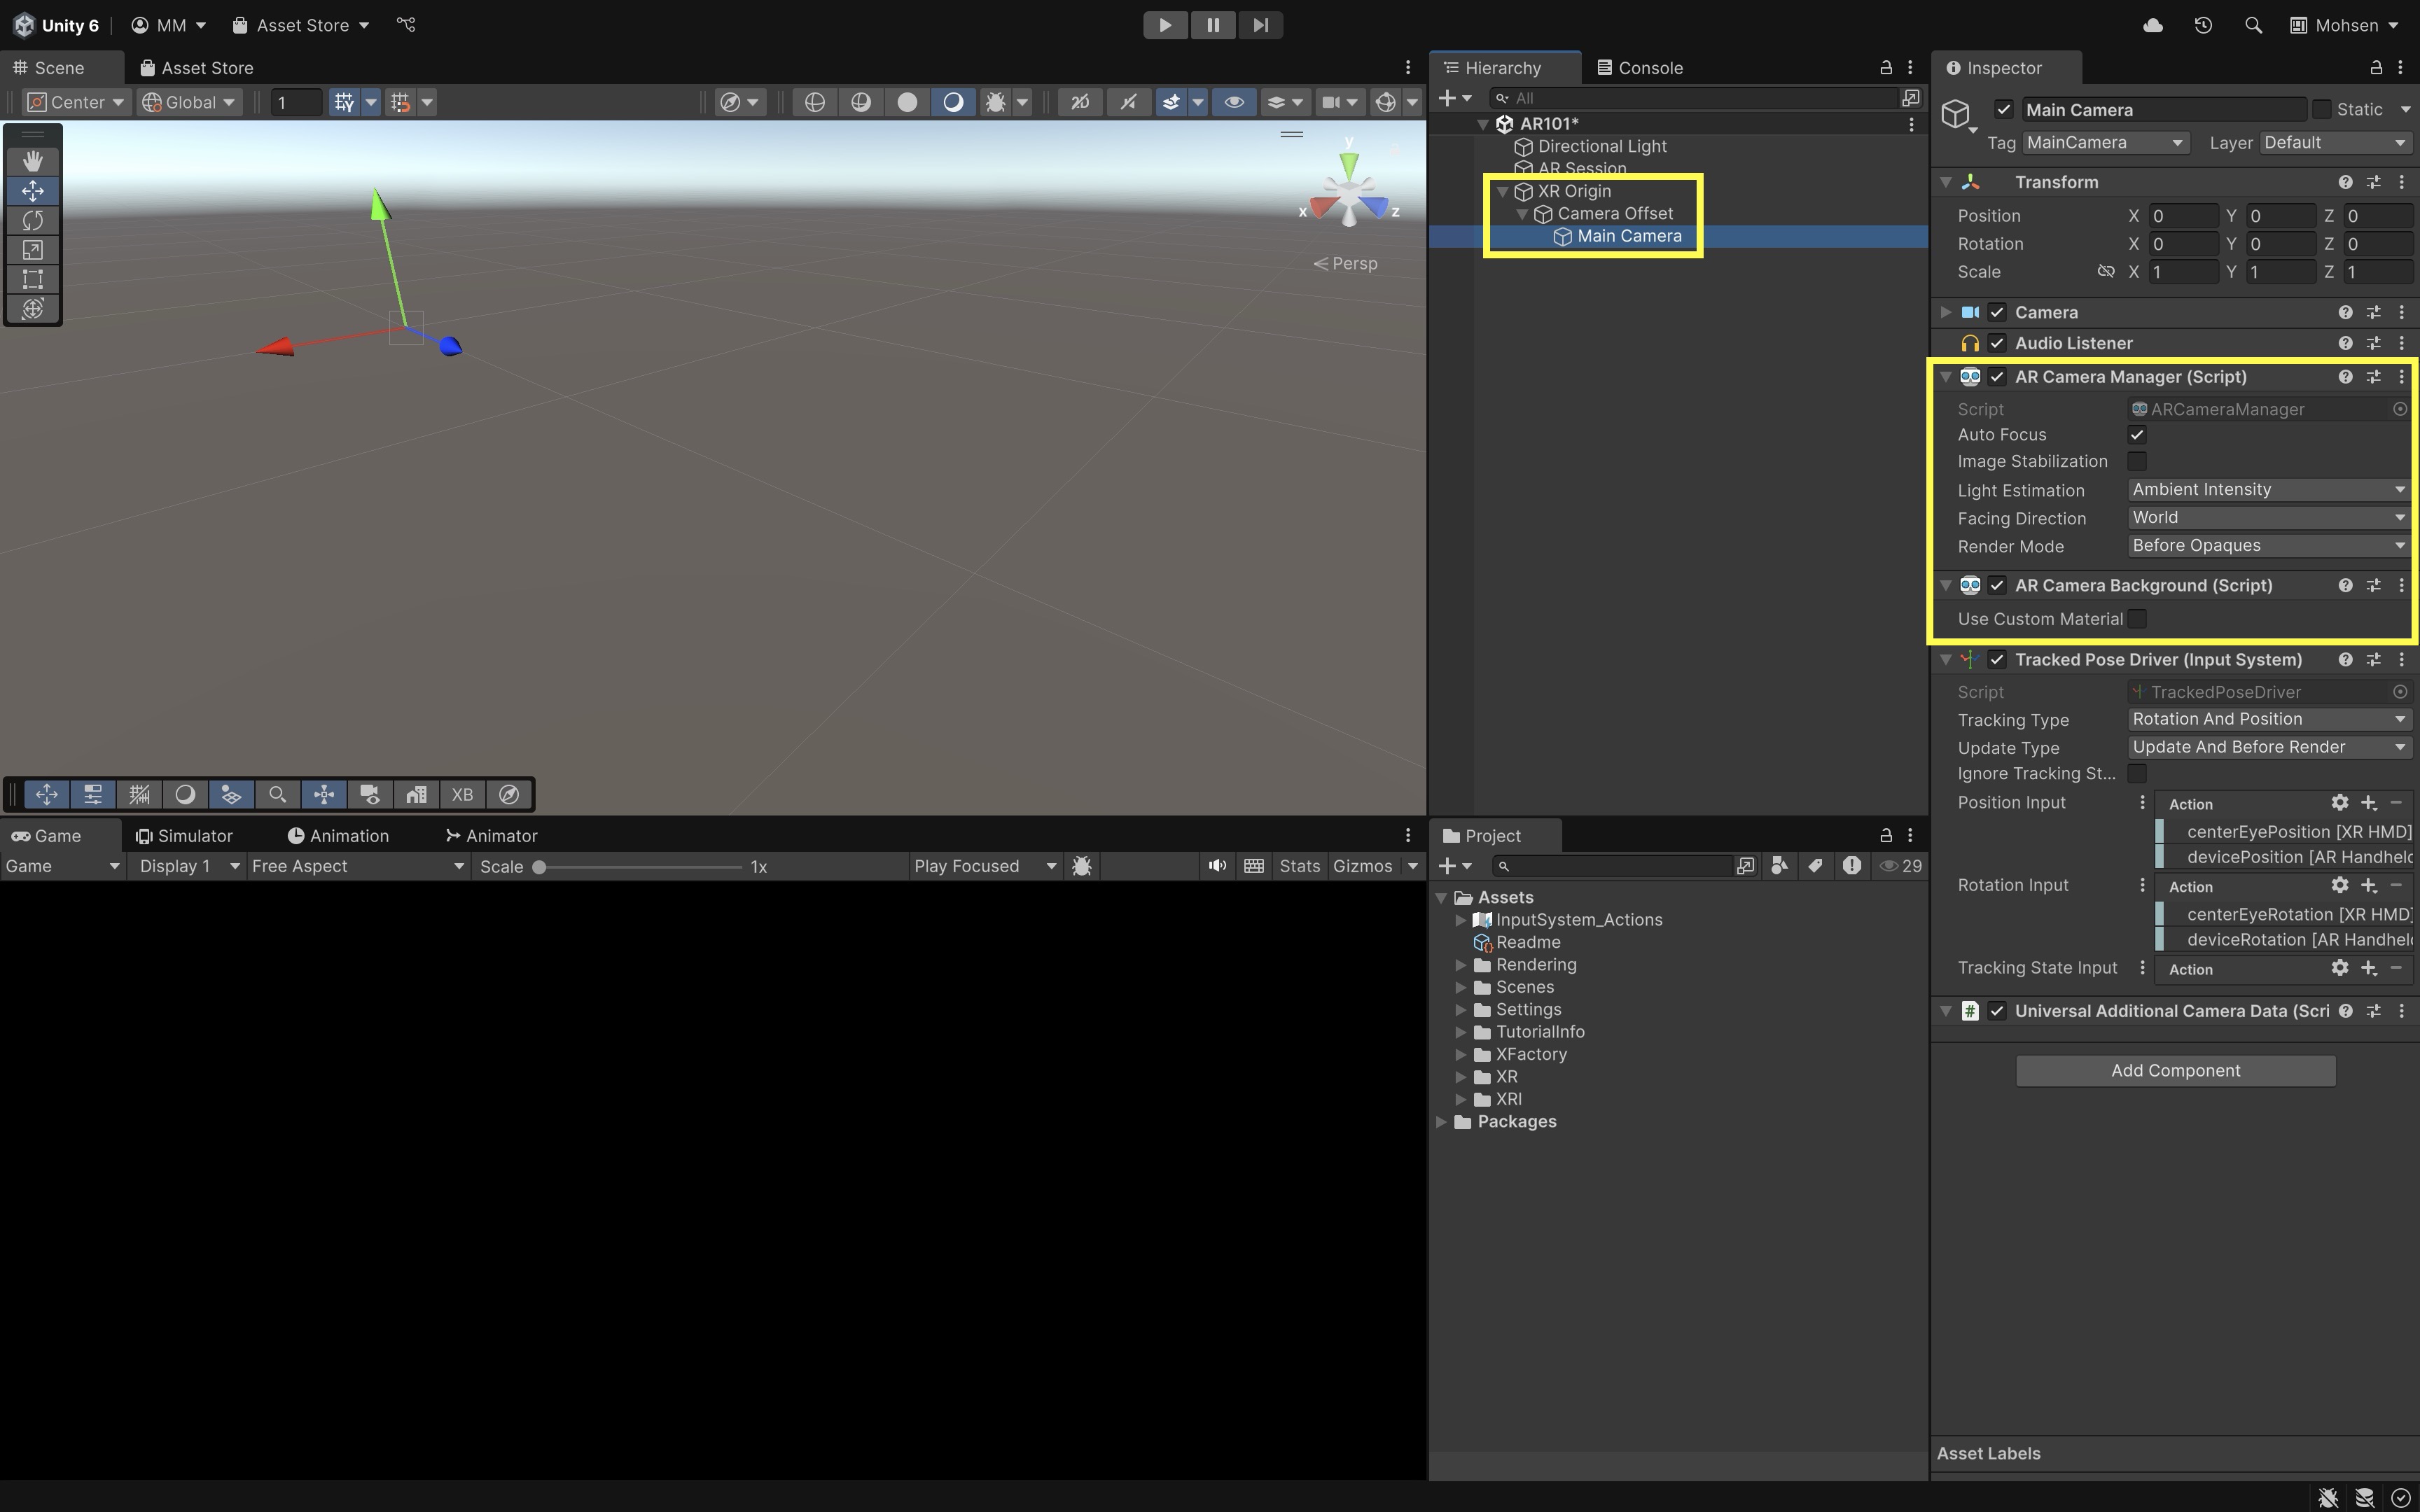
- Select the
Main Camerainside theXR Origin. - Locate the
AR Camera Managercomponent. - Enable
Auto Focusto keep the physical camera lens focused automatically. Useful for dynamic scenes or close-up content. - Choose an appropriate
Light Estimationsetting. For example,Noneuses no light data from the environment,Ambient IntensityorAmbient Spherical Harmonicsenable virtual objects to reflect real-world lighting conditions, andEnvironmental HDR(if supported) enables realistic lighting and reflections, but may reduce performance on lower-end devices. - Set
Facing DirectiontoWorld(back camera) for most AR use cases. UseUser(front camera) only for face-tracking or selfie-style AR experiences. - Set
Render ModetoBefore Opaquesunless you have a custom render ordering need. This mode ensures the camera feed renders before your AR content. - Also, on the
Main Camera, configure theAR Camera Backgroundcomponent. - Leave
Use Custom Materialunchecked for most cases. AR Foundation automatically uses a platform-appropriate shader to render the camera feed. Check this only if you’re applying a custom shader/material (e.g., to add visual effects like color tint, distortion, or depth blending).
- Select the
- Import Custom Assets:
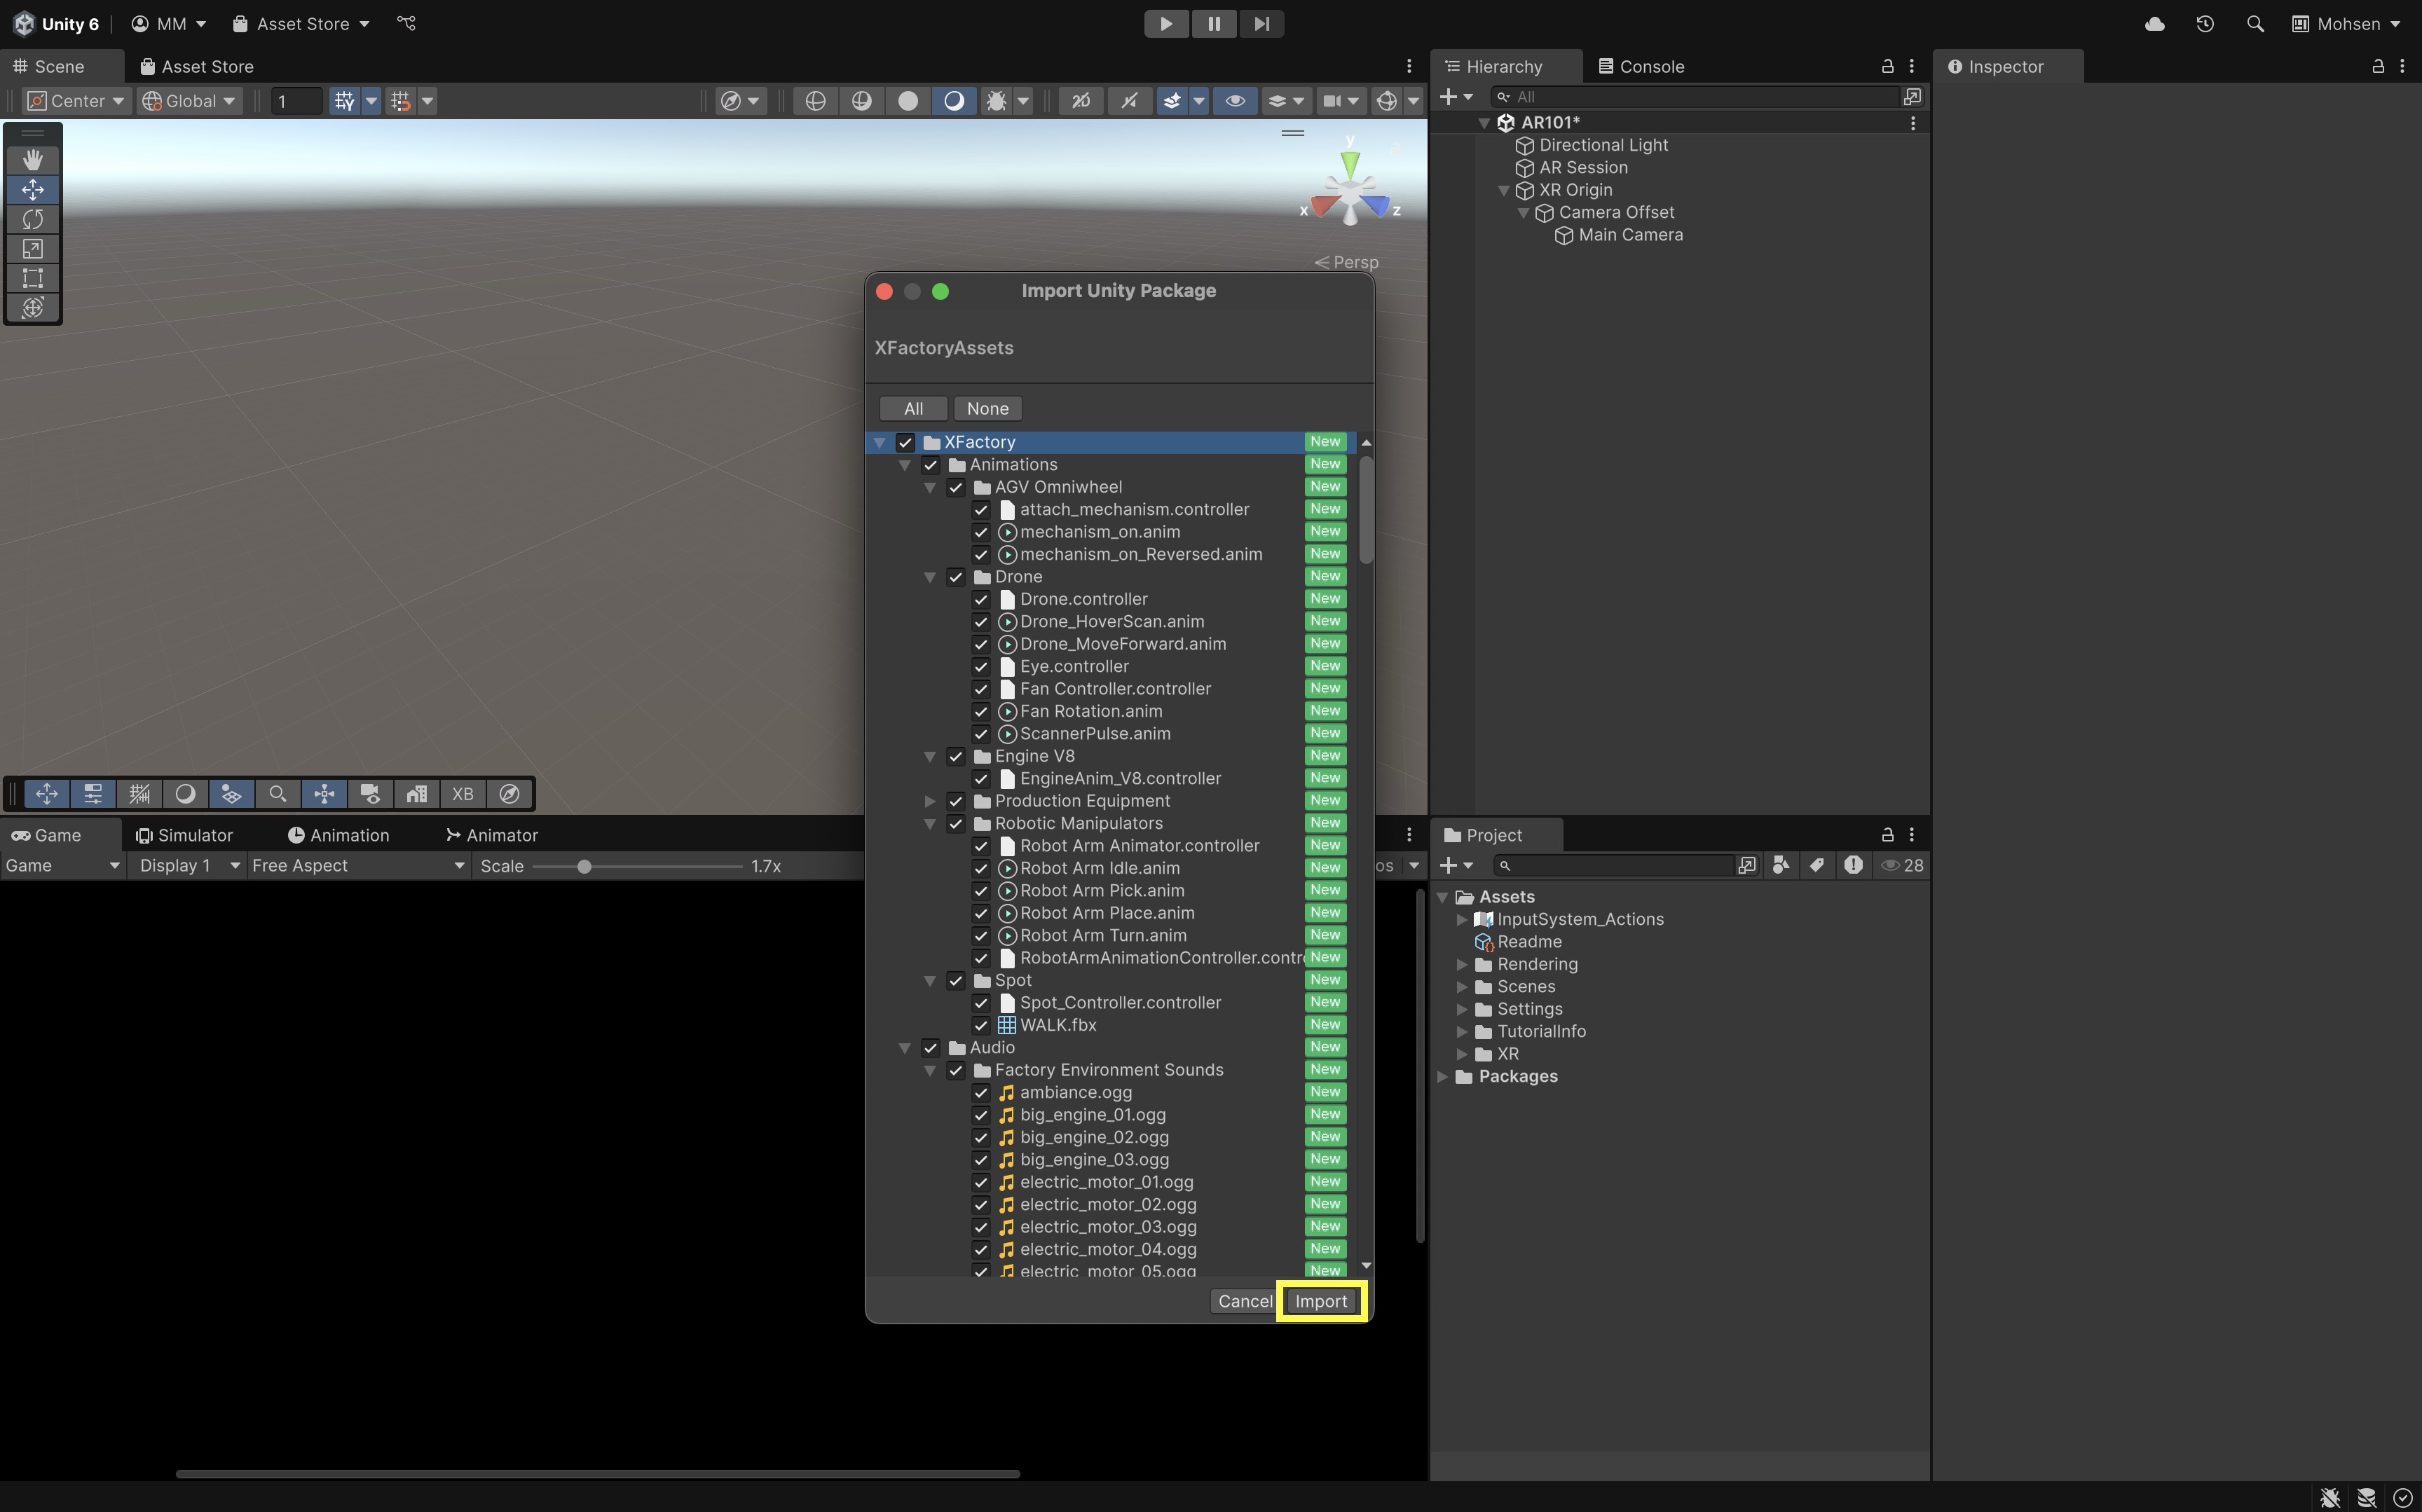
- Drag and drop the
XFactoryAssets.unitypackageinto yourProjectwindow or import them viaAssets > Import Package > Custom Package.... - In the import dialog, make sure all items are selected and click
Import.
- Drag and drop the
- Place the Drone into the Scene:
- Drag the
Droneprefab fromAssets > XFactory > Prefabs > Droneinto theHierarchyas a top-level GameObject. - Select the
DroneGameObject in theSceneview and position it approximately 1.5 meters in front of the camera (e.g.,Position = (0, 0, 1.5)).
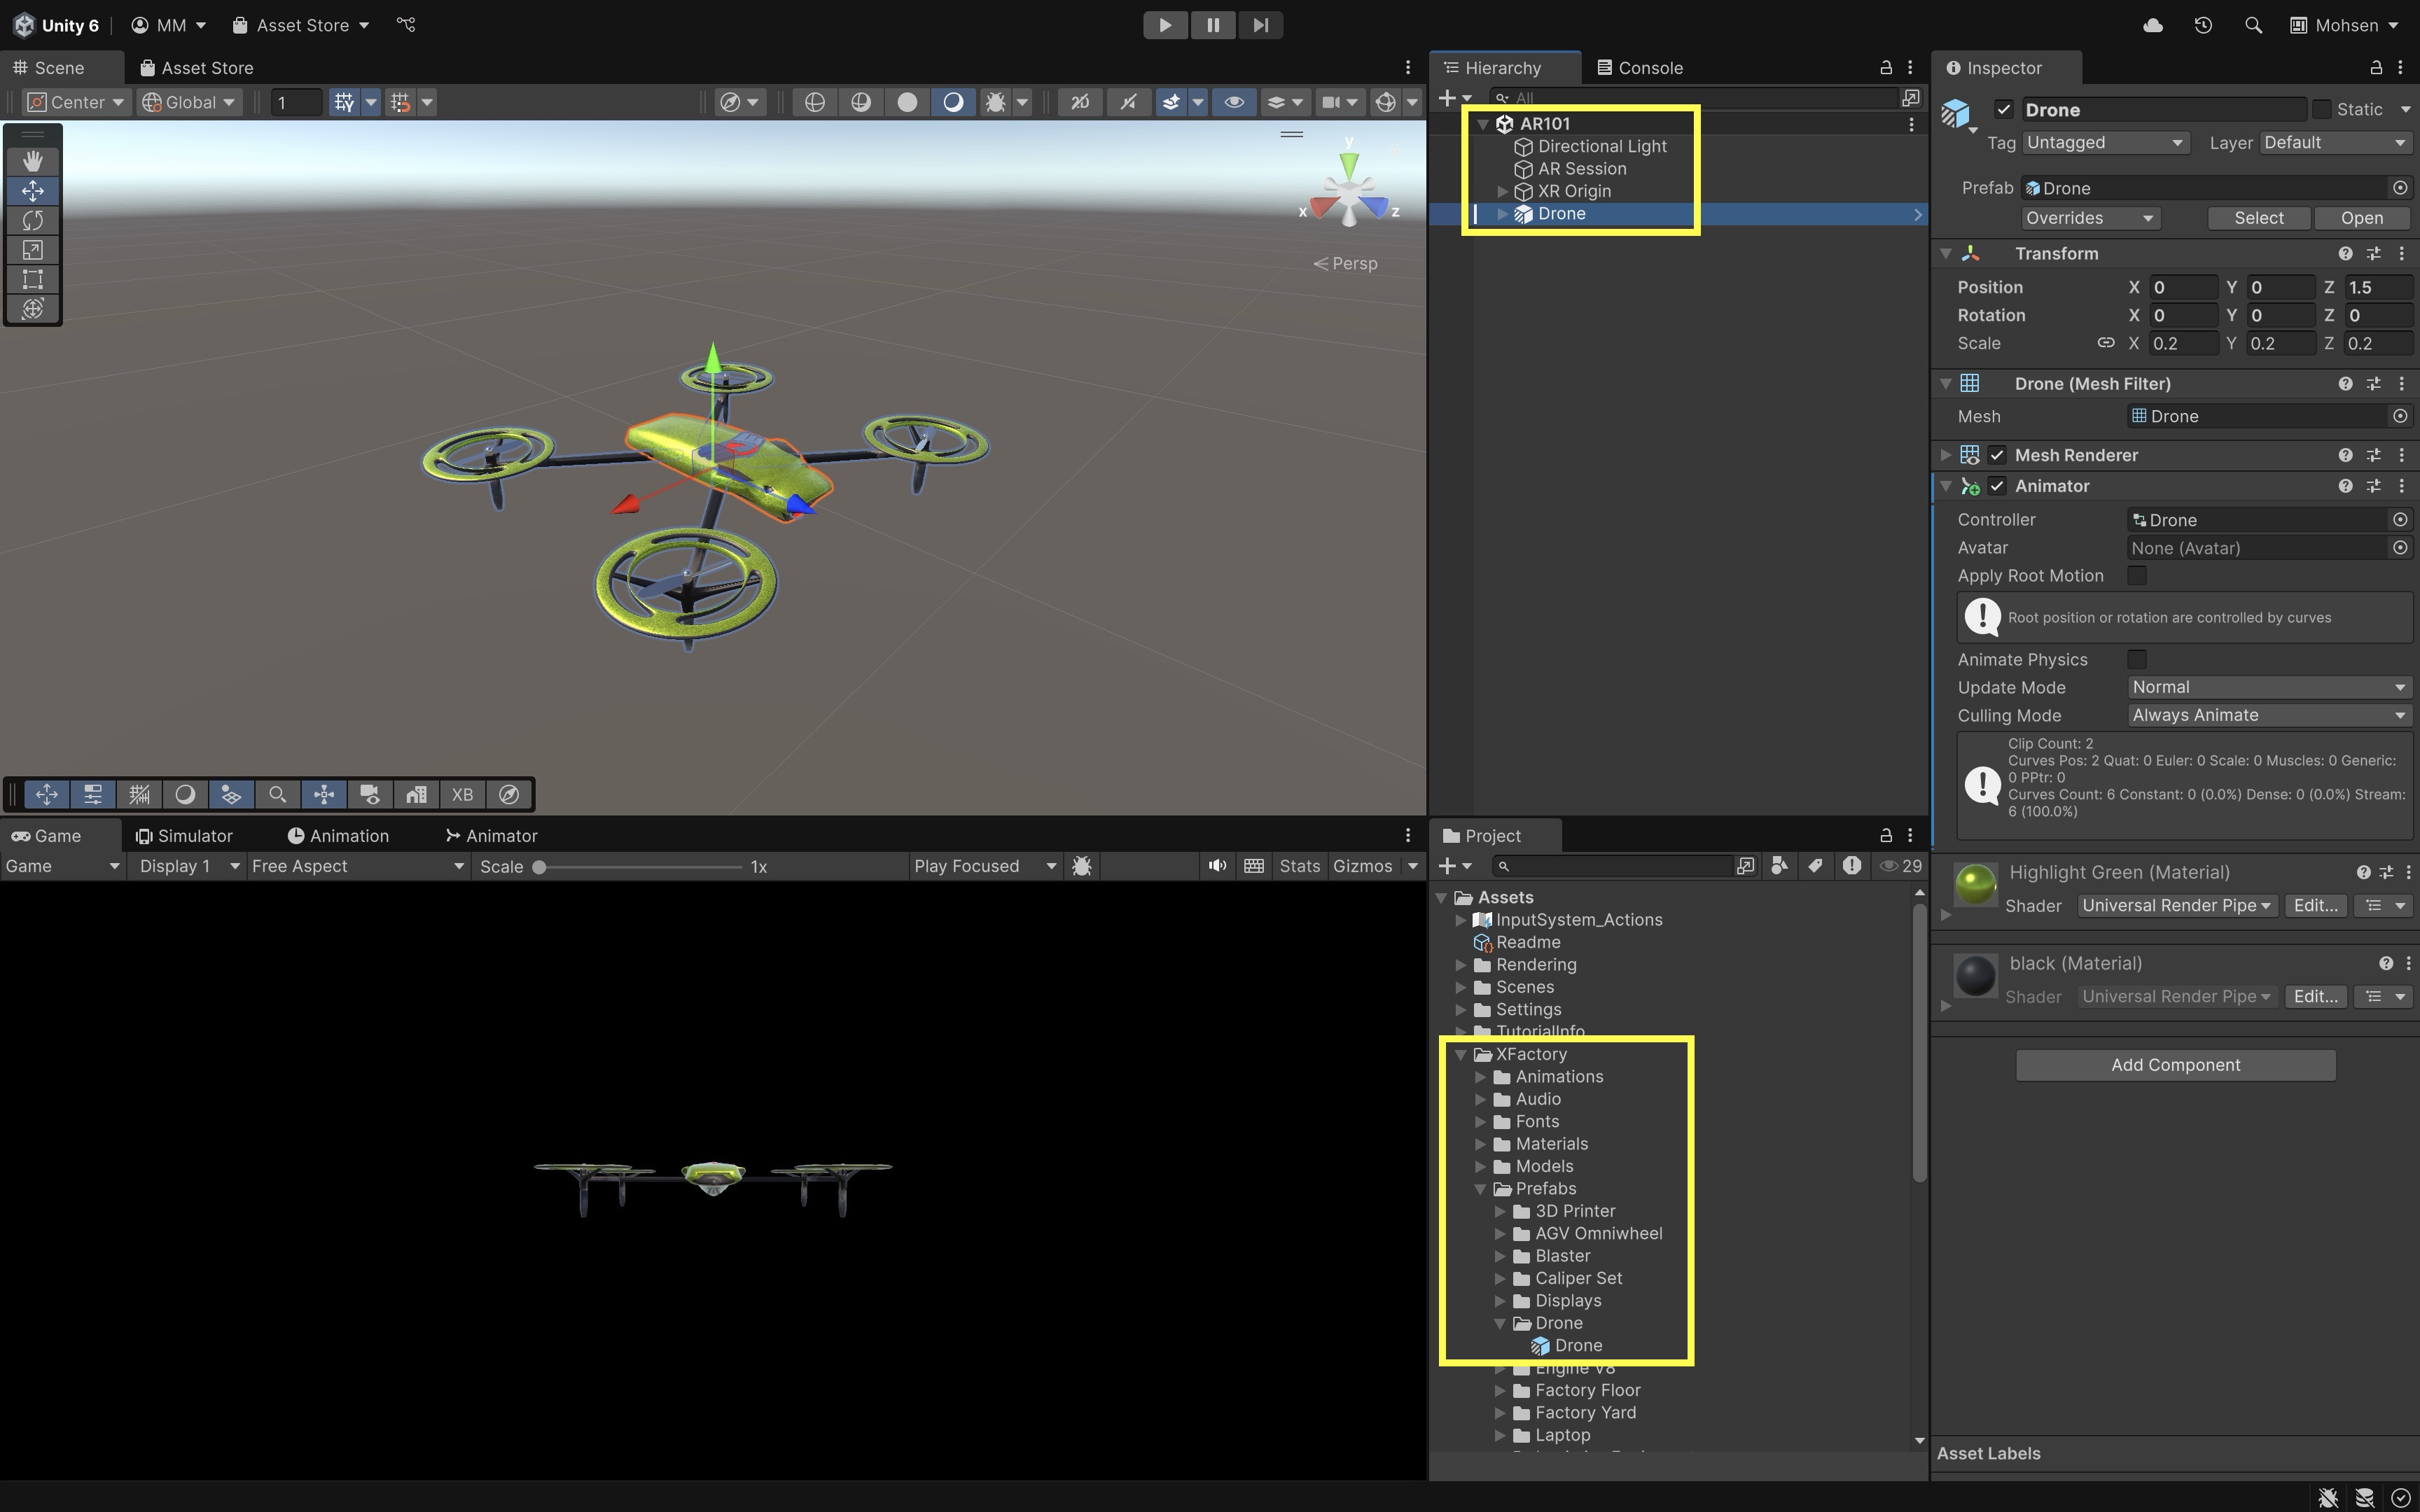
Since the drone is placed in world space, it will appear in front of the user at app launch and remain fixed in place as the user moves around. This setup gives you immediate visibility for first-run testing. For engineering AR, also validate scale, anchors, drift, occlusion, and physical safety in the real environment—AR overlays are training or visualization aids unless connected to validated sensors or control systems.
- Drag the
- Locate the URP Asset:
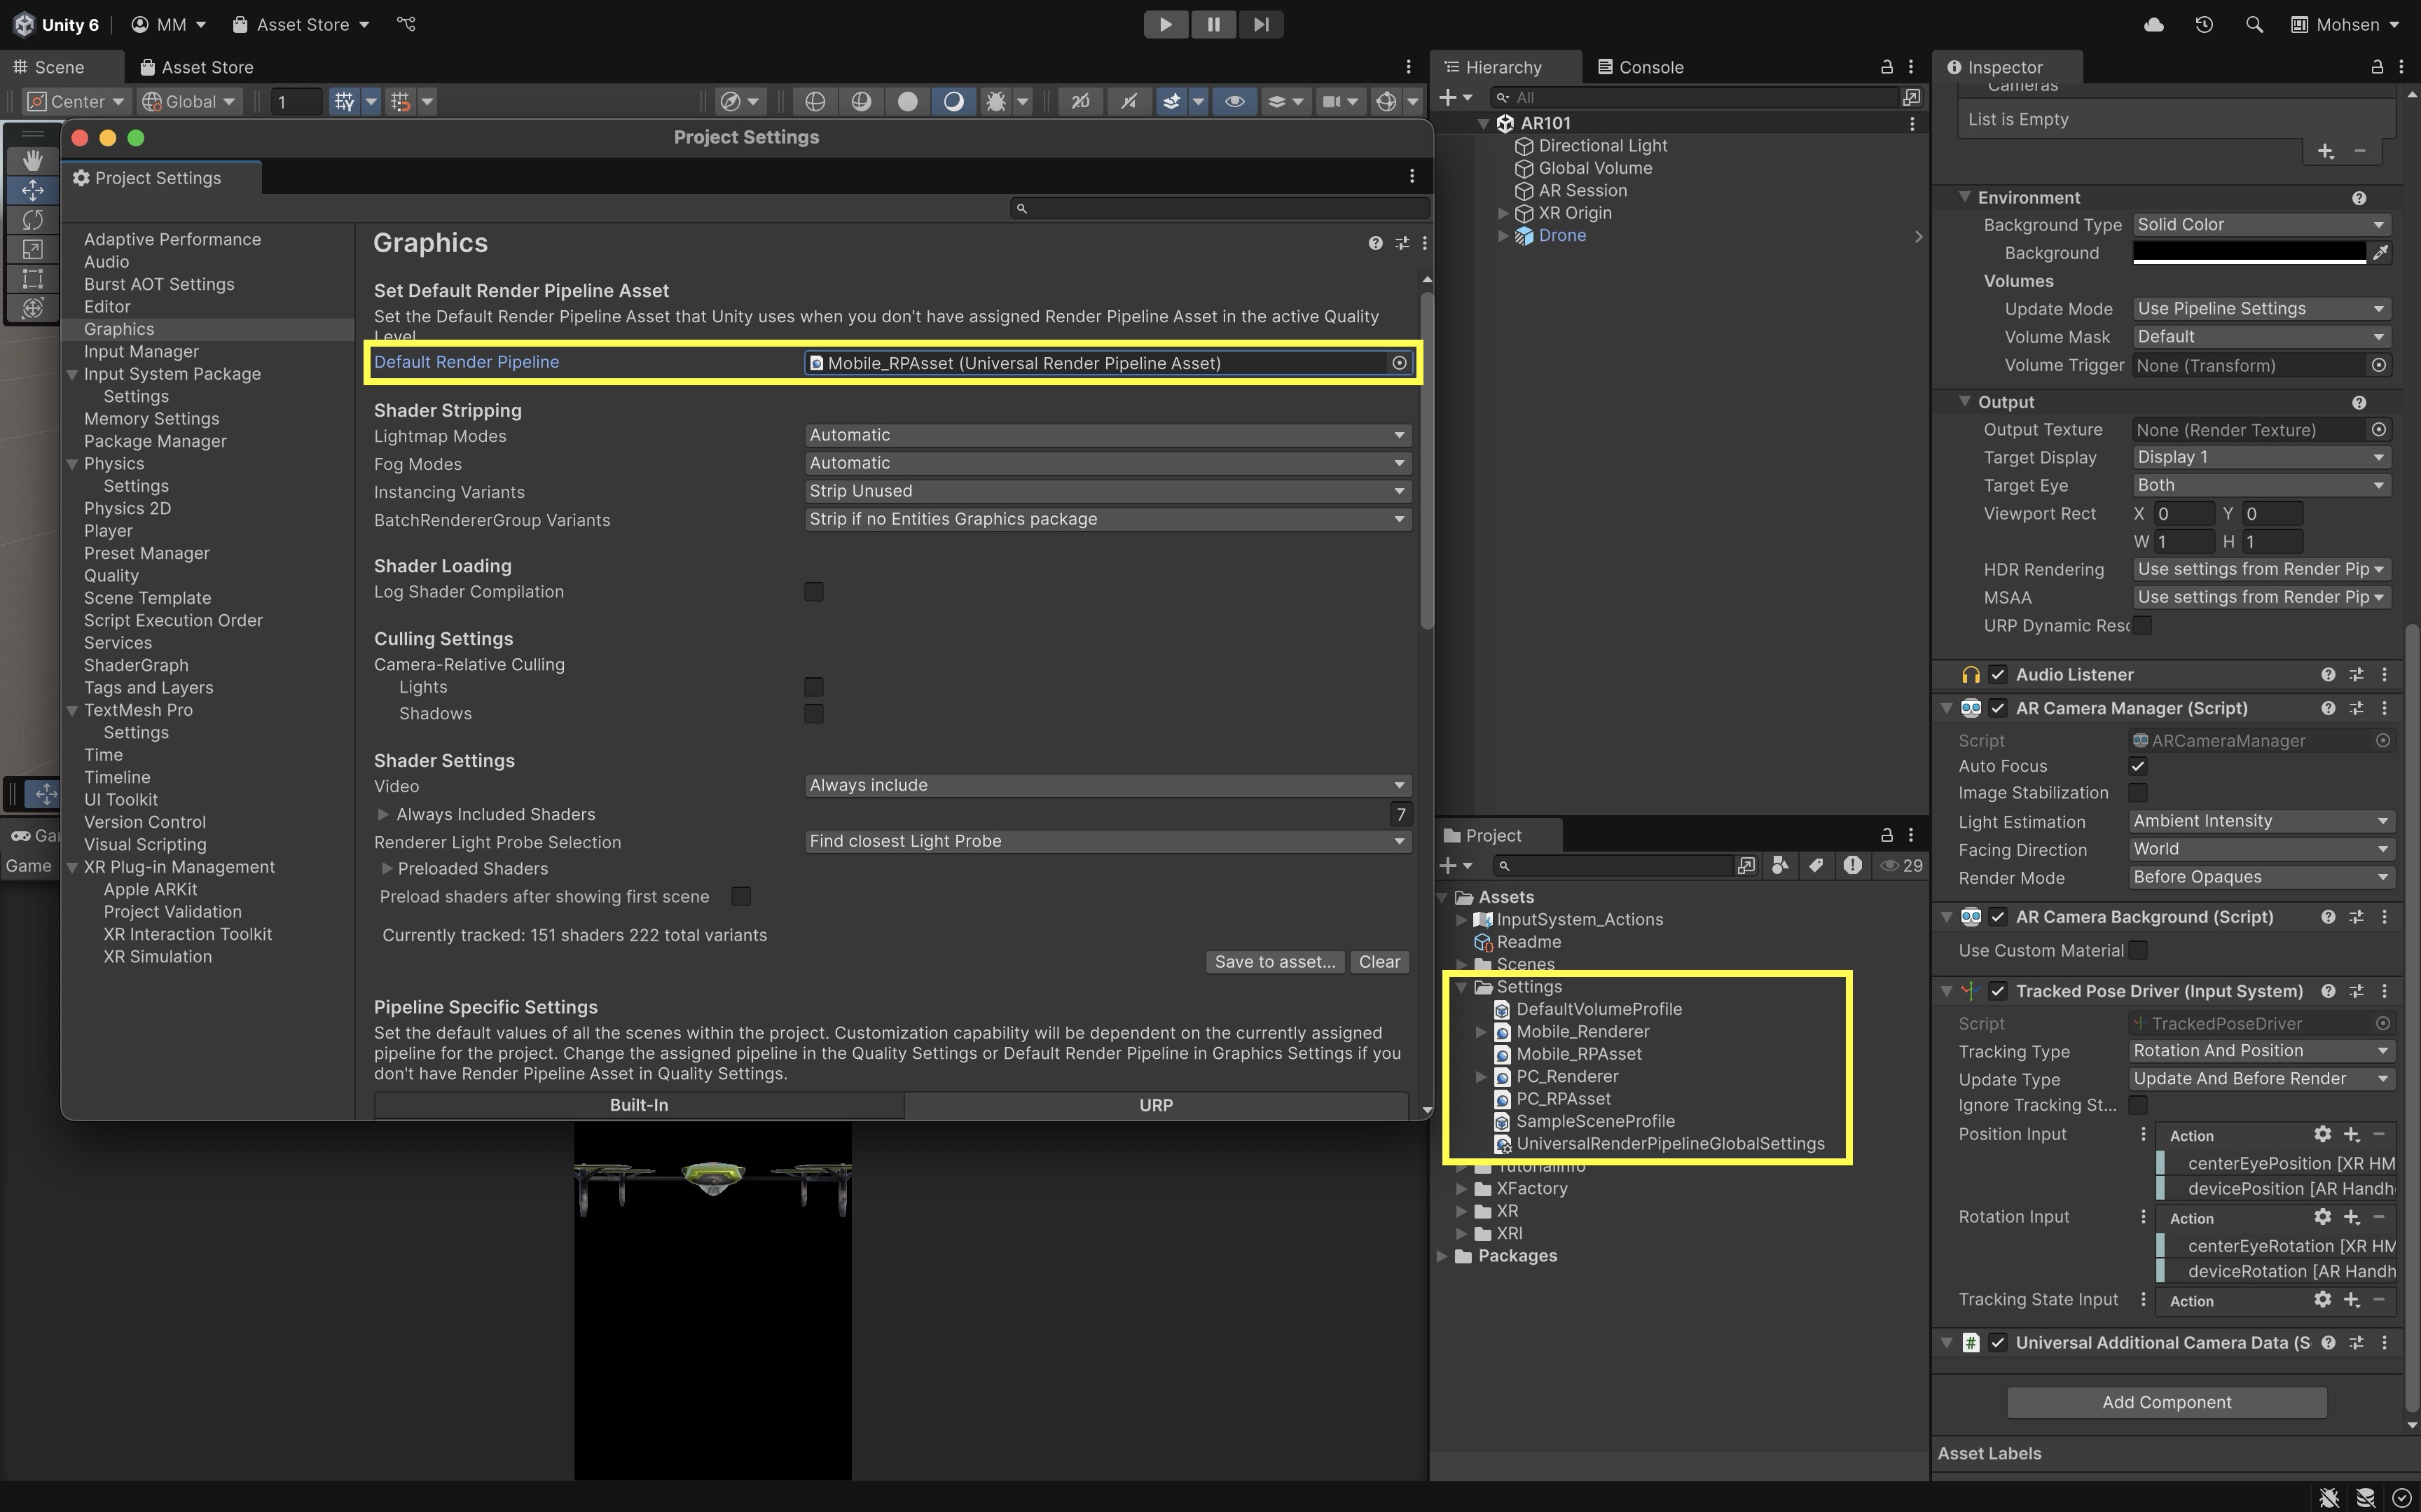
- Open
Edit > Project Settings > Graphics. - Under
Default Render Pipeline, click the asset selector and chooseMobile_RPAsset.
- Open
- Configure URP for AR:
- Go to your
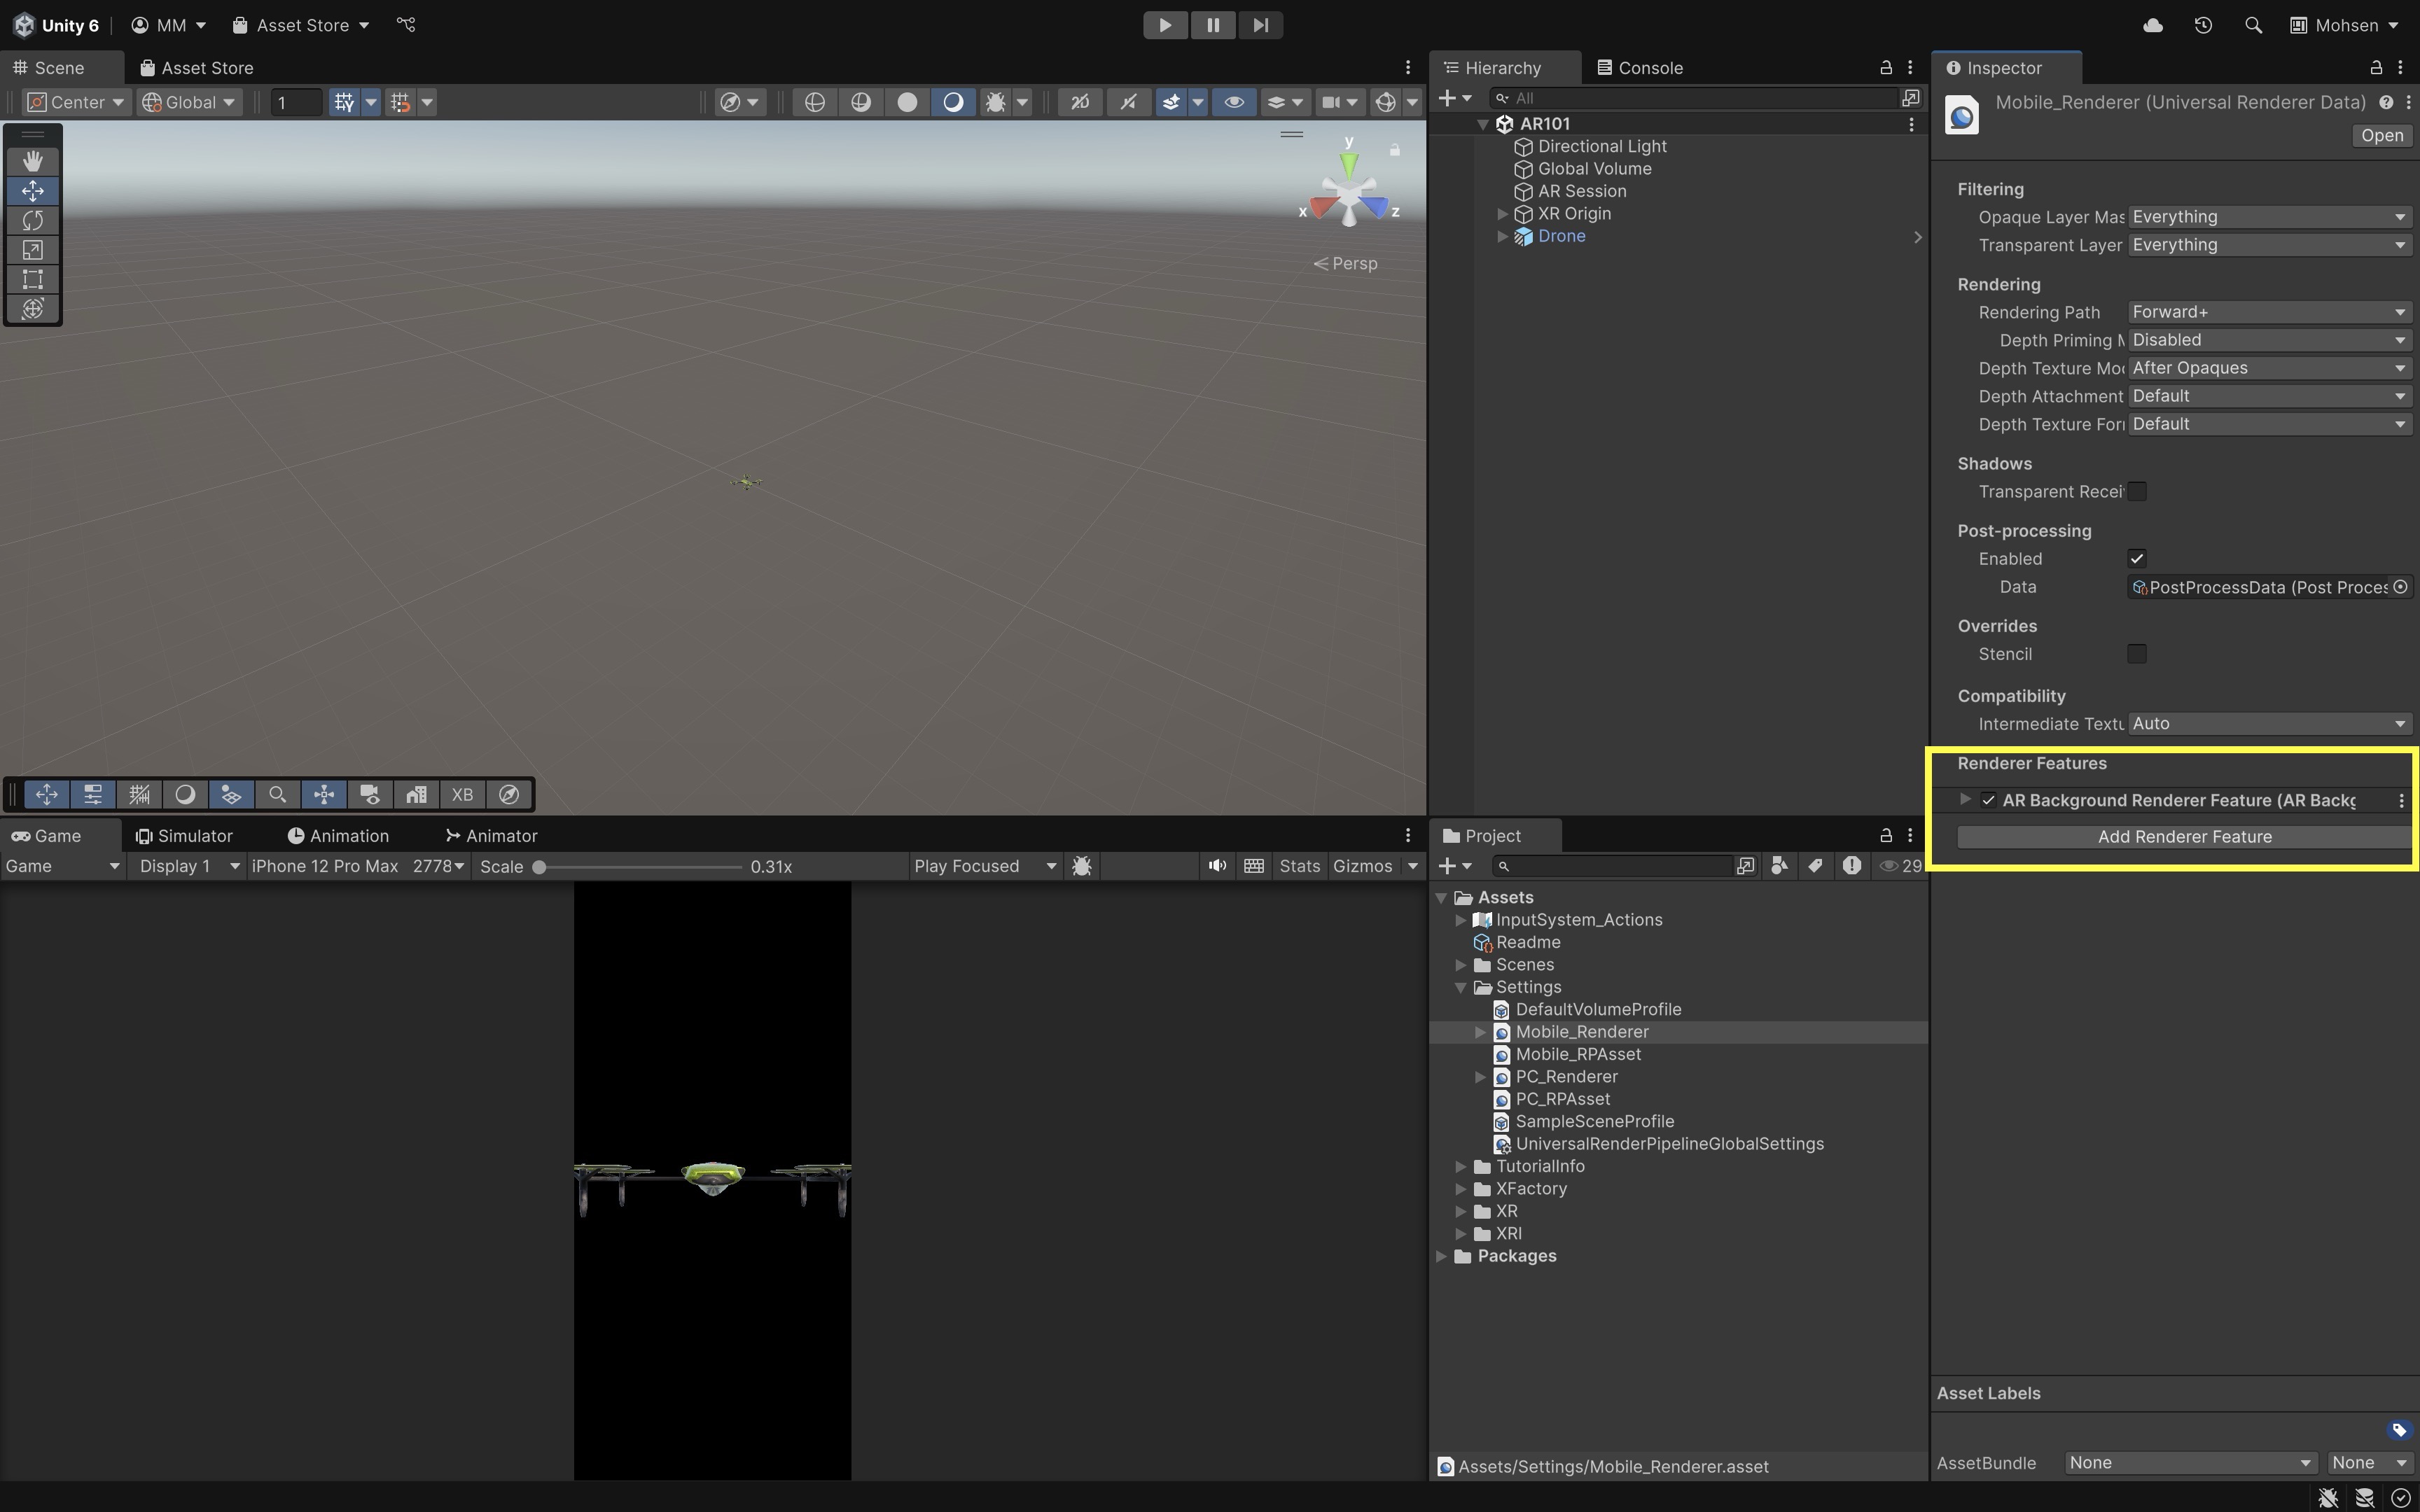
Projectwindow, locate the asset namedMobile_Renderer(usually found underAssets/Settings/) - Select it to open its
Inspector. - Scroll down to
Renderer Features. - If no AR background feature is present, click
Add Renderer Featureand chooseAR Background Renderer Feature. - If your project uses URP, verify that the renderer includes the AR background renderer feature or equivalent AR camera background setup required by your chosen provider. Some templates or provider setups may already configure this.
- Go to your
- Add Mobile UI Buttons (Touch Input):
- Mobile AR touch UI uses
Input System UI Input ModuleplusGraphic Raycasteron the Canvas. - XR controller or pointer UI (used later for Quest passthrough AR) uses
XR UI Input ModuleplusTracked Device Graphic Raycaster. - Only one UI input module should control an
EventSystemat a time. - Go to
Window > Package Manager, search forInput System, and install it if needed. - Go to
Edit > Project Settings > Playerand underOther Settings > Active Input Handling, use the course-standard Input System Package (New) unless a specific dependency requires compatibility mode. - In your
Hierarchy, find theEvent SystemGameObject. - Remove
XR UI Input Module(if present) for this mobile tutorial. - Add
Input System UI Input Module. - You can leave
Actions Assetempty (Unity will use its defaults), or assign a customInput Actionsasset with aUIaction map. - Ensure your UI
Canvashas aGraphic Raycastercomponent (added by default).
- Mobile AR touch UI uses
Deploying to iOS
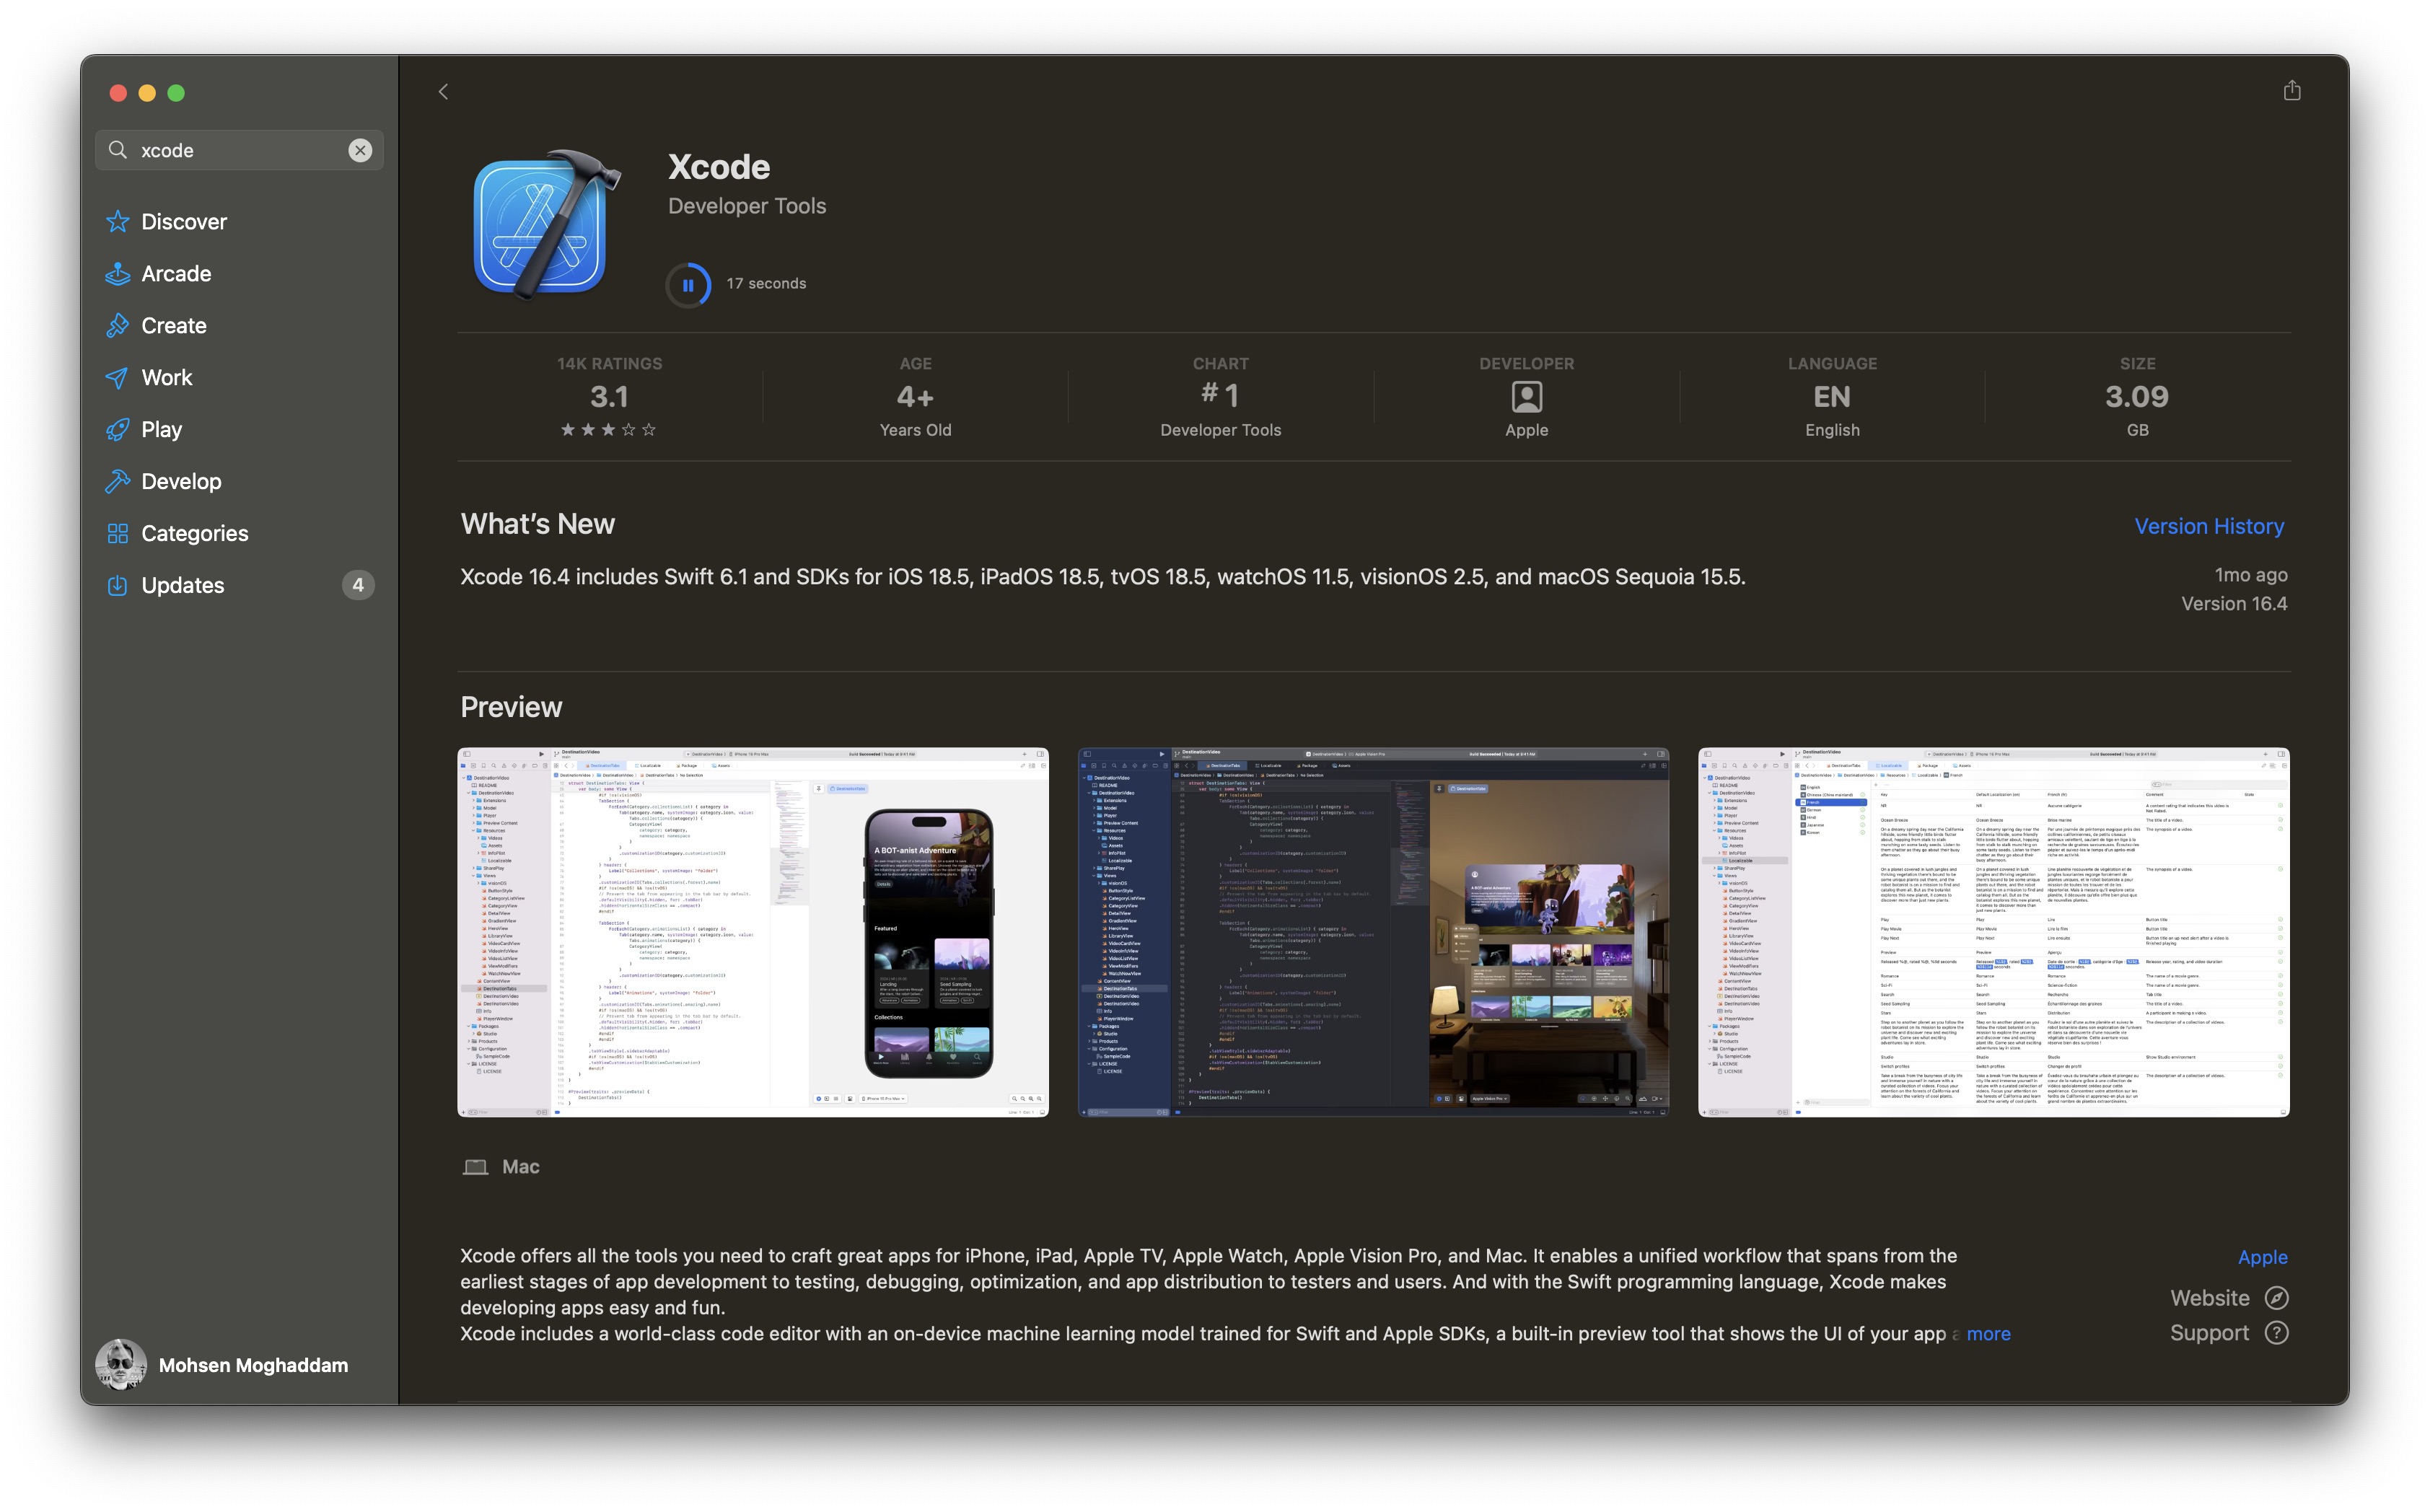
Testing your AR application on an iOS device is crucial because it offers authentic feedback on performance, user interface behavior, and compatibility with Apple’s hardware and software ecosystem. Before you proceed, download and install Xcode from the Mac App Store. Xcode is required to compile and deploy your Unity project on iOS devices, making it an essential tool for iOS development.
- Enable
ARKit:- Go to
Edit > Project Settings > XR Plug-in Management. - Select the
iOStab and ensure thatARKitis enabled. Enabling ARKit connects your project to Apple’s native AR framework, allowing you to access advanced AR functionalities on iOS devices.
- Go to
- Configure Bundle Identifier:
- Open
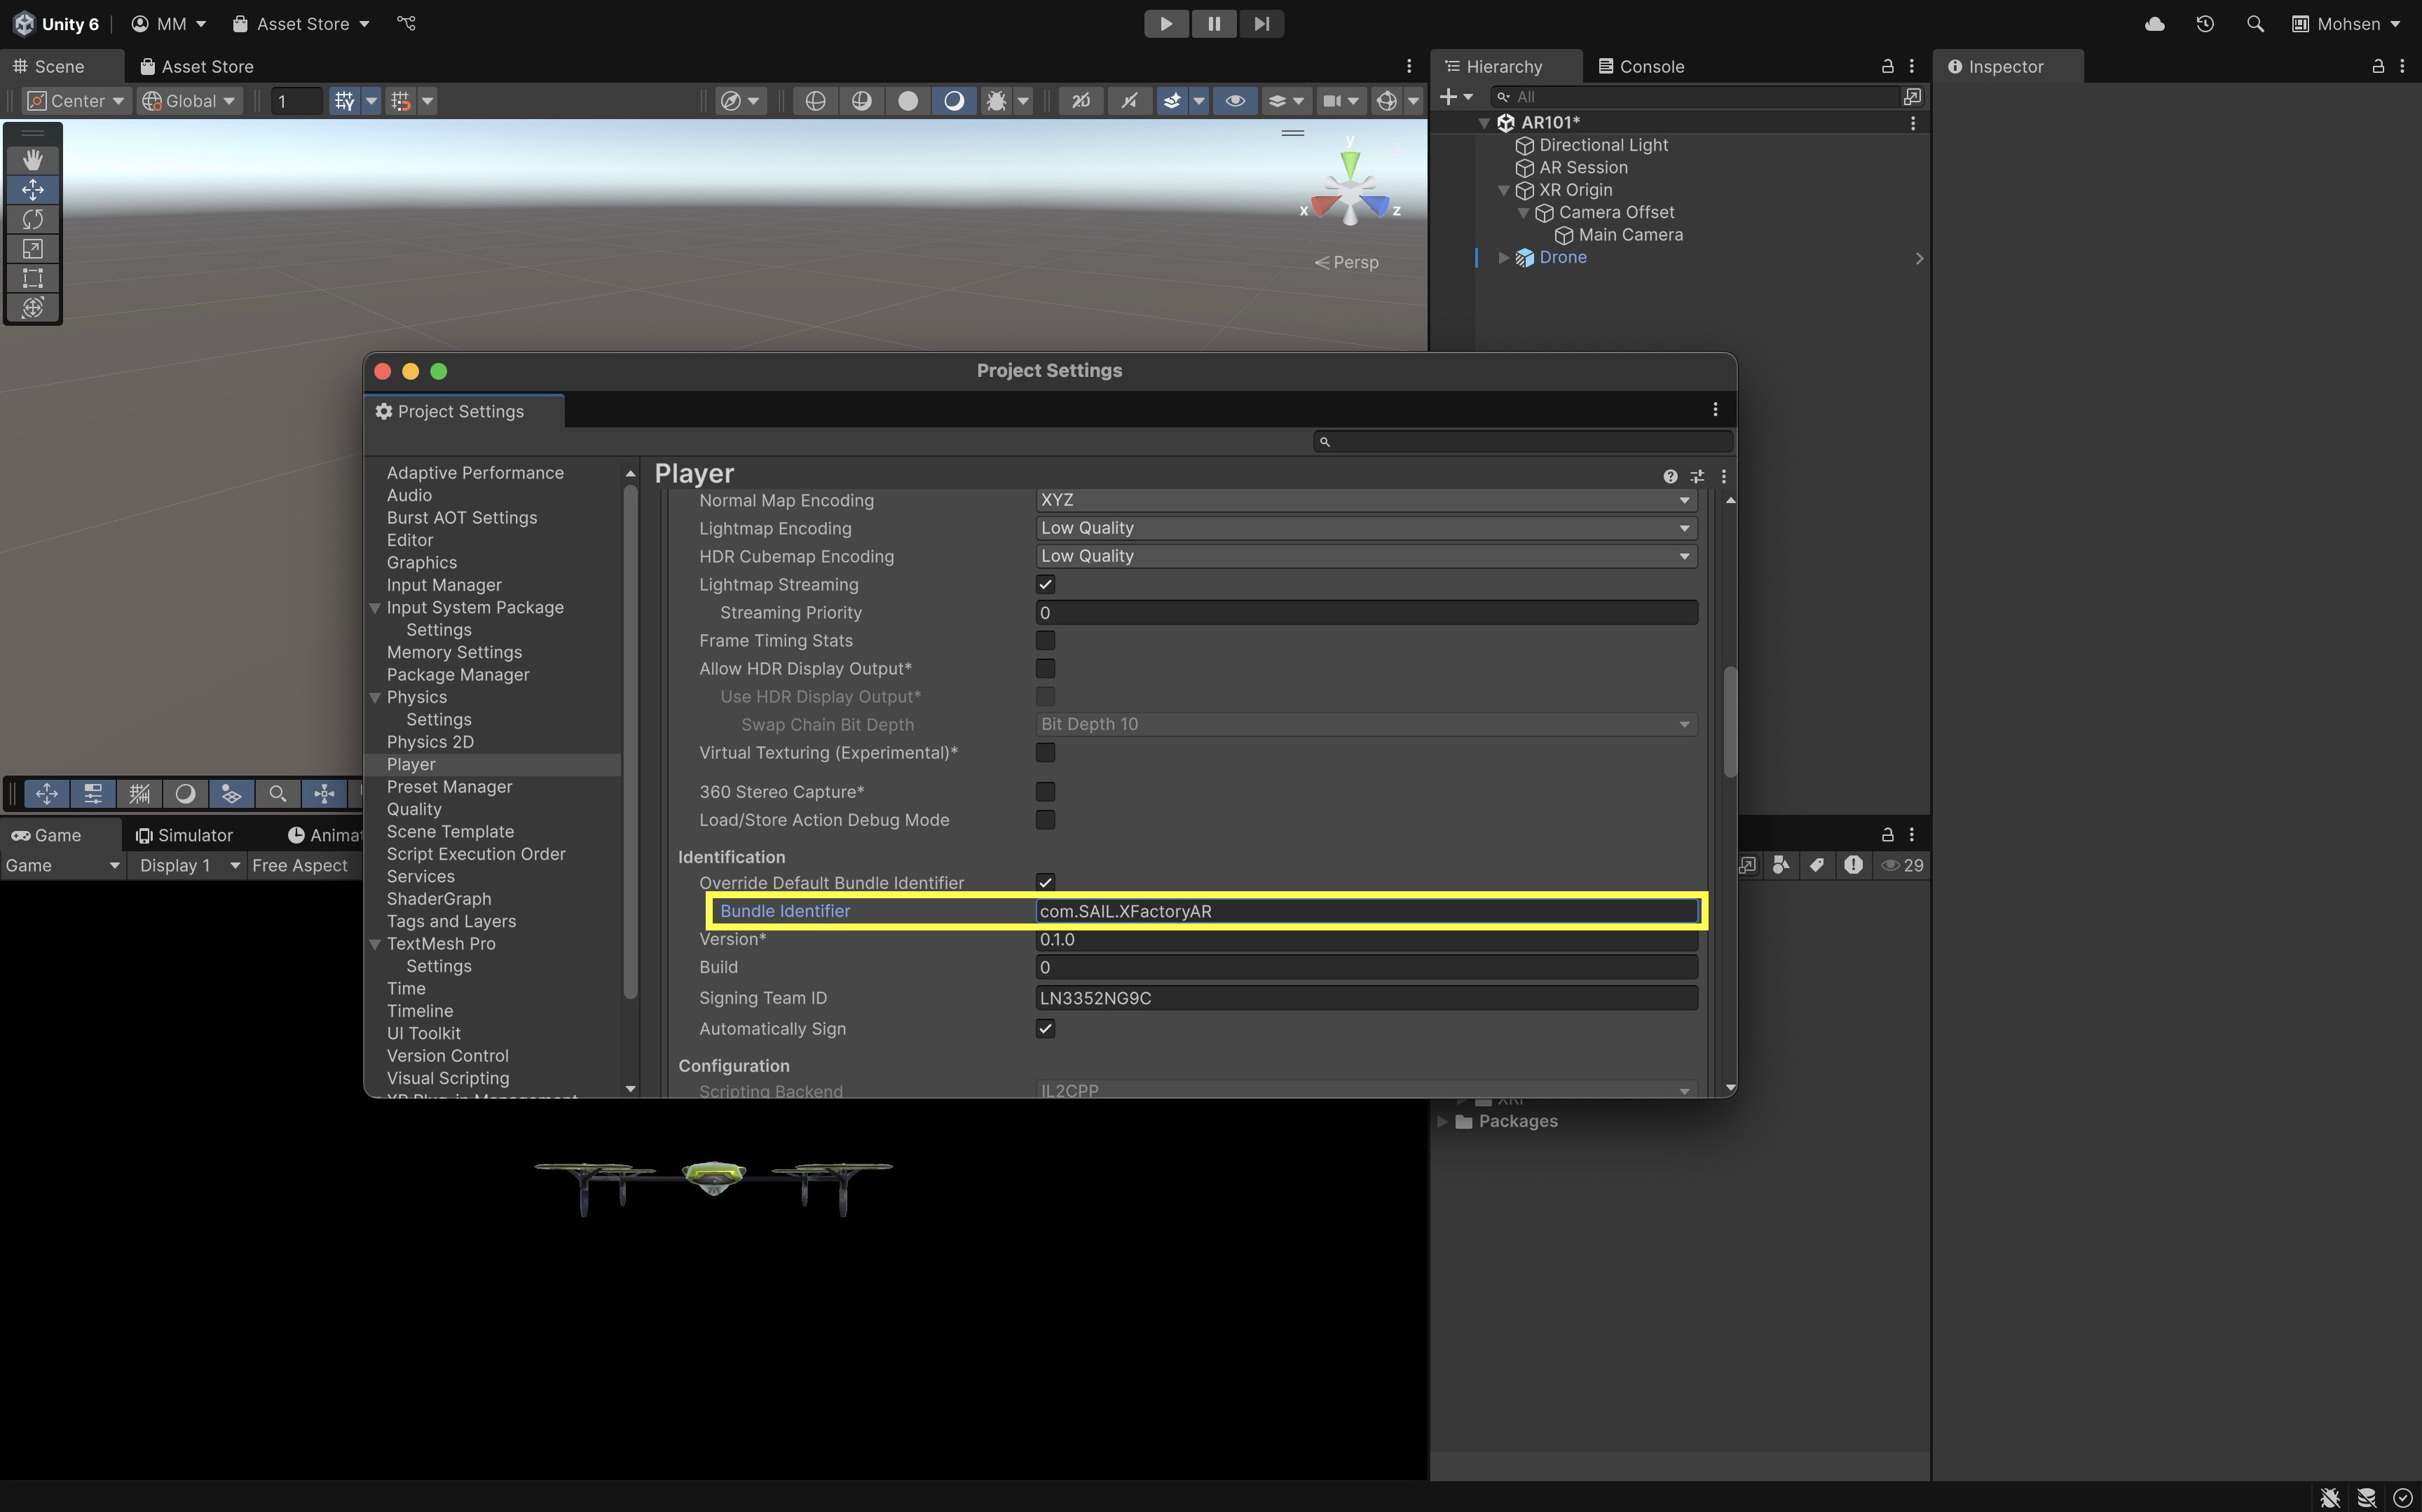
Edit > Project Settings > Player. - Set the
Company NameandProduct Name. This step generates a uniqueBundle Identifier, which is essential for app identification and deployment on the Apple ecosystem. - Ensure that the
Bundle Identifier(formatted ascom.CompanyName.ProductName) is unique and free of spaces or special characters. A correct identifier prevents build errors and is required for distribution on the App Store. - Scroll down to
Camera Usage Descriptionand enter a brief explanation. This will be shown to users the first time the app requests camera access.
- Open
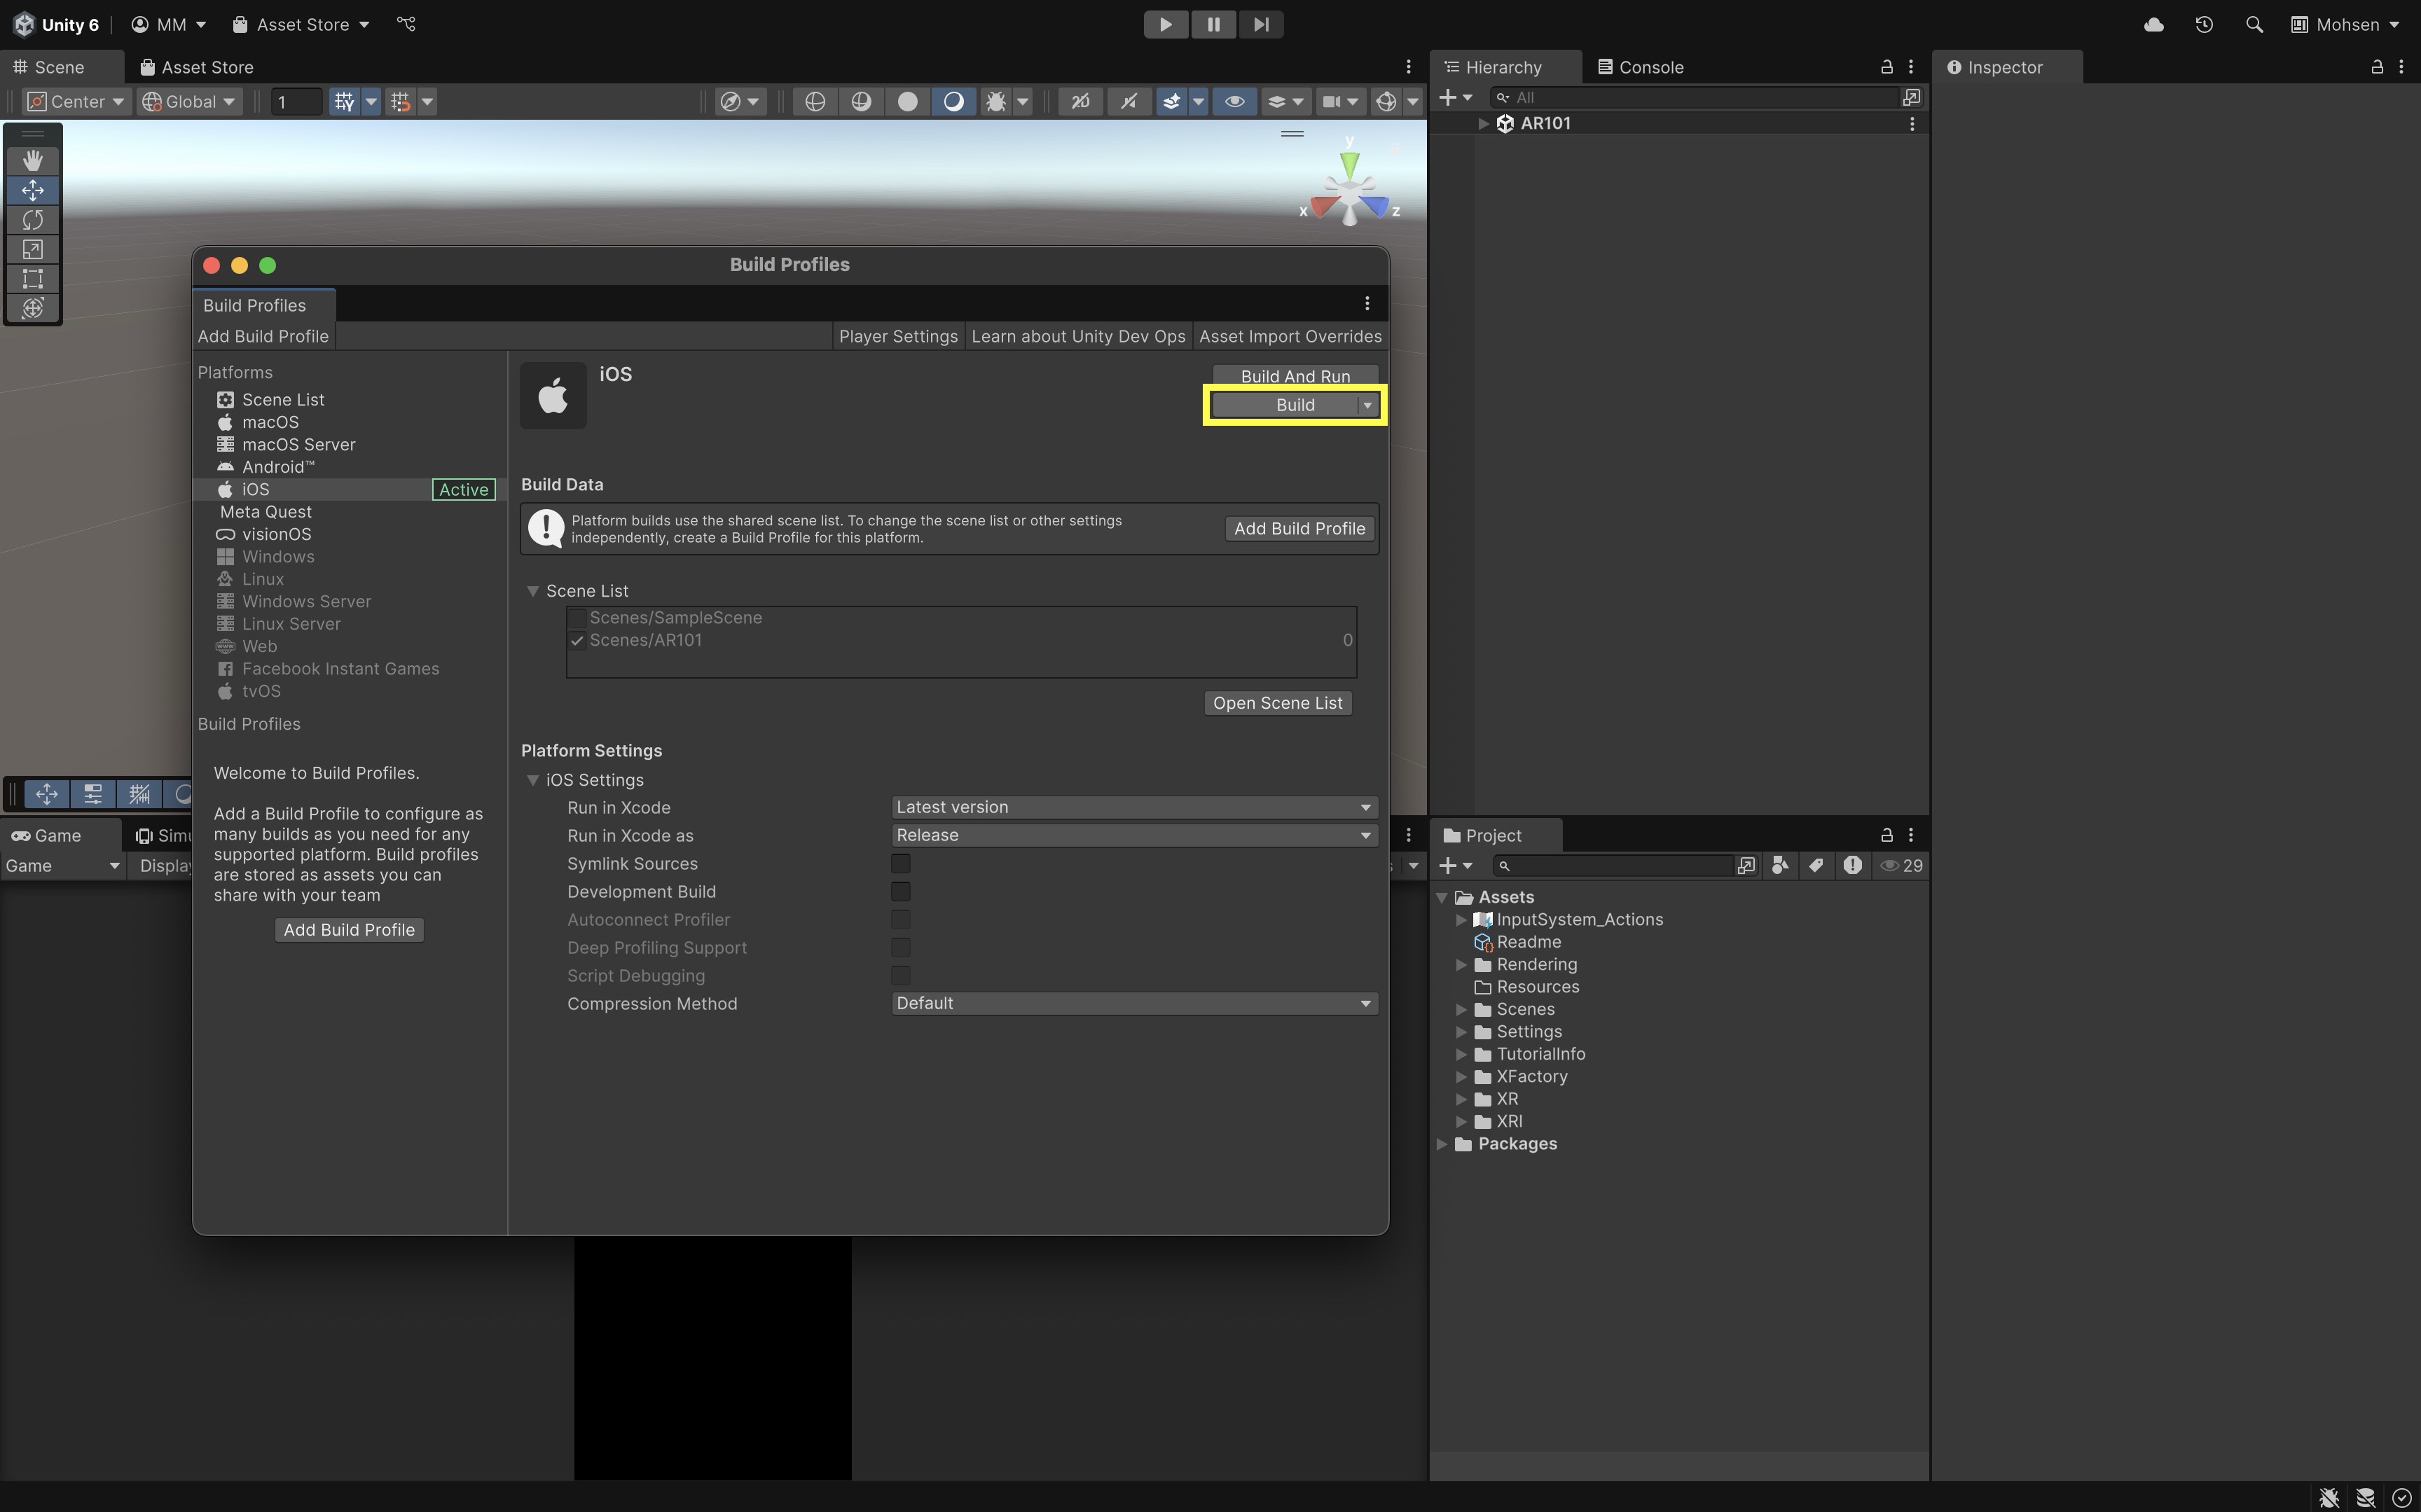
- Configure Build Settings:
- Navigate to
File > Build Profiles. - Go to
Scene List, click theAdd Open Scenesbutton, and only checkScenes/AR101. Adding your current scene ensures that it is included in the build. - Select
iOSas your target platform and clickSwitch Platform. Switching the platform configures your project with iOS-specific libraries and settings. - Click
Buildto create an Xcode project. This exports your Unity project into an Xcode project, which you can then compile and deploy to an iOS device.
- Navigate to
- Build to Device Using Xcode:
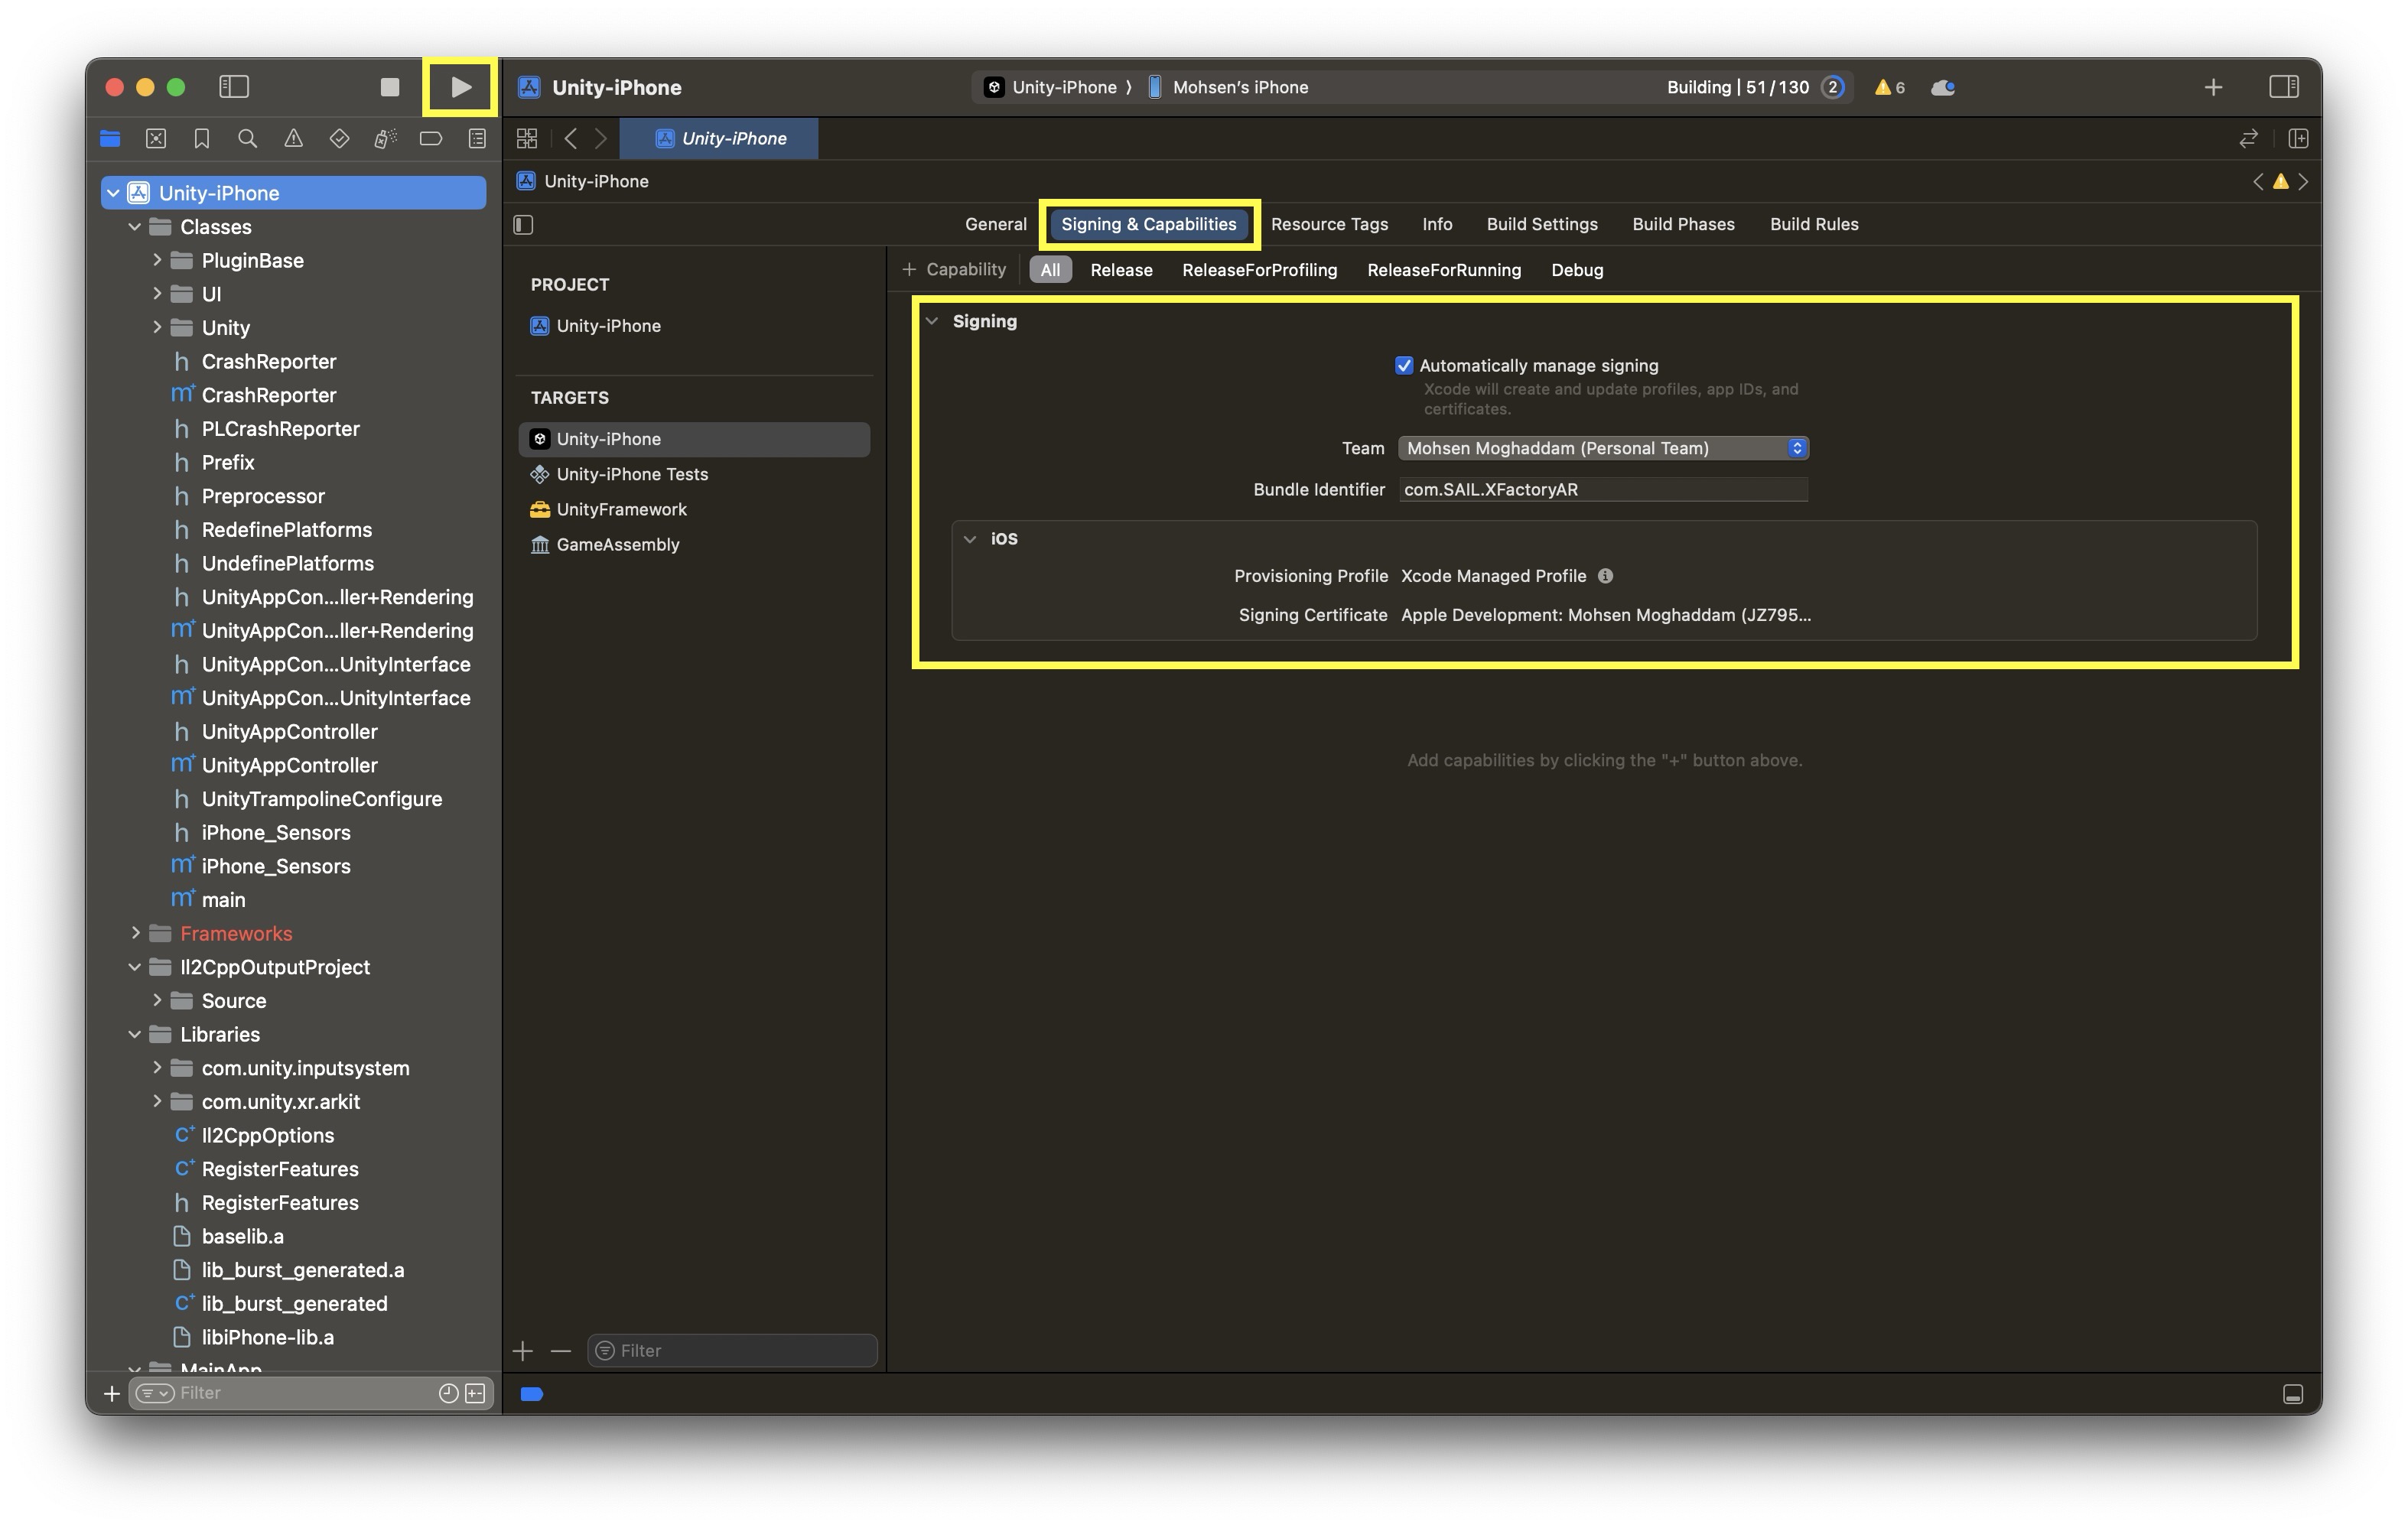
- Open the generated Xcode project (
Unity-iPhone.xcodeproj). - Connect your iOS device via cable.
- Resolve any signing issues. Enable
Automatically manage signingand assign your team underSigning & Capabilities. Resolving signing issues ensures that your app is properly authenticated and trusted by the iOS system. - Once signing issues are resolved, select your device as the run destination and click the run button in Xcode. Running the project on your device lets you test AR functionality in real conditions.
- Trust the developer profile on your iOS device if prompted (navigate to
Settings > General > VPN & Device Management). Trusting the profile allows your device to run the app without security blocks.
- Open the generated Xcode project (
- Test on Your iOS Device:
- On your iOS device, select
Enable Developer Mode. - When launched, you will be prompted for camera access.
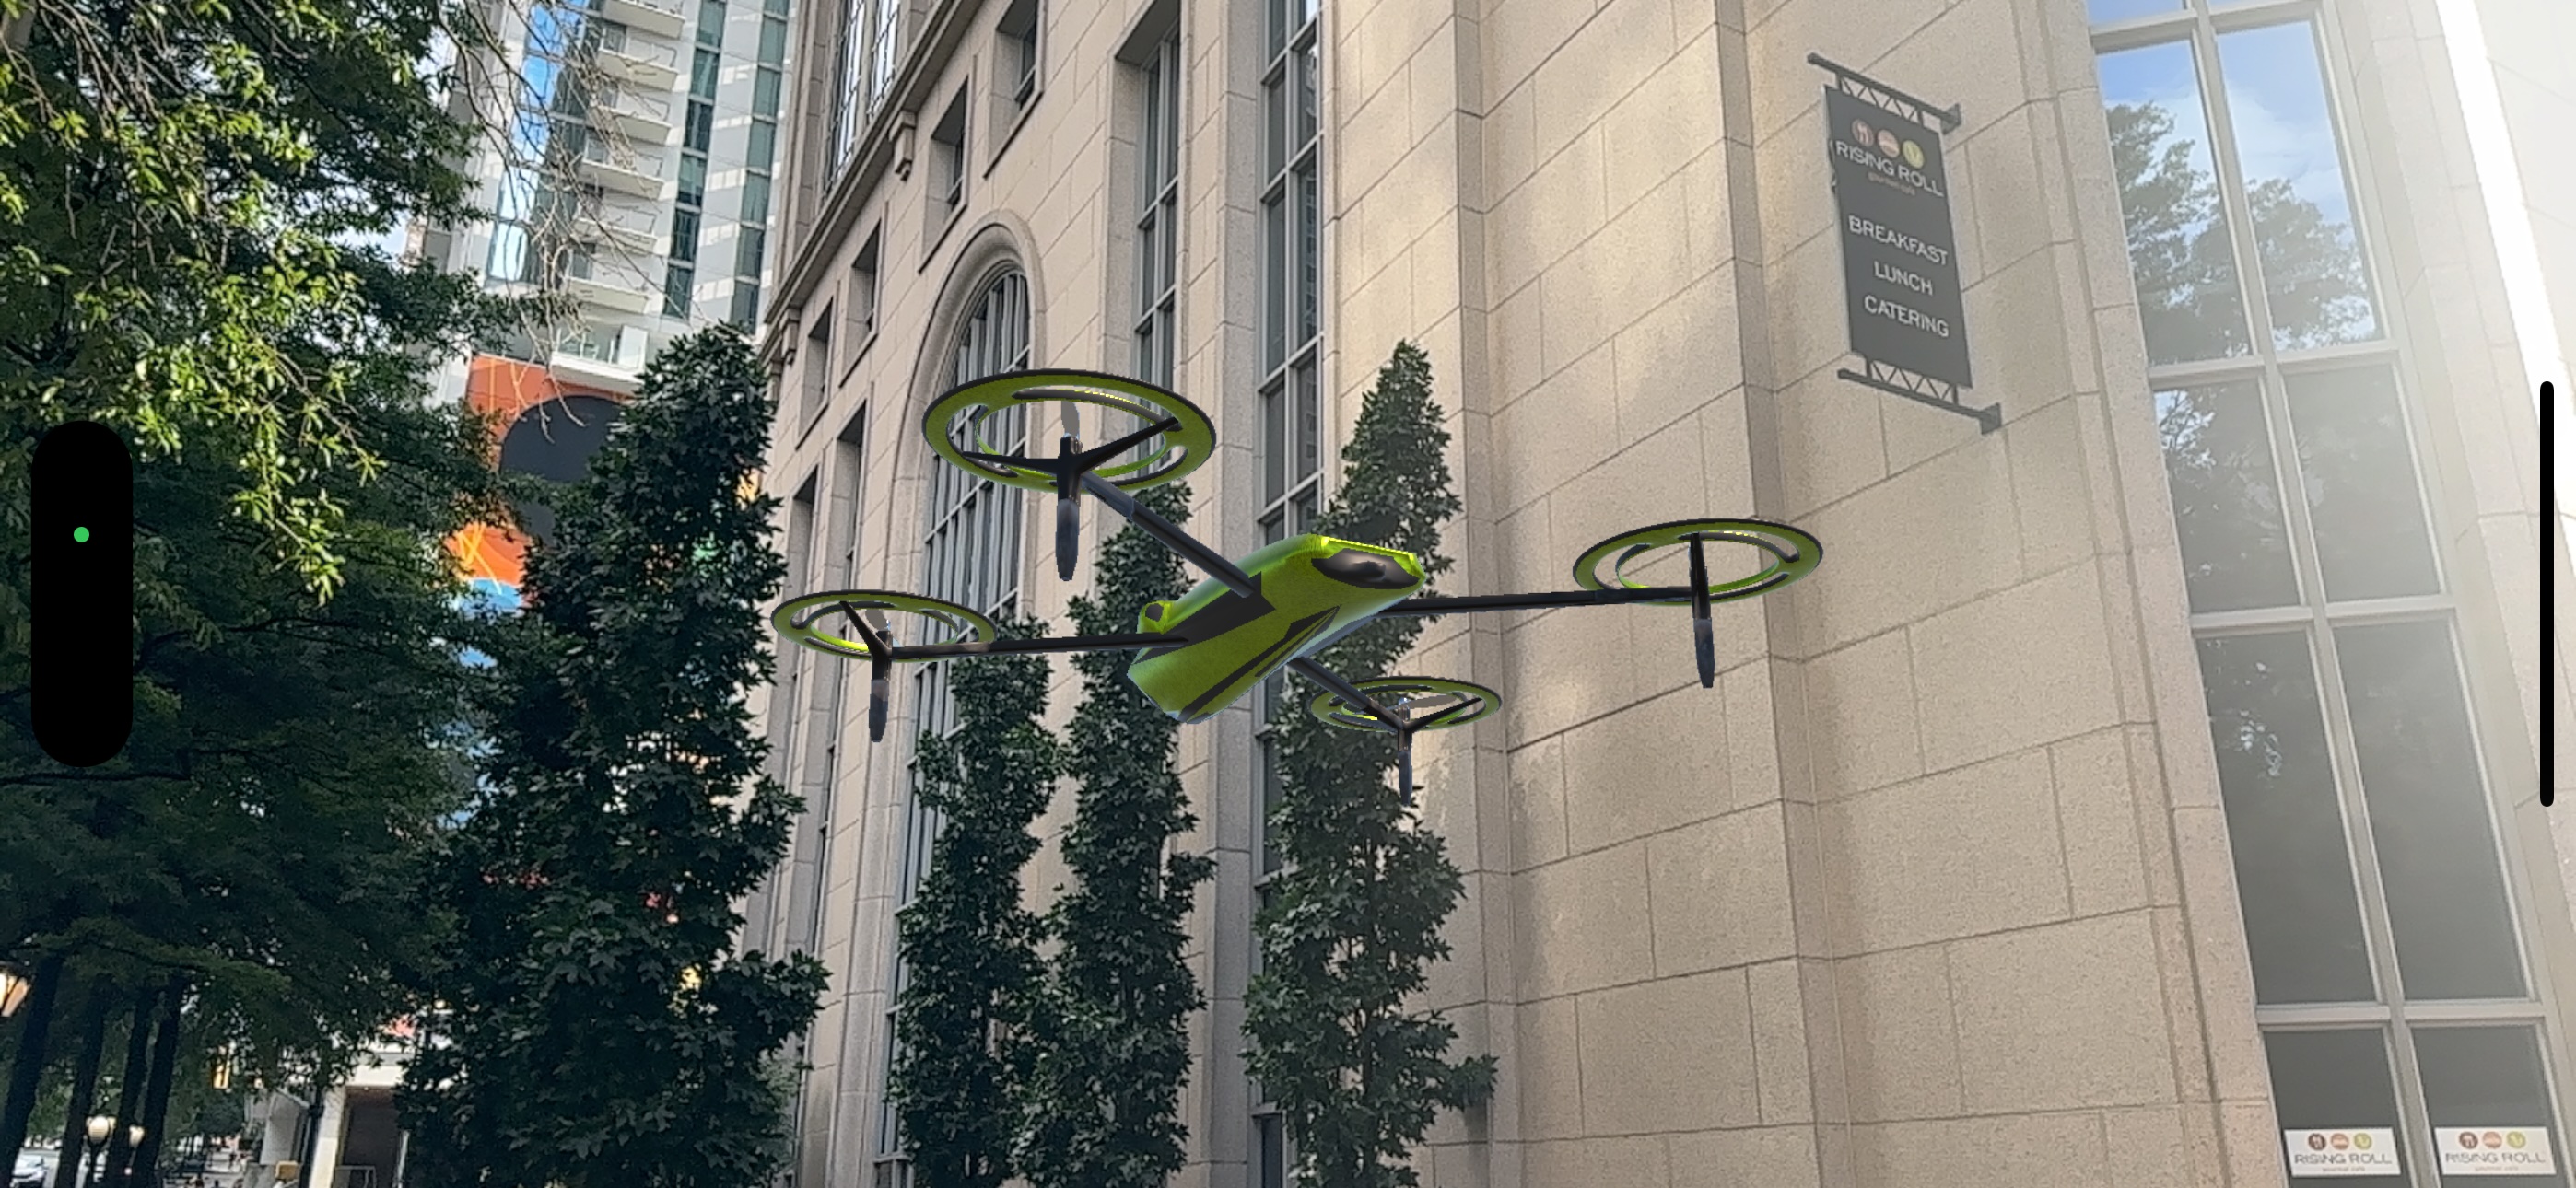
- Once camera access is granted, the app will show your real-world environment as the background, with the drone hovering in front of you, anchored in world space.
- AR features vary by iPhone/iPad model—test on the actual device you expect students or users to use.
- On your iOS device, select
Deploying to Android
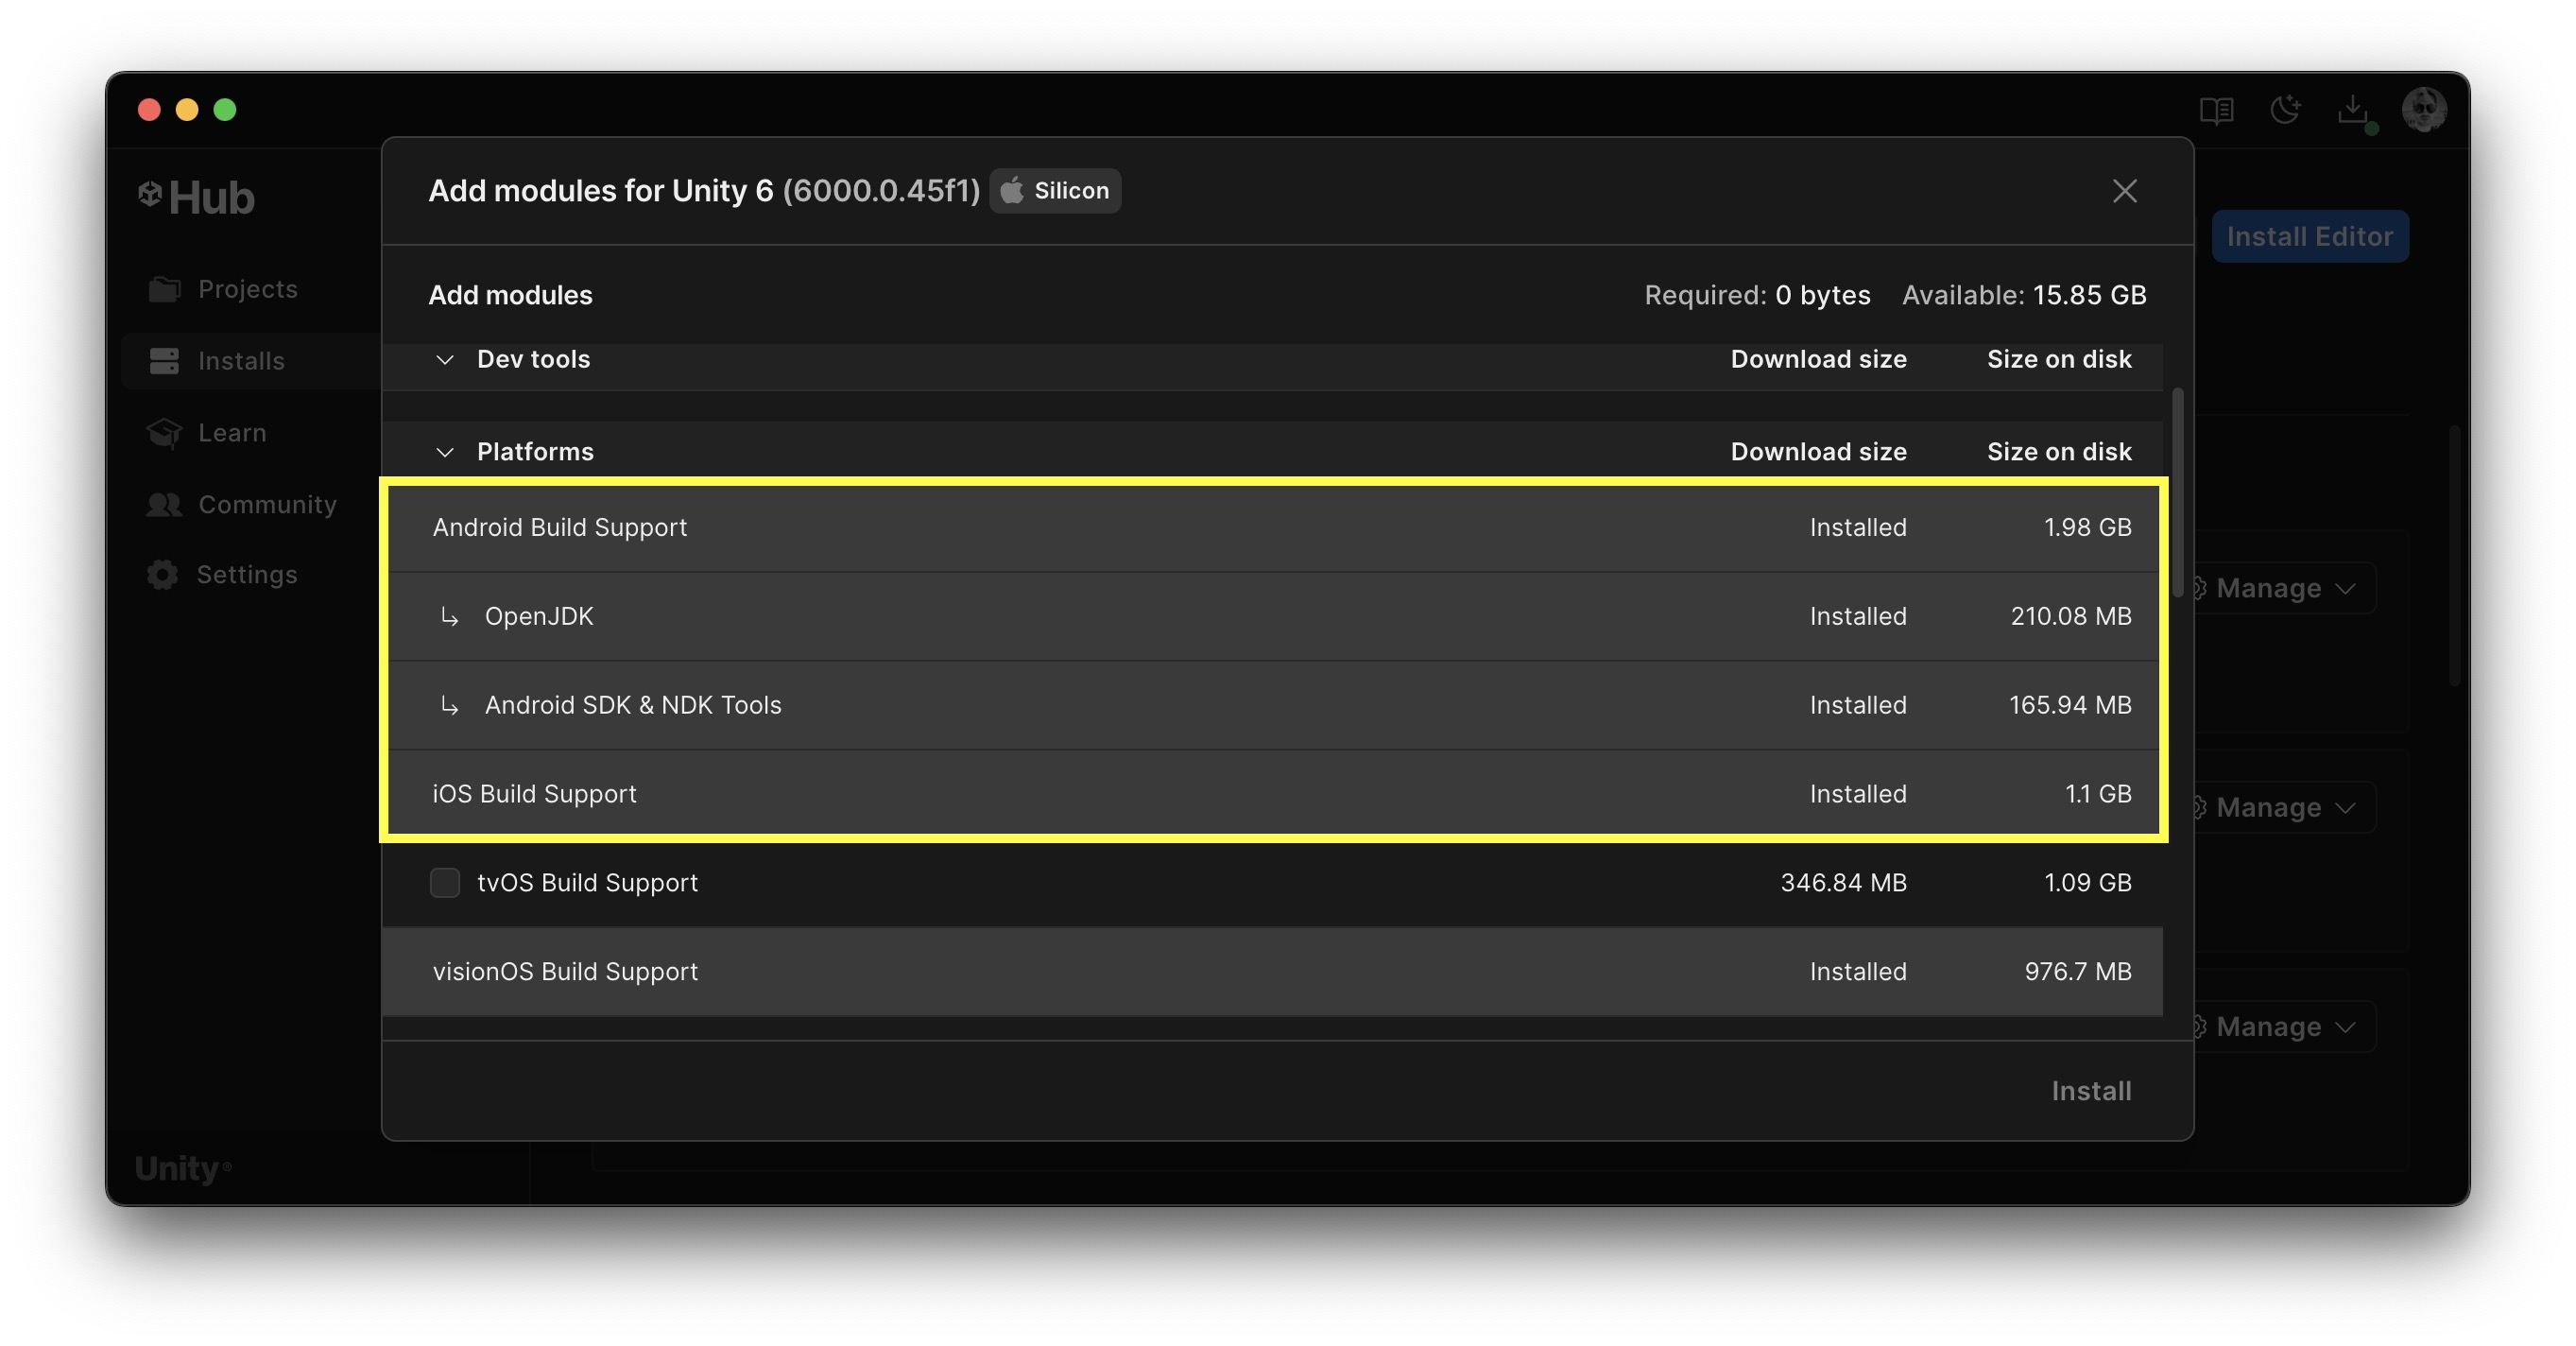
Testing your AR application on an Android device is vital since it provides accurate insights into performance, adaptability, and the overall user experience on a wide range of Android hardware configurations. Before you proceed, ensure the Android Build Support module is installed with Unity. This module is necessary to compile your project into an APK file for Android devices. On your Android device, enable USB Debugging from the Developer Options menu. USB Debugging enables communication between your Android device and the Unity Editor for testing purposes.
- Enable
ARCore:- Go to
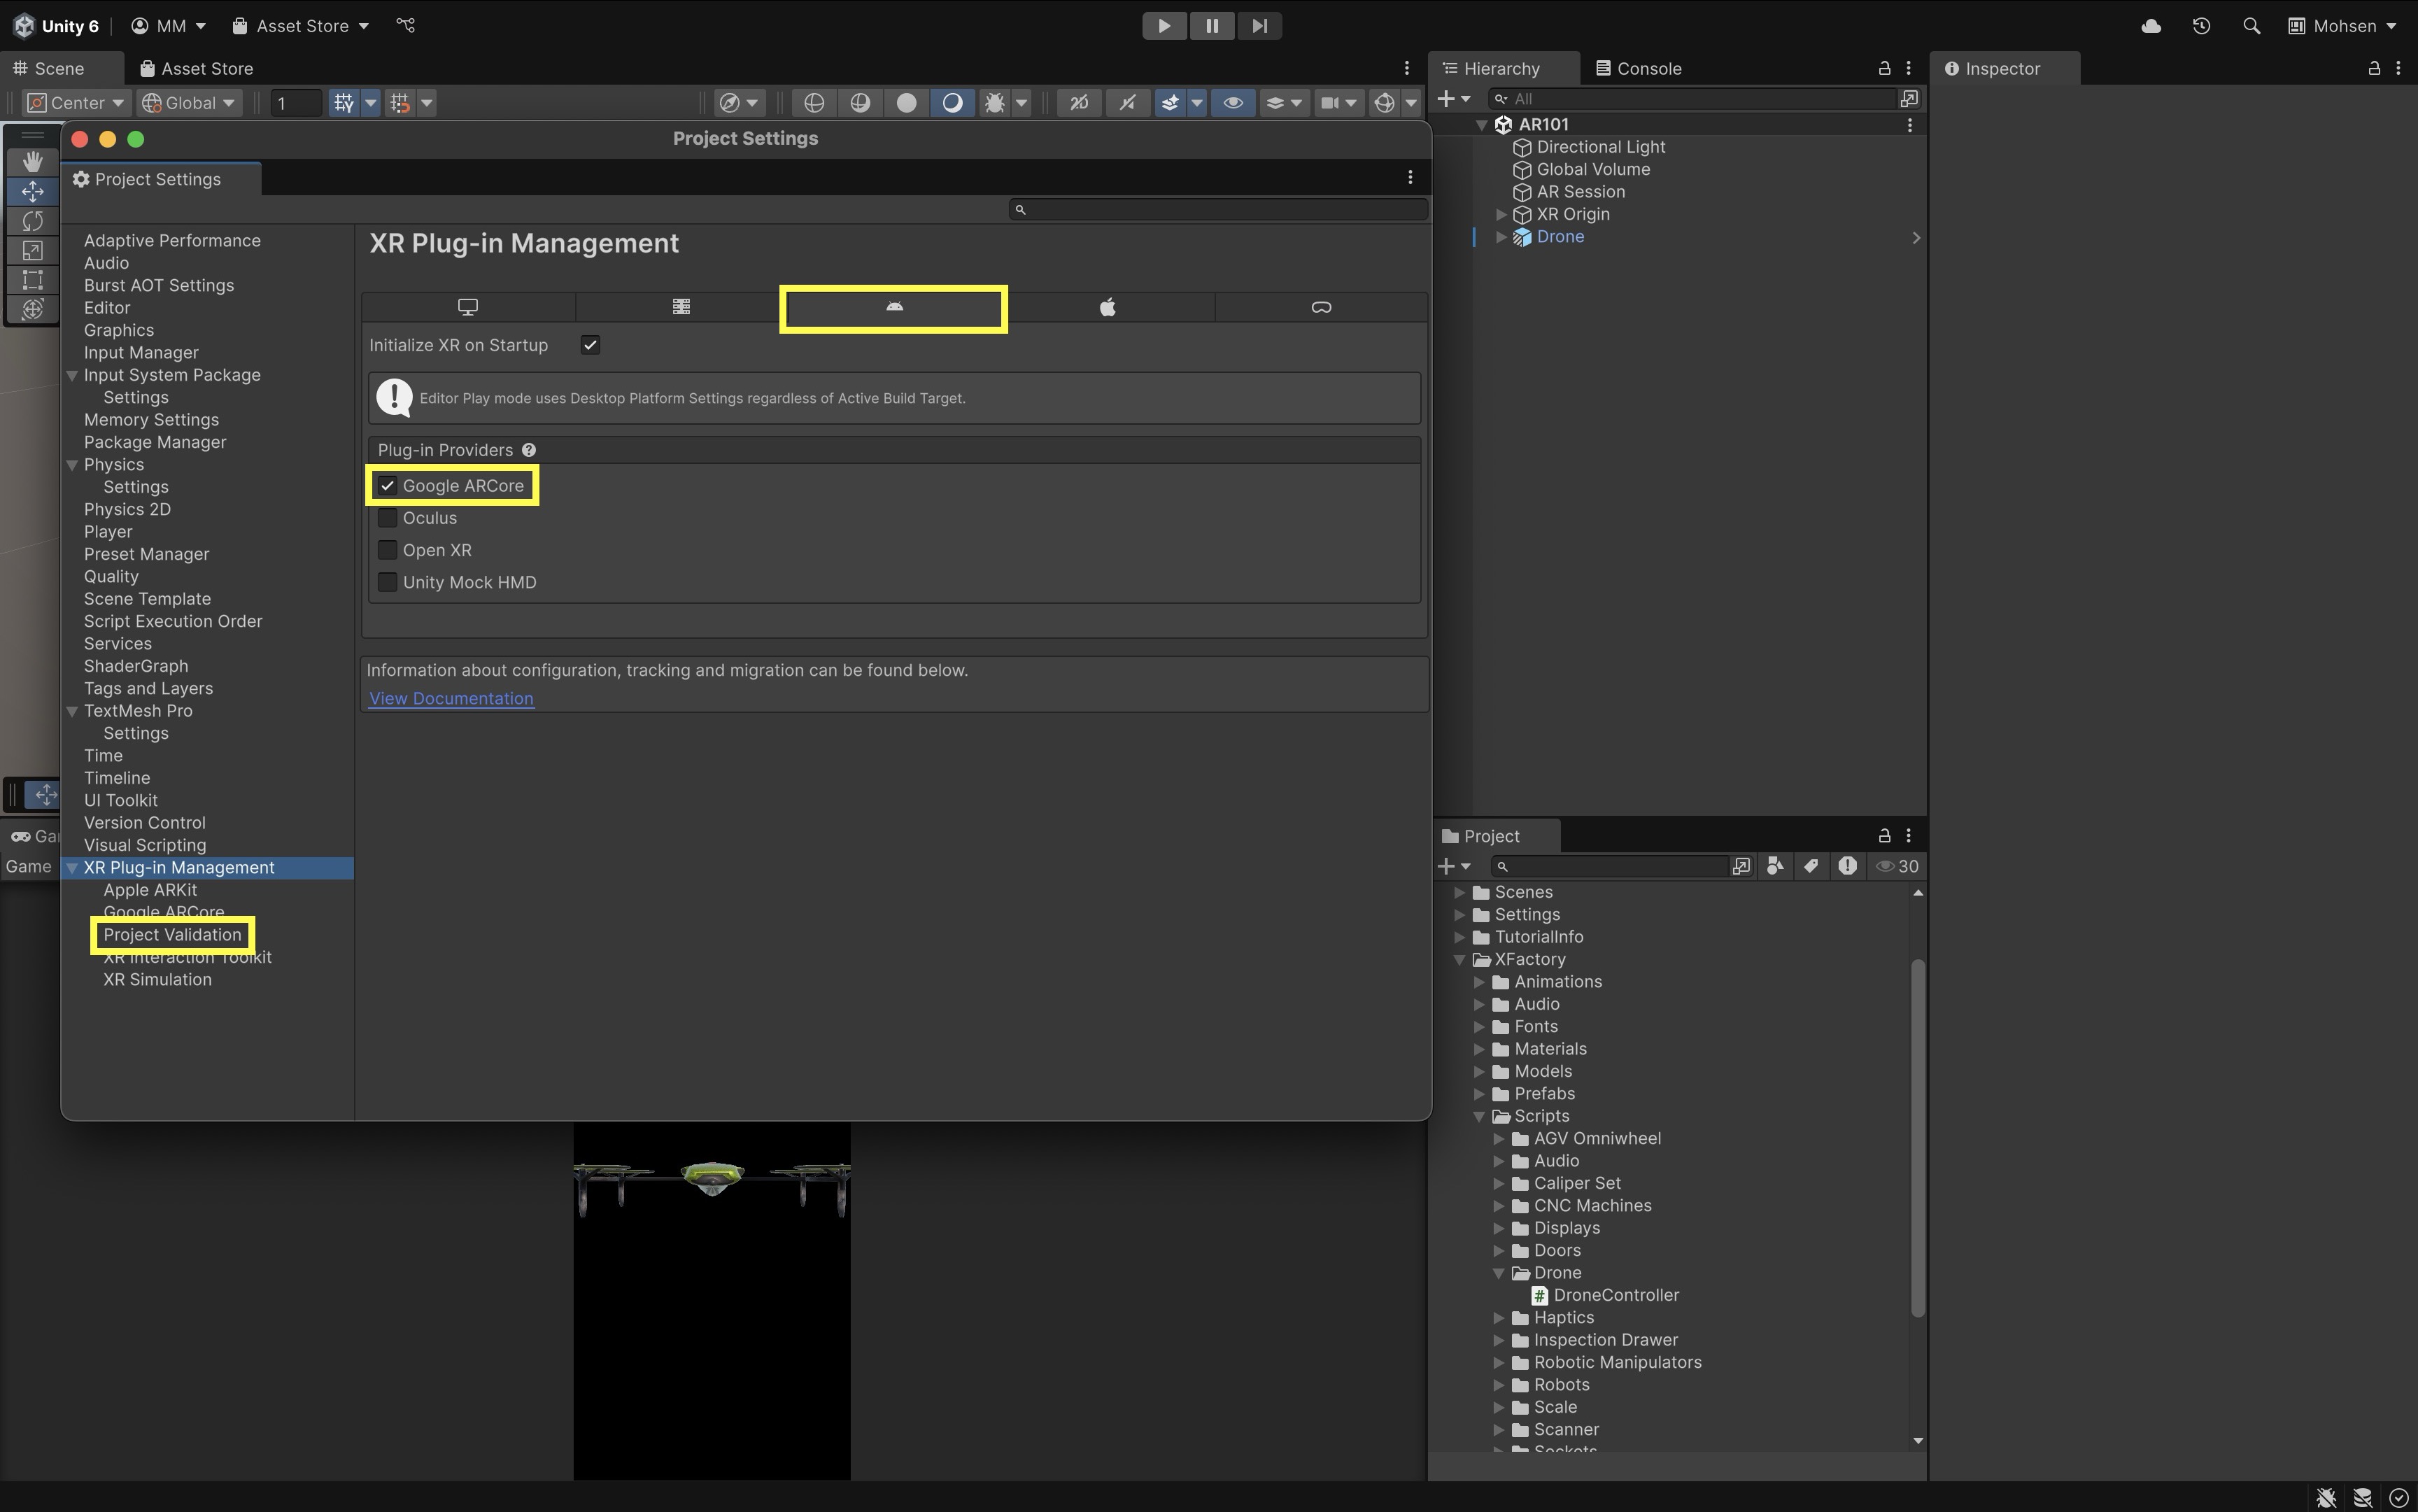
Edit > Project Settings > XR Plug-in Management. - Select the
Androidtab and ensure that theARCoreplug-in is enabled. EnablingARCoreconnects your project to Google’s AR platform, providing access to device-specific AR features. - Go to
Project Validationand fix all the issues. - ARCore support varies by Android device model. Confirm the device supports ARCore before troubleshooting Unity scene logic.
- Go to
- Configure Build Profiles:
- Navigate to
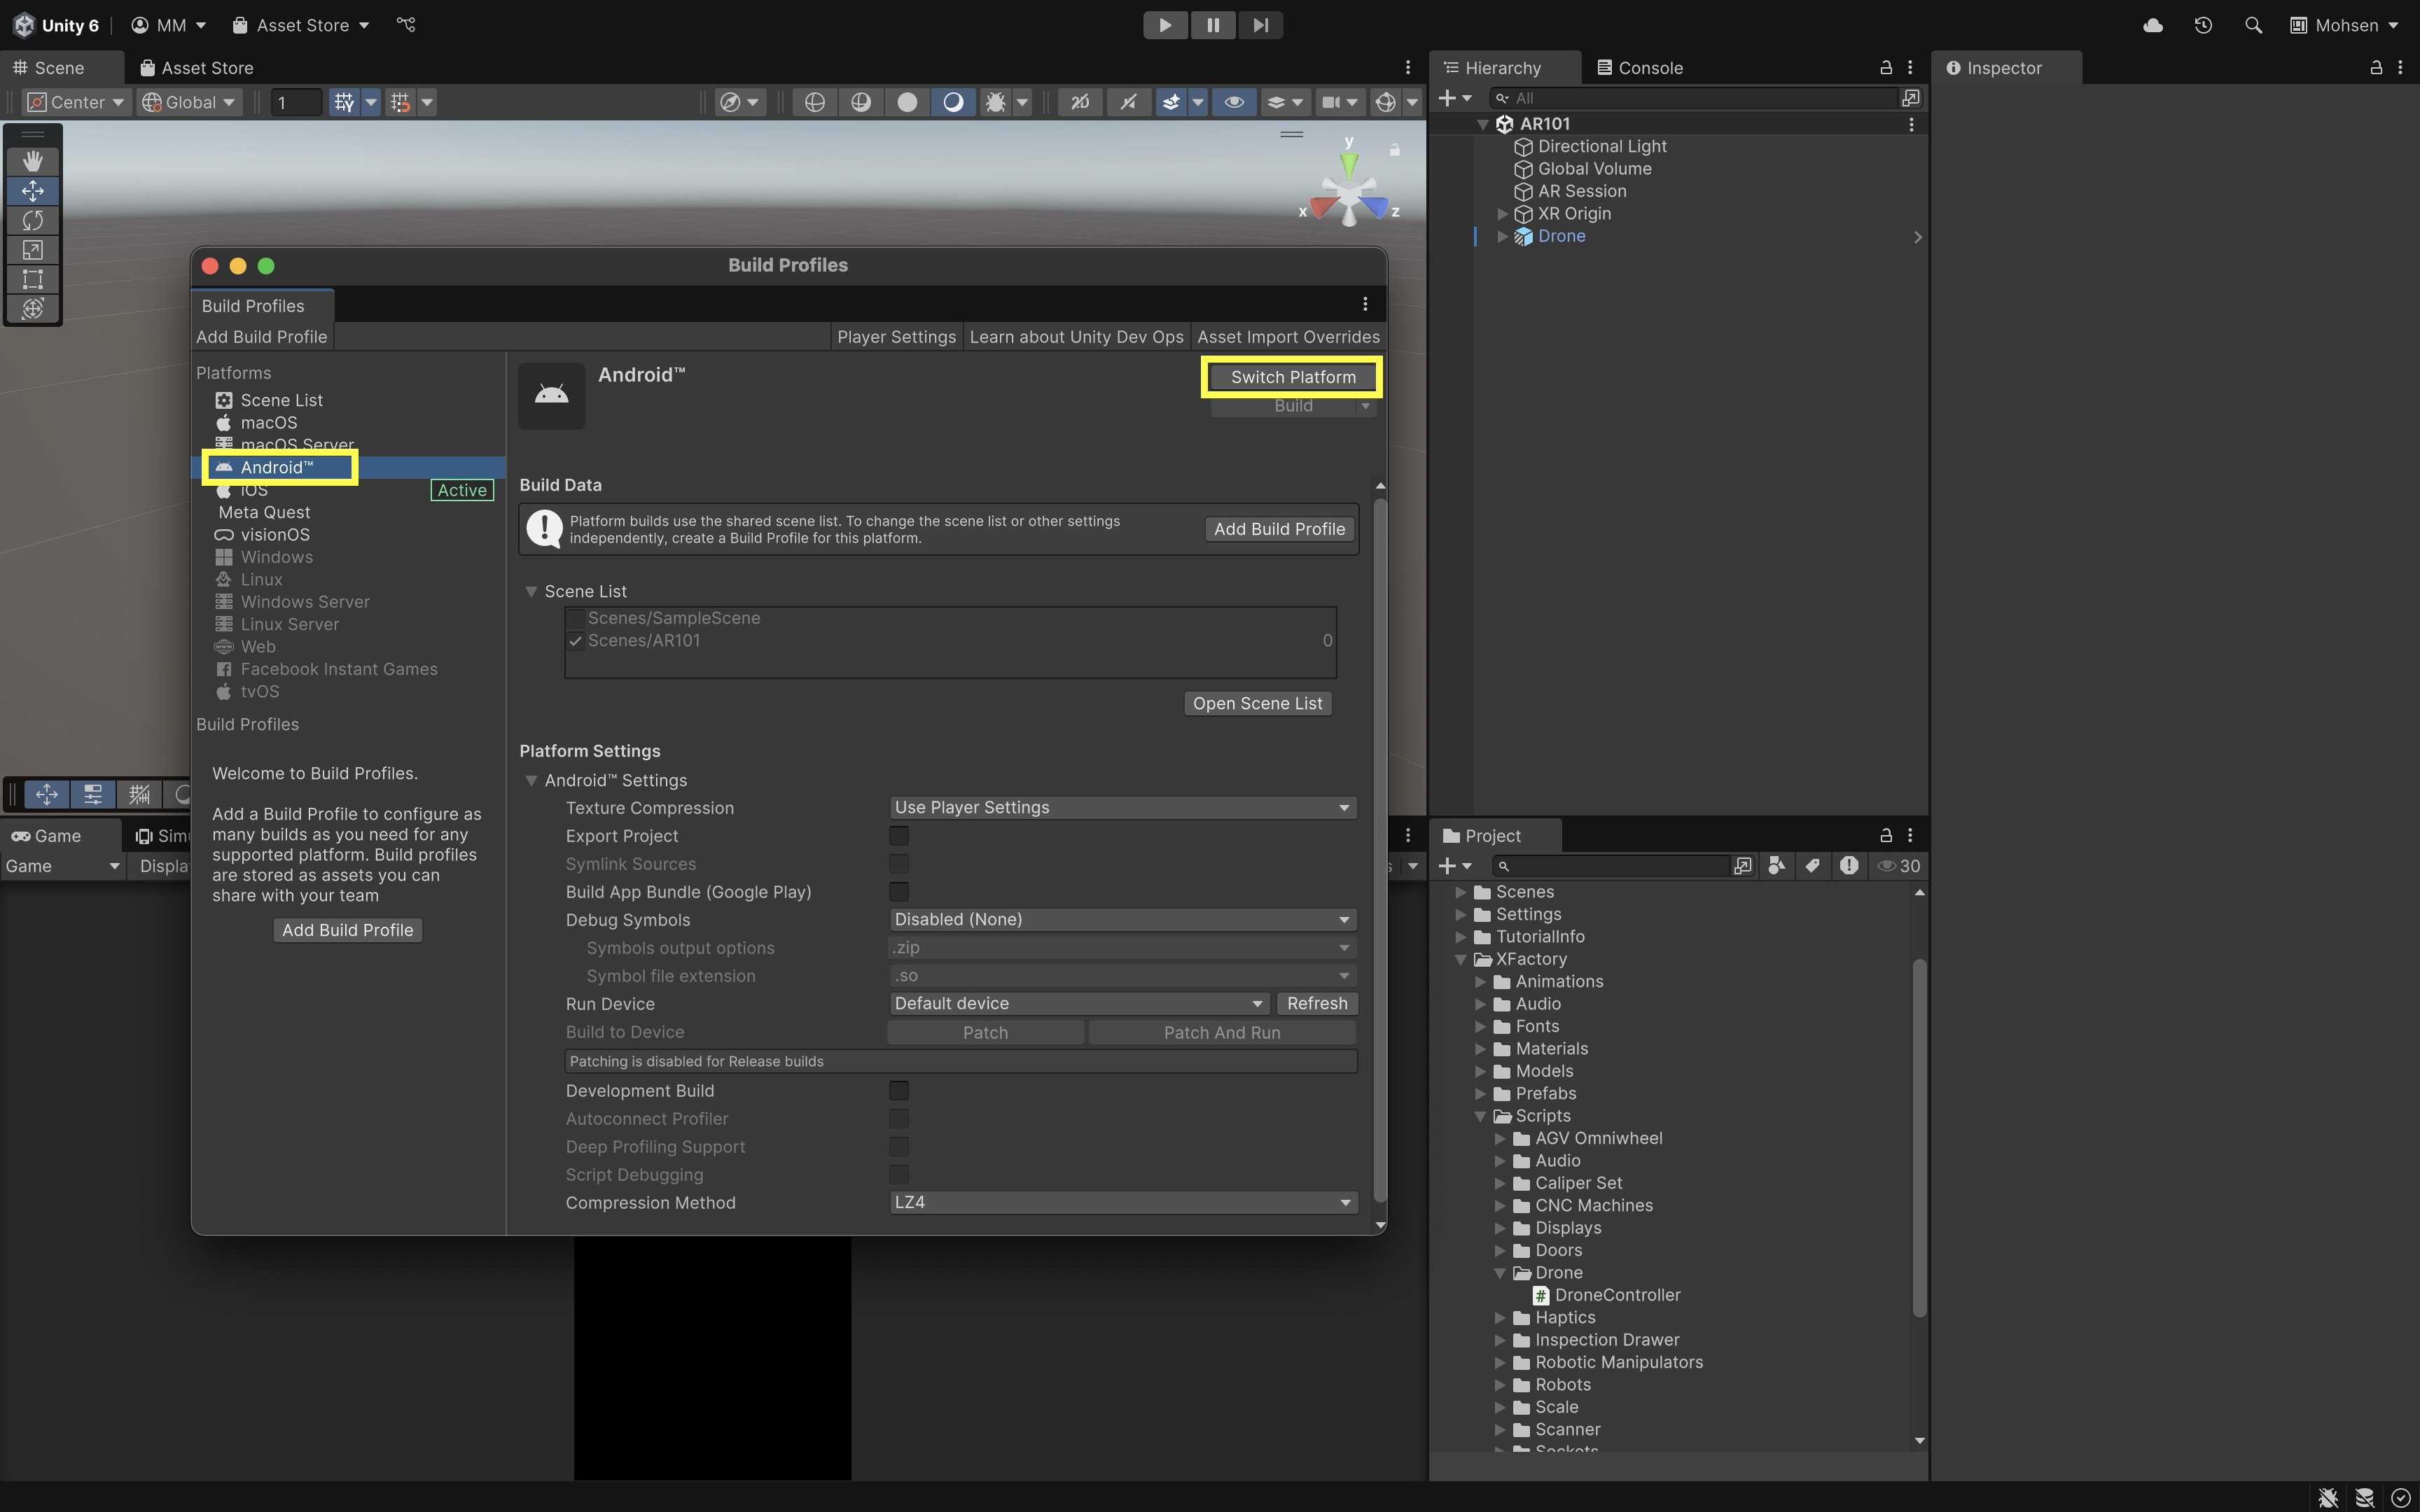
File > Build Profiles. - Add the open scene(s) with
Add Open Scenes. This ensures that the scene you are working on will be part of the final APK. - Select
Androidand clickSwitch Platform. This step converts your project for Android, applying the necessary settings and libraries.
- Navigate to
- Deploy Your App:
- Connect your Android device via cable.
- In the
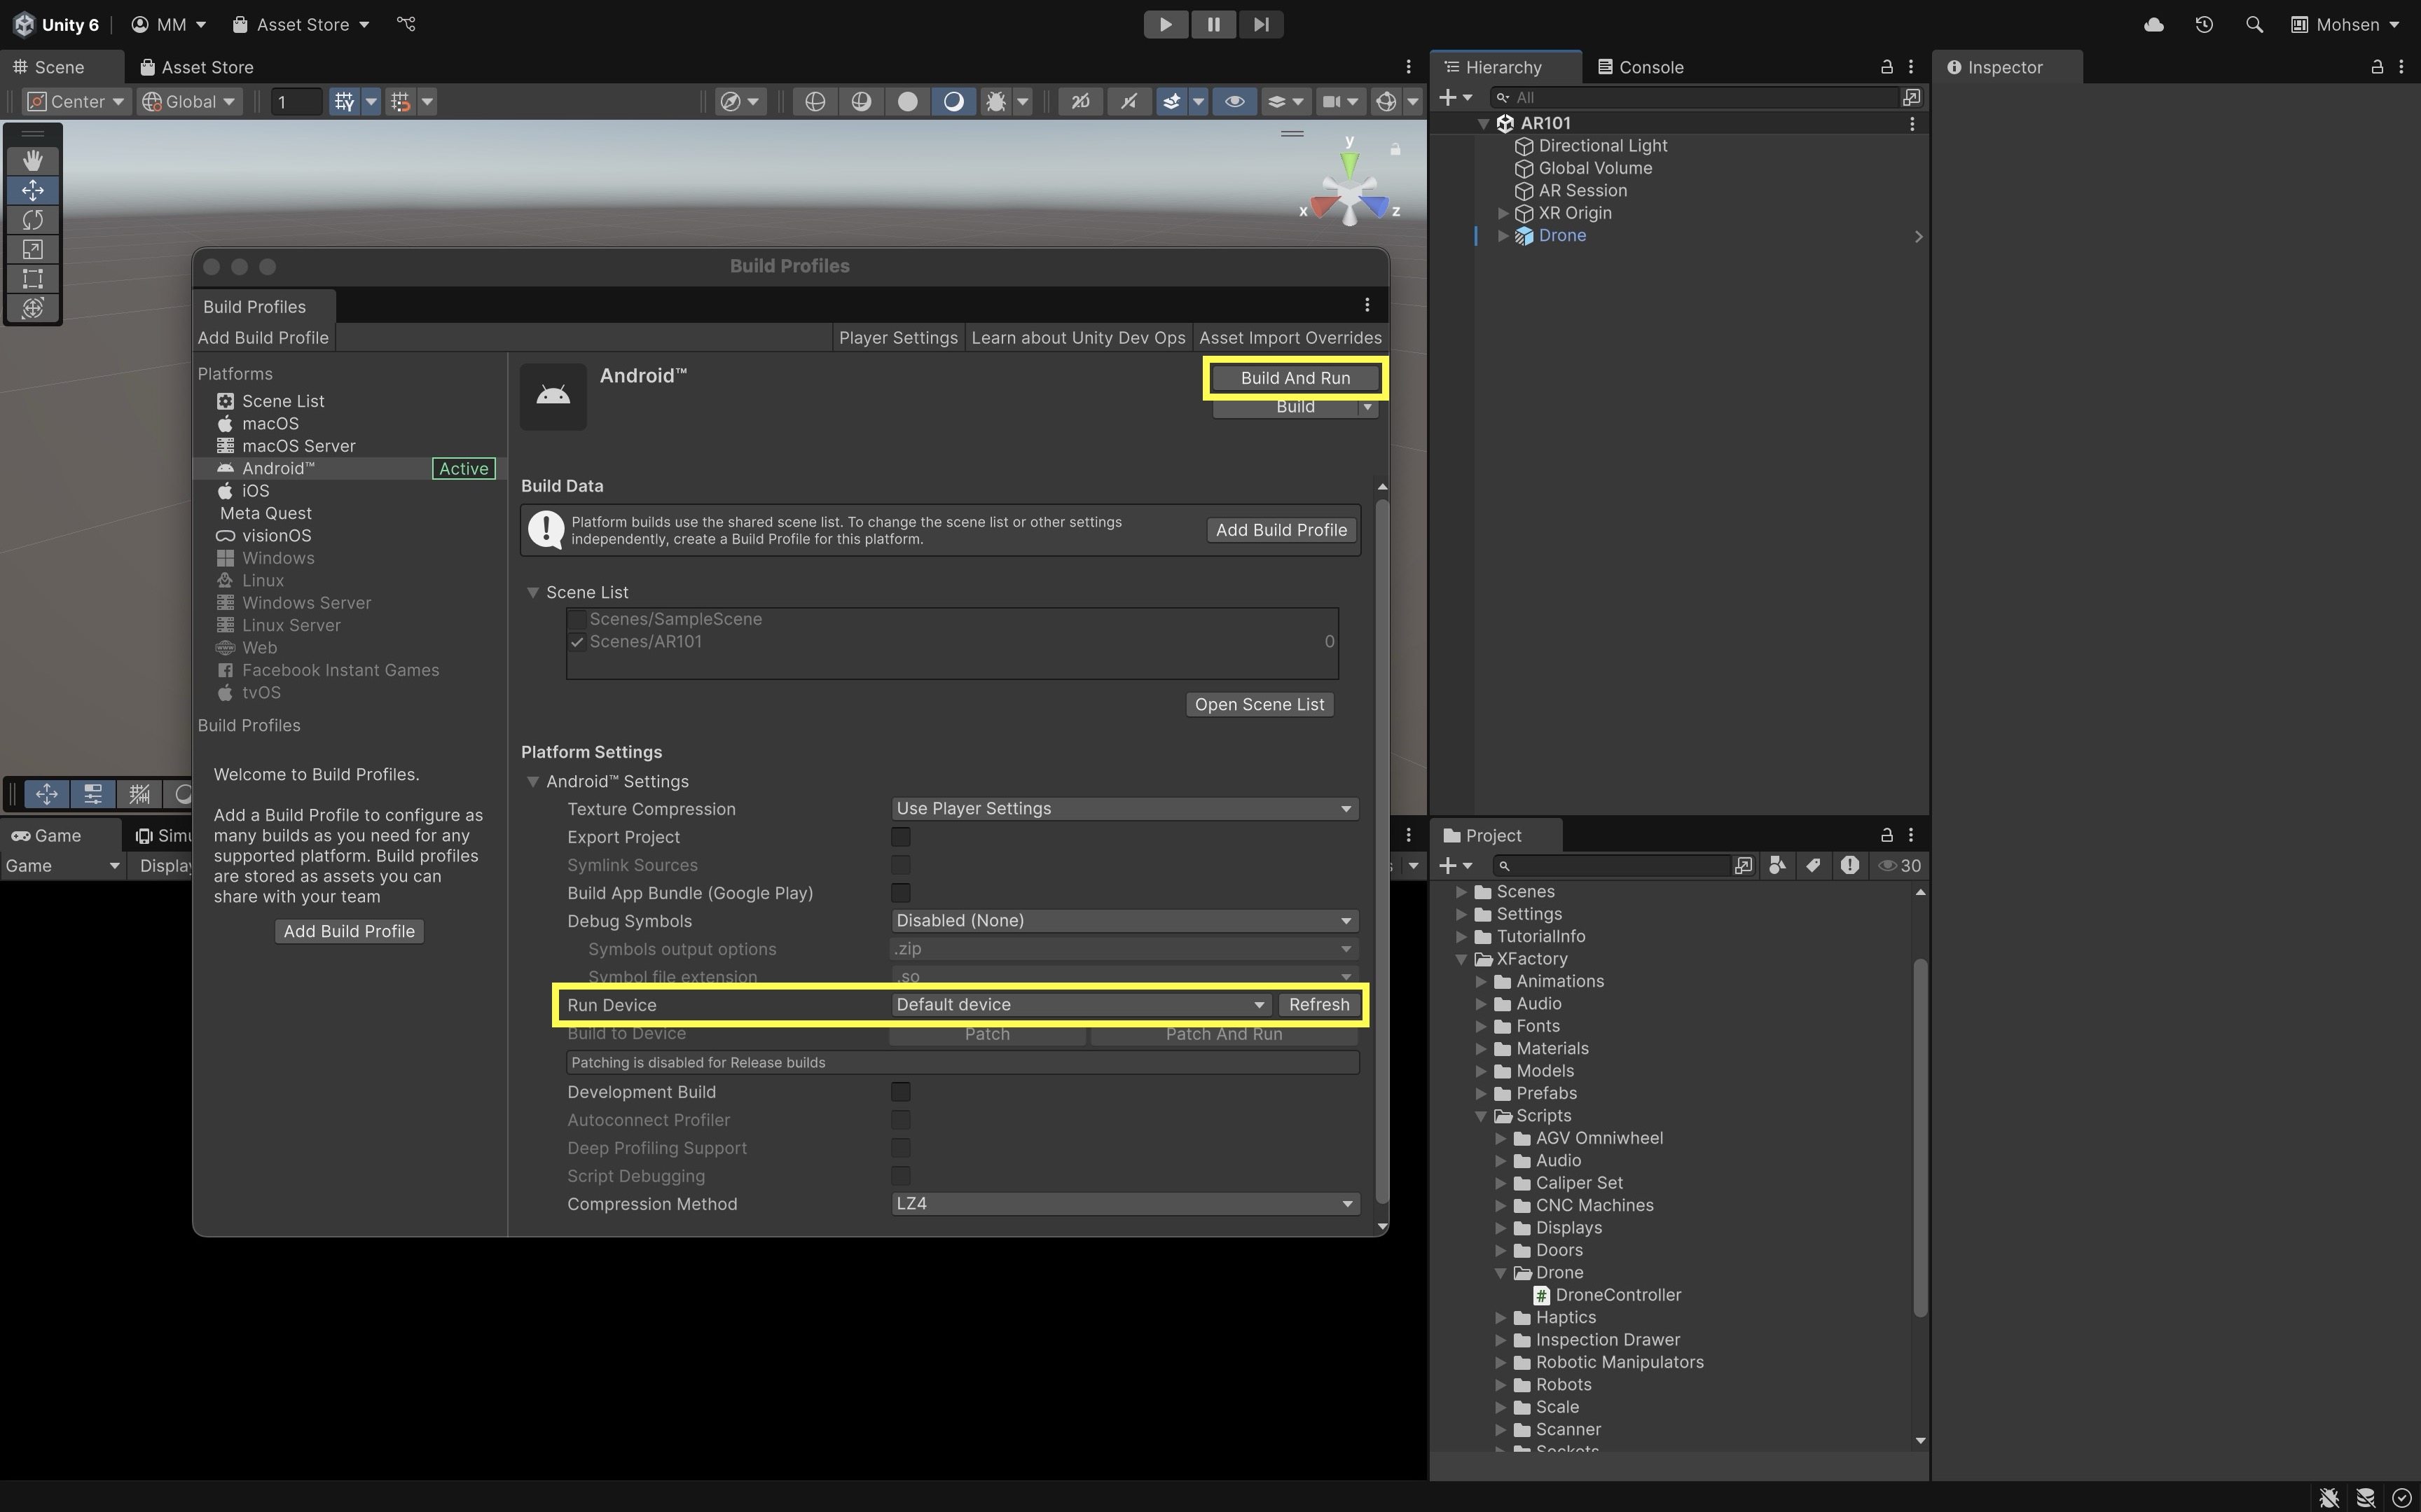
Build Profileswindow, clickRefreshto list your connected device. - Click
Build and Run. Save your build as an APK file (for example, in a folder namedBuilds). This creates an APK, the standard format for Android applications, allowing you to install and test your AR app. - Once the app installs and runs on your device, grant camera and any other runtime permissions when prompted. Without camera access, AR tracking and the live background will not work.
Deployment and Testing Matrix
| Stage | Purpose |
|---|---|
| XR Simulation | Early Editor testing of AR scene logic, planes, raycasts, and anchors |
| iOS device | ARKit camera feed, tracking, touch input, lighting, permissions |
| Android phone/tablet | ARCore support check, camera feed, tracking, touch input, permissions |
| Meta Quest passthrough AR | OpenXR/Meta provider setup, passthrough background, headset input, occlusion/mesh/anchor support where used |
| Real environment | Lighting, reflective surfaces, scale, drift, safety, and task fit |
Iterate by making small modifications (for instance, adjust the scale of a GameObject) to confirm that updated builds deploy correctly. Configure your Game view’s aspect ratio (for example, set it to 16:9 Portrait) within Unity to preview mobile layout during development—but physical device testing remains required.
Architecture
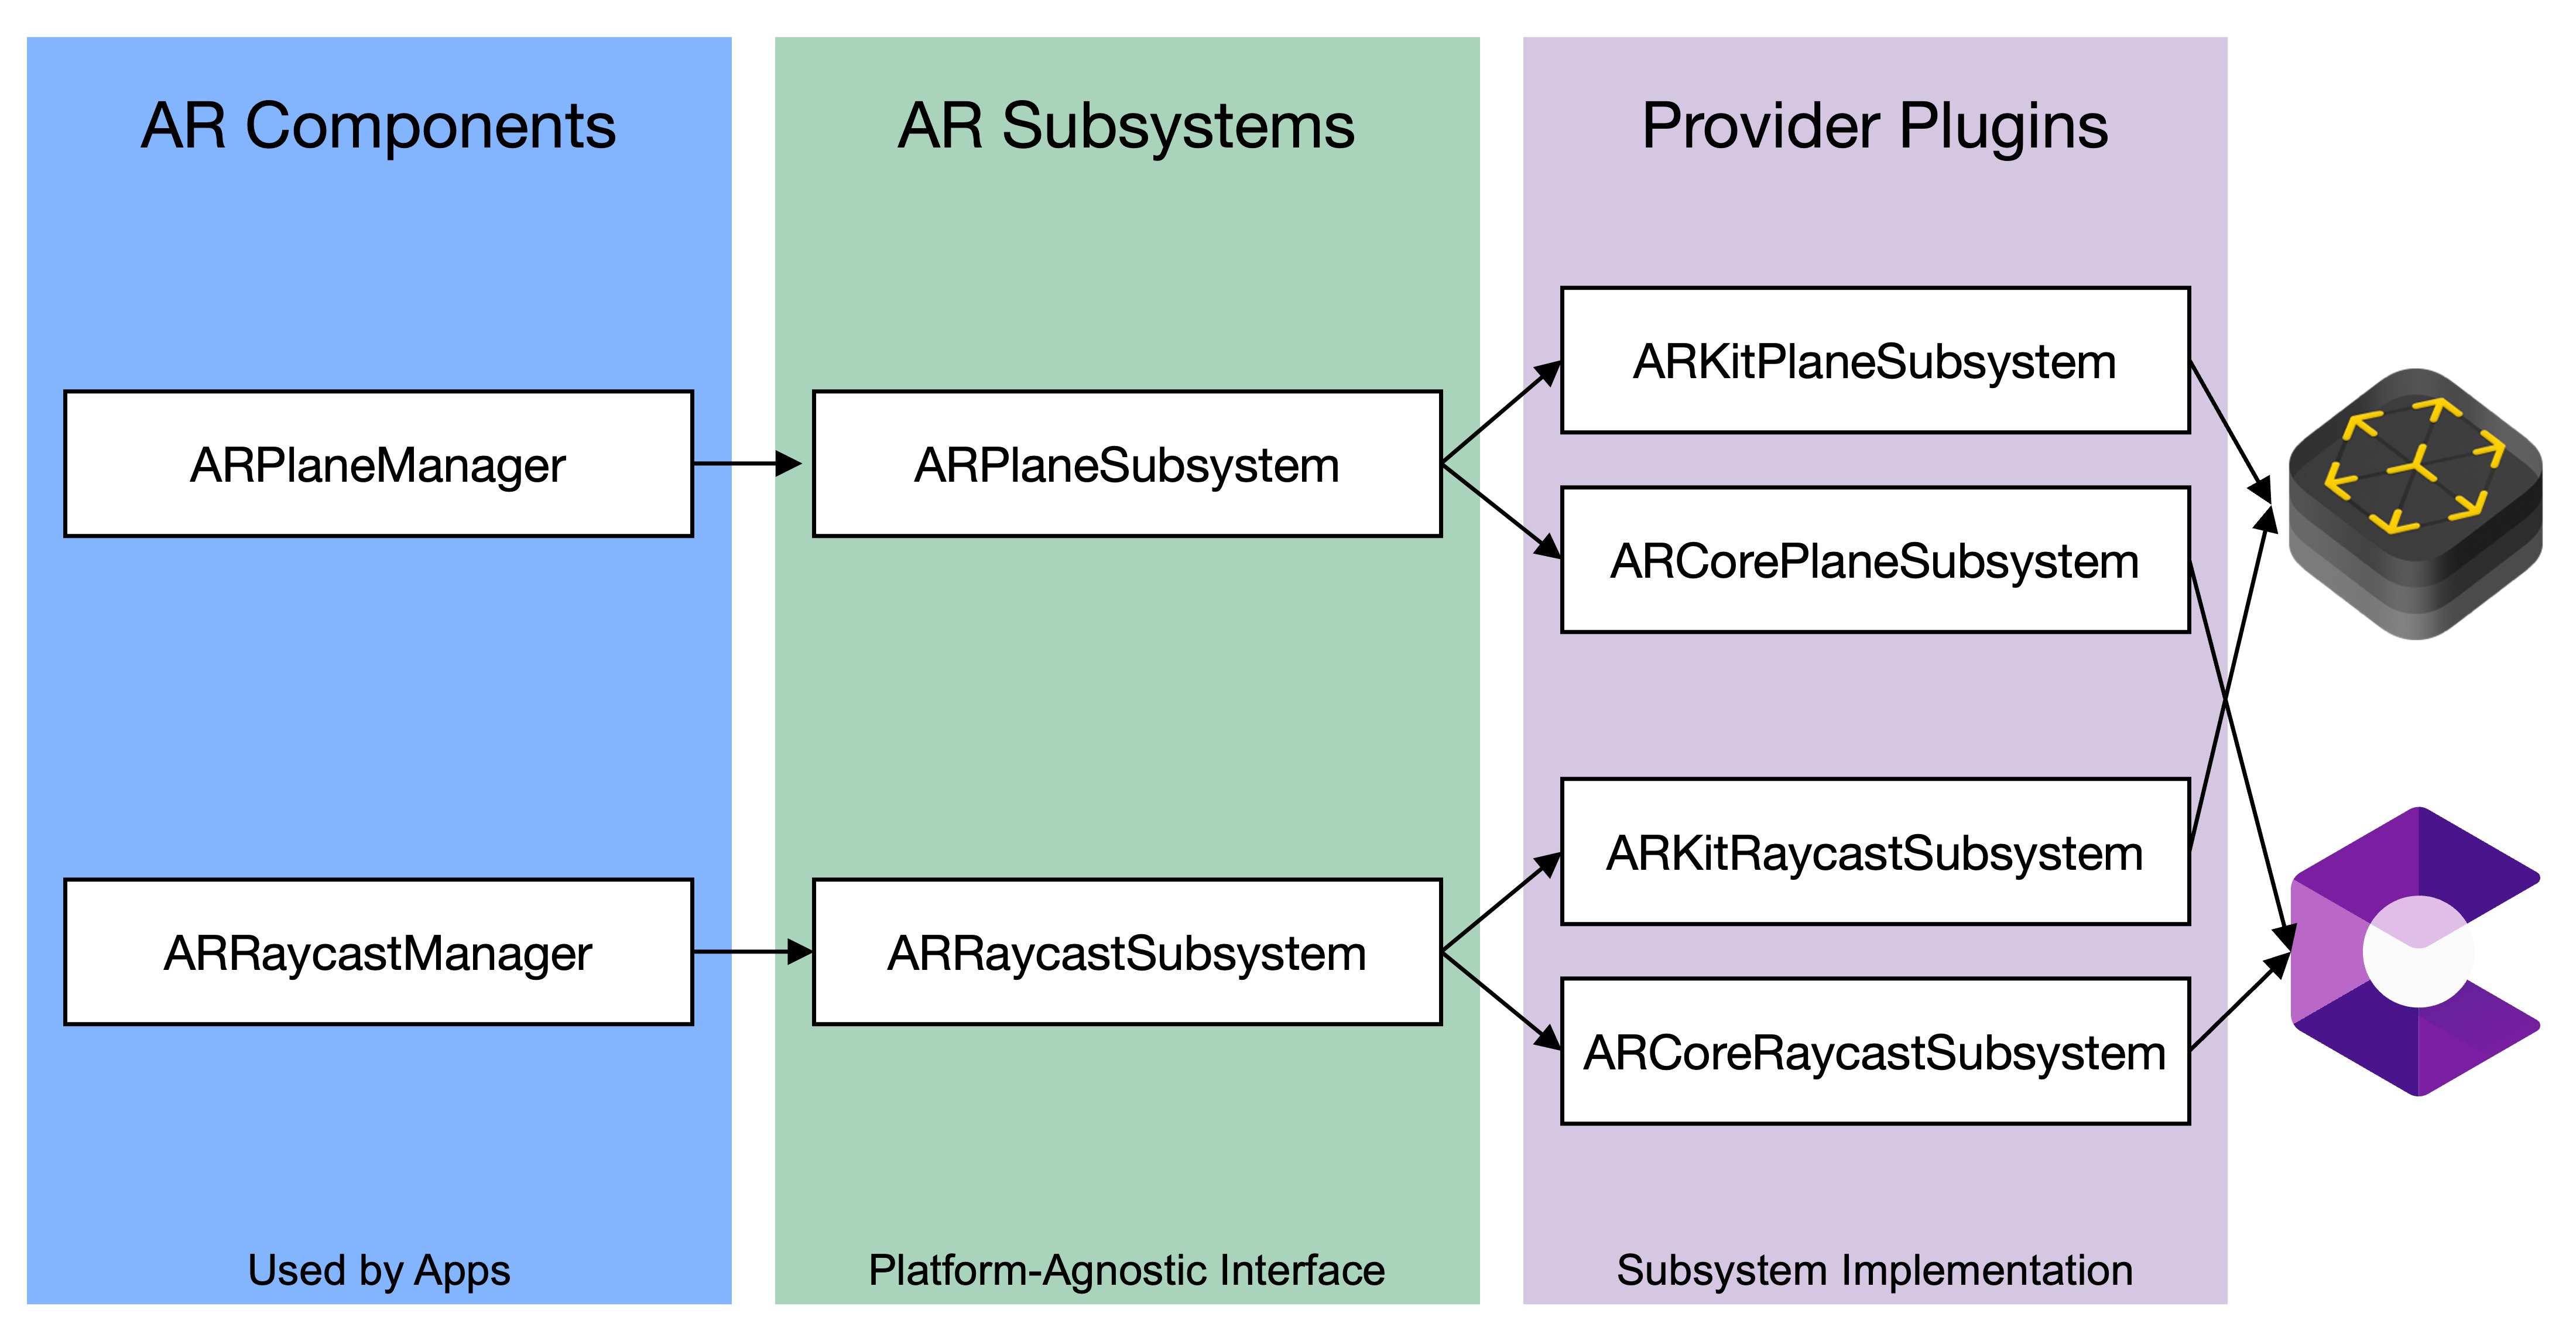
Understanding the AR Foundation architecture is key to making informed decisions when building your AR application. Software architecture refers to the overall structure of a software system. In the context of AR Foundation, this architecture is designed to abstract platform-specific implementations into a unified interface, enabling you to develop AR apps across multiple devices with a consistent API. By understanding these elements, you can better design your application, optimize performance, and troubleshoot issues when integrating native AR capabilities.
Review this Unity documentation to learn more about the AR Foundation architecture, subsystems, and managers.
Subsystems
Subsystems (or SubsystemWithProvider) define the core features and life cycle of AR-related functionality. Subsystems are implemented by providers; managers expose subsystem data as Unity components and GameObjects. They provide an abstraction layer over platform-specific SDKs such as Google ARCore, Apple ARKit, or OpenXR-based Quest providers.
- Life Cycle of Subsystems: All subsystems share the same life cycle. This predictable life cycle, managed by Unity’s active XRLoader, ensures consistency when initiating or terminating AR processes. It also helps in managing system resources effectively by monitoring the state of a subsystem; e.g., created (the subsystem is instantiated), started (it begins processing and delivers data), stopped (processing is halted), and destroyed (the subsystem is disposed).
- Subsystem Descriptors: Each subsystem has a corresponding descriptor that outlines its capabilities and limitations (for example, whether an image tracking subsystem supports mutable libraries). Use descriptors and runtime checks when a feature may not be supported on every device.
- Tracking Subsystems: A tracking subsystem is responsible for detecting and continuously tracking objects (known as trackables) in the physical environment. Trackables are entities such as planes, images, or points that are detected and monitored by the subsystem. Each trackable is uniquely identified using a 128-bit GUID, ensuring consistent tracking across frames. Your app calls methods defined in the
XRPlaneSubsysteminterface to start, update, or stop plane detection. The underlying provider (ARCore for Android, ARKit for iOS, or OpenXR Meta for Quest passthrough AR) implements these methods, so your application code can stay largely shared—while still validating behavior per device.
Managers
Managers in AR Foundation are components added to the XR Origin that make subsystem data accessible to your scene as GameObjects and components. They also handle the life cycle of their respective subsystems. Common managers in this course include AR Plane Manager for surface detection, AR Raycast Manager for tap-to-place mobile AR, AR Anchor Manager for stable placement, and AR Camera Manager and AR Camera Background for camera or passthrough visuals. To add a manager, select the XR Origin, click Add Component in the Inspector, and search for the manager you need. This lets you treat real-world features (surfaces, machines, or tracked parts) as interactive GameObjects you can program, visualize, or annotate—without manually handling raw tracking data.
- Trackable Managers: Trackable managers wrap tracking subsystems, translating raw tracking data into usable components in your scene. For instance,
ARPlaneManagercreates and managesARPlanecomponents when theXRPlaneSubsystemdetects a physical surface. - Trackable GameObjects: These are instantiated as children of the
XR Origin, and their positions, rotations, and scales are defined relative to that origin. This setup provides a clear, organized way to work with dynamic AR content, ensuring that virtual elements align correctly with the physical environment. - Configuring a Trackable’s GameObject: When a new trackable is detected, the manager instantiates a prefab (if specified) or creates an empty GameObject with the corresponding ARTrackable component. If a prefab is set in the manager’s
Inspector, it will be instantiated for each detected trackable. If no prefab is specified, an empty GameObject is created, and the appropriateARTrackablecomponent is added automatically. - Enabling and Disabling Managers: Managers can be enabled or disabled to control which AR features are active. When a manager is enabled, it starts its subsystem; when disabled, it stops the subsystem. This flexibility helps manage power consumption and processing resources. For example, imagine you want to place a floating XFactory drone in your AR application that hovers in mid-air and maintains its position as the user moves around. You add an
AR Anchor Managercomponent to yourXR Origin. When the user taps the screen, your app performs a raycast against the AR environment (typically planes or feature points). If a valid point is found, anARAnchoris created at that position, and the drone prefab is instantiated as a child of that anchor. The drone prefab includes animation for spinning propellers and a smooth hover motion, giving the illusion of autonomous flight in the room.
Think of subsystems as the engine and sensors under the hood—they do the invisible, technical work of detecting planes, images, and motion. Managers are like the dashboard and steering controls—they take that raw subsystem data and make it visible, usable, and interactive inside your Unity scene. In short, subsystems power AR functionality, while managers present and control it.
Key Takeaways
- AR Foundation provides a shared Unity layer, but provider plug-ins determine which features work on each target device.
- Most AR scenes need an
AR Sessionand anXR Origin, with managers added only for the features the scene uses. - Mobile AR and Quest passthrough AR share concepts but require different provider settings, build targets, permissions, and device tests.
- Managers turn real-world trackables into Unity objects, making planes, anchors, images, and raycasts usable in scene logic.
- Engineering AR must be validated on real hardware, especially for scale, drift, occlusion, lighting, permissions, performance, and task safety.