D6. Haptics and Spatial Audio in VR
Learning Outcomes
- Explain and apply multimodal feedback principles in VR. Before class, review how coordinated audio–haptic cues (consistency, proportional intensity, tight synchronization, localization, and comfort controls) improve realism, situational awareness, and safety in engineering scenarios like assembly, teleoperation, and diagnostics.
- Implement controller and glove haptics with Unity XRI. In preparation, configure
HapticImpulsePlayerandSimple Haptic FeedbackonNear-Far Interactorevents under your copiedXR Origin (XR Rig), and skim the per-object patterns (CustomHoverHaptics,CustomSelectHaptics) and, if available, optional hand tracking and bHaptics glove setup (colliders +SimpleFingerHaptics) for object-specific fingertip feedback.- Distinguish feedback paths for controllers, objects, sockets, and gloves. Compare controller-level
Simple Haptic Feedback, custom interactable scripts, socket completion events, and optional fingertip glove haptics so each cue matches the interaction type.- Evaluate feedback for engineering use. Assess whether audio and haptic cues are synchronized, localized, comfortable, proportional, and appropriate for safety-critical training.
- Configure spatial, event-driven, and proximity-triggered audio. Ahead of the session, attach and tune an
AudioSource(setSpatial Blend,Min Distance,Max Distance, loop/3D), prepare clips for event-based playback (e.g., surface-tag switcher), and review optionalSimple Audio Feedback,Audio Reverb Zone, and proximity scripts so sounds activate and attenuate naturally as users move through the environment.
Multimodal VR Experiences
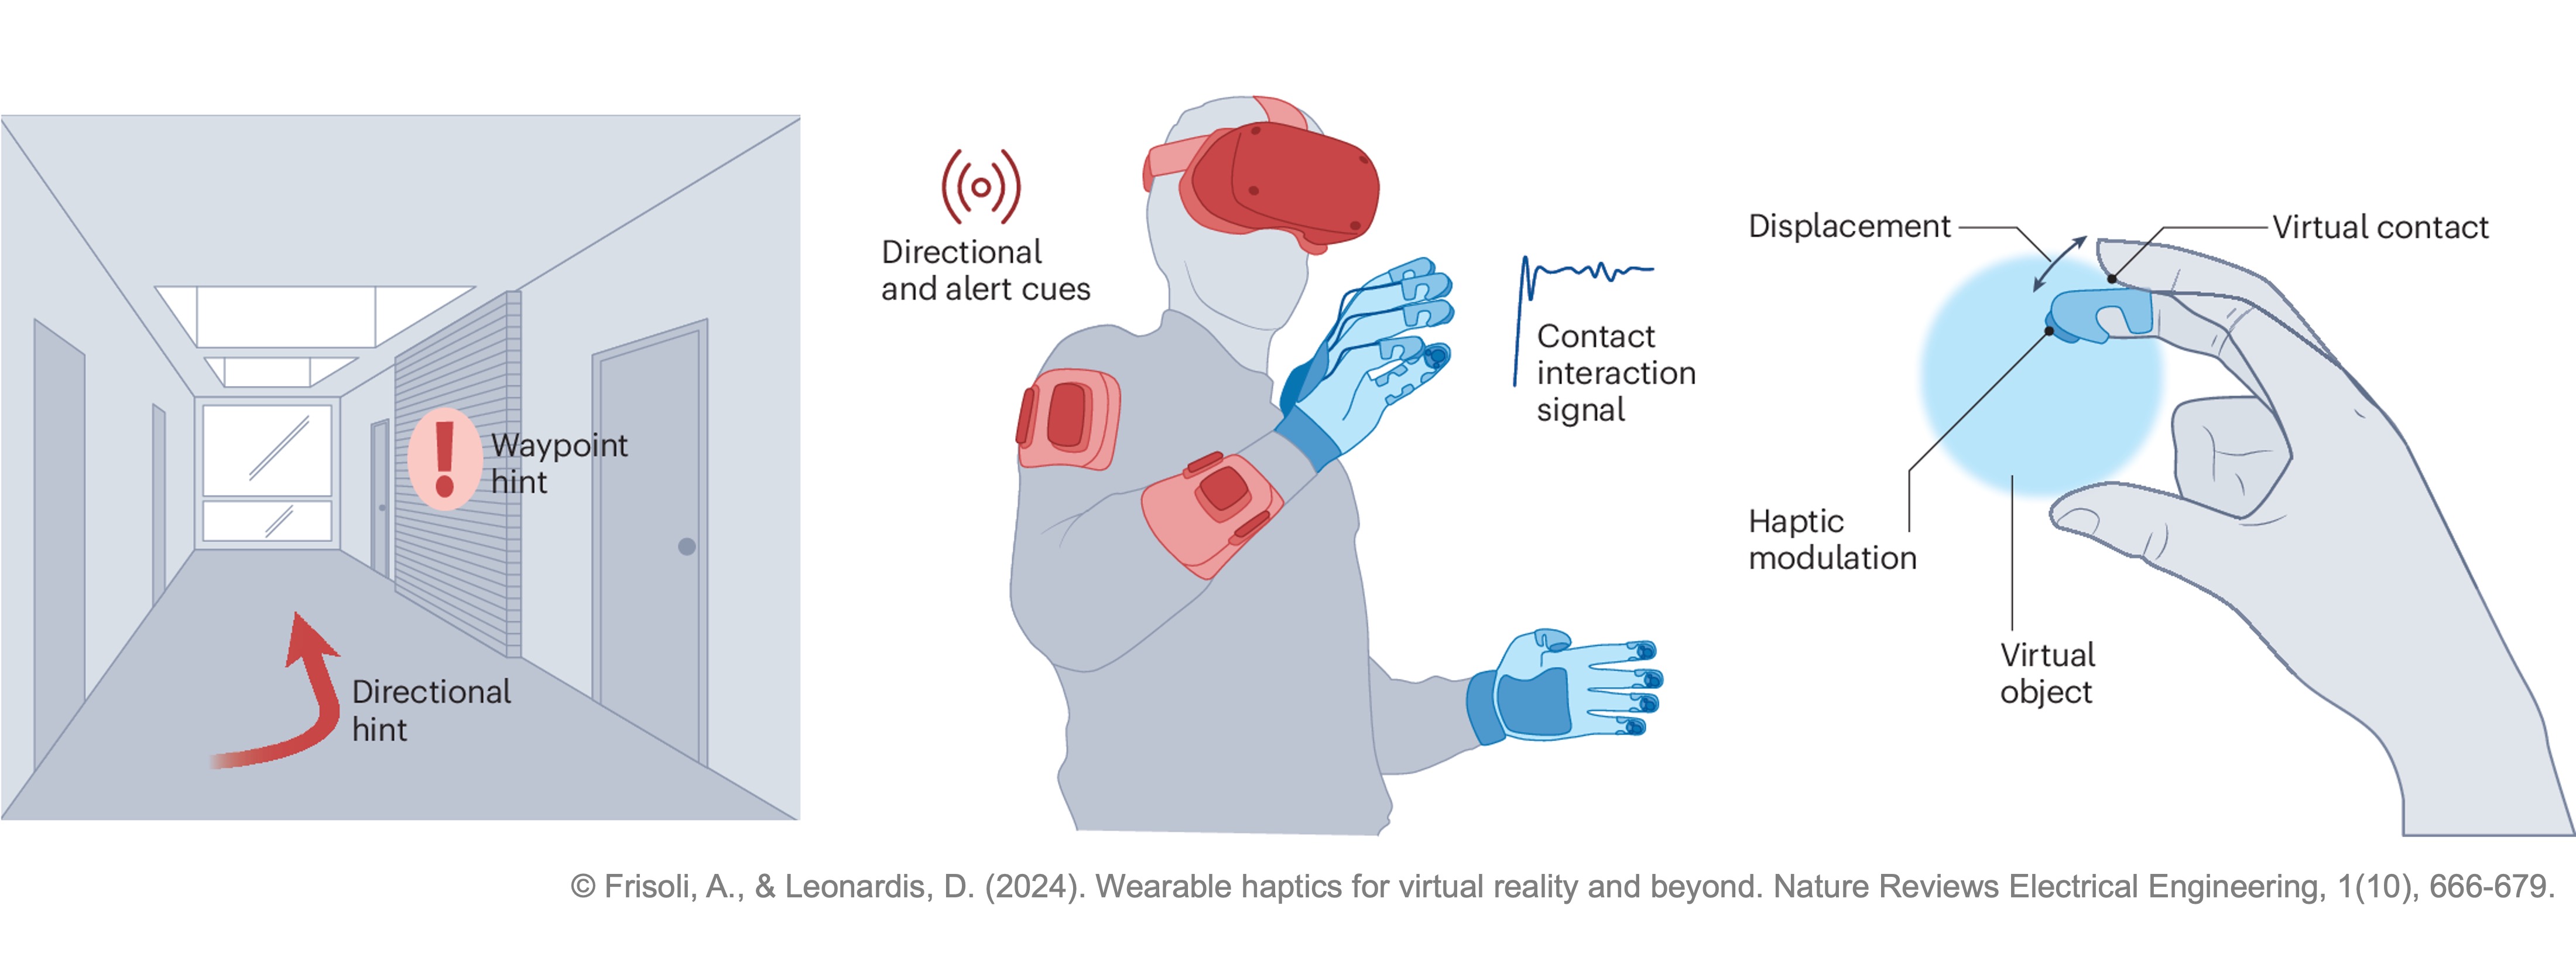
In VR, creating a truly immersive experience goes beyond realistic visuals. The senses of hearing and touch play pivotal roles in bridging the gap between the virtual and the physical world. In engineering applications—such as industrial simulations, training environments, and control systems—accurate auditory cues and haptic feedback are critical for:
- Enhanced Situational Awareness: Operators in control rooms or simulation environments can quickly gauge system status and spatial relationships without relying solely on visual displays.
- Improved Safety and Efficiency: Timely and clear sensory feedback helps users confirm actions (such as engaging emergency controls) and reduces the risk of errors.
- Realistic Simulation of Real-World Systems: Sound cues and tactile sensations, such as the click of a button or the vibration of a control panel, closely mimic physical interactions, making simulations more believable.
- Increased User Engagement: A rich, multimodal experience keeps users immersed in the virtual environment, essential for effective training and remote operations.
Engineering Use Cases
- Industrial Training Simulators: Teach operators to handle machinery, control panels, or robotic arms by providing immediate sensory feedback. In the assembly station of XFactory, users can be trained to work alongside a robotic arm to assemble a complex part like the V8 engine. As they correctly (or incorrectly) assemble each component, the system gives a confirmation beep and a short vibration pulse to the controller.
- Remote Monitoring and Teleoperation: Allow operators to “feel” and “hear” system statuses and anomalies when controlling equipment remotely. In the logistics station of XFactory, the drone is operated remotely. If the path becomes cluttered or a system error is detected (e.g., battery low or sensor failure), a warning tone is played, and a longer vibration indicates urgency.
- Design and Prototyping: Enable engineers to evaluate new control interfaces or equipment designs by simulating the sensory experience of interacting with physical components. In the exhibit station of XFactory, users can import and evaluate a prototype, touch-sensitive control panel. Each button provides a different audio-haptic profile to simulate physical differences (e.g., soft rubbery button vs. hard metallic switch).
- Maintenance and Troubleshooting: Help diagnose issues by associating specific haptic and audio cues with malfunctioning systems, such as abnormal vibrations or unexpected sounds. In the welding station of XFactory, a robot’s welding head alignment is faulty. When diagnostics are run, the VR system plays a distorted buzzing sound and sends a repetitive low-pulse vibration to indicate a hardware malfunction.
Controller vibration and glove feedback do not simulate true force, weight, torque, heat, or material resistance. Treat them as training cues unless validated against the intended engineering task. For diagnostics, warning patterns should be distinguishable, documented, and tested with users so alarms are not confused with normal confirmation cues.
Design Principles
Effective haptic design enhances realism, reinforces user actions, and maintains comfort across devices. The following principles ensure feedback feels intentional, synchronized, and adaptable in any VR experience.
- Consistency and Predictability: Each user action should always produce the same, recognizable response. A light tap might yield a quick, soft pulse and click sound, while a firm press delivers a stronger, deeper vibration. Predictable feedback builds user trust and supports muscle memory.
- Proportional and Context-Aware Feedback: Scale haptic strength and duration to match the significance of an interaction. Routine actions (like opening drawers or pressing buttons) should feel subtle and brief, while critical events (such as warnings or heavy impacts) should deliver stronger, layered feedback patterns that capture attention.
- Multimodal Synchronization: Align haptic, audio, and visual feedback to occur simultaneously—ideally within a few milliseconds. When a button is pressed, the user should feel a pulse, hear a click, and see a corresponding animation at the same moment. Tight timing reinforces realism and immersion.
- Frequency and Texture Pairing: Use different vibration frequencies to convey material qualities or intensity. High-frequency vibrations can simulate texture or fine detail, while low-frequency rumbles suggest weight or impact. Pair these with complementary audio tones so that both sensations enhance, rather than compete with, each other.
- Localization and Device Awareness: Deliver haptic impulses only to the controller or device involved in the interaction. Pressing a control lever with the left hand should cause only the left controller to vibrate. Because vibration strength and frequency vary between devices, calibrate haptics per hardware profile and degrade gracefully when certain effects aren’t supported.
- Comfort and Adaptability: Avoid excessive or continuous vibrations that cause fatigue. Provide user settings to adjust intensity or switch between “audio-only,” “haptic-only,” or combined feedback modes. Flexible control ensures accessibility and comfort during extended sessions.
Controller Haptics
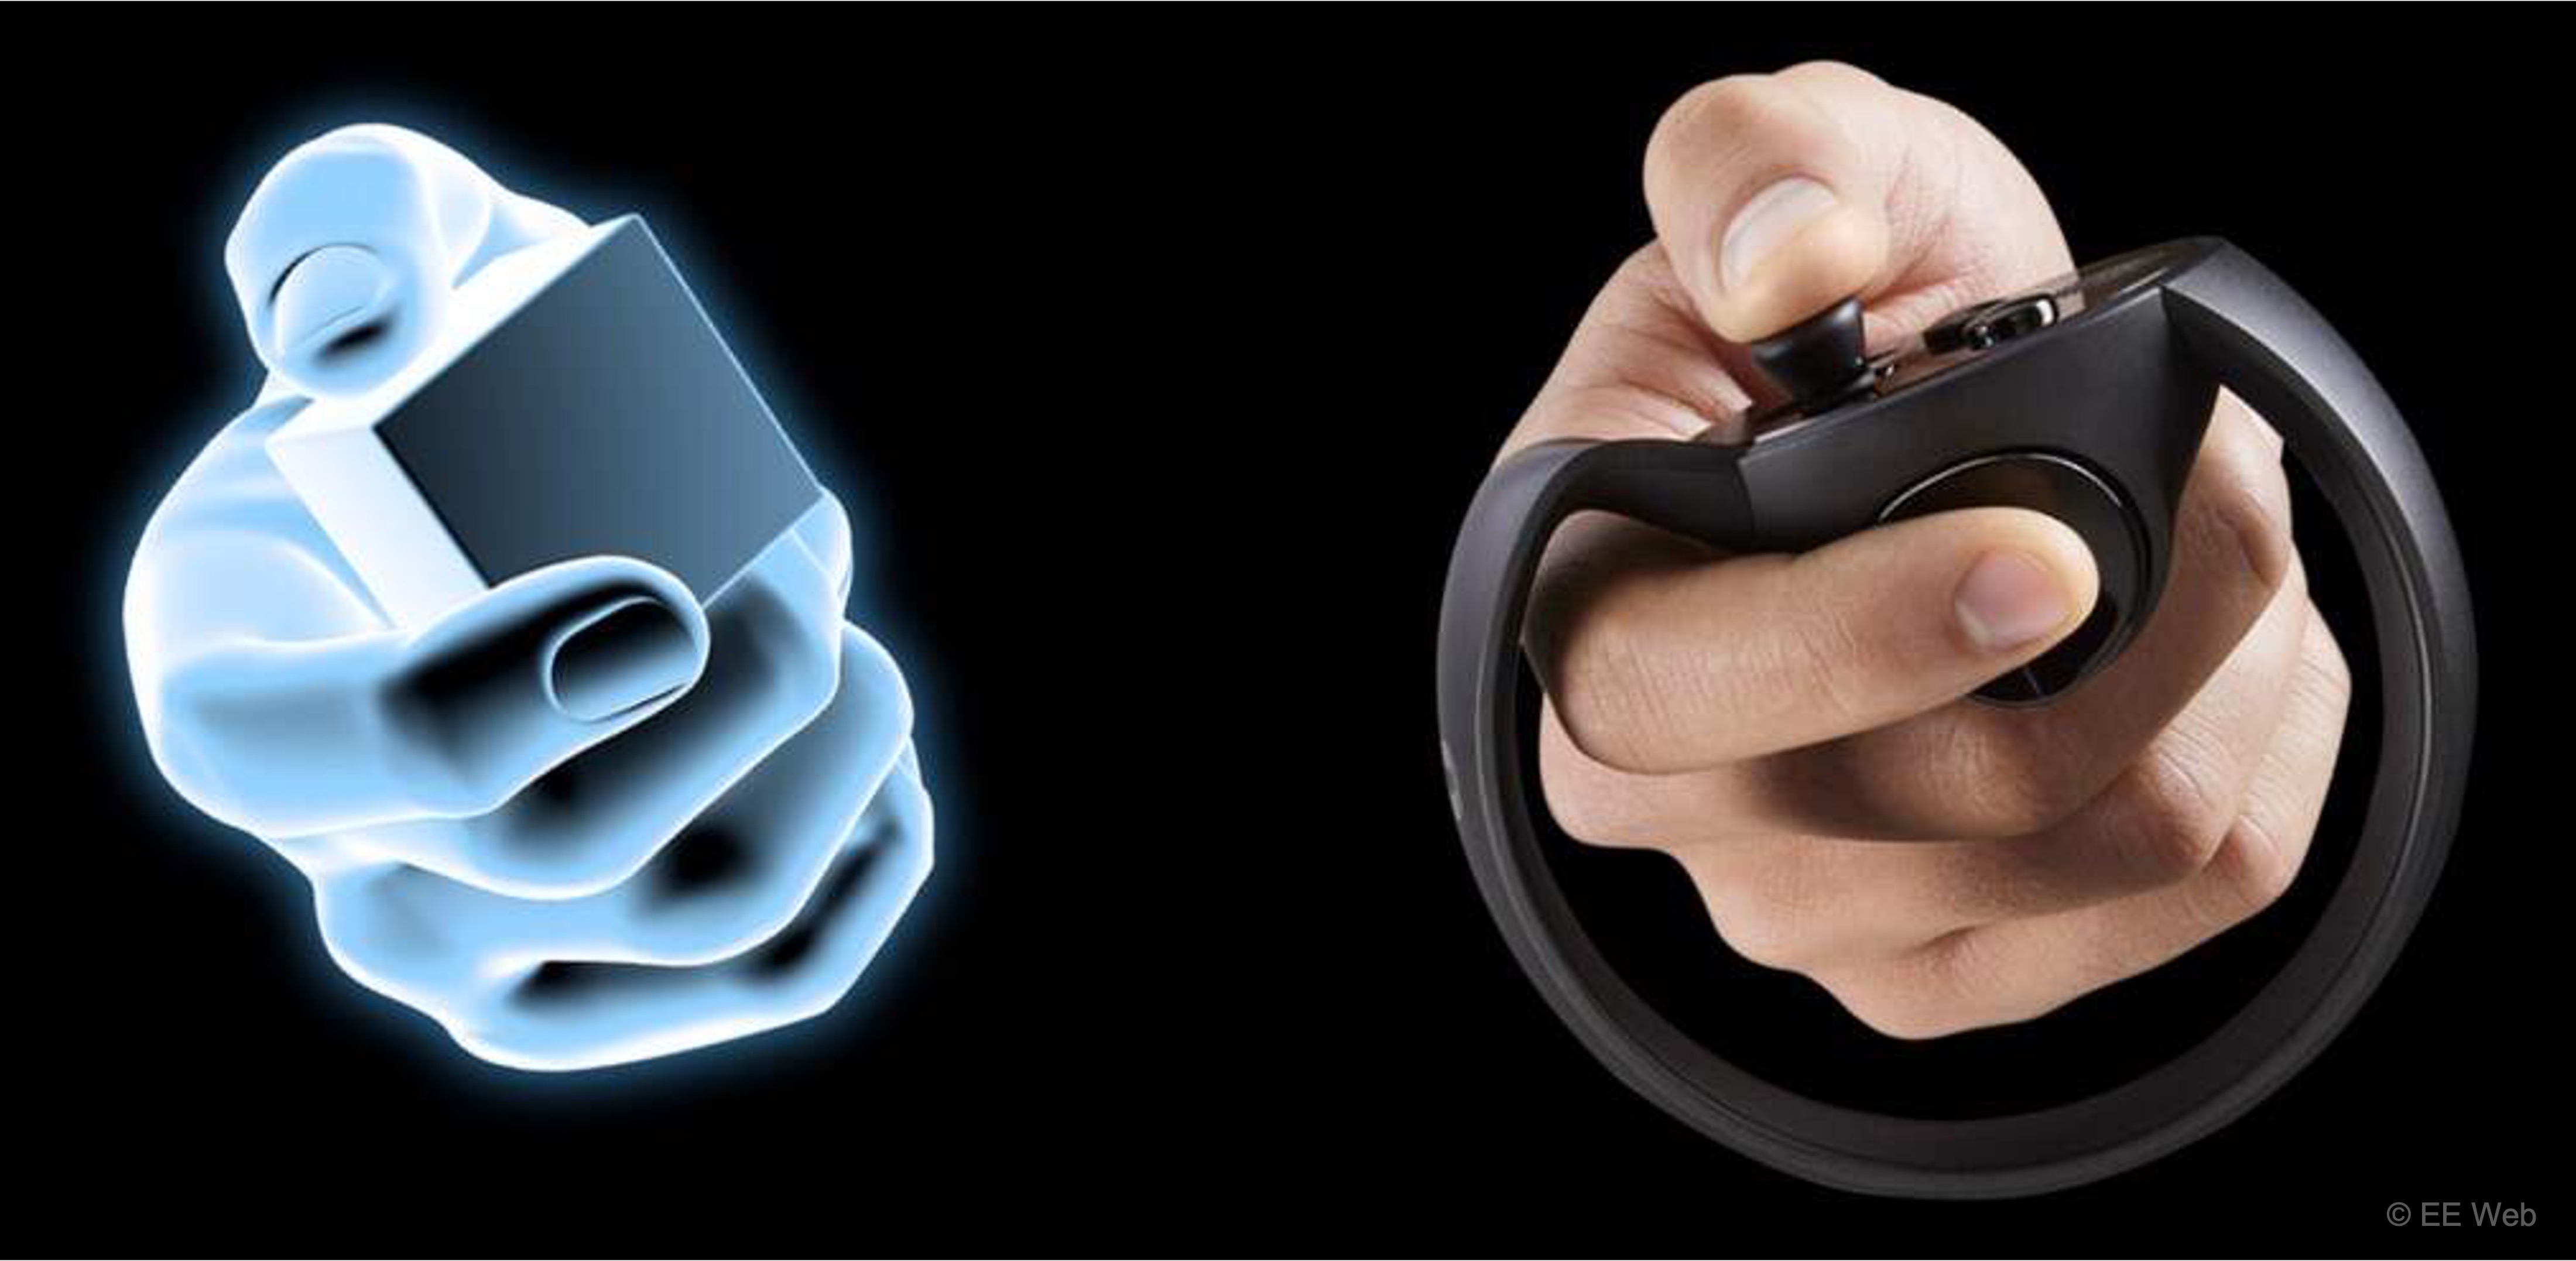
In VR, haptics refers to the use of technology that simulates the sense of touch, allowing users to feel physical sensations in virtual environments. This is achieved through devices like gloves, vests, or controllers that provide feedback such as vibrations, pressure, or force, enhancing immersion and realism in virtual experiences. In XFactory, haptics bring machinery and tools to life. From operating a robot in the assembly station to pushing a button on a forklift dashboard in the logistics station, carefully designed haptic responses reinforce the user’s sense of presence and interaction. Note that good haptic design should balance consistency, context, and comfort, synchronizing multiple sensory cues while adapting gracefully to different users and hardware.
Haptic Impulse Player
The HapticImpulsePlayer component on each controller is the core output driver in Unity’s XR Interaction Toolkit haptic system. It is responsible for sending vibration impulses to the controller’s haptic motor. Rather than deciding when vibrations should play, the HapticImpulsePlayer defines how they are delivered once triggered. It provides a unified interface for sending impulses from other components, such as Simple Haptic Feedback, directly to a specific XR controller. In Starter Assets, a HapticImpulsePlayer is often shared by multiple interactors on a hand/controller. Typically, you attach one HapticImpulsePlayer to each controller under your copied XR Origin (XR Rig) (for example, the left and right hands). Other components then reference it to trigger haptics during interactions. Key properties include:
Haptic Output: Identifies the controller or haptic control that receives impulses. For OpenXR, a haptic control binding may be used.Amplitude Multiplier: A global scaling factor useful for per-controller damping, calibration, or user comfort.
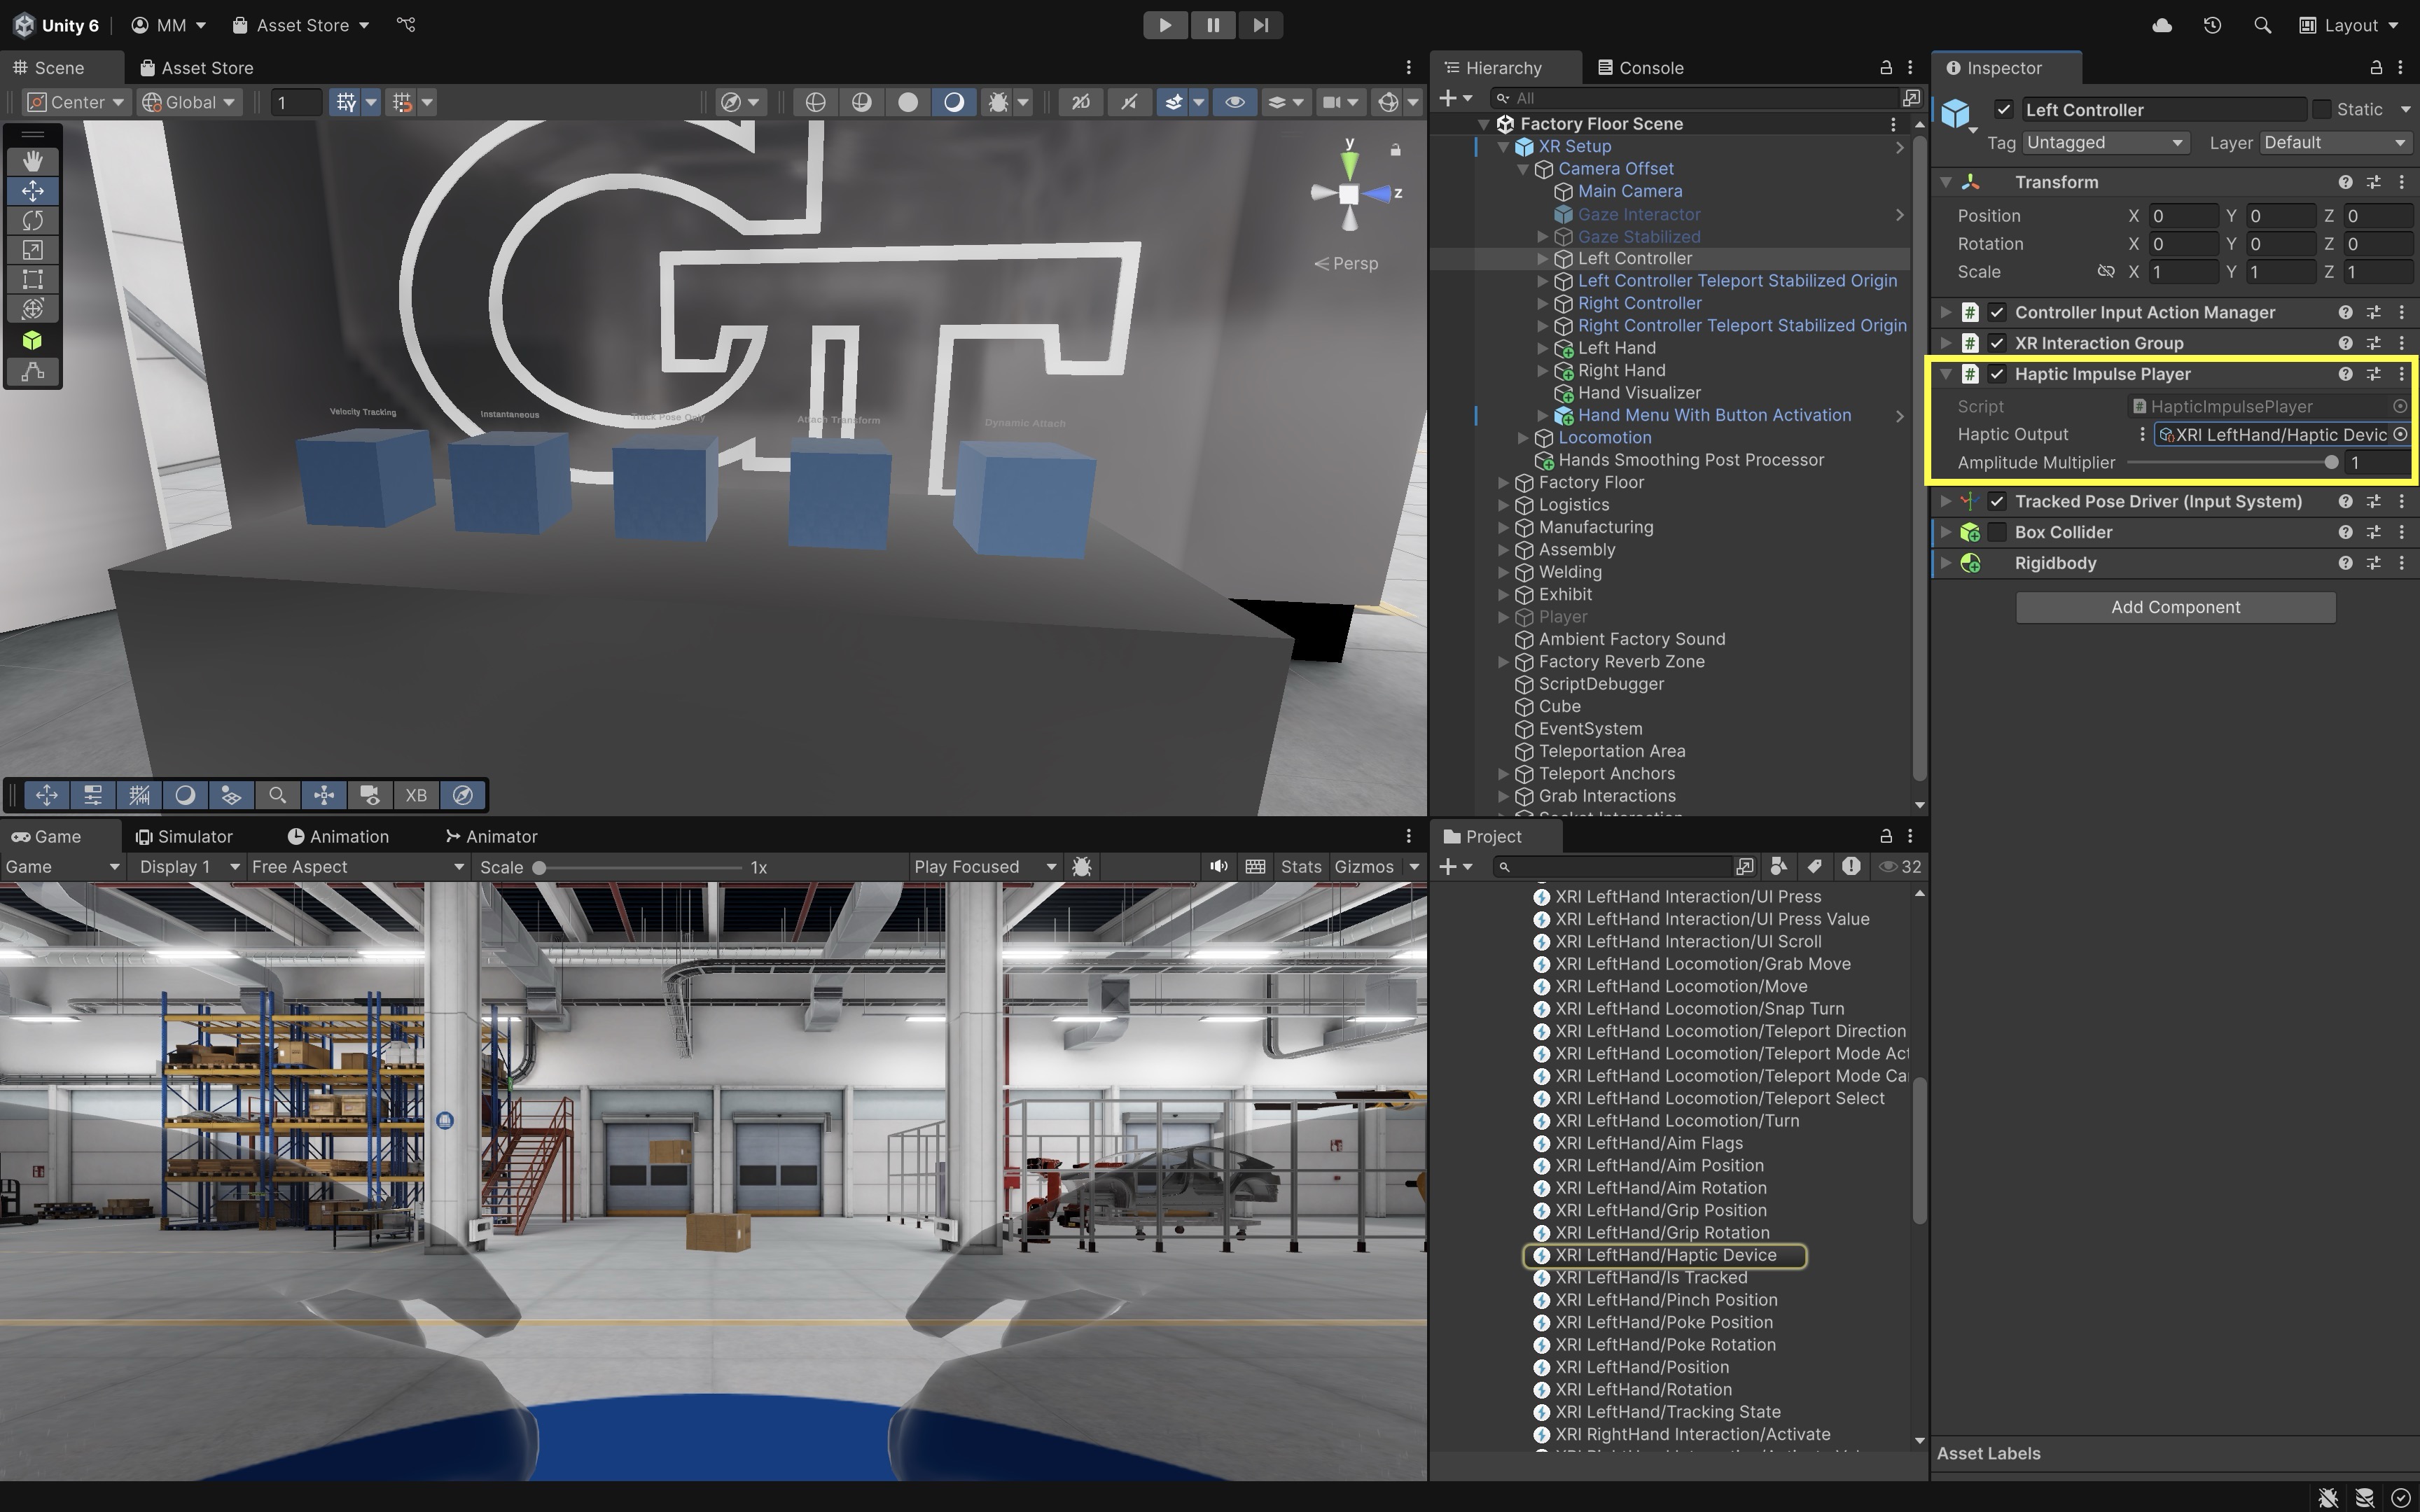
Amplitude, duration, and frequency support vary by controller/runtime. Test on the actual Quest device, not only in the Editor. In essence, the
HapticImpulsePlayerfunctions like an amplifier—it doesn’t initiate haptics on its own but ensures that all incoming impulses are properly routed and adjusted before reaching the hardware device.
Simple Haptic Feedback
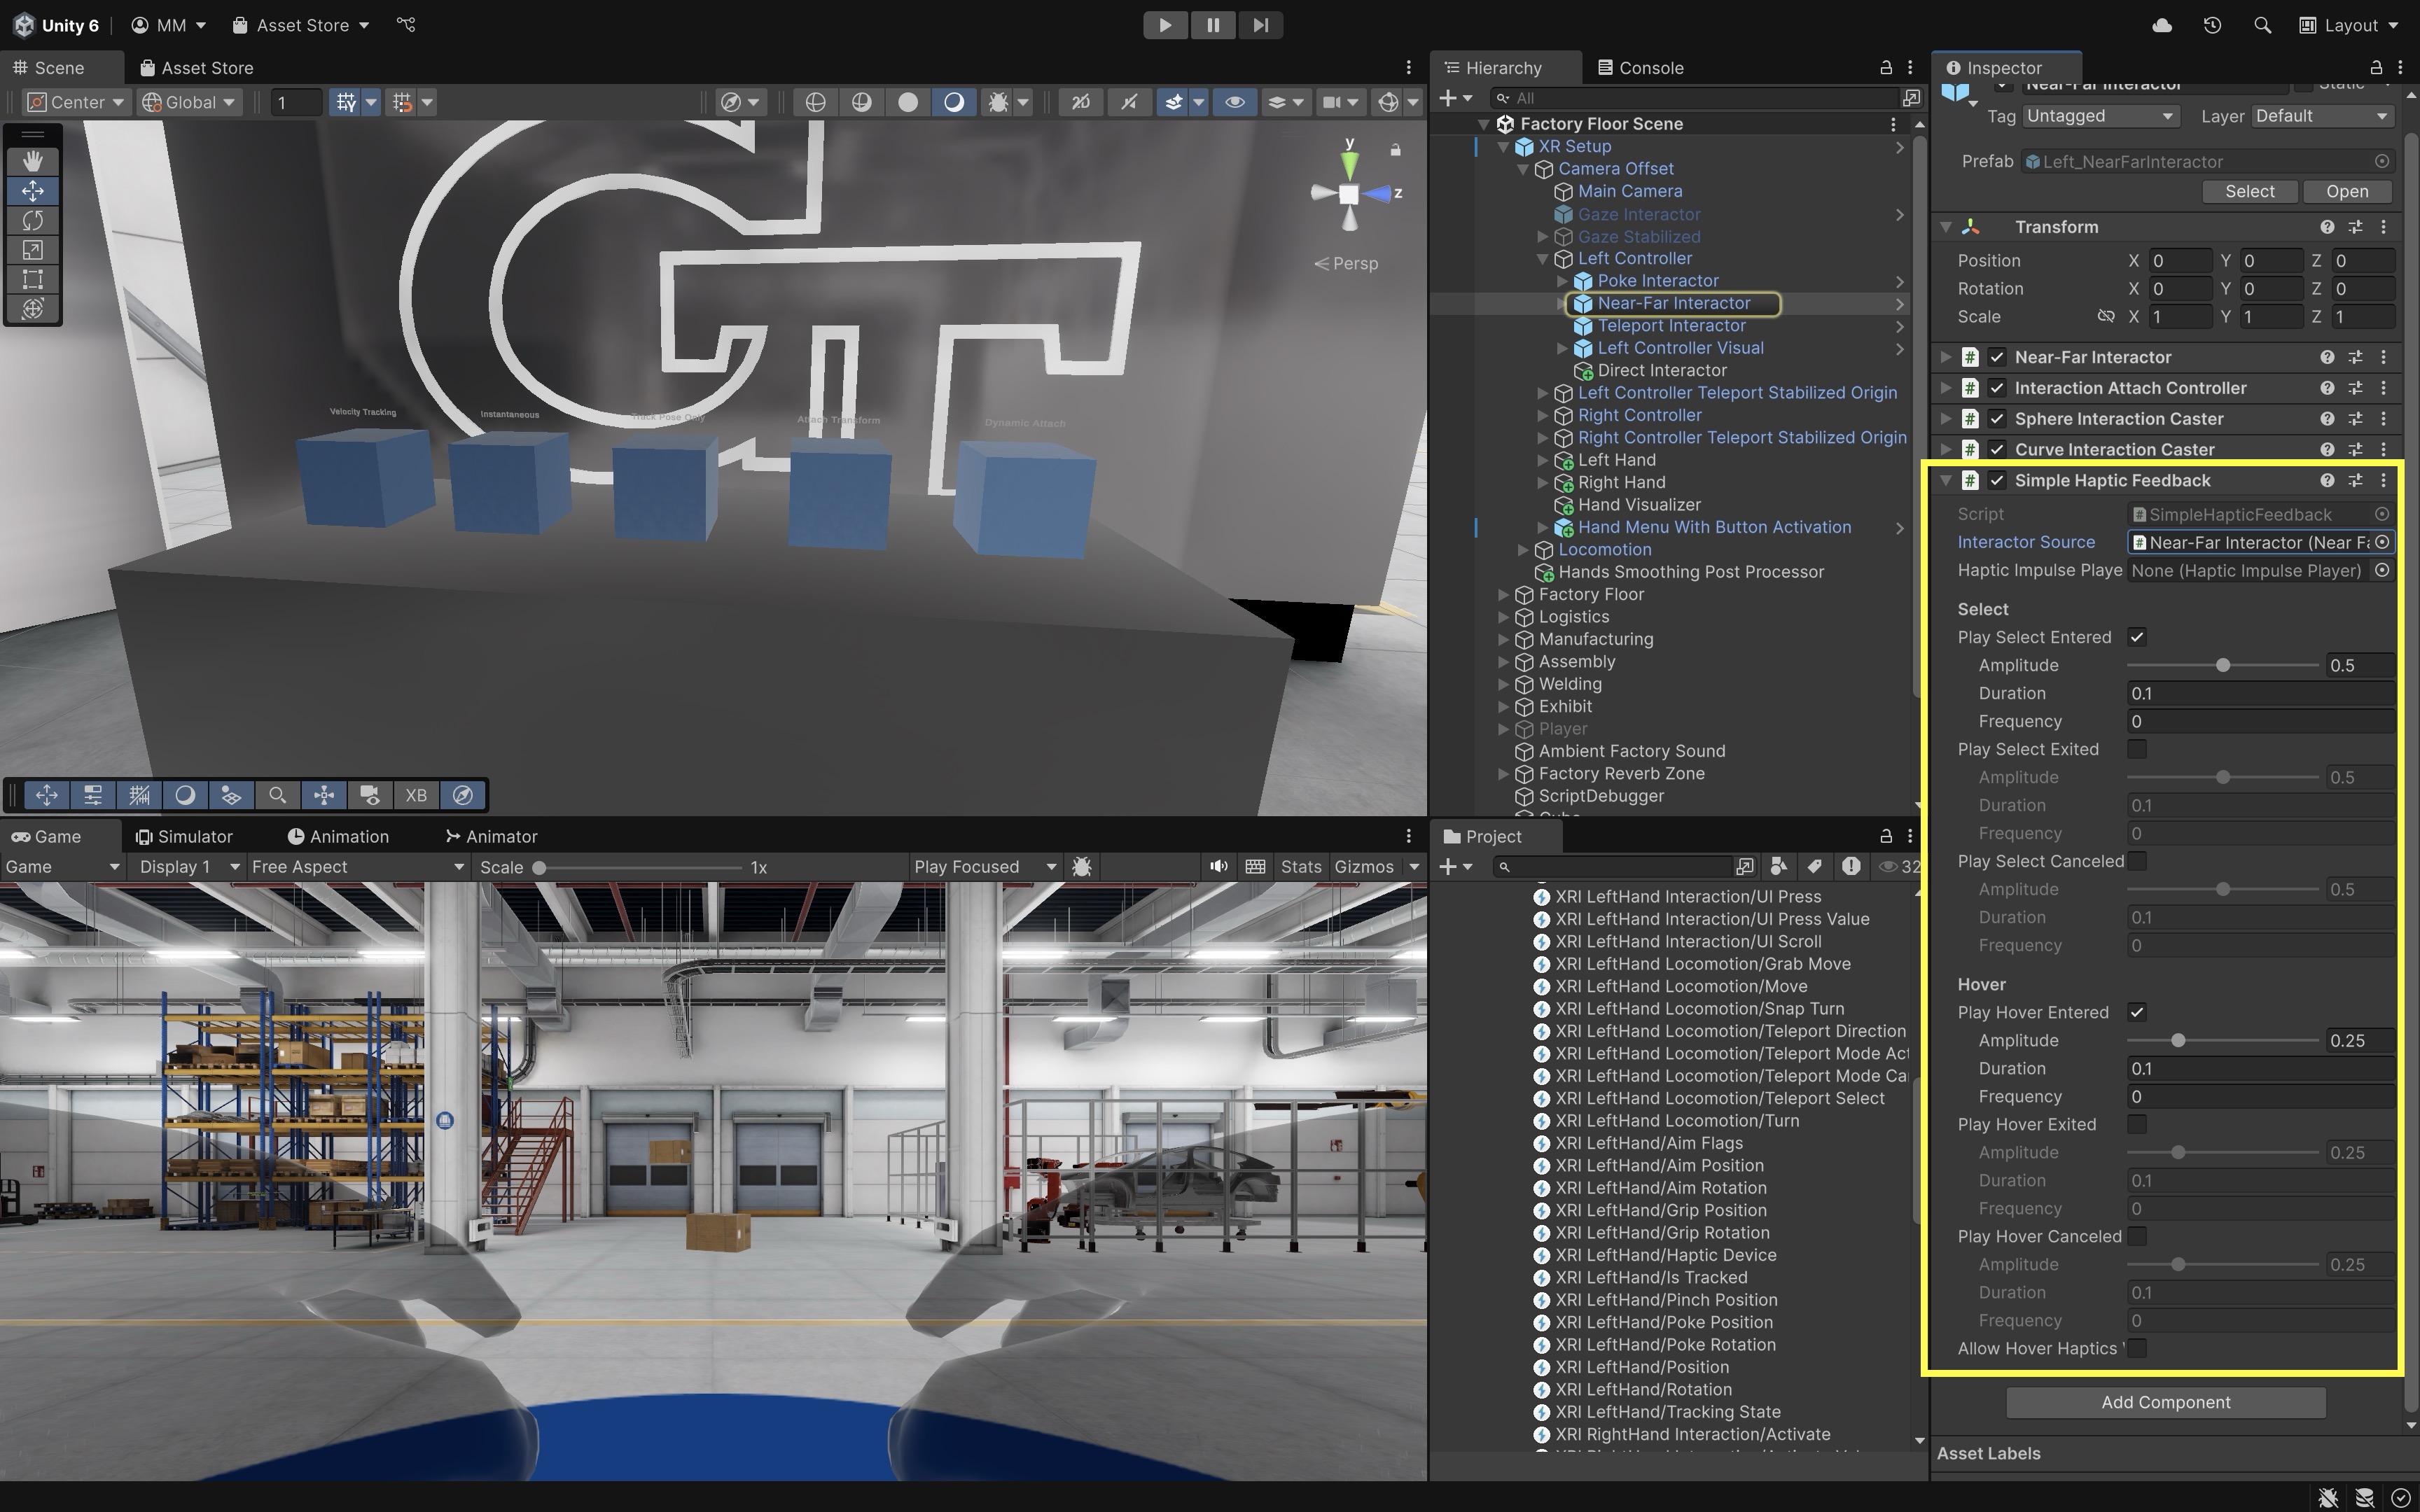
The Simple Haptic Feedback component serves as the event-driven controller for haptics, determining when and what haptic sensations to play for each interaction. It listens to interaction events from an interactor (e.g., hovering over or selecting an interactable) and uses a linked HapticImpulsePlayer to send the corresponding vibration to the hardware. Attach Simple Haptic Feedback to interaction components like Near-Far Interactor, Poke Interactor, or Teleport Interactor. This setup allows the player’s controller to automatically vibrate when specific events occur, such as when an object is grabbed, released, or approached.
Properties
Interactor Source: Defines which interactor this component listens to for hover and select events (e.g.,Near-Far Interactor).Haptic Impulse Player: References theHapticImpulsePlayerthat actually sends the vibration signal. If left empty, Unity will automatically assign a suitableHapticImpulsePlayerfrom the controller’s components at runtime.- Toggleable event options such as
Play Select Entered,Play Select Exited,Play Select Canceled,Play Hover Entered,Play Hover Exited, andPlay Hover Canceleddetermine which interactions trigger haptics. - Each event can define its own parameters, customizing the feel of the feedback. For instance, a short, sharp vibration with high amplitude might simulate a click or button press, while a longer, softer pulse could represent a gentle touch or hover cue:
Amplitude: How strong the vibration is (range0.0 – 1.0).Duration: How long the vibration lasts (in seconds).Frequency: The pitch or “buzziness” of the vibration (in Hz, optional and device-dependent).
Allow Hover Haptics While Selecting: Enables hover-related vibrations even while an object is being held or interacted with.
Key Considerations
- For common hover/select feedback, prefer
Simple Haptic Feedback. Use scripts only when feedback must depend on the object type, surface type, socket state, diagnostic state, or safety state. - For common interactor hover/select sounds, XRI also provides
Simple Audio Feedback, which works similarly toSimple Haptic Feedbackbut plays clips from interaction events. - Custom scripts should send impulses through
HapticImpulsePlayerrather than calling legacy controllerSendHapticImpulse()methods directly.Simple Haptic Feedbackprovides the structured, event-based workflow that aligns with the XR Interaction Toolkit’s interaction system.
Hover Feedback
The Simple Haptic Feedback component in the XR Interaction Toolkit provides a flexible way to configure vibration feedback during common interaction events like hovering, selecting, or canceling. Let’s use it to create a light pulse when the user’s controller hovers near the tire in the assembly station.
- Add the
Simple Haptic FeedbackComponent:- In the
Hierarchy, select theLeft Controller > Near-Far Interactorunder your copiedXR Origin (XR Rig)(repeat forRight Controller, if needed). - In the
Inspector, clickAdd Component. - Search for and add
Simple Haptic Feedback.
- In the
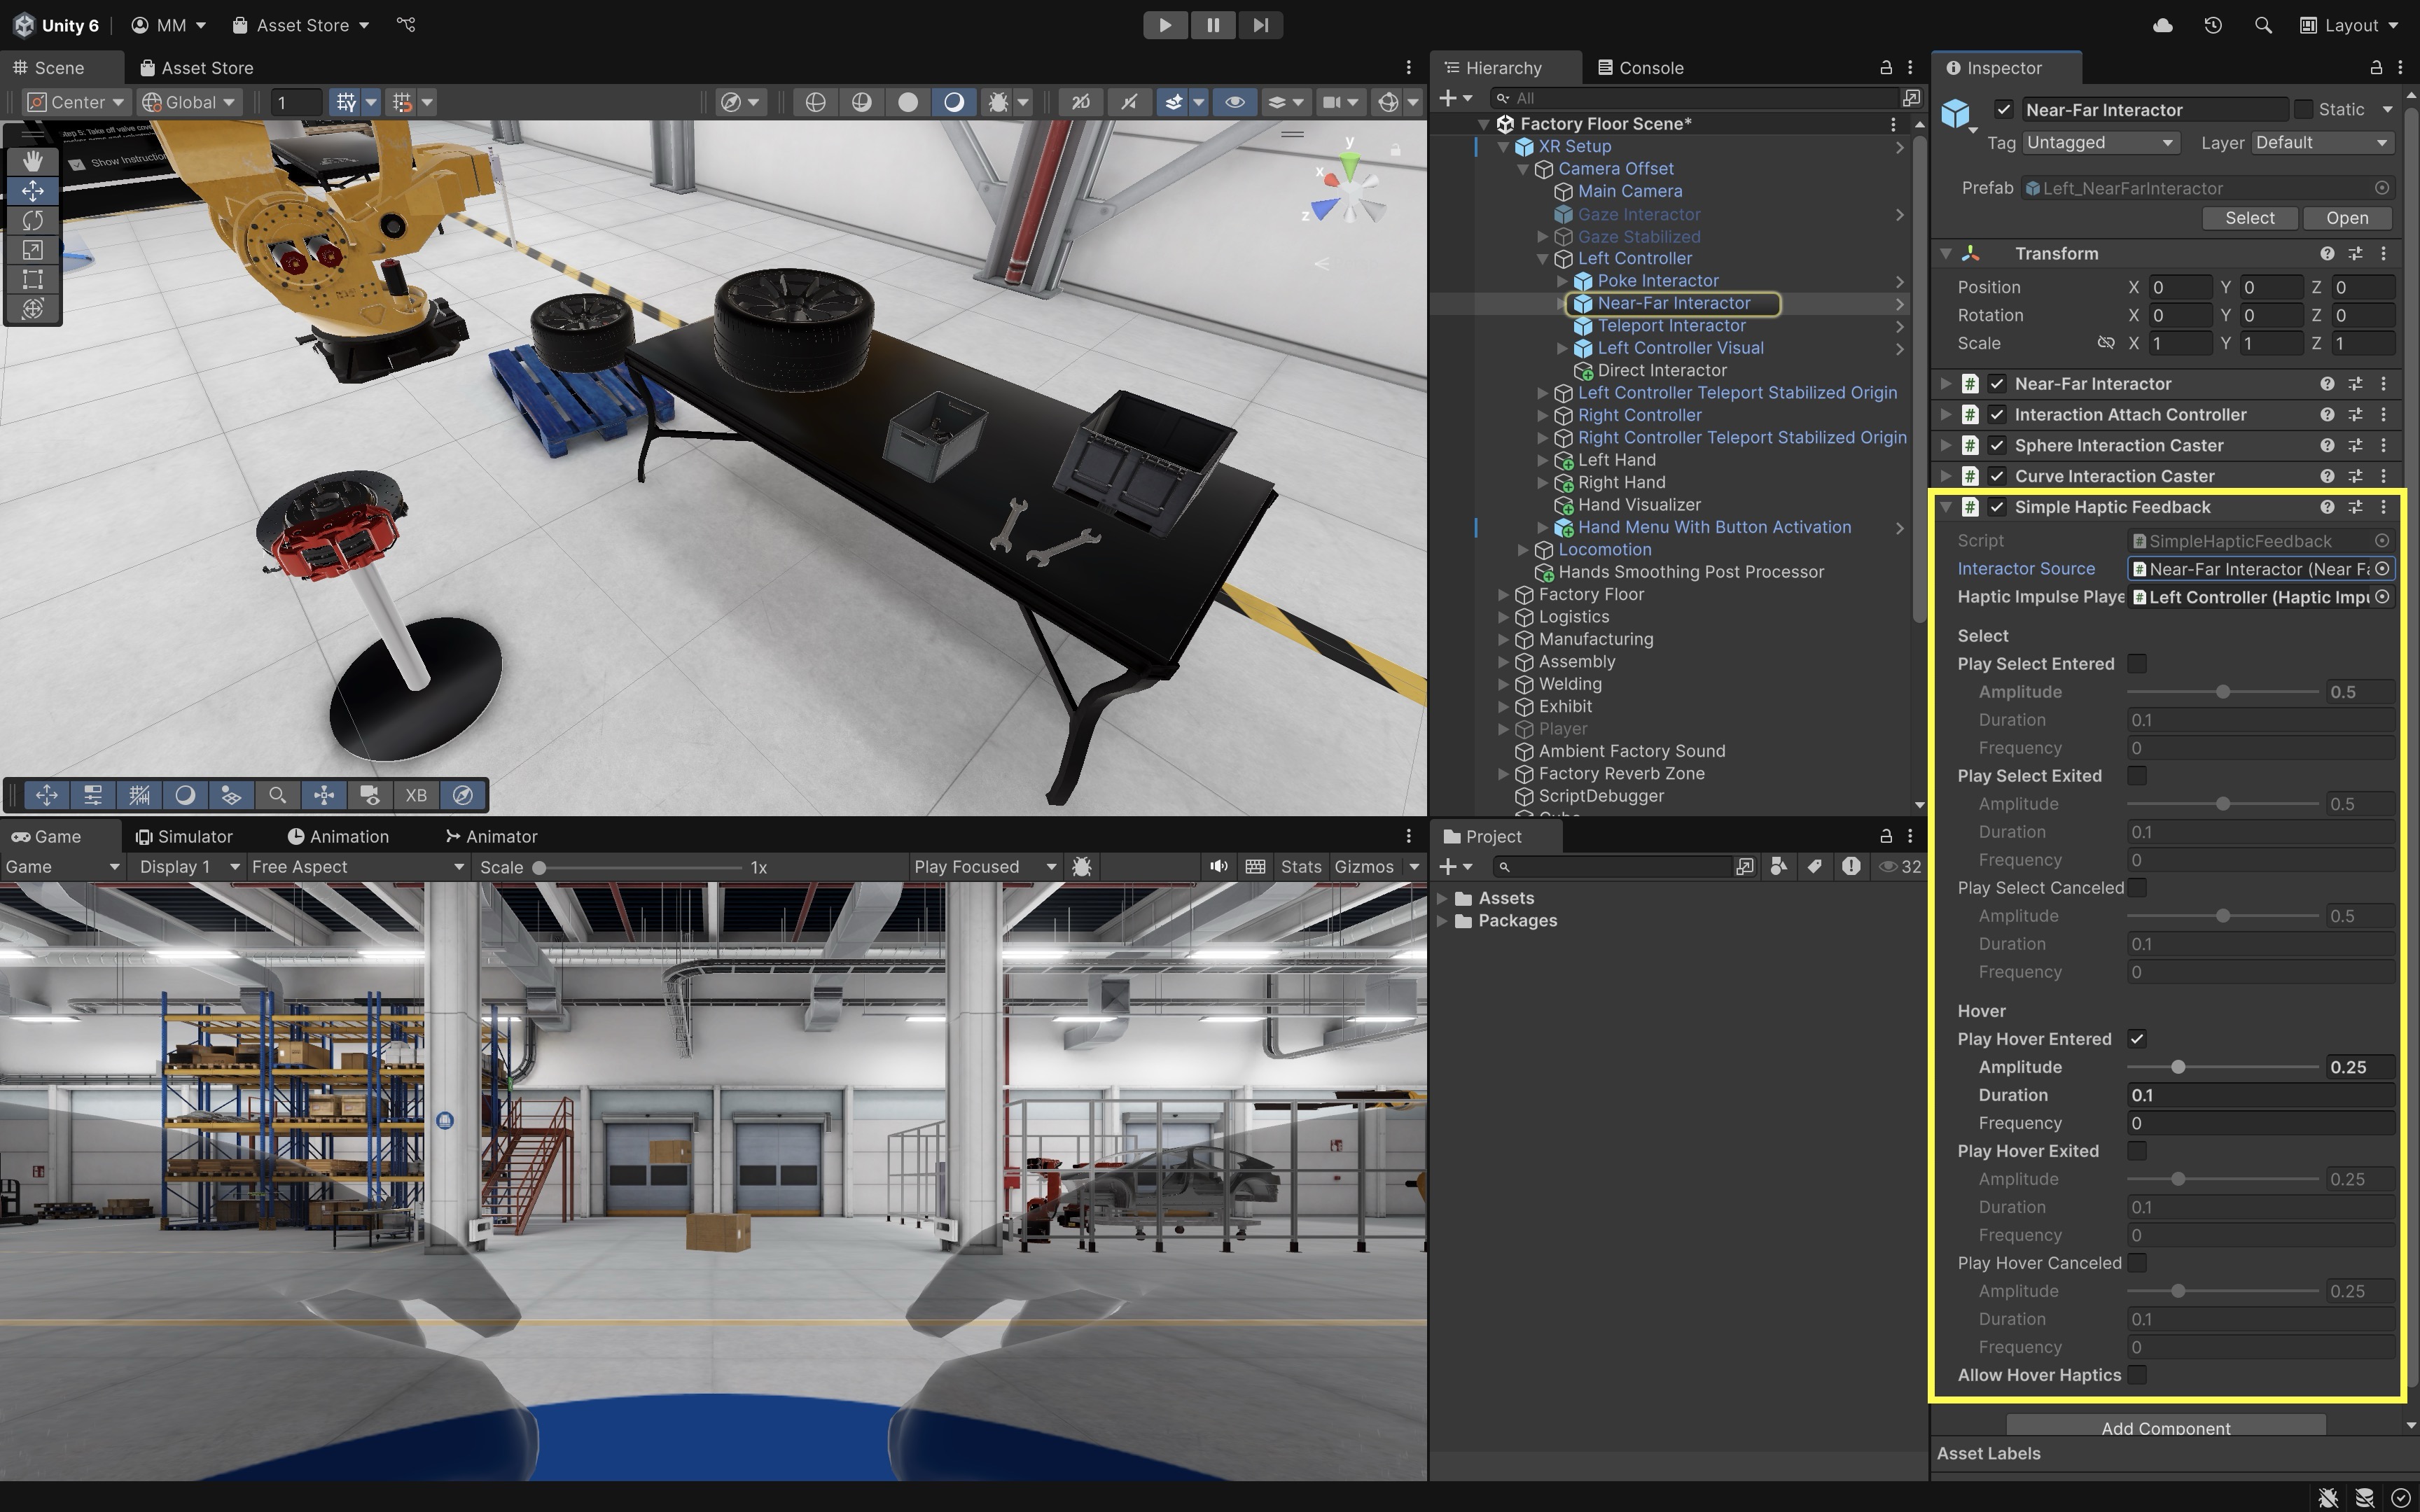
- Enable Hover Enter Feedback:
- In the
Simple Haptic Feedbackcomponent, scroll to theHoversection. - Check the box next to
Play Hover Entered.
- In the
- Set Hover Feedback Parameters:
- Set
Amplitudeto0.25for light vibration. - Set
Durationto0.1to create a short pulse. - Set
Frequencyto0.0(use default frequency or leave at 0 if unsure). - These values create a gentle, noticeable cue as users move close to the tire, ideal for subtle prompts.
- Set
- Test Hover Feedback in Scene:
- Enter Play Mode with the XR Interaction Simulator or Quest Link / Meta Horizon Link for rapid preview, then use Android Build and Run on Quest for final device validation.
- Haptics may not be fully represented in simulator-only testing; validate on the physical controller/glove hardware.
- Move your controller near the tire positioned on the table.
- You should feel a soft pulse as the interactor enters hover range. This hover interaction feels intuitive and non-intrusive, perfect for signaling interactivity across the factory — like near tools, robot controls, or digital screens.
- Add Object-Specific Hover Haptics:
- Optionally, write a script to enable more granular control (e.g., different objects trigger different vibrations) and define feedback per object, rather than globally on the controller.
 using UnityEngine;
 using UnityEngine.XR.Interaction.Toolkit;
 using UnityEngine.XR.Interaction.Toolkit.Interactables;
 using UnityEngine.XR.Interaction.Toolkit.Inputs.Haptics;

 [RequireComponent(typeof(XRBaseInteractable))]
 public class CustomHoverHaptics : MonoBehaviour
 {
     [SerializeField] private float amplitude = 0.2f;
     [SerializeField] private float duration = 0.1f;

     private XRBaseInteractable interactable;

     private void Awake()
     {
         interactable = GetComponent<XRBaseInteractable>();
     }

     private void OnEnable()
     {
         if (interactable != null)
             interactable.hoverEntered.AddListener(OnHoverEntered);
     }

     private void OnDisable()
     {
         if (interactable != null)
             interactable.hoverEntered.RemoveListener(OnHoverEntered);
     }

     private void OnHoverEntered(HoverEnterEventArgs args)
     {
         if (args.interactorObject is Component interactorComponent)
         {
             var hapticPlayer = interactorComponent.GetComponentInParent<HapticImpulsePlayer>();
             if (hapticPlayer != null)
                 hapticPlayer.SendHapticImpulse(amplitude, duration);
         }
     }
 }
If this script does not compile, first verify the installed XR Interaction Toolkit package version and namespaces before changing the interaction logic.
XRBaseInteractableis the base class for interactable objects such asXRGrabInteractableandXRSimpleInteractable.XRSocketInteractoris an interactor, not an interactable. - Configure the Script:
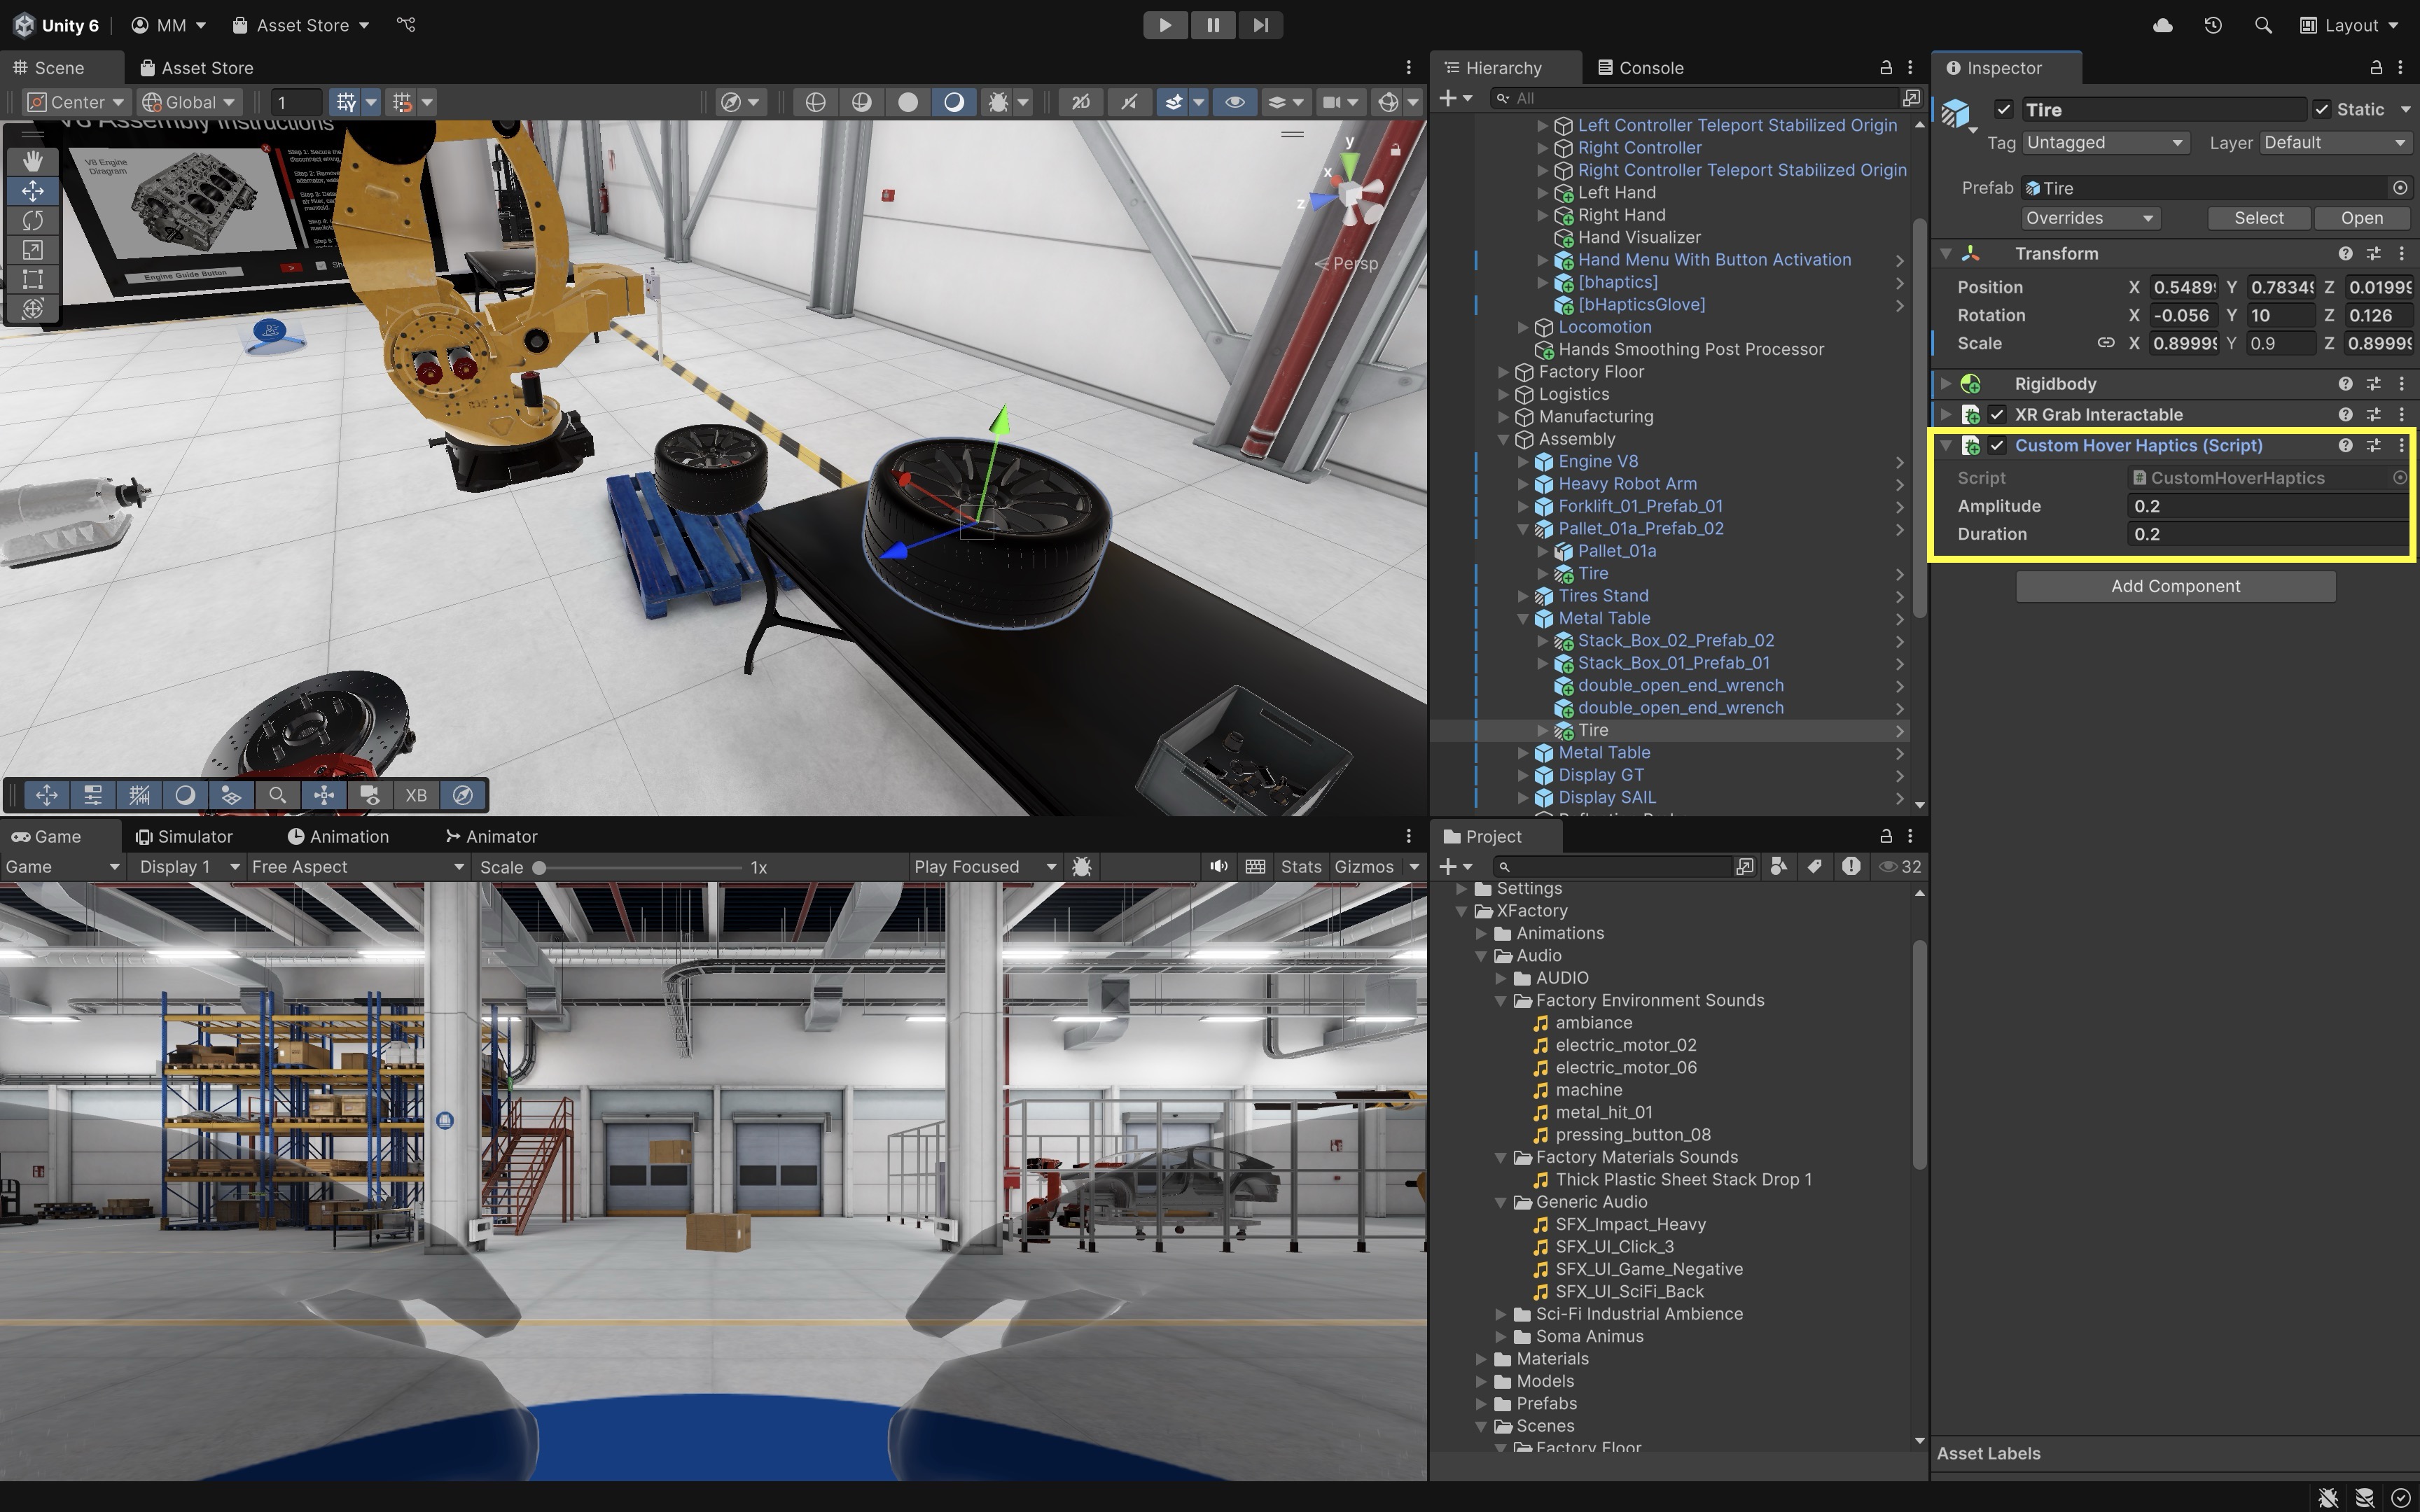
- Select the
TireGameObject in theHierarchy. - Click
Add Component, then addCustomHoverHaptics.cs. - Tweak
AmplitudeandDurationin theInspectorfor a different sensation unique to this object.
Use the
Simple Haptic Feedbackcomponent for controller-based interaction logic. Use the custom script when you want different objects (e.g., torque wrench vs. tire) to feel distinct when hovered. - Select the
Select Feedback
Now we will configure stronger haptic feedback to reinforce intentional actions, like grabbing a tire, pressing a button, or toggling a switch. In this case, the pulse confirms the user has successfully selected (grabbed) the tire in the assembly station.
- Add the
Simple Haptic FeedbackComponent (if not already added):- In the
Hierarchy, select theLeft Controller > Near-Far Interactorunder your copiedXR Origin (XR Rig)(repeat forRight Controller, if needed). - In the
Inspector, clickAdd Component. - Search for and add
Simple Haptic Feedback.
- In the
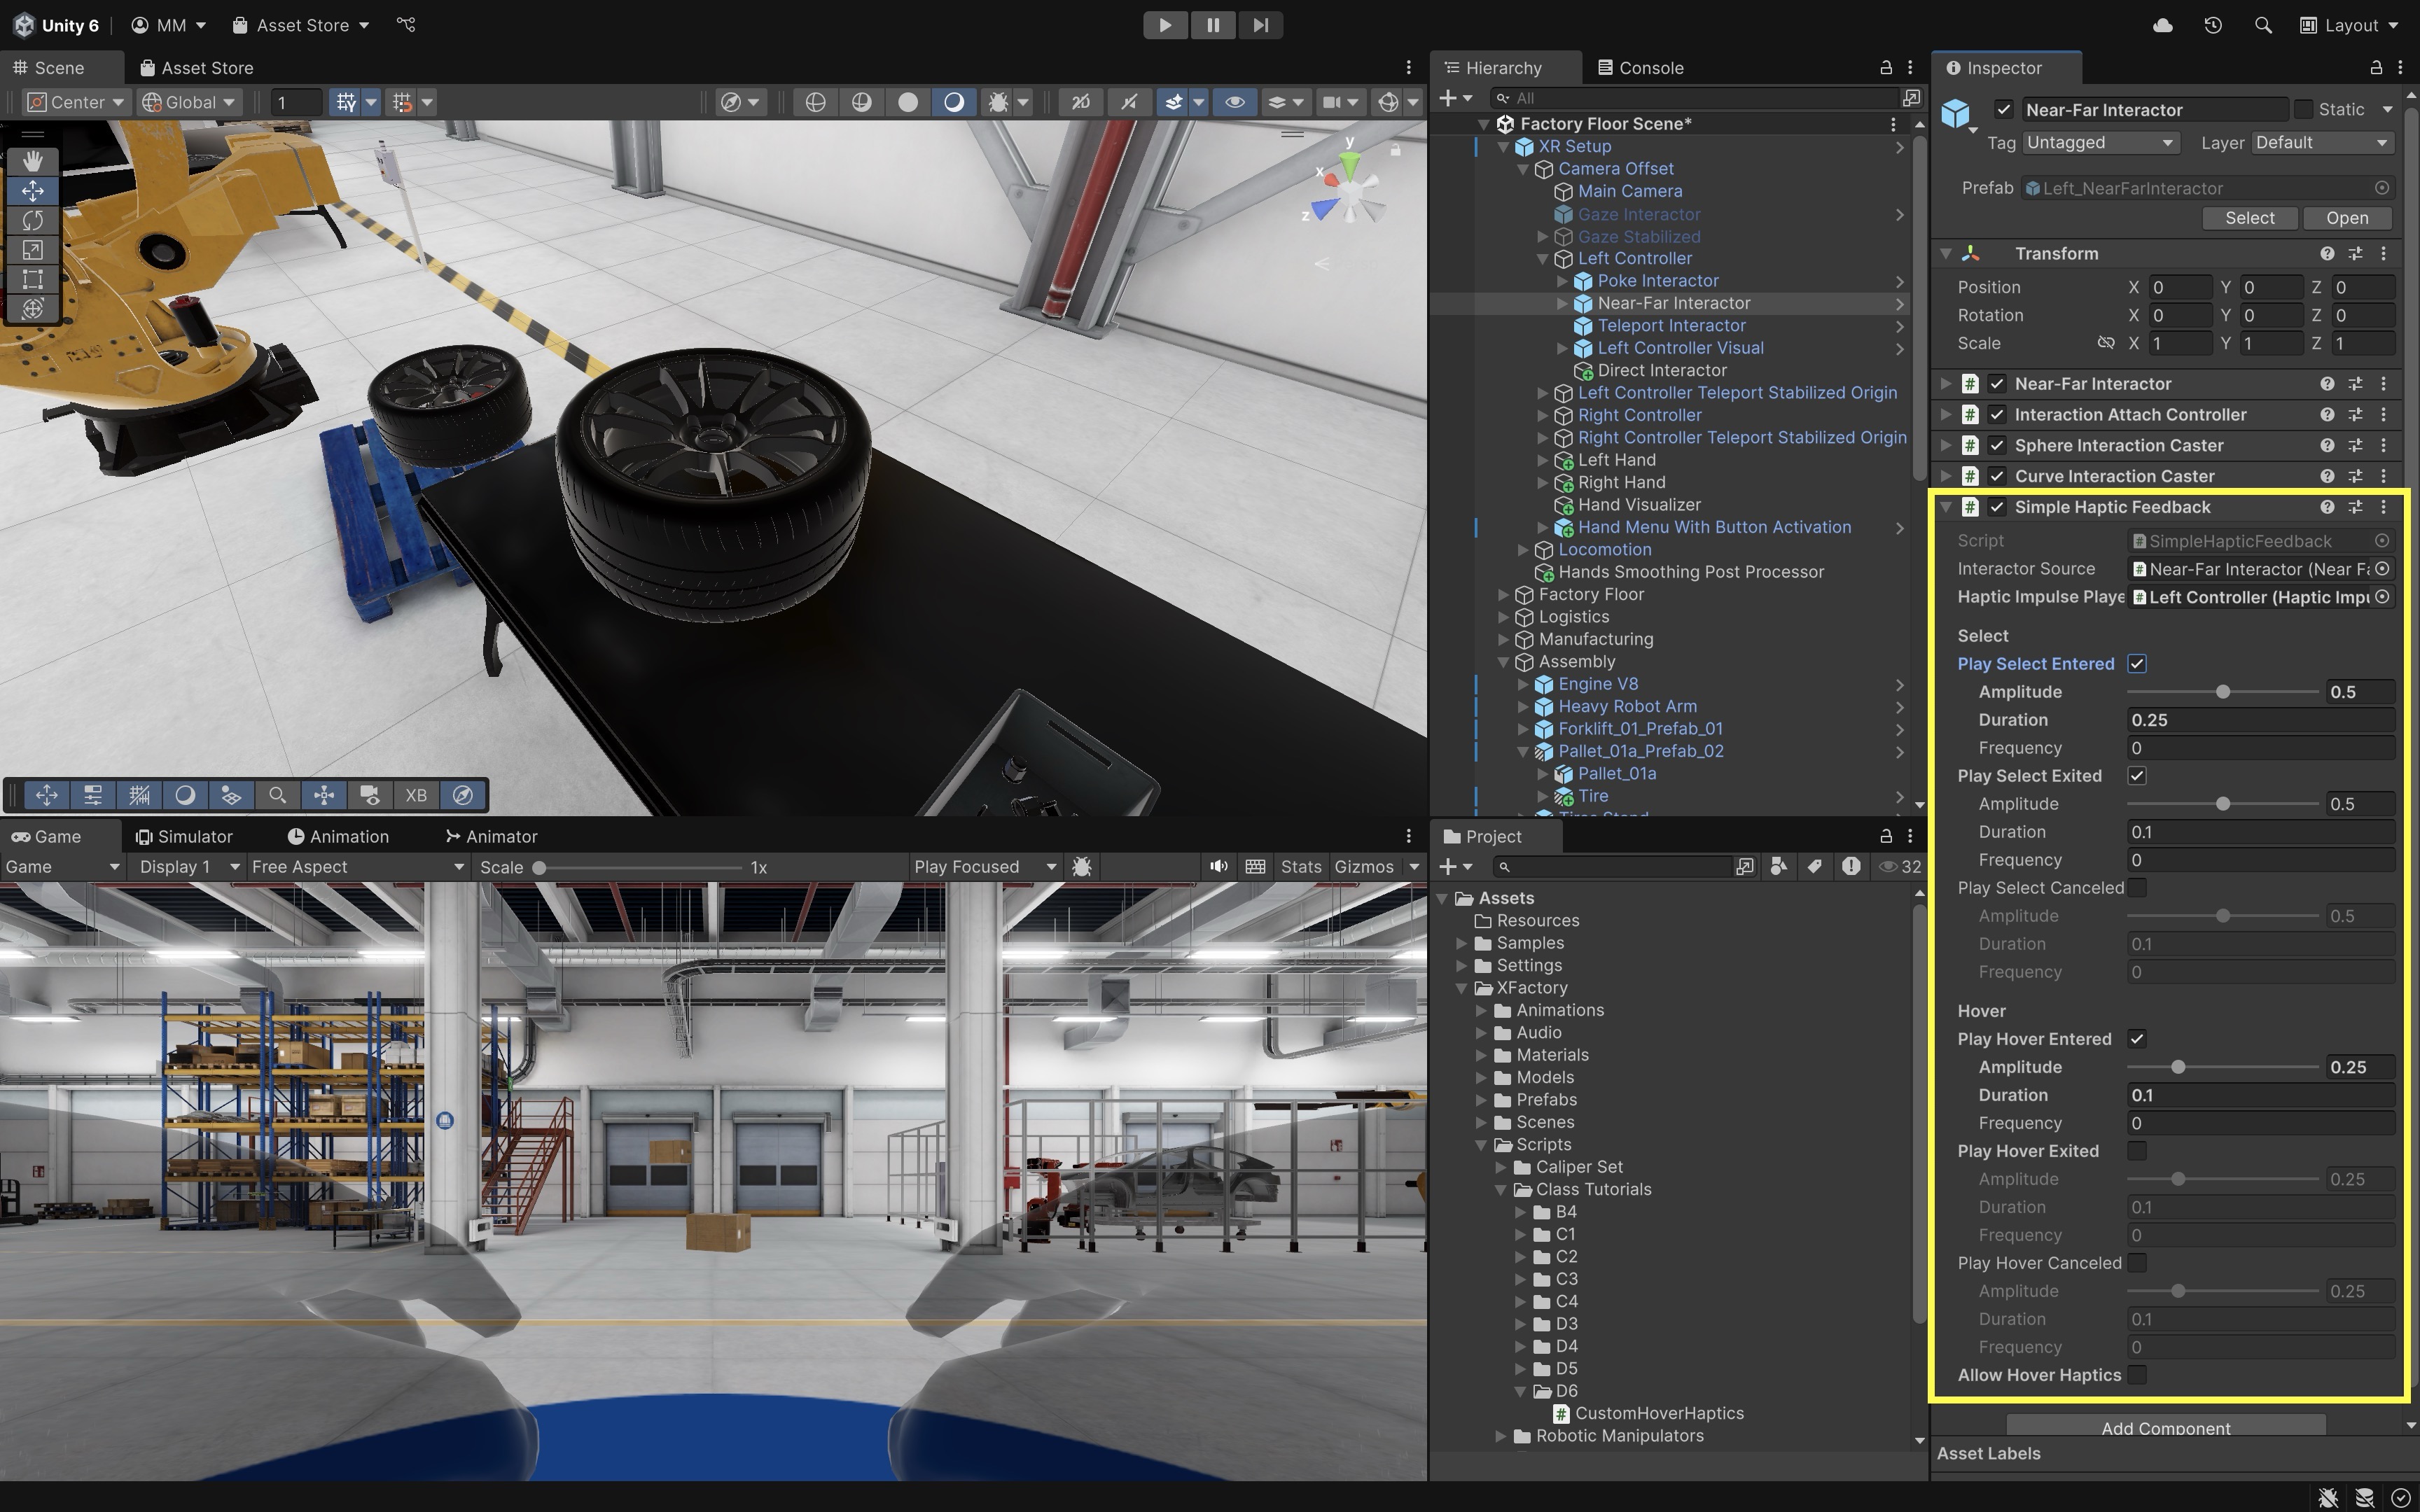
- Enable Select Enter Feedback:
- Locate the
Simple Haptic Feedbackcomponent. - Scroll to the
Selectsection. - Check the box for
Play Select Entered.
- Locate the
- Set Select Feedback Parameters:
- Set
Amplitudeto0.5to make it more pronounced than hover. - Set
Durationto0.25to vibrate longer to signify a “confirmed” action. - Set
Frequencyto0.0unless using a custom frequency pattern. - This pulse acts like a tactile confirmation — perfect for grabbing the tire, flipping a safety switch, or initiating a machine cycle.
- Set
- Test Select Feedback in Scene:
- Enter Play Mode with the XR Interaction Simulator or Quest Link / Meta Horizon Link for rapid preview, then validate haptics with Android Build and Run on Quest.
- Aim at the tire, and grab it using the interactor (direct or ray).
- You should feel a firm pulse when the
Play Select Enteredevent fires, confirming successful selection.
- Add Custom Select Feedback Per Object (Optional):
- Similar to the custom hover haptics example, you can configure different objects to give unique haptic responses on selection. Here’s a custom script you can attach directly to the object.
 using UnityEngine;
 using UnityEngine.XR.Interaction.Toolkit;
 using UnityEngine.XR.Interaction.Toolkit.Interactables;
 using UnityEngine.XR.Interaction.Toolkit.Inputs.Haptics;

 [RequireComponent(typeof(XRBaseInteractable))]
 public class CustomSelectHaptics : MonoBehaviour
 {
     [SerializeField] private float amplitude = 0.5f;
     [SerializeField] private float duration = 0.25f;

     private XRBaseInteractable interactable;

     private void Awake()
     {
         interactable = GetComponent<XRBaseInteractable>();
     }

     private void OnEnable()
     {
         if (interactable != null)
             interactable.selectEntered.AddListener(OnSelectEntered);
     }

     private void OnDisable()
     {
         if (interactable != null)
             interactable.selectEntered.RemoveListener(OnSelectEntered);
     }

     private void OnSelectEntered(SelectEnterEventArgs args)
     {
         if (args.interactorObject is Component interactorComponent)
         {
             var hapticPlayer = interactorComponent.GetComponentInParent<HapticImpulsePlayer>();
             if (hapticPlayer != null)
                 hapticPlayer.SendHapticImpulse(amplitude, duration);
         }
     }
 }
If this script does not compile, first verify the installed XR Interaction Toolkit package version and namespaces before changing the interaction logic.
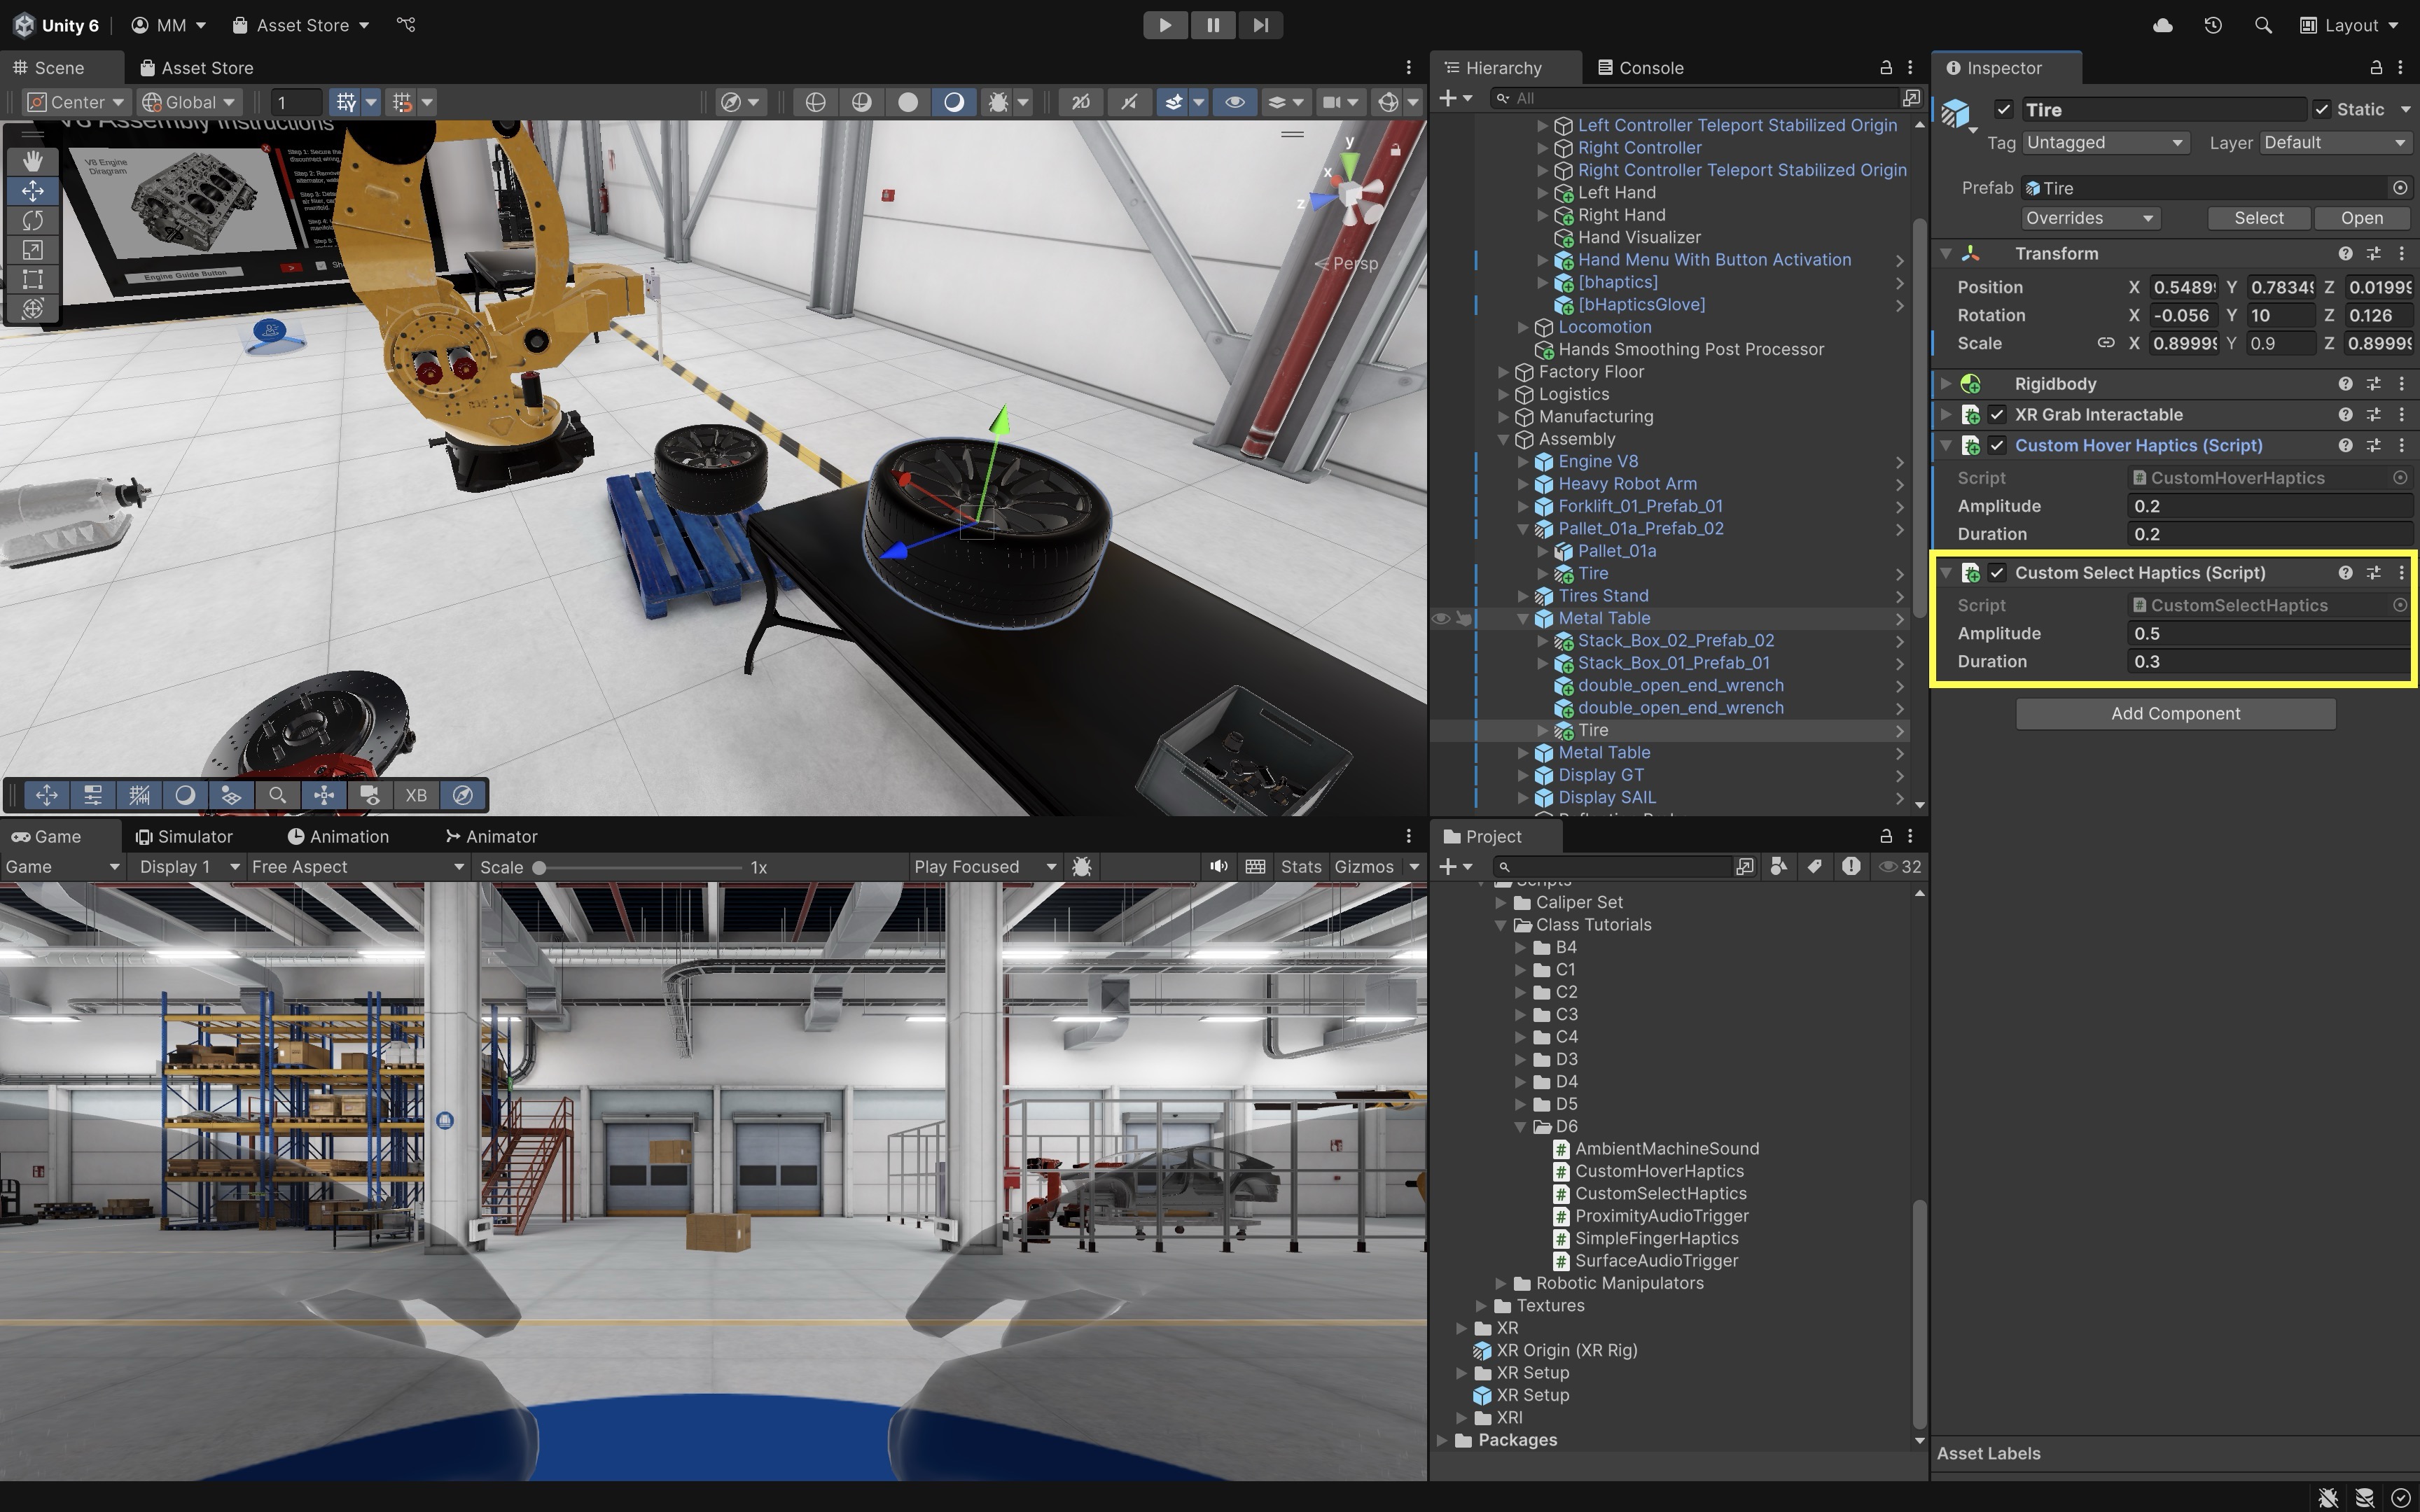
- Configure the Script:
- Select the
TireGameObject in theHierarchy. - Click
Add Component, and chooseCustomSelectHaptics.cs. - Modify the
AmplitudeandDurationvalues in theInspectorfor desired feedback.
- Select the
Attach Feedback
When the user successfully attaches the tire onto its platform (i.e., socket) at the tire stand in the assembly station, we want to simulate a clear tactile “click” — like snapping something firmly into place. For true socket-completion feedback, trigger audio/haptics from the XR Socket Interactor Select Entered event when the tire is actually accepted by the socket. Select Exited on the grabbing interactor can provide release feedback, but it does not prove the object attached successfully.
- Preferred: Socket
Select EnteredFeedback:- Select the tire socket
XR Socket Interactoron the tire stand. - Add an
AudioSourceif needed and assign a short click clip. - On the socket’s
Select Enteredevent (Interactable Eventsor UnityEvent wiring), play the click sound. - Optionally call a small feedback method that sends haptics through an assigned
HapticImpulsePlayer, or use this lightweight script on the socket:
 using UnityEngine;
 using UnityEngine.XR.Interaction.Toolkit;
 using UnityEngine.XR.Interaction.Toolkit.Interactors;
 using UnityEngine.XR.Interaction.Toolkit.Inputs.Haptics;

 [RequireComponent(typeof(XRSocketInteractor))]
 public class SocketAttachFeedback : MonoBehaviour
 {
     [SerializeField] private AudioSource audioSource;
     [SerializeField] private AudioClip attachClip;
     [SerializeField] private HapticImpulsePlayer hapticPlayer;
     [SerializeField] private float hapticAmplitude = 0.7f;
     [SerializeField] private float hapticDuration = 0.35f;

     private XRSocketInteractor socket;

     private void Awake()
     {
         socket = GetComponent<XRSocketInteractor>();
     }

     private void OnEnable()
     {
         if (socket != null)
             socket.selectEntered.AddListener(OnSocketSelectEntered);
     }

     private void OnDisable()
     {
         if (socket != null)
             socket.selectEntered.RemoveListener(OnSocketSelectEntered);
     }

     private void OnSocketSelectEntered(SelectEnterEventArgs args)
     {
         if (audioSource != null && attachClip != null)
             audioSource.PlayOneShot(attachClip);

         if (args.interactorObject is Component interactorComponent)
         {
             var player = hapticPlayer != null
                 ? hapticPlayer
                 : interactorComponent.GetComponentInParent<HapticImpulsePlayer>();
             player?.SendHapticImpulse(hapticAmplitude, hapticDuration);
         }
     }
 }
If this script does not compile, first verify the installed XR Interaction Toolkit package version and namespaces before changing the interaction logic. For socket-completion haptics, assign the intended controller/interactor
HapticImpulsePlayerin the Inspector; the fallback lookup may not find the user’s controller from a socket event. - Select the tire socket
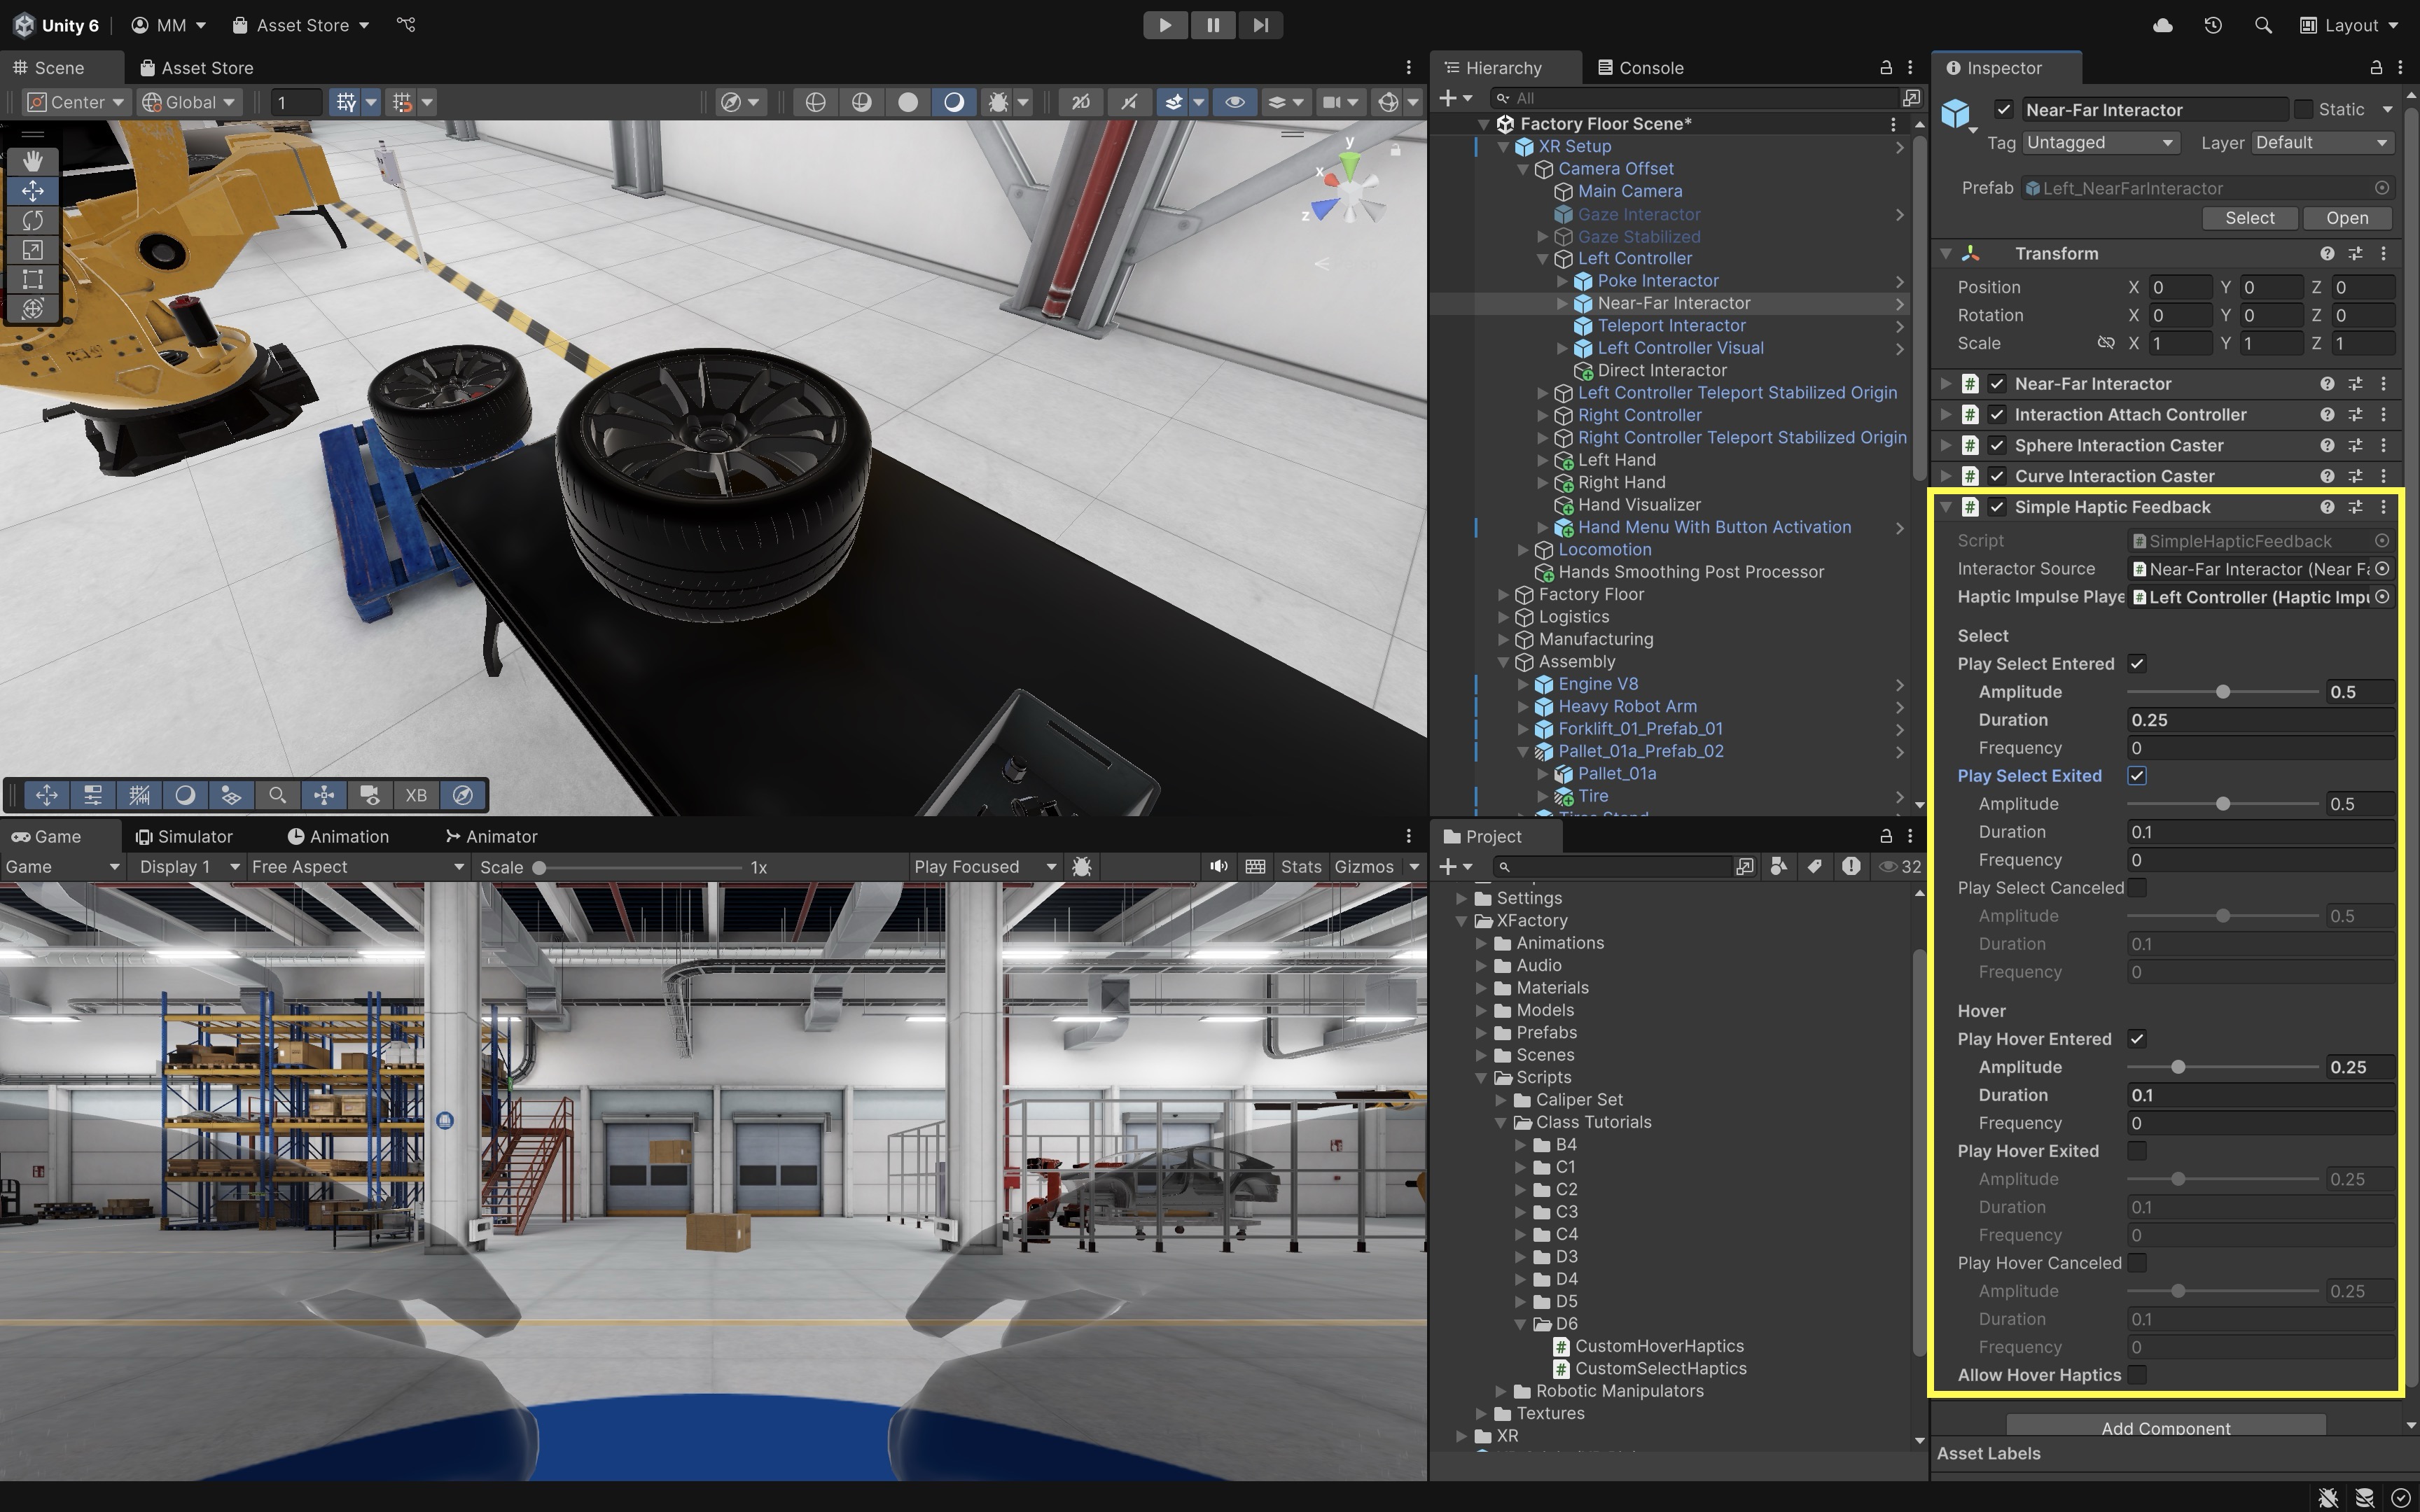
- Optional: Release Feedback on the Interactor:
- On the
Near-Far Interactor, you can still enableSimple Haptic Feedback→Play Select Exitedfor a general release pulse when the user lets go of an object. - Set
Amplitudeto0.7andDurationto0.35if you want a stronger release cue. - Treat this as release feedback, not proof of successful socket attachment.
- On the
- Test Attach Feedback in Scene:
- Enter Play Mode with the XR Interaction Simulator or Quest Link / Meta Horizon Link, then validate on Quest with Android Build and Run.
- Grab the tire and place it into the socket on the tire stand.
- When the socket accepts the tire, you should hear/feel the completion cue from the socket event.
- Releasing the tire elsewhere should not be mistaken for a successful attach unless the socket event fired.
Hand Tracking & Haptic Gloves
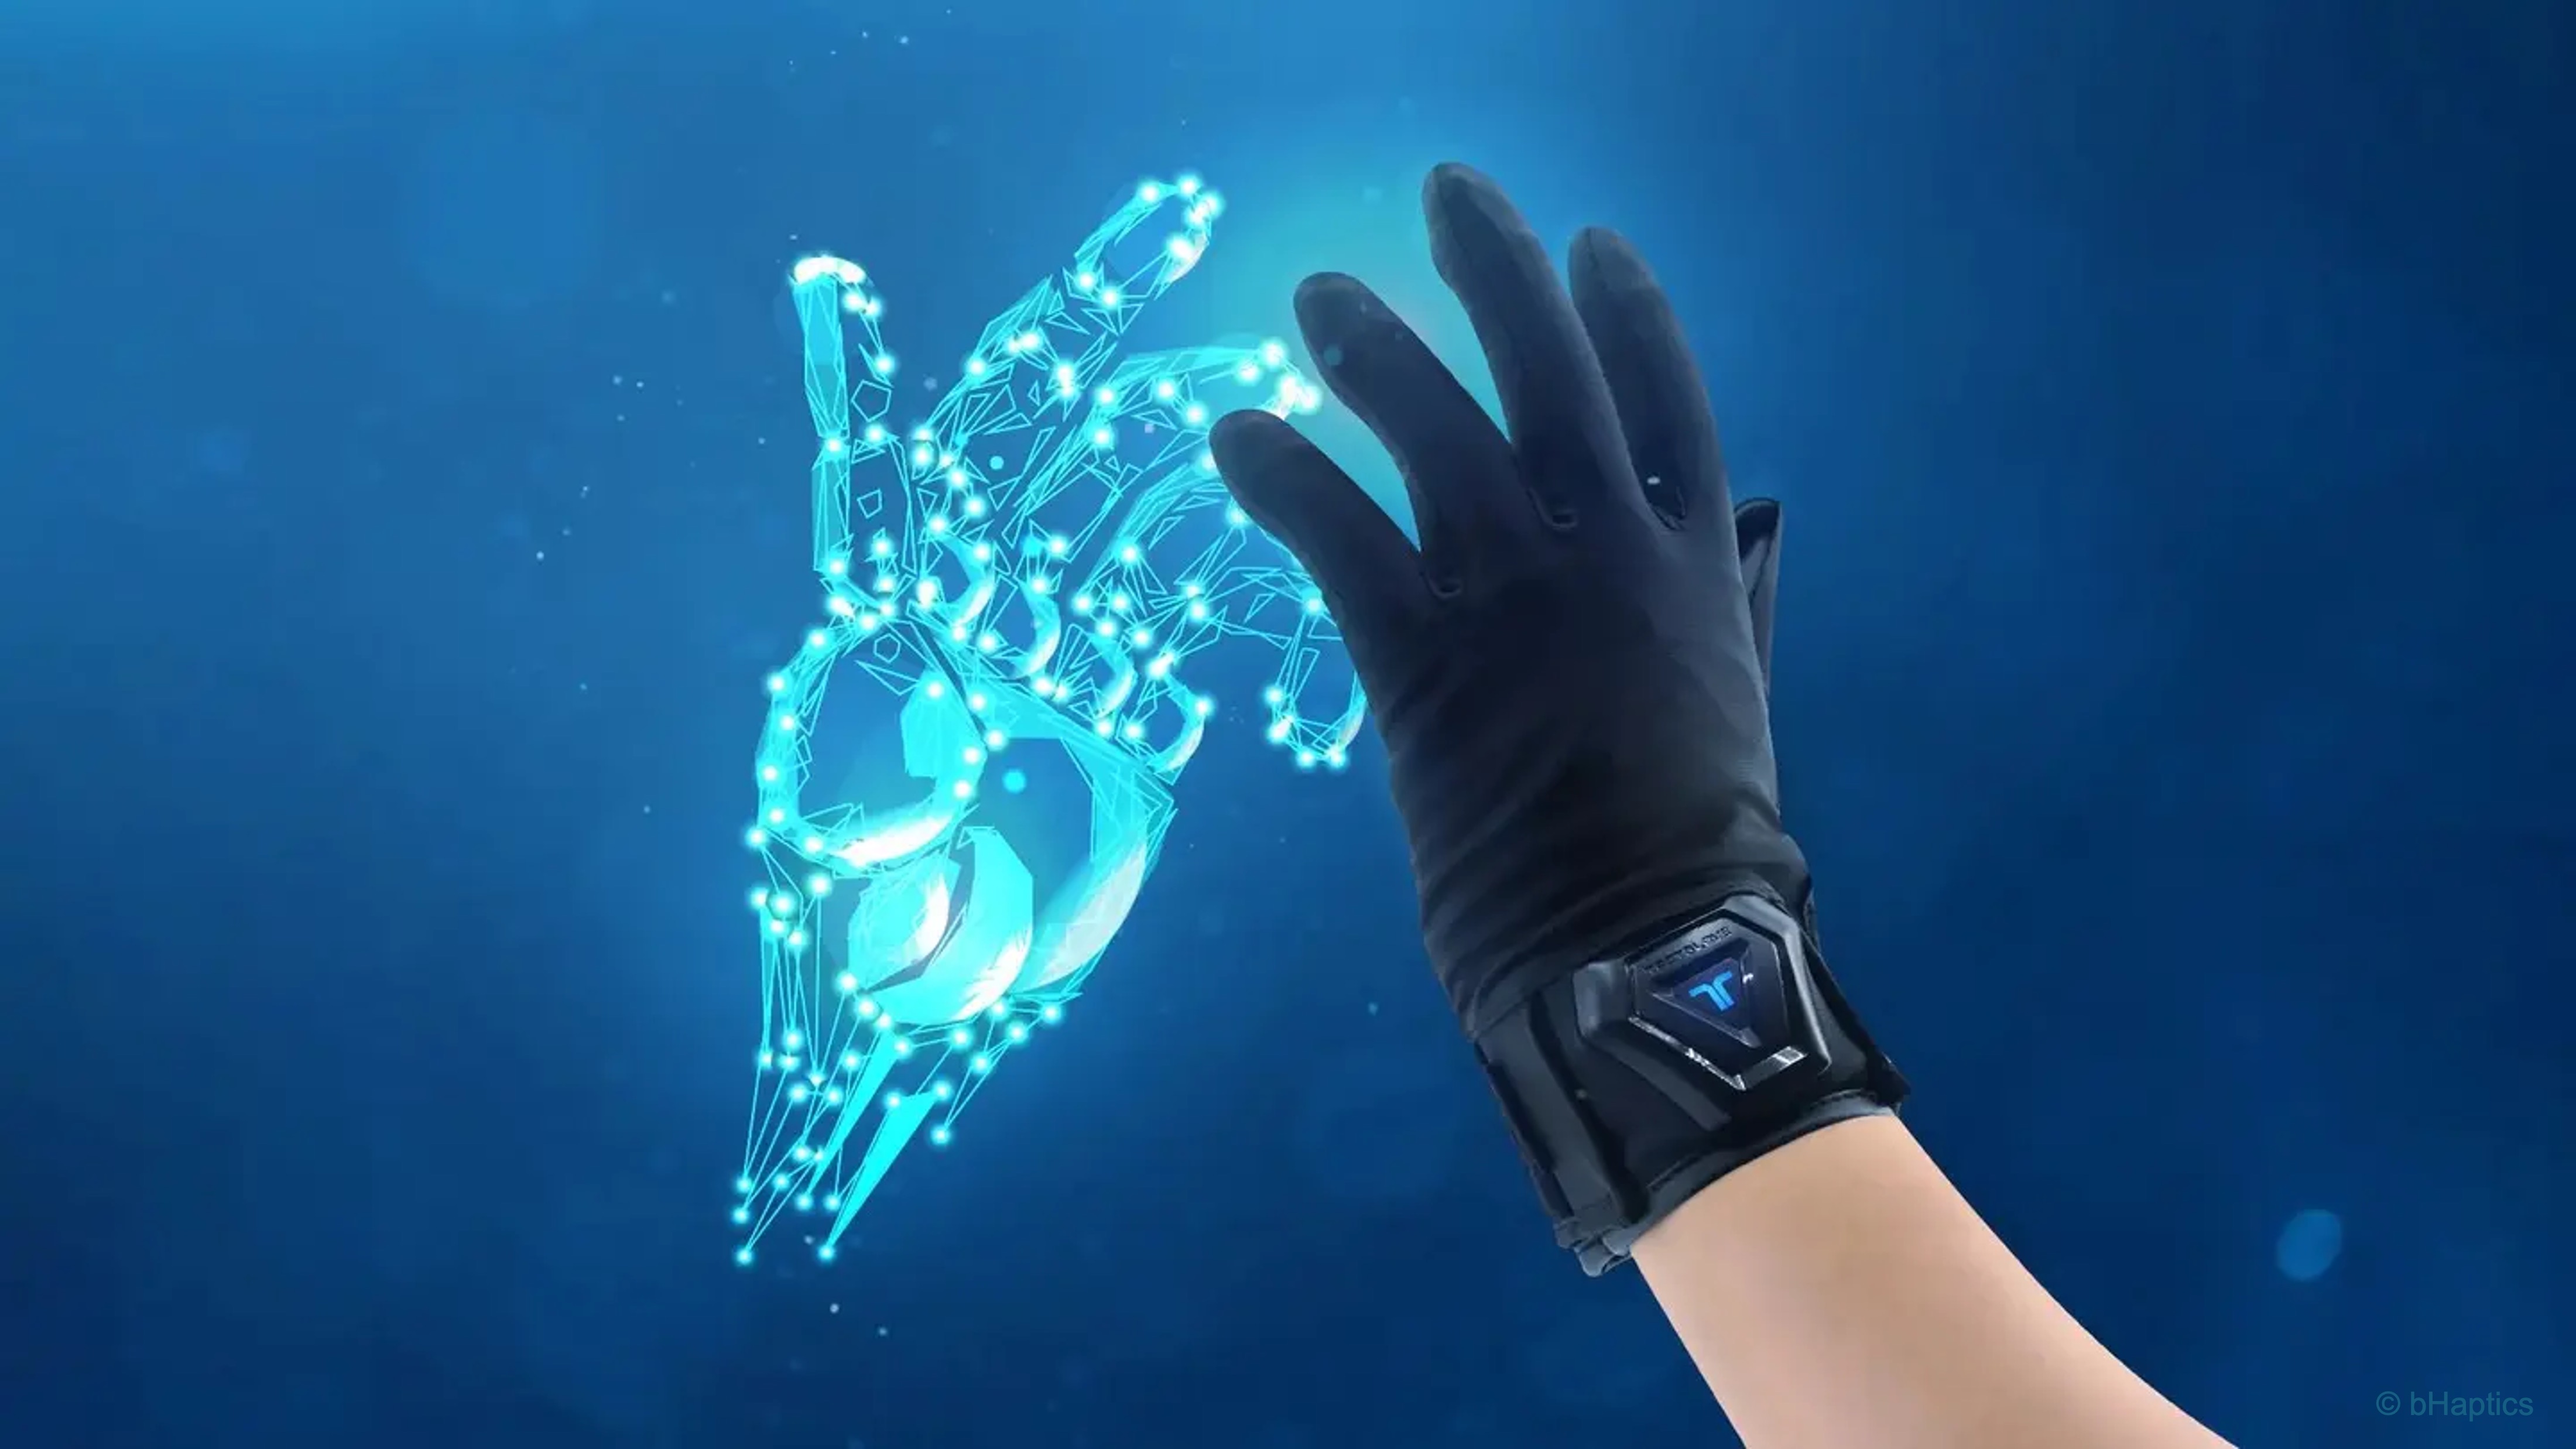
Hand tracking and haptic gloves in VR bring natural, intuitive interaction to virtual environments by letting users see and feel their own hands. Instead of relying solely on controllers, hand tracking captures finger and wrist motion directly, enabling gestures like grabbing, pressing, and pointing. When paired with haptic gloves such as the bHaptics TactGlove DK2, these interactions gain a tactile layer — vibrations in the fingertips and wrists simulate the sensation of touching, pressing, or holding virtual objects. Together, they transform simple gestures into convincing physical experiences, enhancing realism and user immersion in VR.
The sections below depend on platform support, sample packages, and optional hardware. The core D6 controller haptics workflow does not require hand tracking or gloves.
Set Up Hand Tracking
The Hands Interaction Demo requires the XR Hands package and platform support for hand tracking. Not all OpenXR runtimes support hand tracking equally.
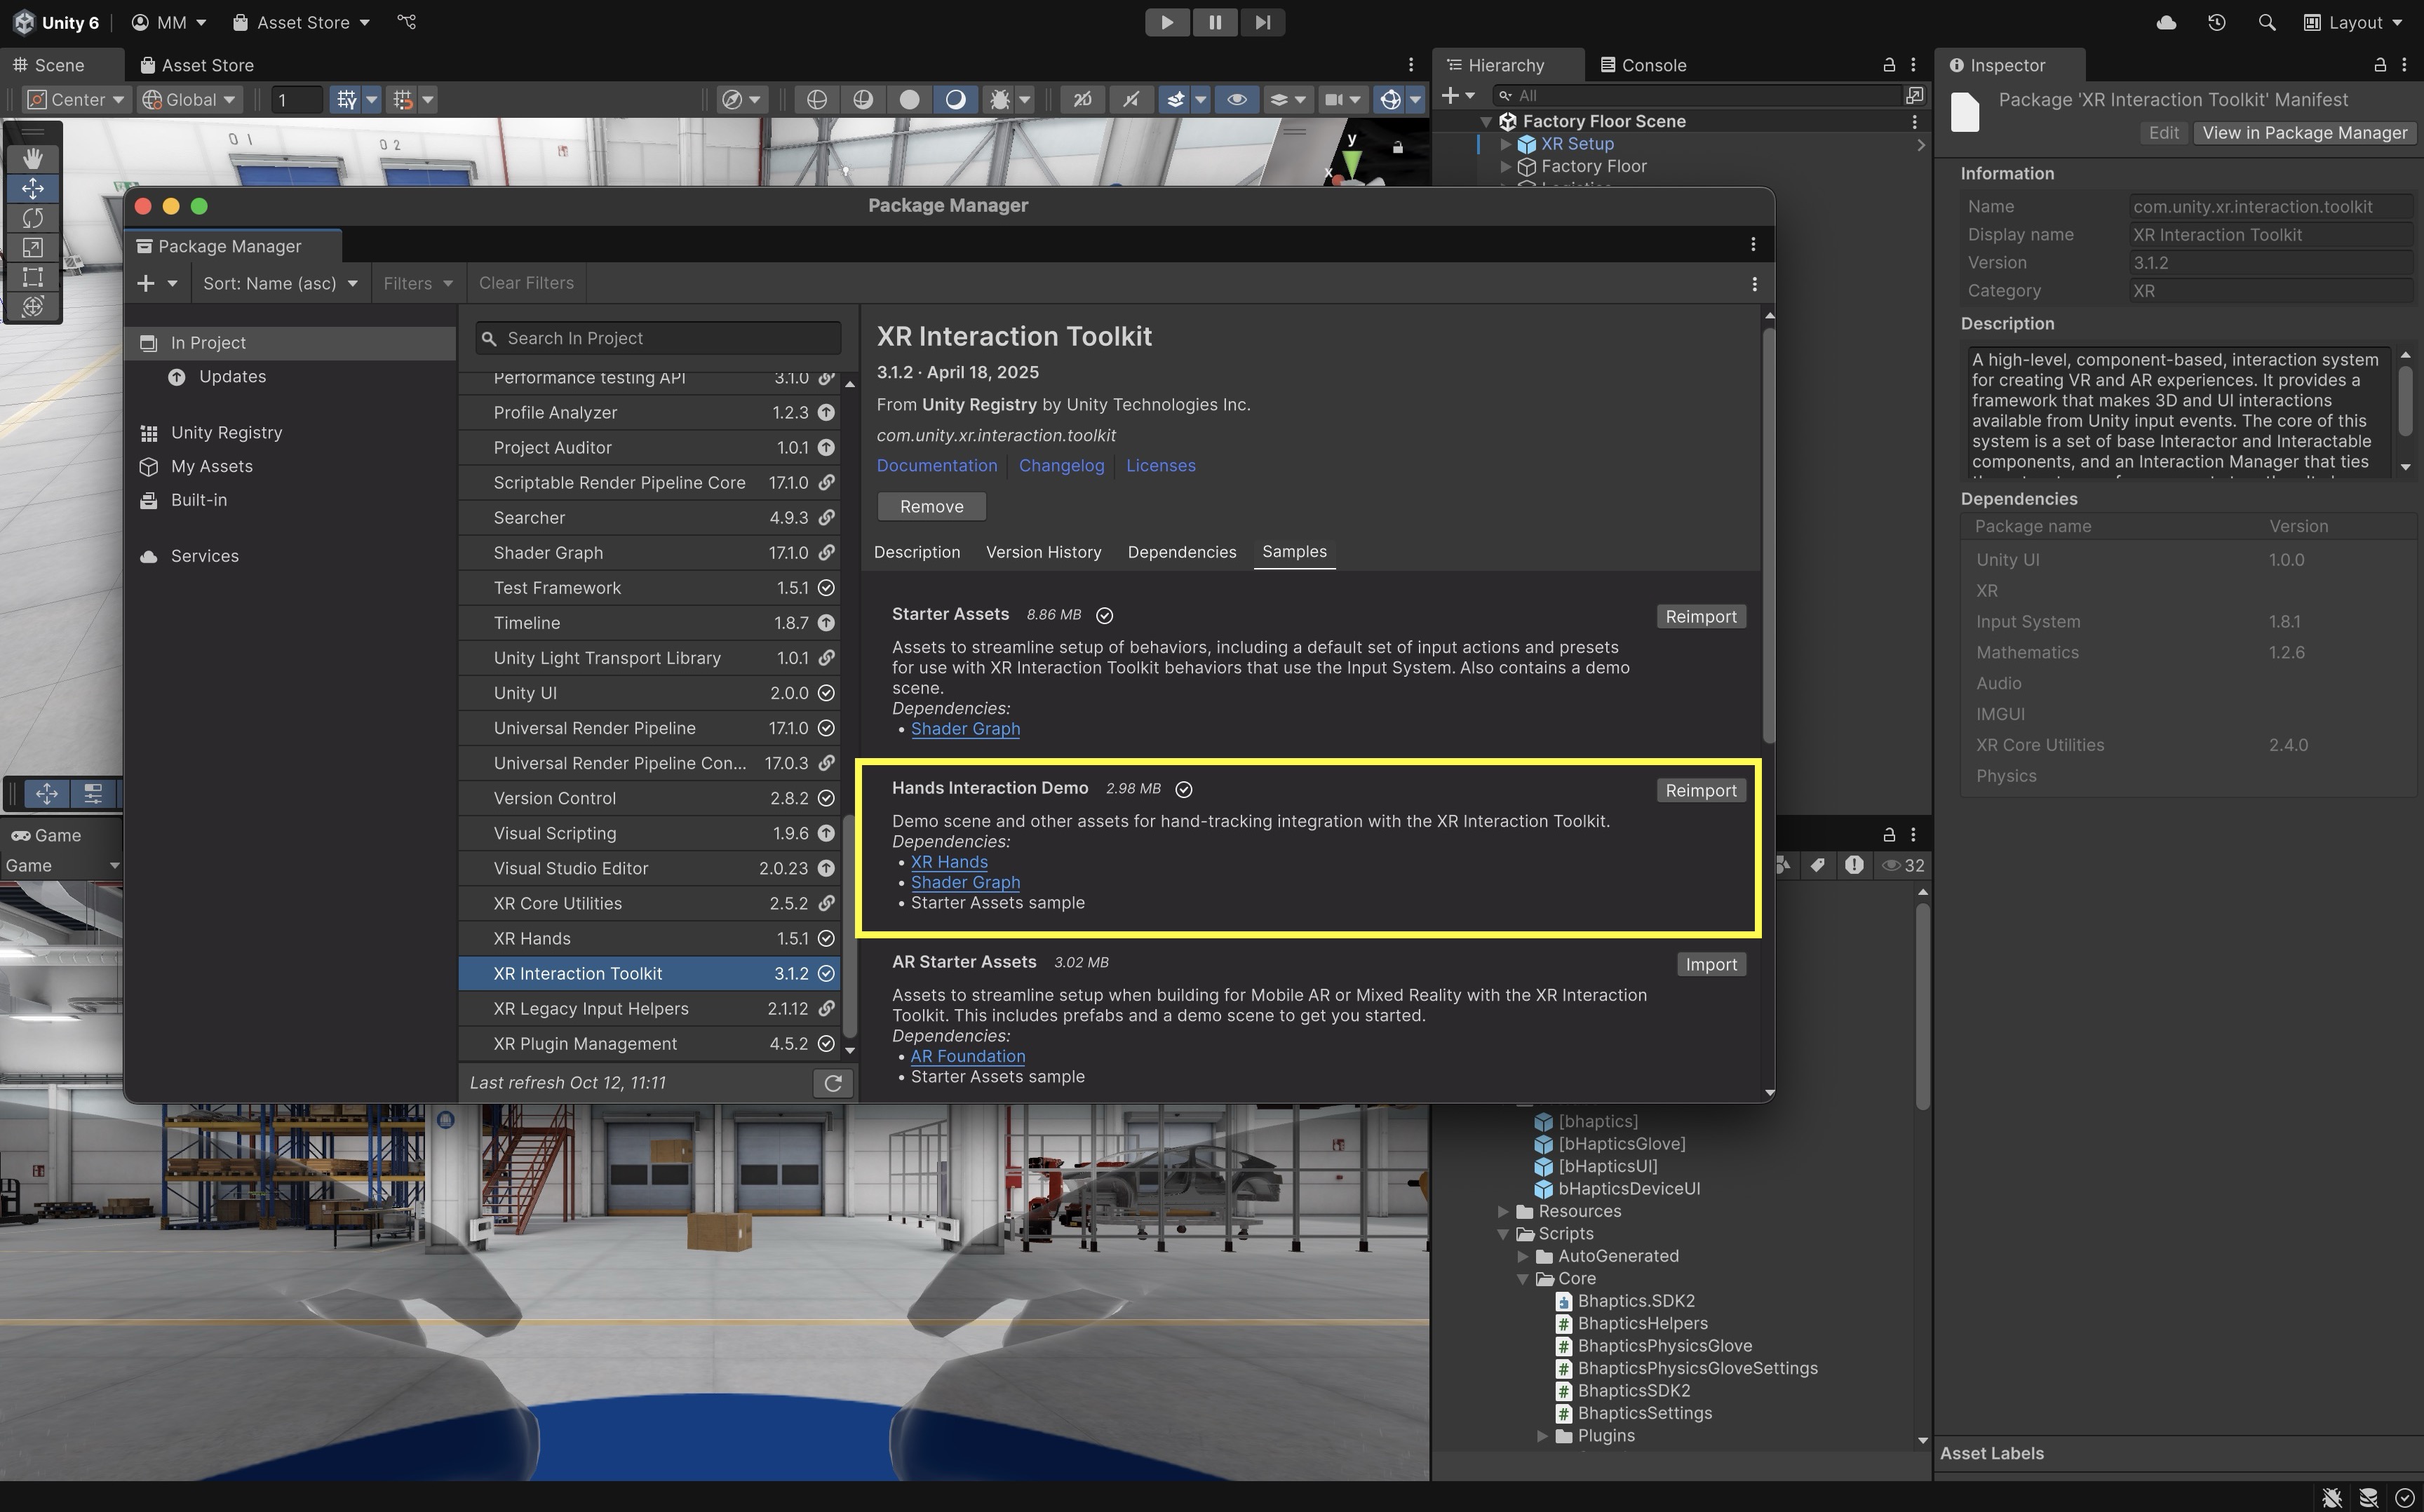
- Install Required Packages for Hand Tracking:
- Click
Window > Package Management > Package Manager. - Select
XR Interaction Toolkit(v3.x or newer). Install if not installed already. - Install the XR Hands package if it is not already in the project.
- Click the
Samplestab. Import Hands Interaction Demo. - Ensure the Input System package is installed and active. Use the project’s course-standard input setting; do not switch to
Bothunless another course dependency requires it.
- Click
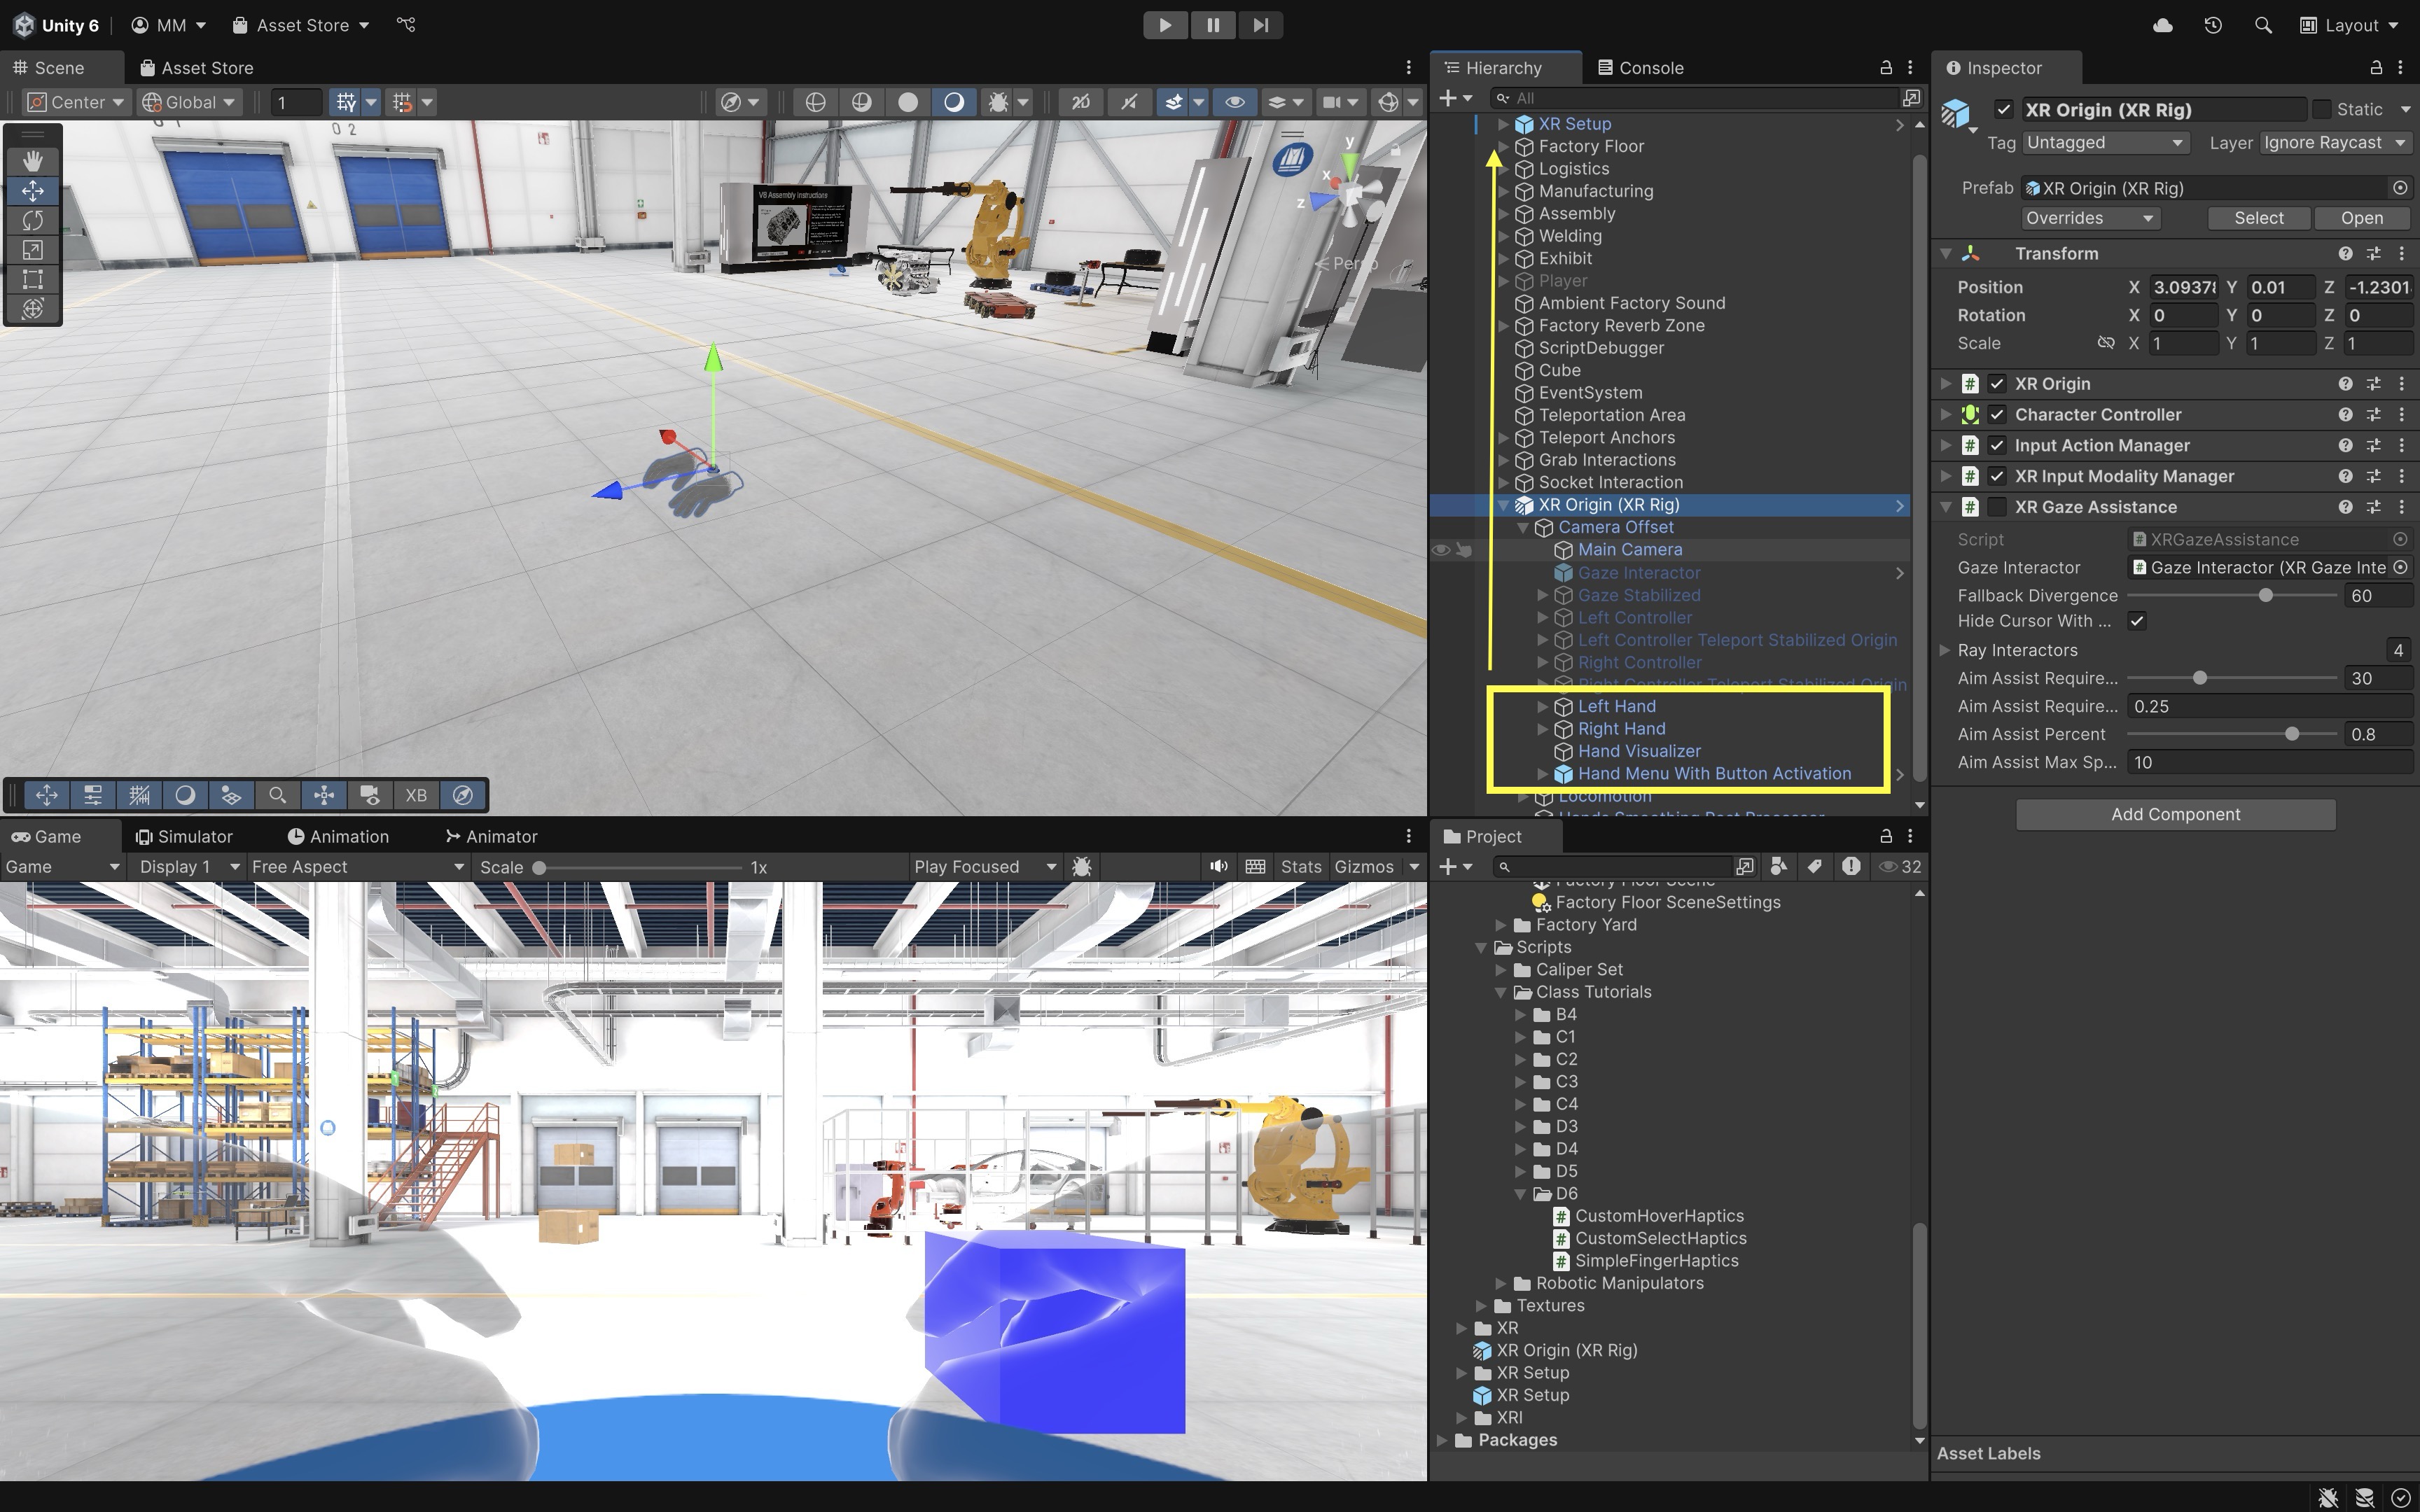
- Set Up Hand Tracking in Scene:
- Use the imported Hands Interaction Demo prefabs or copy the relevant hand visual/interactor objects from the sample rig (for example, hand visuals, interactors, and menu helpers) into the copied
XR Origin (XR Rig), then verify references in the Inspector. - Confirm an XR Input Modality Manager is present if the sample uses controller/hand switching.
- Use the imported Hands Interaction Demo prefabs or copy the relevant hand visual/interactor objects from the sample rig (for example, hand visuals, interactors, and menu helpers) into the copied
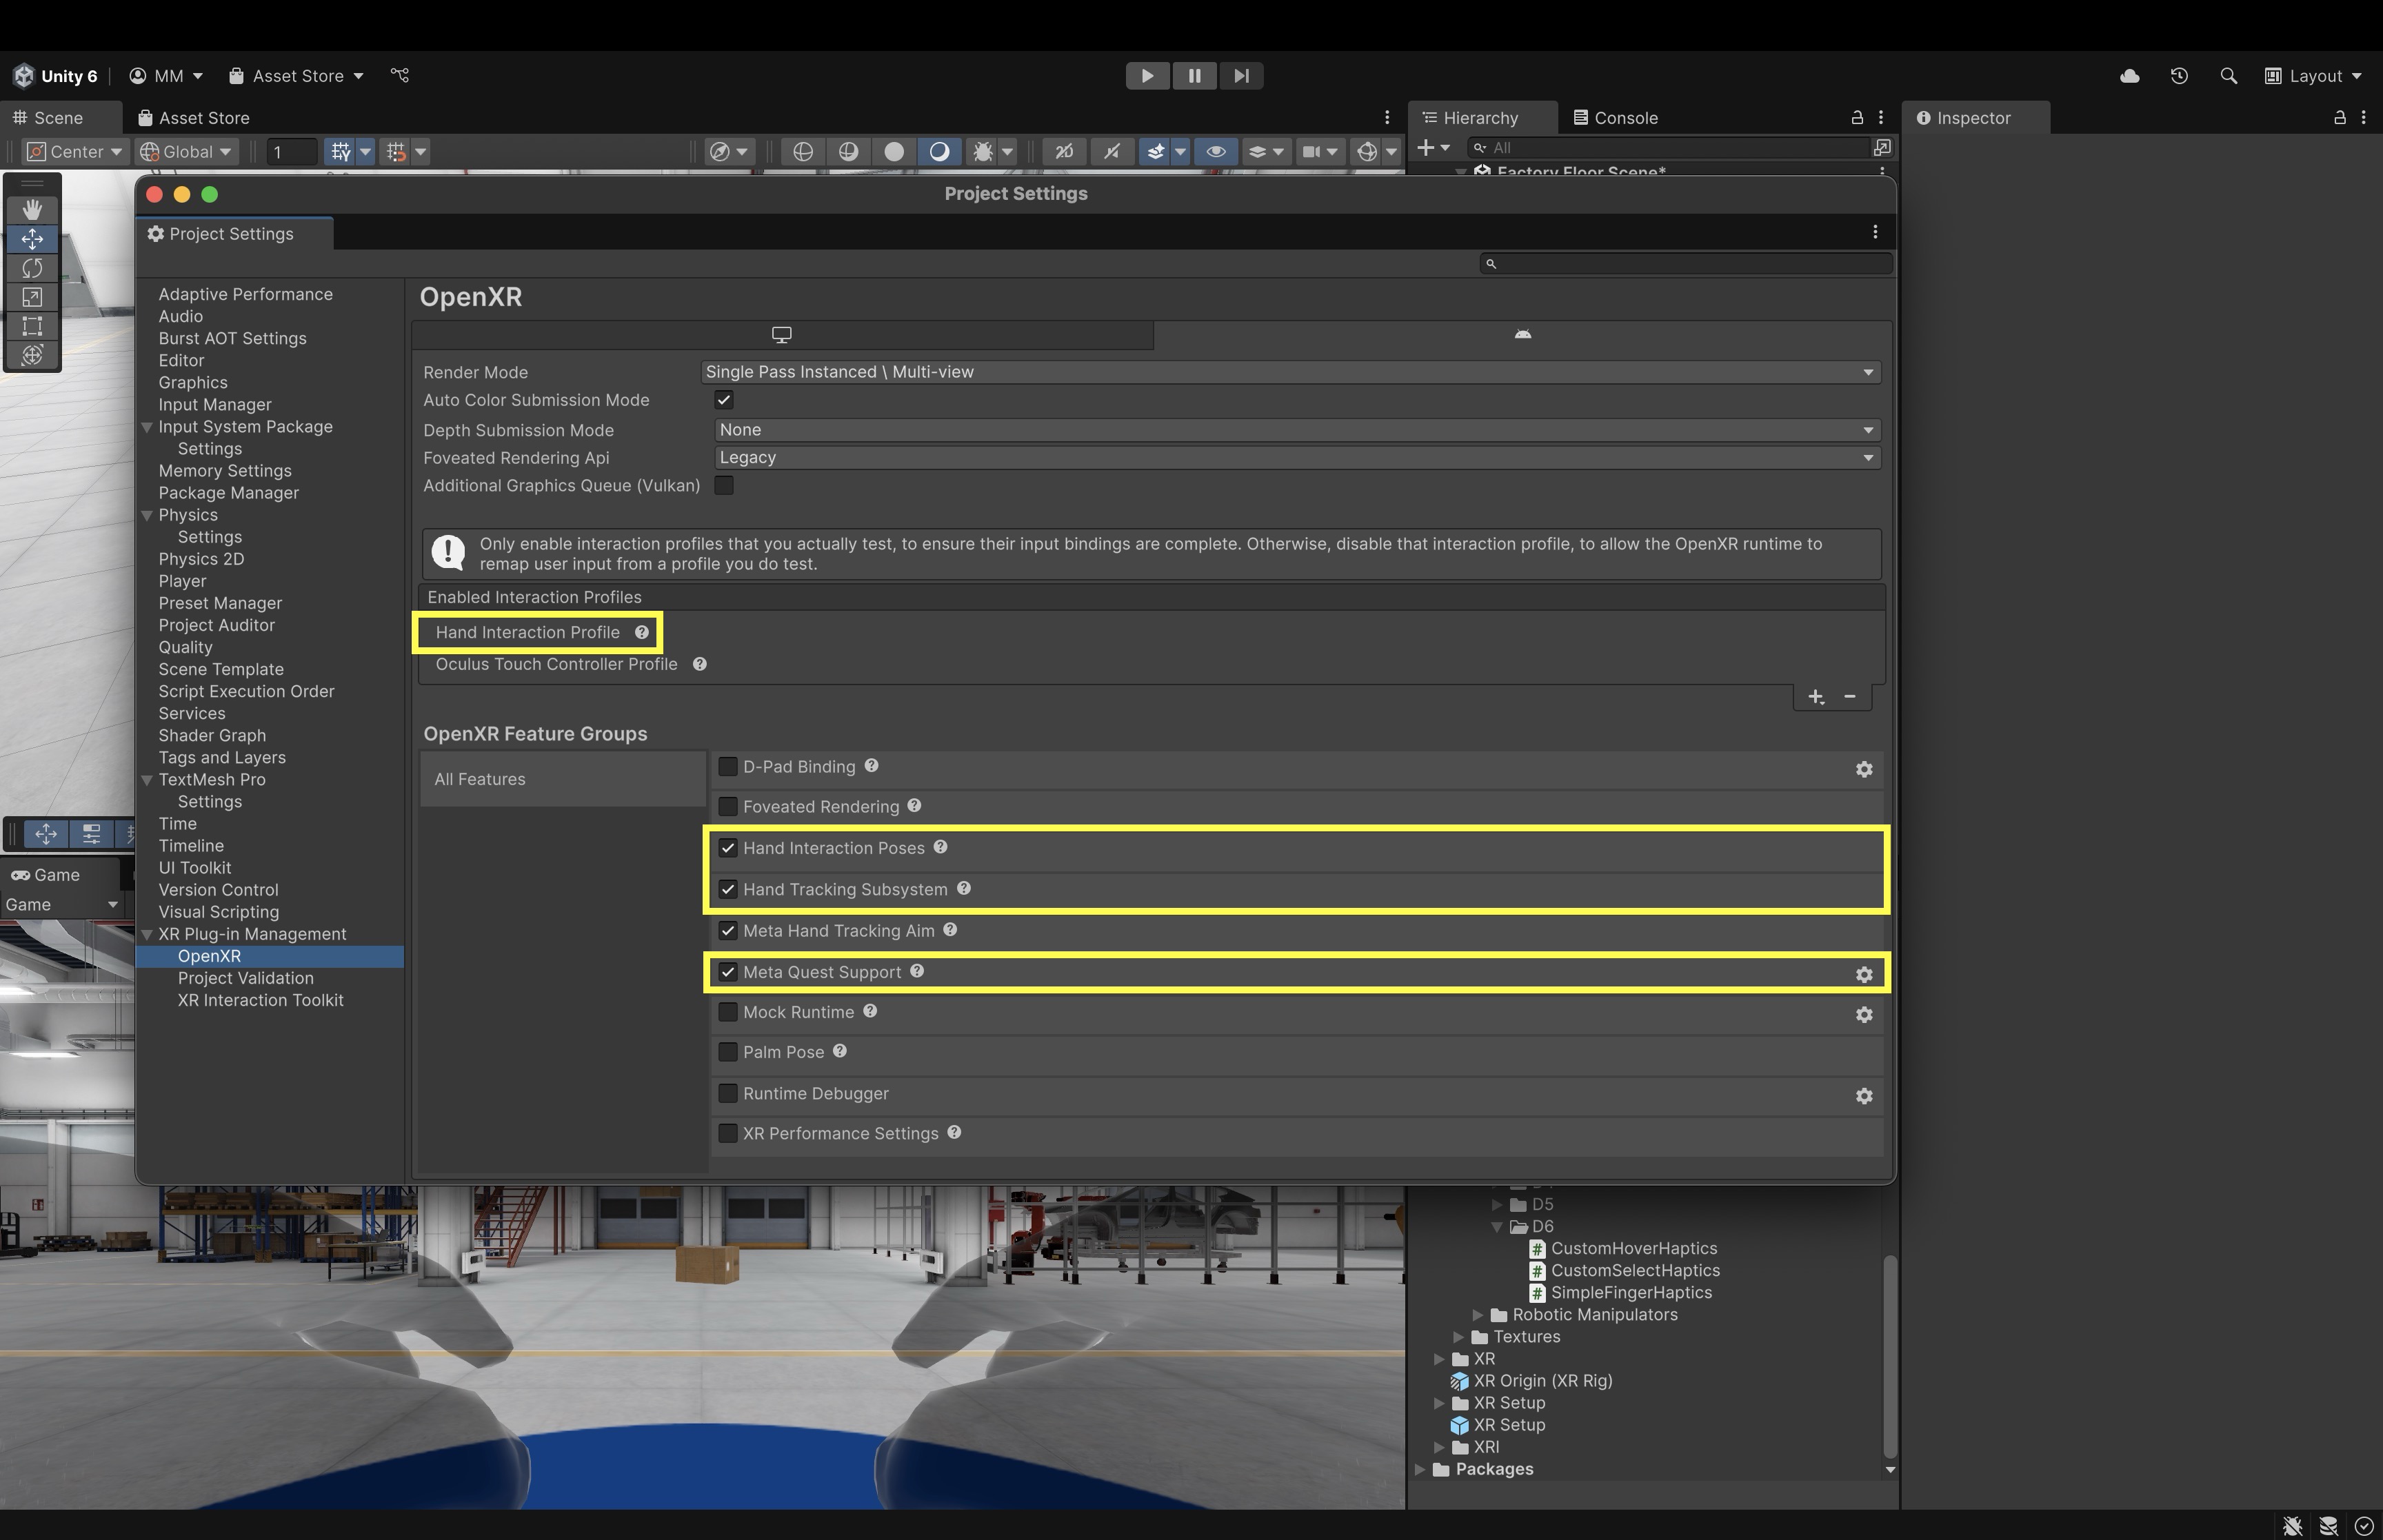
- Enable OpenXR Features:
- Go to
Edit > Project Settings > XR Plug-in Management > OpenXR. - Select your target platform (e.g.,
Androidfor Quest). - Enable the OpenXR hand-tracking features required by the target platform, such as hand tracking and hand interaction profiles. For Quest, also verify Meta Quest/OpenXR support settings for Android.
- Feature names can vary slightly by OpenXR plugin, Unity version, and vendor package.
- Go to
Configure bHaptics SDK
- Import the bHaptics Haptic Plugin:
- Import the bHaptics Haptic Plugin from Unity Asset Store.
- Go to
Window > Package Management > Package Manager > My Assets. - Import the current bHaptics Unity SDK version used by the course and verify prefab names/paths against the installed package.
- Review this bHaptics documentation to learn more about the bHaptics Physics Glove SDK.
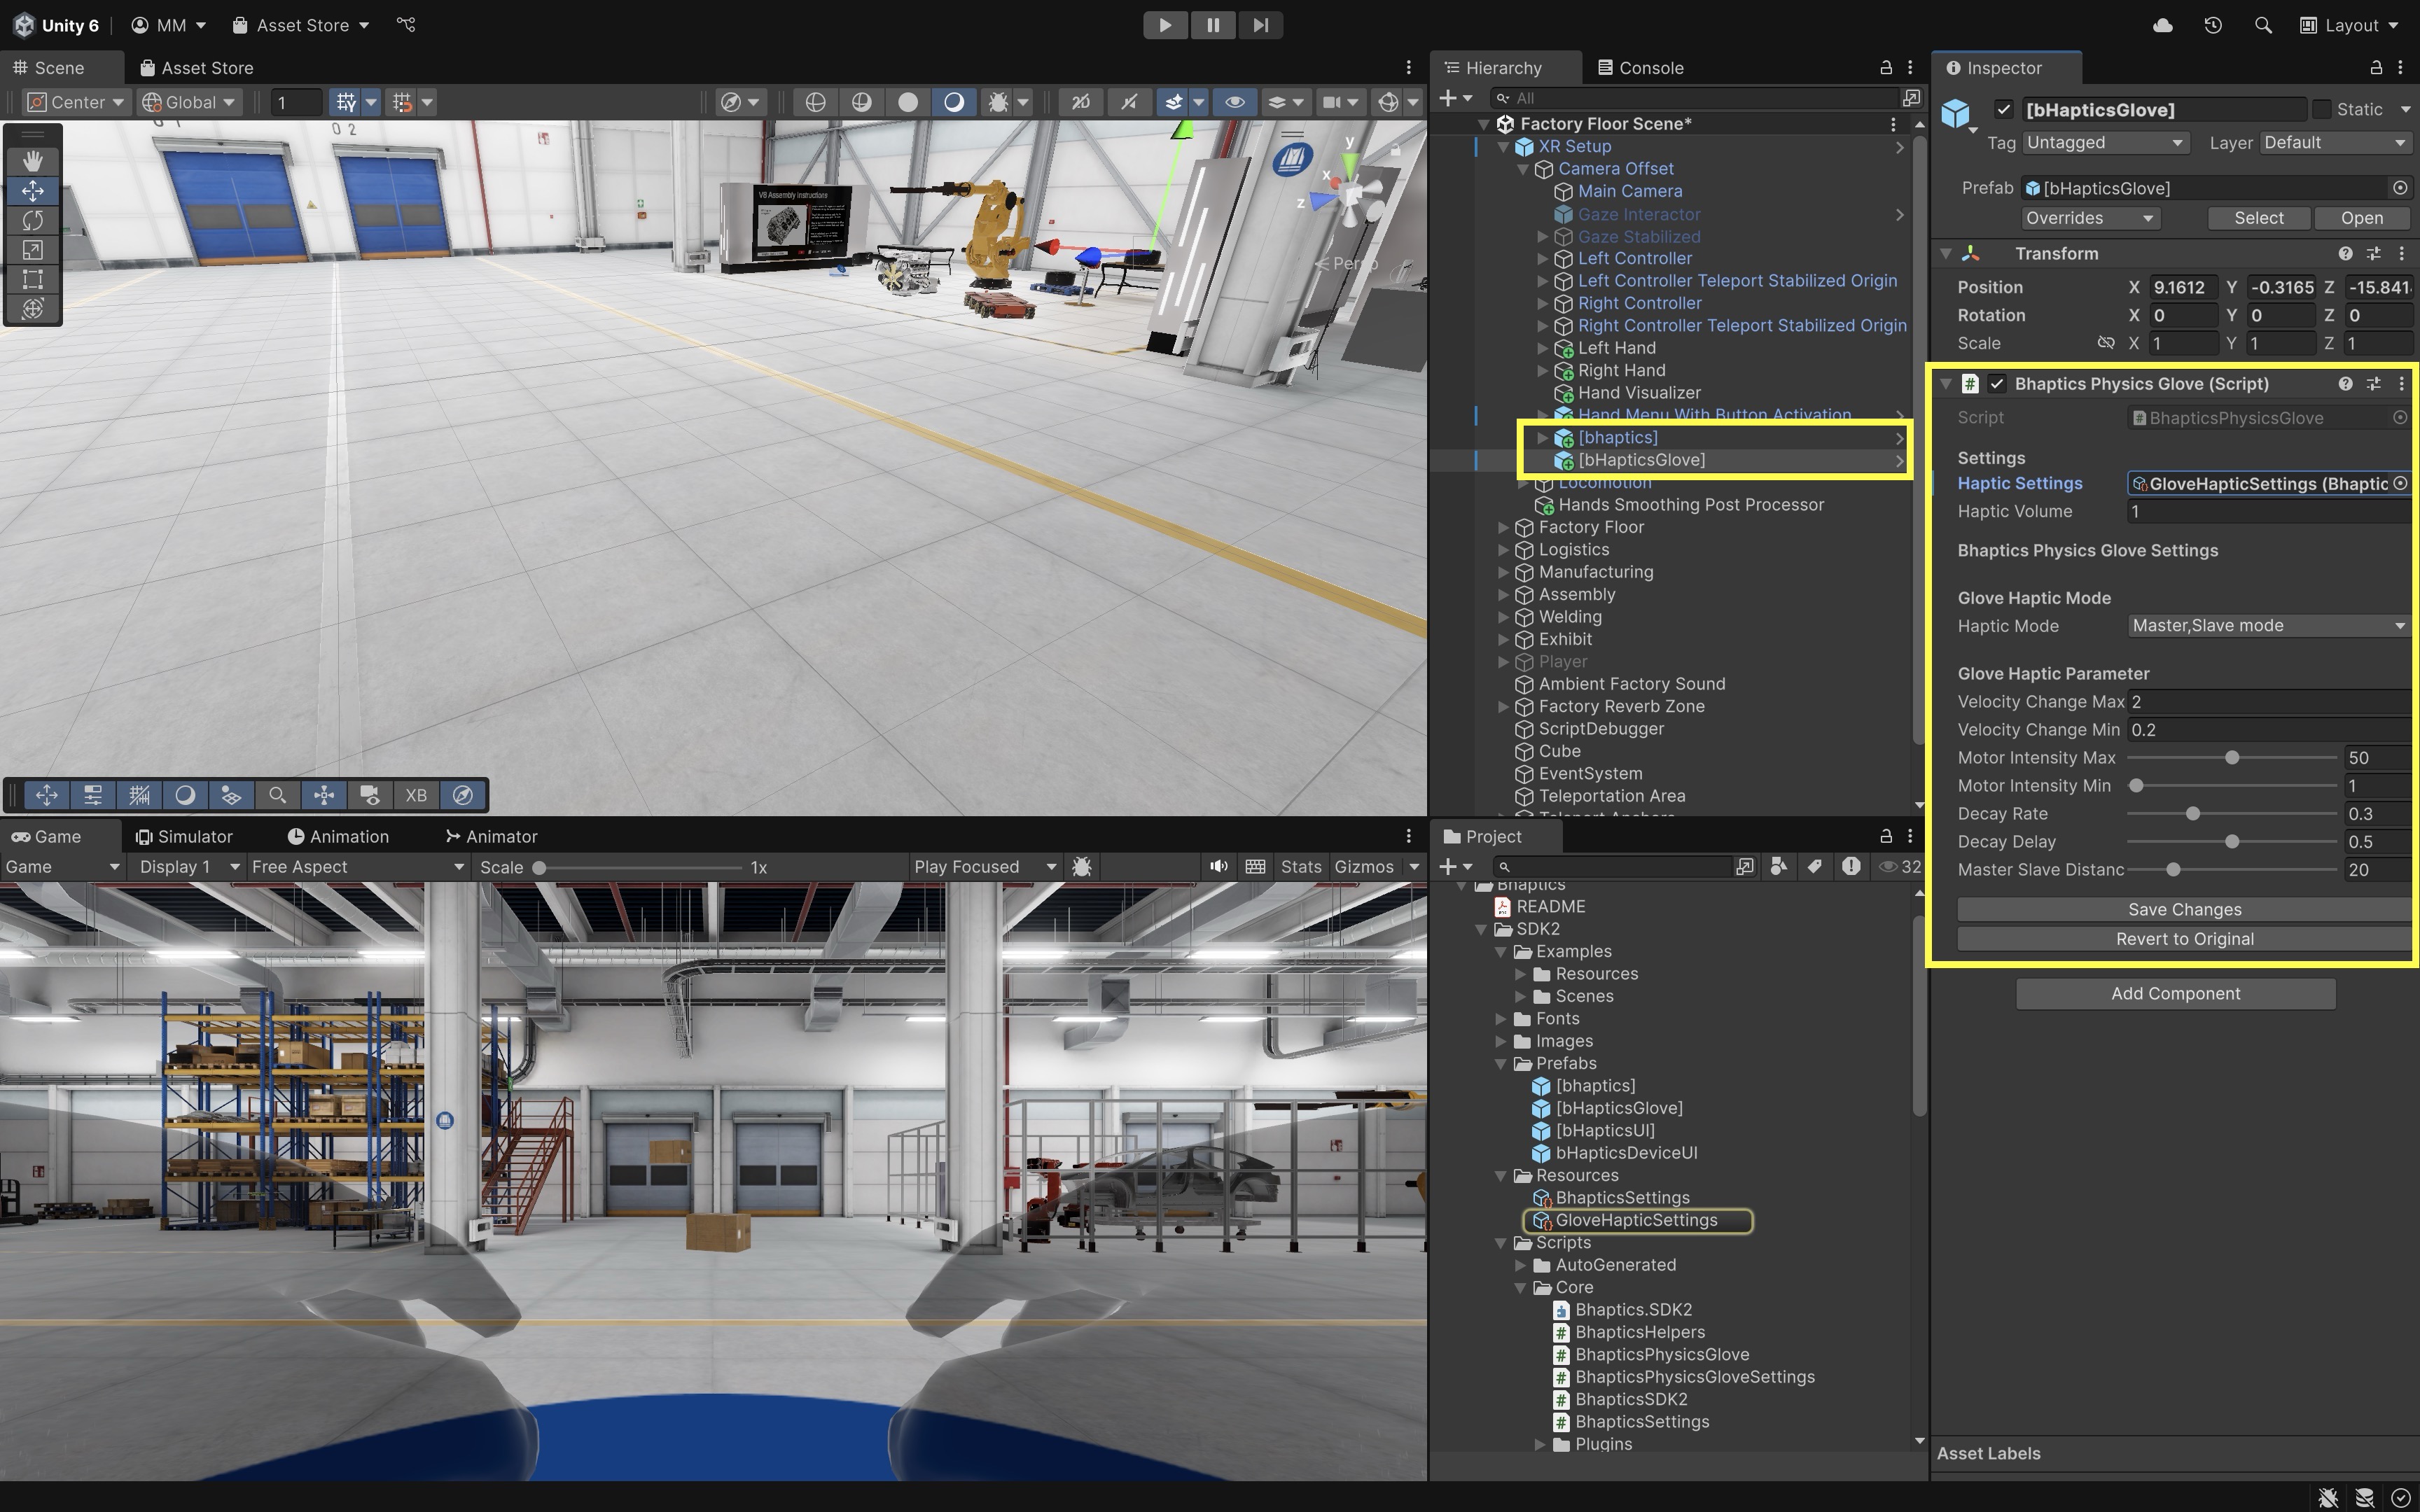
- Set up the Gloves Haptic Settings:
- In the
Projectwindow, open the SDK prefab folder from the imported package (commonly underAssets/Bhaptics/SDK2/Prefabs/). - Drag the required bHaptics manager and glove prefabs into your scene according to the installed SDK.
- Select the glove settings object in the
Hierarchyand create or assignGloveHapticSettingsas described in the SDK docs. - Keep the default parameters for now unless your instructor specifies otherwise.
This section depends on the installed bHaptics SDK version and hardware availability. The core D6 controller haptics workflow does not require gloves. Do not mix bHaptics glove haptics with controller haptics in the same task without clear user feedback settings; users should understand which device is expected to vibrate.
- In the
bHaptics Developer Setup
Before adding SimpleFingerHaptics.cs, connect the Unity project to your bHaptics Developer application:
- Sign in at developer.bhaptics.com.
- Create a new haptic application.
- Create at least one simple TactGlove vibration event.
- Generate an API Key and deploy the application.
- In Unity, open bHaptics → Developer Window.
- Enter the App ID and API Key, then click LINK.
- Add the
[bhaptics]initialization prefab fromAssets/Bhaptics/SDK2/Prefabsto the initial scene. - Use the Developer Window’s Events tab to test vibration before proceeding.
bHaptics Player must be running on the device that hosts the application: the PC when using Quest Link development, or the headset for standalone deployment. See the bHaptics Unity SDK guide for current package details.
Add Physics to Fingertips
- Locate Fingertip Transforms:
- Inside your hand hierarchy (i.e.,
RightHand Interaction VisualandLeftHand Interaction Visual), find:
R_ThumbTipR_IndexTipR_MiddleTipR_RingTipR_LittleTipL_ThumbTipL_IndexTipL_MiddleTipL_RingTipL_LittleTip
- Inside your hand hierarchy (i.e.,
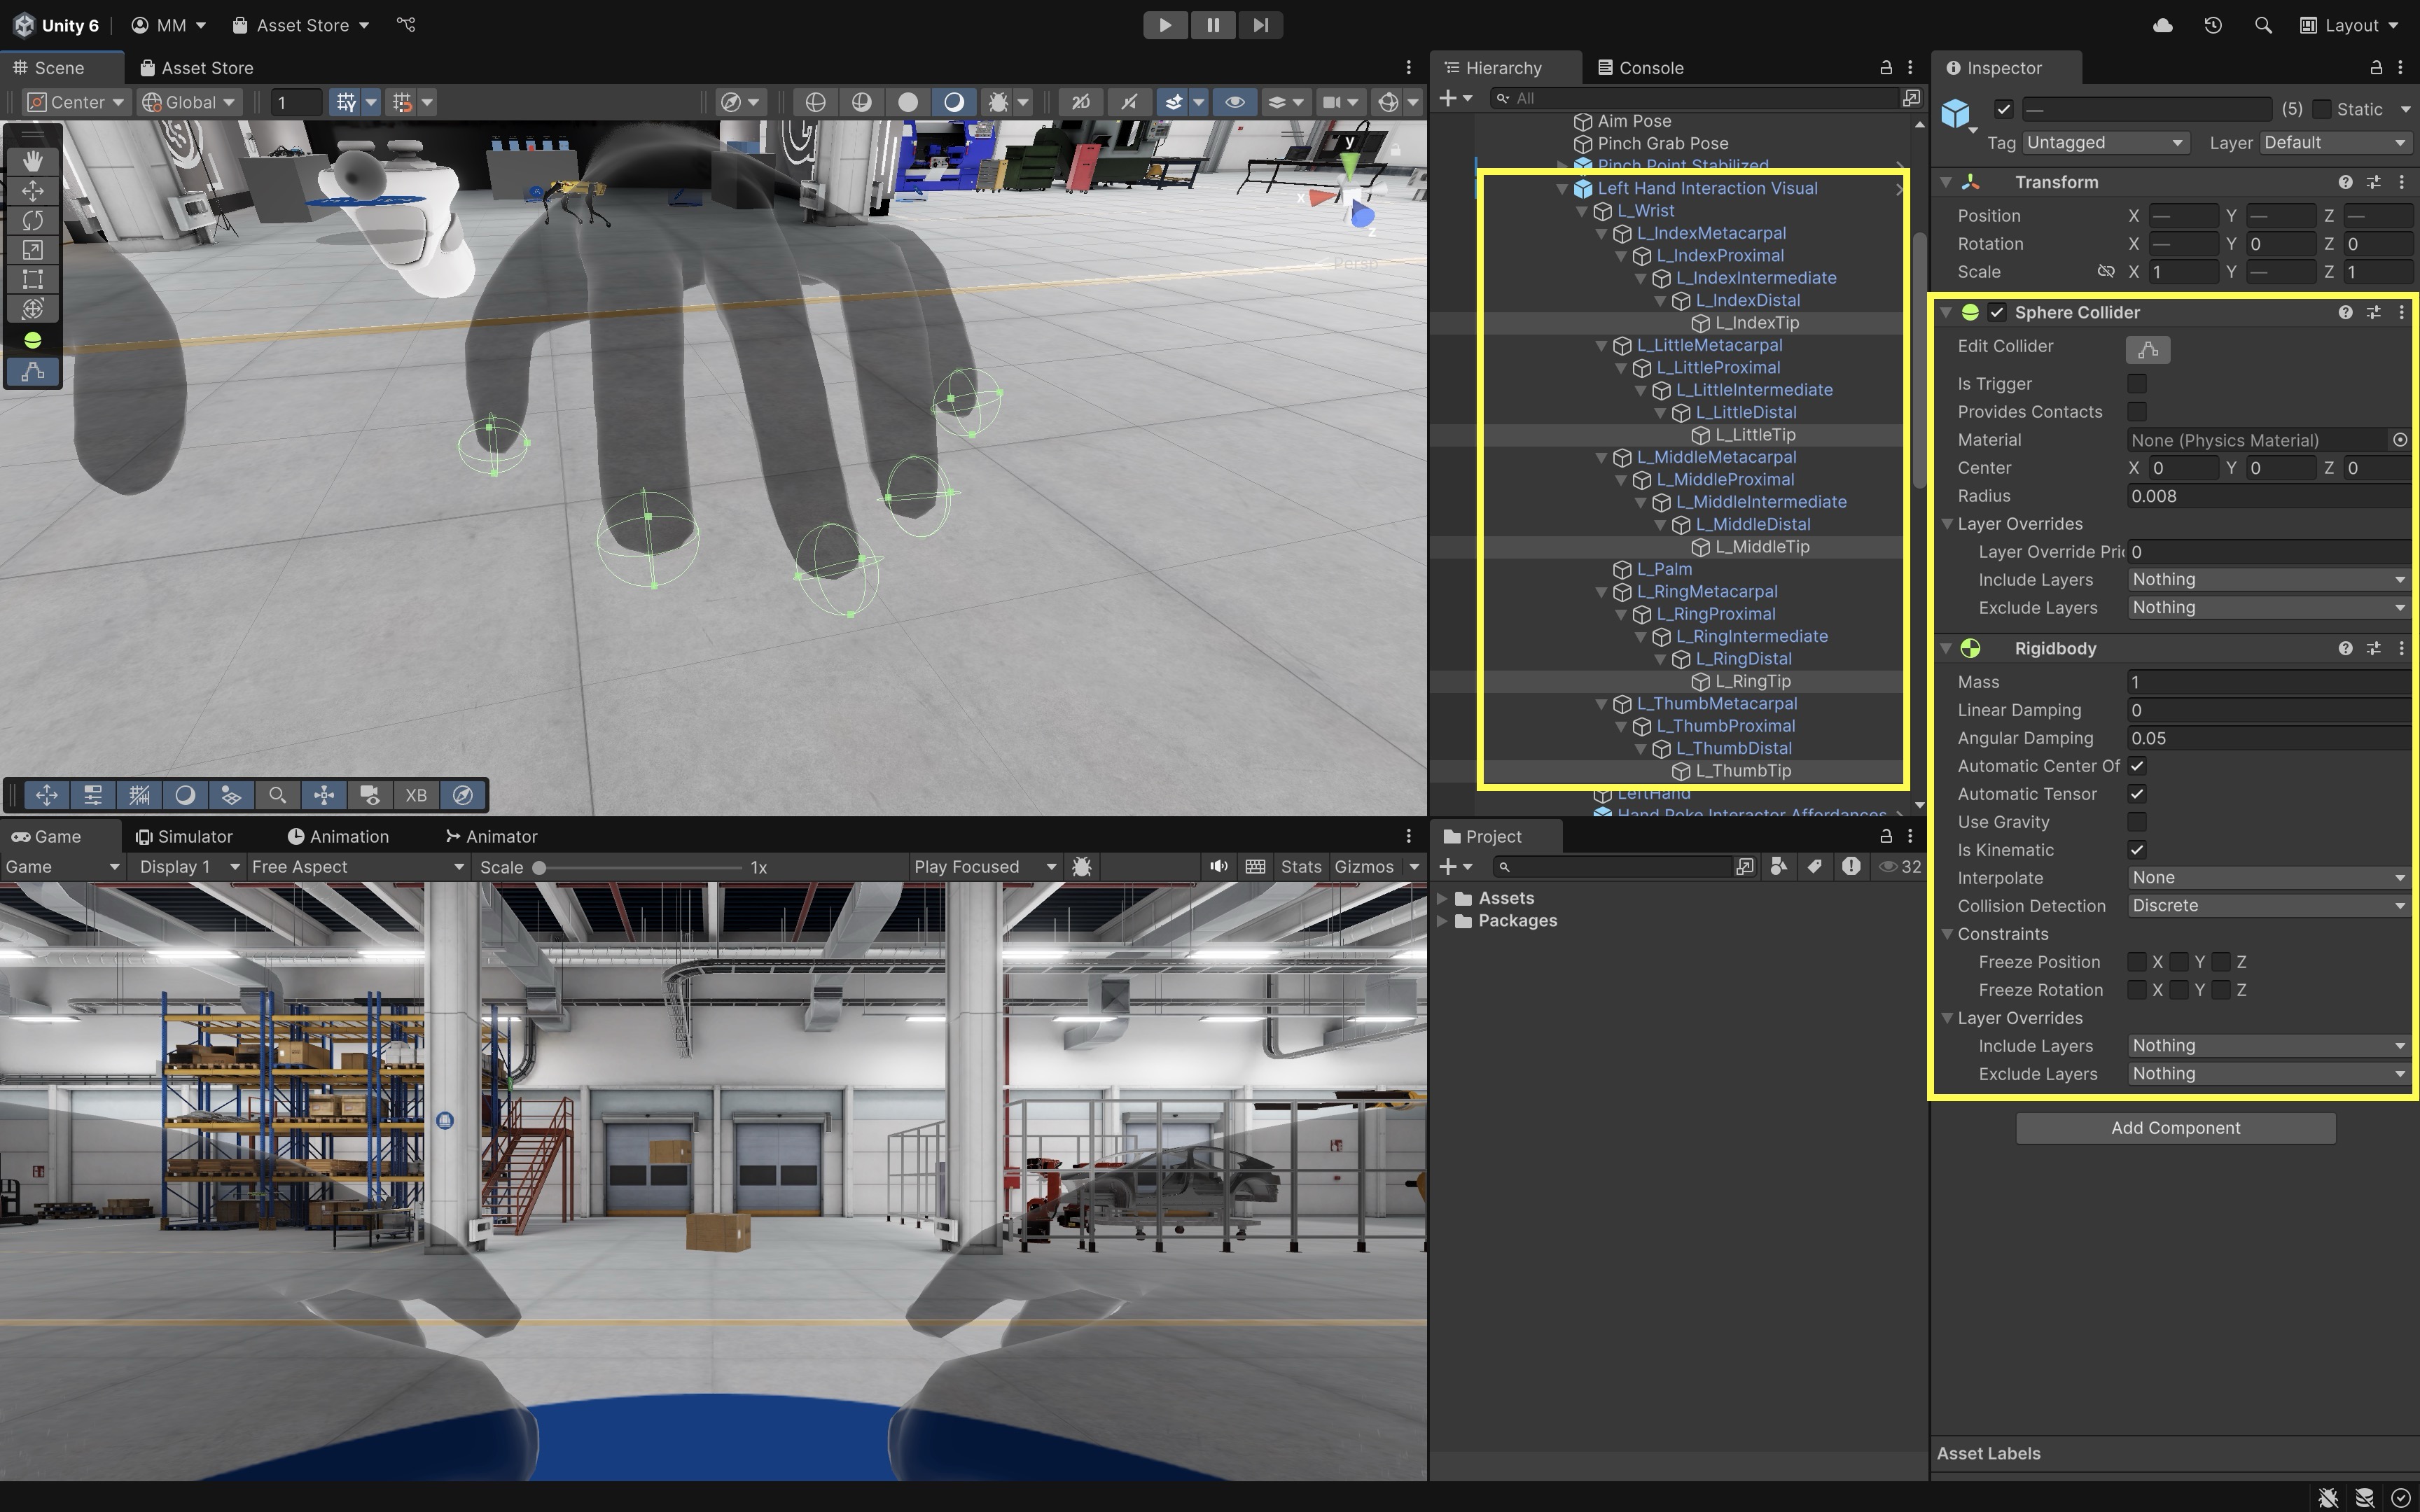
- Add Collider and Rigidbody to Each Fingertip:
- Select the fingertip GameObjects.
- Click
Add Component > Sphere Collider. - Set
Radiusto0.005 – 0.01. - Check
Is Triggerso the trigger-based script below can fire reliably. - Click
Add Component > Rigidbody. - Uncheck
Use Gravity. - Check
Is Kinematic. - Set
Collision DetectiontoContinuous. - At least one collider in the trigger pair must have a
Rigidbody.
- Add the Haptic Script:
- Create a new script named
SimpleFingerHaptics.csin your project. - Paste this code:
using UnityEngine; using Bhaptics.SDK2; using Bhaptics.SDK2.Glove; public class SimpleFingerHaptics : MonoBehaviour { [SerializeField, Range(0, 5)] private int fingerIndex; [SerializeField] private bool isLeft; [SerializeField] private Transform masterTransform; [SerializeField] private Transform slaveTransform; [SerializeField] private Vector3 defaultEnterVector = Vector3.forward; [Header("Haptic Settings")] [SerializeField] private bool enableEnter = true; [SerializeField] private bool enableStay = true; [SerializeField, Min(0.05f)] private float stayInterval = 0.5f; [SerializeField, Min(0f)] private float maxStayDuration = 1.5f; private PositionType Side => isLeft ? PositionType.GloveL : PositionType.GloveR; private float contactStartTime; private float nextStayTime; private void OnTriggerEnter(Collider other) { contactStartTime = Time.time; nextStayTime = Time.time + stayInterval; if (enableEnter && BhapticsPhysicsGlove.Instance != null) BhapticsPhysicsGlove.Instance.SendEnterHaptic( Side, fingerIndex, defaultEnterVector); } private void OnTriggerStay(Collider other) { if (!enableStay || BhapticsPhysicsGlove.Instance == null || masterTransform == null || slaveTransform == null) return; if (Time.time < nextStayTime || (maxStayDuration > 0f && Time.time - contactStartTime > maxStayDuration)) return; nextStayTime = Time.time + stayInterval; BhapticsPhysicsGlove.Instance.SendStayHaptic( Side, fingerIndex, slaveTransform, masterTransform); } private void OnTriggerExit(Collider other) { if (BhapticsPhysicsGlove.Instance != null) BhapticsPhysicsGlove.Instance.SendExitHaptic(Side, fingerIndex); } } - Create a new script named
- Haptic Settings (Inspector):
- Enable Enter: Vibrates when the fingertip initially touches an object.
- Enable Stay: Enables repeated feedback during continued contact.
- Stay Interval: Time between repeated feedback calls, default 0.5 seconds.
- Max Stay Duration: Stops repeated feedback after 1.5 seconds; setting
0disables the limit.
Recommended beginner settings: Enable Enter = true, Enable Stay = false. This prevents overwhelming continuous vibration. You can enable Stay and adjust its interval for more sustained feedback. These settings control event timing, not vibration intensity. The script uses trigger callbacks, so fingertip Sphere Colliders must have Is Trigger enabled, with a Rigidbody on at least one participating collider.
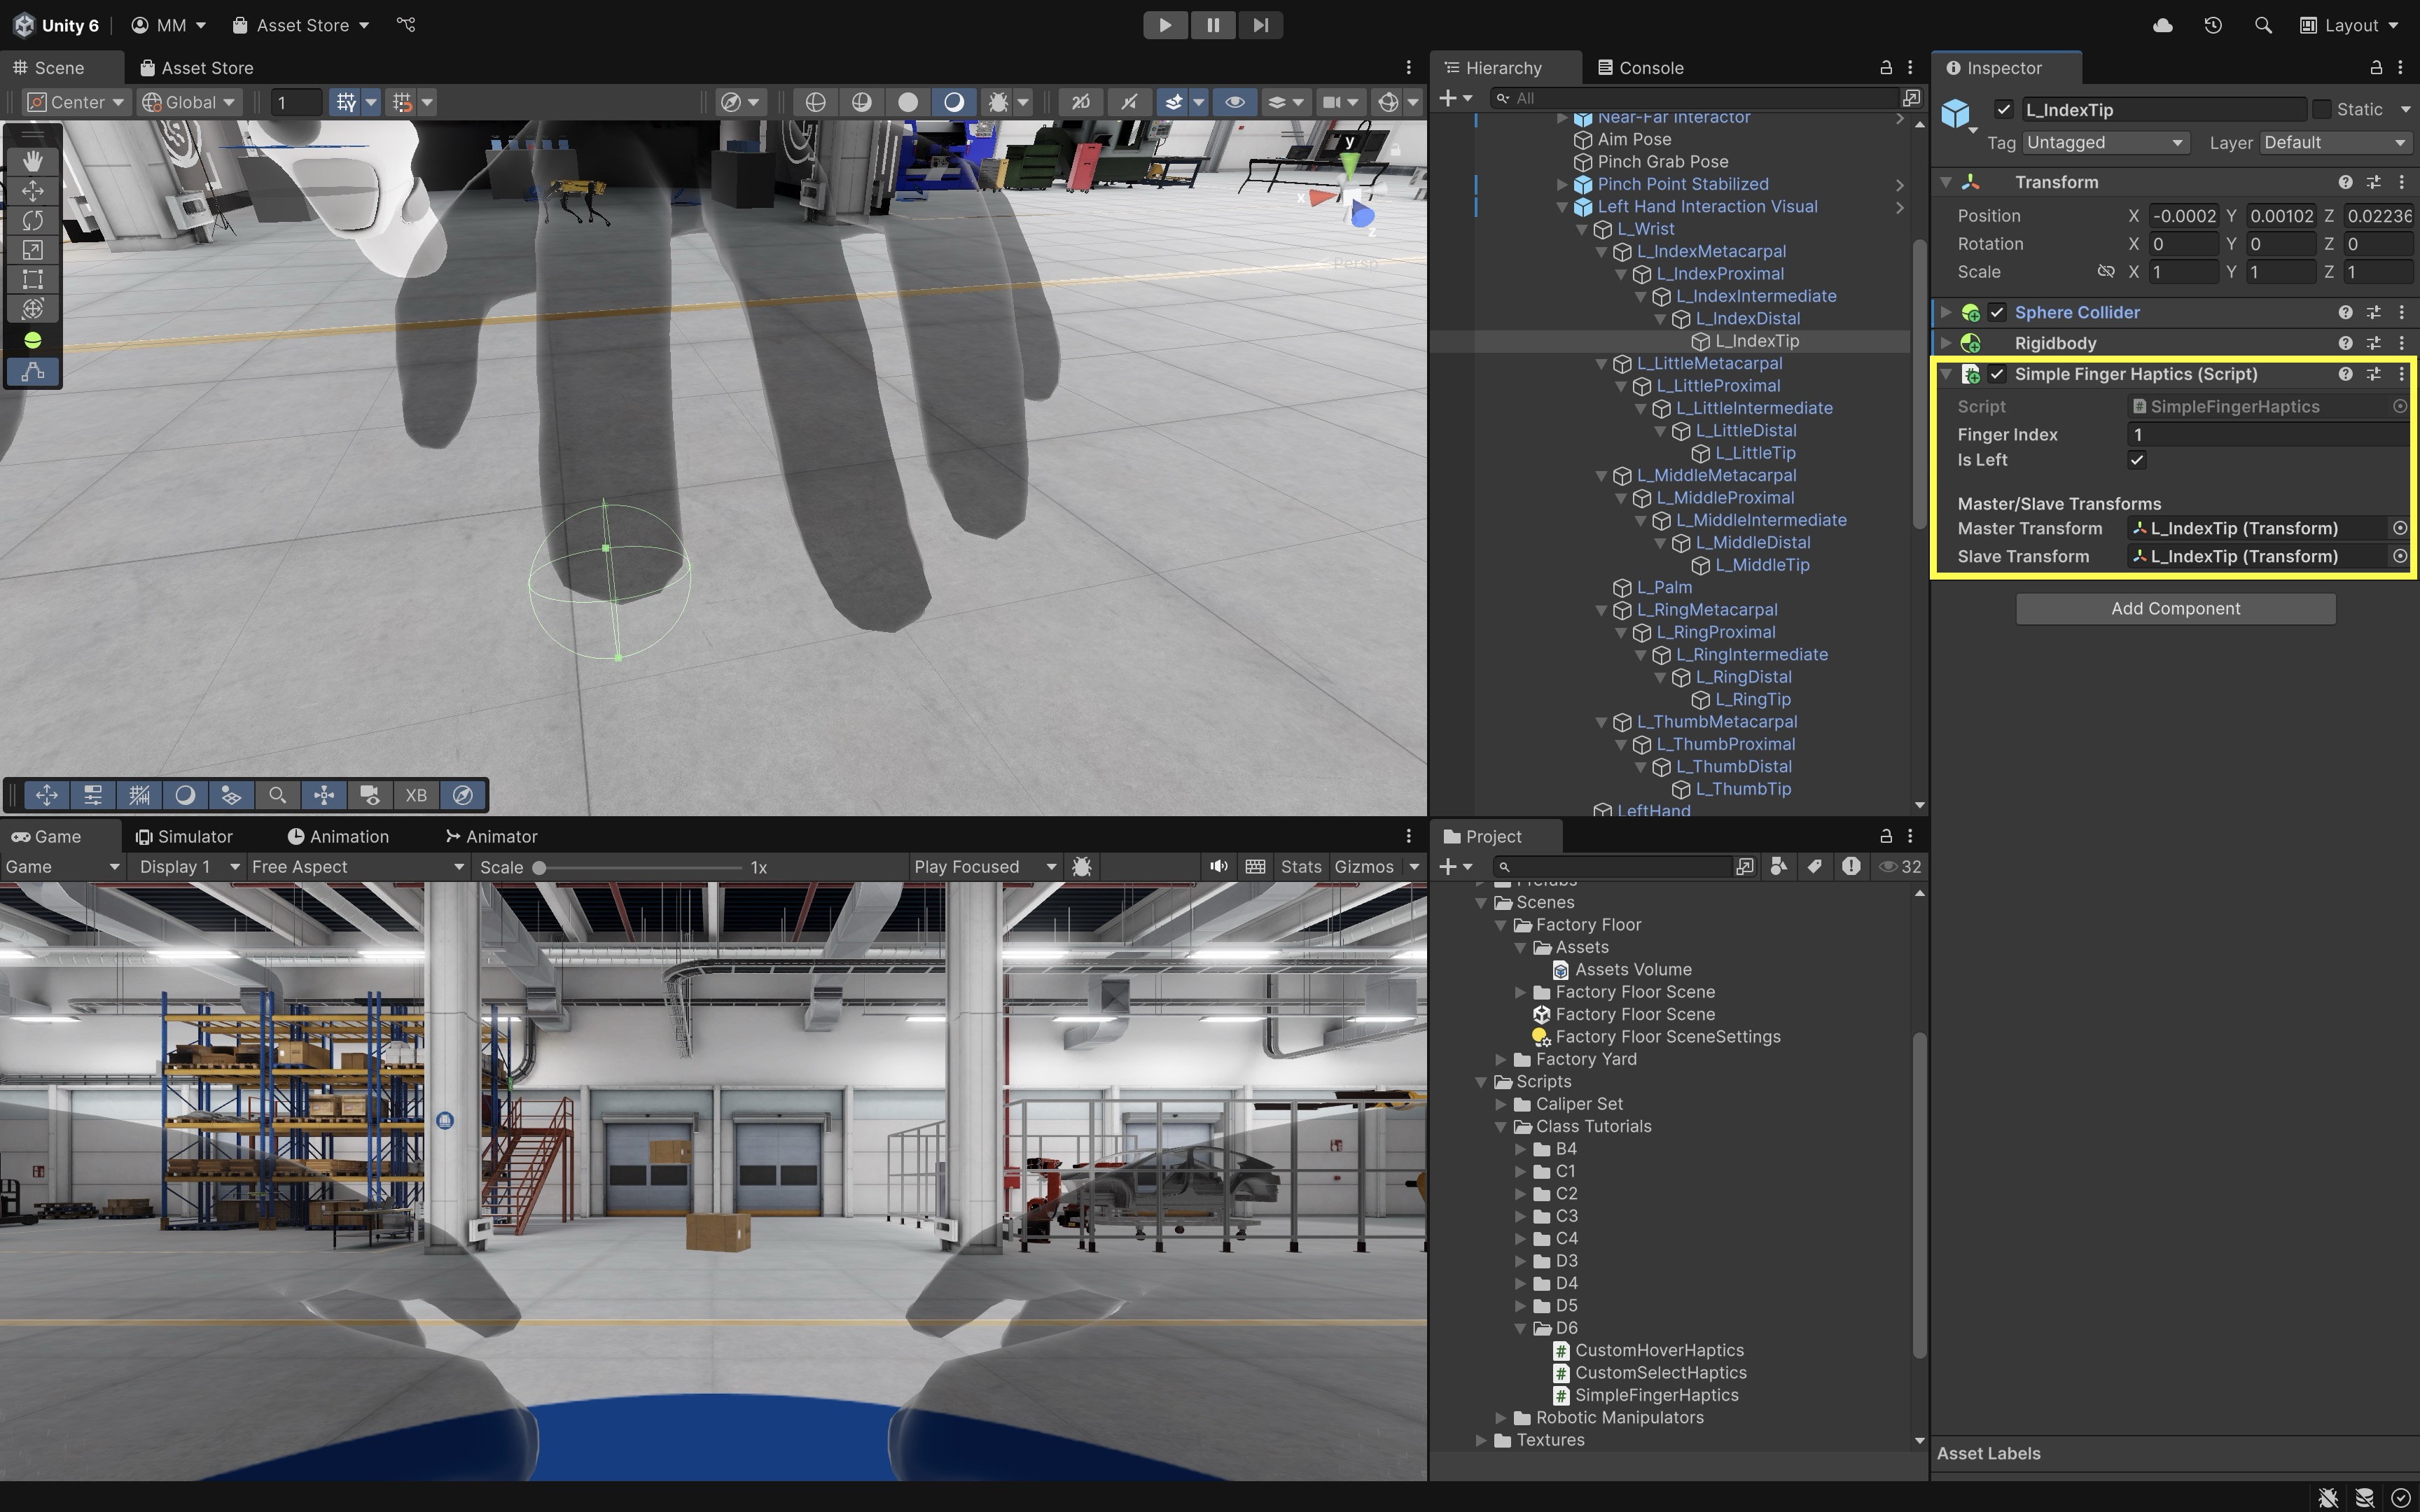
- Configure Each Fingertip in the Inspector:
fingerIndex: Assign0 = Thumb,1 = Index,2 = Middle,3 = Ring,4 = Little,5 = Wrist(optional).isLeft: Check for left-hand fingertips. Uncheck for right-hand fingertips.masterTransform: Drag in the tracked fingertip transform (the one following hand tracking). Usually the same tip under yourHand Interaction Visual.slaveTransform: Drag in the fingertip GameObject that has this script and collider attached (often itself).- In most XRI Hand Interaction setups, you can assign the same GameObject for both
masterTransformandslaveTransformif you’re not using a physics proxy hand. - Under Haptic Settings, start with Enable Enter enabled and Enable Stay disabled unless you need sustained contact feedback.
- Deploy and Test:
- Build and deploy your project to Quest with Android Build and Run.
- Quest Link / Meta Horizon Link is useful for rapid iteration, but controller haptics, hand tracking, glove integration, audio loudness, spatialization, performance, and thermal behavior must be validated on the actual device.
- On the headset, make sure your TactGlove DK2 devices are paired and connected through the bHaptics Player app or system Bluetooth settings.
- Once the gloves are paired, launch your Unity app to test fingertip collisions and haptic feedback in VR.
- Fine-Tuning Haptic Sensation:
- Open your
GloveHapticSettingsasset (attached to[bHapticsGlove]). - Adjust parameters as needed.
motorIntensityMin/Max: Controls vibration strength.velocityChangeMin/Max: Tunes how sensitive it is to impact speed.decayRateanddecayDelay: Control how long sustained contact persists.- Resize fingertip colliders (e.g., radius
0.006–0.01) to optimize detection.
- Open your
Audio in VR
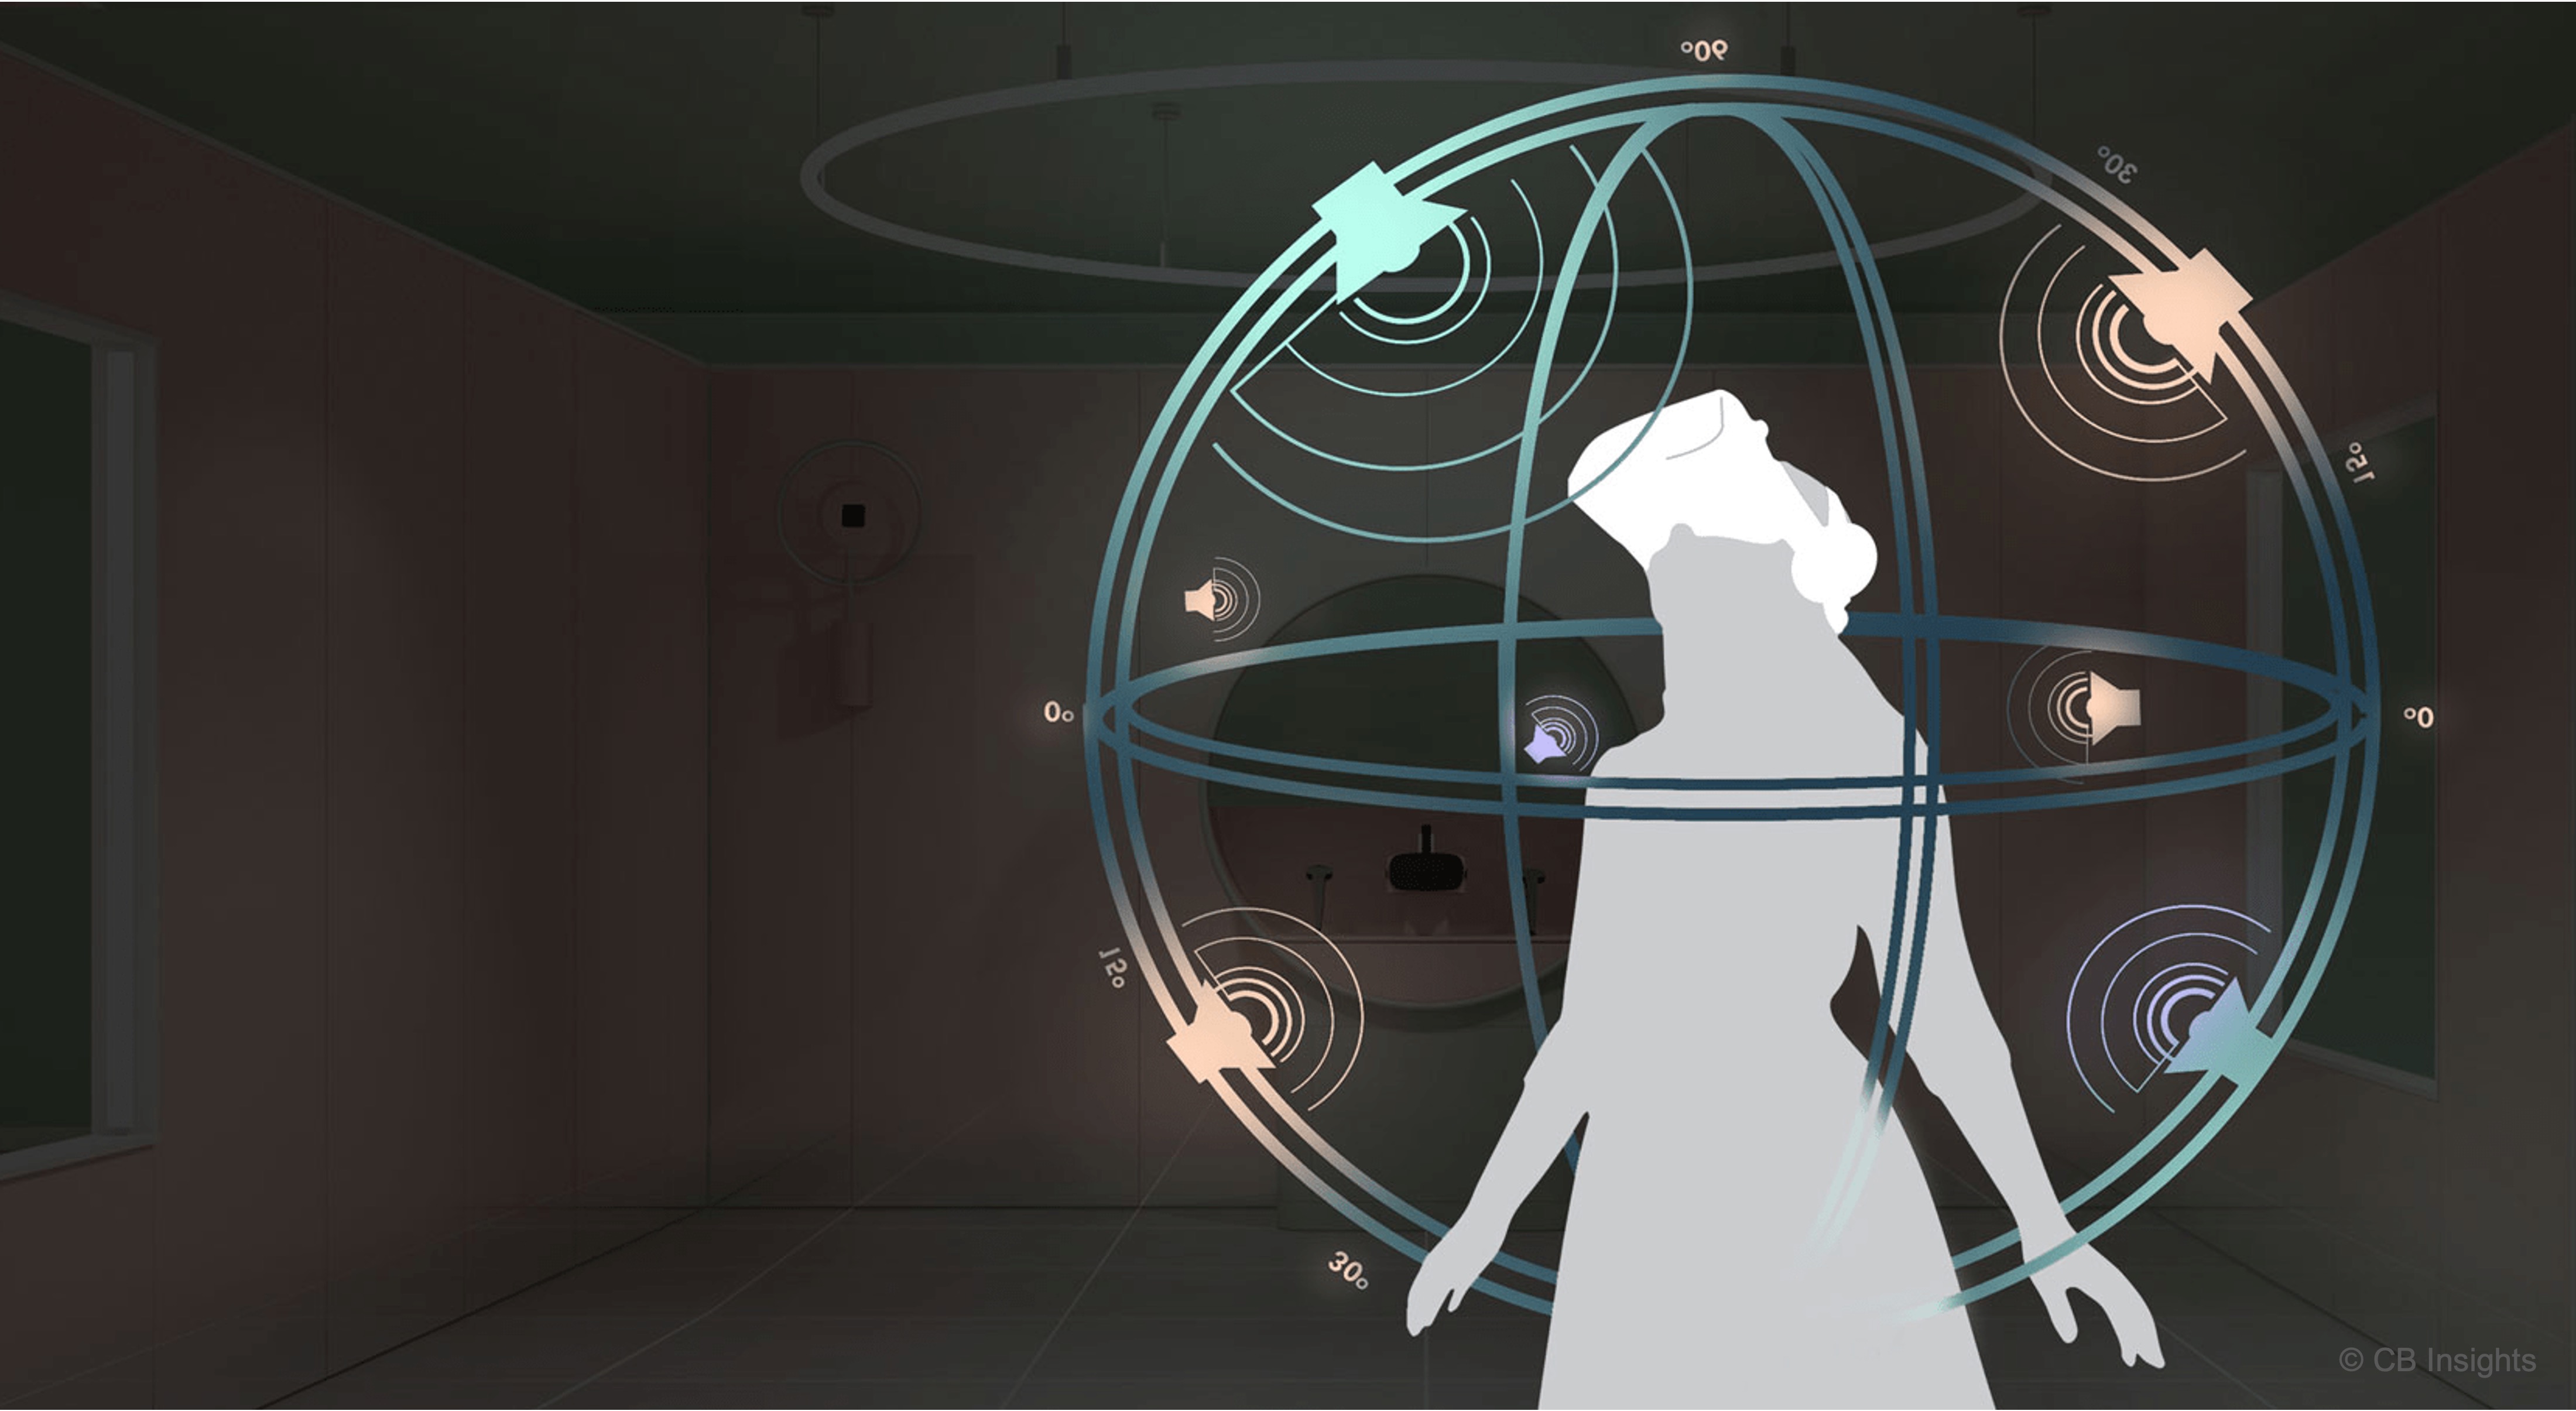
Audio in VR plays a crucial role in creating immersive and realistic experiences by simulating 3D spatial sound that corresponds to the user’s environment and physical movements. It enhances presence, emotional engagement, and user understanding by allowing users to perceive direction, distance, and material characteristics of sound sources, just as they would in a real-world engineering environment. Key concepts include:
- Audio Feedback: Audio feedback uses sound cues to indicate interactions, state changes, or successful task completions. These auditory signals can be subtle (e.g., soft beeps for UI interaction) or mechanical (e.g., metallic clunks when machinery operates). In XFactory, placing a box into a rack at the logistics station can trigger a satisfying “clunk” sound, reinforcing task completion.
- Spatial Audio: This technique adjusts sound characteristics—such as stereo balance, volume, and filtering—based on the user’s position and orientation. It provides directional awareness, helping users interpret where sounds are coming from and how far away they are. In the manufacturing station of XFactory, the CNC machines should sound louder as users walk toward them and quieter as they move away.
- Audio Events: Audio events are specific triggers that play sound effects during interactions. These include object grabs, button presses, or environmental triggers (like a door opening). In the assembly station, interacting with the large display screen should trigger a crisp UI confirmation tone.
Principles
- Immersion & Presence: Craft audio that aligns seamlessly with the visual and interactive world. Every machine, tool or environment element should emit appropriate sounds—whether it’s the steady, low-pitched hum of a CNC lathe or the distant echo of footsteps in a factory hall. Even subtle layers of ambient noise (airflow, distant machinery, electrical buzz) reinforce spatial context and keep users “in” the scene.
- Spatial & Directional Cues: Use accurate 3D audio positioning so users can pinpoint sound sources at a glance. In a multi-station workshop, they should hear a welding arc crackle to their left or a conveyor belt whirring behind them. Consistent volume attenuation and HRTF-based panning help operators quickly locate equipment or hazards without breaking visual focus.
- Clarity & Consistency: Define a clear “audio vocabulary” for key actions and system states. Reuse the same short beep for every successful control-panel selection or the same alert tone for safety warnings across all modules. Predictable, unambiguous sounds build muscle memory and reduce cognitive load, so users instantly recognize outcomes and system responses.
- Layered Soundscapes: By blending these levels thoughtfully—mixing quieter ambient tracks under louder interactive cues—you create a rich, believable soundscape that enhances situational awareness without masking critical feedback. Build depth by stacking multiple audio layers:
- Ambient Base: Continuous environmental loops (air handling units, distant machinery).
- Functional Mid-Layer: Operational sounds tied to active components (motors, hydraulics).
- Interactive Top-Layer: Event-driven cues (button clicks, error tones).
- Performance and Comfort: Limit simultaneous looping 3D sources. Use compressed clips appropriately. Route machine, UI, ambient, and warning sounds through Audio Mixer groups/buses. Avoid overly loud or continuous warnings. Test in headset because spatialization and loudness differ from desktop speakers.
Event-Driven Audio
In VR, event-driven audio feedback is triggered in response to specific game or application events, such as footsteps, machinery actions, UI interaction, or object manipulation. It creates a dynamic and interactive sound experience that responds to user behavior in real time, enhancing immersion by responding to user interactions. Let’s demonstrate how to trigger different sounds when a large box is dropped onto various surfaces inside the logistics station of the XFactory. We will use XR Interaction Toolkit for grabbing and dropping, AudioSource for playing sounds, and physics-based collision detection for triggering different clips.
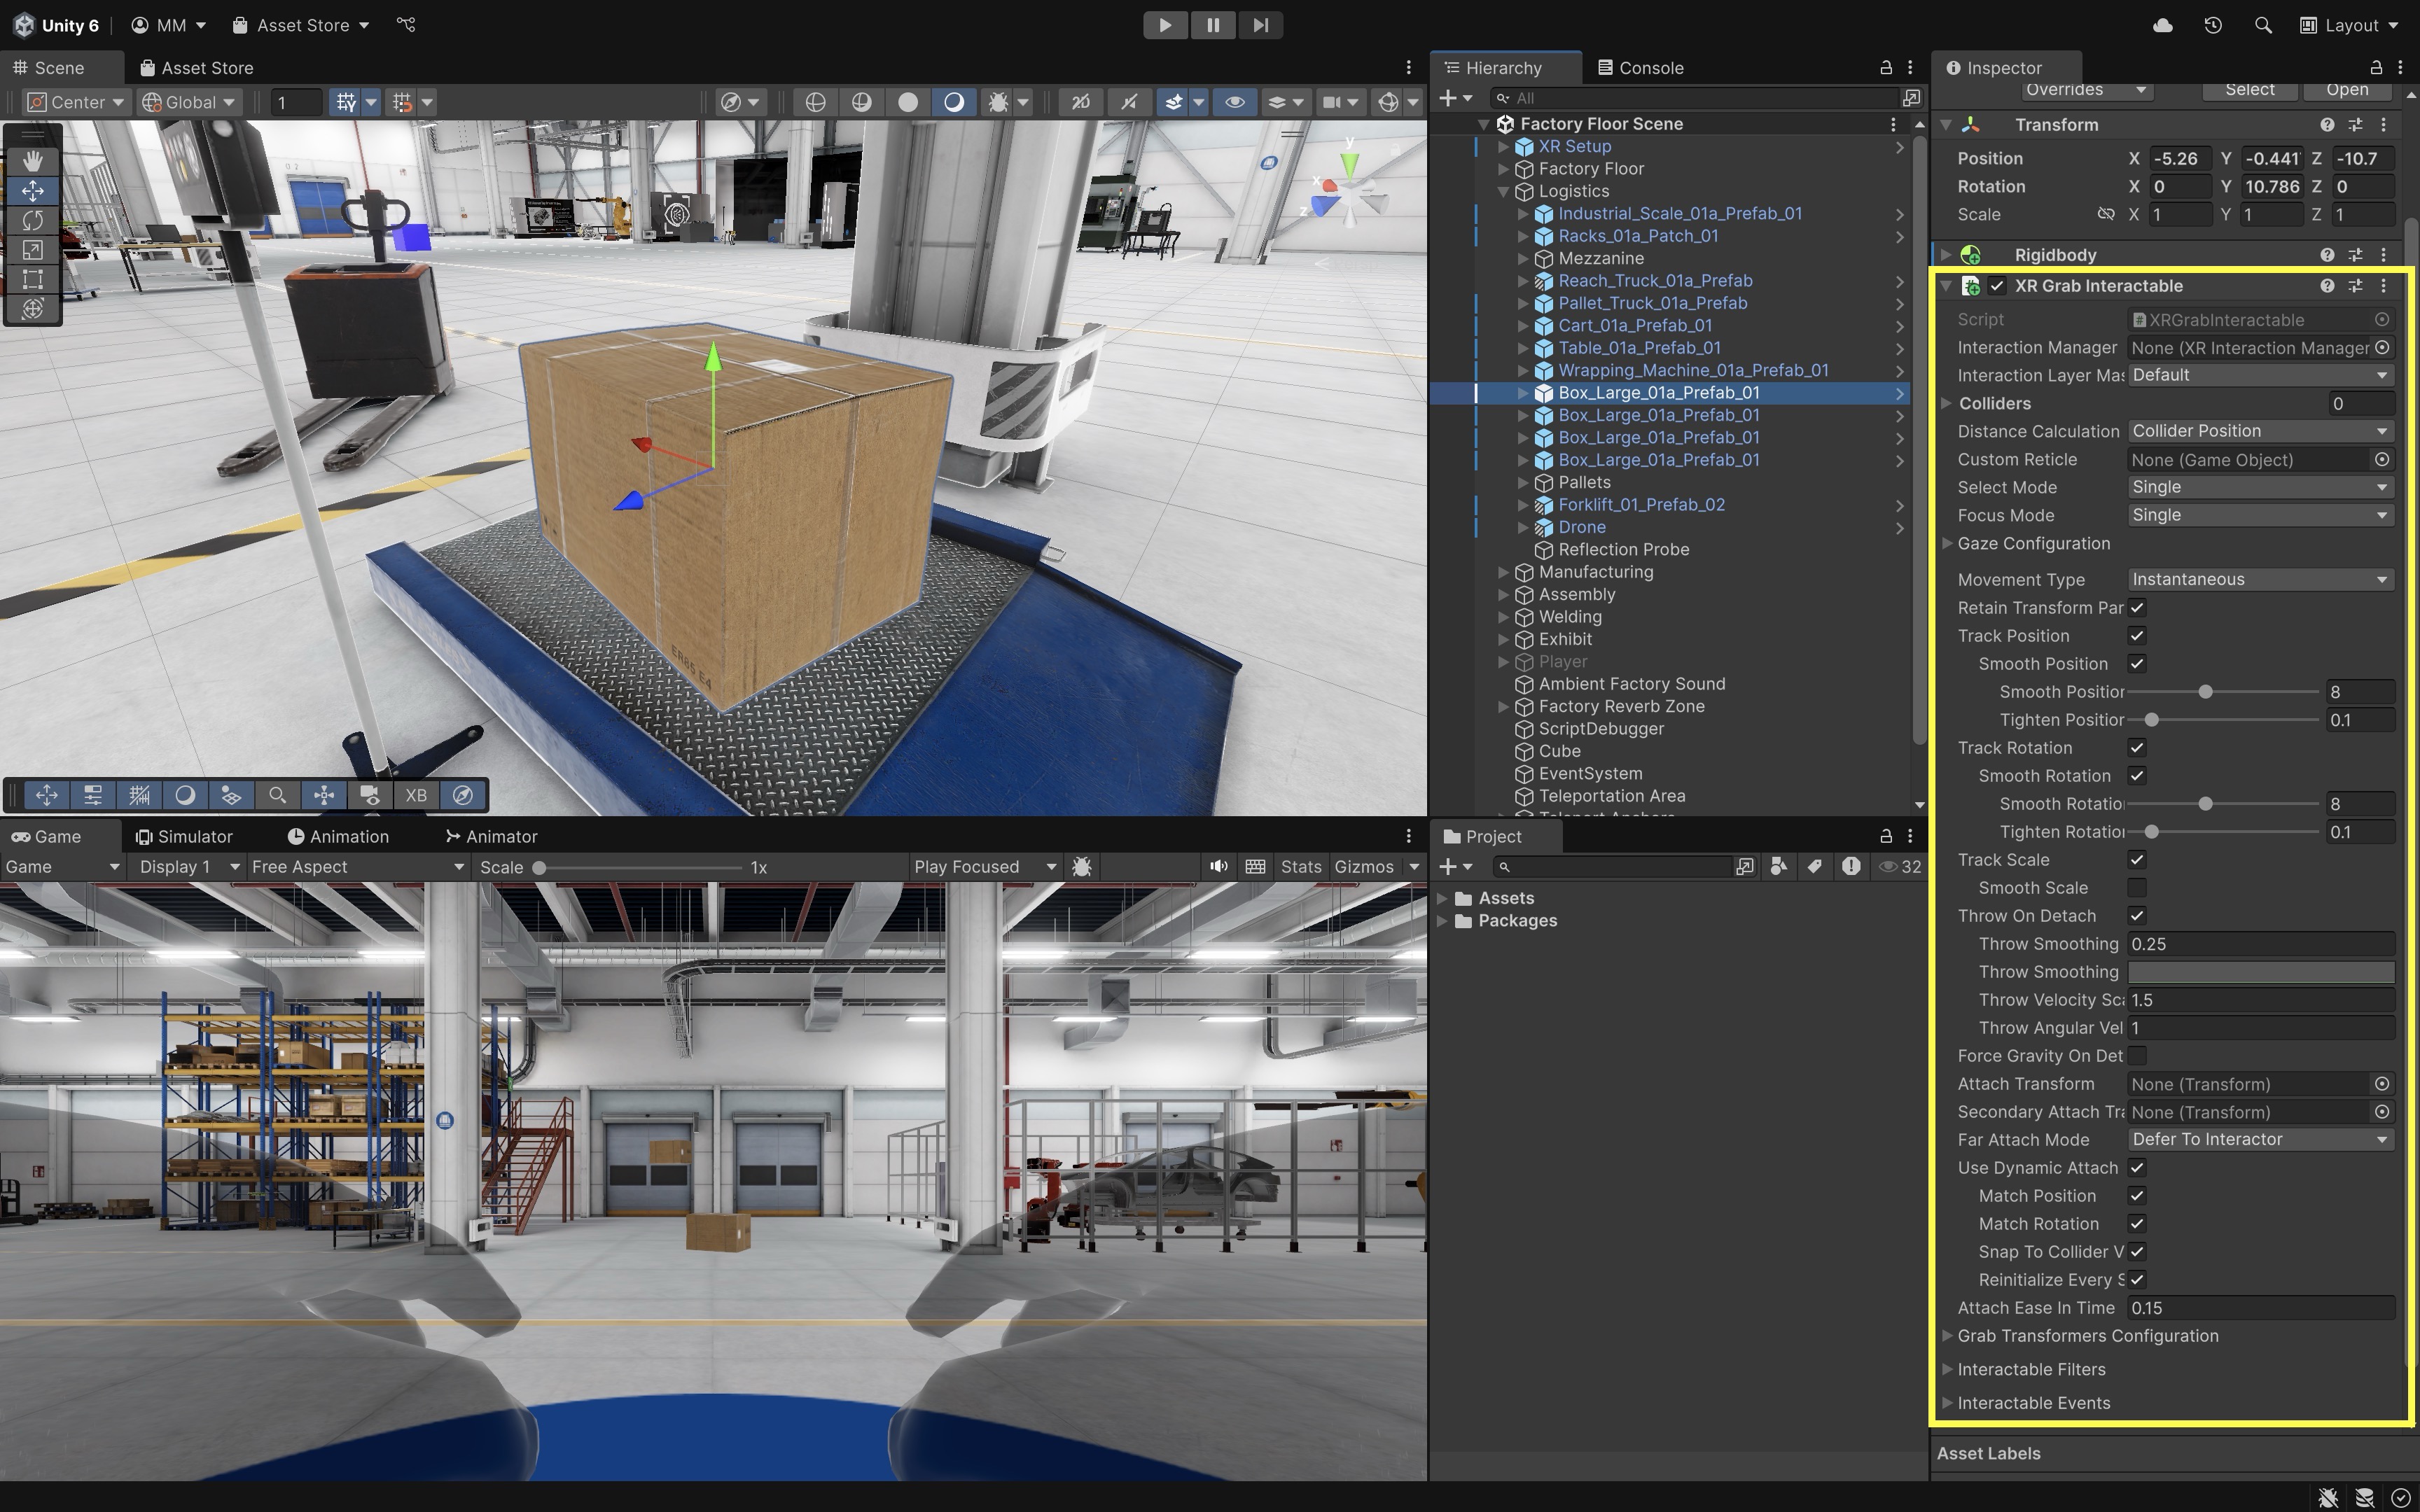
- Prepare Your Environment:
- Inside the logistics station, create or place a grabbable box (e.g.,
Box_Large_01a_Prefab_01). - Make sure the box has a
Rigidbody, aCollider, and anXR Grab Interactable. - Position the box next to the scale (
Industrial_Scale_01a) and a wooden pallet (e.g., Pallet_02_Prefab_02). - Confirm the scale, pallet, and concrete floor have appropriate colliders.
- Inside the logistics station, create or place a grabbable box (e.g.,
- Create and Configure an Audio Trigger Script:
- Make sure your box prefab (
Box_Large_01a_Prefab_01) has anAudioSourcecomponent. If not, the script below requires one via[RequireComponent(typeof(AudioSource))]. - The box must be released/dropped and colliding physically for
OnCollisionEnterto fire. - Create and attach the following script to your box prefab:
 using UnityEngine;

 [RequireComponent(typeof(AudioSource))]
 public class SurfaceAudioTrigger : MonoBehaviour
 {
     [SerializeField] private AudioClip metalClip;
     [SerializeField] private AudioClip woodClip;
     [SerializeField] private AudioClip concreteClip;
     [SerializeField] private float minimumImpactSpeed = 0.5f;
     [SerializeField] private float minimumTimeBetweenSounds = 0.15f;

     private AudioSource audioSource;
     private float lastPlayTime;

     private void Awake()
     {
         audioSource = GetComponent<AudioSource>();
     }

     private void OnCollisionEnter(Collision collision)
     {
         if (Time.time - lastPlayTime < minimumTimeBetweenSounds)
             return;

         if (collision.relativeVelocity.magnitude < minimumImpactSpeed)
             return;

         string tag = collision.gameObject.tag;
         AudioClip clip = null;

         switch (tag)
         {
             case "Metal":
                 clip = metalClip;
                 break;
             case "Wood":
                 clip = woodClip;
                 break;
             case "Concrete":
                 clip = concreteClip;
                 break;
         }

         PlaySound(clip, collision.relativeVelocity.magnitude);
     }

     private void PlaySound(AudioClip clip, float impactSpeed)
     {
         if (audioSource == null || clip == null)
             return;

         float volume = Mathf.Clamp01(impactSpeed / 3f);
         audioSource.PlayOneShot(clip, volume);
         lastPlayTime = Time.time;
     }
 }
Tags are simple and readable for this lesson. For larger projects, consider a surface material component, physics material mapping, or audio surface database instead of relying only on tags.
- Make sure your box prefab (
- Configure the Script:
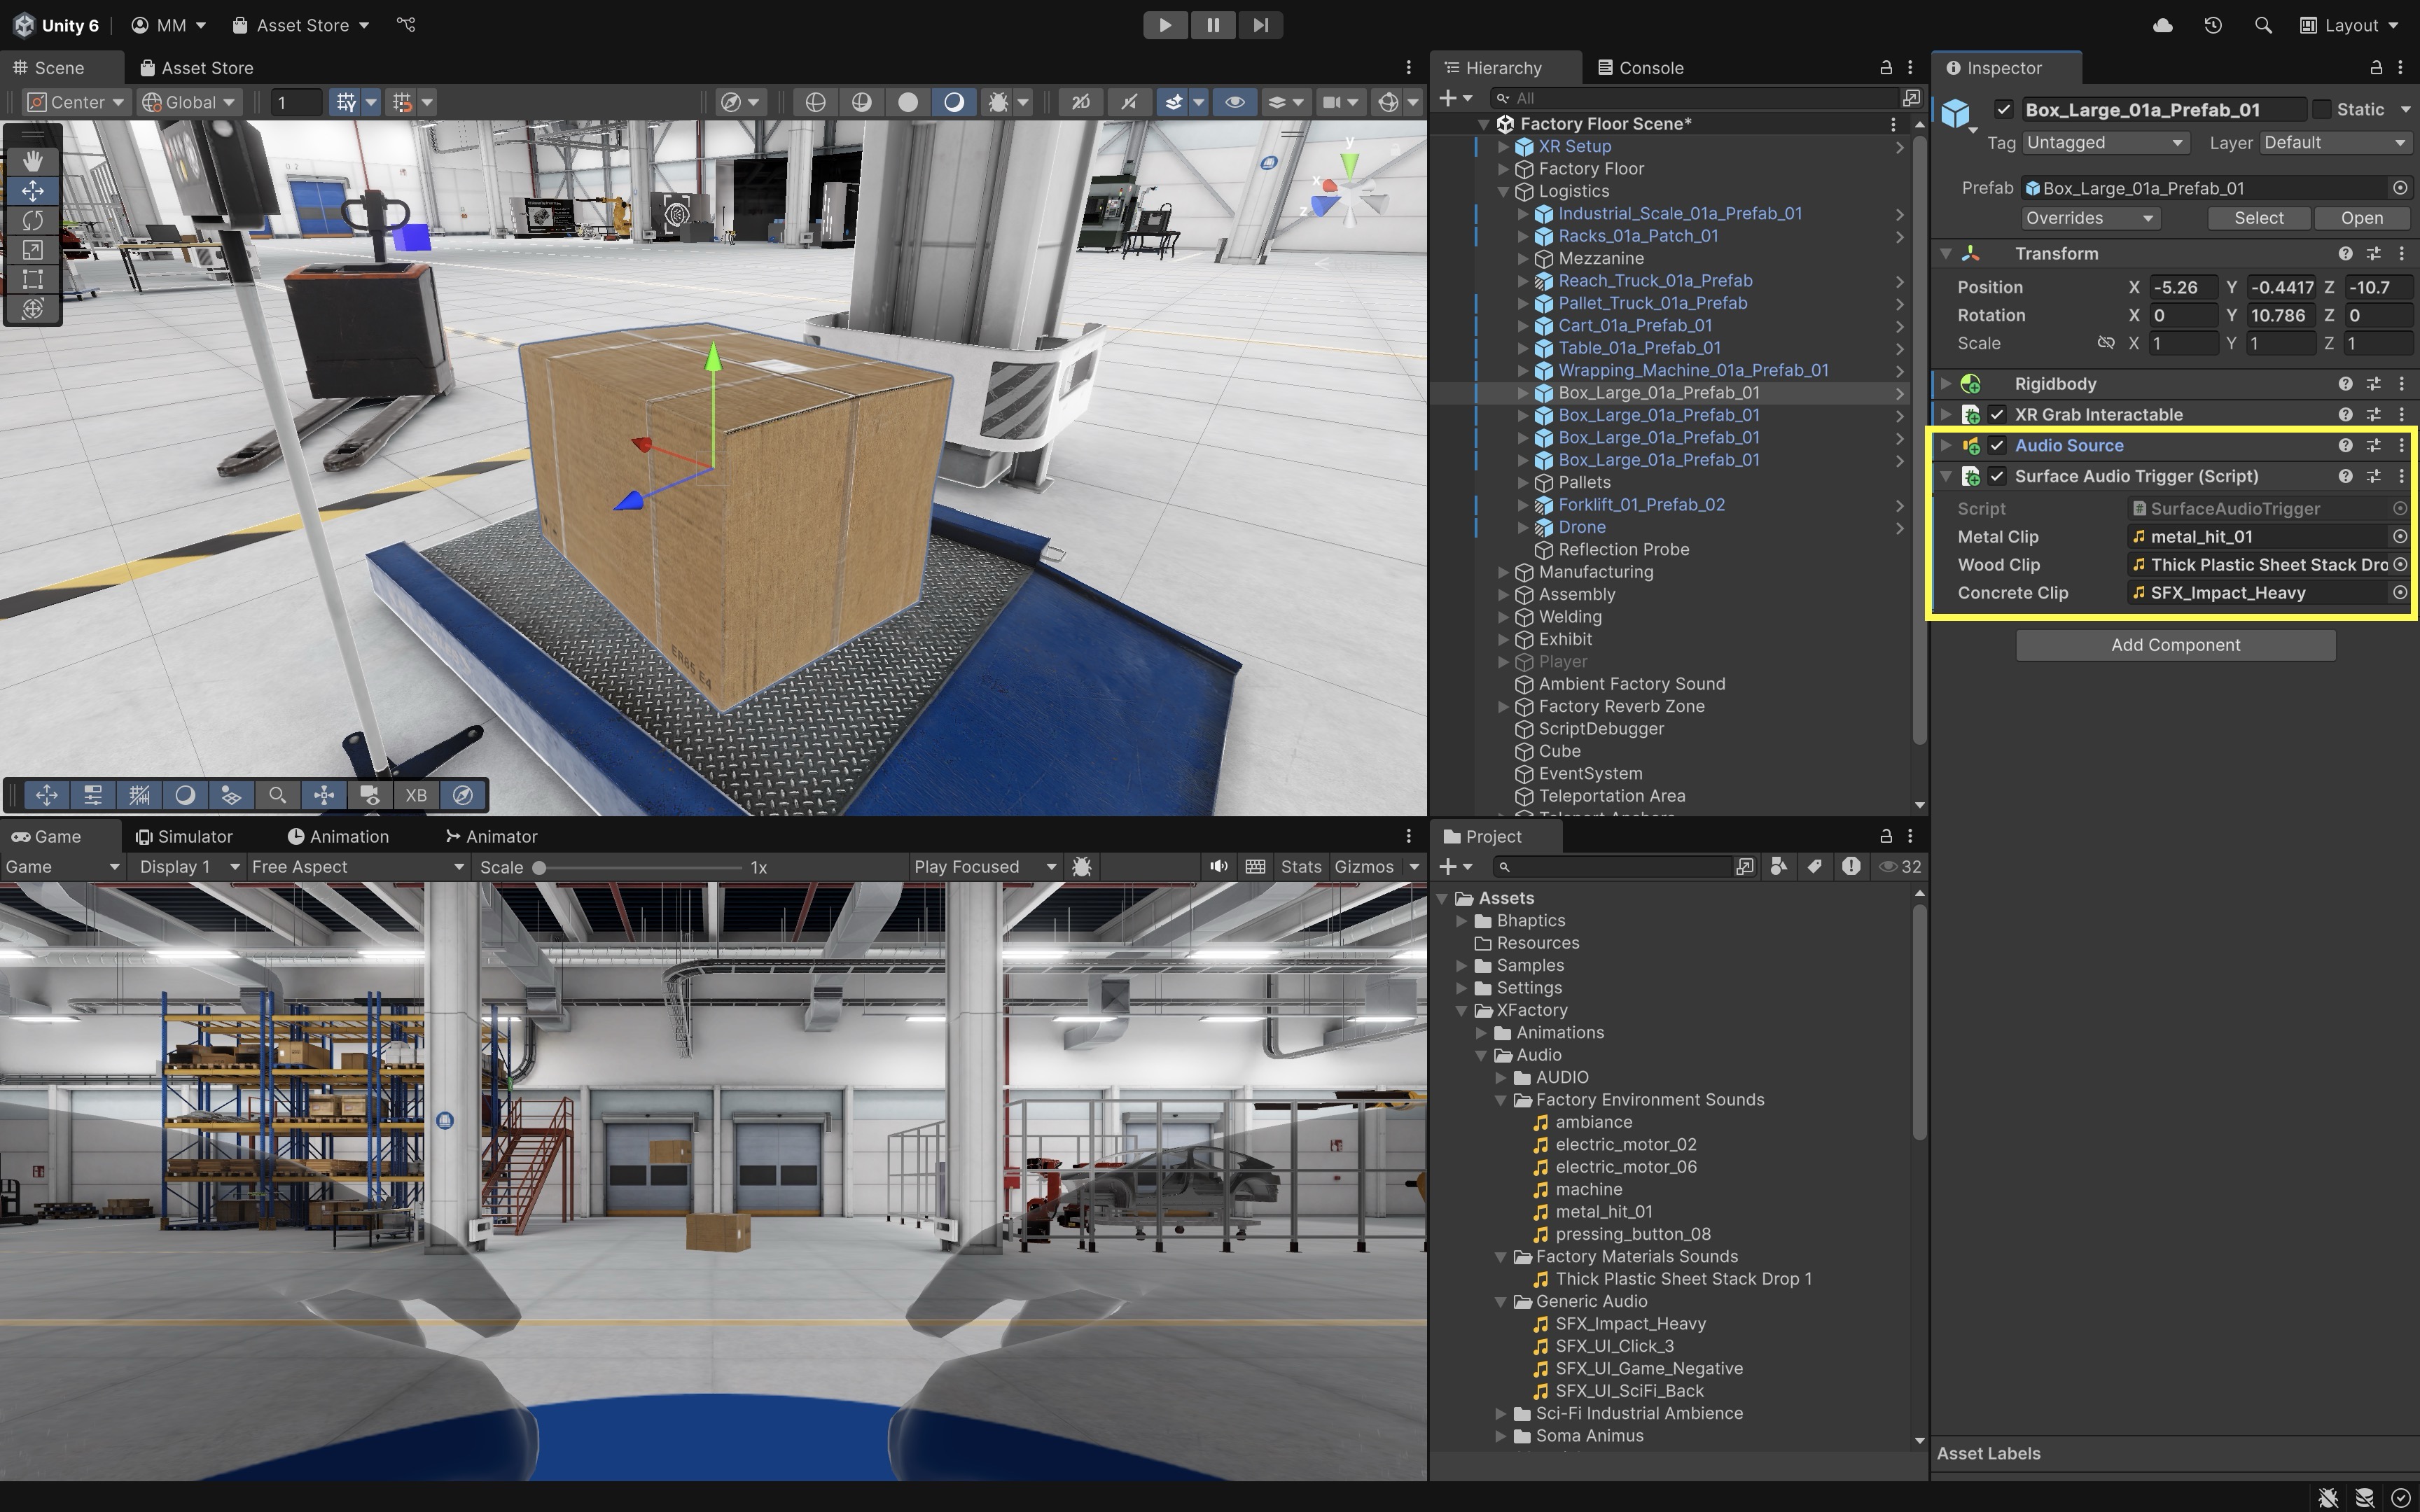
- Select the box GameObject in the
Hierarchy. - In the
Inspector, find theSurface Audio Triggercomponent. - Drag appropriate audio clips into the three fields:
Metal Clip,Wood Clip, andConcrete Clip.
- Select the box GameObject in the
- Tag the Surfaces:
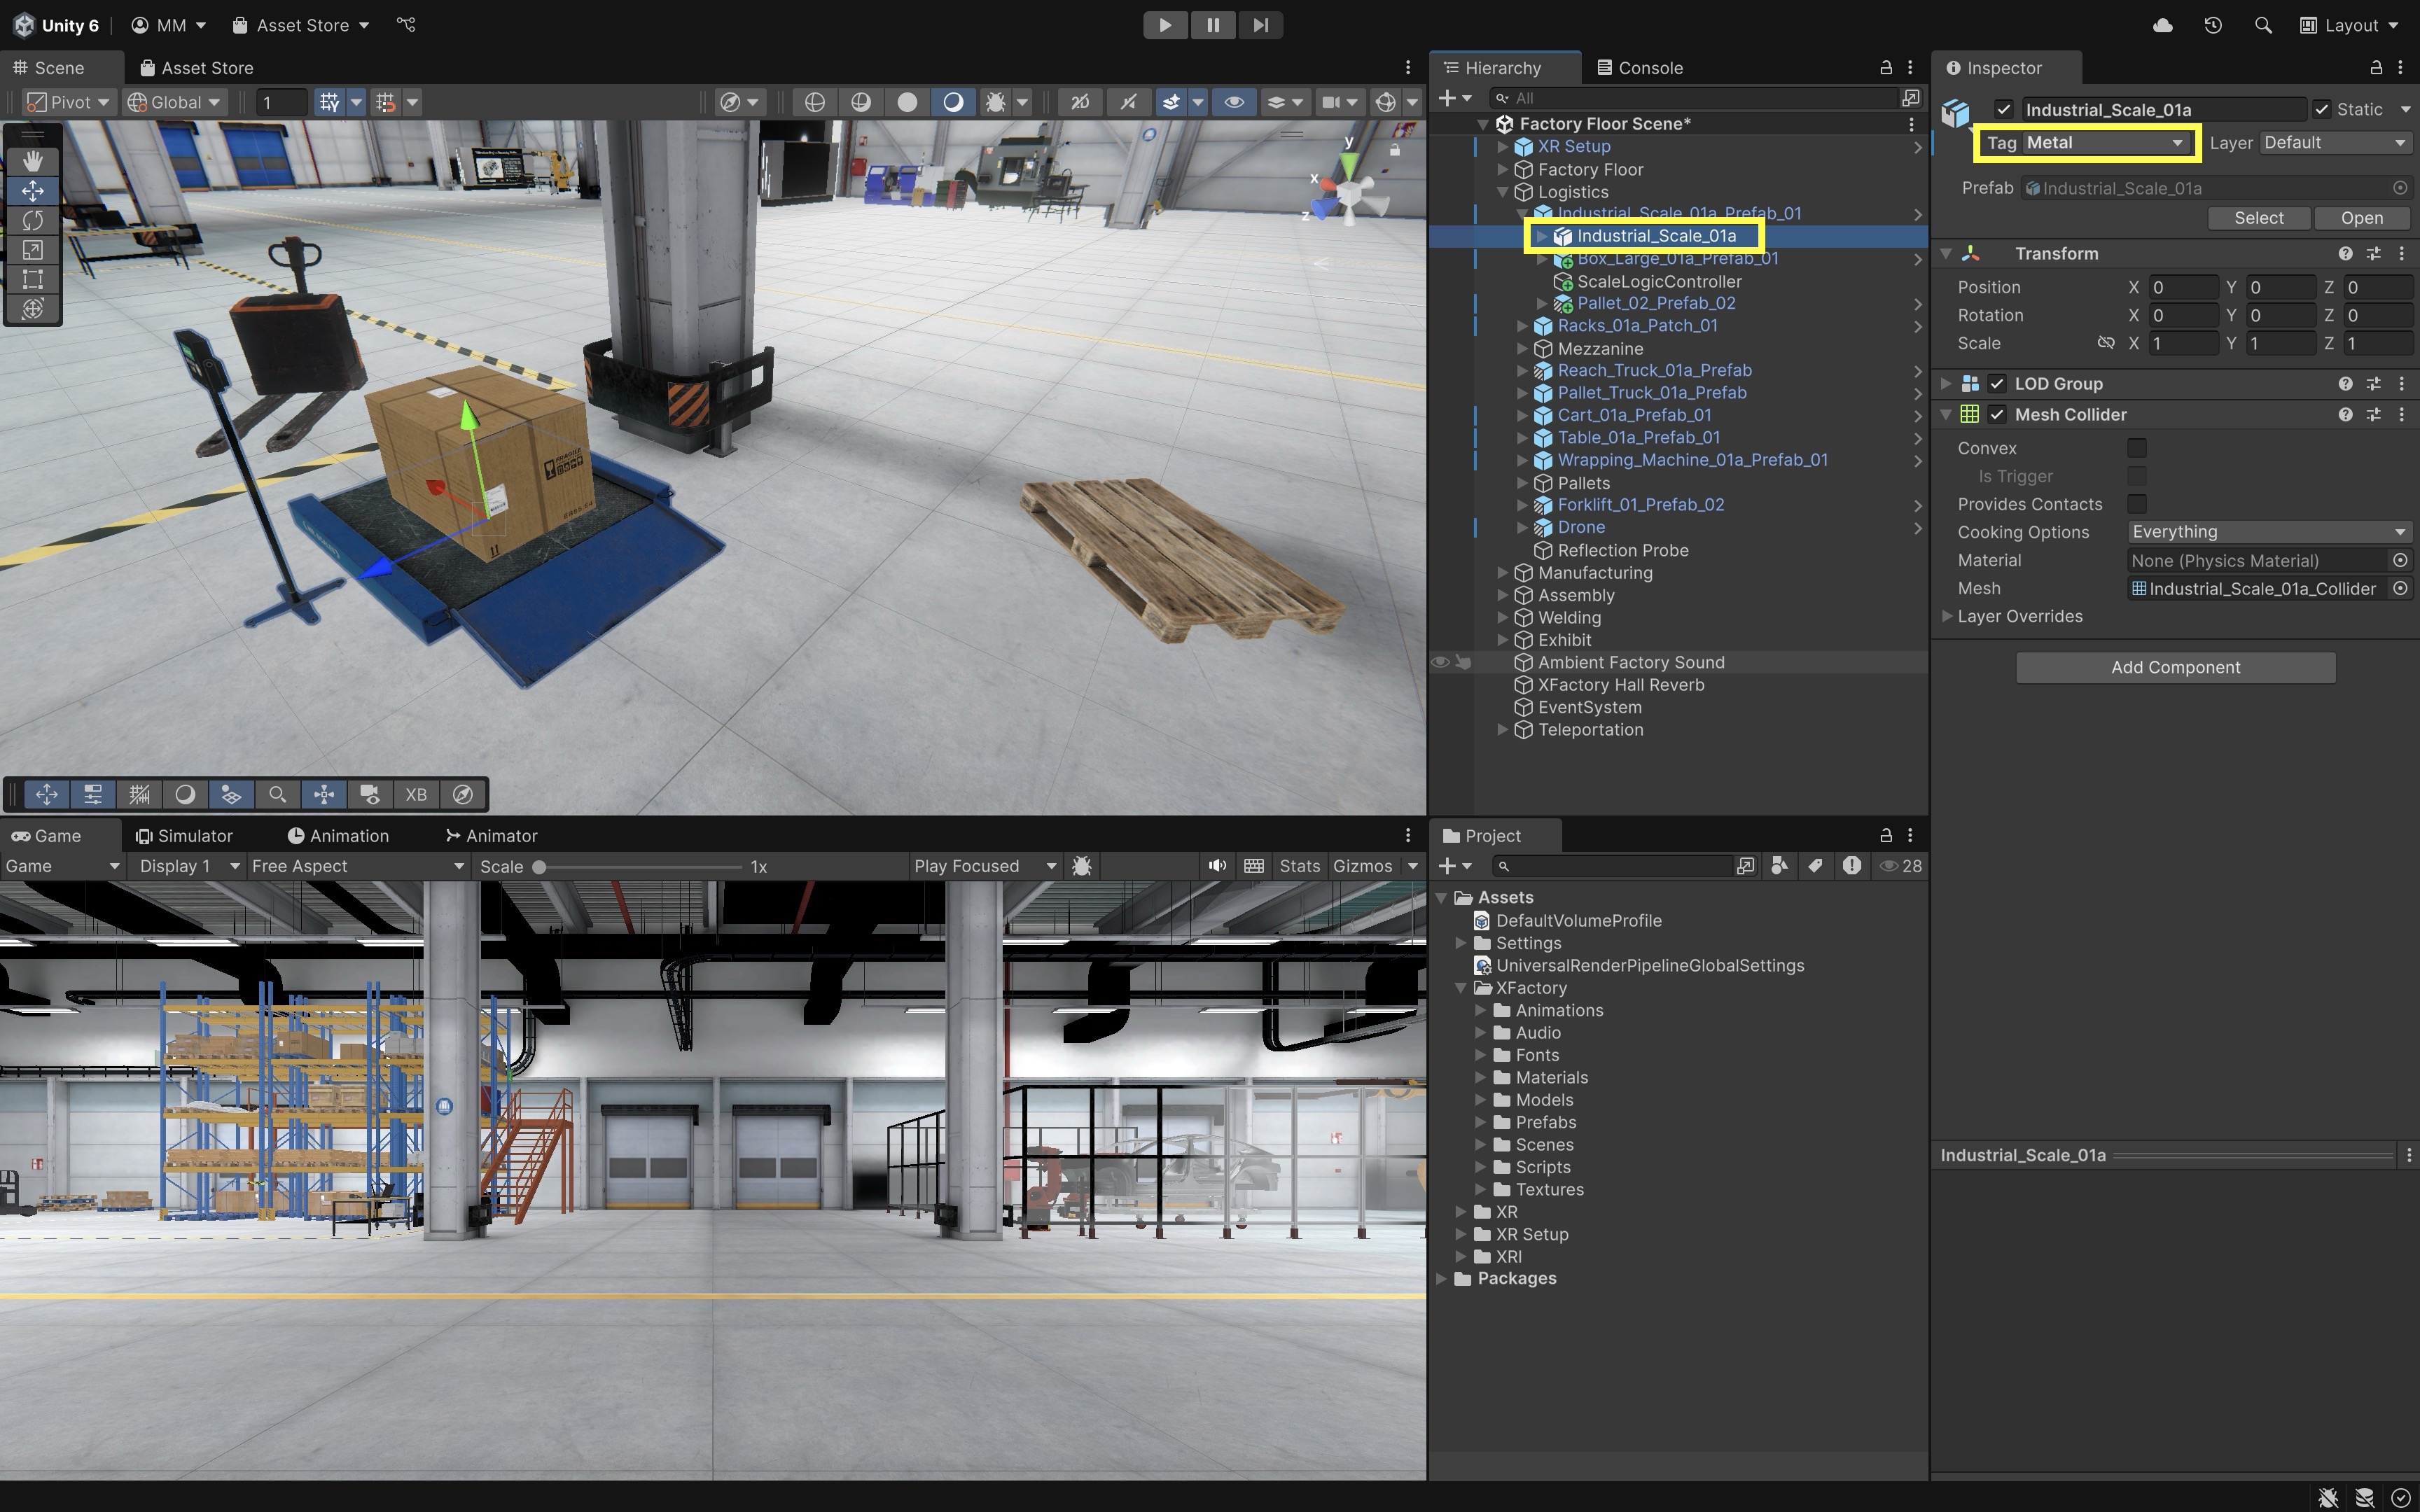
- Tag the scale
Metal. - Tag the pallet
Wood. - Tag the floor
Concrete. - Go to
Tags & Layers > Add Tag, addMetal,Wood, andConcrete, and assign them to the respective objects.
- Tag the scale
- Test the Behavior:
- Enter Play Mode with the XR Interaction Simulator or Quest Link / Meta Horizon Link, then validate with Android Build and Run on Quest.
- Pick up the box using the controller and release it so it falls onto each surface.
- Listen for context-aware impact audio feedback.
This setup showcases dynamic feedback based on user action and environment context, tightly integrated VR interaction and audio design. You can expand this system to other factory objects—like different drop sounds for metal parts in the production station, or warning buzzers if items are dropped in restricted zones.
3D Spatial Audio
3D spatial audio simulates sound sources in a three-dimensional space, allowing users to perceive direction, distance, and environmental effects. This is especially useful in immersive VR environments like your XFactory, where spatial context enhances realism and user awareness. Let’s enable ambient machine sound for the CNC_Mill_Set GameObject in the manufacturing station using Unity’s 3D audio features.
- Prepare the CNC Machine:
- In the
Hierarchy, locateCNC_Mill_Set - Confirm it already has an
Audio Sourcecomponent (or add one if not).
- In the
- Configure the
Audio Source:- Go to the
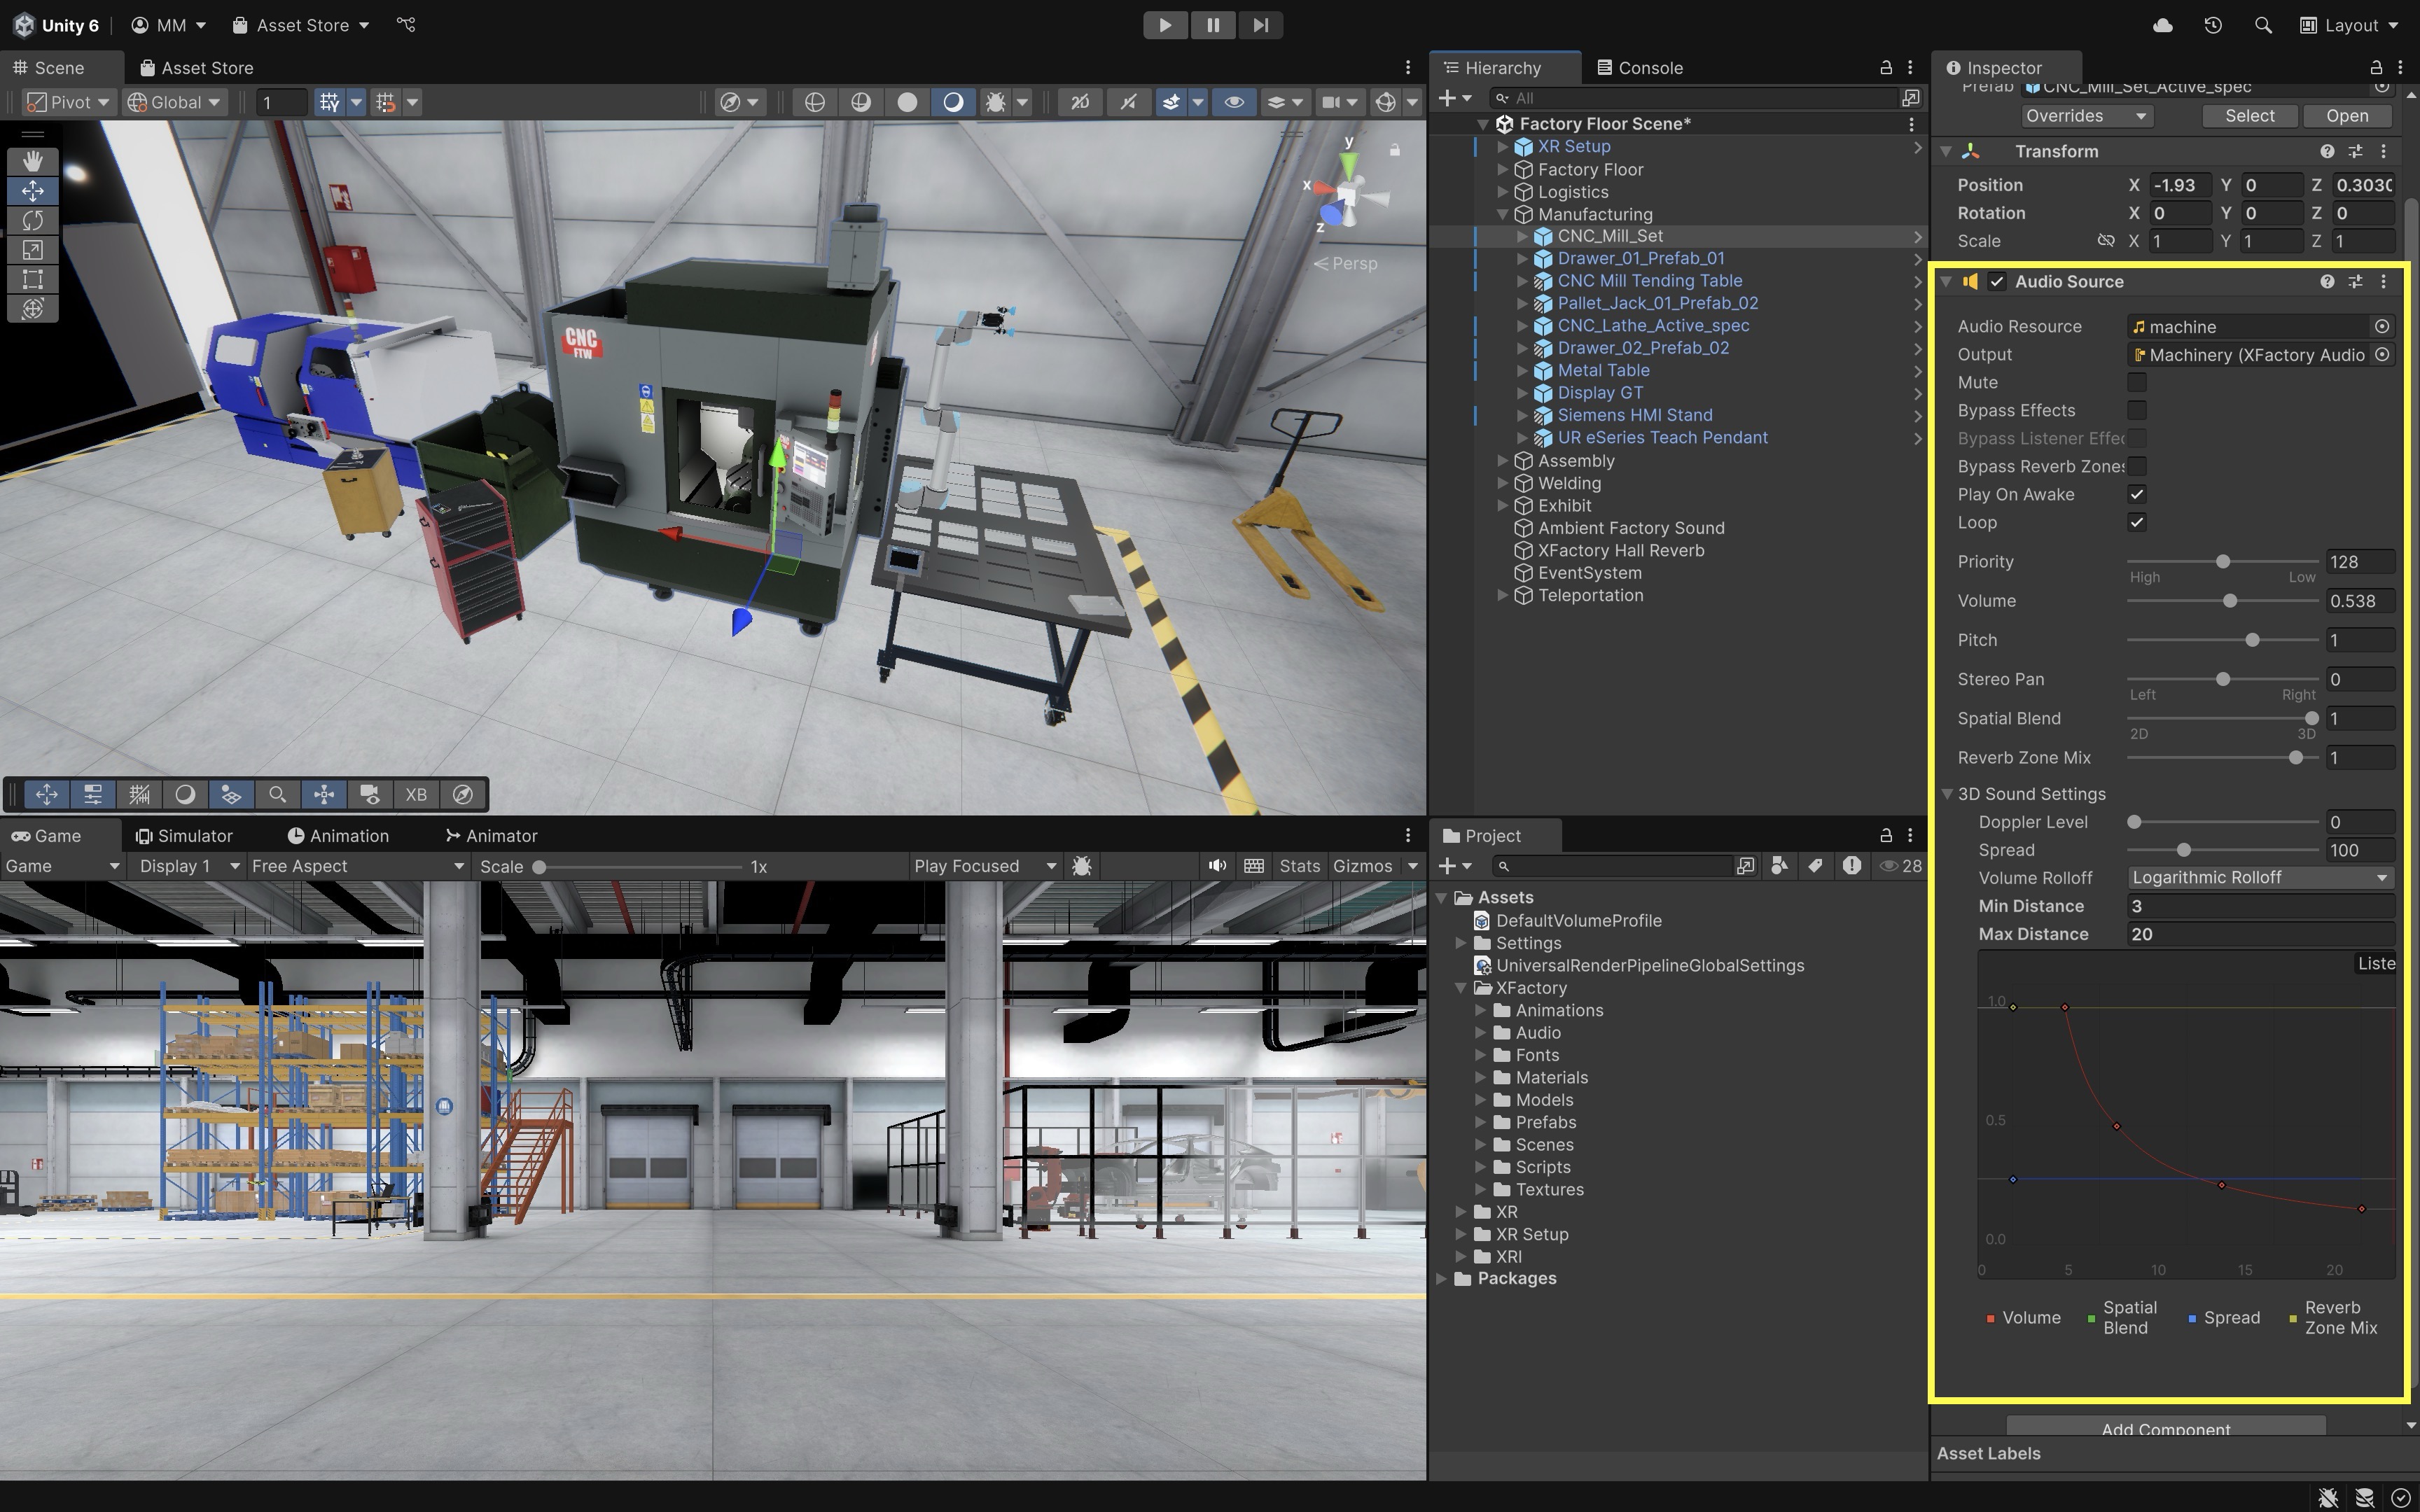
Audio Sourcecomponent. Audio Clip/Audio Resource: Assign a looping ambient sound (e.g.,machine.ogg) that represents the machine hum.Play On Awake: Enable this so the sound starts automatically when the scene loads.Loop: Enable this to keep the sound playing continuously.Spatial Blend: Set to1.0to make the sound fully 3D and spatially aware.Min Distance: Set to3meters. The sound will be at full volume within this range.Max Distance: Set to20meters. Beyond this distance, the sound fades out gradually.- Optionally, adjust
Spreadto control stereo width for large machines. Avoid excessiveDoppler Levelon stationary factory equipment; high Doppler settings can sound unnatural or uncomfortable in VR.
For large machines, a single point source may sound unrealistic. Use multiple quiet sources or place the source near the main sound-emitting component. Use an Audio Mixer to control overall machine, UI, and warning volumes.
- Go to the
- Automate Playback and 3D Settings (Optional):
- Attach the script below to the
CNC_Mill_SetGameObject. - Assign an ambient clip such as
machine.oggin theInspector.
 using UnityEngine;

 [RequireComponent(typeof(AudioSource))]
 public class AmbientMachineSound : MonoBehaviour
 {
     [SerializeField] private AudioClip ambientClip;

     private AudioSource audioSource;

     private void Awake()
     {
         audioSource = GetComponent<AudioSource>();
         if (ambientClip == null || audioSource == null)
             return;

         audioSource.clip = ambientClip;
         audioSource.loop = true;
         audioSource.playOnAwake = true;
         audioSource.spatialBlend = 1.0f;
         audioSource.minDistance = 3f;
         audioSource.maxDistance = 20f;
         audioSource.Play();
     }
 }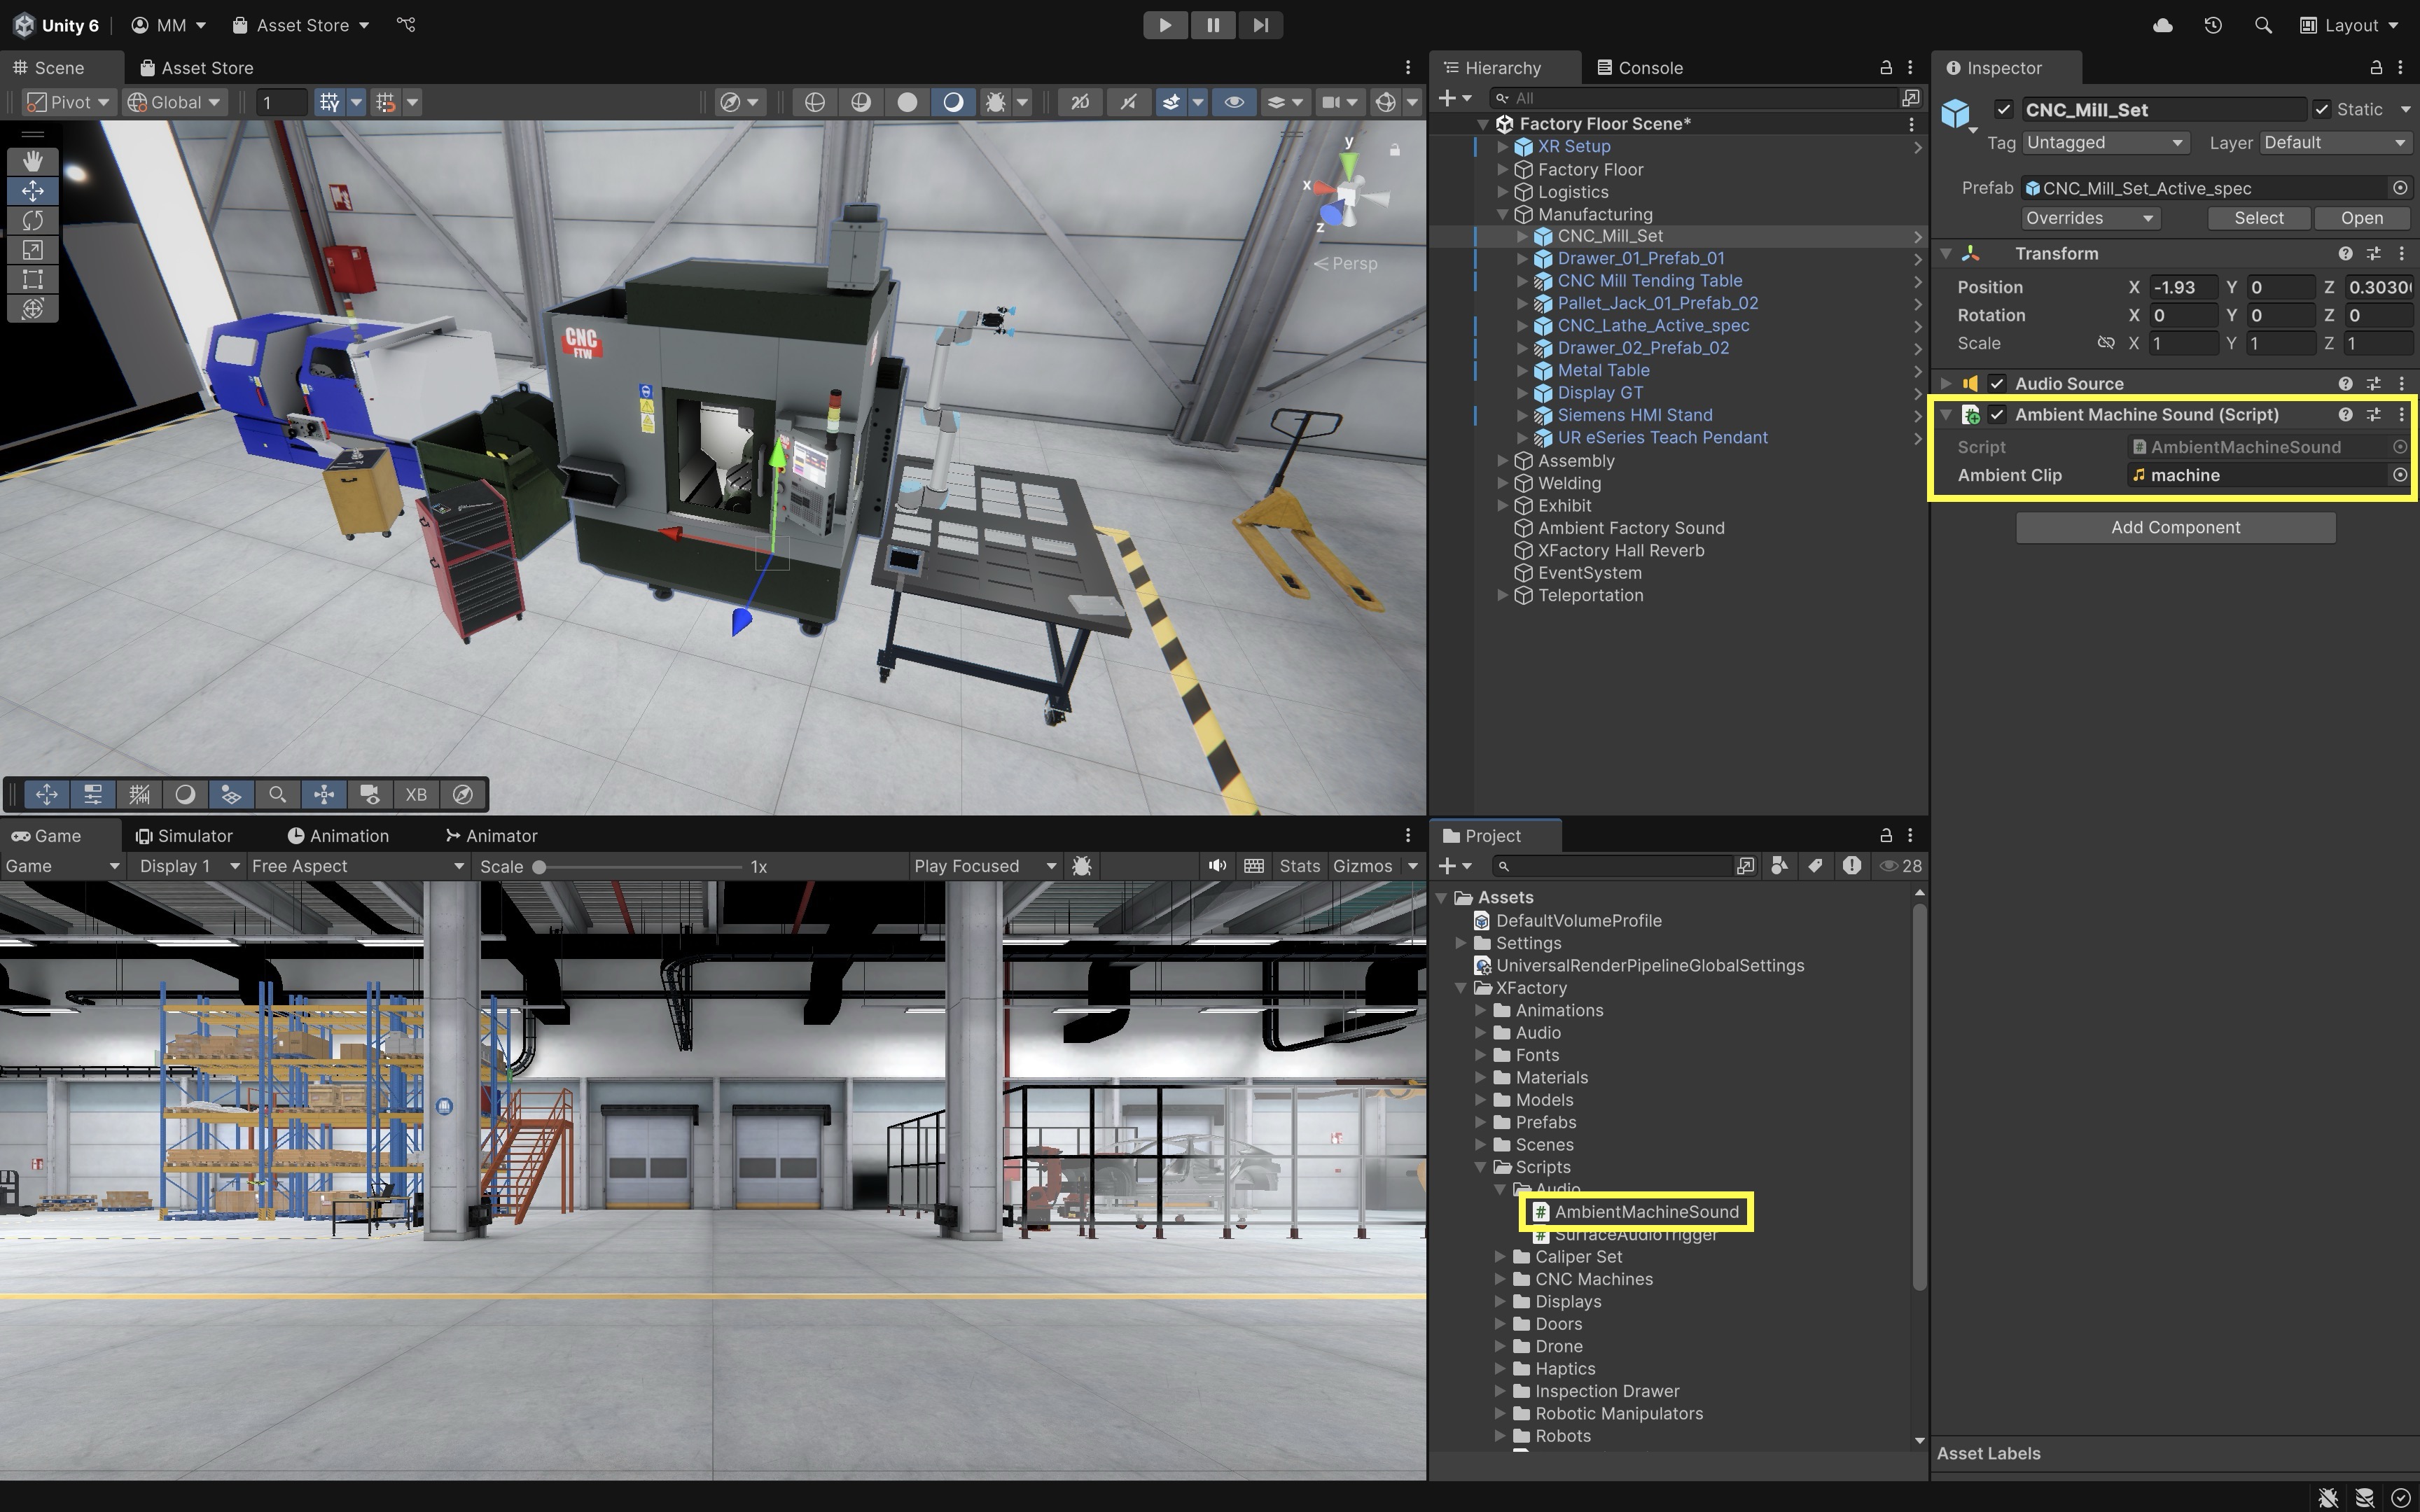
The script configures an
AudioSourceto loop a 3D ambient clip, sets near and far fade distances, and starts playback automatically. The sound naturally fades with distance, making it ideal for prefabs or multiple ambient machines—ensuring consistent, realistic audio with minimal setup. - Attach the script below to the
- Add
Audio Reverb Zonefor Factory Acoustics (Optional):- In the
Hierarchy, right-click and chooseAudio > Audio Reverb Zone. - Position the zone to fully encompass the desired area (e.g., manufacturing station).
- Go to the
Inspector. - Set
Min Distanceto5meters. Inside this range, full reverb is applied. - Set
Max Distanceto15meters. Outside this, reverb fades out completely. - Set
Reverb PresettoFactory,Hangar, orRoomto simulate realistic industrial acoustics.
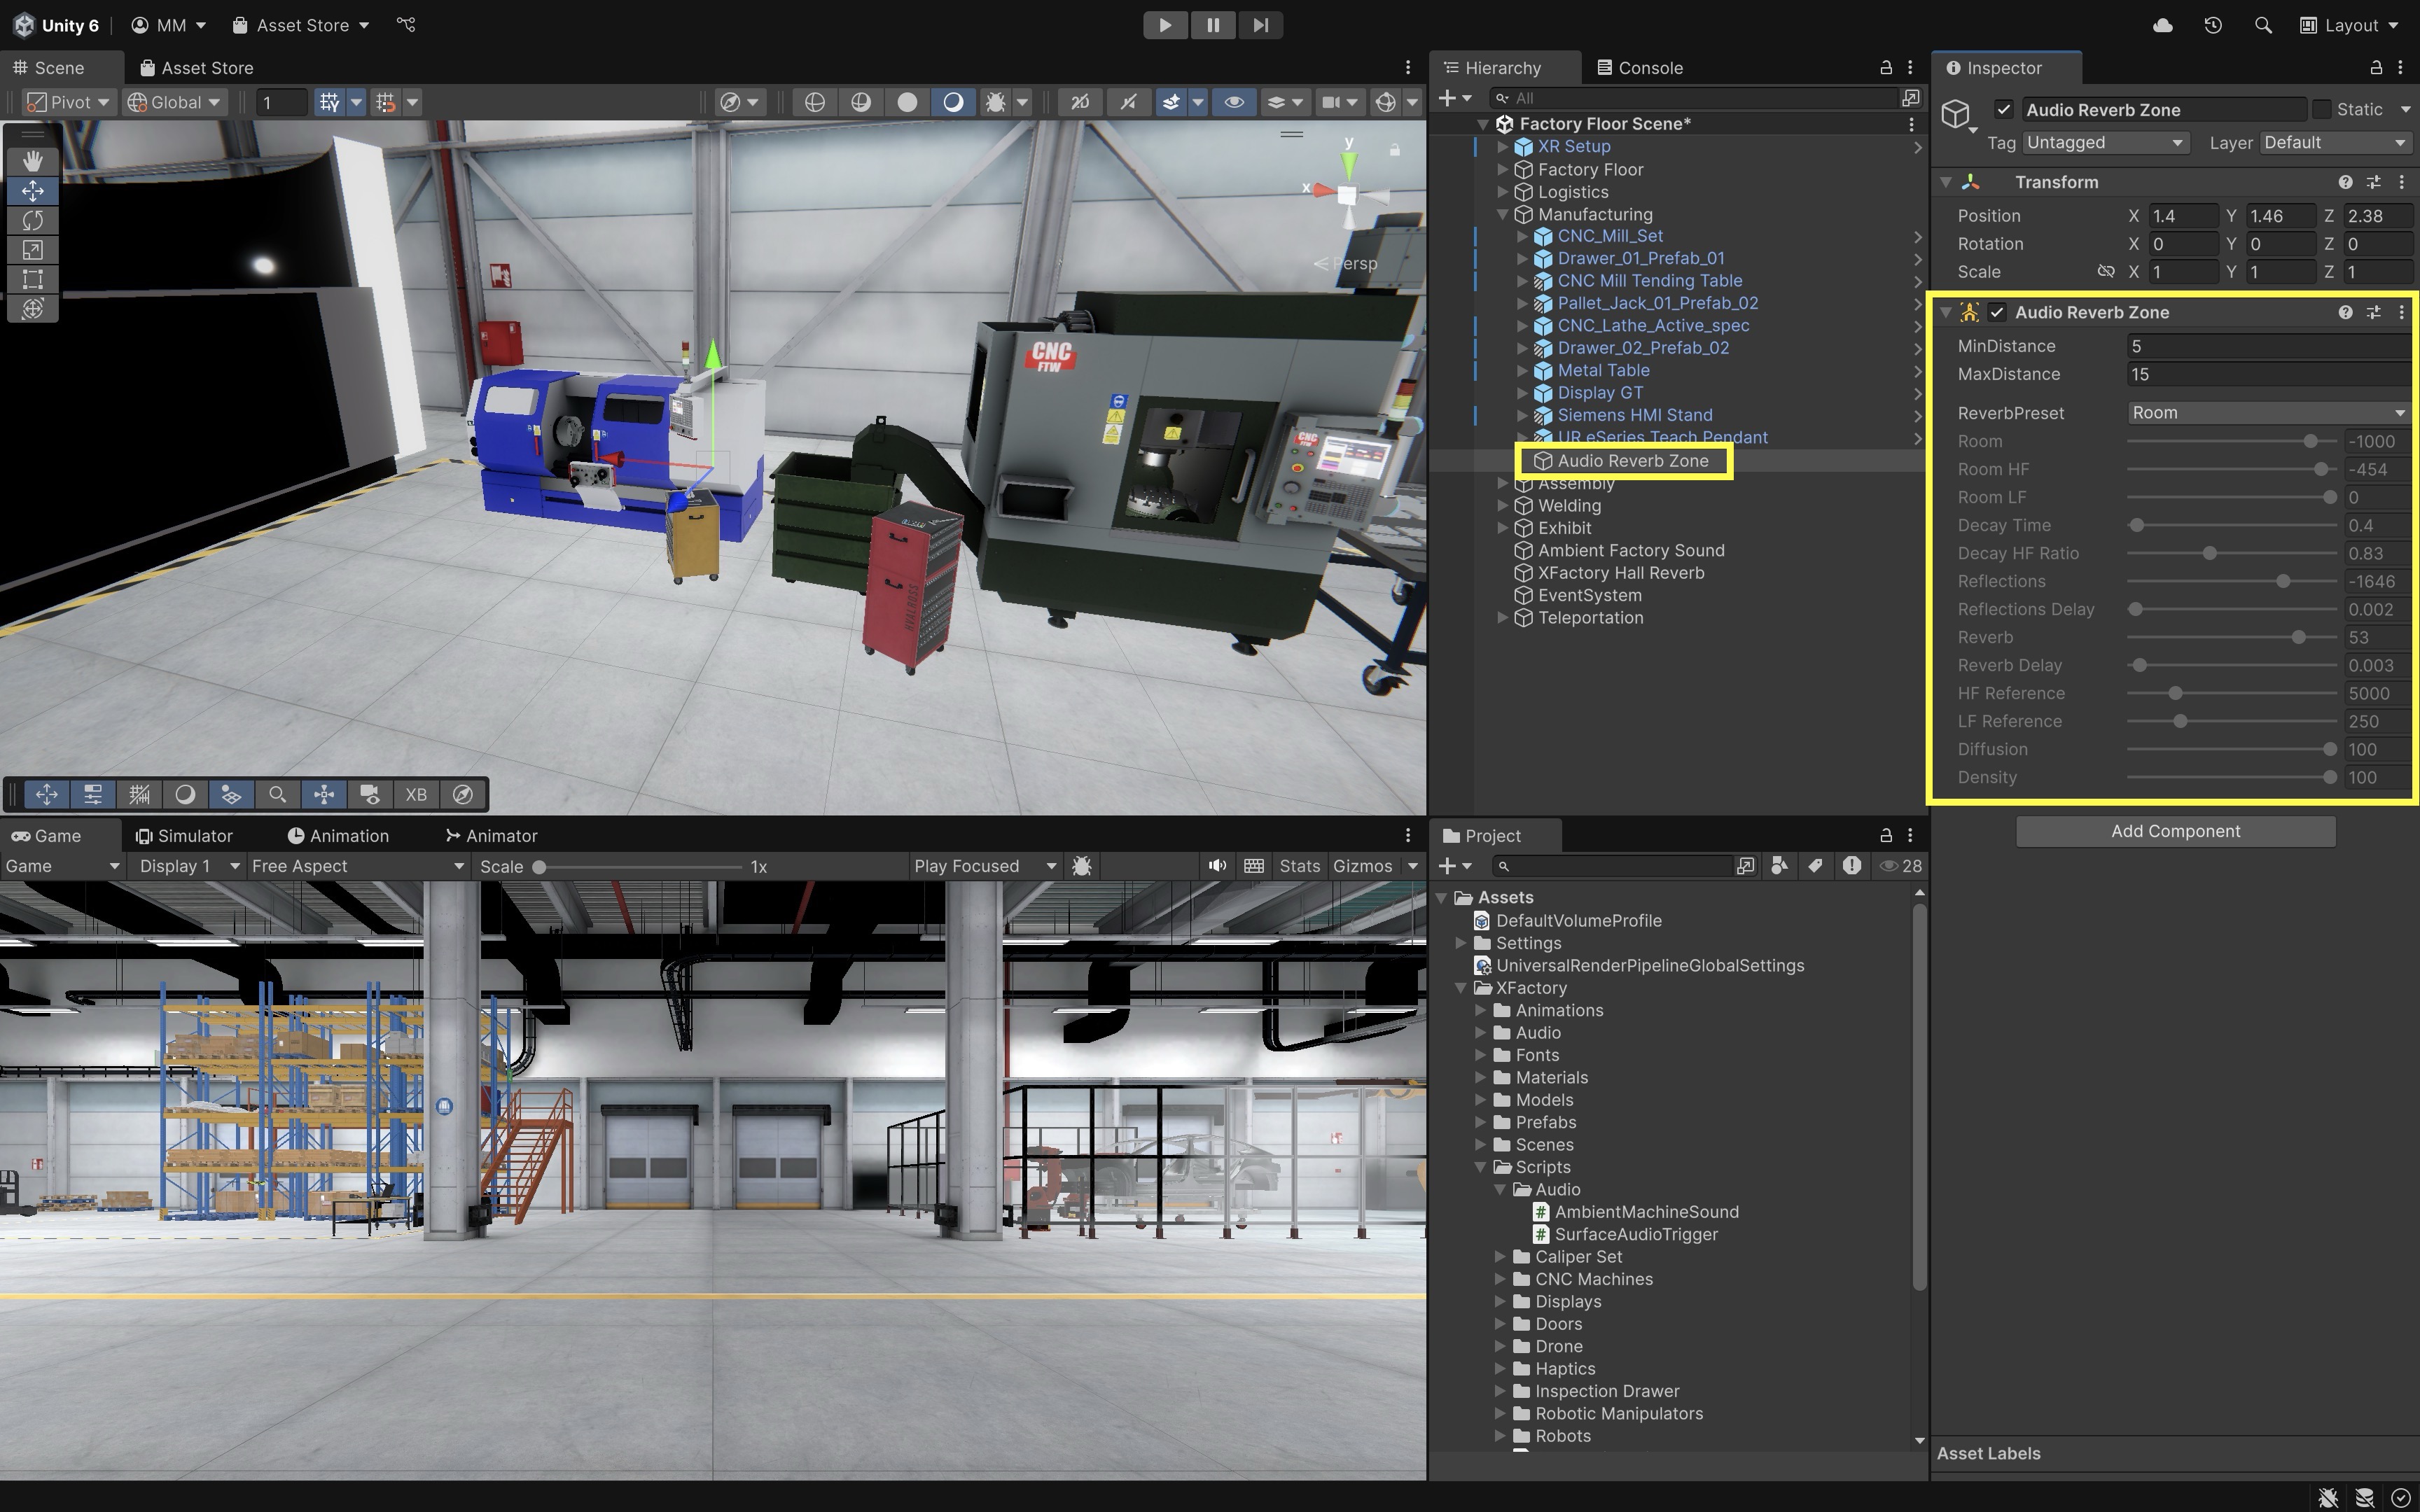
Reverb zones only affect 3D audio sources within their area. As the user moves in or out of the zone, sounds dynamically gain or lose reverb — enhancing the spatial feel of different factory zones.
- In the
Proximity-Triggered Audio
A Proximity-Triggered Audio setup plays sound only when the user is within a defined range of a sound-emitting object. This improves realism and performance by avoiding unnecessary audio playback in distant or inactive areas. Instead of always playing machine audio, let’s make the CNC_Mill_Set emit sound only when the user approaches, mimicking a real-world scenario where machine noise becomes prominent only when nearby.
- Add and Configure the Audio Source:
- Select the
CNC_Mill_SetGameObject in the manufacturing station. - Add an
Audio Sourcecomponent if it doesn’t already exist. - Go to the
Inspector. Audio Clip/Audio Resource: Assign a mechanical loop (e.g.,machine.ogg).Loop: Enabled.Play On Awake: Disabled (sound will be triggered via script).Spatial Blend:1(Fully 3D).Min Distance:3(full volume within 3m).Max Distance:20(fades out gradually).
- Select the
-
Add and Configure the Proximity Trigger Script: Prepare a script that checks the distance between the user’s headset (camera) and the CNC machine. This simple version fades volume based on distance instead of calling
Stop()immediately when the user leaves range.using UnityEngine; [RequireComponent(typeof(AudioSource))] public class ProximityAudioTrigger : MonoBehaviour { [SerializeField] private AudioClip machineClip; [SerializeField] private Transform userHead; [SerializeField] private float playDistance = 6f; [SerializeField] private float fadeRange = 2f; private AudioSource audioSource; private void Awake() { audioSource = GetComponent<AudioSource>(); if (machineClip != null) audioSource.clip = machineClip; audioSource.loop = true; audioSource.playOnAwake = false; audioSource.spatialBlend = 1f; } private void Update() { if (userHead == null) return; float distance = Vector3.Distance(userHead.position, transform.position); float fadeStart = playDistance; float fadeEnd = playDistance + fadeRange; if (distance <= fadeEnd) { if (!audioSource.isPlaying) audioSource.Play(); audioSource.volume = distance <= fadeStart ? 1f : 1f - Mathf.InverseLerp(fadeStart, fadeEnd, distance); } else { if (audioSource.isPlaying) audioSource.Stop(); audioSource.volume = 0f; } } }For many machines, use trigger zones, update throttling, or an audio manager instead of every object checking distance every frame.
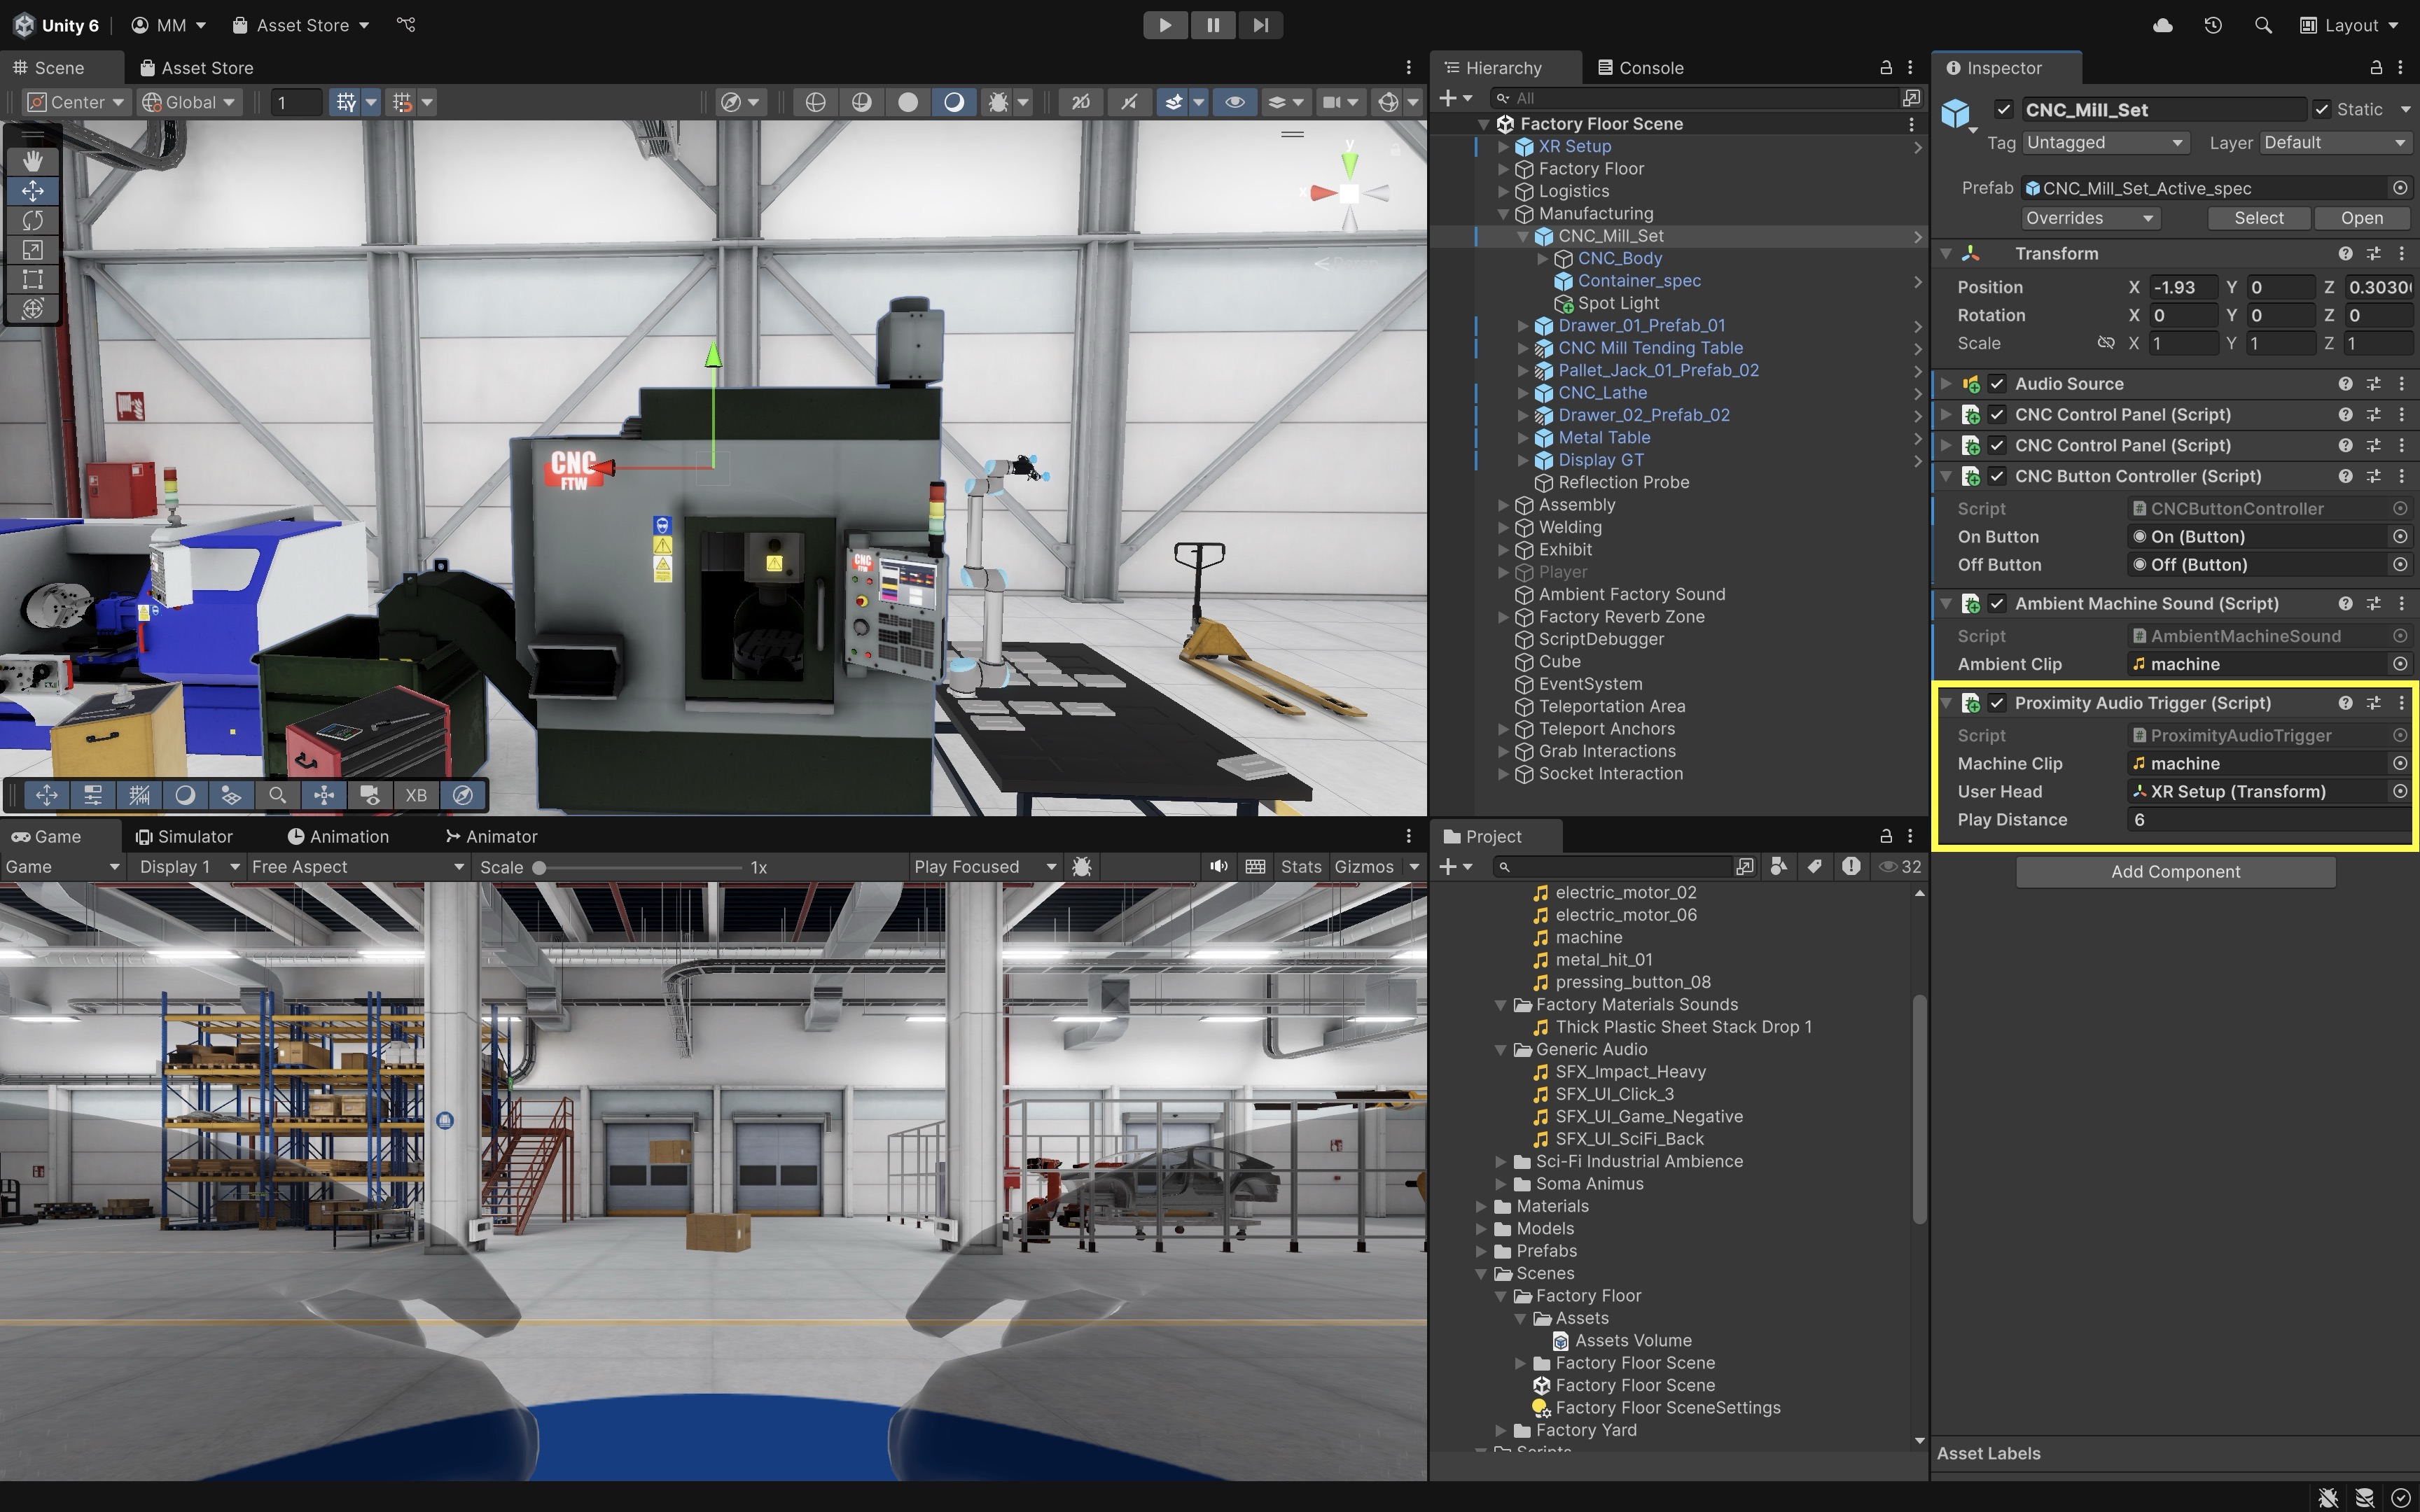
- Configure the Script:
- Attach the
ProximityAudioTriggerscript to the sameCNC_Mill_SetGameObject. - Go to the
Inspector. - Drag your audio clip (e.g.,
machine.ogg) into theMachine Clipfield. - Drag the
Main Camera(XR Origin (XR Rig) > Camera Offset > Main Camera) from your copied VR Template setup into theUser Headfield. - Adjust the
Play Distancevalue to control when the sound activates (e.g.,6meters for a moderate range).
- Attach the
- Play and Test:
- Enter Play Mode with the XR Interaction Simulator or Quest Link / Meta Horizon Link, then validate audio loudness and spatialization with Android Build and Run on Quest.
- Walk toward the CNC machine and listen for the audio to increase as you approach.
- Move away and notice the audio fading out until it stops completely.
- Try different approach angles to confirm the sound spatialization feels realistic.
- Adjust
Play Distance,Min Distance, andMax Distancein the Inspector if the audio triggers too soon, too late, or feels unnatural.
Proximity-triggered audio limits active audio sources in large scenes, reducing processing load. It also mimics how object sounds become audible only when the user is nearby and enhances spatial awareness by tying audio to physical proximity.
Key Takeaways
- HapticImpulsePlayer and Simple Haptic Feedback cover most controller hover/select feedback needs.
- Custom haptic scripts are for object-, socket-, or state-specific behavior—not routine interactor pulses.
- Socket Select Entered is the reliable completion cue; interactor release alone is not proof of attachment.
- Event-driven and spatial audio reinforce training cues; simulator/Link preview is not enough for device validation.
- Controller and glove feedback trains operators—it does not prove physical force, weight, or safety by itself.