D3. Object Manipulation in VR
Learning Outcomes
- Explain the function and configuration of the
XR Grab Interactablecomponent in Unity. Before class, review its purpose in enabling object grabbing, explore movement types and grab transformers, and note how physics settings affect throwing and stability in VR.- Set up grabbable objects for near and far interaction in VR. As preparation, add a
Rigidbody, collider, andXR Grab Interactableto an object, verify XRI Interaction Layer compatibility with the Starter Assets interactor, and test grabbing in Play Mode.- Compare near, far, and near-far grabbing using the Starter Assets
Near-Far Interactor. Ahead of the session, study how one interactor can handle touch and distance selection; optionally configureXR Direct Interactorfor near-only demonstrations.- Distinguish XRI Interaction Layers from Unity physics layers. For pre-class work, understand how
Interaction Layer MaskandPhysics Layer Maskfilter interactors, interactables, and casters differently.- Validate engineering grab behavior. Review scale, mass, collider accuracy, attach points, throw behavior, and safe object affordances for tools such as the XFactory barcode scanner.
- Apply best practices for VR object interaction. Come prepared with one UX improvement and one performance optimization (e.g., simplifying colliders, enabling haptics, cleaning hierarchy) you could apply to your own project.
Grab Interaction
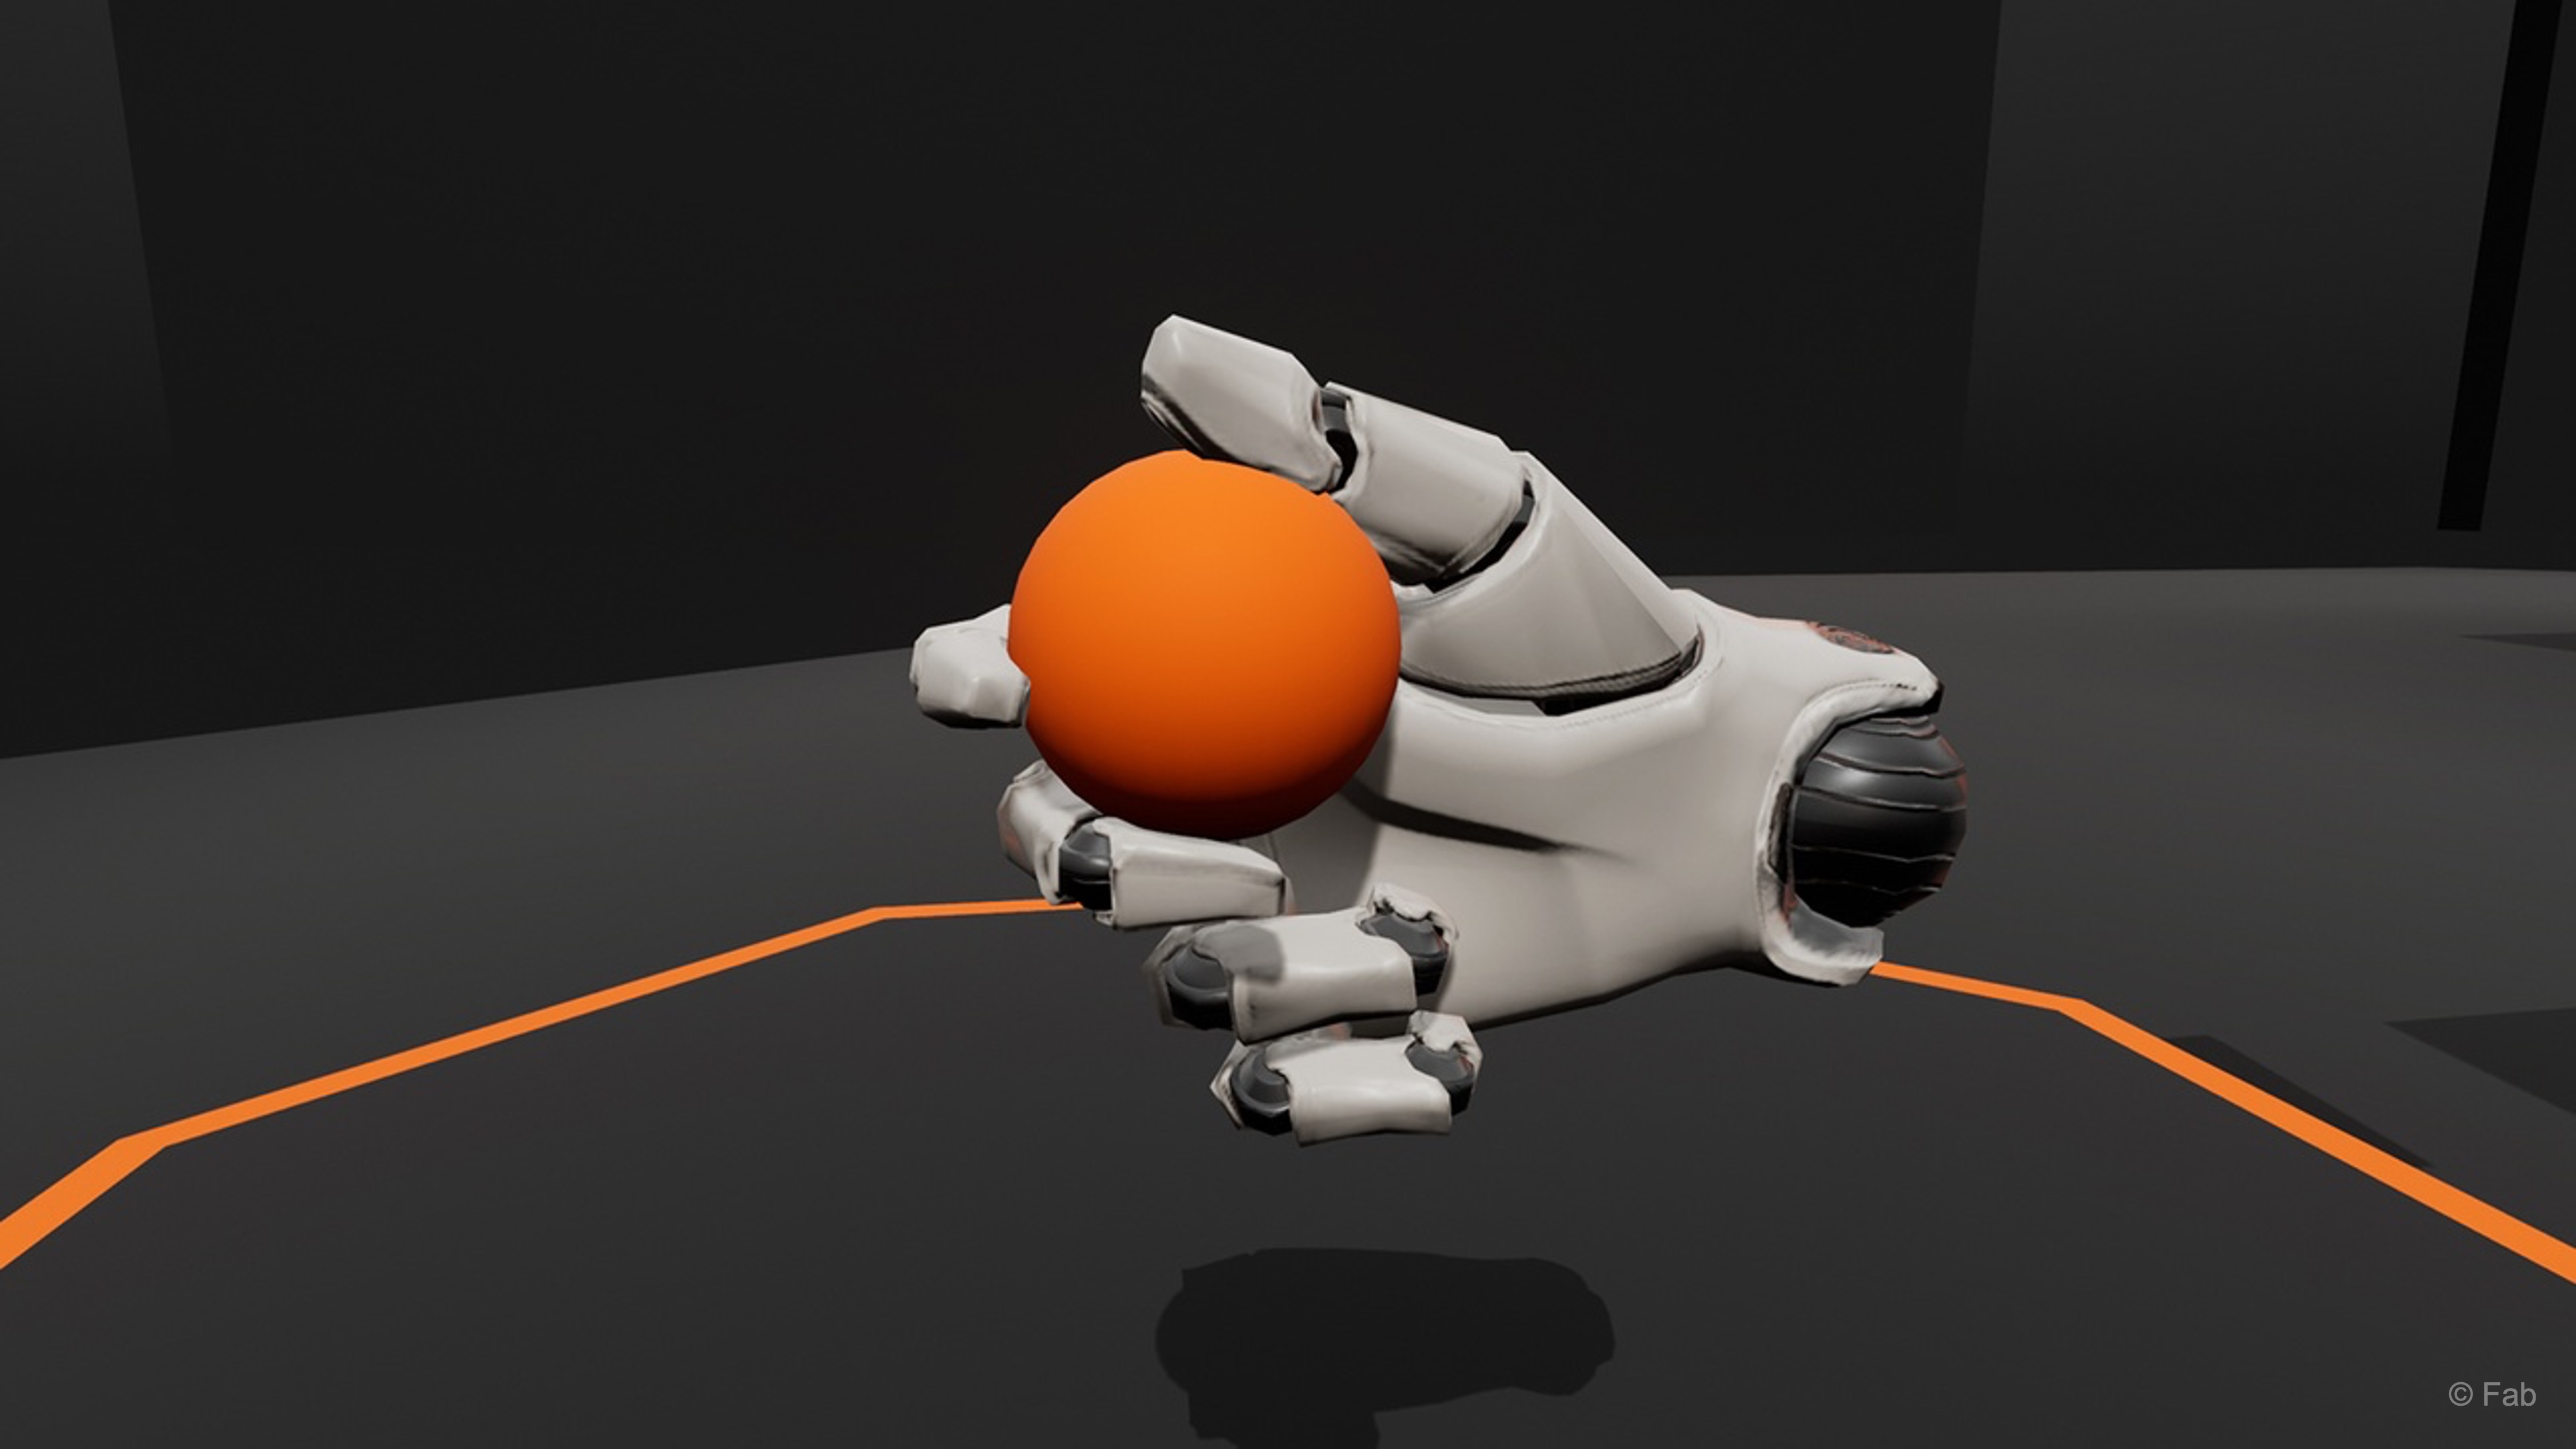
Immersive VR experiences rely on intuitive interactions. One of the most fundamental is grabbing objects. In virtual environments, being able to reach out, pick up, and manipulate items is key to making the experience feel natural and believable. Grabbable objects allow players to interact with the world beyond simple observation. When an object is grabbed, it typically attaches to the user’s virtual hand or controller, moving with it in real time. Upon release, objects often respond with realistic physics-based motion—such as inheriting the hand’s velocity—enabling interactions like throwing or dropping items convincingly. These mechanics form the foundation of interactive VR. By supporting natural object handling, developers can create experiences where users feel present and engaged across various use cases:
- Tool Use and Task Simulation: Users can pick up and manipulate tools or equipment, whether for industrial training, repair tasks, or role-specific simulations. This includes scenarios like using wrenches, welders, or surgical instruments, often with constraints or snapping to simulate real-world behavior.
- Inspection and Exploration: Objects can be grabbed, rotated, and examined closely to understand their details. This is valuable in training, education, product design, or even entertainment, such as inspecting mechanical parts, artifacts, or models.
- Assembly and Construction: Grabbable parts can be combined to simulate assembly tasks, from mechanical systems to medical devices. These interactions help users practice coordination, precision, and procedural knowledge.
- Interactive Interfaces and Controls: Virtual UI elements can be designed to be grabbed, moved, or manipulated. This can include repositioning panels, dragging sliders, or picking up virtual displays, blending physical interaction with digital controls.
- Physics and Realism: Grabbed objects often inherit forces and constraints, enabling realistic throwing, weight simulation, or balance challenges. This adds immersion for gaming, training, and physics-based learning experiences.
- Safety, Role-Play, and Specialized Training: Grab interactions simulate critical tools and equipment in high-stakes environments. Examples include handling fire extinguishers, medical instruments, or tactical gear — allowing users to safely practice in scenarios that mirror real-world challenges.
XR Grab Interactable
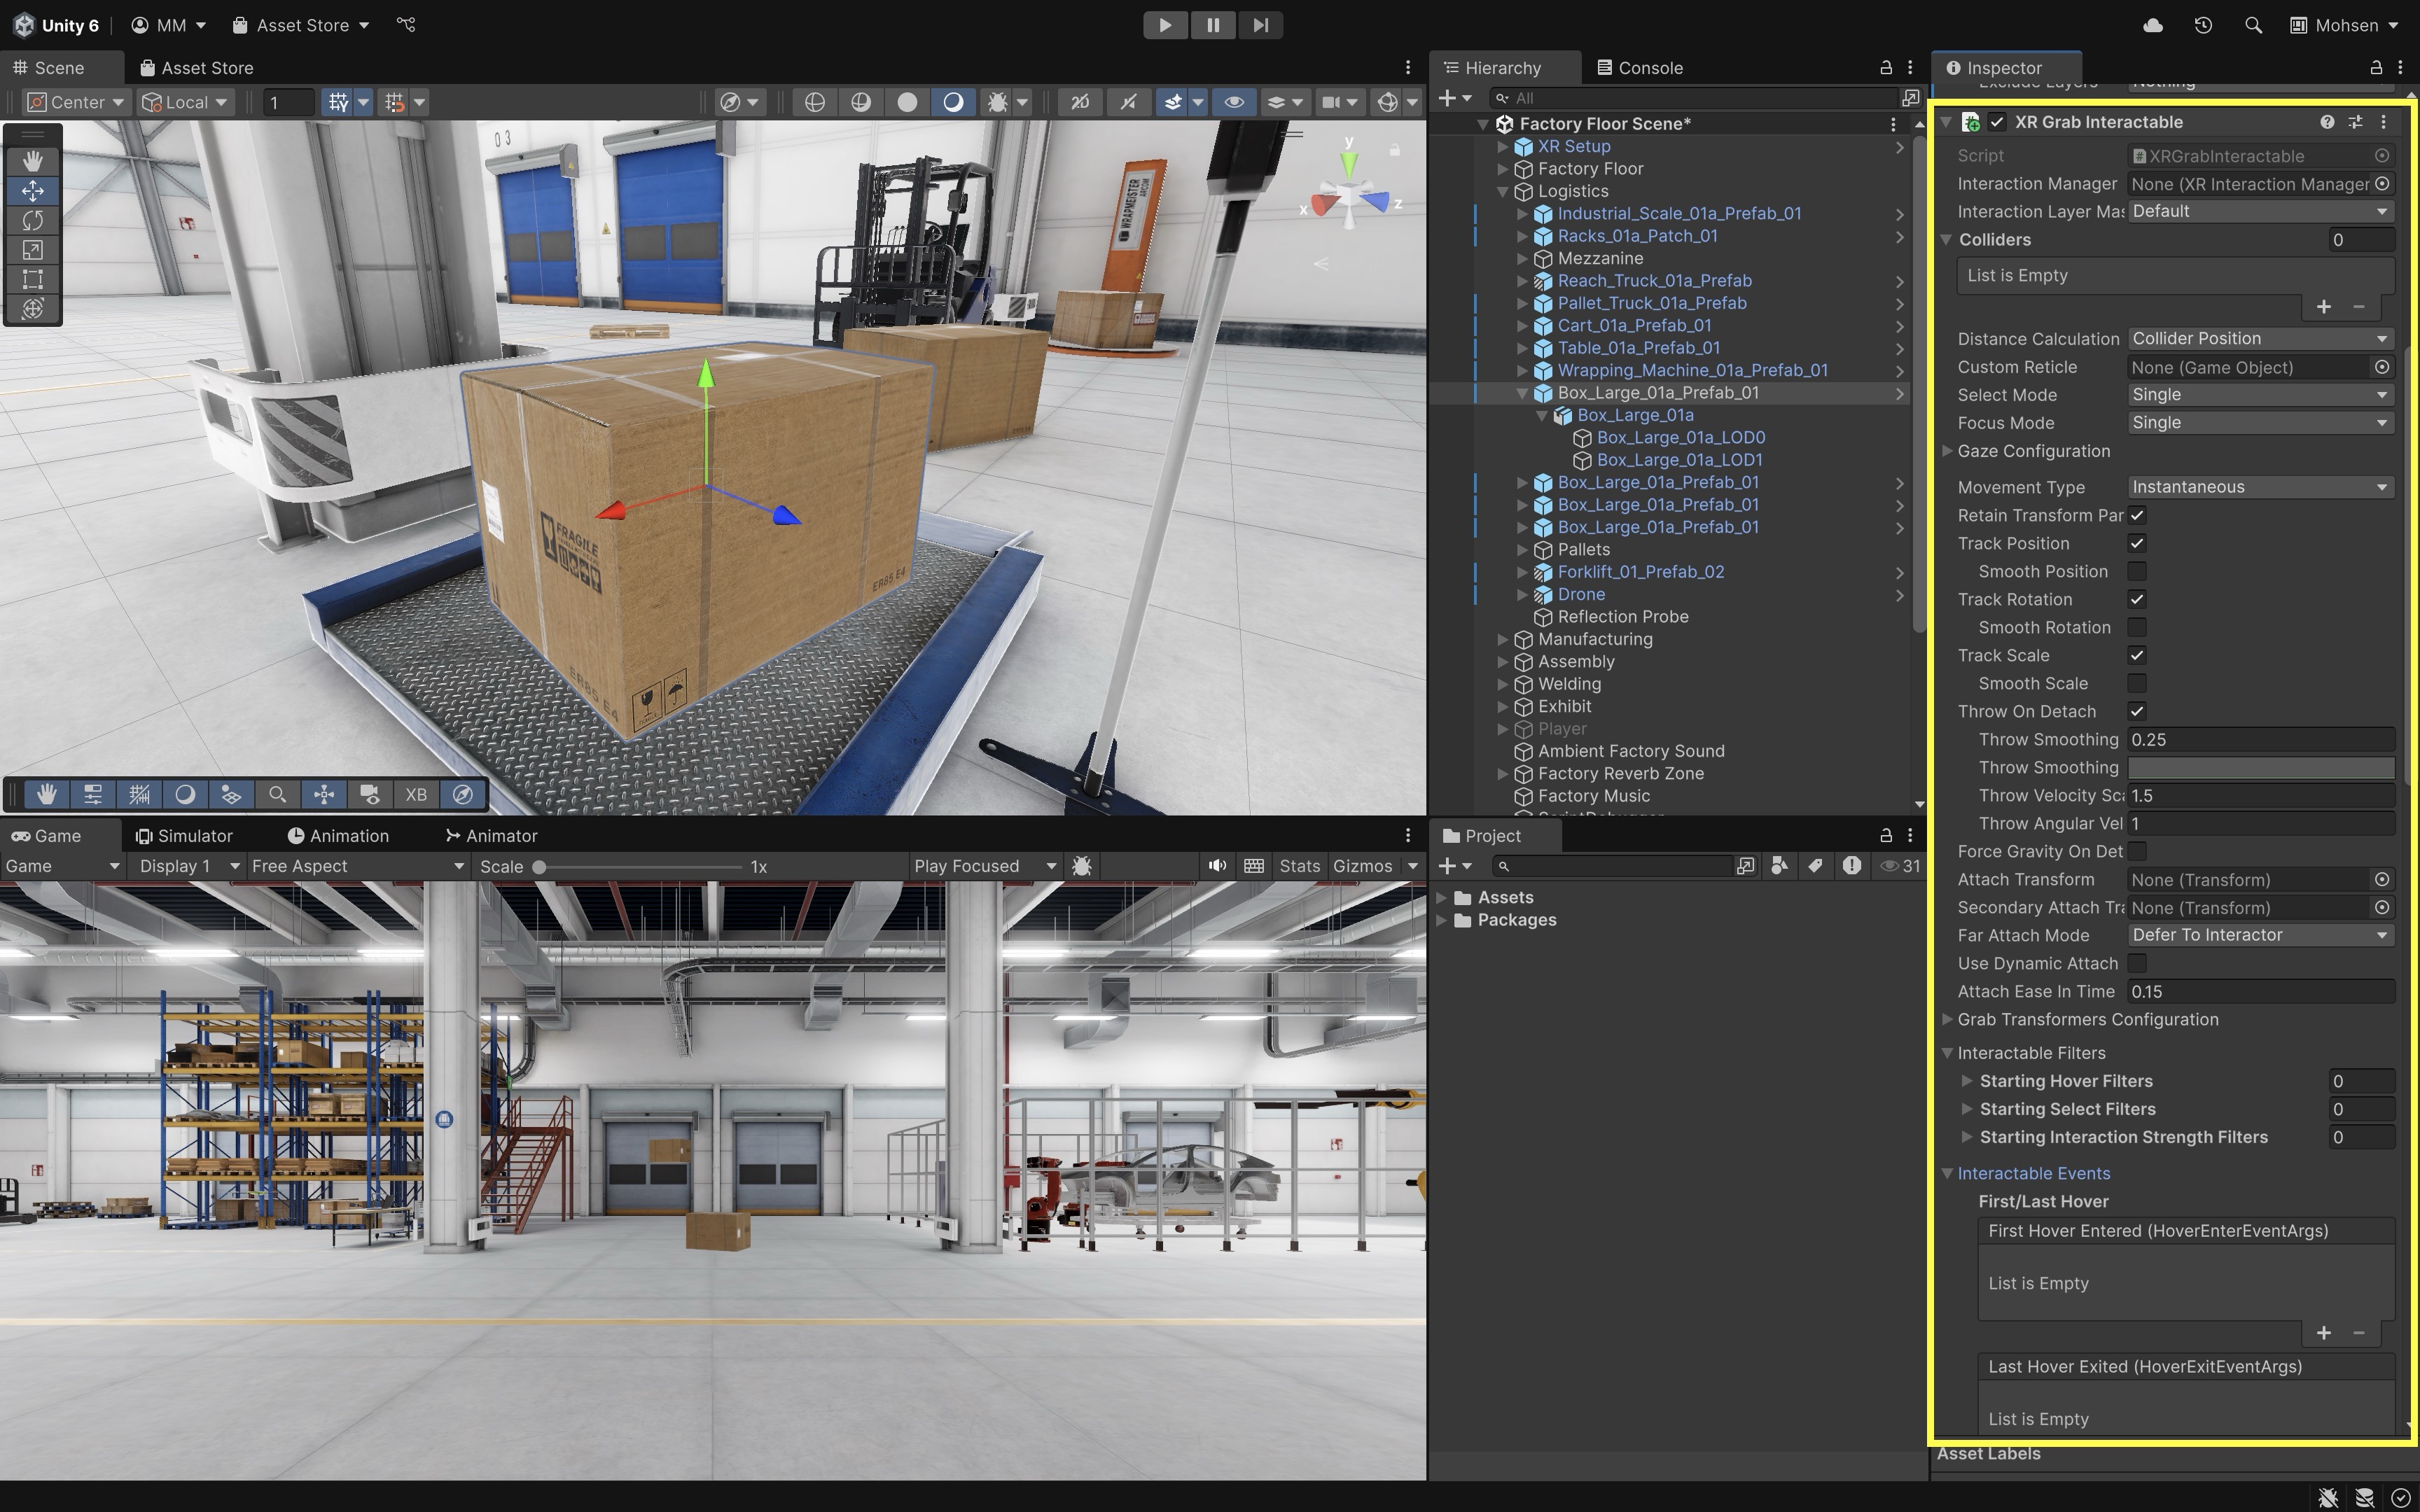
XR Grab Interactable is a component from the XR Interaction Toolkit that, when attached to a GameObject, makes it grabbable and interactable in VR. This allows users to pick up, hold, move, and release objects using VR controllers or hand tracking. The component provides multiple configuration options to control how objects attach, move, and behave physically, enabling both realistic and specialized interaction patterns.
Review this Unity Documentation to learn more about
XR Grab Interactable.
Core Settings
Interaction Manager: Defines whichXR Interaction Managerthe object communicates with. This ensures the interactable can be managed consistently within the overall interaction system.Interaction Layer Mask: Filters which interactors are allowed to grab the object using XRI Interaction Layers. For example, a near-only tool might use aNearOnlyinteraction layer that matches only the left-hand interactor. This is separate from Unity’s regular Layers/Tags.Colliders: The object can have one or more colliders assigned to define its physical grab regions.Distance Calculation Mode: Determines how distance is calculated for far or ray-based grabs. Options includeTransform Position,Collider Position, andCollider Volume. This affects how the object prioritizes selection when multiple targets are in reach.Custom Reticle: A visual indicator that replaces the default reticle when targeting this object, providing custom feedback (e.g., a highlight icon when focusing on a control panel).Parent Interactable/Auto Find Parent Interactable: Optional settings for nested tools or assemblies where a child interactable should defer to or coordinate with a parent interactable.
Selection and Focus
Select Mode: Controls whether one or multiple interactors can select the object at the same time (e.g.,Singlevs.Multiple). Toggle or sticky selection behavior belongs toSelect Action Triggeron the interactor, notSelect Mode.Focus Mode: Controls how the object responds to focus (hovering before selection). For example, an object might highlight while hovered, even before being grabbed.Allow Gaze Interaction/Allow Gaze Select/ gaze timing settings: Enable gaze-based interaction when used withXRGazeInteractor. These settings do not require eye tracking on every headset; head-direction gaze can also be used depending on setup.
Grab Transformers
In current XRI, XR Grab Interactable uses grab transformers to calculate object position, rotation, and scale during grabs:
Add Default Grab Transformers: Adds default transformer behavior when the component is created.Starting Single Grab Transformers/Starting Multiple Grab Transformers: Define transformers used for one-handed or two-handed grabs.XR General Grab Transformer: The common default transformer; supports translation, rotation, and scale constraints.
Use default transformers for normal objects; add or customize transformers only when you need constraints such as fixed-axis motion, two-handed rotation, or scaling.
Movement and Physics
Movement Type: Sets how the object moves when grabbed:Velocity Tracking— applies velocity and angular velocity for realistic throwing and momentum; better for physical response, but may lag or jitter if poorly tuned.Kinematic— precise following using physics timing with a kinematicRigidbody.Instantaneous— updates theTransformdirectly each frame for the most responsive visual behavior, but can pass through colliders more easily.
Predicted Visuals Transform: Optional child transform used to reduce apparent stutter when using physics-based movement types by separating visual prediction from physics motion.Retain Transform Parent: Determines whether the object keeps its original parent in the hierarchy after being released or reverts to the scene root.Track Position/Track Rotation/Track Scale: Toggle whether the object follows the interactor’s position, rotation, or scale. Disabling position tracking can create interactions like rotating knobs without movement.Throw On Detach: Applies the interactor’s velocity to the object when released. Most relevant for velocity-based physical release; it is not a universal “realism” switch.Force Gravity On Detach: Ensures gravity is applied immediately after release, regardless of the Rigidbody’s prior settings.- Rigidbody interpolation: Interpolation can reduce visual stutter, but it may add perceived latency while grabbing; test in headset.
Attachment Options
Attach Transform: The main point where the object attaches when grabbed. Often set to an empty child object such asGripHandleto ensure correct alignment (e.g., tool handles).Secondary Attach Transform: An optional second attach point that enables two-handed interactions or alternate grab positions.Far Attach Mode: Controls how objects behave when grabbed from a distance (e.g., snapping instantly vs. flying smoothly to the hand).Use Dynamic Attach: When enabled, generates an attach point dynamically at the grab location. Combine withMatch Positionand/orMatch Rotationfor natural pickup behavior.Snap To Collider Volumecan improve placement on irregular shapes.Attach Ease In Time: Sets the interpolation time for moving into place after being grabbed, smoothing the transition instead of snapping immediately.
Filters and Events
Interactable Filters: Conditions that determine whether the object can currently be interacted with. For example, access could be locked until prerequisites are met.Interactable Events: Unity Events triggered during the grab lifecycle (hover enter, select enter, select exit, etc.). These can drive feedback such as sounds, haptics, or activating systems. Developers can connect these events to custom scripted methods in the Inspector or via code to implement custom behaviors.
Near-Far Interaction
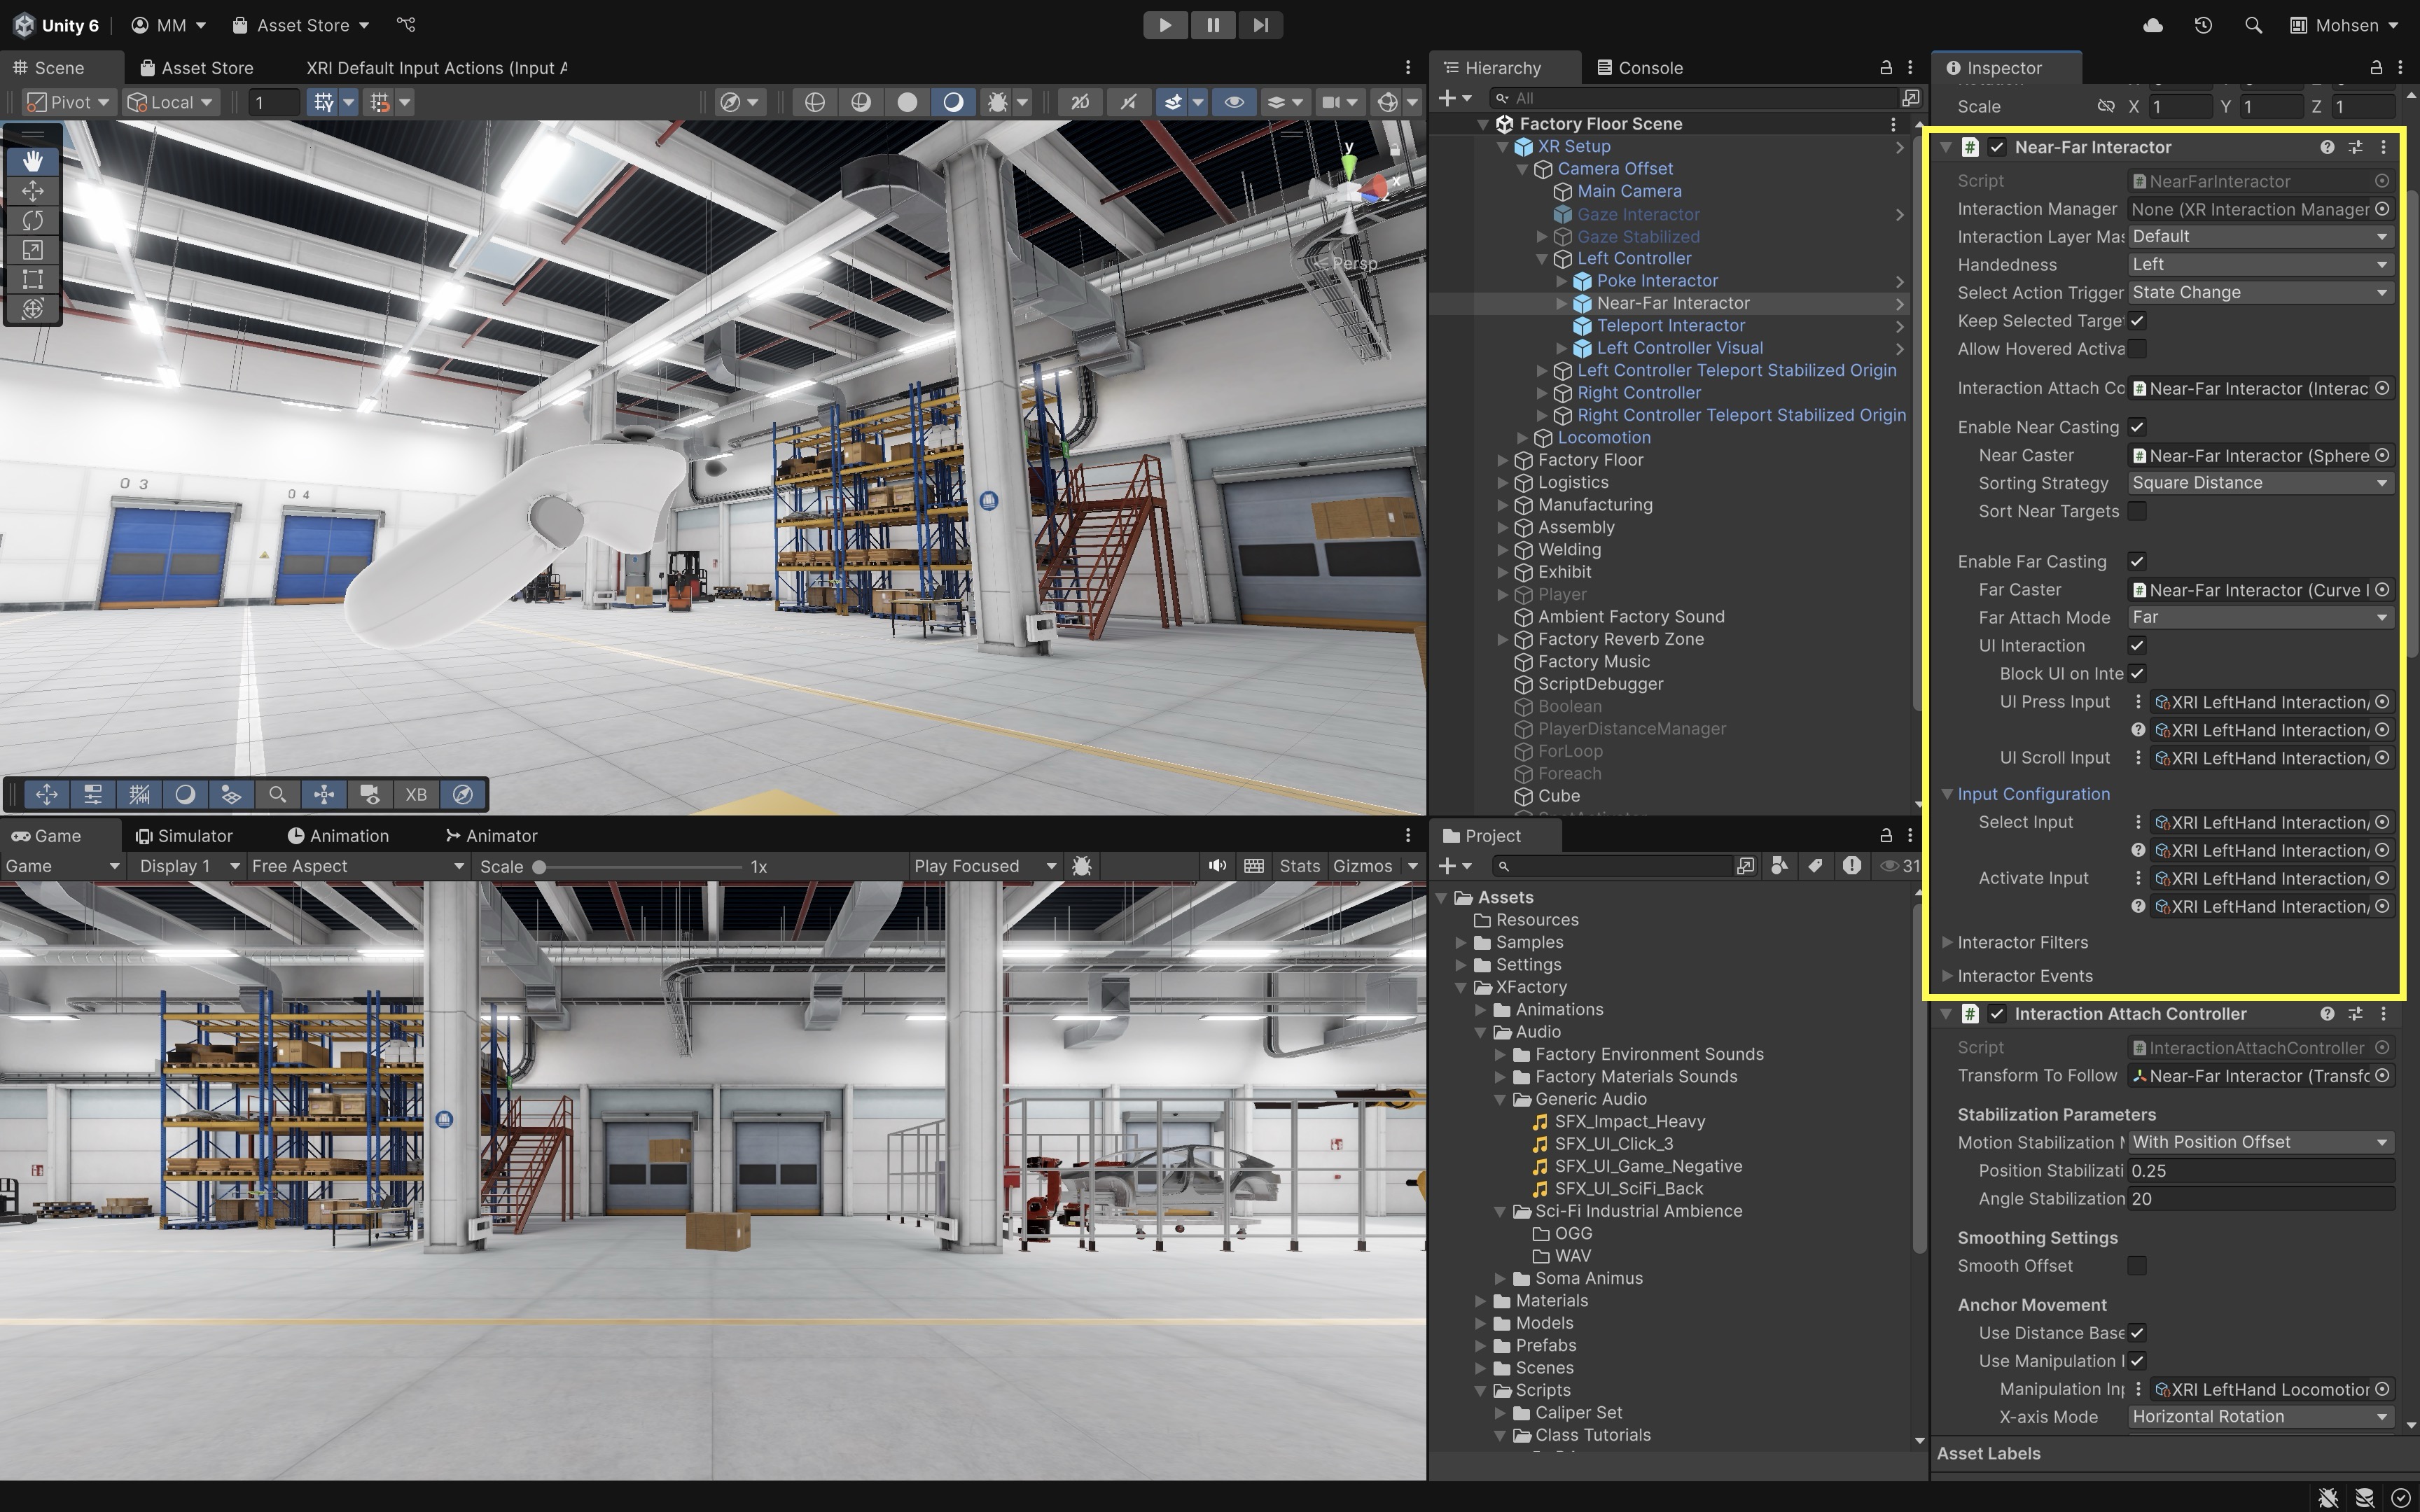
The Near-Far Interactor is a unified interactor in the XR Interaction Toolkit that combines both near and far interaction into a single component. For many controller workflows, Near-Far Interactor provides a unified near/far interaction path. XR Direct Interactor and XR Ray Interactor remain useful for specialized near-only, far-only, AR, UI, or custom setups. Starter Assets commonly use Near-Far Interactor so students can grab nearby objects by touch and distant objects by ray/curve without swapping interactors manually. It works seamlessly with interactables like XR Grab Interactable, as well as Unity UI elements when UI Interaction is enabled.
Prerequisite: This session assumes your D1
XFactoryVRscene includes the complete VR Template XR setup with theXR Origin (XR Rig),XR Interaction Manager,Input Action Manager,XRI Default Input Actions, locomotion, and working controller tracking/interactors from D1/D2.
Properties
Interaction Manager: Handles communication with the XR Interaction Manager.Interaction Layer Mask: Defines which interactables this interactor can affect.Select Action Trigger: Sets how selection input is interpreted (hold, toggle, sticky).Keep Selected Target Valid: Keeps an object selected even when no longer pointed at.Allow Hovered Activate: Sends activate/deactivate events to hovered interactables.Target Priority Mode: Determines how many interactables are tracked at once.Parent Interactable: Specifies a dependency to control processing order.Interaction Attach Controller: Controls how objects attach and follow the hand.Enable Near/Far Casting: Toggles near or far interaction capability.Near/Far Casters: Components that detect nearby or distant targets.Sorting Strategy: Chooses how near targets are prioritized (distance, collider, etc.).Far Attach Mode: Sets whether far-grabbed objects move to the hand or stay at distance.UI Interaction: Enables interaction with Unity UI elements.UI Press & Scroll Input: Defines input for clicking and scrolling UI.Select & Activate Input: Configures inputs for selecting and activating objects. Choose matching actions fromXRI Default Input Actions.Interactor Filters & Events: Extends behavior and hooks into interaction events.XR Interaction Group: If the copied VR Template setup uses an interaction group underXR Origin (XR Rig), it manages priority between interactors on the same controller so they do not fight over the same select input.
Key Features
- Dual Interaction Modes: Uses a near caster (touch/overlap) and a far caster (curve/ray) in one interactor, with automatic switching and UGUI support from the far cast. Quick tuning can be done via Near target sorting (e.g., SquareDistance) and Far Attach Mode (bring to hand vs. stay at hit point). Depending on settings, a far grab can keep the object at the hit point or pull it to the hand.
- Attach Control: An Interaction Attach Controller drives the attach transform (position/rotation). Default gives distance-based velocity scaling for smooth pull-in, works with hand or controller. Swap in a custom controller to change pull profiles, offsets, or constraints.
- Visual Support:
CurveVisualControllerrenders the far interaction path using curve data. Decoupled from logic, so visuals are easy to restyle or replace. - Starter Assets wiring: The Starter Assets interactor may already include near/far casters, attach controller, UI support, and curve visual setup. Verify existing wiring before manually adding components.
Example
You can make tools, parts, and devices within XFactory grabbable in VR using Unity’s XR Interaction Toolkit. In this example, we’ll make the barcode scanner in the Logistics Station interactable using the XR Grab Interactable. When grabbed, it will play a click sound and trigger haptic feedback for immersion.
- Locate the Barcode Scanner in the Logistics Station:
- Find the
Scanner_01ain the scene or place it from theProjectwindow. - Rename the instance to
BarcodeScannerif you want. - Position it on the table inside the logistics station.
- Find the
- Add Physics and Interaction Components:
- Add a
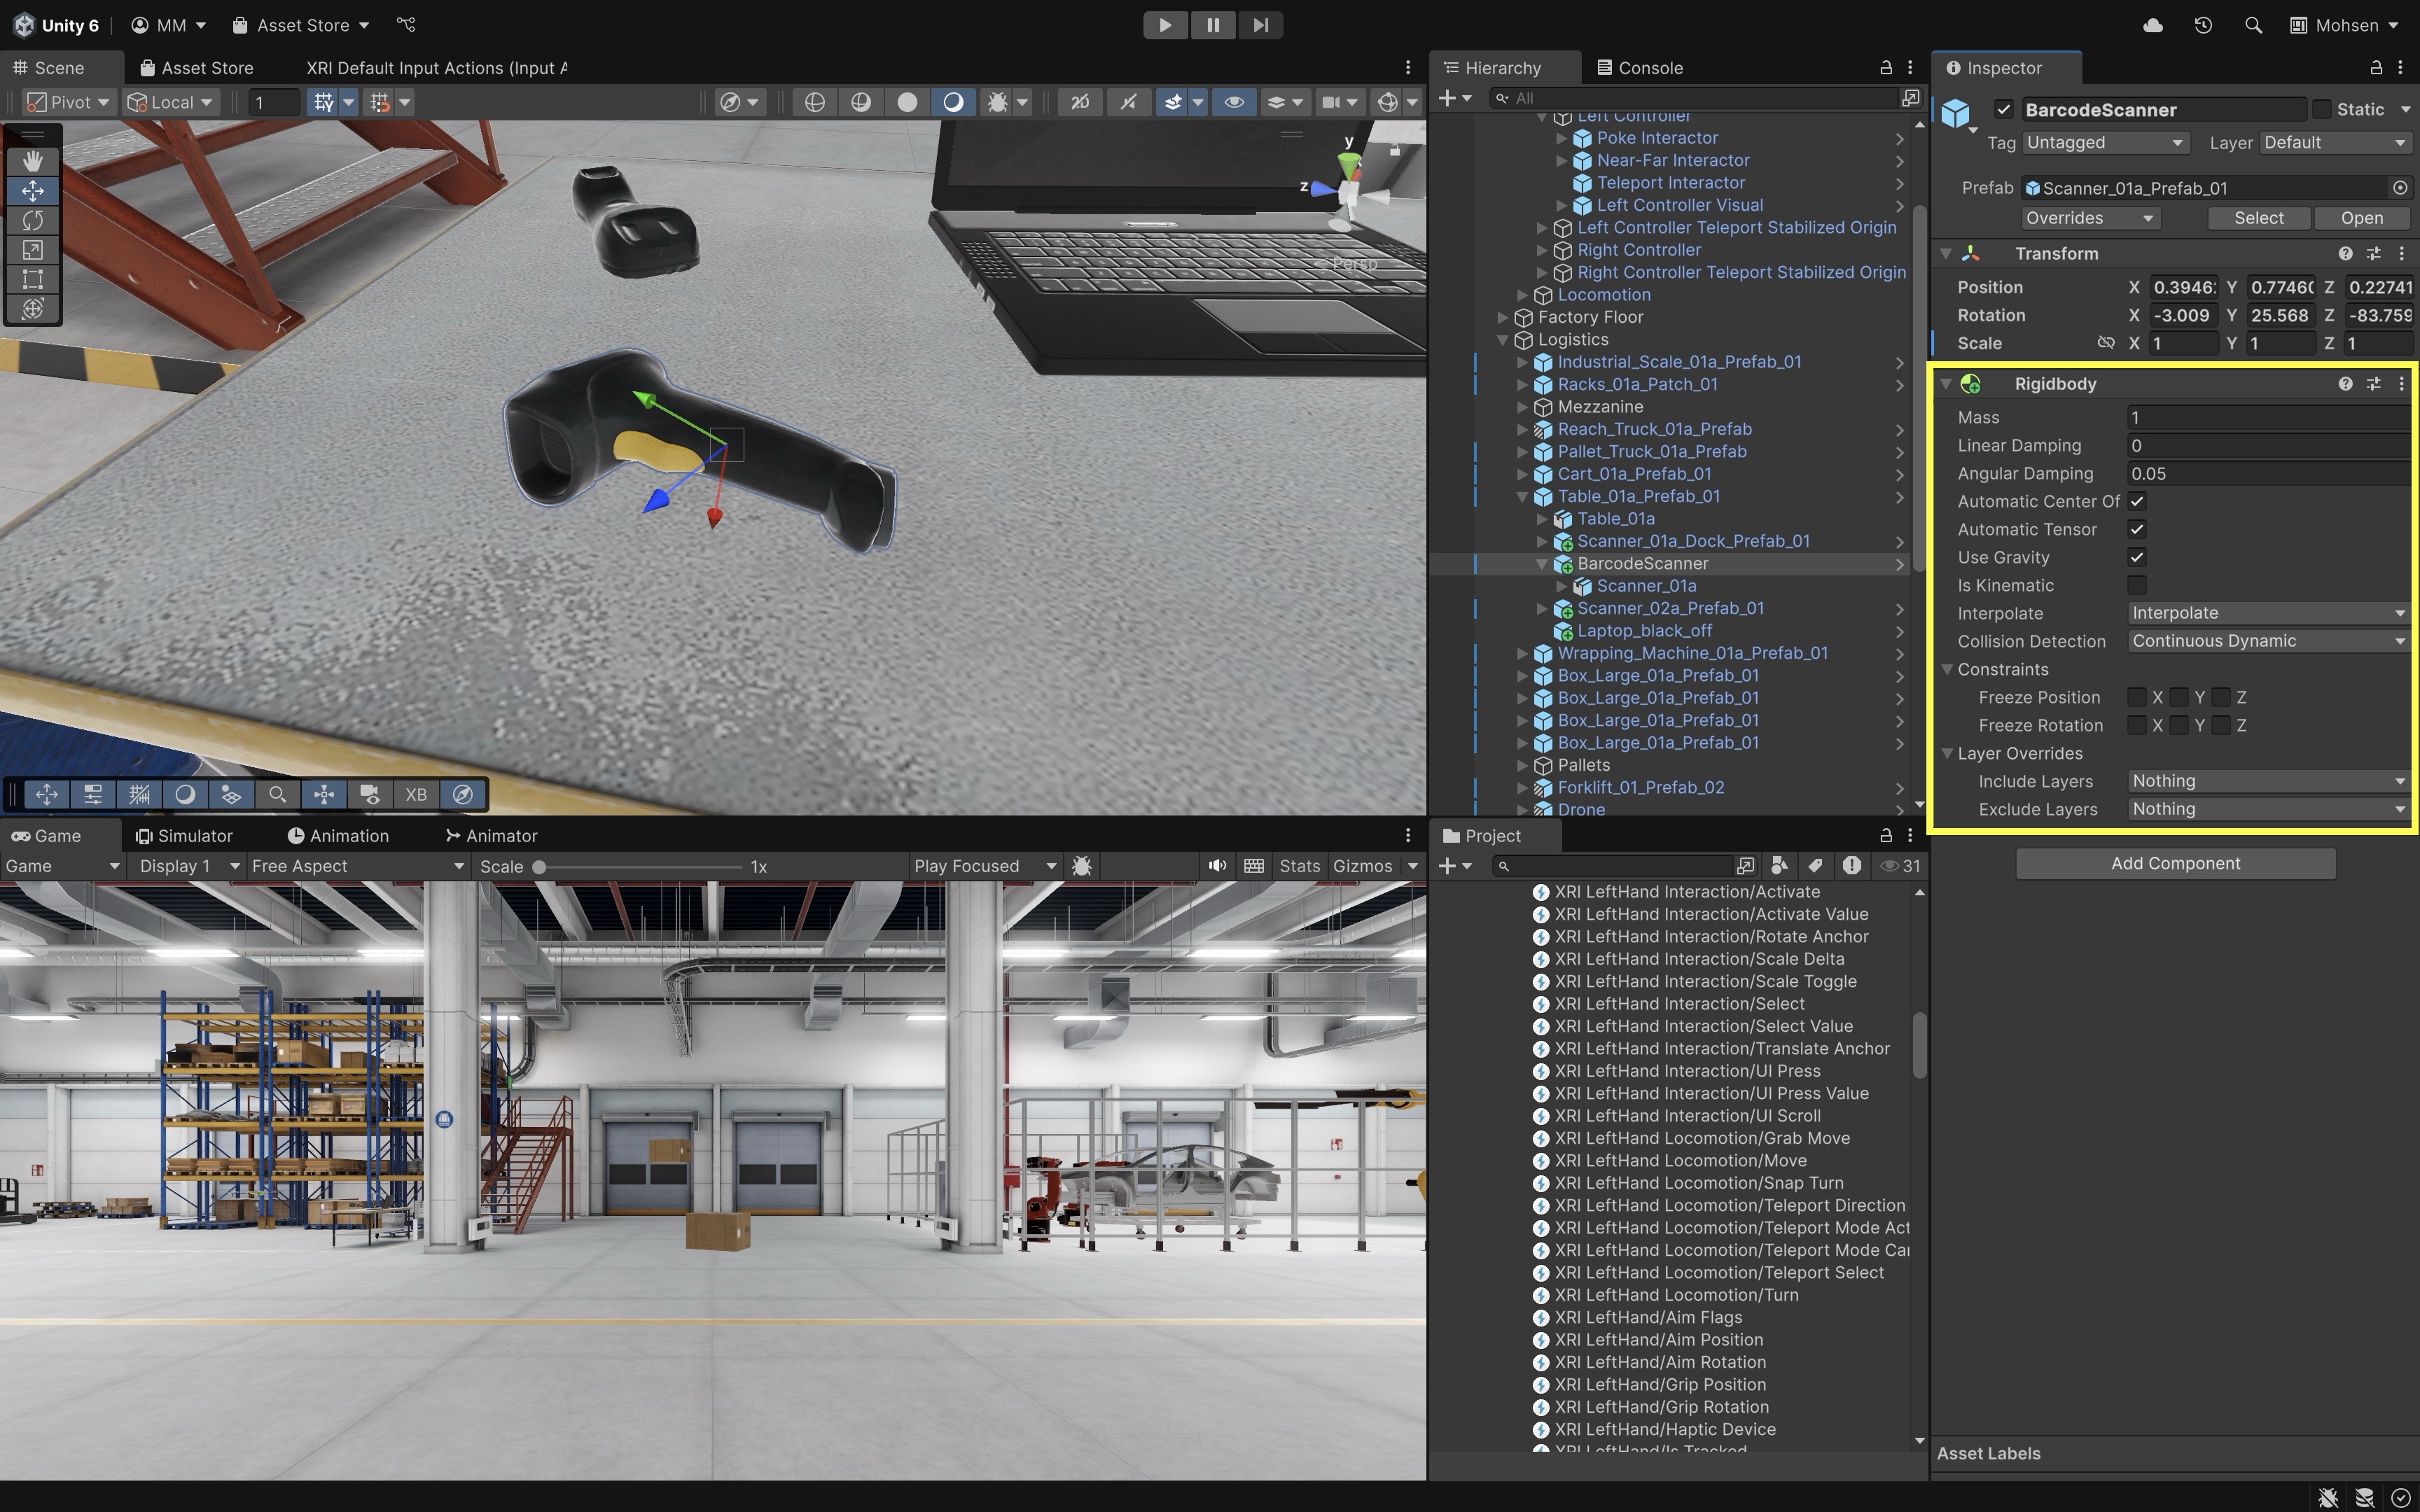
Rigidbodycomponent to theBarcodeScannerGameObject. - Use
Discretecollision detection for simple slow objects; useContinuous Dynamiconly for fast-moving or thrown objects that risk tunneling. - Verify that it has a valid collider. Prefer primitive colliders or compound primitive colliders for tools and boxes; use convex mesh colliders only when needed for shape accuracy. The grabbable collider should usually be non-trigger if the object is expected to collide physically with the environment. Trigger colliders are mainly for interactor overlap zones or sensor logic.
- Add a
- Enable Grab Interaction:
- Add an
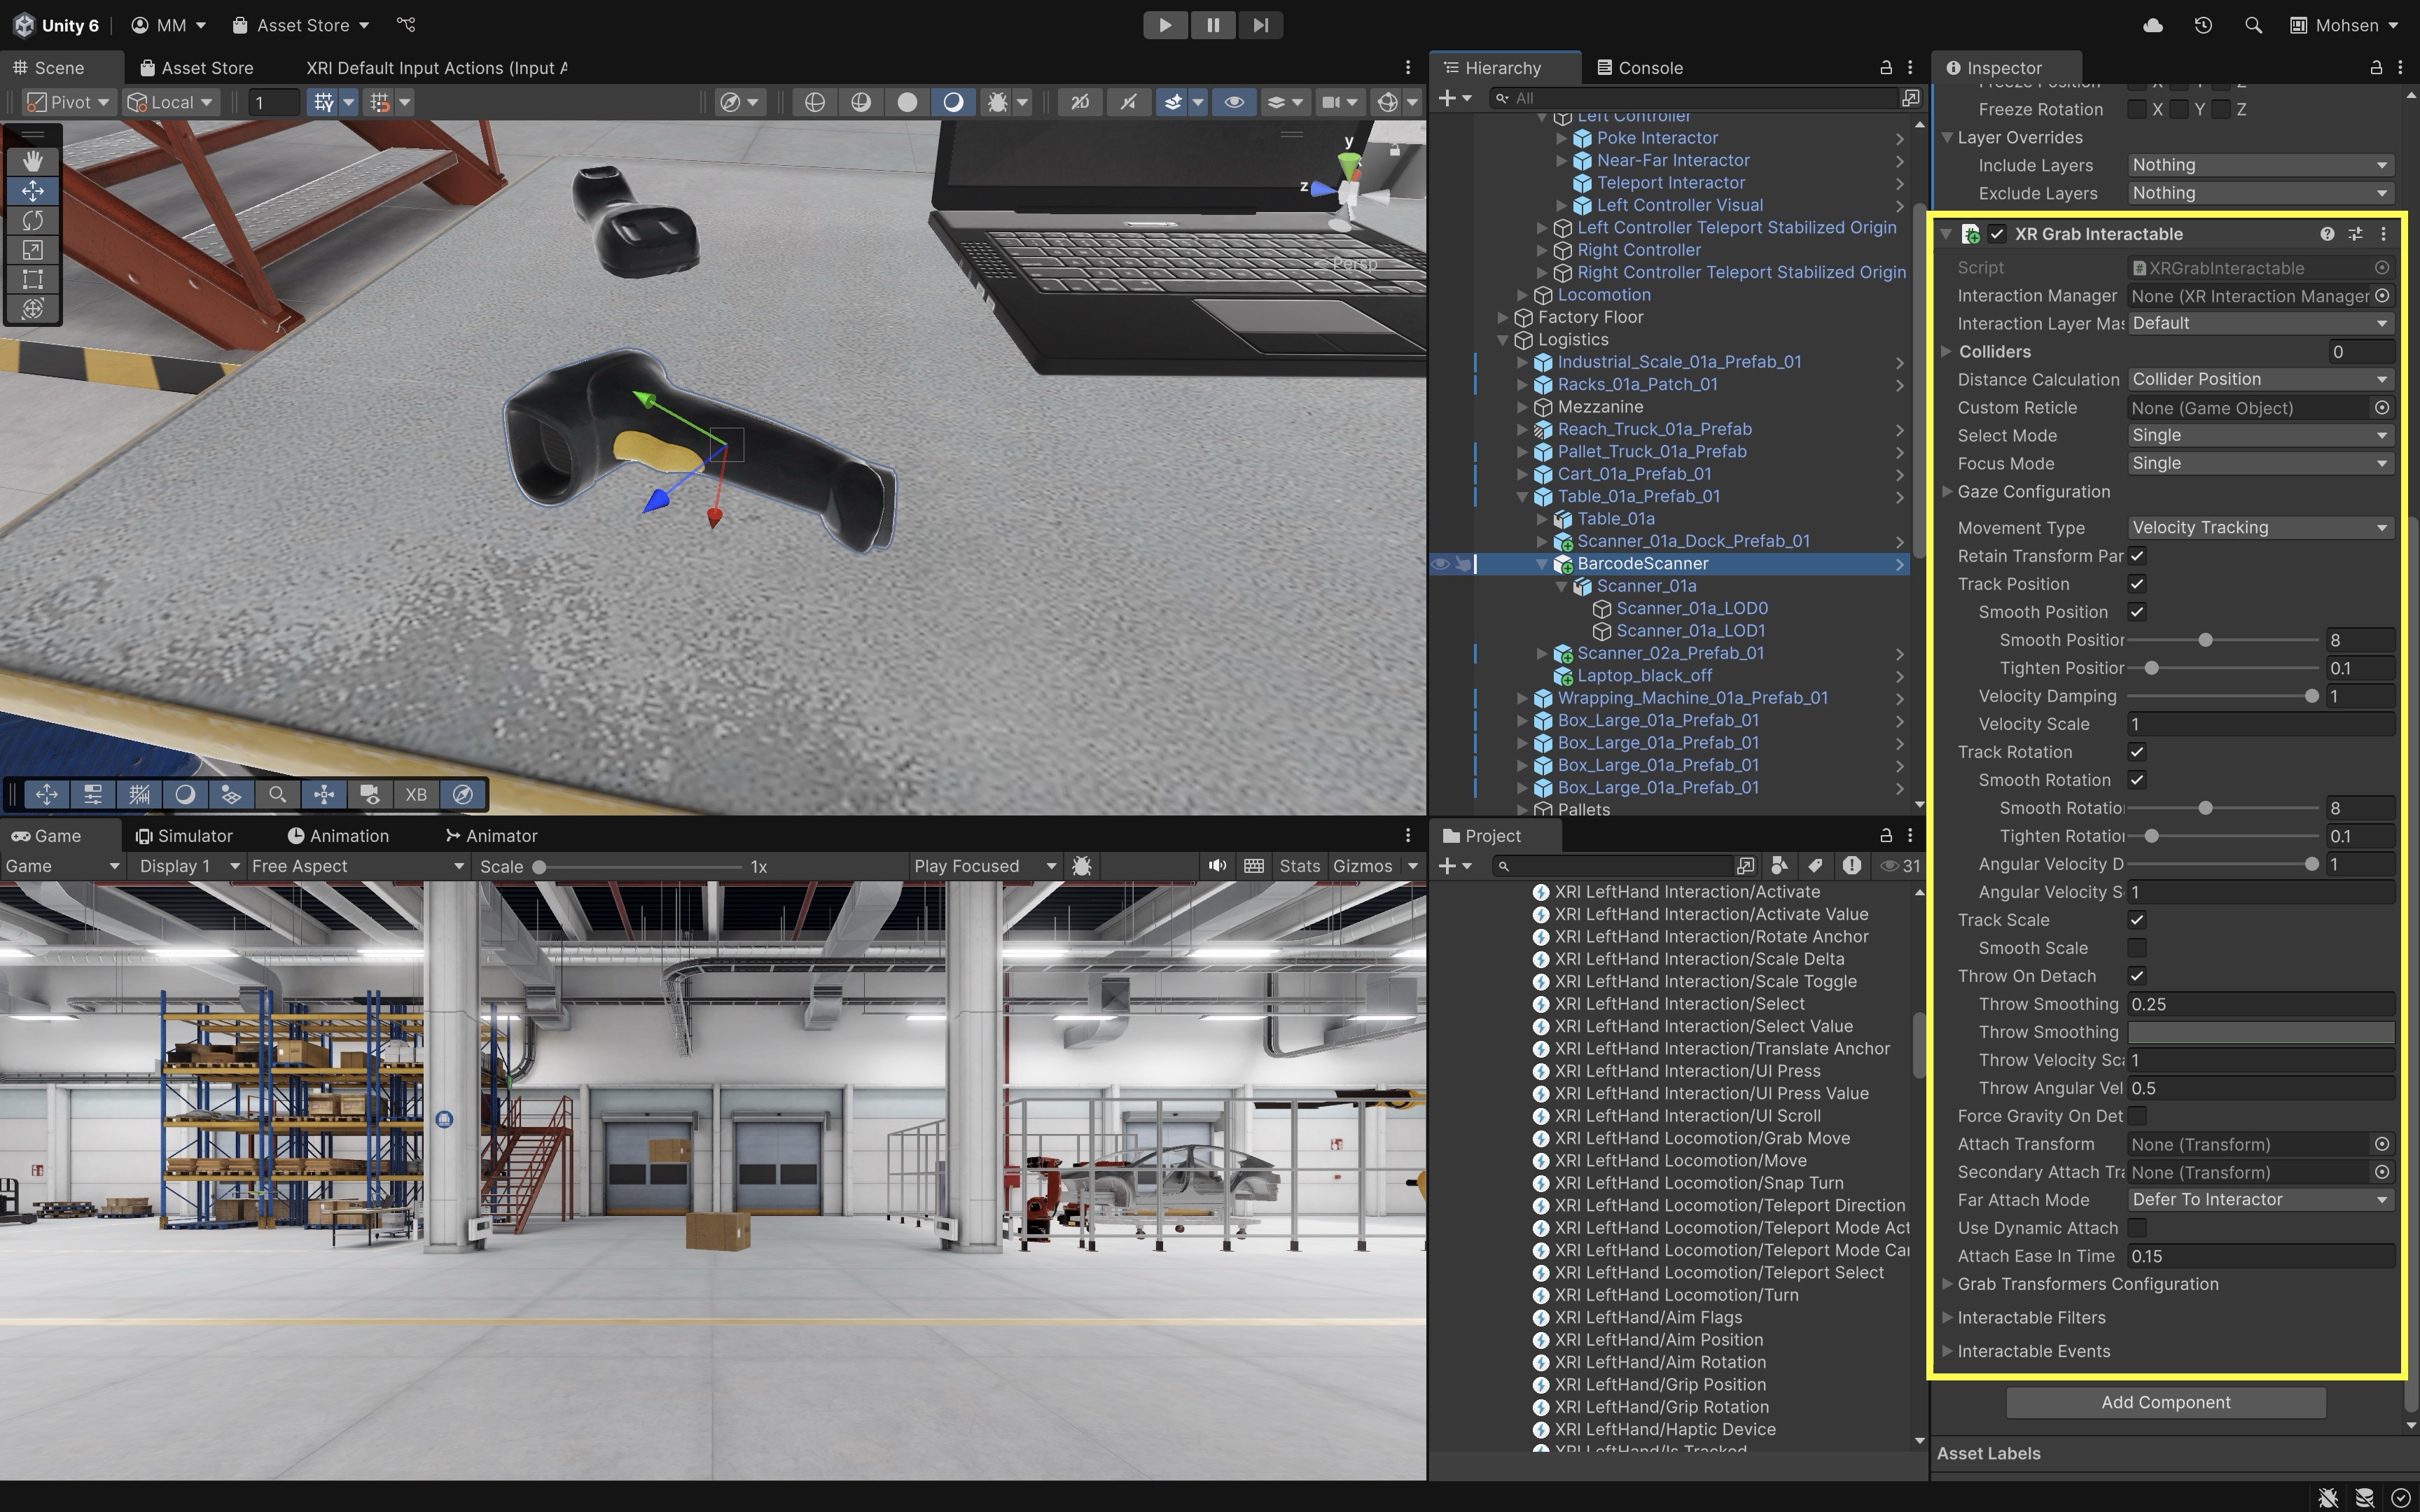
XR Grab Interactablecomponent. - Set
Movement TypetoVelocity Tracking. - Enable
Smooth PositionandSmooth Rotation. - Set
Throw On Detach=true. - Set
Throw Velocity Scale=1.0. - Set
Throw Angular Velocity Scale=0.5. - Ensure the scanner and the grabbing interactor share a compatible XRI Interaction Layer in their
Interaction Layer Maskfields.
- Add an
- Create a Grab Feedback Script (Event-based):
- Create a new
MonoBehaviourscript namedBarcodeScanFeedbackEvents.cs. - Attach this script directly to the
BarcodeScannerGameObject. - For simple select/hover haptics, you can also use
Simple Haptic Feedbackwith aHaptic Impulse Playeron the interactor where possible. The script below is useful when you want custom audio and haptic logic in one place.
 using UnityEngine;
 using UnityEngine.XR.Interaction.Toolkit;
 using UnityEngine.XR.Interaction.Toolkit.Inputs.Haptics;
 using UnityEngine.XR.Interaction.Toolkit.Interactors;

 public class BarcodeScanFeedbackEvents : MonoBehaviour
 {
     [Header("Audio")]
     [SerializeField] private AudioClip beepClip;

     [Header("Haptics")]
     [SerializeField, Range(0f, 1f)]
     private float hapticAmplitude = 0.5f;

     [SerializeField]
     private float hapticDuration = 0.1f;

     // Called by XR Grab Interactable → Interactable Events → Select Entered
     public void OnSelectEntered(SelectEnterEventArgs args)
     {
         PlayBeep();
         SendHaptics(args.interactorObject);
     }

     // (Optional) Called by XR Grab Interactable → Interactable Events → Select Exited
     public void OnSelectExited(SelectExitEventArgs args)
     {
         // Optional lighter exit feedback.
     }

     private void PlayBeep()
     {
         if (beepClip != null)
             AudioSource.PlayClipAtPoint(beepClip, transform.position);
     }

     private void SendHaptics(IXRSelectInteractor interactor)
     {
         if (interactor == null)
             return;

         // Prefer HapticImpulsePlayer when available on the interactor hierarchy.
         if (interactor is Component interactorComponent)
         {
             var hapticPlayer = interactorComponent.GetComponentInParent<HapticImpulsePlayer>();
             if (hapticPlayer != null)
             {
                 hapticPlayer.SendHapticImpulse(hapticAmplitude, hapticDuration);
                 return;
             }
         }

         // Haptic support depends on controller and runtime support.
     }
 }
If this script does not compile, first verify the installed XR Interaction Toolkit package version and namespaces before changing the interaction logic.
- Create a new
- Configure the Script:
- Select
BarcodeScannerin theHierarchy. - In
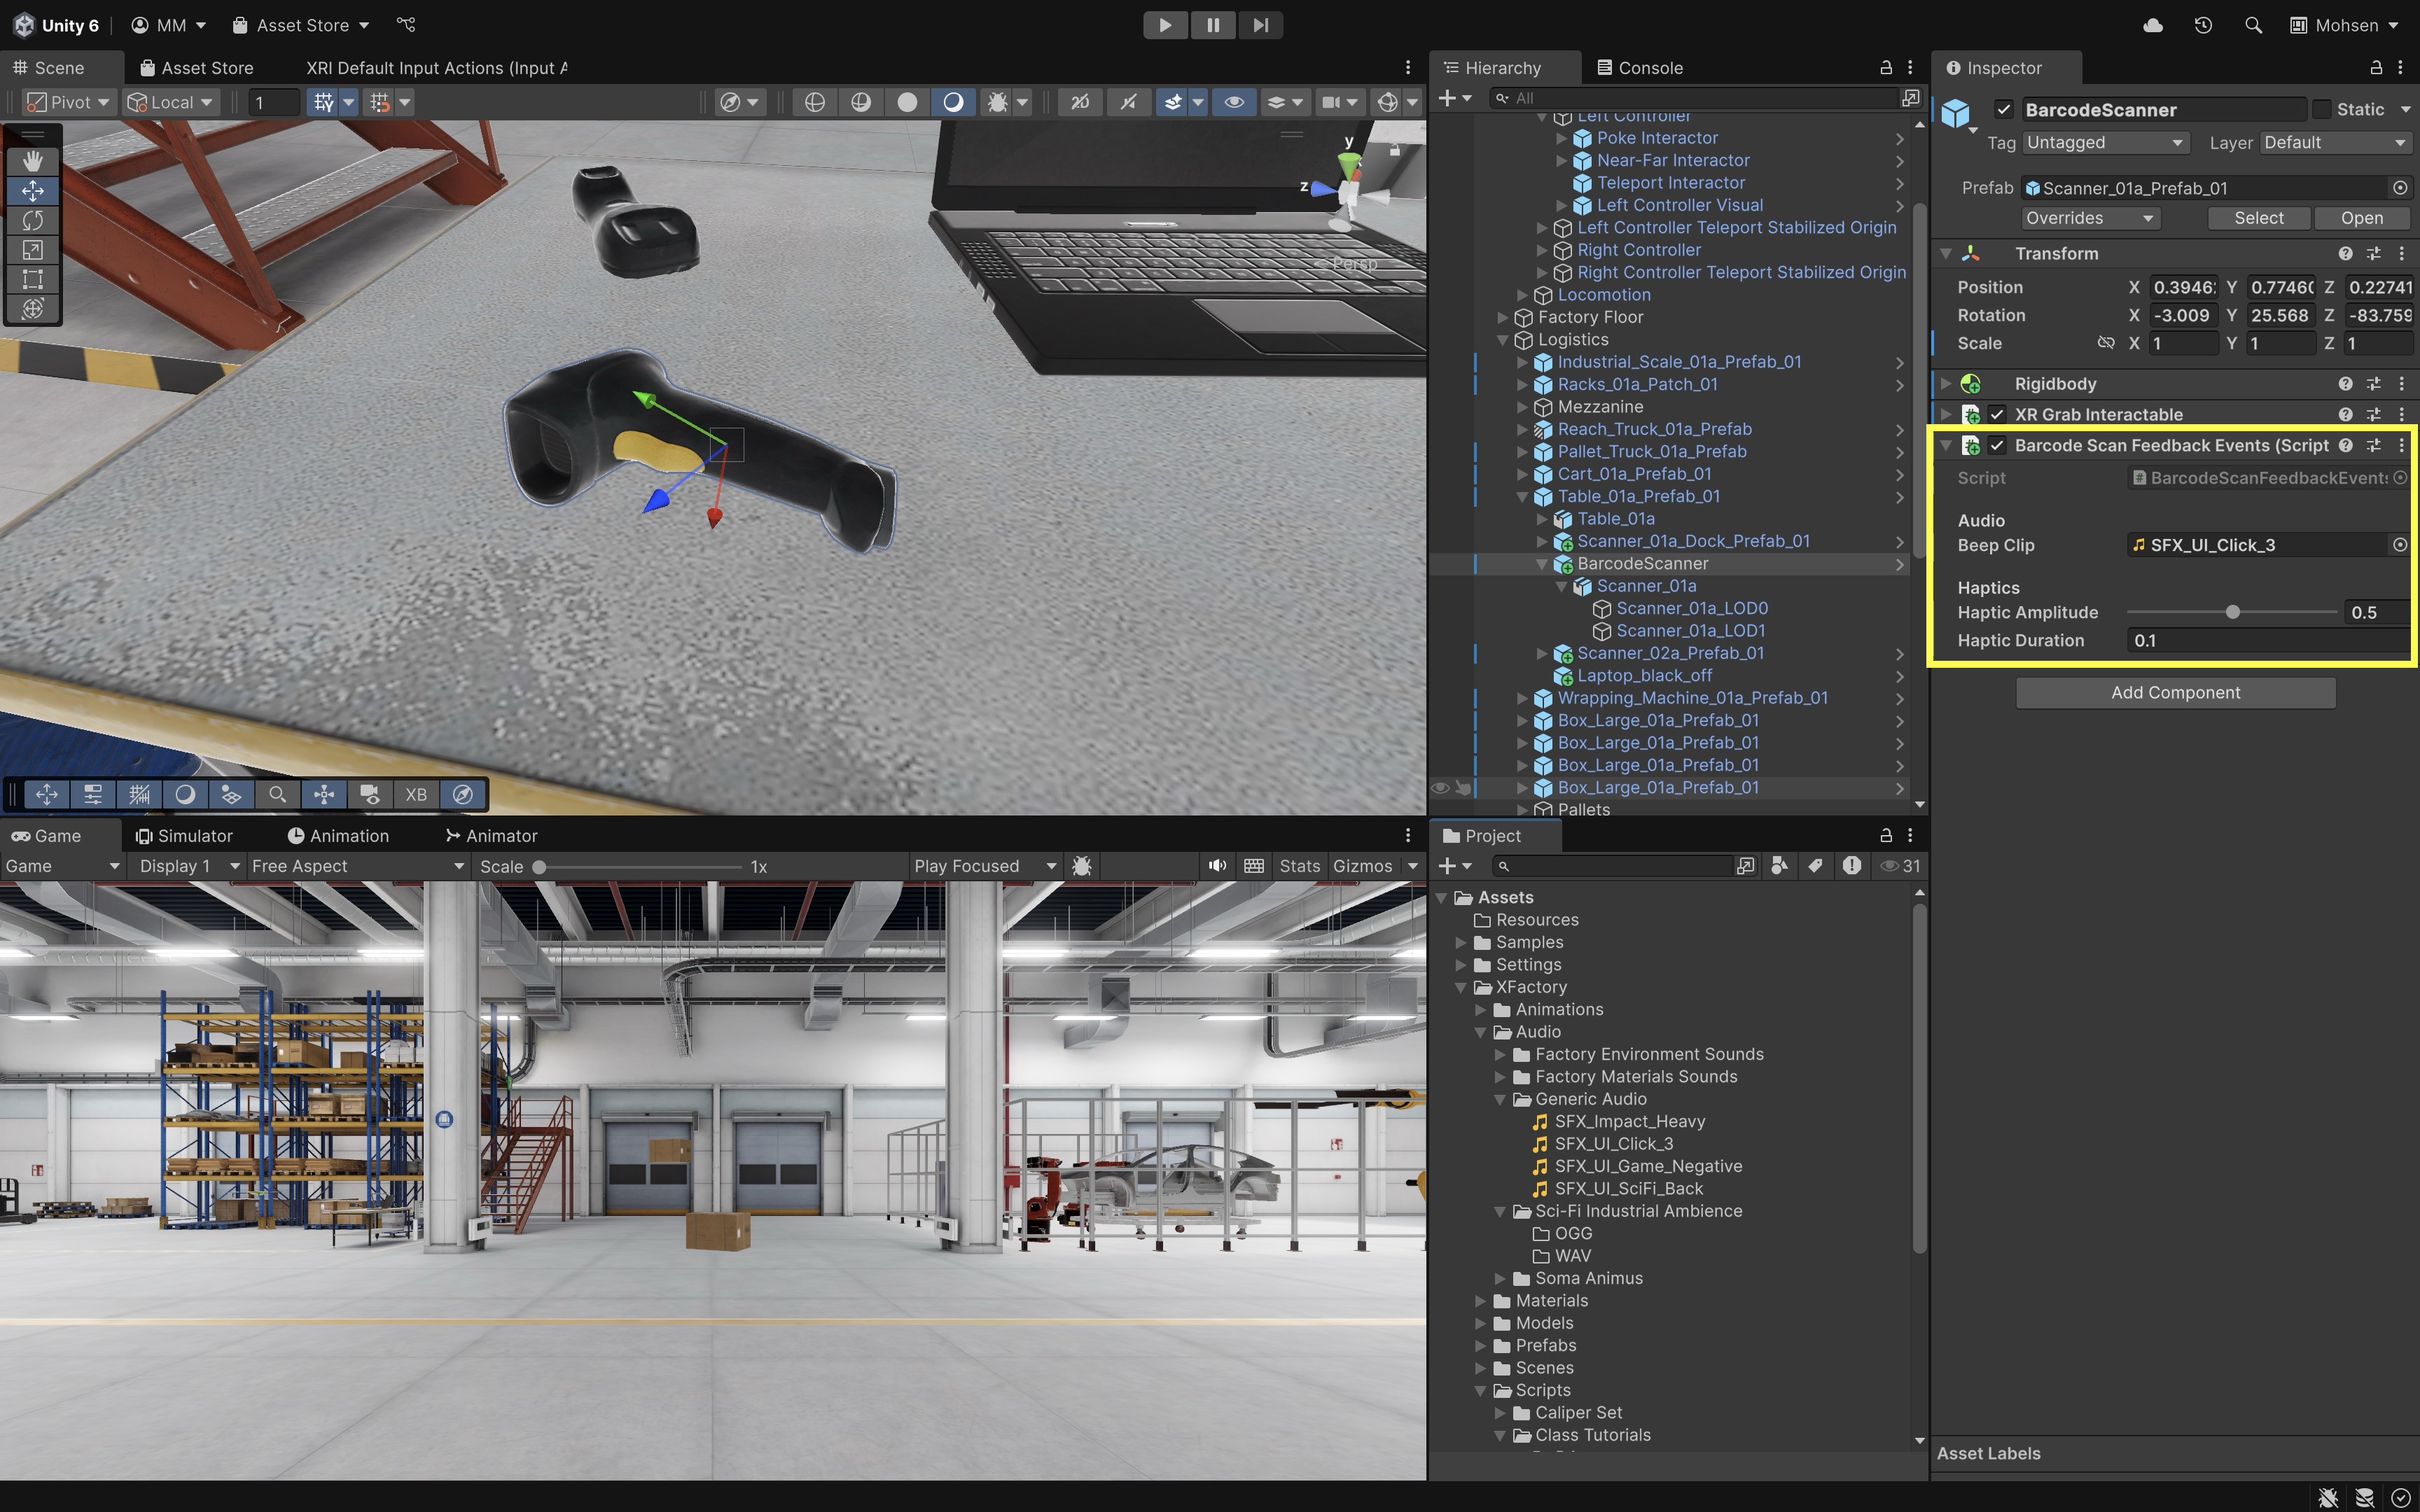
BarcodeScanFeedbackEvents, assign a short beep clip (e.g.,SFX_UI_Click_3.ogg). - Set
Haptic Amplitude(e.g.,0.5) and Haptic Duration (e.g.,0.1s).
AudioSource.PlayClipAtPointis fine for a simple demo. For production XR audio, anAudioSourceon the object gives more control over spatial blend, mixer routing, volume, and distance falloff. - Select
- Hook Up
XR Grab Interactable → Interactable Events(Inspector Only):- On
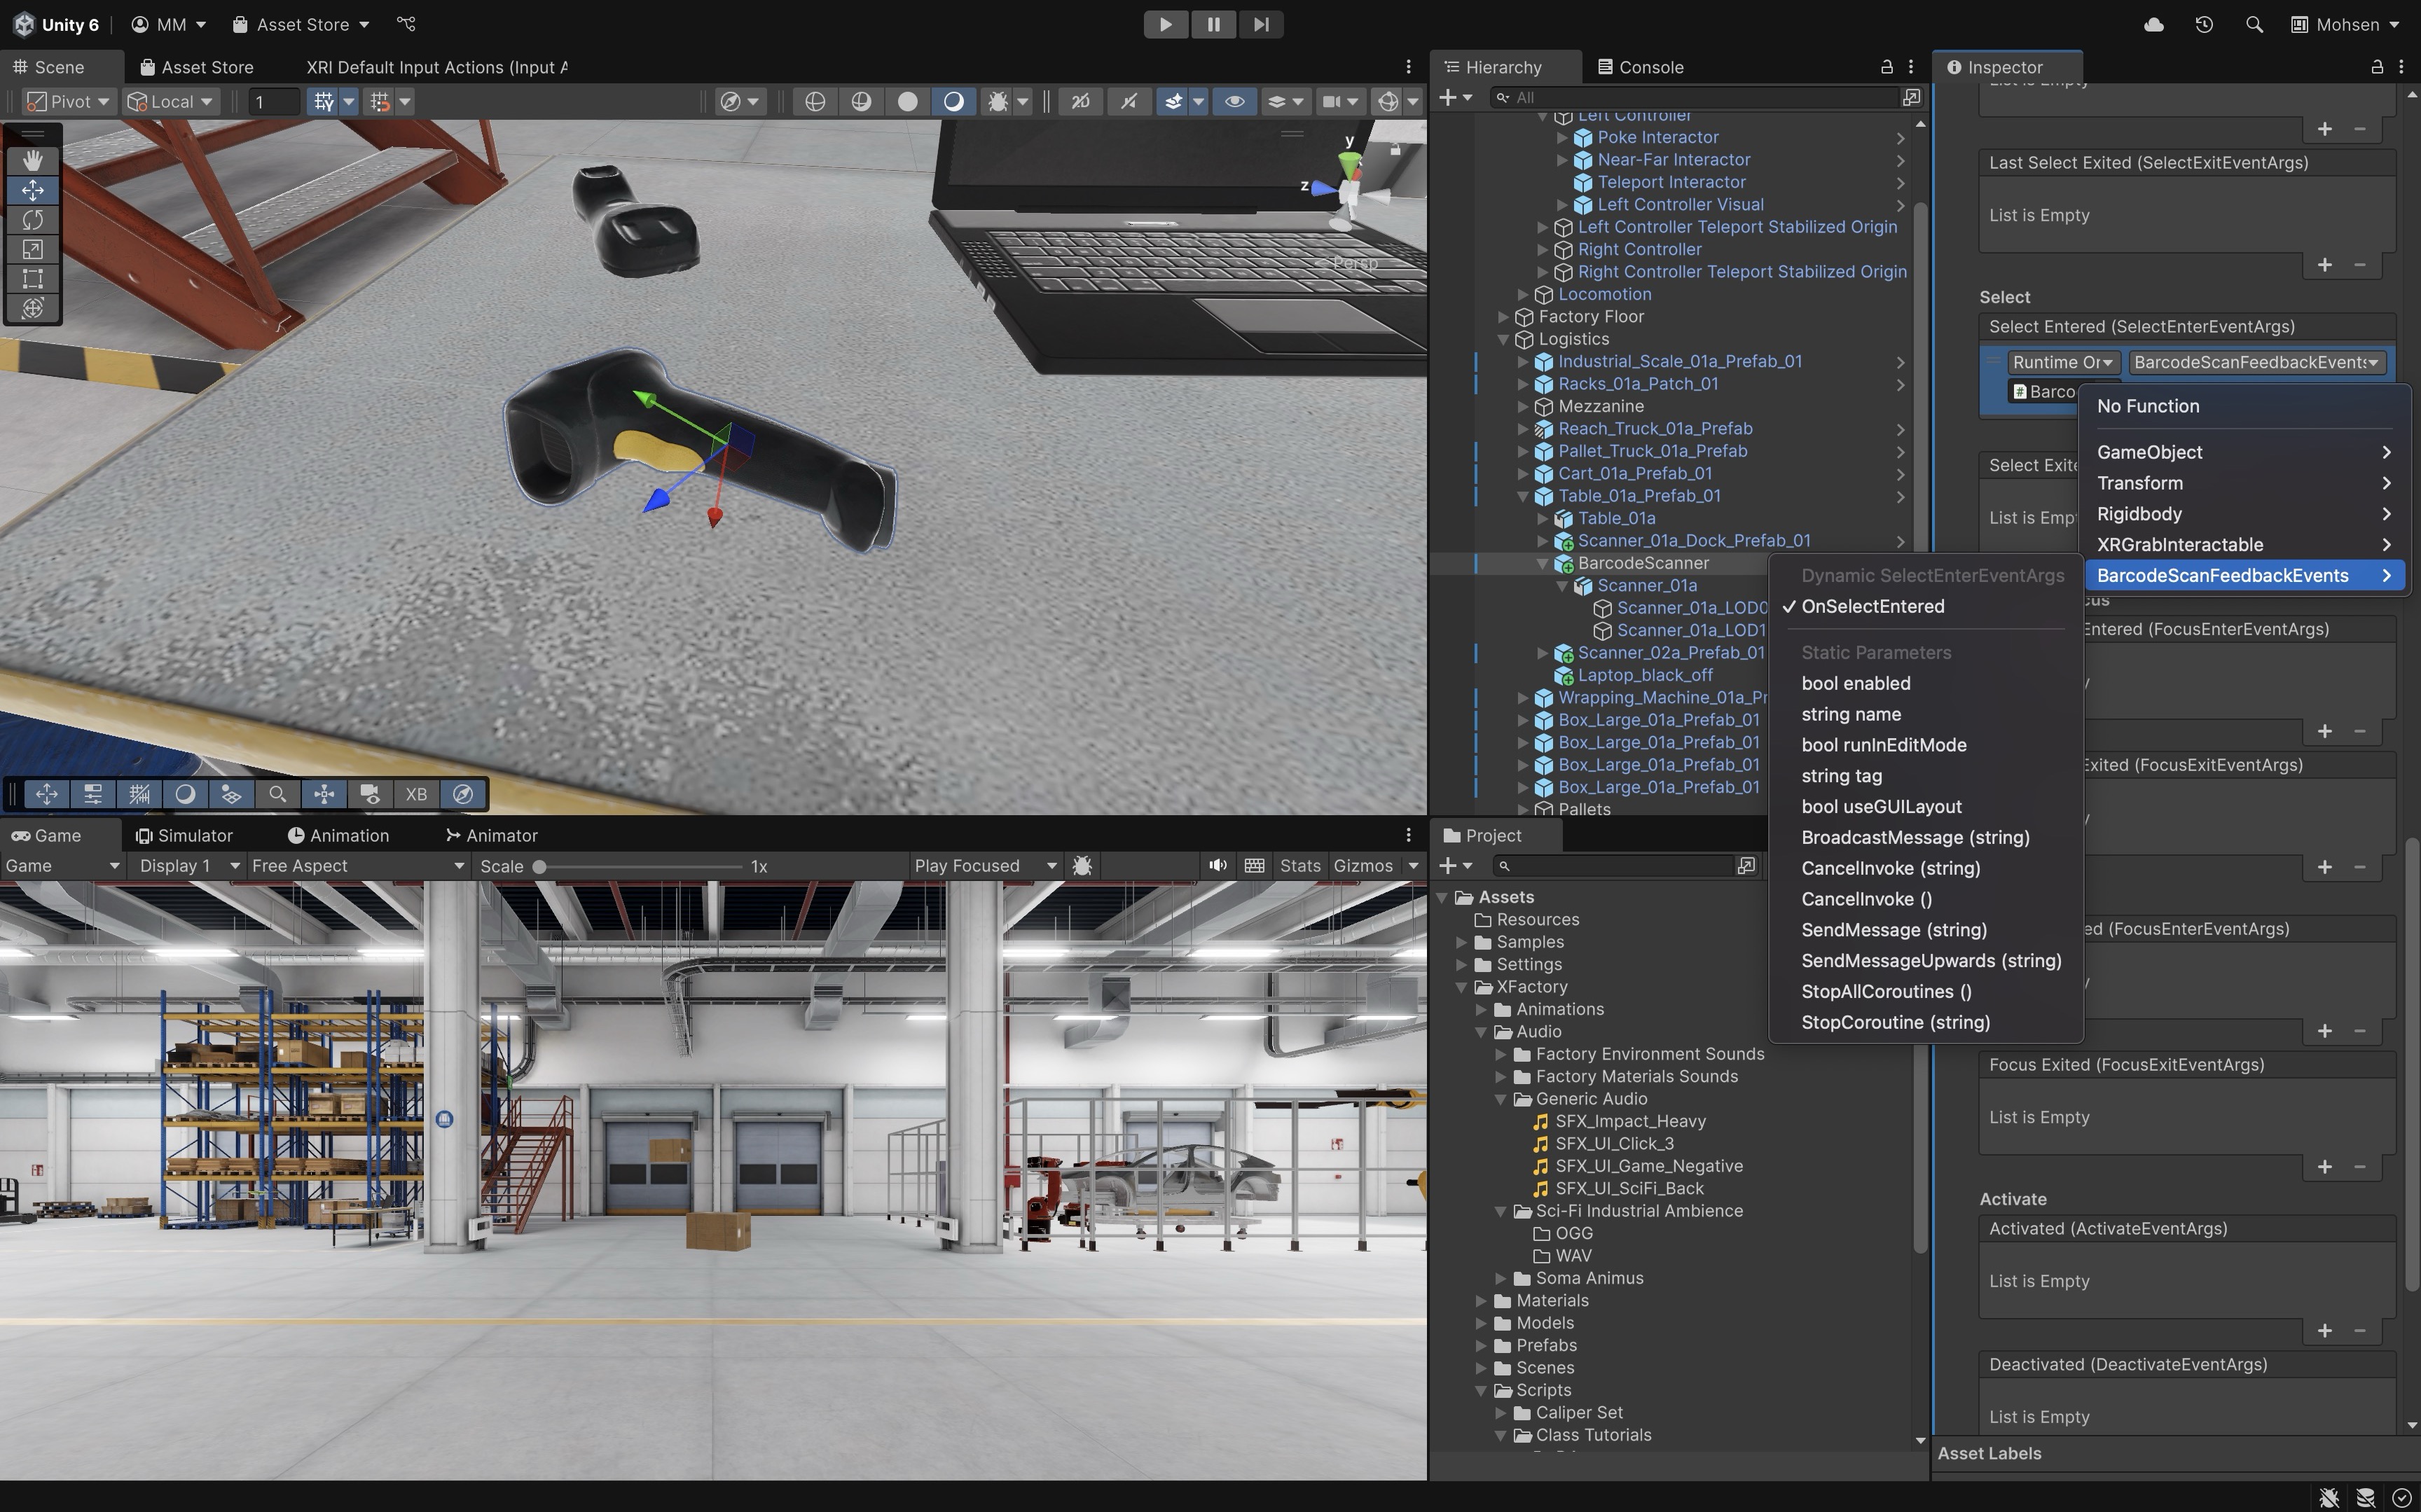
BarcodeScanner, openXR Grab Interactablein theInspector. - Expand
Interactable Event. - Under
Select Entered, click+, dragBarcodeScanner(the object withBarcodeScanFeedbackEvents.cs) into the object field, then chooseBarcodeScanFeedbackEvents → OnSelectEntered(SelectEnterEventArgs).
- On
- Verify Setup Before Testing:
- Scanner has
Rigidbody. - Scanner has at least one valid collider.
- Scanner has
XR Grab Interactable. - Scanner and interactor share a compatible XRI Interaction Layer.
- Input actions are enabled through
Input Action Manager. - The relevant interactor is enabled and in the
XR Interaction Groupif the rig uses one.
- Scanner has
- Deploy & Test:
- Enter Play Mode with the XR Interaction Simulator or Quest Link / Meta Horizon Link (Windows) for rapid preview.
- Build and run to Quest through the Android/Meta Quest pipeline for final standalone validation.
- Grab the scanner → you should hear the beep and feel a short vibration on the grabbing controller if haptics are supported.
- Release (if wired) → optional exit feedback plays.
In many XRI Starter Assets scenes, controllers already use
Near-Far Interactor, so you may not need to add ray or direct interactors manually.
Direct Interaction
The XR Direct Interactor is a touch-based interactor for objects your hand/controller is physically overlapping. It uses a trigger volume (or an optimized sphere-cast mode) to detect nearby interactables and handles direct grabs without any ray/curve. In current XRI Starter Assets workflows, Near-Far Interactor is the primary baseline; use XR Direct Interactor here as an optional near-only comparison or specialized setup.
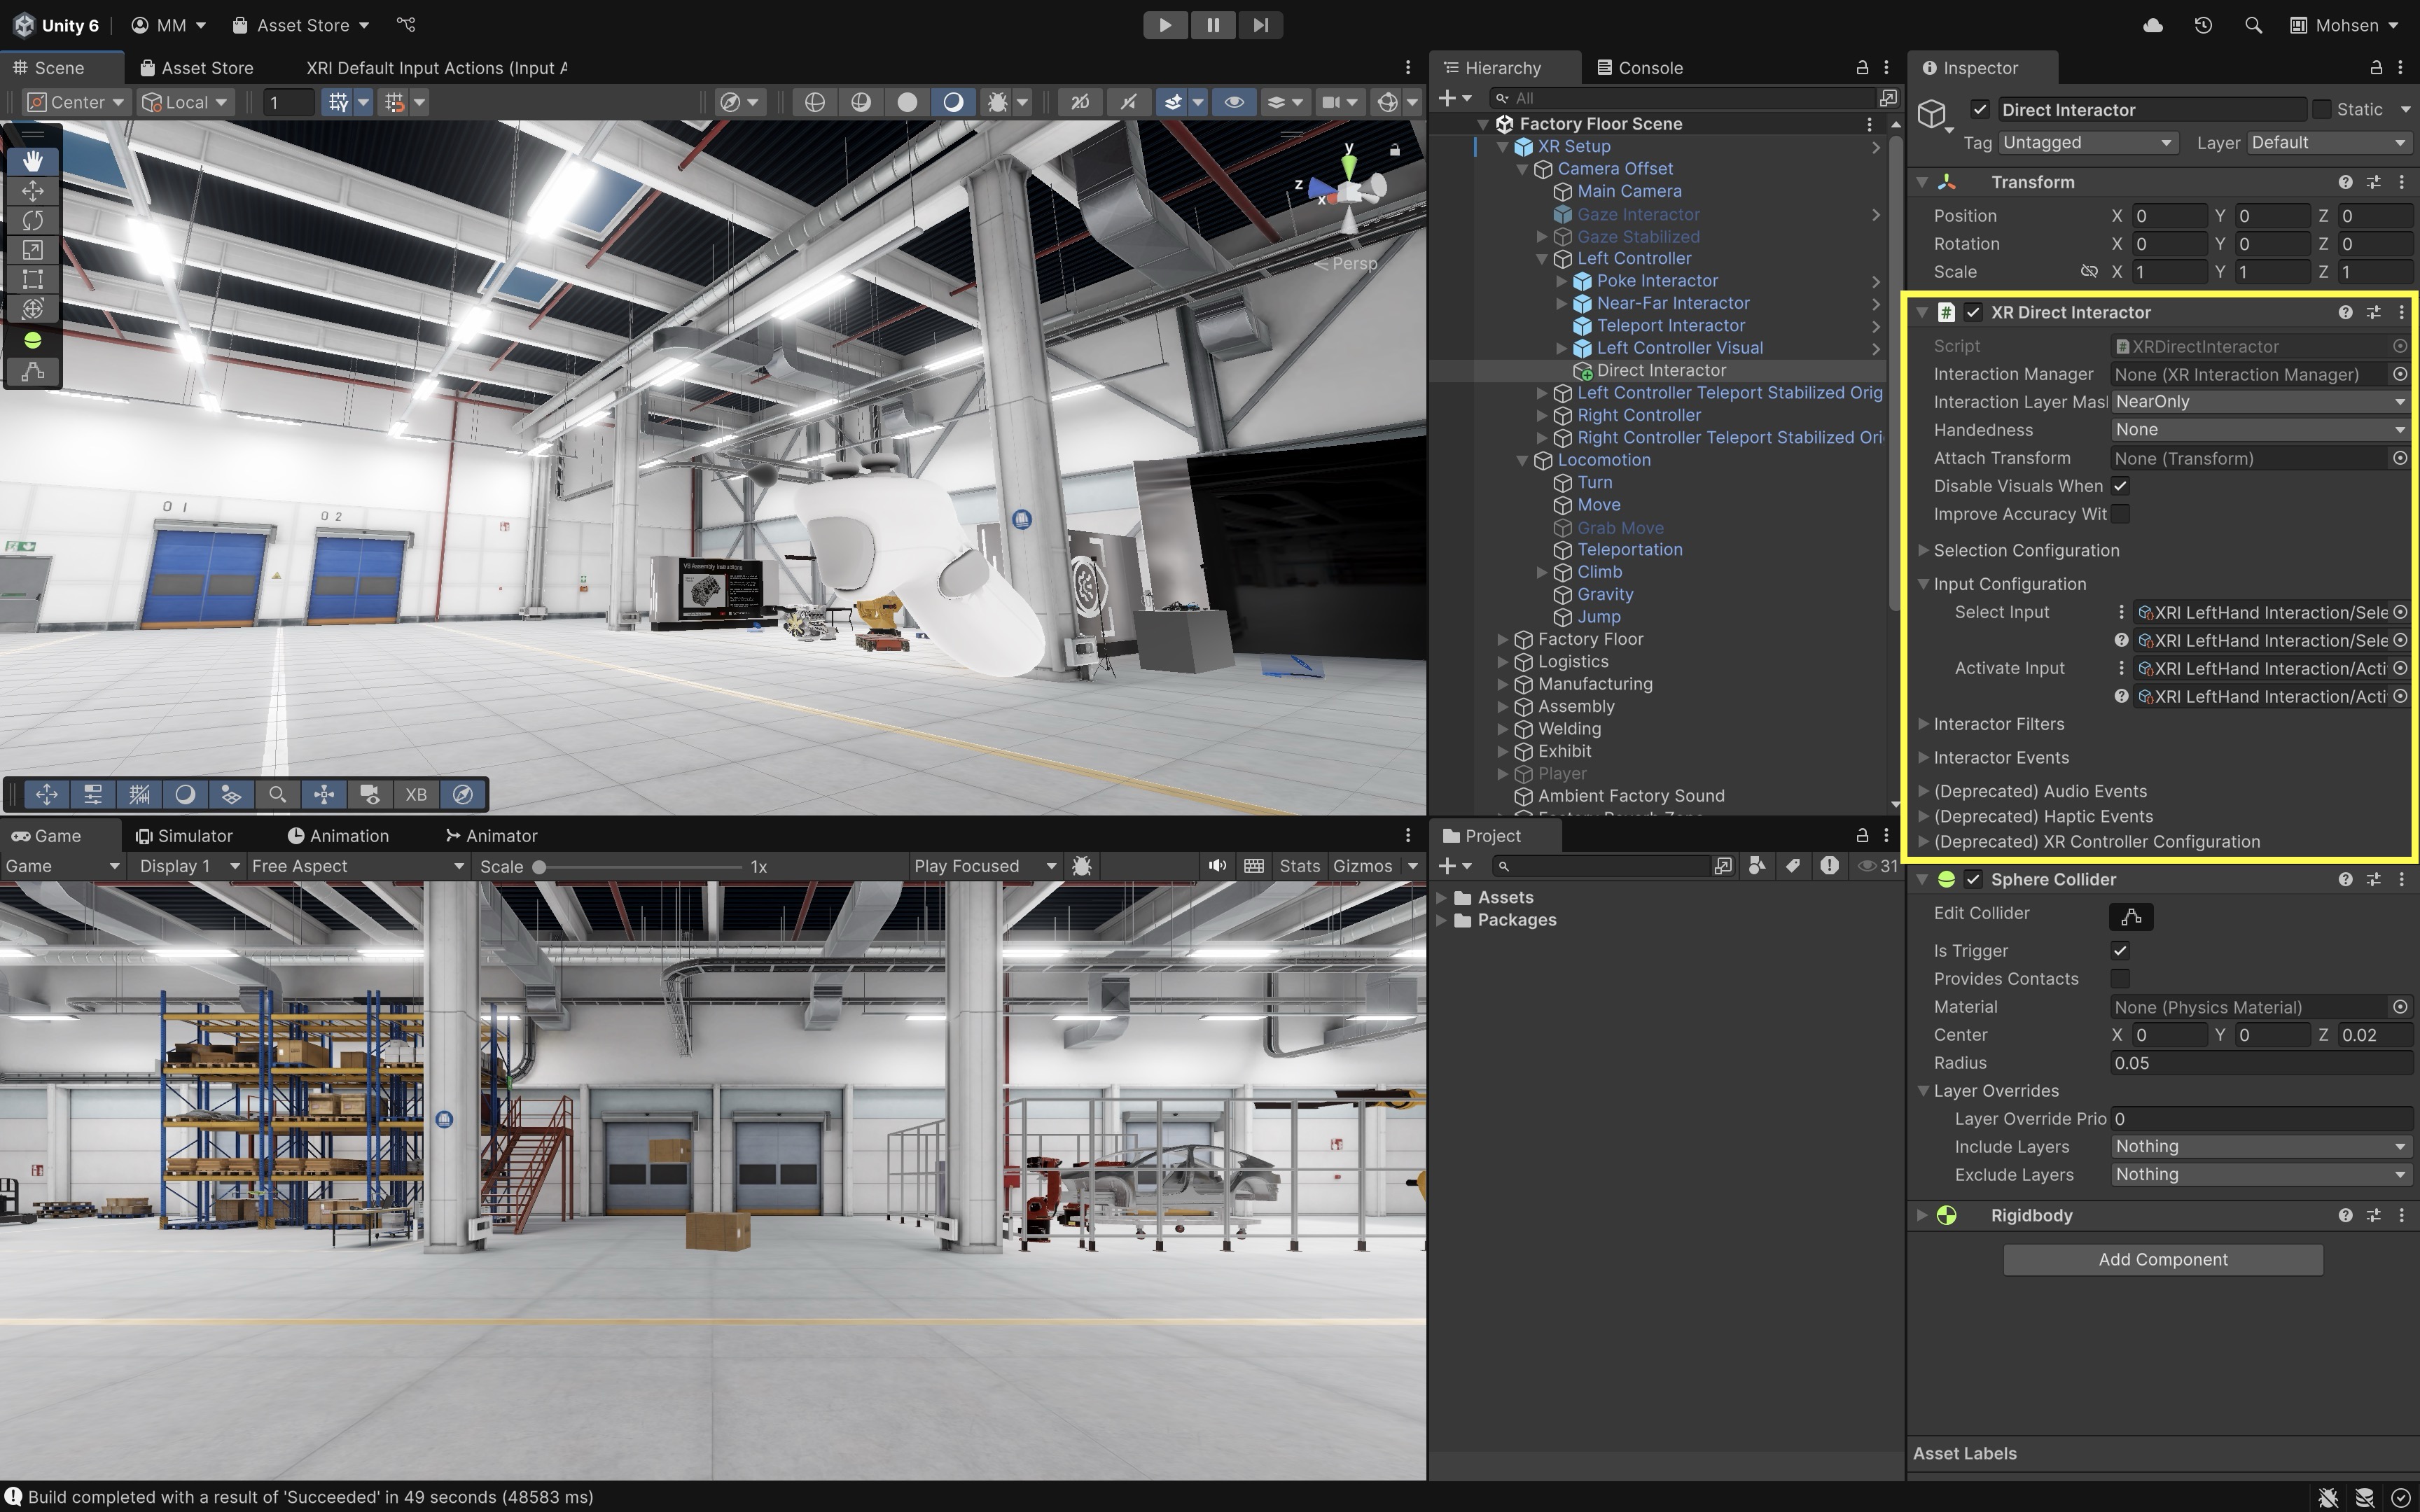
Ensure the interactor has a trigger collider on the hand/controller interactor, not on the grabbable object (or enable Improve Accuracy With Sphere Collider). Configure
Select Action Trigger,Interaction Layer Mask, and optional feedback viaInteractable EventsorSimple Haptic Feedback.
Properties
Interaction Manager: Links to the XR Interaction Manager.Interaction Layer Mask: Which interactables you can touch.Handedness: Left/right association for the interactor.Attach Transform: Anchor used when an object is selected.Improve Accuracy With Sphere Collider: Per-frame sphere-cast overlap (performance/accuracy tradeoff).Physics Layer Mask/Physics Trigger Interaction: Limits and rules for overlap hits.Select Action Trigger: How selection input is interpreted.Keep Selected Target Valid: Stay selected even when no longer overlapping.Hide Controller On Select: Hide the controller model during grabs.Audio Events/Haptic Events/Interactor Events: Built-in hooks for feedback and logic.
*Direct Interactor is near-only (no far/ray interaction). For combined near + far, use Near-Far Interactor.
Key Features
- Touch-Only Selection: Uses a trigger collider on the interactor to detect overlaps (or Improve Accuracy With Sphere Collider to sphere-cast each frame). Ideal for natural, hands-on grabbing and manipulation of nearby items.
- Attach & Hand Context: Per-hand setup via Handedness and an Attach Transform (auto-created if missing) for stable object attachment. Options like Hide Controller On Select and Keep Selected Target Valid (stay selected after contact ends).
- Input Model: Flexible Select Action Trigger modes: State, State Change (recommended), Toggle, Sticky.
- Filtering & Ordering:
Interaction Layer Mask,Physics Layer Mask/Trigger Interactionto limit what you can touch.Target Priority Mode,Parent Interactable(withAuto Find) to tune processing order and performance. - Built-in Feedback Hooks:
Interactor Eventsplus convenientAudio EventsandHaptic Eventsfor hover/select enter/exit/cancel.
Common Approaches
To compare near-only grabbing against the Starter Assets near/far workflow, you can configure one controller for touch-only interaction while leaving the other on Near-Far Interactor. Two common approaches:
- Near-only comparison with Starter Assets: Disable far casting on the
Near-Far Interactorfor one controller, or filter interactables so only nearby objects on a dedicated XRI interaction layer can be selected. - Specialized near-only interactor: Add a separate
XR Direct Interactoronly if you intentionally want a dedicated near-only interactor.
Implementation
The steps below add a separate XR Direct Interactor on the left controller for side-by-side comparison with the barcode scanner.
- Configure the
Left Controllerfor Near Grabbing:- In the
Hierarchy, select theLeft Controllerunder your copiedXR Origin (XR Rig). - Right-click on it and select
Create Empty. Rename itDirect Interactor. - Click
Add Component, search forXR Direct Interactor, and add it. - Click on the
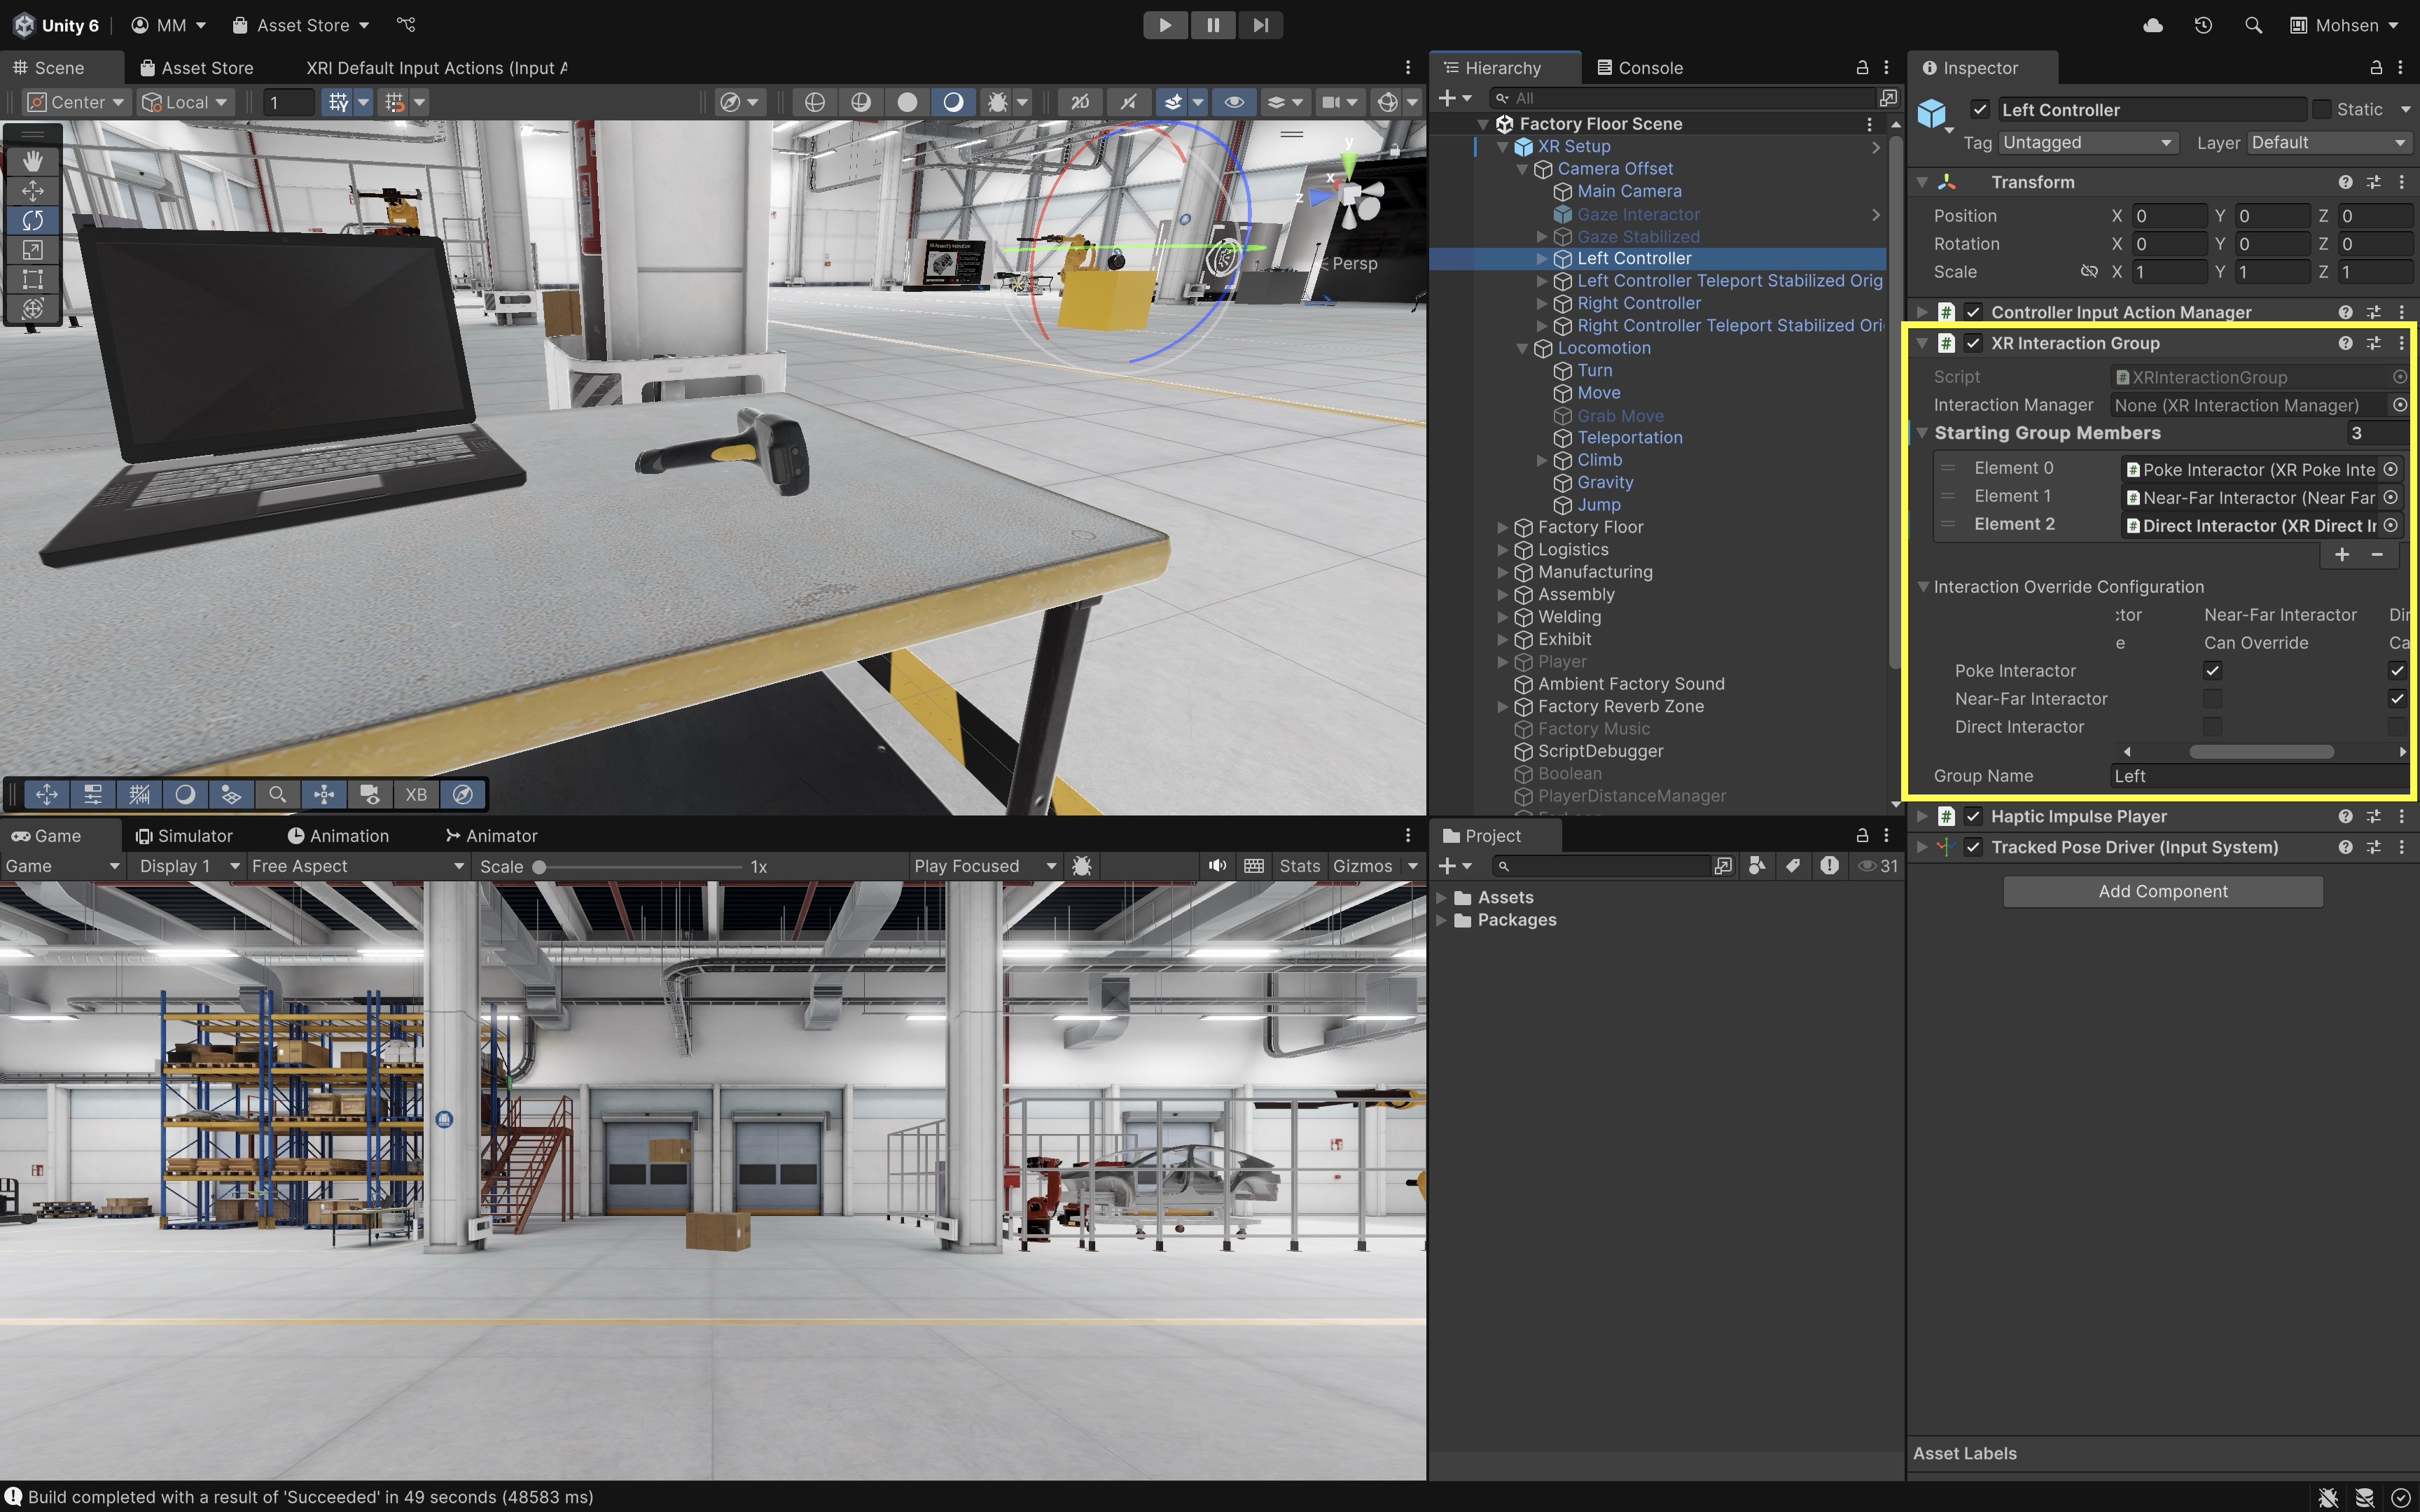
Left ControllerGameObject. - If the copied VR Template rig already has an
XR Interaction Group, add theDirect Interactorto it rather than building a new group from scratch. The group manages priority between interactors on the same controller so direct, ray, and near-far interactors do not fight over the same select input. - If your rig uses an
XR Interaction Group, verify the direct interactor’s priority/order relative to other interactors on the same controller.
- In the
- Assign XRI Interaction Layer:
- Create or choose an XRI Interaction Layer for near-only filtering (for example,
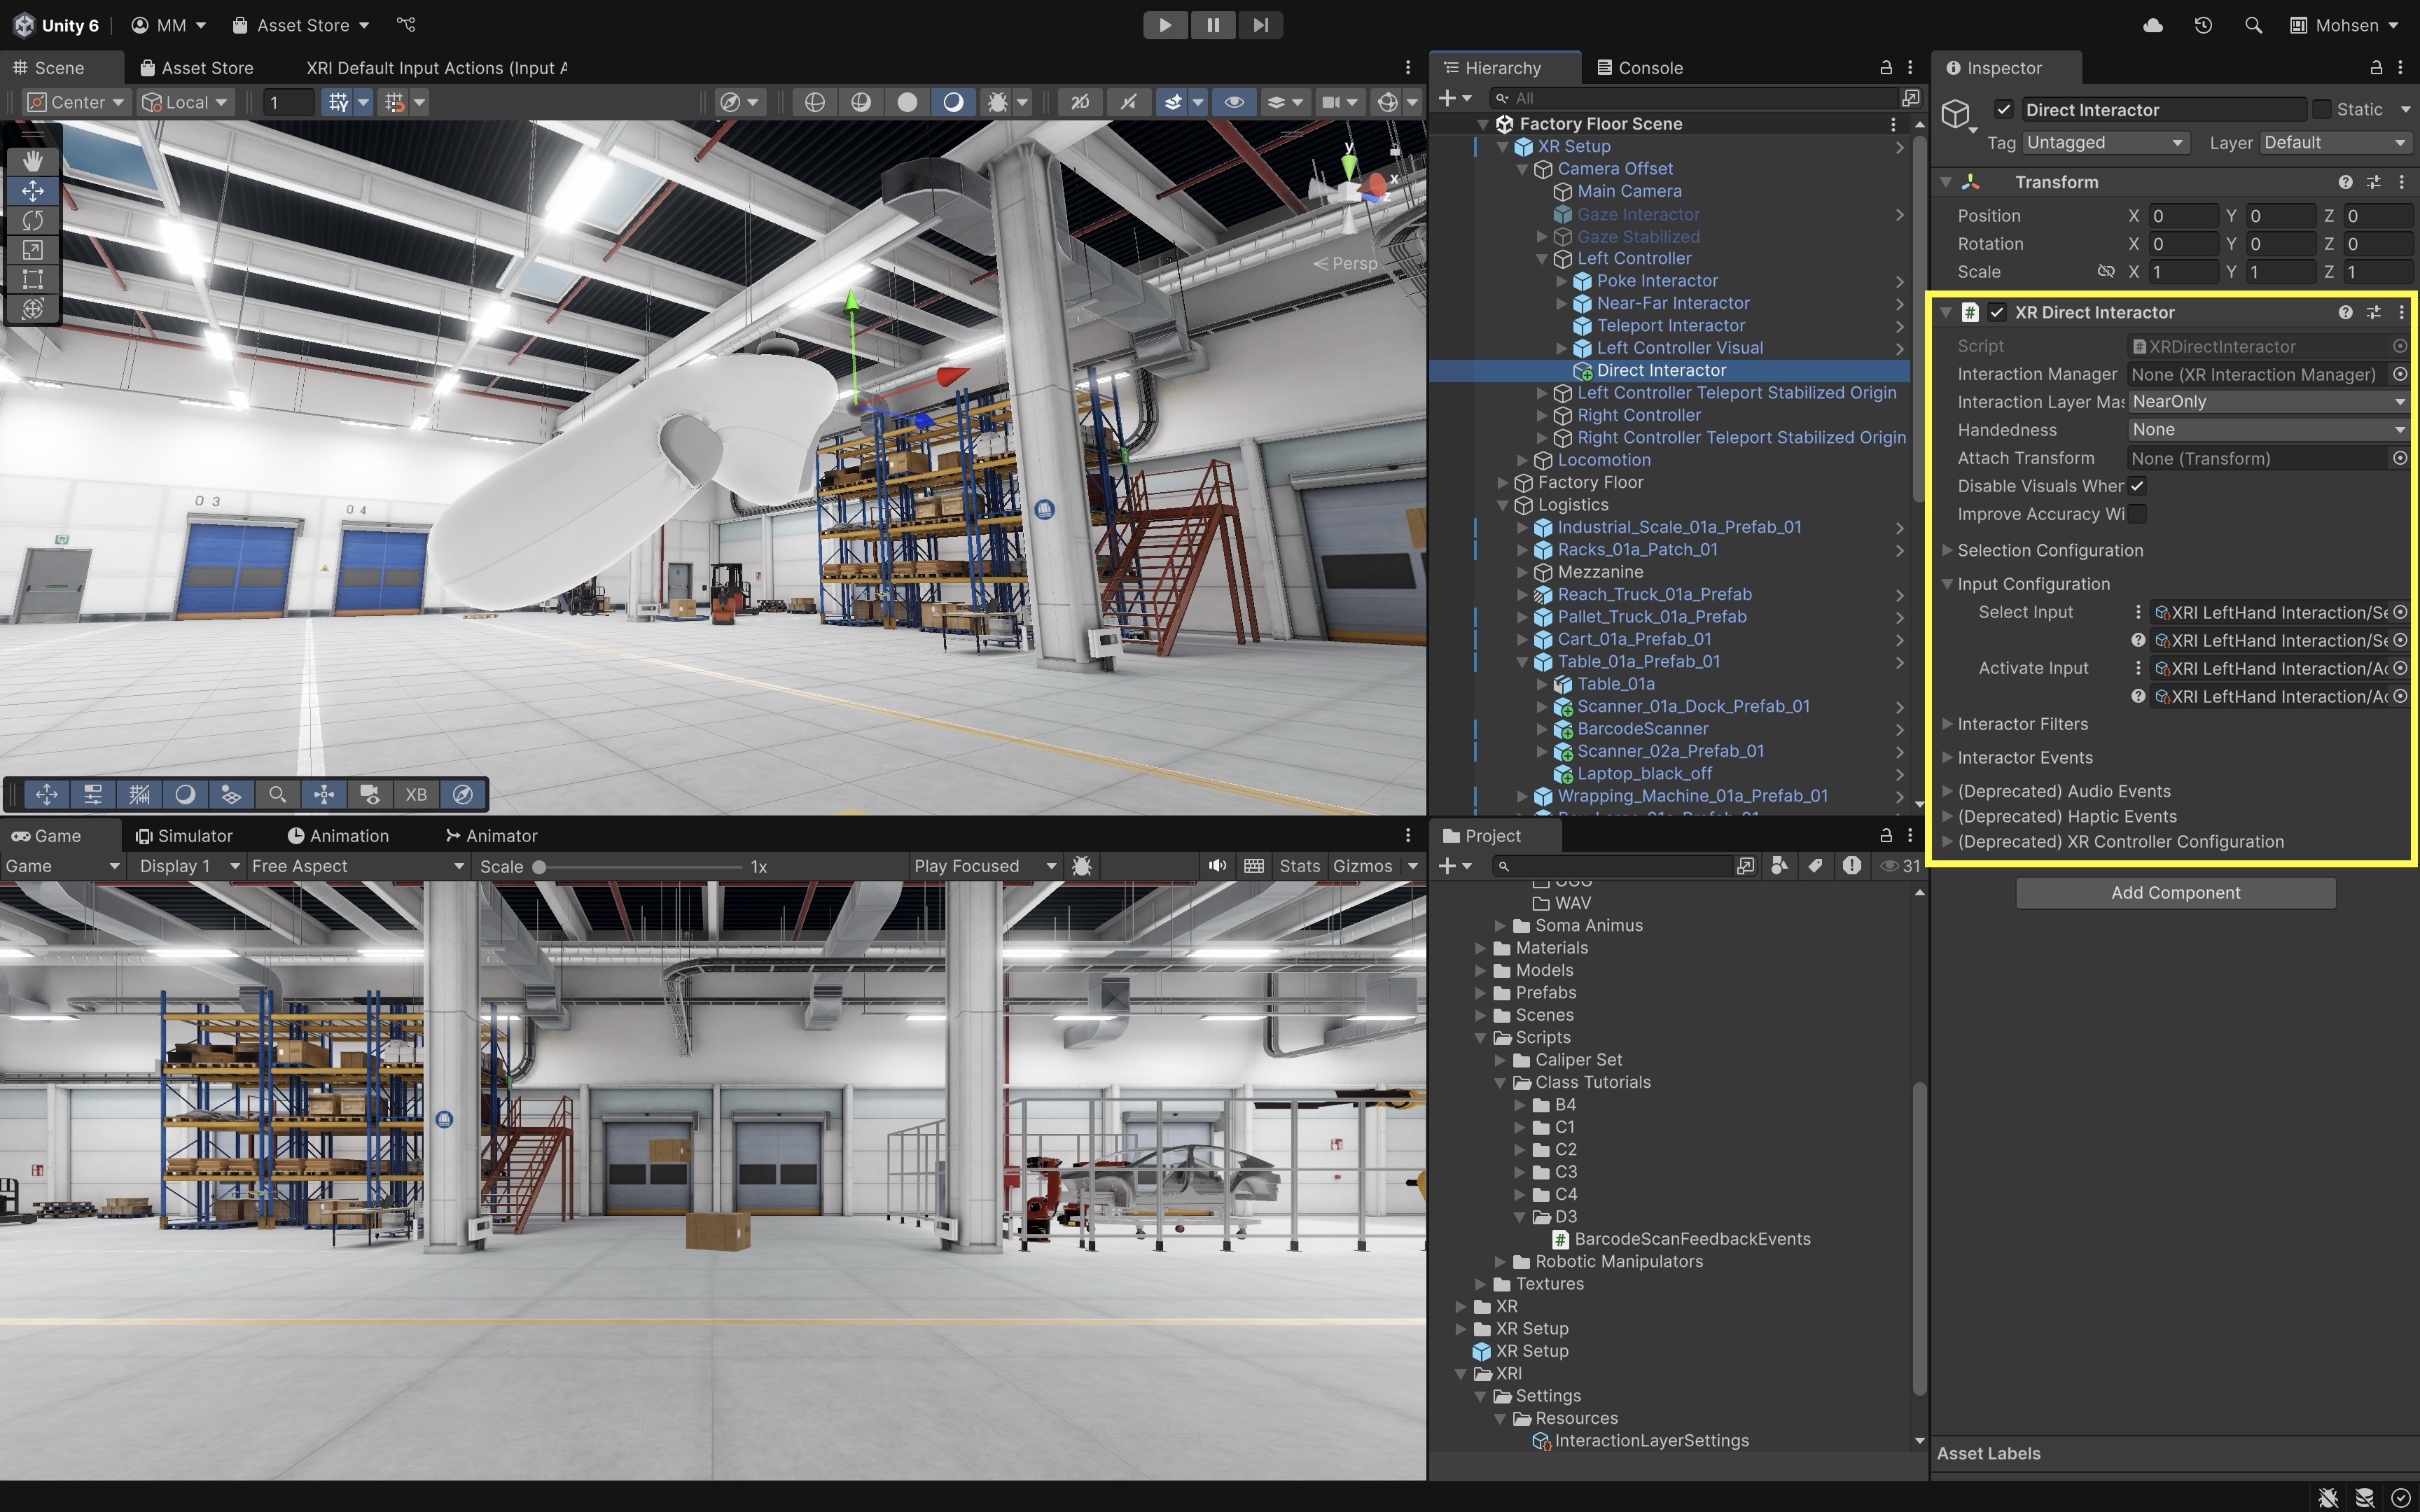
NearOnly). - On the
XR Direct Interactor, setInteraction Layer Maskto that interaction layer. - Choose the matching select/activate actions from
XRI Default Input Actions(for example,XRI LeftHand Interaction/SelectandXRI LeftHand Interaction/Activate).
Common mistake: A GameObject’s Unity Layer and an XRI
Interaction Layer Maskare different systems. A grabbable object must match the interactor’s XRI interaction layer, and its collider must still be detectable by the relevant physics/caster settings.- Interaction Layer Mask controls which interactors can interact with which interactables.
- Physics Layer Mask controls which colliders are considered by physics/casters.
- Unity’s regular Layers/Tags are not the same as XRI Interaction Layers.
- Create or choose an XRI Interaction Layer for near-only filtering (for example,
- Update the Interactable Object (Barcode Scanner):
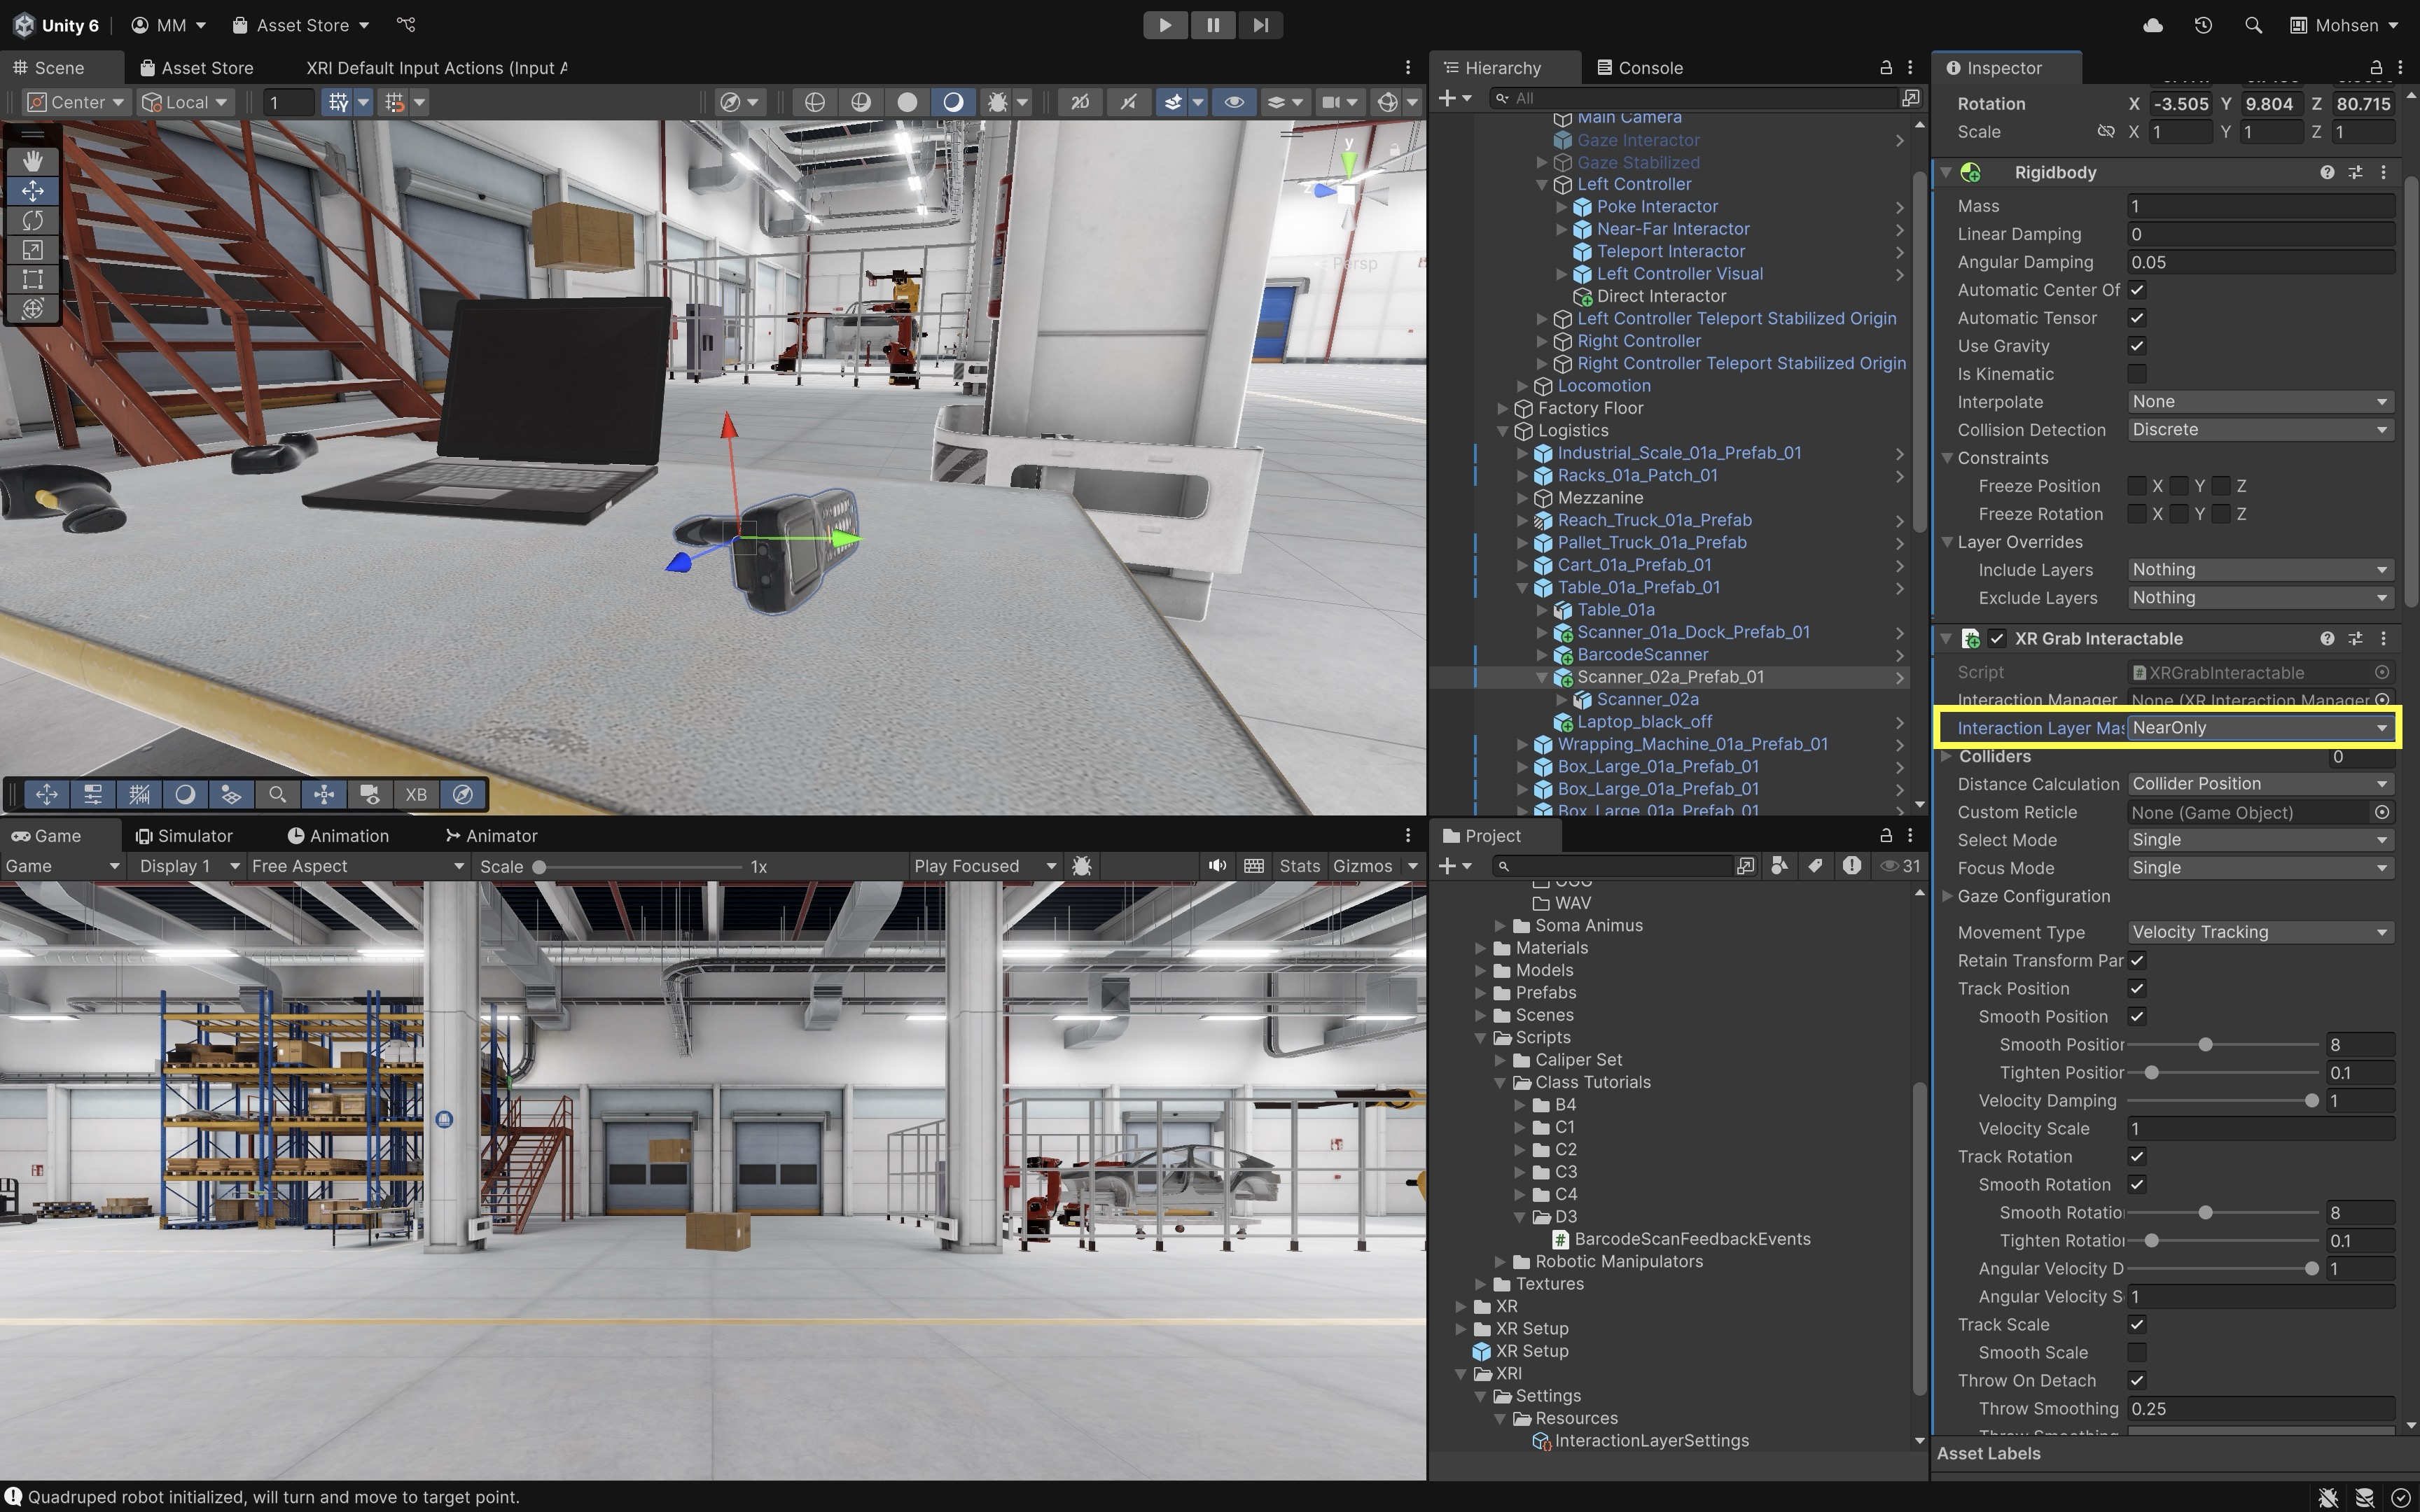
- Select the other barcode scanner on the table (
Scanner_02a_Prefab_01) in theHierarchy. - Ensure the object has a
Rigidbodyand a non-trigger collider (Box or convex Mesh). - Add an
XR Grab Interactablecomponent and setInteraction Layer Maskto the same XRI interaction layer used by the direct interactor.
- Select the other barcode scanner on the table (
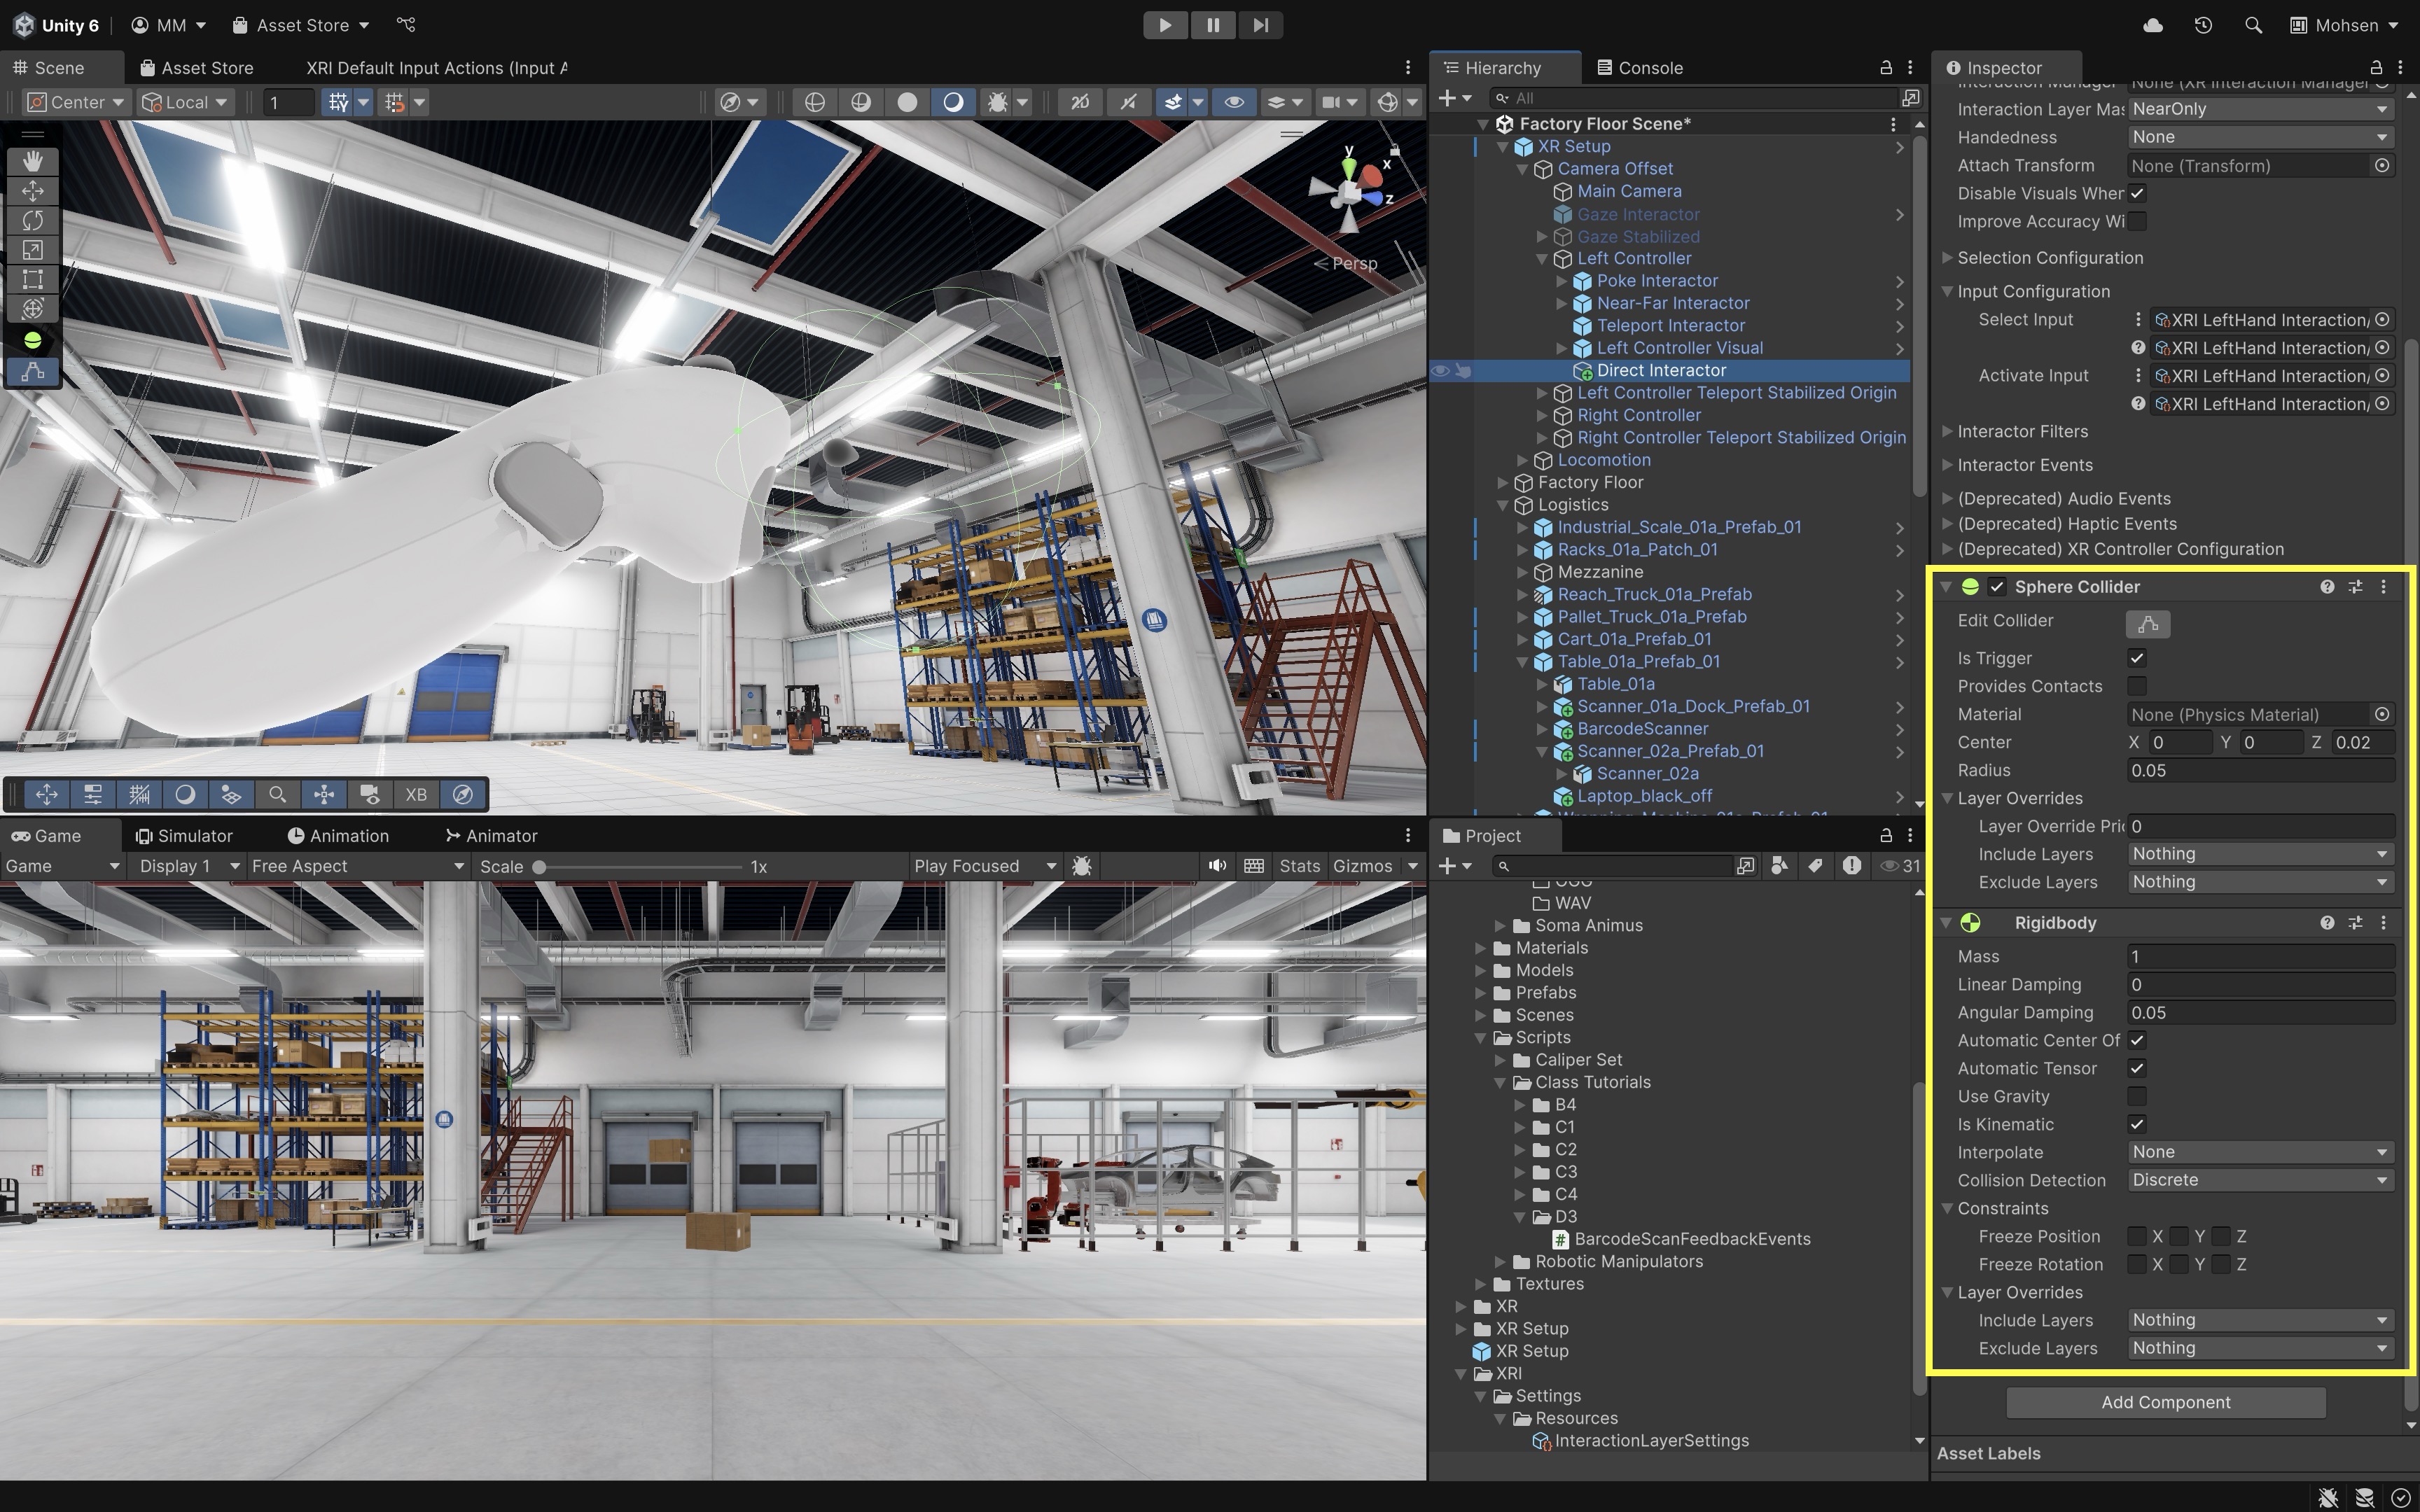
- Add a Trigger Collider (for Direct Interactor overlap mode):
- Select the
Direct InteractorGameObject under theLeft ControllerGameObject. - Add a
Sphere Collider, checkIs Trigger. - Set
Radiusto about0.05–0.1and adjustCenter(e.g.,Z = 0.02) so it sits just in front of the hand.
- Select the
- Add a Kinematic
Rigidbodyto the Direct Interactor (for trigger events):- With
Direct InteractorGameObject still selected, add aRigidbody. - Uncheck
Use Gravityand checkIs Kinematic. - This kinematic Rigidbody is for reliable trigger overlap detection on the interactor. It should not apply gravity or forces to the hand.
- With
- Test the Interaction in Play Mode or on Device:
- Enter Play Mode with the XR Interaction Simulator or Quest Link / Meta Horizon Link (Windows) for rapid preview.
- Build and run to Quest through the Android/Meta Quest pipeline for final standalone validation.
- Try grabbing the barcode scanner.
- Your left hand (near-only) should grab when close.
- Your right hand (near-far-interaction-based) should not grab the scanner if interaction layers are filtered correctly.
- This setup provides a clear side-by-side comparison of near-only grabbing vs. near/far grabbing in XFactory.
If the correct object is highlighted but cannot be selected, check the interaction group, select input, layer masks, and whether another interactor is already selecting the target.
Custom Grab Behavior
Fine-tuning interactions in XR goes beyond just making objects grabbable. You can control how they align with the user’s hands, how controller models behave during interaction, and how the system responds to subtle inputs. These customizations help create a polished and realistic experience—especially in environments like XFactory, where precision matters when handling tools, devices, and user interfaces.
In current XRI,
XR Grab Interactableuses grab transformers such asXR General Grab Transformerto calculate object position, rotation, and scale during grabs. Use default transformers for normal objects; add or customize transformers only when you need constraints such as fixed-axis motion, two-handed rotation, or scaling.
Attach Transform
To improve the realism and ergonomics of object interaction in VR, you can define a custom attach point so that grabbed items align properly with the user’s hand. Let’s set this up for the barcode scanner in the logistics station.
- Create a Custom Attach Point:
- Right-click on the
BarcodeScannerGameObject and selectCreate Empty. - Rename the new child GameObject to
GripHandle. - Position
GripHandleon the grip area of the scanner (where a user would naturally hold it). - Orient the attach transform so the scanner sits naturally in the virtual hand. Use the local axes, controller model, and Play Mode testing to verify grip direction and rotation.
- For engineering tools, attach transforms should support ergonomic handling and task accuracy, not just visual alignment.
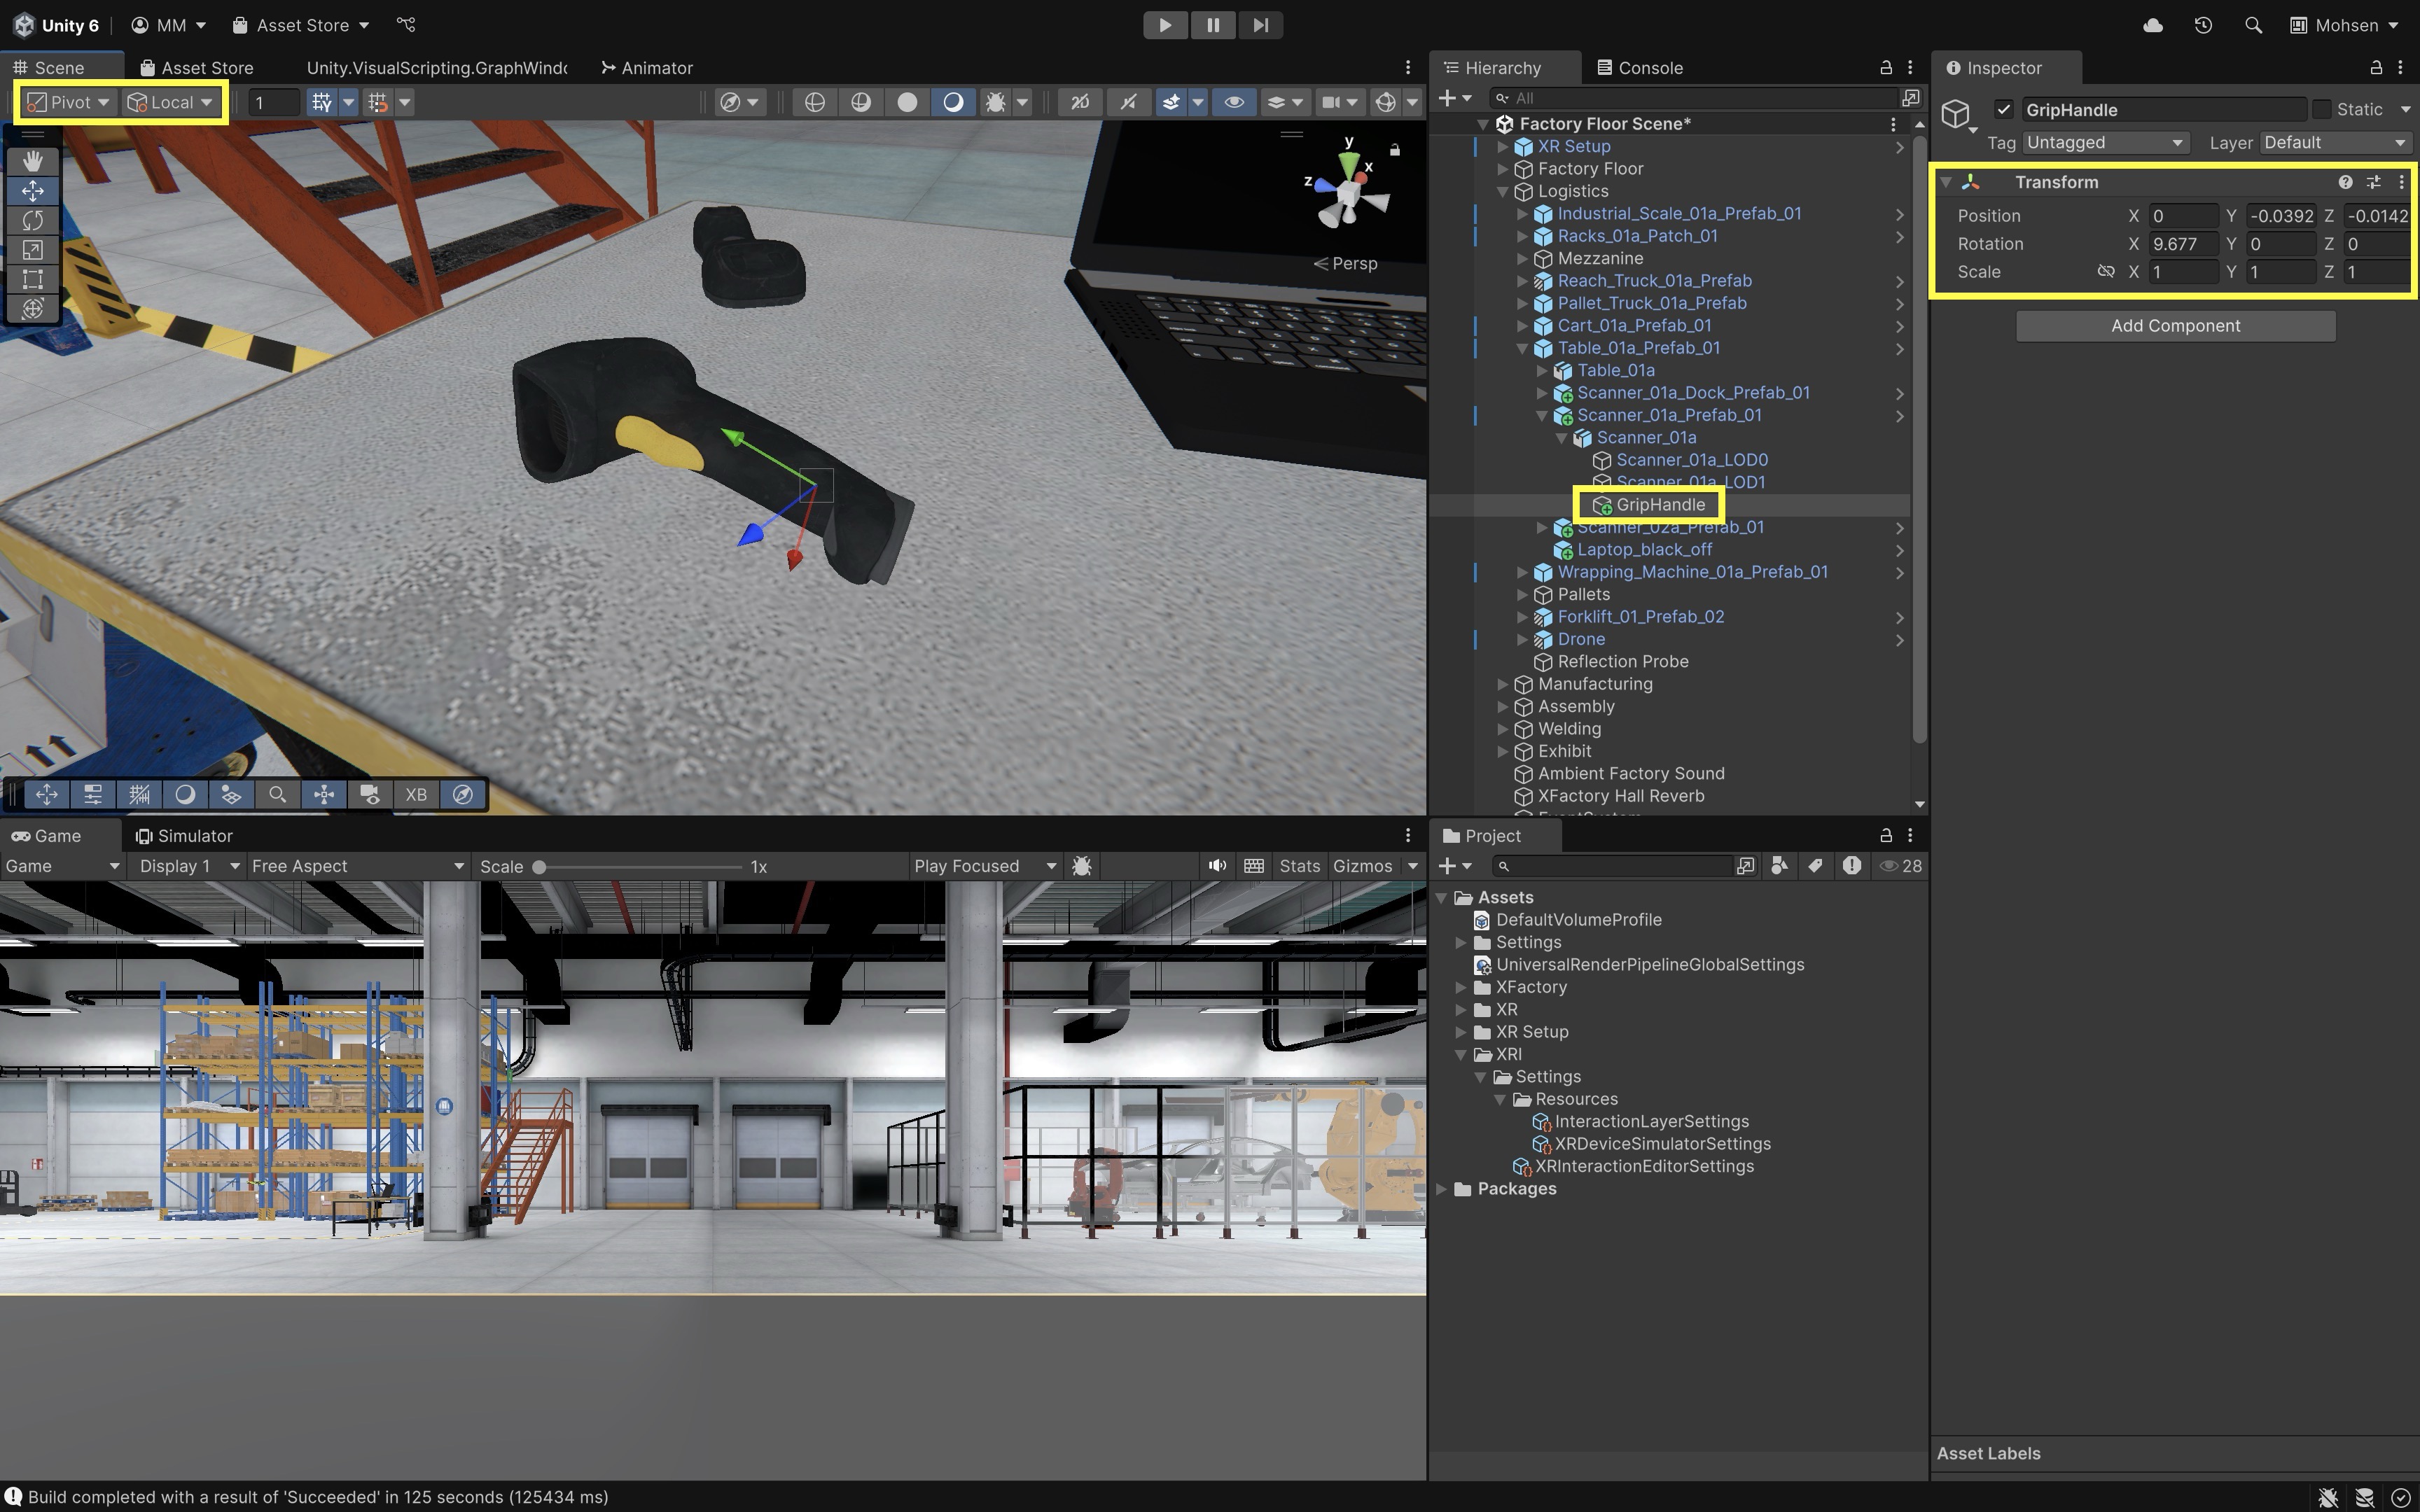
You can enable
PivotandLocalmode in Unity’sSceneview to see the local axes while adjusting the transform. Try temporarily attaching a cube toGripHandleto visualize orientation. - Right-click on the
- Assign the Attach Transform:
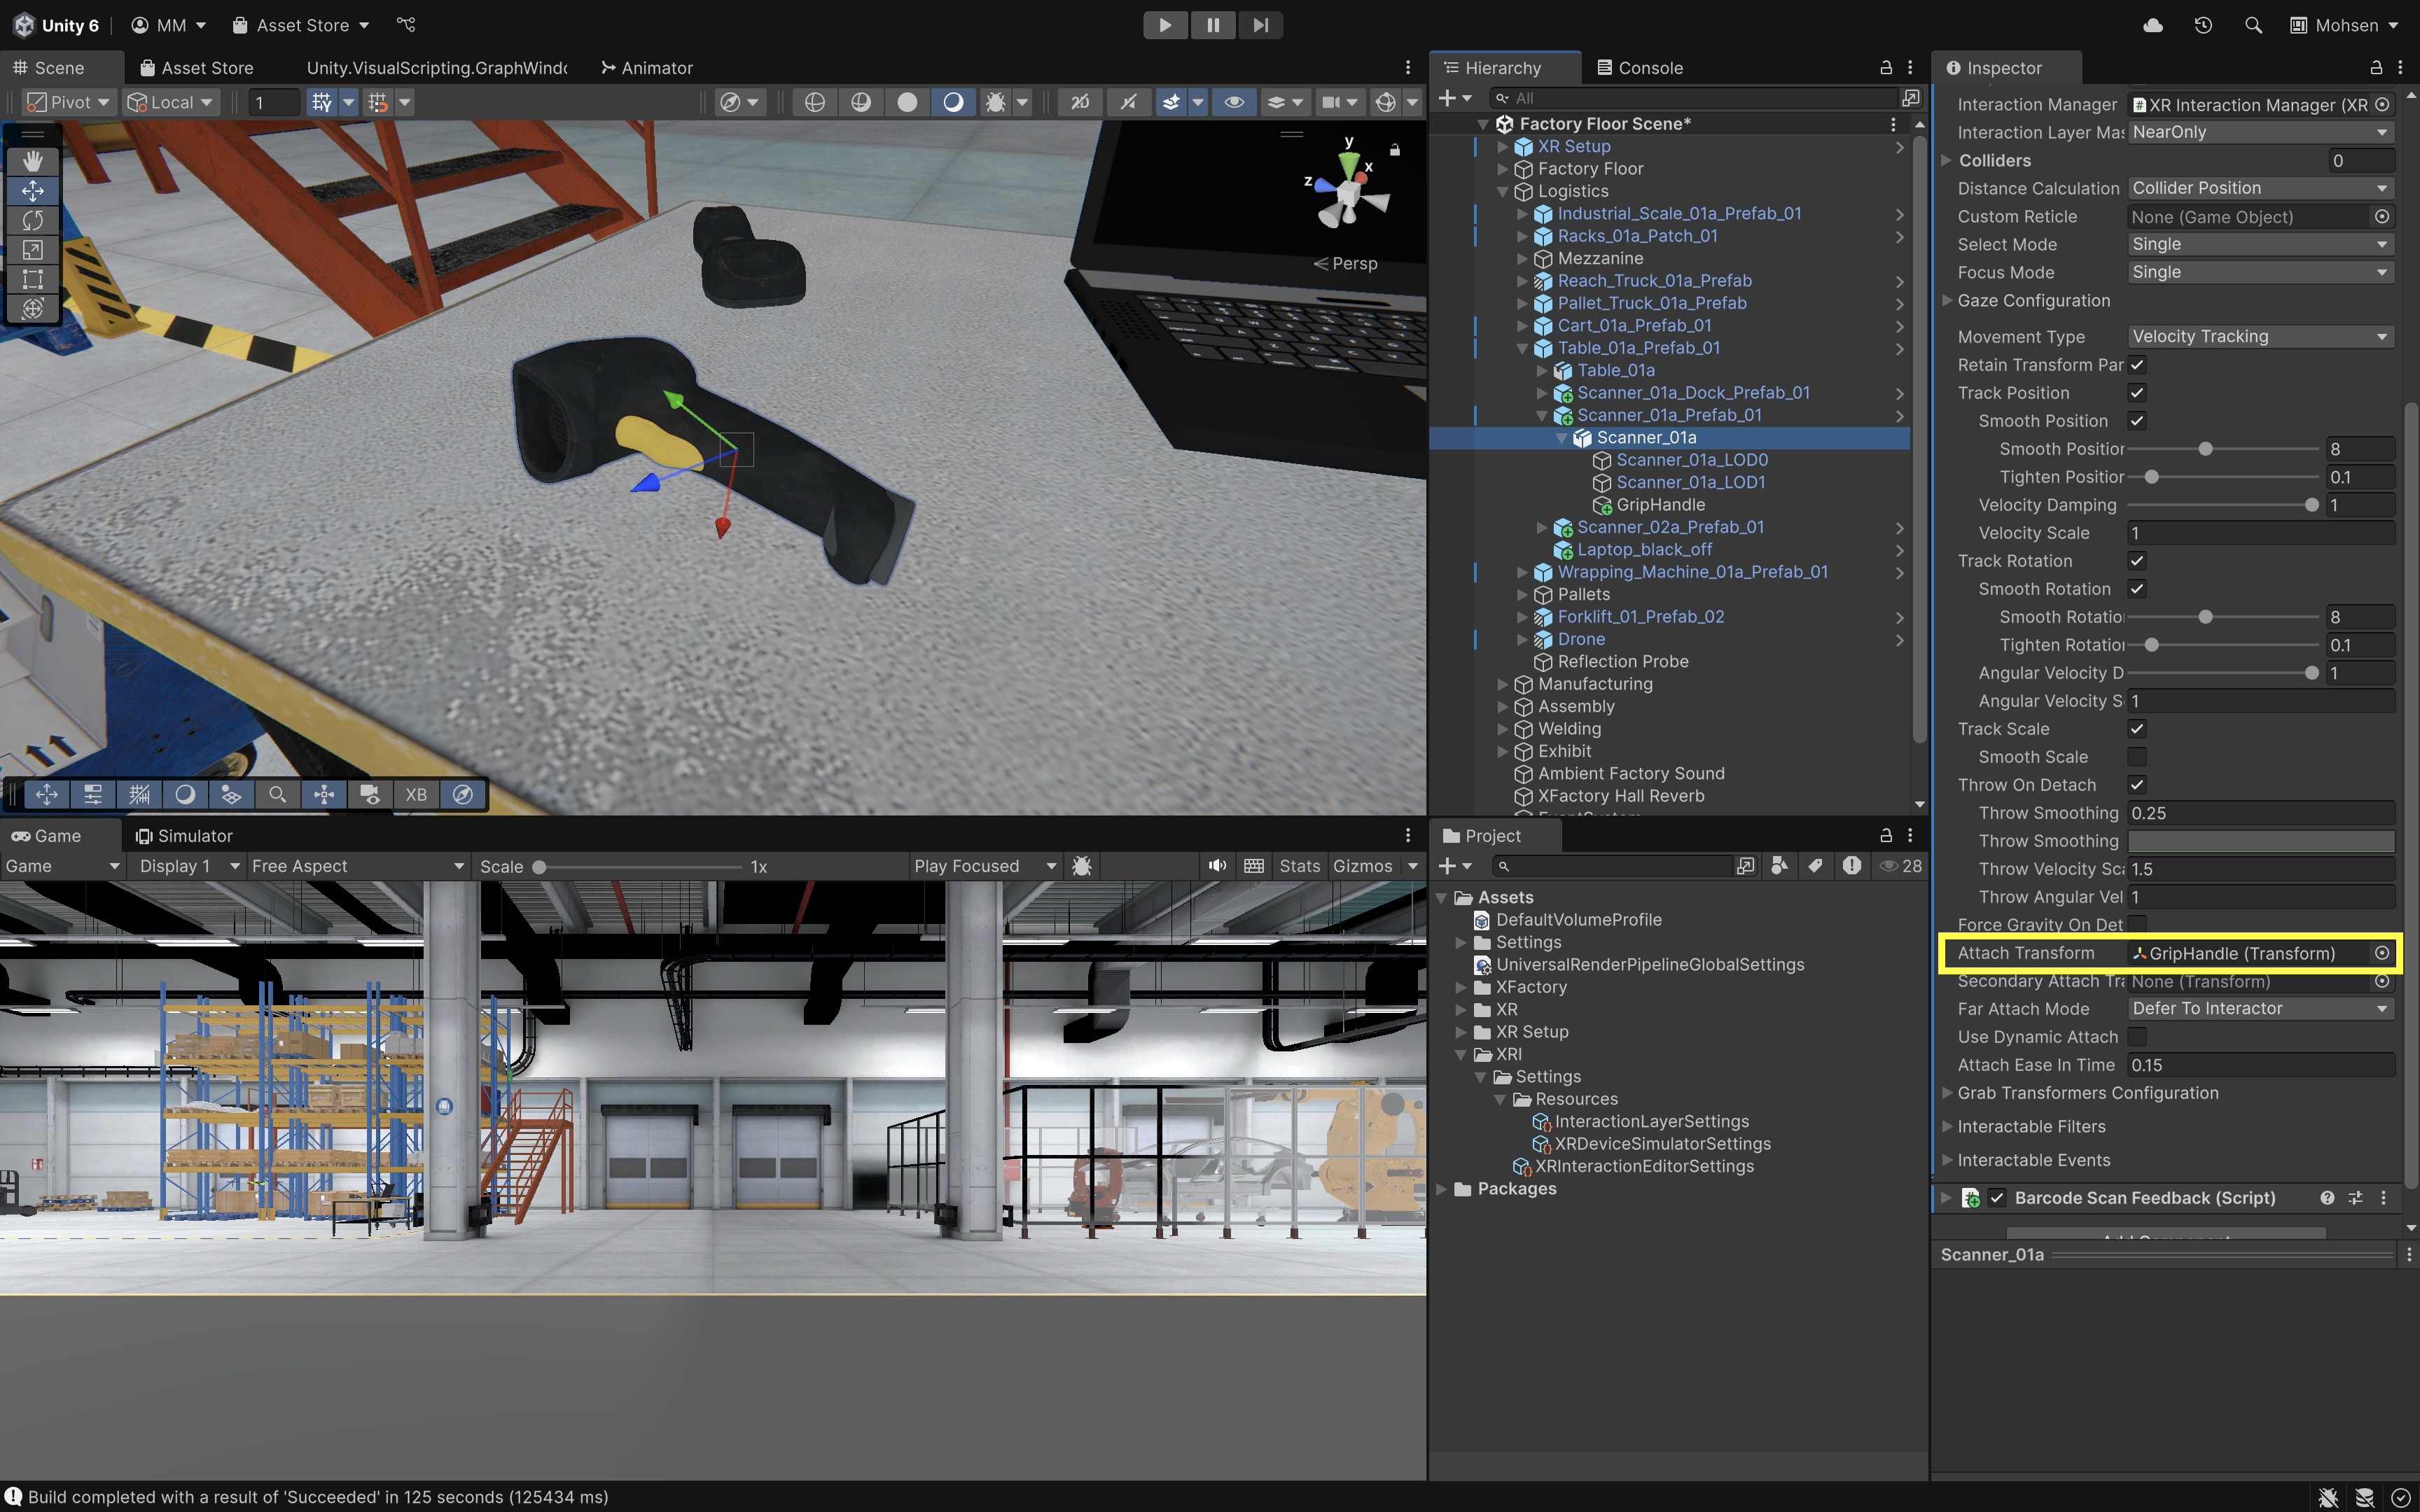
- Select the
BarcodeScannerGameObject. - In the
XR Grab Interactablecomponent, drag theGripHandleobject into theAttach Transformfield.
- Select the
- Deploy and Test the Behavior:
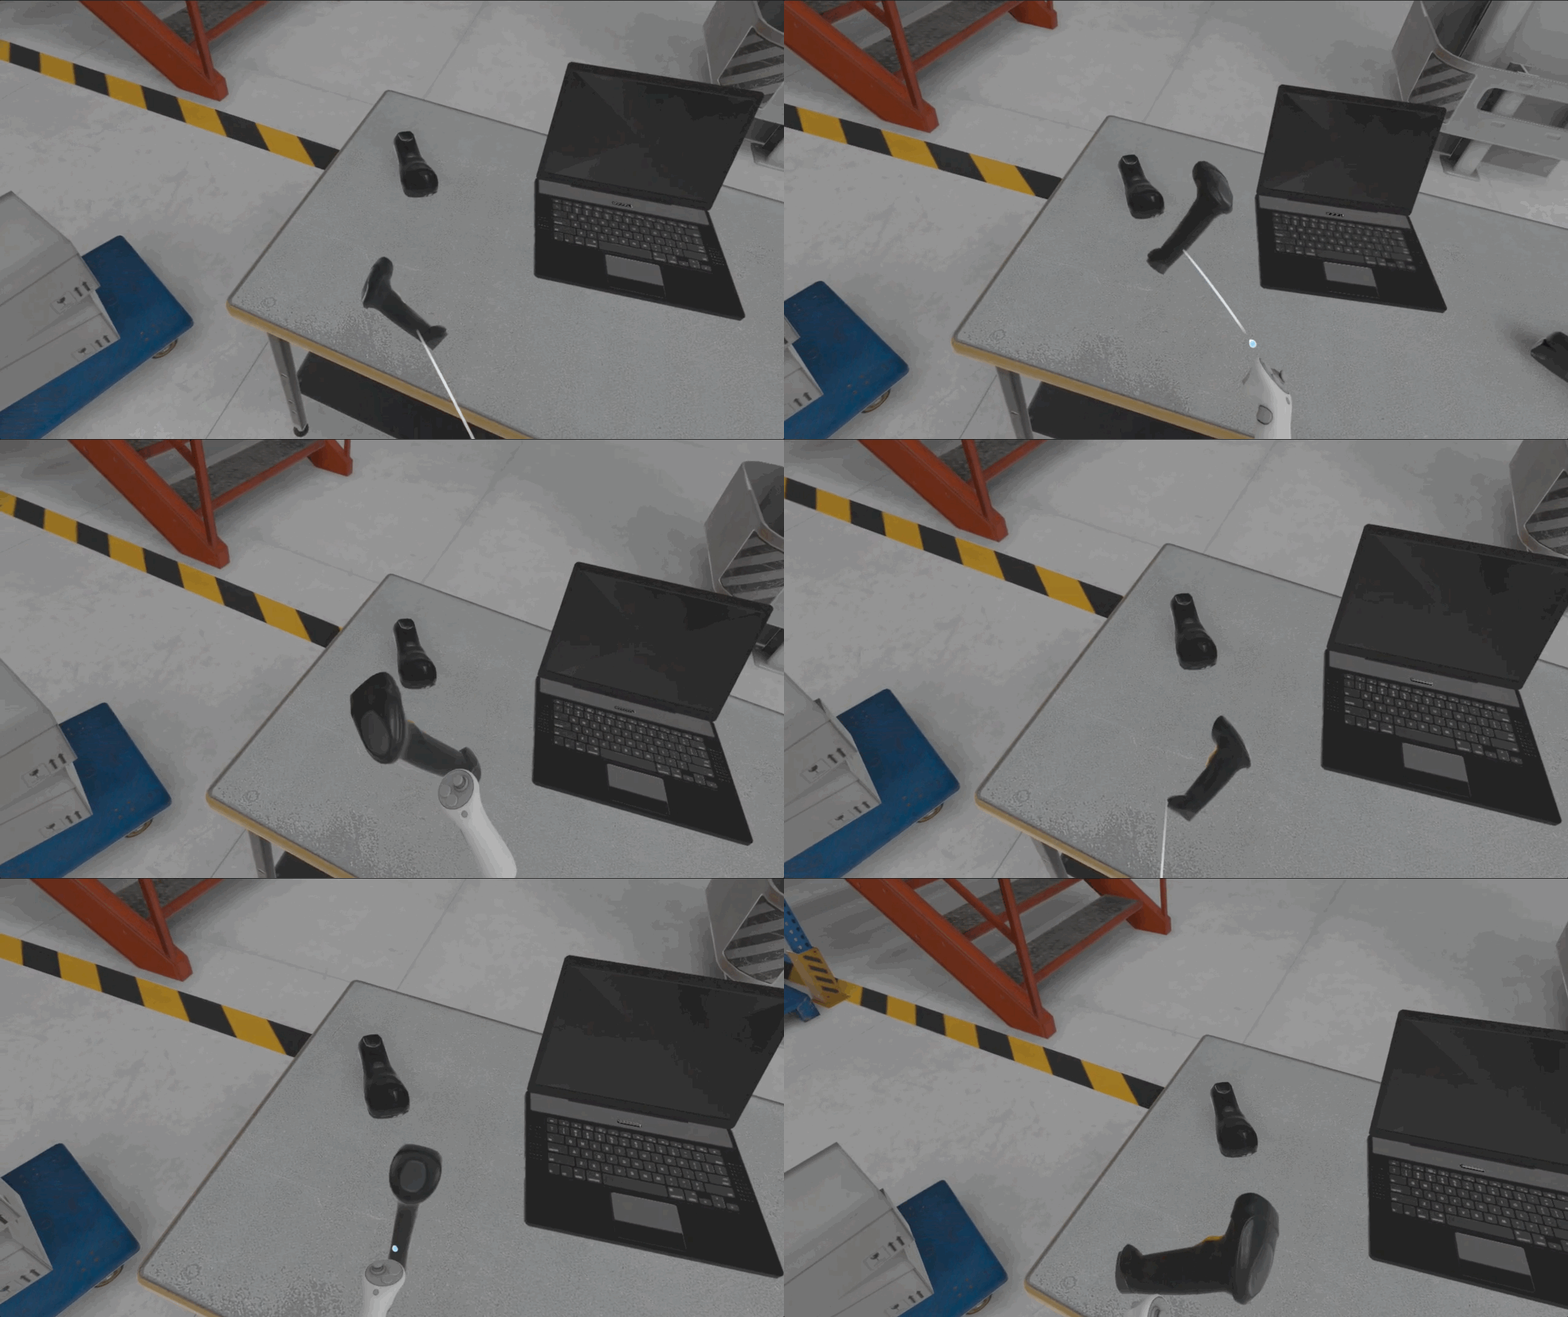
- Test in Play Mode with Quest Link / Meta Horizon Link or on device.
- This makes the scanner sit properly in the user’s virtual hand, improving both comfort and realism when picked up.
Preserving Orientation
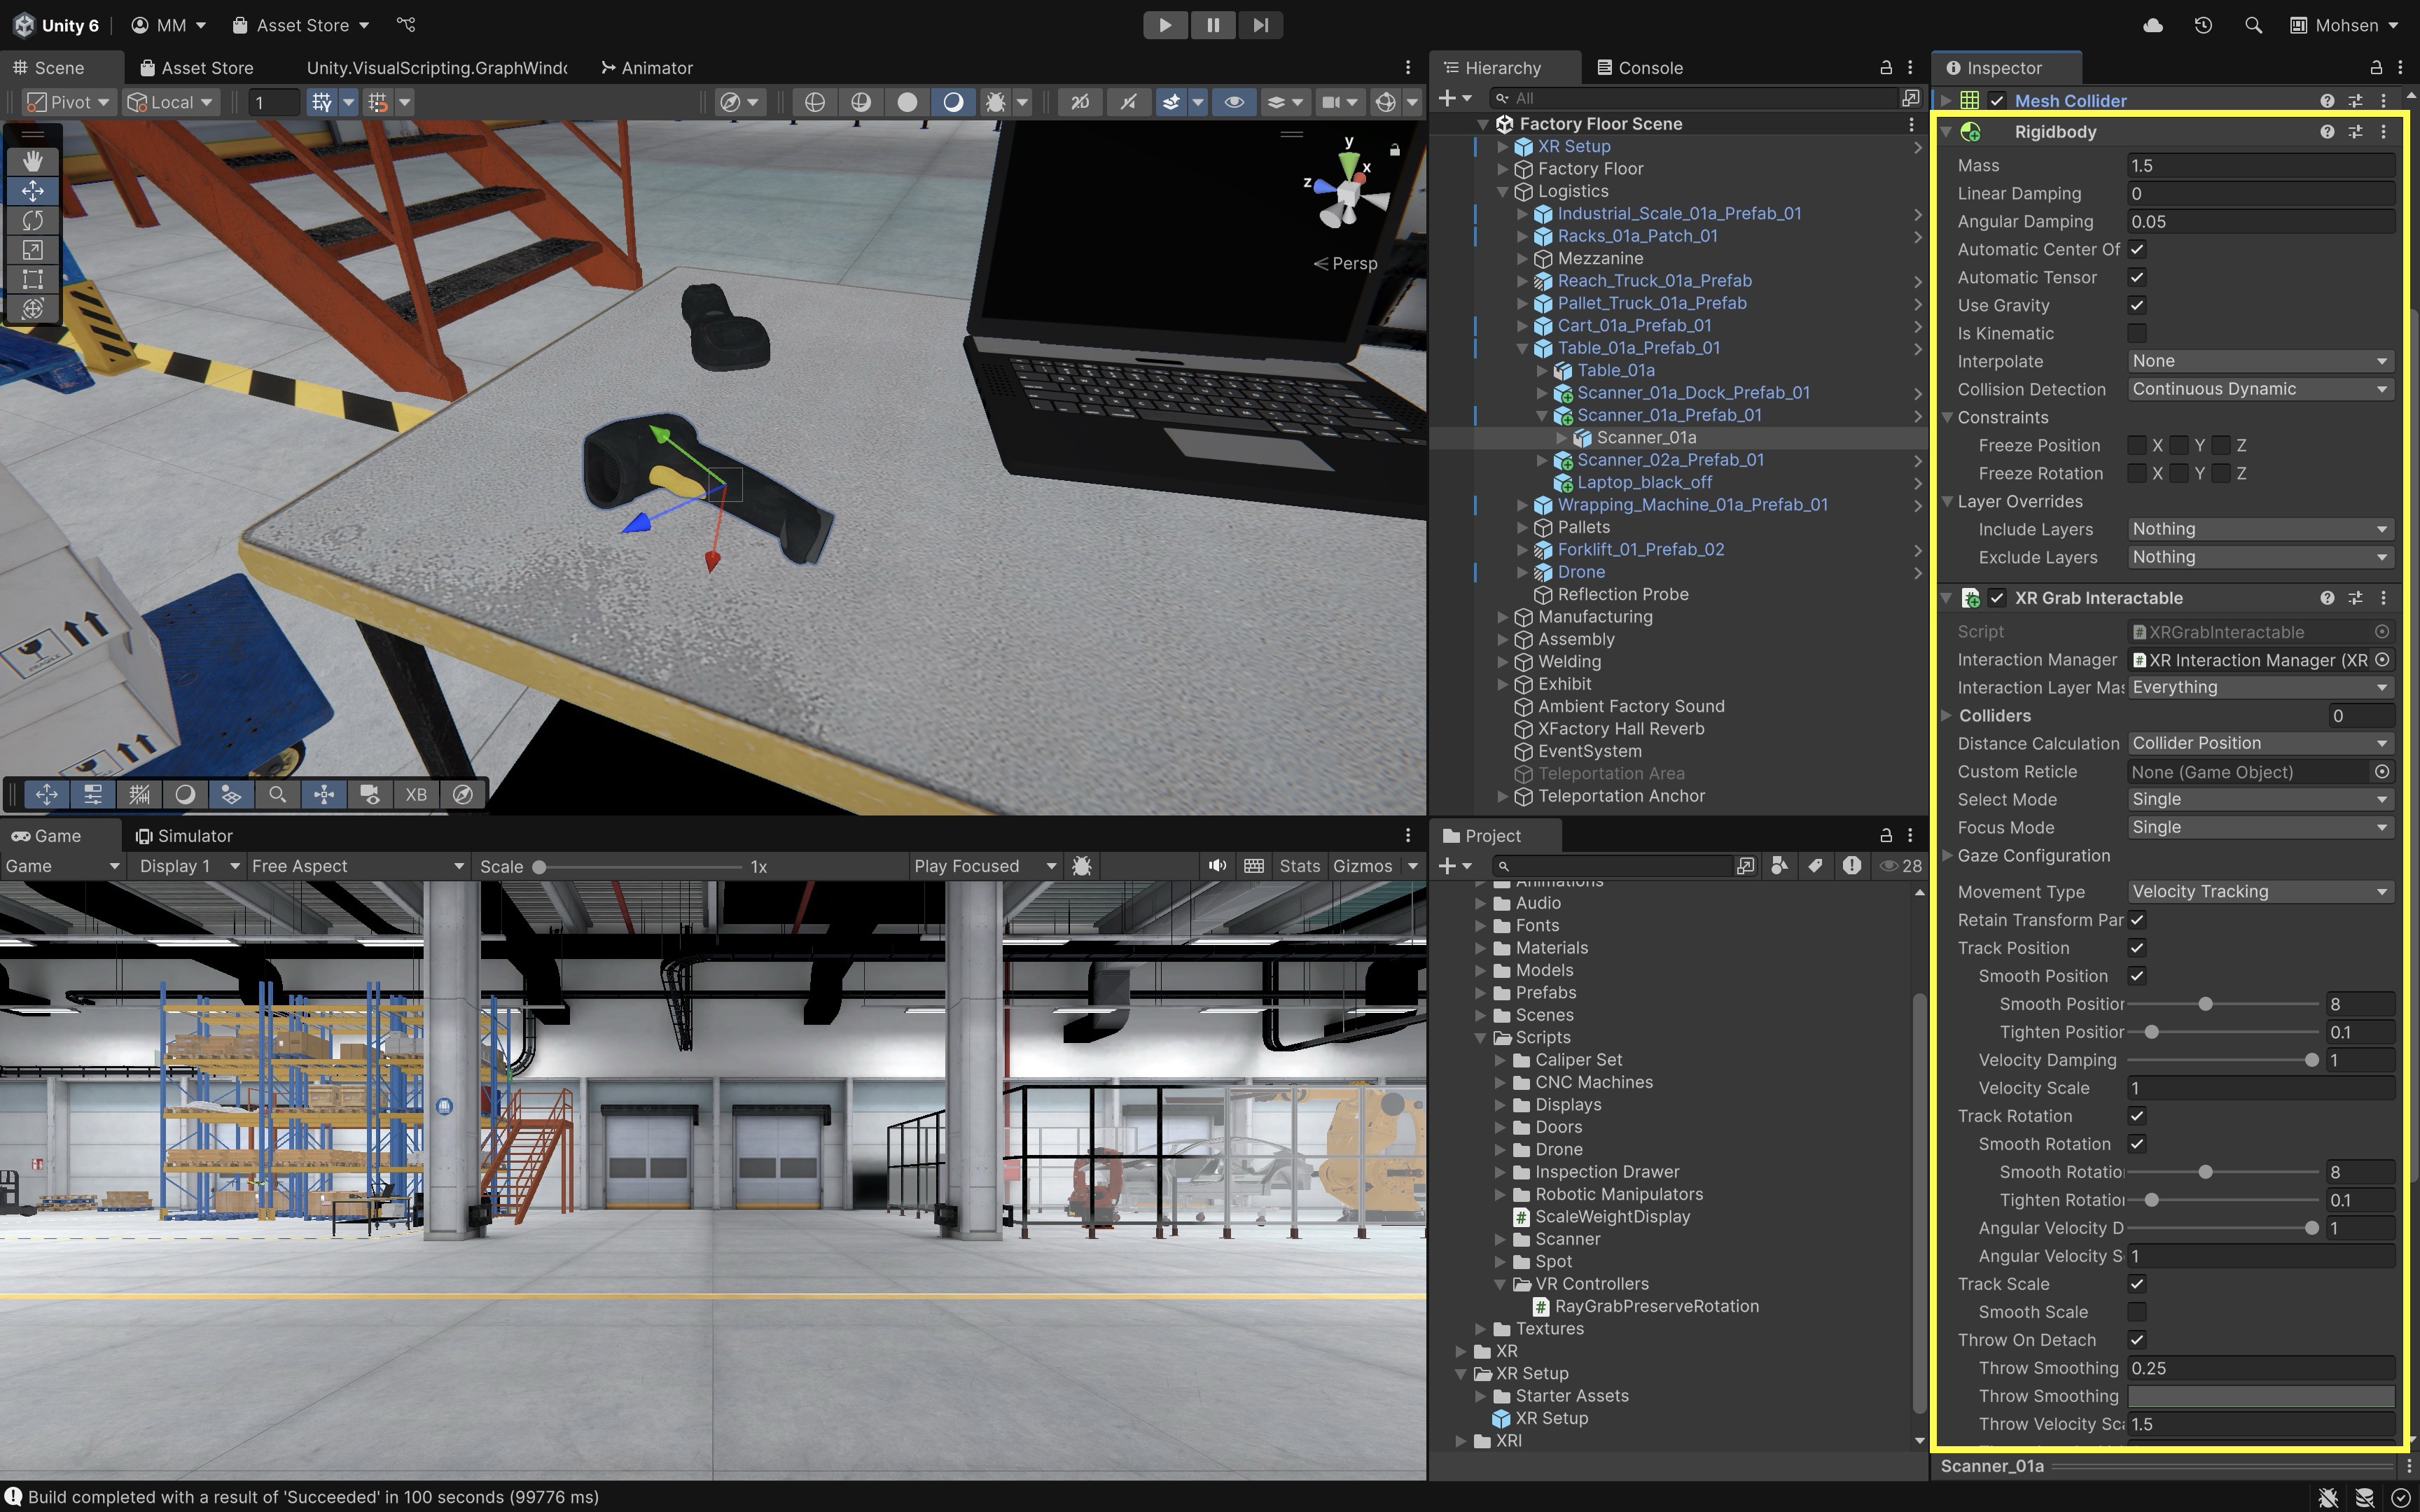
In VR, it is important that objects feel physically natural when picked up—whether by directly touching them with your virtual hand or by pulling them in from a distance with a near/far interactor. By default, an object may snap to a predefined orientation when grabbed, which feels unnatural. For example, a barcode scanner might twist or snap when picked up from an odd angle. Built-in XRI dynamic attach handles most beginner and intermediate cases.
- Add/Confirm Required Components:
- Select
Scanner_02a_Prefab_01in theHierarchy. - Add or confirm the following components:
Rigidbody: EnableUse Gravity. UseDiscretecollision detection unless the object is frequently thrown.XR Grab Interactable: SetMovement TypetoVelocity Tracking. EnableTrack Position,Track Rotation, andThrow On Detach.
- Select
- Enable Built-in Dynamic Attach:
- In the
XR Grab Interactablecomponent, enableUse Dynamic Attach. - Enable
Match Positionand/orMatch Rotationdepending on the desired behavior. - Consider
Snap To Collider Volumefor irregular shapes. - Leave
Attach Transformempty only when object-origin-based attachment is acceptable. An empty attach transform does not automatically preserve natural grab orientation in all cases.
- In the
- Test the Interaction:
- Near grab: Reach out and pick up the barcode scanner. Notice whether it keeps a natural orientation in your hand.
- Far grab: Pull in the scanner from a distance and verify that orientation and attach behavior feel acceptable for the task.
- Move and rotate your hand — the scanner should follow smoothly for training and simulation use.
- Optional Advanced Script (only if built-in settings are not enough):
- If you need per-hand or per-interactable overrides, attach the script below to the
Direct InteractorGameObject. Prefer built-in dynamic attach first.
 using UnityEngine;
 using UnityEngine.XR.Interaction.Toolkit;
 using UnityEngine.XR.Interaction.Toolkit.Interactables;
 using UnityEngine.XR.Interaction.Toolkit.Interactors;

 public class PreserveGrabRotation : MonoBehaviour
 {
     private XRBaseInteractor interactor;

     void Awake()
     {
         interactor = GetComponent<XRBaseInteractor>();
         if (interactor != null)
             interactor.selectEntered.AddListener(OnSelectEntered);
     }

     void OnDestroy()
     {
         if (interactor != null)
             interactor.selectEntered.RemoveListener(OnSelectEntered);
     }

     private void OnSelectEntered(SelectEnterEventArgs args)
     {
         if (args.interactableObject is XRGrabInteractable grab)
         {
             var attachTransform = interactor.attachTransform;
             if (attachTransform != null && grab.transform != null)
                 attachTransform.rotation = grab.transform.rotation;
         }
     }
 }
Built-in
Use Dynamic AttachwithMatch Rotationhandles most cases. The optional script above is for fine-grained control—such as applying different offsets per hand, preserving rotation only for certain interactables, or overriding behavior dynamically at runtime. - If you need per-hand or per-interactable overrides, attach the script below to the
Best Practices
Designing effective VR interactions requires attention to user experience, technical performance, and scene structure. The following best practices will help you create intuitive, efficient, and scalable grab interactions.
UX and Realism
Focus on creating interactions that feel natural, predictable, and immersive. Well-tuned physics, object scaling, and input responsiveness are essential for reinforcing presence in VR.
- Accurate Scaling: Always ensure that grabbable objects (e.g., tires, boxes, scanners) are modeled and scaled to real-world dimensions. Use reference tools like a “measuring stick” to compare sizes in Unity and maintain physical believability across all XFactory stations.
- Engineering grab validation: Not every factory object should be grabbable; lock or filter heavy machinery, hazards, conveyors, robots, and safety-critical controls. VR grabbing does not automatically simulate real weight, torque, force feedback, or tool resistance. If the interaction supports training or engineering conclusions, verify the simulation assumptions. Check scale, mass, collider shape, attach point, throw behavior, and socket compatibility for each grabbable engineering object. Use constraints, sockets, or guided affordances for parts that should only move along realistic assembly paths.
- Natural Grabbing: For objects like tires, toolboxes, or assembly parts, use
Use Dynamic AttachwithMatch Position/Match Rotationwhen you want pickup to feel natural. Use a customAttach Transformsuch asGripHandlewhen a tool needs a fixed ergonomic grip. - Smooth but Responsive Behavior: Enable
Smooth PositionandSmooth Rotationon interactables, but fine-tune their values (e.g., 0.2–0.4) to prevent laggy movement or jitter. This is especially important when handling heavy tools (like a welding torch) or delicate items (like a headset in the exhibit station). - Feedback and Clarity: Reinforce grab actions with subtle audio cues, haptic feedback (if supported), and visual indicators. For simple cases, prefer
Simple Haptic Feedbackwith aHaptic Impulse Playeron the interactor. For example, when a user picks up a barcode scanner, a gentle beep can signal readiness—supporting user confidence and immersion.
Performance Optimization
Smooth and stable performance is crucial, especially on mobile VR platforms (e.g., Meta Quest). Optimize physics and visuals to maintain low latency and high frame rates during all grab interactions.
- Simplified Colliders: Use primitive colliders (e.g.,
Box Collider,Capsule Collider) or compound primitive colliders instead of mesh colliders wherever possible. Avoid convex mesh colliders on many frequently grabbed objects unless shape accuracy is required. - Efficient
RigidbodySettings: Set appropriatemassfor realism (heavier for engine parts, lighter for handheld tools). UseDiscretecollision detection for simple slow objects; useContinuous Dynamicselectively for fast-moving or thrown objects that risk tunneling. Adjustdragandangular dragto simulate material friction or air resistance. - Clean interactable hierarchies: Keep the root GameObject on grabbable prefabs with
Rigidbody+XR Grab Interactable; place visuals and colliders on child objects when needed. Grabbable objects should not be marked static. - Object Pooling for Interactables: When using repeatable objects (e.g., boxes in Logistics or printed parts in production), implement pooling systems to reduce instantiation cost and garbage collection spikes during gameplay.
- Avoid unnecessary per-frame scripts: Prefer inspector events, built-in haptics, and default grab transformers on many grabbables instead of custom update logic on every object.
Scene Organization
Structured scenes improve efficiency and ensure consistent workflows and easier troubleshooting.
- Clean Hierarchy Structure: Group related objects under meaningful parent GameObjects (e.g.,
AssemblyStation/Tools,LogisticsStation/Interactables). This organization speeds up navigation, testing, and prefab modifications. - Consistent Naming Conventions: Name GameObjects, prefabs, and scripts with clear, descriptive labels (e.g.,
Tire_Assembly,Box_Logistics_A,Scanner_UI). Avoid generic names like “Cube” or “Object001”. - Interaction layers vs physics layers: Use XRI Interaction Layers (
Grabbable,NearOnly,UI, etc.) for interactor/interactable filtering. Use Unity physics layers separately when you need physics or caster filtering. Do not confuse the two systems. - Prefab Modularity: Turn frequently reused items (e.g., tools, teach pendants, screens) into modular prefabs with configurable grab settings. This allows you to reuse and adjust objects across multiple XFactory stations without duplicating logic or assets.
Grab Testing Checklist
Before moving on, verify the following in Play Mode and on device:
- Object has
XR Grab Interactable. - Object has
Rigidbody. - Object has valid non-trigger collider(s) for physical interaction.
- Interactor and interactable share the correct XRI Interaction Layer.
- Physics Layer Mask allows the near/far caster to detect the object.
- Input actions are enabled through
Input Action Manager. - Select input works on the intended controller.
- Near grab works at expected reach distance.
- Far grab works only when intended.
- Object does not tunnel through tables, floors, or machines during normal use.
- Attach transform or dynamic attach feels natural in headset.
- Haptic/audio feedback fires once and does not spam.
- Quest Link / Meta Horizon Link preview works where available.
- Android build-to-device test works on Quest.
Key Takeaways
- Near-Far Interactor is the common grab baseline; direct-only interactor setups remain useful for specialized cases.
- XR Grab Interactable settings for movement, attach, and layers determine how objects feel when picked up.
- Grab transformers, dynamic attach, and interaction layers vs physics layers are key debugging surfaces.
- Multimodal feedback (audio/haptics) confirms successful grabs without relying on visuals alone.
- Validation, collider hygiene, and on-device testing keep grab interactions stable in assembly and logistics tasks.