C3. MonoBehaviour
Learning Outcomes
- Describe the role of
MonoBehaviouras the foundation for Unity scripts. Before class, review its purpose and familiarize yourself with common lifecycle methods likeStart()andUpdate().- Differentiate between initialization and setup methods in Unity. As preparation, study
Awake(),Start(),OnEnable(),Reset(), andOnValidate()by creating a script that logs each method to observe their execution order.- Implement frame update loops for continuous behavior. Ahead of the session, write
Update(),FixedUpdate(), andLateUpdate()methods to move or rotate a GameObject usingTime.deltaTimeand log when each method runs.- Respond to physics collisions and trigger events. For your pre-work, create GameObjects with colliders and write scripts that log messages when collisions or trigger entries occur.
- Detect visibility changes of GameObjects in the scene. In preparation, use
OnBecameVisible()andOnBecameInvisible()to log when an object enters or leaves the camera’s view.- Handle teardown events for cleanup in Unity. Before arriving, use
OnDisable()andOnDestroy()in a script to log when a GameObject is disabled or destroyed at runtime.
What Is MonoBehaviour?
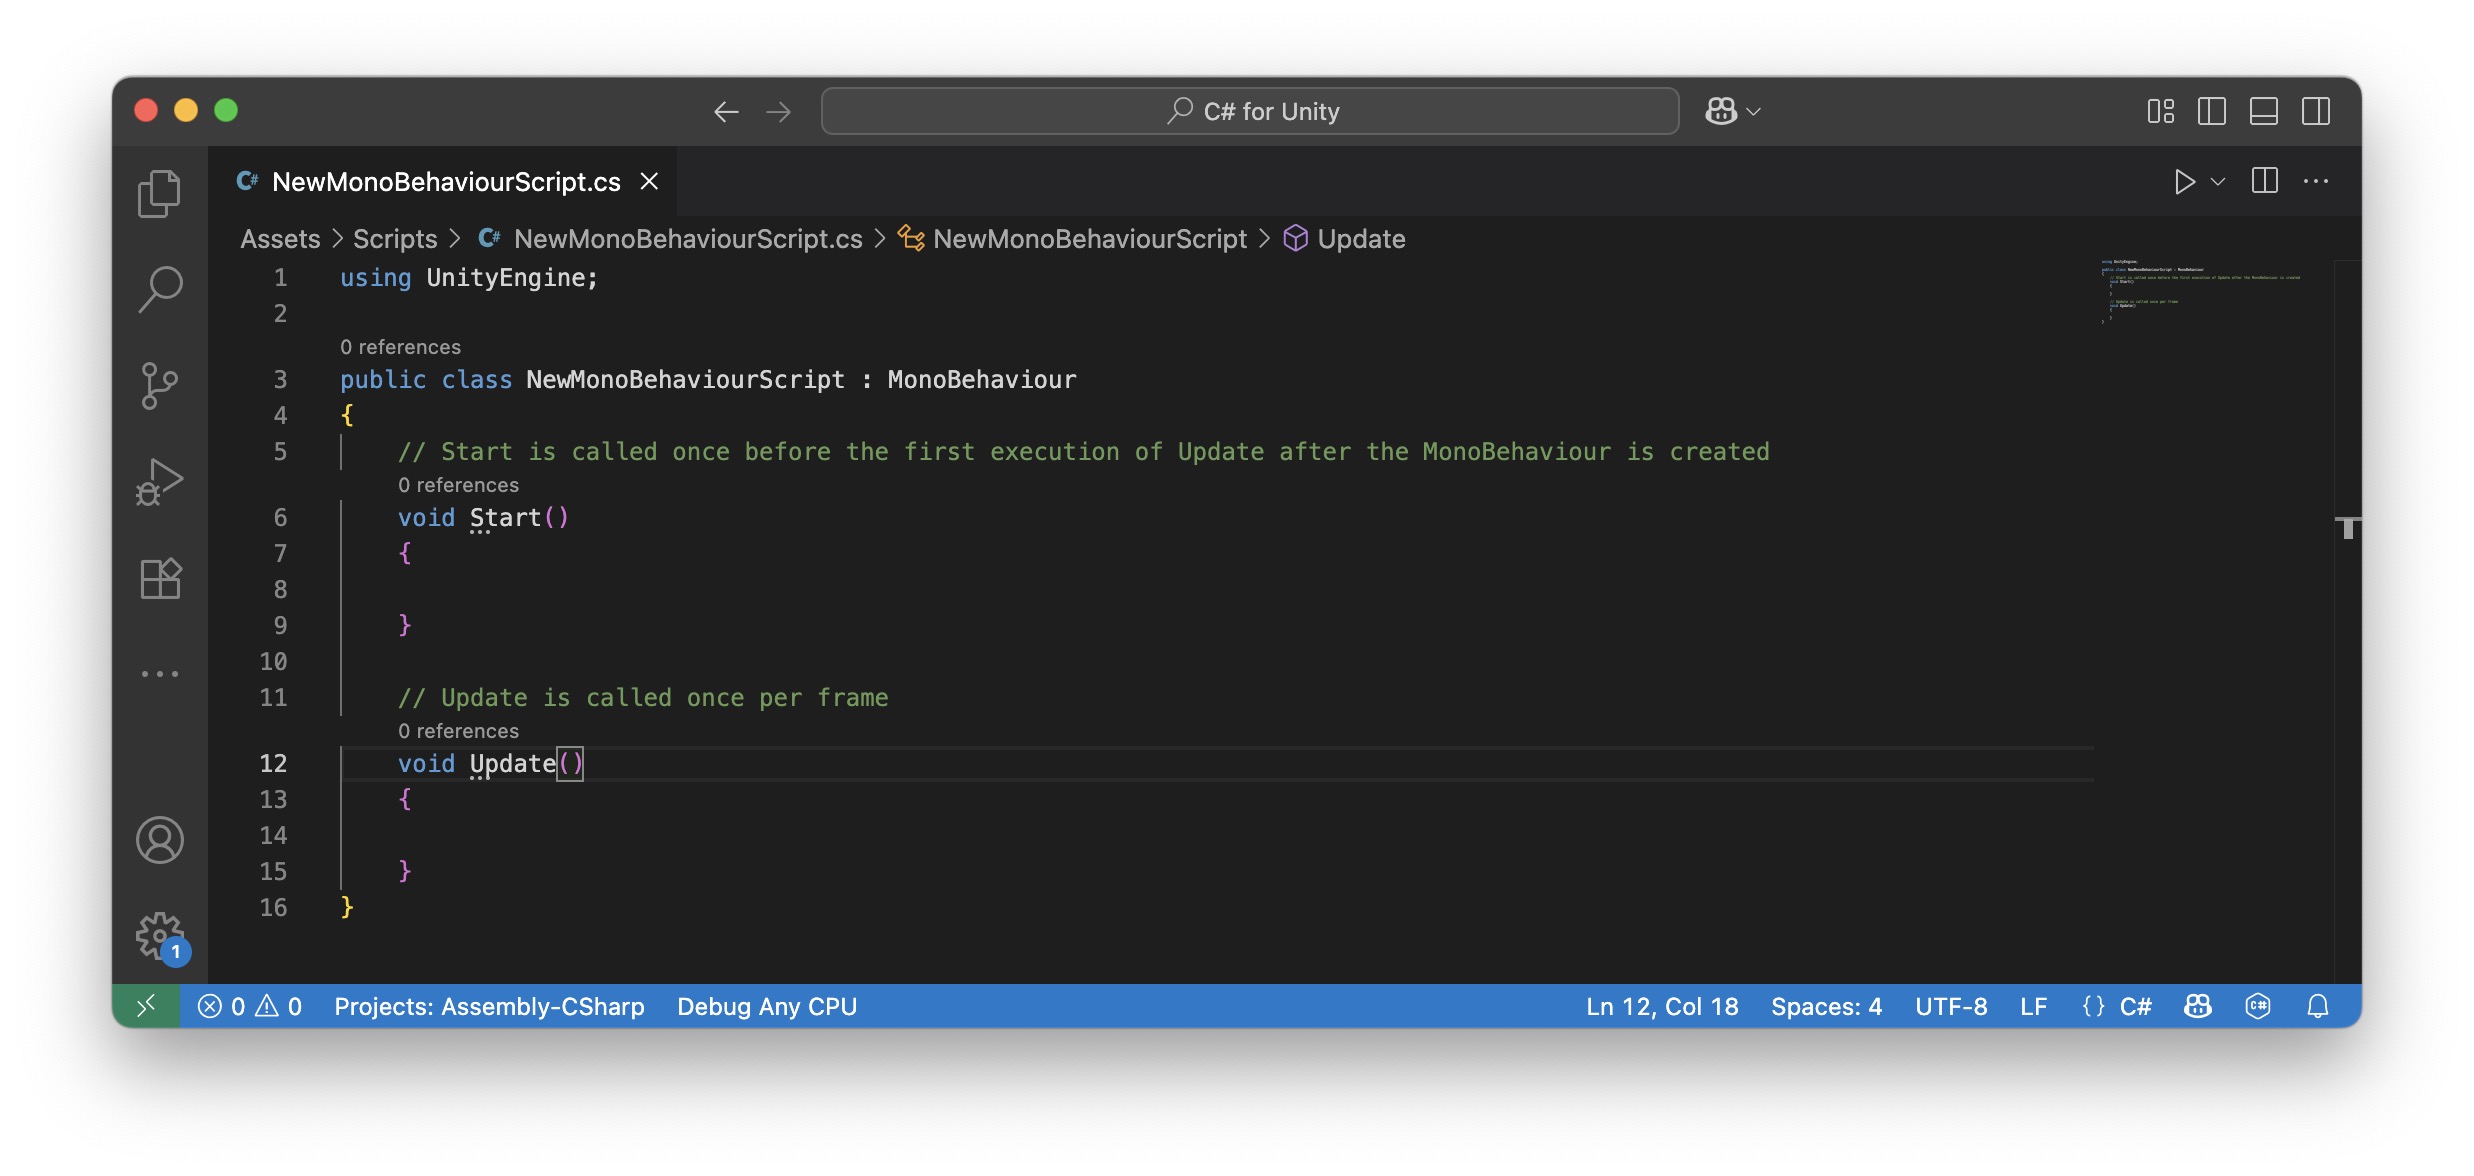
MonoBehaviour is the foundational base class from which most Unity scripts that are attached to GameObjects derive. Plain C# helper classes do not need to inherit from MonoBehaviour unless they must be attached to a GameObject or receive Unity event messages. It serves as the essential bridge between your custom C# code and Unity’s powerful engine, enabling your scripts to participate in the engine’s internal lifecycle, event system, and component-based architecture. MonoBehaviour simplifies development by providing a set of built-in methods or “messages”—like Start(), Update(), and OnCollisionEnter()—so you don’t have to build core behavior management from scratch. MonoBehaviour connects your C# code to the GameObject system in Unity. When you create a script and attach it to a GameObject in your scene:
- Unity treats the script as a Component—just like a
Rigidbody,Collider, orAudio Source. - Your script gains access to Unity’s game loop and lifecycle.
- You can define behaviors and interactions that run automatically without needing to call them manually.
Review this Unity documentation to learn more about
MonoBehaviour.
The MonoBehaviour Script
When you create a new script in Unity, it typically inherits from MonoBehaviour by default. This inheritance grants access to Unity’s lifecycle messages—such as Start(), Update(), and many others—that are automatically called by the engine at specific times during the game’s execution. These hooks make it easy to define behavior that reacts to events like object initialization, frame updates, collisions, and visibility changes. You can attach a script to a GameObject by dragging it onto a GameObject in the Hierarchy, selecting the GameObject and dragging the script into the Inspector, or using the Component > Scripts submenu. Key features of MonoBehaviour script include:
-
Lifecycle Integration and Event Handling:
MonoBehaviourprovides built-in lifecycle methods (Awake,Start,Update,FixedUpdate, etc.) that Unity automatically calls at the correct time. This eliminates manual polling or boilerplate initialization logic and ensures your code runs when the GameObject and its components are ready. For example, in XFactory’s logistics station, you can useStart()to initialize drone pathfinding logic, whileUpdate()continuously monitors their battery level or navigational state:public class DroneController : MonoBehaviour { void Start() { Debug.Log("Drone initialized and ready for pathfinding."); } void Update() { Debug.Log("Monitoring drone navigation and battery status..."); } } -
Component-Based Architecture: Unity’s design is centered on GameObjects and their components. A
MonoBehaviourscript is a custom component that defines behavior and can be attached to any GameObject. This modular structure promotes reusability, scalability, and easier debugging. For example, attach aForkliftControllerscript to a forklift GameObject in the logistics station to give it autonomous movement behavior during package transport.using UnityEngine; public class ForkliftController : MonoBehaviour { [SerializeField] private float moveSpeed = 5f; // Editable in the Inspector but not directly from other scripts void Update() { if (Input.GetKey(KeyCode.M)) { transform.Translate(Vector3.forward * moveSpeed * Time.deltaTime); } } }The class is called
MonoBehaviourbecause it represents a behavior (a script component that defines how a GameObject acts) and it was originally powered by the Mono runtime, which Unity used to run C# across platforms. In other words, aMonoBehaviouris the foundational way you give GameObjects custom behaviors in Unity, while the “Mono” part reflects Unity’s early adoption of the Mono framework for scripting.
Inherited Members
The MonoBehaviour class inherits a wide range of useful properties and methods from its parent classes (Behaviour, Component, and Object). These inherited members give your scripts direct access to the GameObject they are attached to, making it easier to interact with components, control object behavior, and respond to gameplay events. Key inherited members include:
gameObject: Grants direct access to the GameObject this script is attached to. You can use it to enable/disable the object, access or modify components, or manage its hierarchy and state.transform: Provides access to the GameObject’sposition,rotation, andscalein the scene. Crucial for movement, orientation, and spatial logic.name: Thenameof the GameObject. Useful for identification, debugging, or dynamic naming during runtime.tag: A string identifier used to categorize or group GameObjects. Useful for filtering objects in logic or triggering behavior based on tags.CompareTag(string tag): Efficiently compares the GameObject’s tag to a givenstring. Preferred over string comparison for performance.GetComponent<T>(): Retrieves a component of typeTattached to the same GameObject. Used to interact with other components (e.g.,Rigidbody,Collider, or scripts).GetComponents<T>(): Retrieves all components of typeTattached to the GameObject.TryGetComponent<T>(out T component): Safely attempts to retrieve a component of typeT, returning a boolean indicating success or failure. Avoids exceptions.GetComponentInChildren<T>(): Finds a component of typeTin the GameObject or its child objects.GetComponentInParent<T>(): Finds a component of typeTin the GameObject or its parent objects.
Example
Now let’s utilize everything we have discussed so far, from the basics of MonoBehaviour to inherited members, specifically GetComponent<T>(), to control the Drone GameObject in the XFactory logistics station.
- Create a
MonoBehaviourScript:- Right-click on the
Scriptsfolder in theProjectwindow and selectCreate > MonoBehaviour Script. Name itDroneController.cs. - Paste the following script into it.
- It uses inherited members like
name,transform, andgameObjectdirectly fromMonoBehaviour. - It uses
GetComponent<Animator>()to access and control the drone’s main flight animation. - It uses
transform.Find()to access child objects likeEyeand theFanscontainer. - It uses
GetComponent<Animator>()on the childEyeto enable/disable its scanner’s pulse animation at runtime.
using UnityEngine; public class DroneController : MonoBehaviour { private Animator droneAnimator; // Controls drone flight animations private Animator eyeAnimator; // Controls Eye scanner animation private Transform[] fanTransforms; // References to the 4 fan objects private bool isFlying = false; // Tracks drone flight state private bool isEyeActive = true; // Tracks if Eye animator is active [SerializeField] private float idleFanSpeed = 1000f; // Fan speed while hovering [SerializeField] private float activeFanSpeed = 2000f; // Fan speed while flying void Start() { // Get the Animator on the main Drone droneAnimator = GetComponent<Animator>(); // Find Eye and get its Animator Transform eye = transform.Find("Eye"); if (eye != null) { eyeAnimator = eye.GetComponent<Animator>(); } // Get references to four fan objects under "Fans" Transform fansParent = transform.Find("Fans"); if (fansParent != null) { fanTransforms = new Transform[4]; for (int i = 0; i < 4; i++) { Transform fan = fansParent.Find($"fan.00{i + 1}"); if (fan != null) { fanTransforms[i] = fan; } } } Debug.Log($"{name} initialized with DroneController"); } void Update() { // Toggle flying state with 'F' key if (Input.GetKeyDown(KeyCode.F) && droneAnimator != null) { if (isFlying) { droneAnimator.SetTrigger("Return"); isFlying = false; Debug.Log("Drone is returning to hover."); } else { droneAnimator.SetTrigger("Move"); isFlying = true; Debug.Log("Drone is flying."); } } // Toggle Eye animator on/off with 'T' if (Input.GetKeyDown(KeyCode.T) && eyeAnimator != null) { isEyeActive = !isEyeActive; eyeAnimator.enabled = isEyeActive; // Enable/disable the Animator component Debug.Log("Eye animation is now " + (isEyeActive ? "ON" : "OFF")); } // Rotate fans based on drone state float currentSpeed = isFlying ? activeFanSpeed : idleFanSpeed; if (fanTransforms != null) { foreach (var fan in fanTransforms) { if (fan != null) { fan.Rotate(Vector3.forward * currentSpeed * Time.deltaTime); } } } } } - Right-click on the
- Configure the Script:
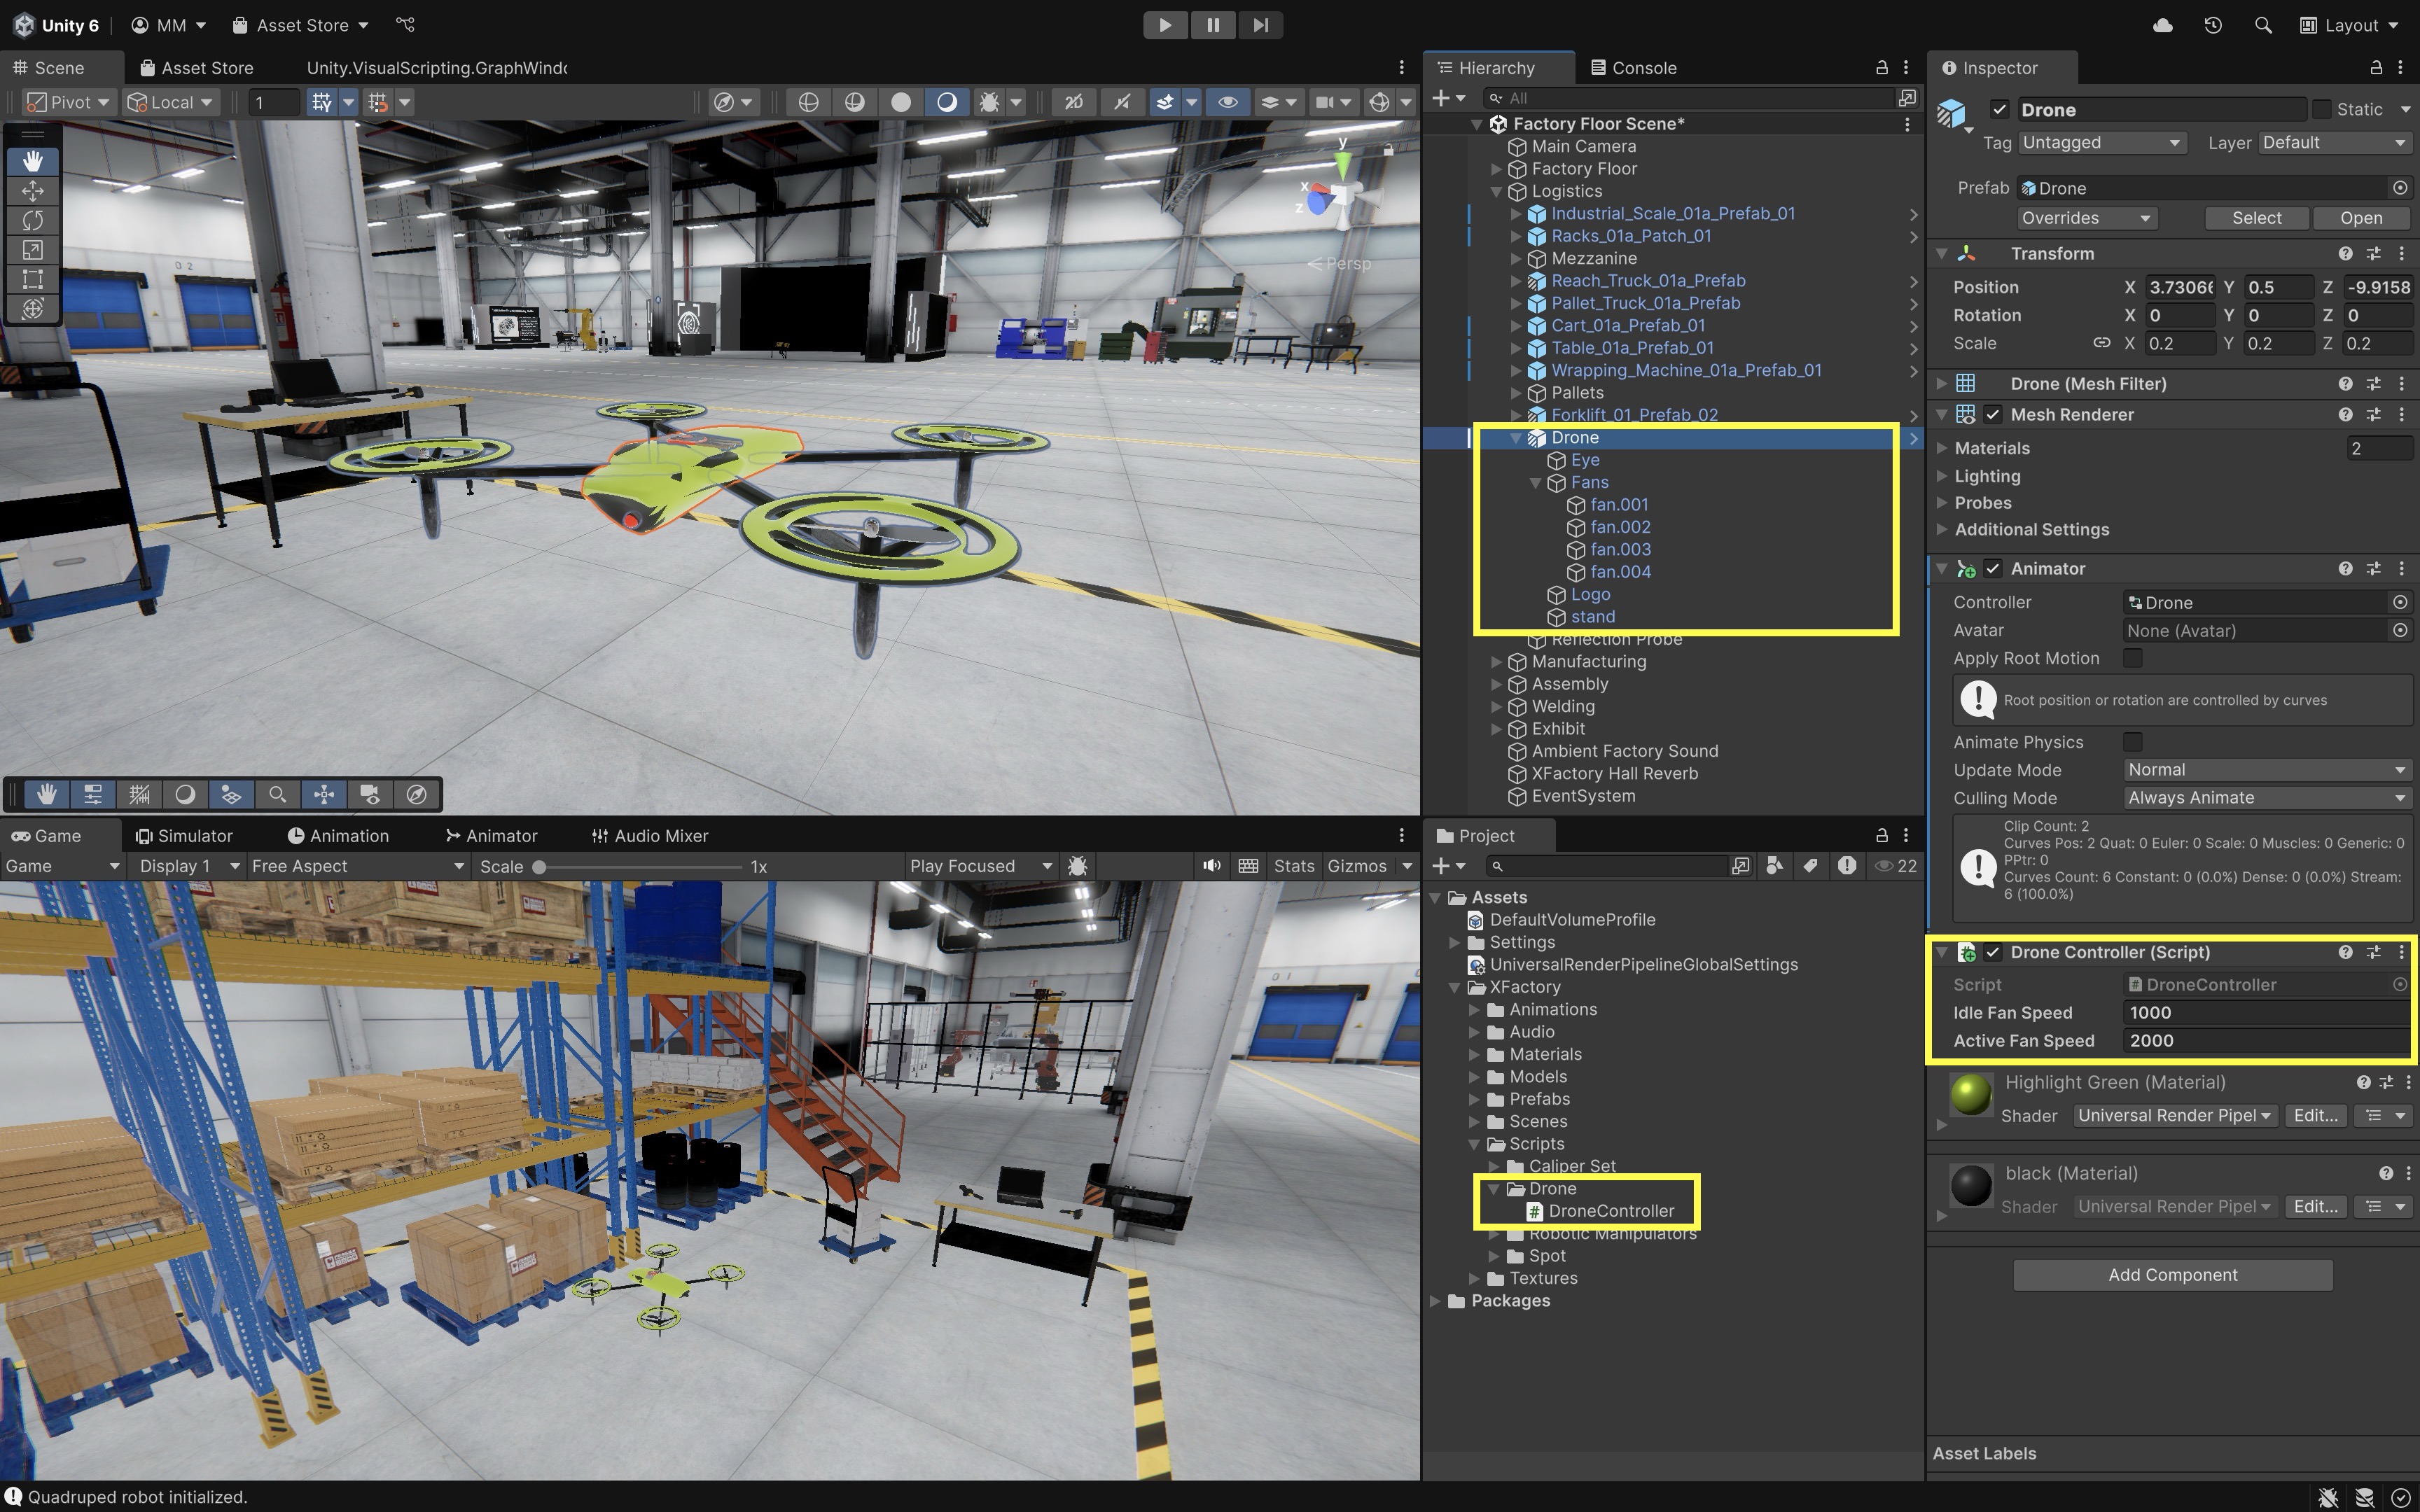
- Attach this script to the
DroneGameObject in theHierarchy. - Adjust
Idle Fan SpeedandActive Fan Speedas necessary.
- Attach this script to the
- Play and Observe the Behavior:
- Enter Play mode.
- Press F to toggle flying/hovering by triggering animation transitions (
MoveandReturnin the drone Animator Controller). - Press T to enable/disable the Eye pulsing animation (via
Animator.enabled). - Fan GameObjects are dynamically rotated around their Z-axis, with speed adjusted based on flight state.
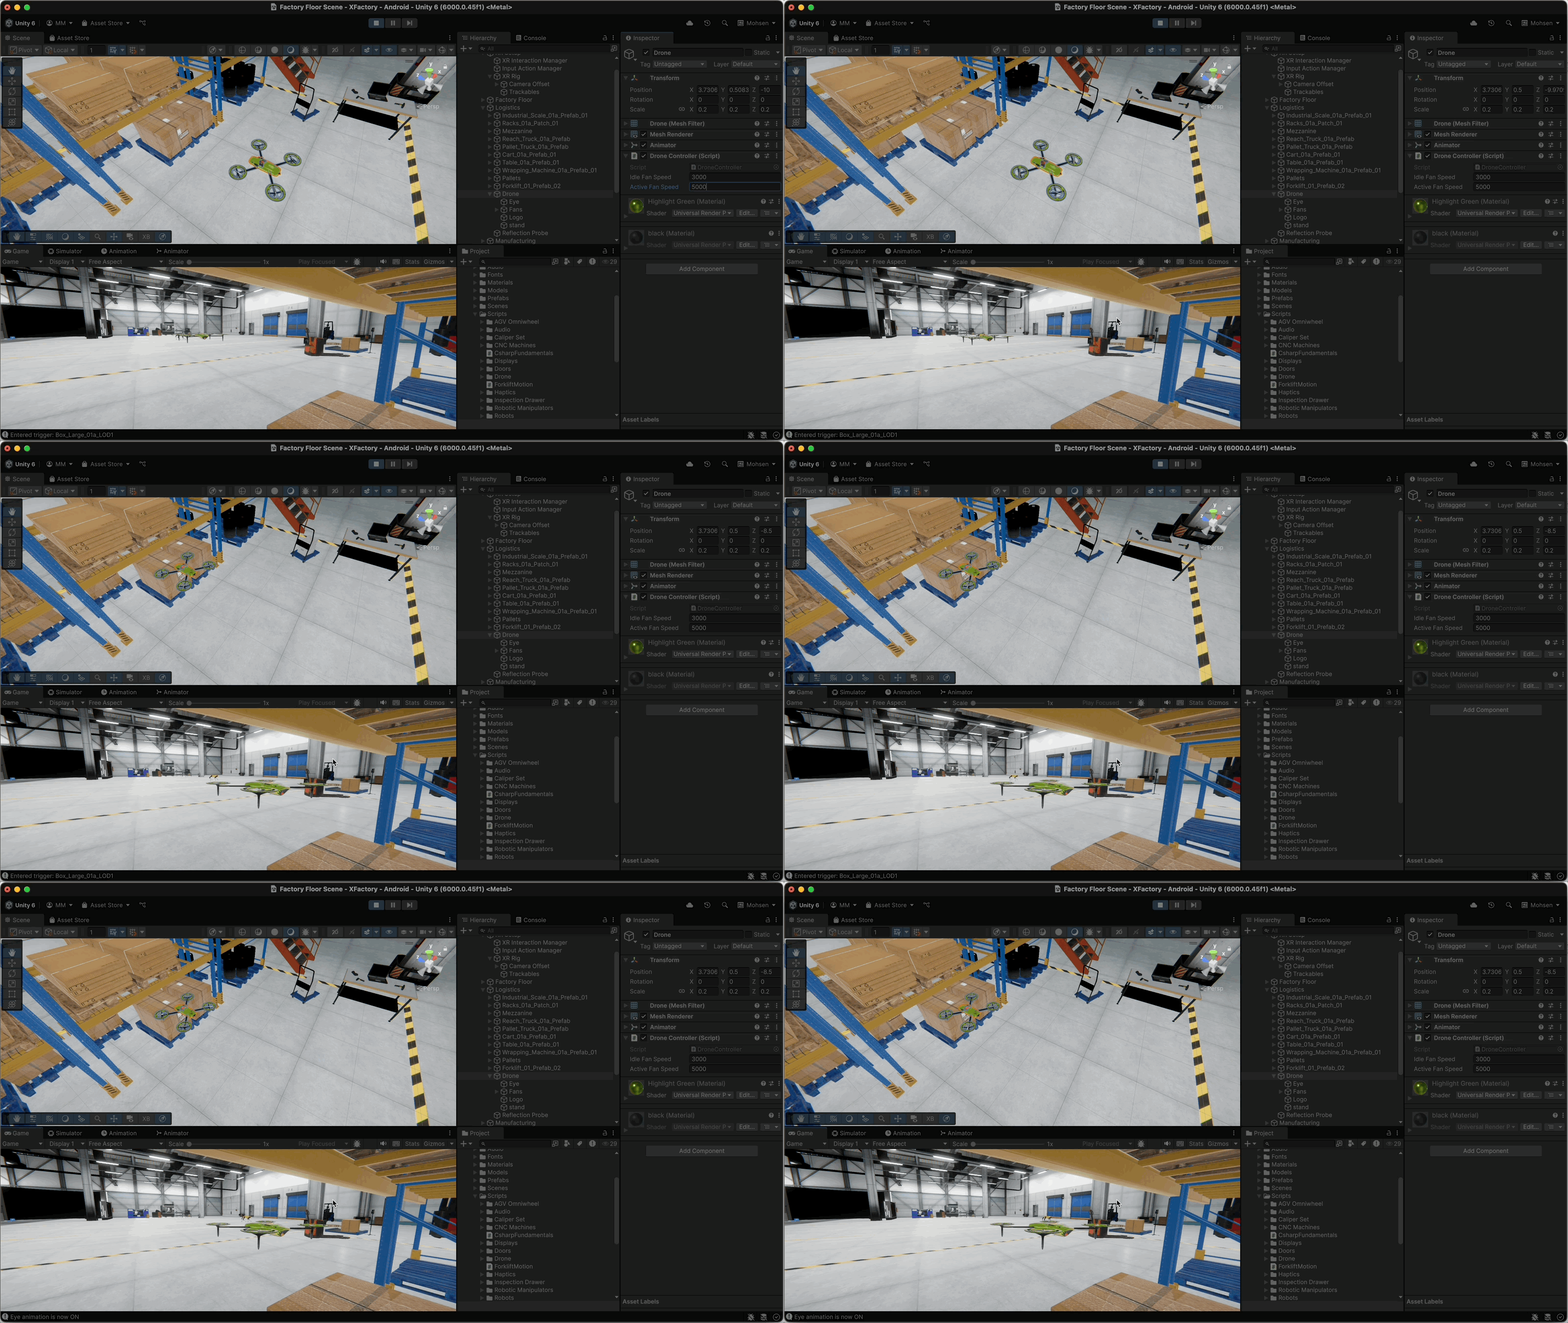
- Press Play with Quest Link connected and you can watch the drone animation in your Meta Quest headset.
Messages
Messages are special event functions in MonoBehaviour. Unlike methods you call manually, messages are triggered automatically by Unity’s internal systems based on events in the game environment. This design makes it simple to respond to changes in game state, physics, input, rendering, and more without having to constantly check for those events yourself. Messages are crucial for three main reasons:
- Event-Driven Programming: Messages allow your scripts to follow an event-driven model. Instead of writing loops to monitor for conditions (like user input or collision events), you simply implement a message method (e.g.,
OnCollisionEnter()) and Unity calls it when the event happens. - Separation of Concerns: Each message is responsible for handling a specific type of event. This modularity makes it easier to organize code—one method per event—improving readability and maintainability.
- Simplicity: Unity takes care of detecting events (such as collisions or input) and calling your methods. You only need to implement the logic, which accelerates development.
| Message | Definition |
|---|---|
Awake() |
Called when a script instance is loaded; used for early initialization. |
Start() |
Invoked just before the first frame update; ideal for initialization after Awake(). |
FixedUpdate() |
Called at fixed intervals; used for physics updates. |
Update() |
Called once per frame; used for general updates and handling real-time actions. |
LateUpdate() |
Called after Update(); ideal for operations that depend on prior updates. |
OnValidate() |
Called in the Editor when a script is loaded or a value changes in the Inspector; useful for auto-updates. |
Reset() |
Called in the Editor when you click the Reset button in the Inspector; resets fields to default values. |
OnCollisionEnter() |
Called when a collider/rigidbody starts touching another collider/rigidbody. |
OnCollisionStay() |
Called every frame while another collider/rigidbody remains in contact. |
OnCollisionExit() |
Called when another collider/rigidbody stops touching this object. |
OnTriggerEnter() |
Invoked when another object enters a trigger collider on this object. |
OnTriggerStay() |
Called every frame while another object stays within the trigger collider. |
OnTriggerExit() |
Called when another object exits the trigger collider. |
OnBecameVisible() |
Called when the object becomes visible to any camera. |
OnBecameInvisible() |
Called when the object is no longer visible by any camera. |
OnDisable() |
Called when the script or its GameObject is disabled; used for cleanup or stopping actions. |
OnEnable() |
Called when the script or its GameObject becomes enabled and active. |
OnDestroy() |
Called just before the object is destroyed; used for final cleanup. |
For a full list of Unity event messages, see Unity’s MonoBehaviour documentation.
MonoBehaviour Code Checklist
- Does this script need to inherit from
MonoBehaviour, or could it be a plain C# helper class? - Is initialization in
Awake()orStart()based on when references are needed? - Is frame-based logic in
Update()only when it must run every frame? - Is physics movement or Rigidbody logic in
FixedUpdate()? - Are camera-follow or post-movement visual updates in
LateUpdate()? - Are collision and trigger requirements satisfied by the correct Collider/Rigidbody setup?
- Are Inspector references assigned and null-safe?
- Are event subscriptions or long-running behaviors cleaned up in
OnDisable()orOnDestroy()?
It is important to remember that
MonoBehaviourscripts are always Components. Therefore, they must be attached to an active GameObject to work. Sometimes, it is better to attach custom scripts to an empty GameObject—such as a “Manager” (e.g., TeleportationManager or InteractionManager)—to keep your scene clean, organized, and easier to maintain.
Initialization and Setup

These are methods that Unity calls during the lifecycle of a GameObject to set up and manage runtime behavior. While some occur only once, others enable real-time updates throughout gameplay. They are essential for driving dynamic behavior in XFactory—such as robotic movements, sensor monitoring, or user interaction with AR/VR panels. Key use cases include:
- Polling for input (e.g., sensor/user data).
- Moving objects (e.g., drone, quadruped).
- Checking conditions (e.g., machine state, energy level, assembly progress).
- Updating UI or animations frame-by-frame.
Reset()
The Reset() method is called when the user selects the Reset() option from the component’s context menu in the Inspector, or when a component is added to a GameObject for the first time. It is used to assign sensible default values or references and does not run in Play Mode. It is ideal for setting up default values or basic references to reduce manual configuration. Key features include:
- Editor-Only: The
Resetmethod is only executed in editor mode, not in the final build. - Default Initialization: It provides a mechanism to set up default values for public fields or properties, enhancing usability.
- Ease of Use: Offers a quick way for developers to restore a component’s configuration without manually adjusting properties.
Example
In XFactory, you might use Reset() to auto-link the logistics drone to its navigation target when the component is first added in the Editor or manually reset in the Inspector (not during Play Mode). Attach the following script to the Drone GameObject prefab. Create a "Waypoint" tag in Project Settings > Tags and Layers before using Reset(), so GameObject.FindWithTag("Waypoint") can succeed at edit time. Tag-dependent examples require the tag to exist in Unity before runtime; otherwise tag lookup or comparison can fail.
using UnityEngine;

public class DroneSetup : MonoBehaviour
{
    [SerializeField] private GameObject navigationTarget;

    void Reset()
    {
        Debug.Log("Reset: Assigning default navigation target.");

        // Try to auto-assign a default navigation waypoint
        if (!navigationTarget)
        {
            navigationTarget = GameObject.FindWithTag("Waypoint");
        }
    }
}
OnValidate()
OnValidate() is an editor-only callback that is invoked when a script is loaded or when a value is changed in the Inspector. It is commonly used to enforce constraints, correct mistakes, or auto-update related properties without waiting for runtime. Key features include:
- Editor-Only: Executes only within the Unity Editor and not in runtime builds.
- Data Validation: Ideal for checking and clamping values to keep data consistent (e.g., ensuring numerical values remain within a specified range).
- Frequent Calls: Can be triggered often during normal Editor operations such as loading scenes, building a player, or entering Play Mode.
Because
OnValidate()can run frequently in the Editor, keep it lightweight and avoid expensive searches or runtime-only logic. The example below clamps a forklift’s position at edit time for validation—not as a substitute for runtime gameplay logic.
Example
Use OnValidate() to ensure the forklift remains within the defined X–Z boundaries near the logistics area. OnValidate() runs in the Editor, so it enforces boundary limits immediately when the forklift is moved or adjusted in the Inspector—no need to enter Play Mode to see it applied, while runtime clamping ensures the forklift never leaves the warehouse area during gameplay.
using UnityEngine;

public class ForkliftController : MonoBehaviour
{
    [Header("Motion Settings")]
    [SerializeField]
    private float moveSpeed = 3f; // Editable in the Inspector but not directly from other scripts

    [Header("Boundary Settings (World Space)")]
    [SerializeField] private Vector2 xBounds = new Vector2(-20f, -5f);
    [SerializeField] private Vector2 zBounds = new Vector2(0f, 9f);

    void Update()
    {
        if (Input.GetKey(KeyCode.M))
        {
            transform.Translate(Vector3.forward * moveSpeed * Time.deltaTime);
            ClampPosition();
        }
    }

    private void OnValidate()
    {
        // Ensure position is clamped in the Editor too
        ClampPosition();
    }

    private void ClampPosition()
    {
        Vector3 pos = transform.position;

        pos.x = Mathf.Clamp(pos.x, xBounds.x, xBounds.y);
        pos.z = Mathf.Clamp(pos.z, zBounds.x, zBounds.y);

        transform.position = pos;
    }
}
OnEnable()
OnEnable() is automatically called when a GameObject becomes enabled and active. This method is invoked every time the object enters Play Mode, provided it is enabled. Key features include:
- Automatic Invocation: Runs immediately when the GameObject is enabled, making it ideal for initialization tasks.
- Editor Support: With edit-mode execution attributes such as
[ExecuteAlways],OnEnable()can also be called in the Unity Editor. - Complementary Functionality: Works in tandem with
OnDisable()(introduced later), which is called when the GameObject is disabled.
Example
In XFactory’s exhibit area, a manager script on an always-active empty GameObject toggles the quadruped robot (Spot) on and off with a key press. A separate SpotLifecycleLogger on Spot logs when Spot itself is enabled or disabled. Attach SpotToggleManager to an empty GameObject (for example, SpotManager), assign the Spot GameObject in the Inspector, and attach SpotLifecycleLogger to Spot. Press X in Play Mode to toggle Spot; SpotLifecycleLogger reports OnEnable() and OnDisable() on Spot when its active state changes.
using UnityEngine;

public class SpotToggleManager : MonoBehaviour
{
    [SerializeField] private GameObject spotDog;

    void Update()
    {
        if (Input.GetKeyDown(KeyCode.X) && spotDog != null)
        {
            bool newState = !spotDog.activeSelf;
            spotDog.SetActive(newState);
            Debug.Log($"SpotToggleManager: Spot set active = {newState}");
        }
    }
}
using UnityEngine;

public class SpotLifecycleLogger : MonoBehaviour
{
    void OnEnable()
    {
        Debug.Log("OnEnable: Spot is active.");
    }

    void OnDisable()
    {
        Debug.Log("OnDisable: Spot is inactive.");
    }
}
Awake()
Awake() is automatically called when an enabled script instance is loaded. It is primarily used to initialize variables or states before the game starts running. This method is invoked in scenarios such as when a GameObject is active on scene load, when an inactive GameObject is activated, or when a new GameObject is created via instantiation. Key features include:
- One-time Initialization: Called only once during the lifetime of a script instance. If the Scene is reloaded or loaded additively, each instance will have its own
Awake()call. - Order of Execution: All active GameObjects have their
Awake()called before anyStart()methods. However, the order in whichAwake()is called across different GameObjects is not deterministic. - Early Setup: Since
Awake()is called before anyStart()methods, it is ideal for establishing references or setting initial states. - Called on Disabled Scripts:
Awake()is executed even if the script component is disabled, as long as its GameObject is active. - Exception Handling: If an exception occurs during
Awake(), Unity will disable the component to prevent further errors.
Example
Attach this script to the robot GameObject (Spot) to cache its Rigidbody in Awake() and confirm readiness in Start(). Awake() runs first for internal setup; Start() runs afterward for initialization that may depend on other objects being ready.
using UnityEngine;

[RequireComponent(typeof(Rigidbody))]
public class SpotAwake : MonoBehaviour
{
    private Rigidbody rb;
    private string status;

    void Awake()
    {
        // Runs immediately when the object is loaded
        rb = GetComponent<Rigidbody>();
        status = "Initialized";

        Debug.Log("Awake: Cached Rigidbody and set status to Initialized.");
    }

    void Start()
    {
        // Runs just before the first frame update
        // Often used for setup that depends on other objects being ready
        Debug.Log($"Start: Robot ready with mass = {rb.mass}, status = {status}");
    }
}
Start()
Start() is invoked on the frame when a script is enabled, just before any of the frame and update loops are called for the first time. It is executed exactly once in the lifetime of the script, which makes it ideal for initialization that relies on other objects being set up first. Key features include:
- One-Time Initialization: Called only once per script instance, ensuring that initialization occurs only when needed.
- Execution Timing: Runs after the
Awake()method of all objects, allowing it to safely interact with objects that have already initialized. - Coroutine Support: Can be implemented as a Coroutine, enabling the suspension of execution (using yield) for tasks like waiting.
- Conditional Execution: May not run on the same frame as
Awake()if the script is not enabled during initial scene loading.
Tutorial
Let’s extend the simple SpotWalker.cs script to guide the quadruped robot in the exhibit station of XFactory to a specified point in the XFactory scene, while enforcing editor-time setup and runtime behavior using Unity’s lifecycle callbacks:
- Editor Setup with
Reset(): Auto-assigntargetPointwhen the component is added or reset. Key line:targetPoint = GameObject.FindWithTag("Waypoint")?.transform; - Validation in
OnValidate(): Clamp the waypoint’s position withinxBoundsandzBoundswhenever it’s edited in theInspector. Key pattern:Mathf.Clampontp.xandtp.z. - Early Initialization in
Awake(): Reset thehasArrivedflag before any other logic runs. - Activation Hook with
OnEnable(): Log and reinitialize state each time the component is enabled in Play Mode or Editor. - First-Frame Setup in
Start(): Confirm the robot is initialized and ready to move. - Continuous Movement in
Update(): UsesVector3.MoveTowardsto smoothly move along both X and Z axes. TheApplication.isPlayingguard is defensive; in a normal runtime script,Update()runs during Play Mode, whileOnValidate()handles editor-time validation. Arrival check: When distance < 0.05 units, stop and log arrival.
Implementation
-
Attach the script below to your quadruped GameObject (
Spot). Make sure the quadruped robot has aTransform; anAnimatoris optional if you want to disable animation on arrival.using UnityEngine; public class SpotWalker : MonoBehaviour { [Header("Movement Settings")] [SerializeField] private float speed = 1.0f; [SerializeField] private float rotationSpeed = 180f; // Degrees per second [SerializeField] private Transform targetPoint; [SerializeField] private Vector2 xBounds = new Vector2(-20f, 20f); [SerializeField] private Vector2 zBounds = new Vector2(-10f, 10f); private bool hasArrived; private Animator animator; // Animator to disable on arrival // ————— Editor Setup ————— void Reset() { // Auto-assign a waypoint tagged "Waypoint" (tag must exist in Project Settings) targetPoint = GameObject.FindWithTag("Waypoint")?.transform; } void OnValidate() { if (targetPoint) { // Clamp the target position within bounds whenever edited Vector3 tp = targetPoint.position; tp.x = Mathf.Clamp(tp.x, xBounds.x, xBounds.y); tp.z = Mathf.Clamp(tp.z, zBounds.x, zBounds.y); targetPoint.position = tp; } } // ————— Runtime Initialization ————— void Awake() { hasArrived = false; animator = GetComponent<Animator>(); // Cache Animator reference } void OnEnable() { hasArrived = false; if (animator != null) animator.enabled = true; // Ensure animations are active on enable Debug.Log($"SpotWalker enabled, heading to: {(targetPoint ? targetPoint.name : "none")}."); } void Start() { Debug.Log("Quadruped robot initialized, will turn and move to target point."); } // ————— Movement, Turning & Arrival Handling ————— void Update() { // Only run movement and turning in Play Mode if (!Application.isPlaying || targetPoint == null || hasArrived) return; // Compute direction on the XZ plane Vector3 direction = targetPoint.position - transform.position; direction.y = 0; if (direction.sqrMagnitude > 0.0001f) { // Determine the rotation needed Quaternion targetRotation = Quaternion.LookRotation(direction); // Rotate smoothly toward the target transform.rotation = Quaternion.RotateTowards( transform.rotation, targetRotation, rotationSpeed * Time.deltaTime ); // Move forward in the newly faced direction transform.position = Vector3.MoveTowards( transform.position, targetPoint.position, speed * Time.deltaTime ); } // Arrival check if (Vector3.Distance(transform.position, targetPoint.position) < 0.05f) { hasArrived = true; Debug.Log("Arrived at target point."); if (animator != null) { animator.enabled = false; // Deactivate Animator on arrival Debug.Log("Animator disabled upon arrival."); } } } } - Create an empty GameObject and tag the object as
"Waypoint", or drag anyTransformintoTarget Pointmanually. -
Adjust
Speed,Rotation Speed,xBounds, andzBoundsin theInspector.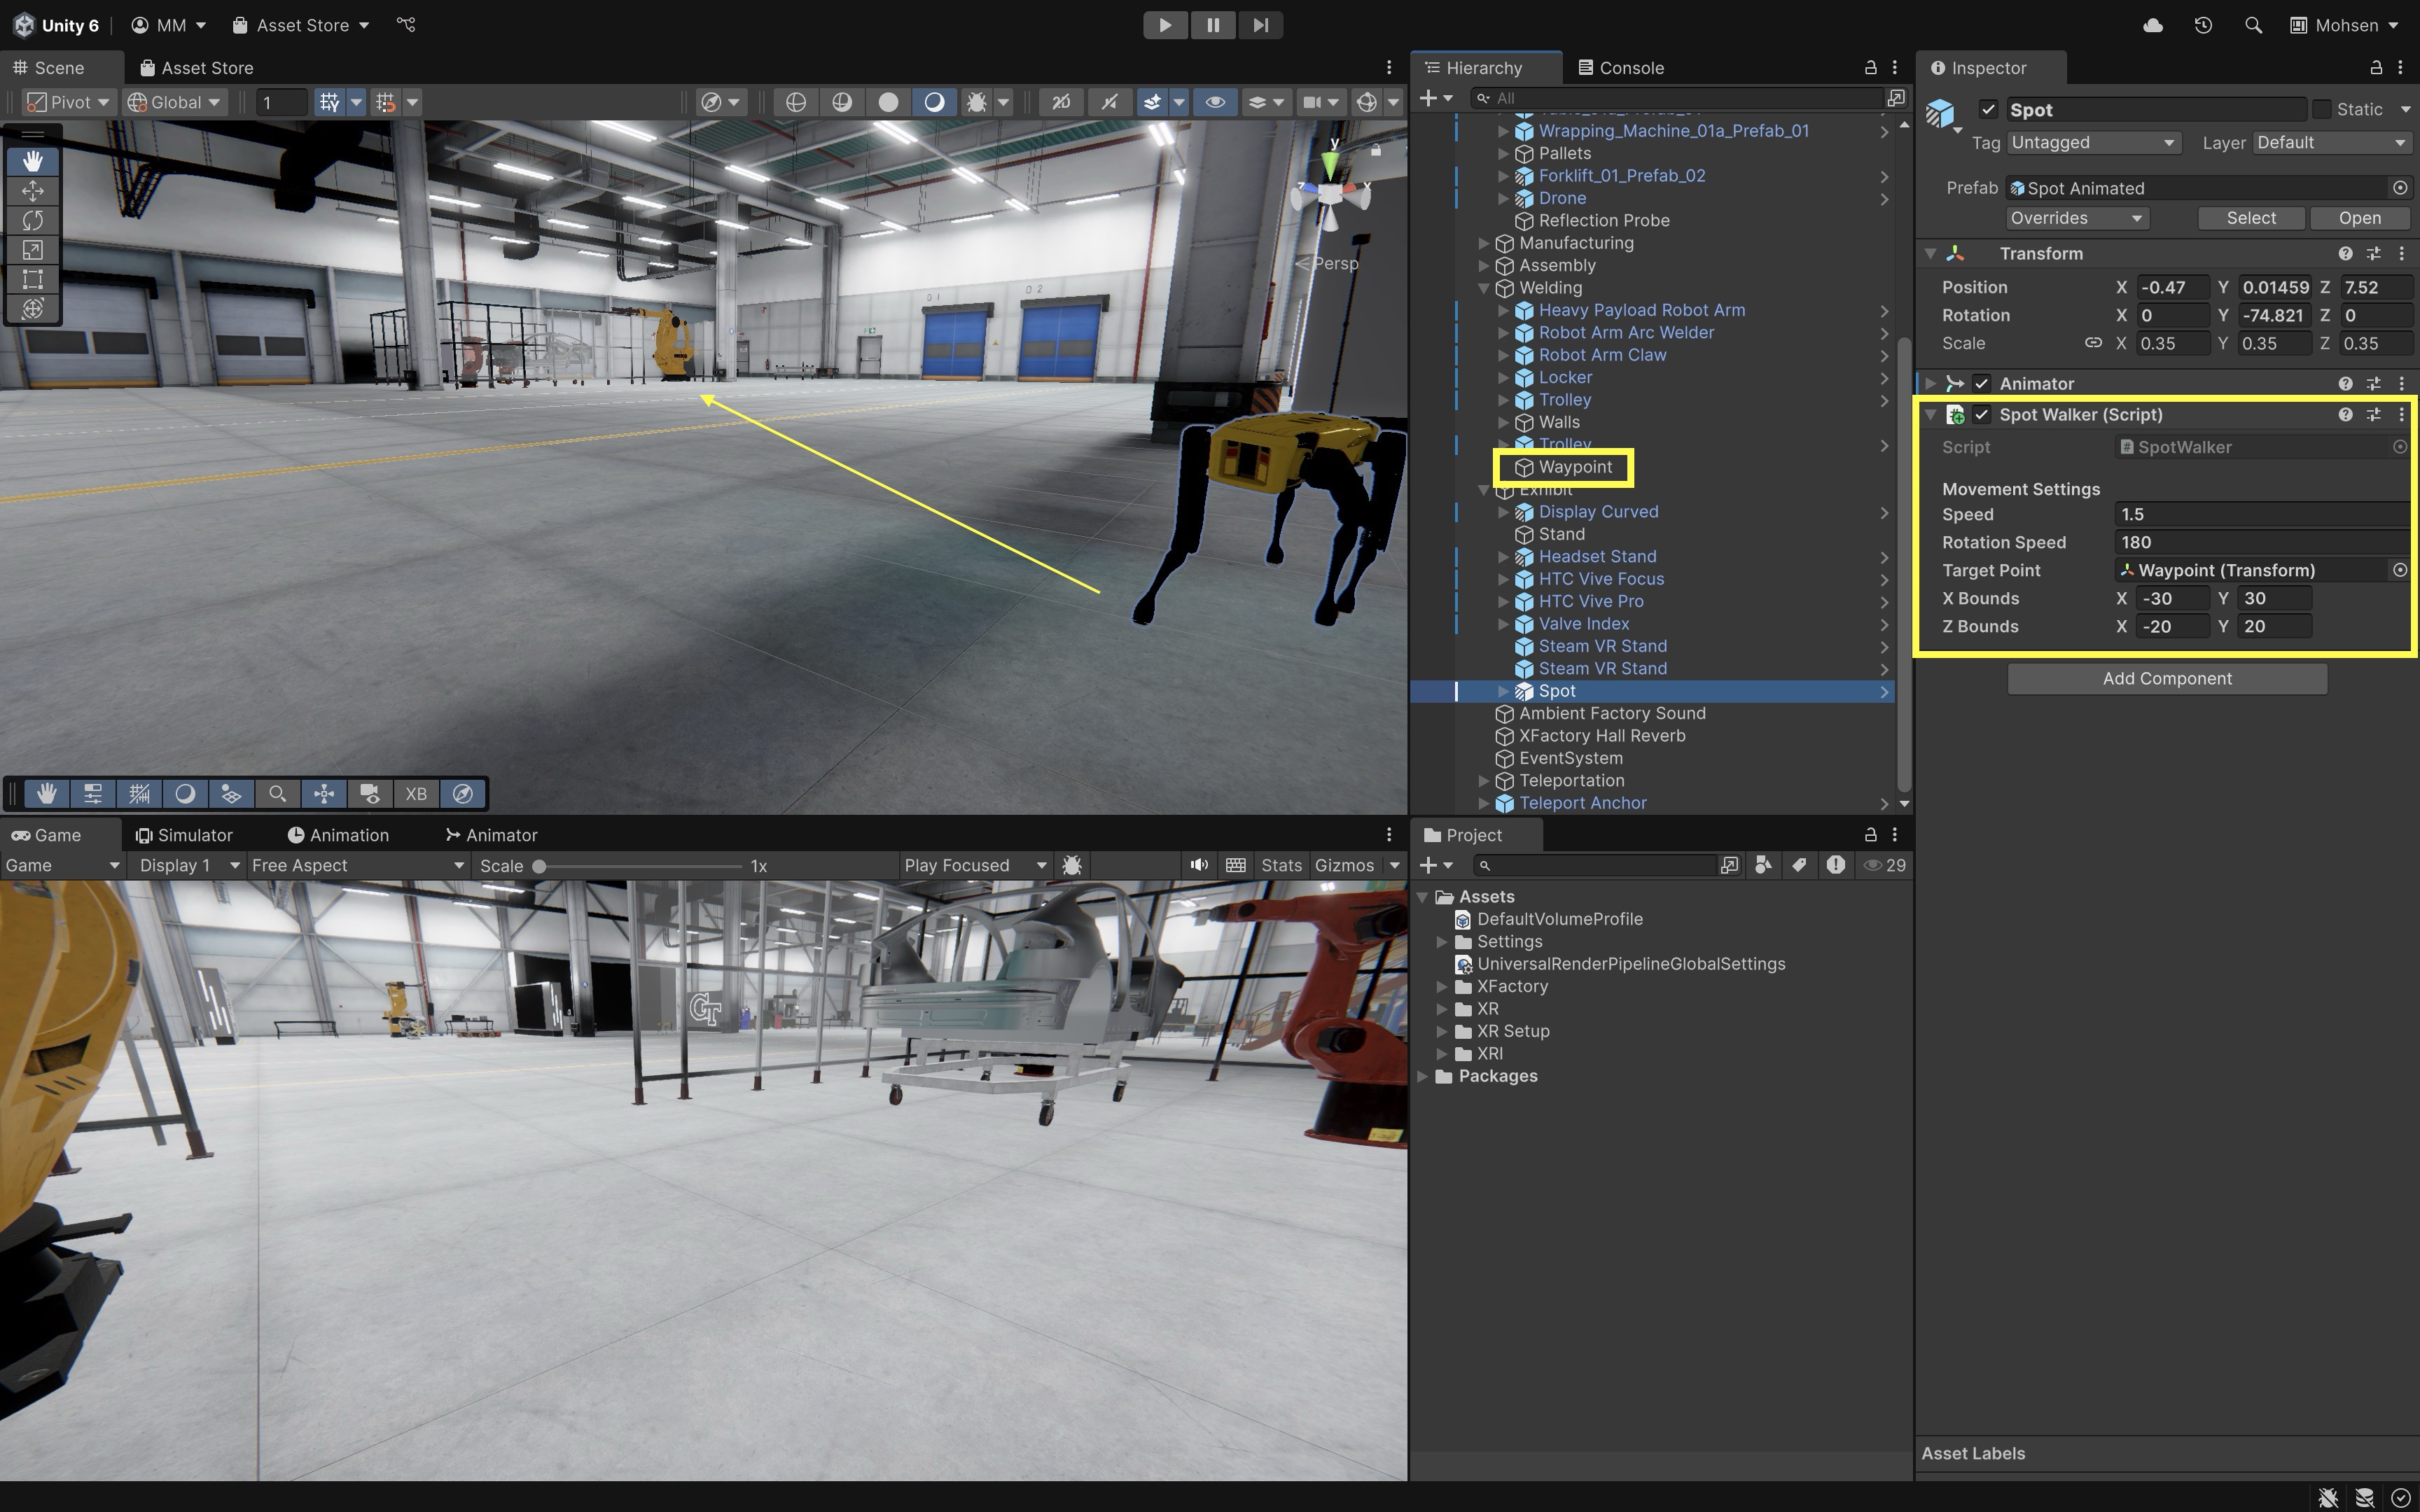
-
Play the scene—watch your robot walk to the target and stop on arrival. The walk can also be previewed in a Quest Link–connected Meta Quest headset.
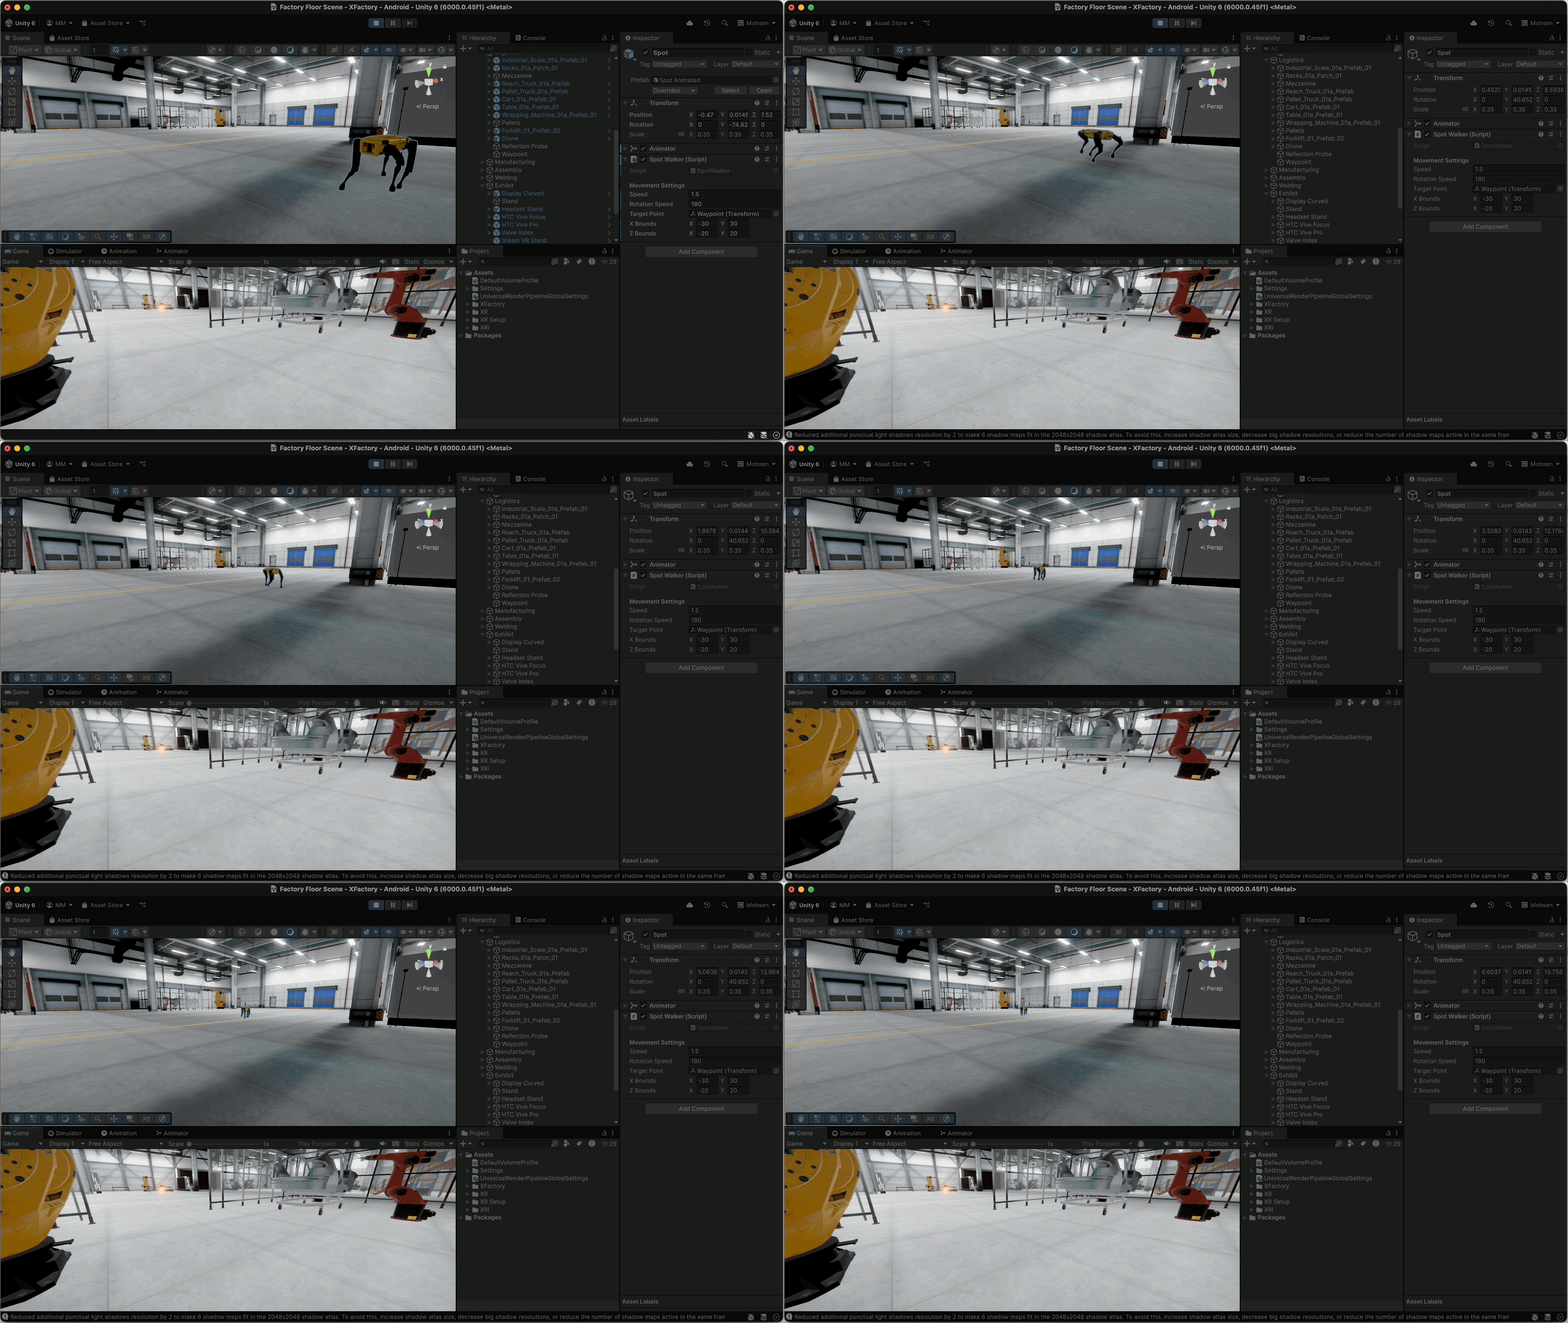
You have leveraged Unity’s lifecycle methods, especially Initialization and Setup messages, to create a robust, self-validating movement controller that works seamlessly in both the Editor and at runtime.
Frame and Update Loops

These methods are called once per frame or at a consistent time interval by Unity to handle ongoing logic during simulation. In XFactory, these loops are crucial for managing everything from real-time robotic motion to drone navigation, user interaction, UI feedback, and camera control. Key use cases include:
- Polling for user or machine input.
- Moving factory robots, drones, or conveyor belts.
- Monitoring operational conditions (e.g., battery level, tool wear).
- Updating UI panels, visual indicators, or animations.
Update()
Update() is called every frame when the script’s component is enabled. It is primarily used to implement frame-dependent behaviors and game logic. Key features include:
- Frame-Based Execution: Runs every frame, making it ideal for tasks like checking for input or updating game states.
- Time Management: Uses
Time.deltaTimeto calculate the elapsed time since the last frame, ensuring frame rate independent movement and actions. - Conditional Use: Not every script requires an
Update()function; it should only be implemented when continuous frame-based processing is necessary. - Enabled Dependency: The function is called only if the
MonoBehaviouris enabled.
Example
In XFactory’s logistics station, the forklift (Forklift) can use Update() to move forward whenever the operator presses the M key. Attach this script to a forklift GameObject in the warehouse. Because it uses transform.Translate inside Update(), the motion is tied to the rendering frame rate and does not interact with the physics engine—making it simple, but less realistic for collision handling.
using UnityEngine;

public class ForkliftUpdate : MonoBehaviour
{
    [SerializeField]
    private float moveSpeed = 3f;

    void Update()
    {
        if (Input.GetKey(KeyCode.M))
        {
            // Frame-based movement (ignores physics)
            transform.Translate(Vector3.forward * moveSpeed * Time.deltaTime);
            Debug.Log("Update: Forklift moved forward with Transform.Translate.");
        }
    }
}
FixedUpdate()
FixedUpdate() is Unity’s method for consistent, physics-based updates. It is called at regular, fixed intervals—ideal for any logic involving Rigidbody motion, collisions, or real-world physical simulations. Key features include:
- Fixed Time Step: Runs every 0.02 seconds by default (configurable in project settings).
- Physics Engine Sync: Designed for
Rigidbodymovement, collision response, and force application. - Frame Rate Independence: Unlike
Update(),FixedUpdate()provides consistent physics behavior regardless of graphical frame rates.
Example
In XFactory’s logistics station, the forklift (Forklift) can use FixedUpdate() with a Rigidbody to move forward whenever the operator presses the N key. Attach this script to a forklift GameObject that has a Rigidbody component. Because the motion is applied inside FixedUpdate(), it runs in sync with Unity’s physics engine, ensuring consistent movement across frame rates and realistic collision handling with other objects in the warehouse.
using UnityEngine;

[RequireComponent(typeof(Rigidbody))]
public class ForkliftFixedUpdate : MonoBehaviour
{
    [SerializeField]
    private float moveSpeed = 3f;

    private Rigidbody rb;

    void Awake()
    {
        rb = GetComponent<Rigidbody>();
    }

    void FixedUpdate()
    {
        if (Input.GetKey(KeyCode.N))
        {
            // Physics-based movement (collides realistically with obstacles)
            rb.MovePosition(rb.position + transform.forward * moveSpeed * Time.fixedDeltaTime);
            Debug.Log("FixedUpdate: Forklift moved forward with Rigidbody.MovePosition.");
        }
    }
}
For simple keyboard tests this is acceptable, but in larger projects it is often better to read input in
Update()and apply Rigidbody movement inFixedUpdate().
LateUpdate()
LateUpdate() is called every frame after all Update() methods have run. It’s ideal for tasks that depend on updated GameObject positions, such as camera tracking. Key features include:
- Execution Order: Runs after all
Update()calls, ensuring motion is complete before responding. - Frame-Based Call: Used for frame-dependent tasks like camera smoothing or bone-based animation alignment.
- Ideal for Follow-Cameras: Prevents laggy camera behavior that can occur if updates run out of sync.
In XFactory’s exhibit station, a camera can follow a quadruped robot using
LateUpdate()to ensure smooth tracking after the robot moves. Attach this script to the camera GameObject (e.g.,Main Camera) intended to follow the quadruped robot (Spot) in the exhibit area. UseLateUpdate()so the camera updates after the robot has moved each frame, ensuring smooth and consistent tracking behavior.
Tutorial
Let’s extend our previous SpotWalker.cs example to demonstrate Unity’s special update loops:
- Physics-Driven Movement with
FixedUpdate(): Runs at a consistent timestep (default 0.02 s) in sync with the physics engine. UsesRigidbody.MoveRotationandMovePositionto turn and advance the robot toward its target. Checks for arrival and disables the Animator when the robot reaches the waypoint. - Smooth Camera Follow with
LateUpdate(): Executes every frame, after allUpdate()calls. Repositions and orients the camera to trail the robot’s final pose without jitter.
Implementation
-
Update your
SpotWalker.csso that all movement and turning runs inFixedUpdate()using aRigidbody. Replace the oldUpdate()with this:using UnityEngine; [RequireComponent(typeof(Rigidbody))] public class SpotWalker : MonoBehaviour { [Header("Movement Settings")] [SerializeField] private float speed = 1.0f; [SerializeField] private float rotationSpeed = 180f; // Degrees per second [SerializeField] private Transform targetPoint; [SerializeField] private Vector2 xBounds = new Vector2(-10f, 10f); [SerializeField] private Vector2 zBounds = new Vector2(-5f, 5f); private bool hasArrived; private Animator animator; // Animator to disable on arrival private Rigidbody rb; // Physics body // ———— Runtime Initialization ———— void Awake() { rb = GetComponent<Rigidbody>(); animator = GetComponent<Animator>(); // Freeze X/Z rotations so the robot stays upright rb.constraints = RigidbodyConstraints.FreezeRotationX | RigidbodyConstraints.FreezeRotationZ; hasArrived = false; } void OnEnable() { hasArrived = false; if (animator != null) animator.enabled = true; Debug.Log($"SpotWalker enabled, heading to: {(targetPoint ? targetPoint.name : "none")}."); } void Start() { Debug.Log("Quadruped robot initialized; using FixedUpdate for motion."); } // ———— Physics‐Timed Movement, Turning & Arrival ———— void FixedUpdate() { if (targetPoint == null || hasArrived) return; // 1. Compute horizontal direction Vector3 dir = targetPoint.position - rb.position; dir.y = 0; if (dir.sqrMagnitude > 0.0001f) { // 2. Smoothly rotate via Rigidbody Quaternion desired = Quaternion.LookRotation(dir); Quaternion nextRot = Quaternion.RotateTowards( rb.rotation, desired, rotationSpeed * Time.fixedDeltaTime ); rb.MoveRotation(nextRot); // 3. Move forward via Rigidbody Vector3 step = dir.normalized * speed * Time.fixedDeltaTime; rb.MovePosition(rb.position + step); } // 4. Arrival check & Animator disable if (Vector3.Distance(rb.position, targetPoint.position) < 0.05f) { hasArrived = true; Debug.Log("Arrived at target point (FixedUpdate)."); if (animator != null) { animator.enabled = false; Debug.Log("Animator disabled upon arrival."); } } } } -
Add a
Rigidbodycomponent to your quadruped and freeze itsXandZrotations. Ensure it also has anAnimator.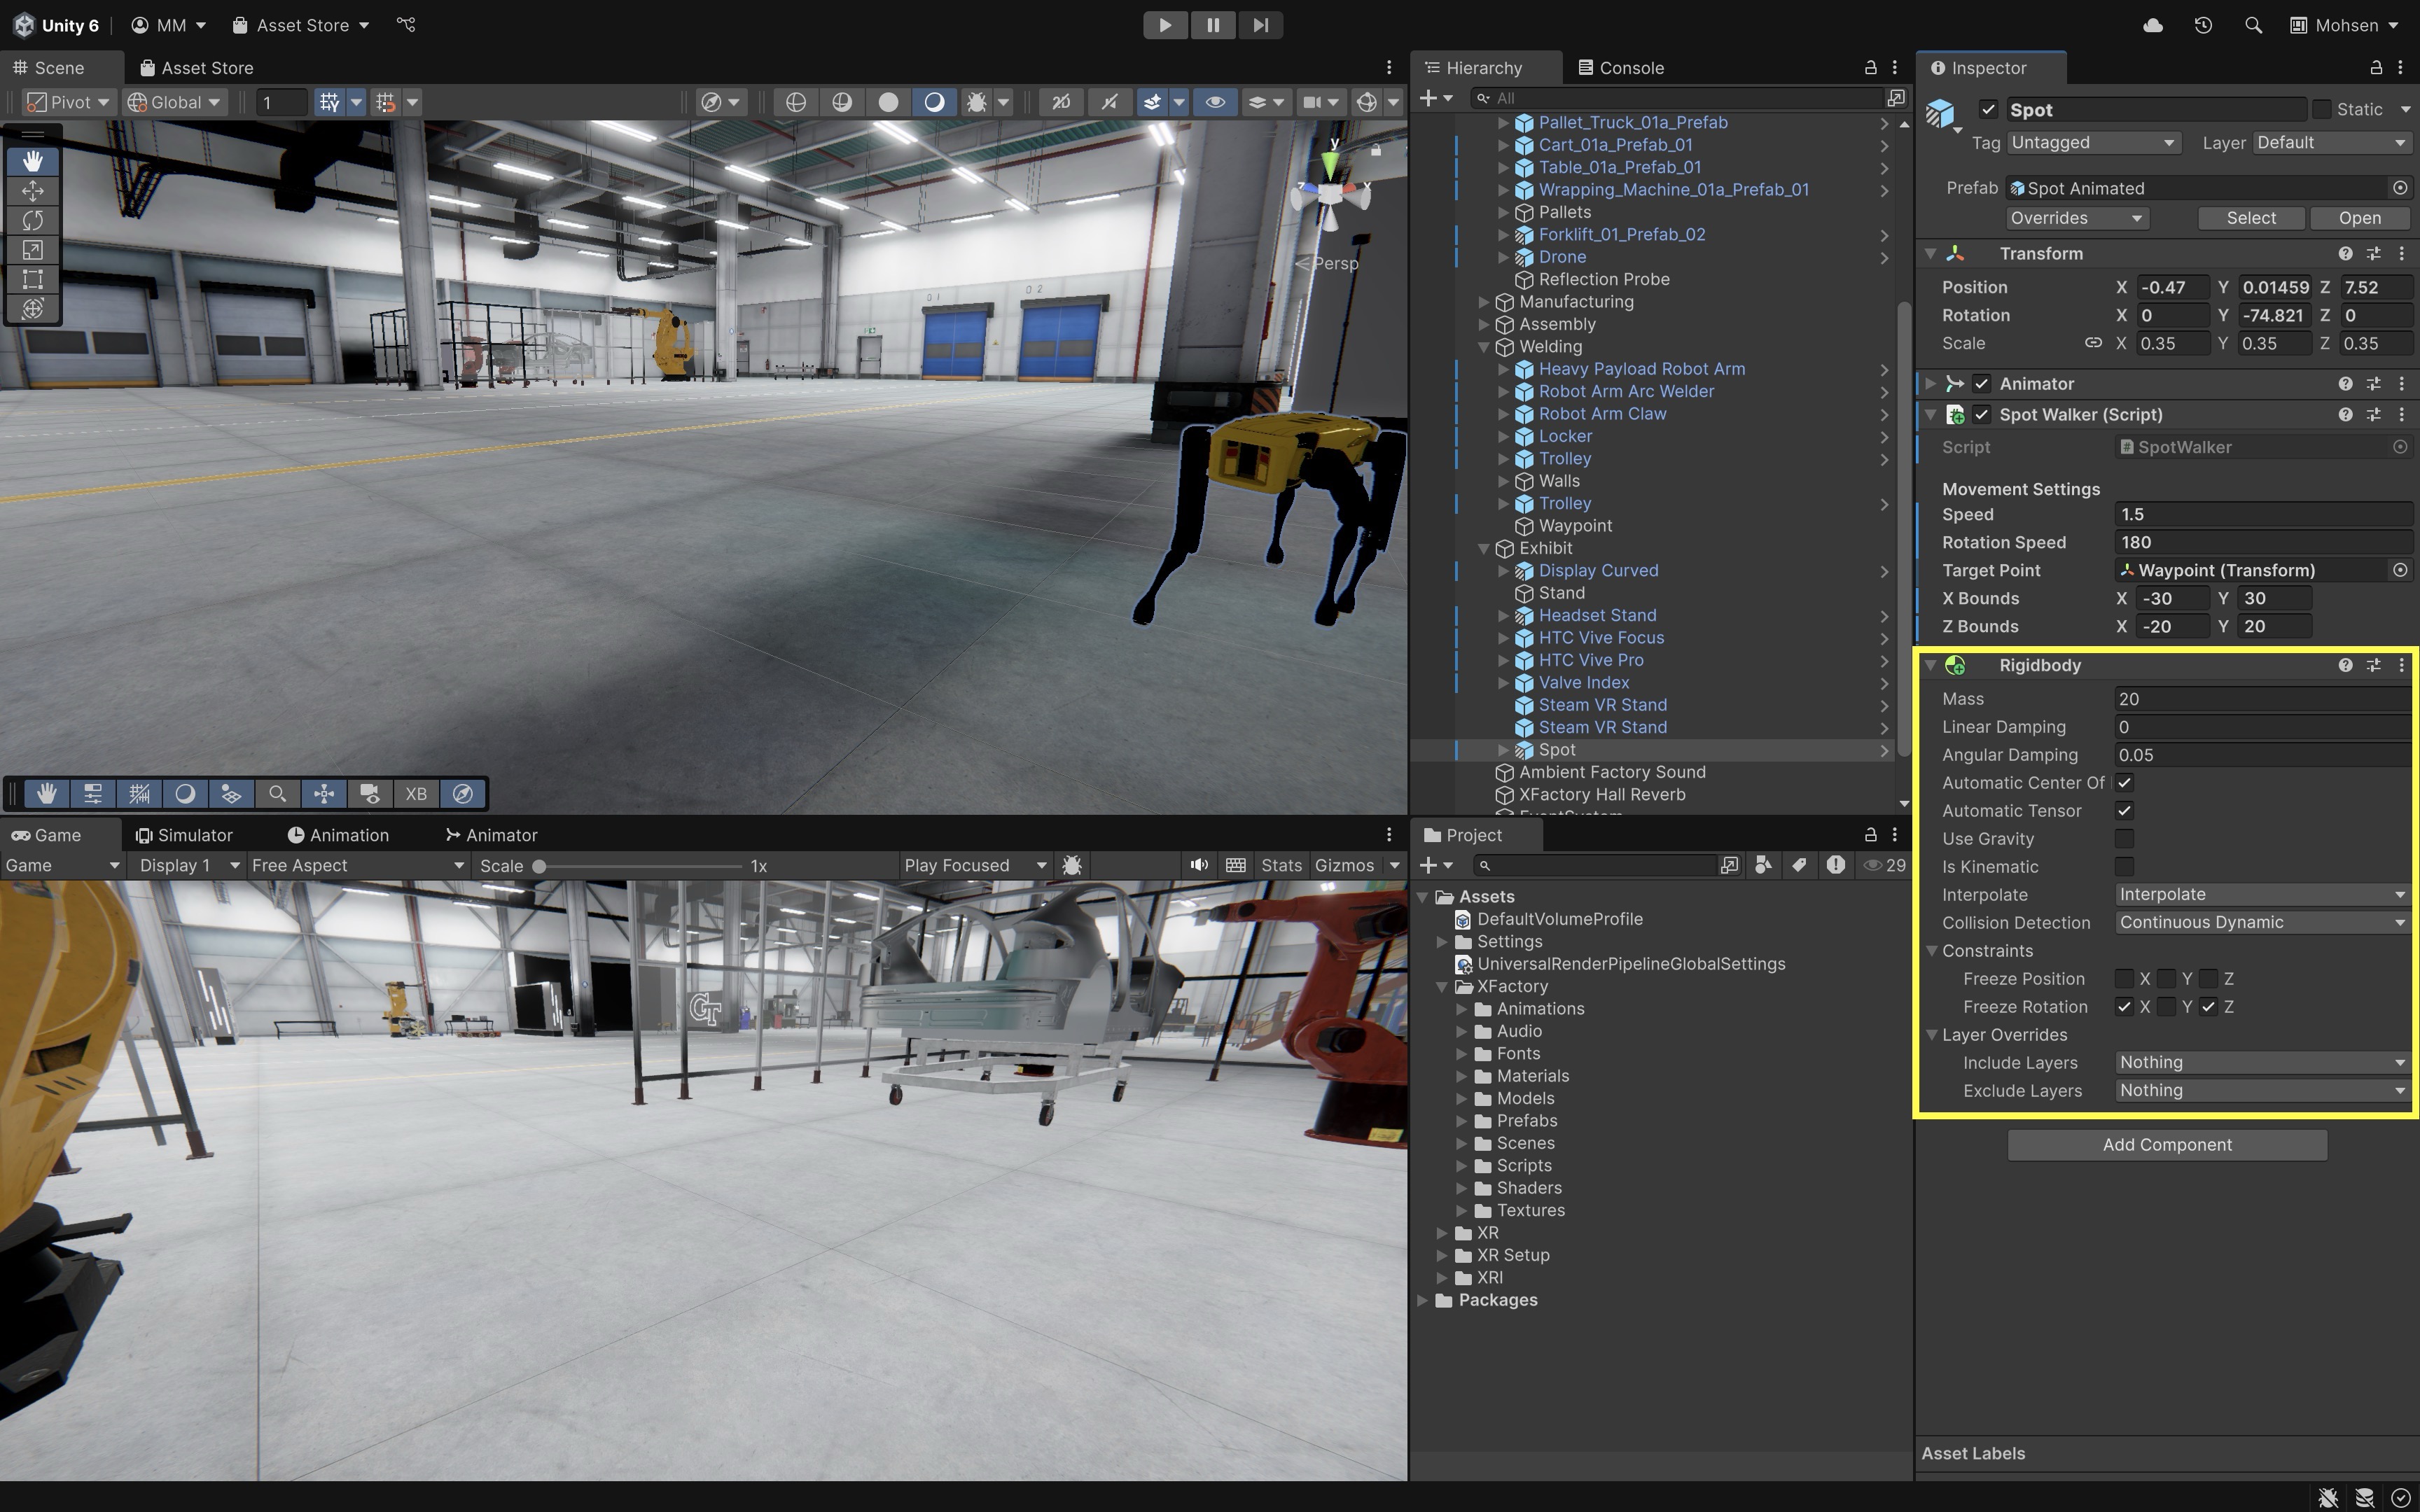
-
Create
FollowSpotCamera.csand attach to yourMain Camera:using UnityEngine; public class FollowSpotCamera : MonoBehaviour { [Tooltip("Drag your robot's Transform here")] [SerializeField] private Transform spot; [Tooltip("Offset in the robot's local space (x = right, y = up, z = forward)")] [SerializeField] private Vector3 offset = new Vector3(0f, 2f, -5f); [Tooltip("Smooth follow speed")] [SerializeField] private float smoothSpeed = 5f; void LateUpdate() { if (spot == null) return; // Position is target + rotated offset (so it stays behind the robot) Vector3 desiredPos = spot.position + spot.rotation * offset; transform.position = Vector3.Lerp( transform.position, desiredPos, smoothSpeed * Time.deltaTime ); // Always look at the robot transform.LookAt(spot); } } -
In the
Inspector, drag Spot’sTransforminto theSpotfield and adjustOffsetandSmooth Speed.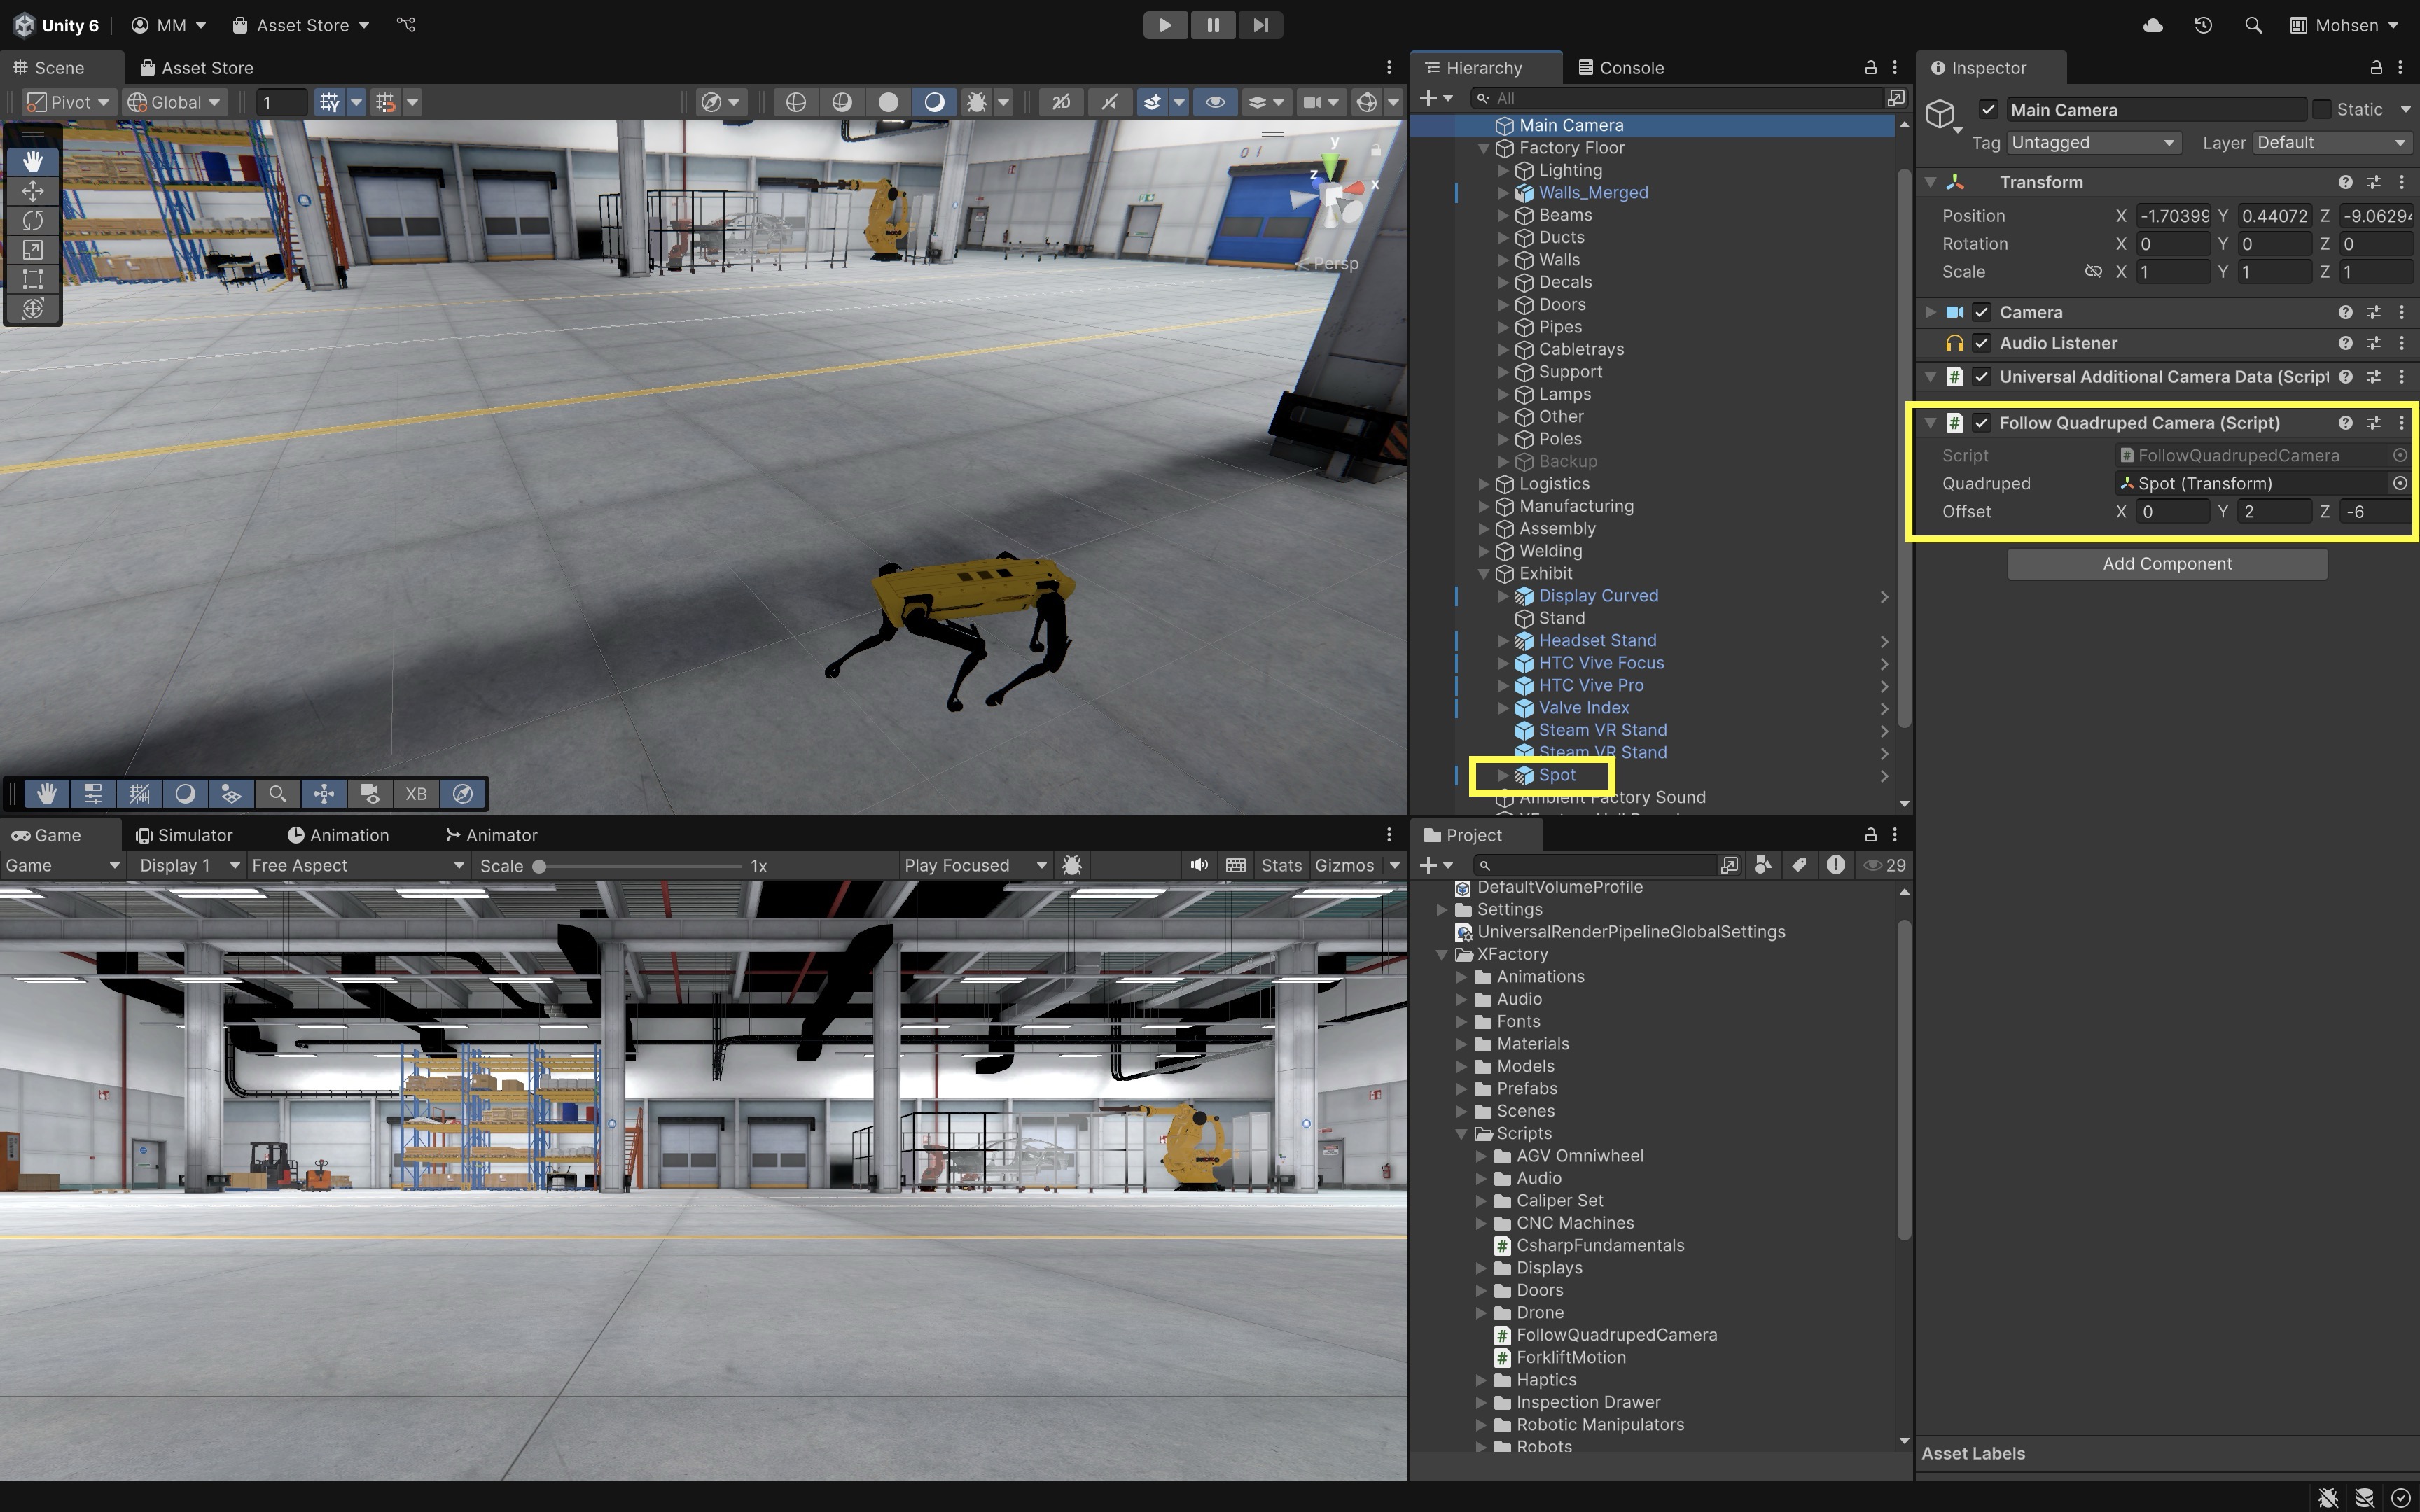
-
Play the Scene. The robot will now turn and move under fixed‐timestep physics control, disable its
Animatoron arrival, and the camera will smoothly follow inLateUpdate(). If Quest Link is set up, follow the same motion in your Meta Quest as a visual preview before Module D.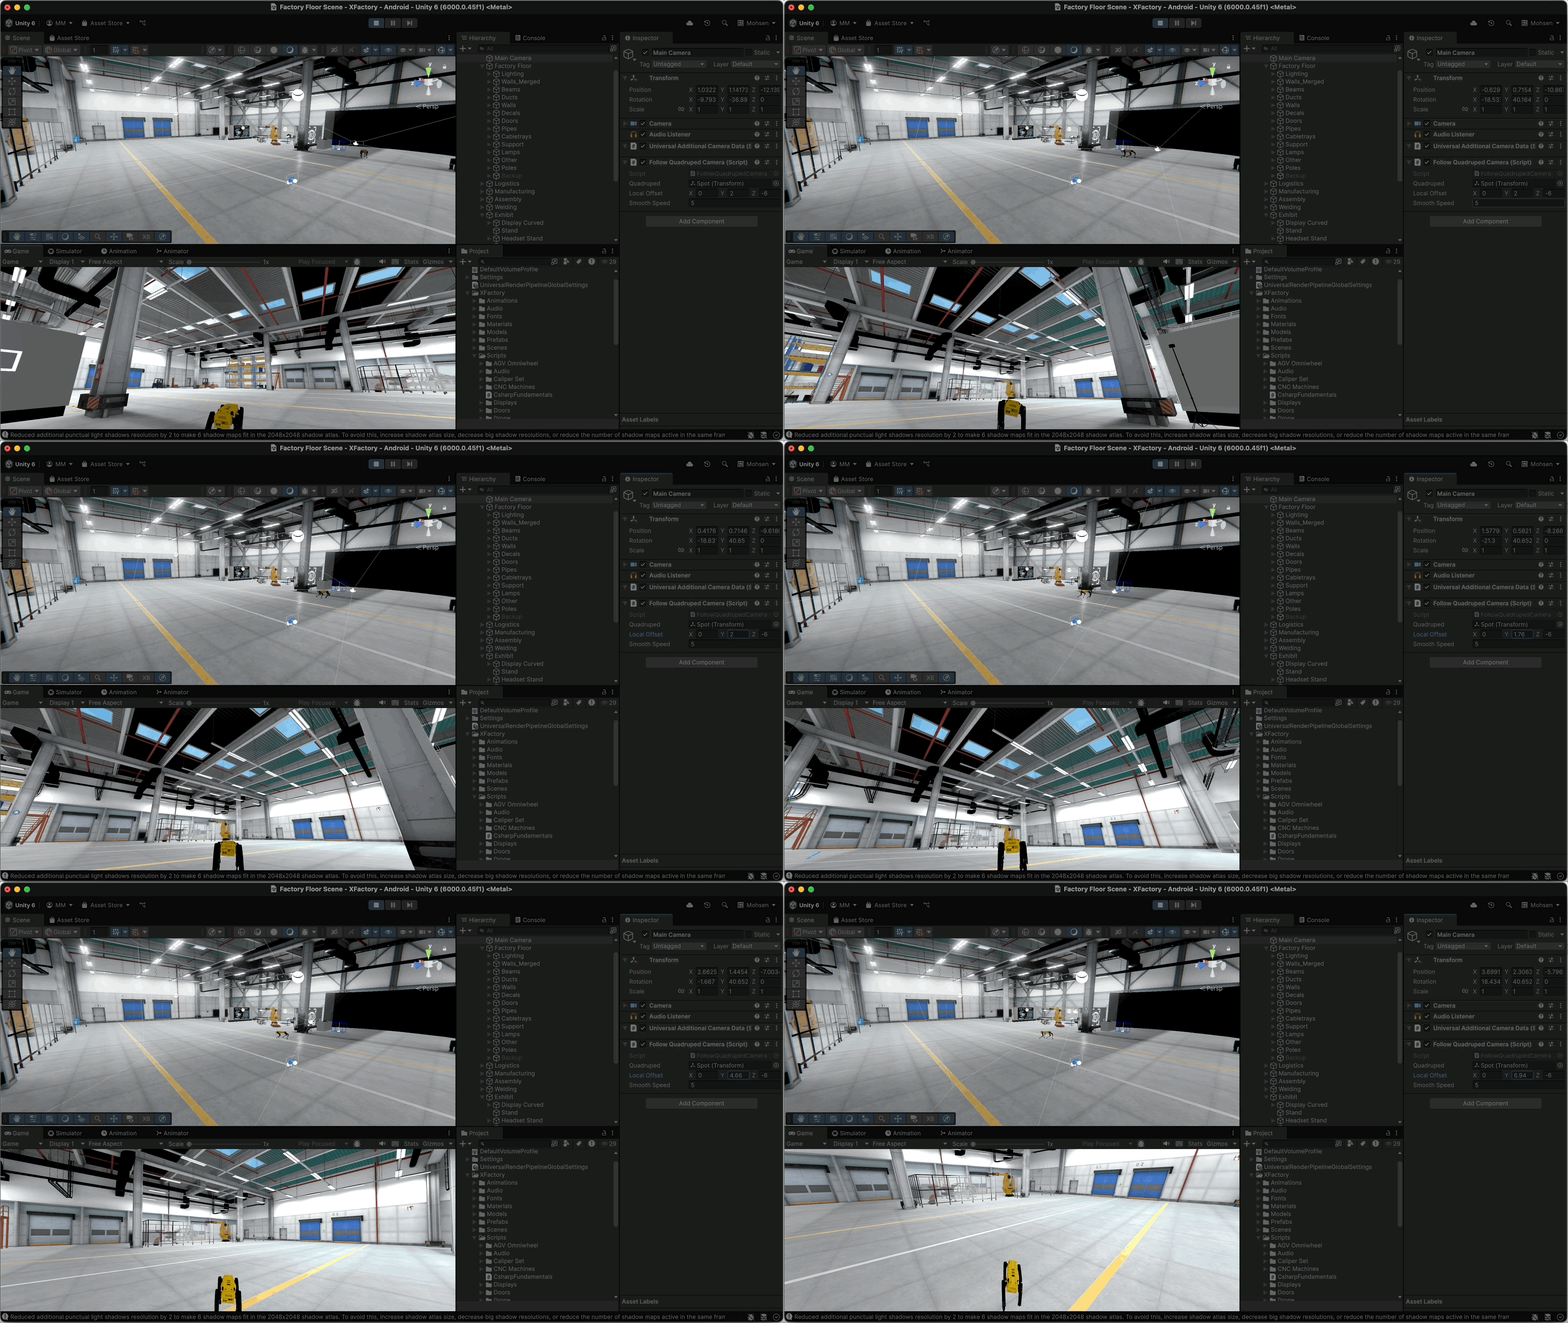
Physics Events
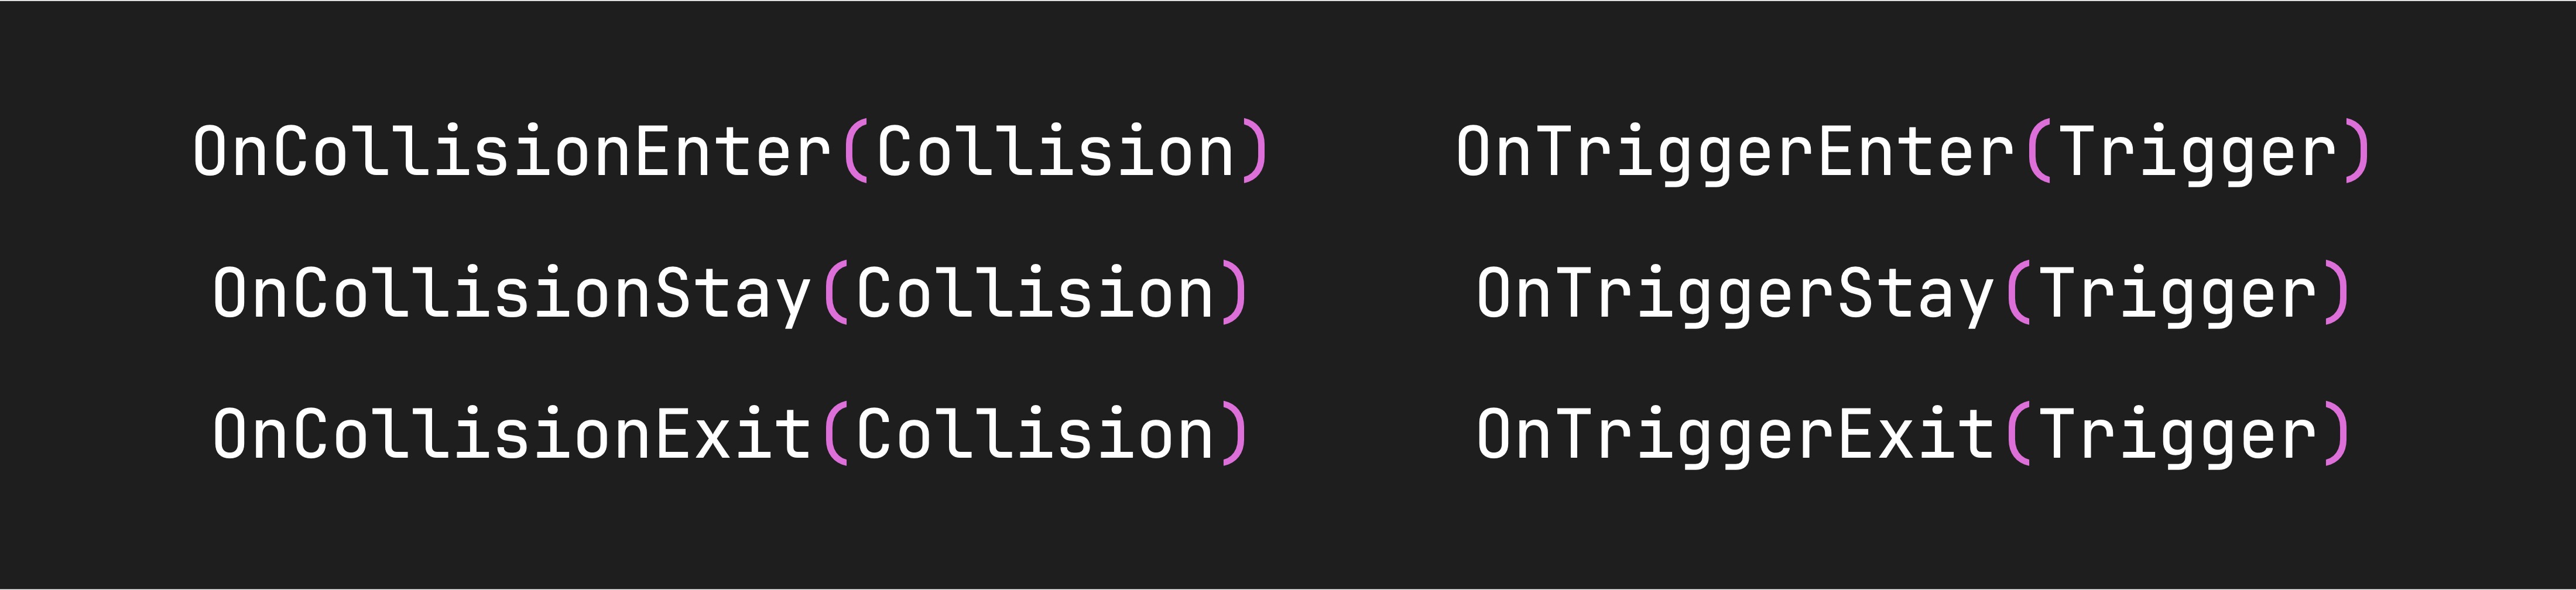
These are triggered automatically when the GameObject interacts with other objects through the Unity physics system (using Colliders and Rigidbody components). There are two types: Collision (solid object contact) and Trigger (non-physical overlap). Key use cases include:
- Detecting hits, landings, or bumps.
- Triggering effects or events when entering a zone.
- Managing physics-based reactions (e.g., bouncing, sliding).
OnCollisionEnter/Stay/Exit()
Unity provides three key callbacks—OnCollisionEnter, OnCollisionStay, and OnCollisionExit—to handle different stages of collisions between GameObjects. These methods let you detect when collisions begin, persist, and end, providing detailed physics data through the Collision object. They are essential for building responsive interactions, such as triggering effects on impact, monitoring sustained contact, or resetting states when collisions stop.
OnCollisionEnter(Collision): Called when a GameObject with a non-kinematicRigidbodystarts colliding with another collider. It passes aCollisionobject containing rich information about the contact. Key features include collision data through aCollisionobject (contact points, impact velocity, etc.), physics interaction that only triggers when one of the colliding objects has a non-kinematic rigidbody, performance optimization by omitting the parameter if details are not needed, and event propagation which allows collision events to be sent to disabledMonoBehaviourscripts.OnCollisionStay(Collision): Invoked each frame while two GameObjects remain in contact. Useful for ongoing feedback or monitoring sustained pressure/contact. Key features include continuous collision monitoring (called every frame while the collision persists), detailed collision data (contact points and relative velocity), performance considerations (omit parameter to avoid extra computations), the requirement that one collider must have a non-kinematic rigidbody, and the fact that collision stay events are not triggered for rigidbodies that are sleeping.OnCollisionExit(Collision): Called when two colliders stop touching. Commonly used for cleanup, state reset, or to log the end of a collision event. Key features include collision end notification (triggered when contact ceases), optional detailed collision data (contact points and velocity, though often just used to signal the end), the requirement that one object must have a non-kinematic rigidbody, and performance considerations (omit parameter if detailed data is unnecessary to reduce computations).
Example
In XFactory’s training arena, a simple training object can log when it collides with obstacles such as crates or walls. Attach this script to a player or training object with a CapsuleCollider and a Rigidbody with Is Kinematic checked and Use Gravity unchecked. Objects it collides with must also have a Collider; at least one colliding object needs a non-kinematic Rigidbody for OnCollisionEnter/Stay/Exit to fire reliably.
using UnityEngine;

[RequireComponent(typeof(Rigidbody))]
[RequireComponent(typeof(CapsuleCollider))]
public class PlayerCollisionLogger : MonoBehaviour
{
    void OnCollisionEnter(Collision collision)
    {
        Debug.Log($"[Player] ENTER collision with: {collision.gameObject.name}");
    }

    void OnCollisionStay(Collision collision)
    {
        Debug.Log($"[Player] STAY collision with: {collision.gameObject.name}");
    }

    void OnCollisionExit(Collision collision)
    {
        Debug.Log($"[Player] EXIT collision with: {collision.gameObject.name}");
    }
}
OnTriggerEnter/Stay/Exit()
Unity provides three key trigger callbacks—OnTriggerEnter, OnTriggerStay, and OnTriggerExit—to detect when objects interact with trigger zones. Unlike collisions, triggers don’t physically block movement but instead allow for non-physical interactions such as sensors, checkpoints, and area-based events. For trigger callbacks, one collider must have Is Trigger enabled, and at least one of the two interacting objects must include a Rigidbody. Together, these methods let you monitor when an object enters, remains inside, and exits a trigger zone for full lifecycle control.
OnTriggerEnter(Collider):OnTriggerEnter(Collider)is called when a GameObject with a trigger collider overlaps another collider. It’s commonly used for non-physical detection such as zone-based events, pickups, or proximity-based interactions. One of the colliders must be marked as a trigger, and at least one object must have aRigidbodycomponent (typically the moving object), with both havingColliders. This method is executed during theFixedUpdate()cycle, and theotherparameter refers to the collider of the object that entered the trigger.OnTriggerStay(Collider):OnTriggerStay(Collider)is called every physics update while another object remains inside a trigger collider. It is ideal for monitoring ongoing presence within a zone, such as charging stations, loading bays, or weight sensors. It provides continuous detection and is called repeatedly while the other collider stays inside the trigger. At least one object must have aRigidbodycomponent, and this method is especially useful for checking ongoing conditions like object stability, valid position, or contact duration.OnTriggerExit(Collider):OnTriggerExit(Collider)is called when another collider exits a trigger zone. It is commonly used to stop processes that began withOnTriggerEnter()orOnTriggerStay(). It provides exit detection, signaling that an object has left the trigger zone, and requires at least one of the two colliders to have aRigidbody. It complements entry events for full lifecycle control, but note that if the object is destroyed or deactivated inside the trigger, no exit event will occur.
Example
This example shows how a training object with a Rigidbody and trigger collider can detect when it enters, stays inside, or exits a trigger zone using OnTriggerEnter/Stay/Exit. Triggers don’t physically block movement but still fire events when overlapped—ideal for sensors, checkpoints, or area-based gameplay mechanics.
using UnityEngine;

[RequireComponent(typeof(Rigidbody))]
[RequireComponent(typeof(CapsuleCollider))]
public class PlayerTriggerLogger : MonoBehaviour
{
    void OnTriggerEnter(Collider other)
    {
        Debug.Log($"[Player] ENTER trigger with: {other.gameObject.name}");
    }

    void OnTriggerStay(Collider other)
    {
        Debug.Log($"[Player] STAY trigger with: {other.gameObject.name}");
    }

    void OnTriggerExit(Collider other)
    {
        Debug.Log($"[Player] EXIT trigger with: {other.gameObject.name}");
    }
}
In the Inspector, enable
Is Triggeron the trigger collider, or place this script on the moving object and ensure the zone collider is marked as a trigger.
Tutorial
Let’s use OnTriggerEnter(Collider) to simulate a box scanning process in the logistics station using the drone. You will:
- Pilot a drone in Play Mode using W/A/S/D, Q/E (yaw), and Z/C (vertical movement). This keyboard-driven drone is for desktop testing, not final XR input.
- Scan storage boxes by bumping them with a trigger sphere and displaying their names on a UI text.
- Keep the fans spinning at idle or active speed based on movement input.
- Chase–style camera follows behind using
LateUpdate().
Implementation
- Update the
DroneController.csScript:- Update the existing
DroneController.csscript attached to yourDrone(must have aRigidbody) as follows. - This script handles movement in
FixedUpdate(), fan rotation & scan‐UI inUpdate(), and scanning viaOnTriggerEnter().
using UnityEngine; using TMPro; [RequireComponent(typeof(Rigidbody))] public class DroneController : MonoBehaviour { [Header("Movement Settings")] [SerializeField] private float speed = 5f; // linear speed (m/s) [SerializeField] private float rotationSpeed = 100f; // yaw speed (deg/s) [Tooltip("How quickly velocity matches target (1/seconds). Higher = snappier.")] [SerializeField] private float velocityDamping = 12f; [Tooltip("How quickly yaw matches target (1/seconds). Higher = snappier.")] [SerializeField] private float yawDamping = 20f; [Header("Fan Settings")] [SerializeField] private float idleFanSpeed = 1000f; [SerializeField] private float activeFanSpeed = 2000f; [Header("Scan UI (TextMeshPro)")] [SerializeField] private TextMeshProUGUI scanText; [SerializeField] private float displayDuration = 2f; private Rigidbody rb; private Transform[] fanTransforms; private bool isFlying; private float scanTimer; // ---- input cached per-frame ---- float forwardInput, strafeInput, turnInput, verticalInput; void Awake() { rb = GetComponent<Rigidbody>(); // Physics settings that help visual smoothness rb.interpolation = RigidbodyInterpolation.Interpolate; rb.collisionDetectionMode = CollisionDetectionMode.Continuous; rb.maxAngularVelocity = 100f; rb.constraints = RigidbodyConstraints.FreezeRotationX | RigidbodyConstraints.FreezeRotationZ; var fansParent = transform.Find("Fans"); if (fansParent != null) { fanTransforms = new Transform[fansParent.childCount]; for (int i = 0; i < fansParent.childCount; i++) fanTransforms[i] = fansParent.GetChild(i); } } void Update() { // ----- cache inputs here (per render frame) ----- forwardInput = (Input.GetKey(KeyCode.W) ? 1f : 0f) + (Input.GetKey(KeyCode.S) ? -1f : 0f); strafeInput = (Input.GetKey(KeyCode.D) ? 1f : 0f) + (Input.GetKey(KeyCode.A) ? -1f : 0f); turnInput = (Input.GetKey(KeyCode.E) ? 1f : 0f) + (Input.GetKey(KeyCode.Q) ? -1f : 0f); verticalInput= (Input.GetKey(KeyCode.Z) ? 1f : 0f) + (Input.GetKey(KeyCode.C) ? -1f : 0f); // normalize planar so diagonals aren't faster; keep vertical independent Vector2 planar = new Vector2(strafeInput, forwardInput); planar = planar.sqrMagnitude > 1f ? planar.normalized : planar; strafeInput = planar.x; forwardInput = planar.y; isFlying = Mathf.Abs(forwardInput) + Mathf.Abs(strafeInput) + Mathf.Abs(turnInput) + Mathf.Abs(verticalInput) > 0f; // Clear scan text after the display duration if (scanText && !string.IsNullOrEmpty(scanText.text)) { scanTimer += Time.deltaTime; if (scanTimer >= displayDuration) { scanText.text = ""; scanTimer = 0f; } } } void FixedUpdate() { // ----- linear velocity target ----- Vector3 targetVel = (transform.forward * forwardInput + transform.right * strafeInput + transform.up * verticalInput) * speed; // Exponential smoothing towards targetVel (frame-rate independent) float tv = 1f - Mathf.Exp(-velocityDamping * Time.fixedDeltaTime); // Unity 6 uses Rigidbody.linearVelocity for 3D Rigidbody velocity. rb.linearVelocity = Vector3.Lerp(rb.linearVelocity, targetVel, tv); // ----- yaw angular velocity target ----- // Convert deg/s to rad/s for angularVelocity float yawRadPerSec = rotationSpeed * Mathf.Deg2Rad * turnInput; float currentYaw = Vector3.Dot(rb.angularVelocity, Vector3.up); float targetYaw = yawRadPerSec; float ta = 1f - Mathf.Exp(-yawDamping * Time.fixedDeltaTime); float newYaw = Mathf.Lerp(currentYaw, targetYaw, ta); // preserve only yaw (keep X/Z zero because we froze them) rb.angularVelocity = new Vector3(0f, newYaw, 0f); } void LateUpdate() { // Rotate fans visually after physics for smooth visual motion float fanSpeed = isFlying ? activeFanSpeed : idleFanSpeed; if (fanTransforms != null) { float angle = fanSpeed * Time.deltaTime; // purely visual for (int i = 0; i < fanTransforms.Length; i++) fanTransforms[i].Rotate(Vector3.forward, angle, Space.Self); } } void OnTriggerEnter(Collider other) { if (other.CompareTag("StorageBox") && scanText != null) { scanText.text = $"Scanned: {other.name}"; scanTimer = 0f; Debug.Log($"[Drone] Scanned: {other.name}"); } } } - Update the existing
- Add a Front–Mount Trigger Collider:
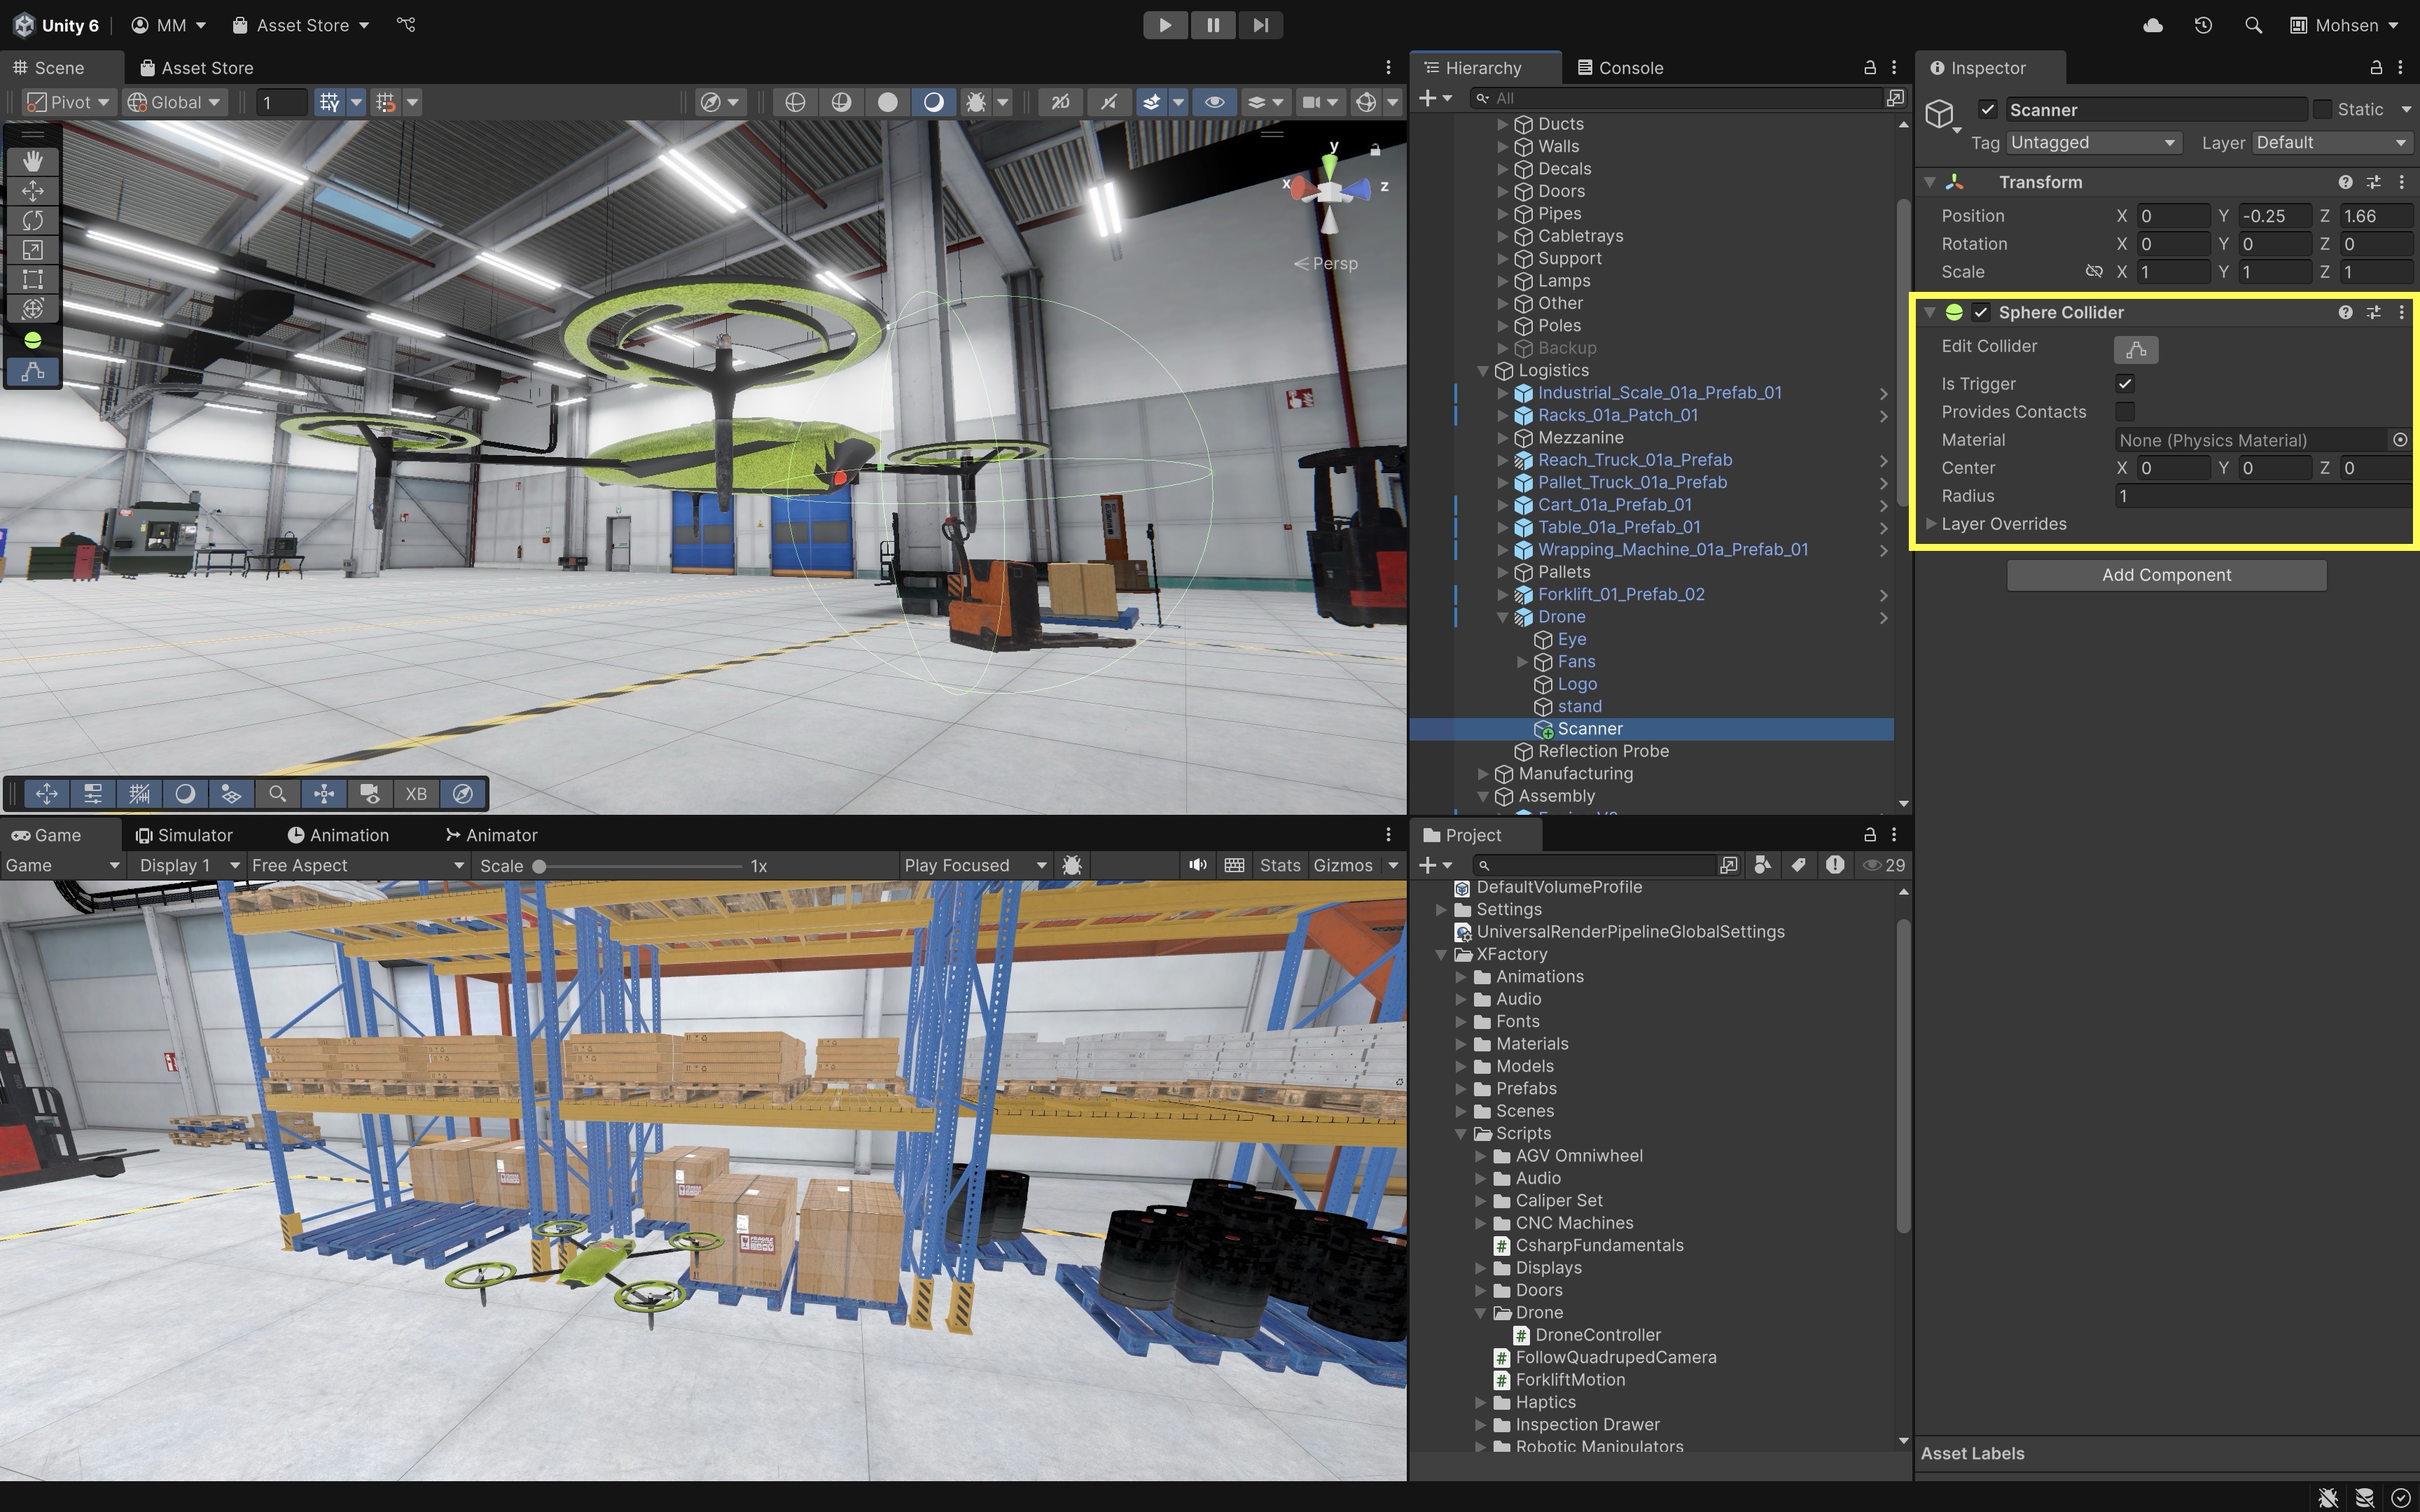
- Under your
DroneGameObject, create an empty child namedScannerand position it at the drone’s nose (where you want it to “scan” forward). Also, make sure to disable the drone’sAnimator. - Keep the
Rigidbodyon the Drone root. The childScannertrigger collider will participate as part of that Rigidbody hierarchy. - On the
Scannerchild, add aSphereCollidercomponent. - In the
SphereCollidersettings, checkIs Trigger. - Adjust the
Radiusso it just encapsulates the front of the drone without overlapping too far. This trigger will fireOnTriggerEnter()in yourDroneControllerwhen it overlaps anyStorageBox. - Ensure each storage box has a
Colliderand itsTagis set toStorageBox.
- Under your
- Add a Scan UI Text:
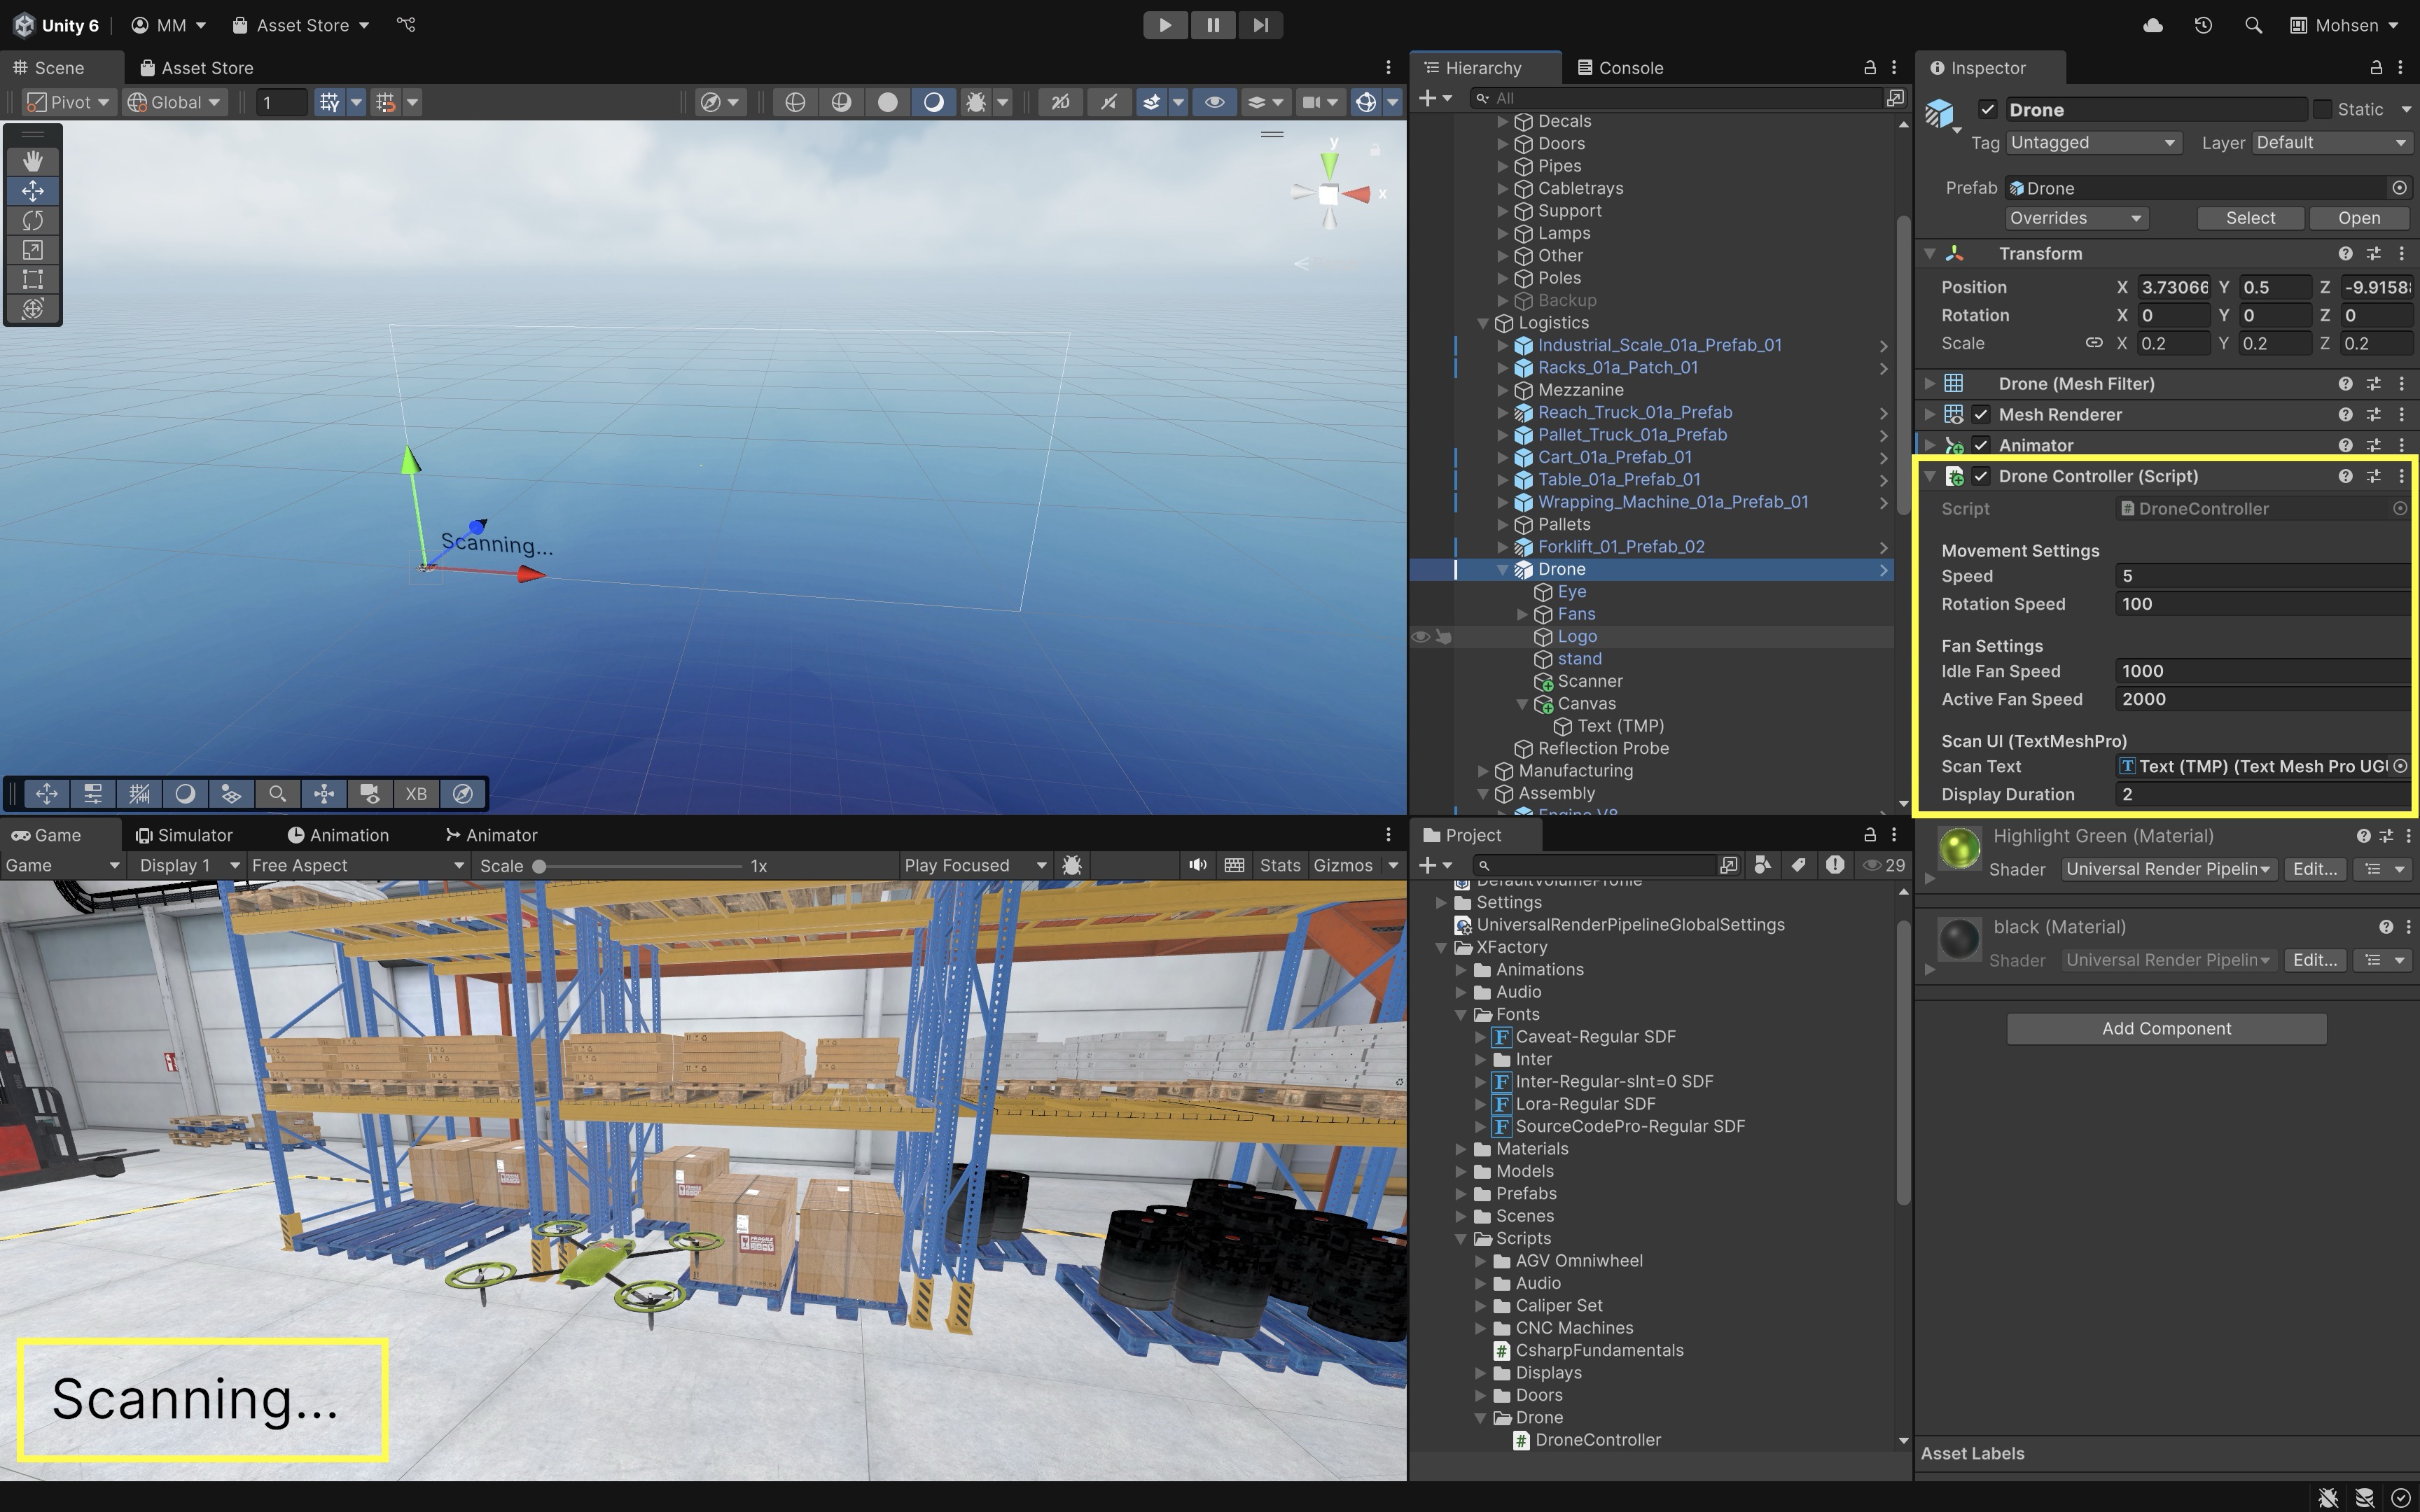
- Create a
Screen Space - OverlayUICanvas, addUI > Text - TextMeshPro. - Position the text element (e.g., top-left of the screen) and clear its default content.
- Optionally style the font, size, and color for readability.
- Drag this Text component into the
Scan Textfield on yourDroneControllerscript in theInspector.
- Create a
- Create a
FollowDroneCamera.csScript:- Create a new script named
FollowDroneCamera.cs. - Attach it to your
Main Camera. Remove the other script (FollowQuadrupedCamera.cs) to avoid conflict.
using UnityEngine; public class FollowDroneCamera : MonoBehaviour { [Tooltip("Assign your Drone’s Transform here")] [SerializeField] private Transform drone; [Tooltip("Local offset: (X right, Y up, Z back)")] [SerializeField] private Vector3 localOffset = new Vector3(0f, 3f, -8f); [Tooltip("Smooth follow speed")] [SerializeField] private float smoothSpeed = 50f; void LateUpdate() { if (drone == null) return; // 1. Compute world position behind the drone Vector3 desiredPos = drone.TransformPoint(localOffset); // 2. Smoothly interpolate camera position transform.position = Vector3.Lerp( transform.position, desiredPos, smoothSpeed * Time.deltaTime ); // 3. Always look at the drone’s center transform.LookAt(drone); } } - Create a new script named
- Configure the Script:
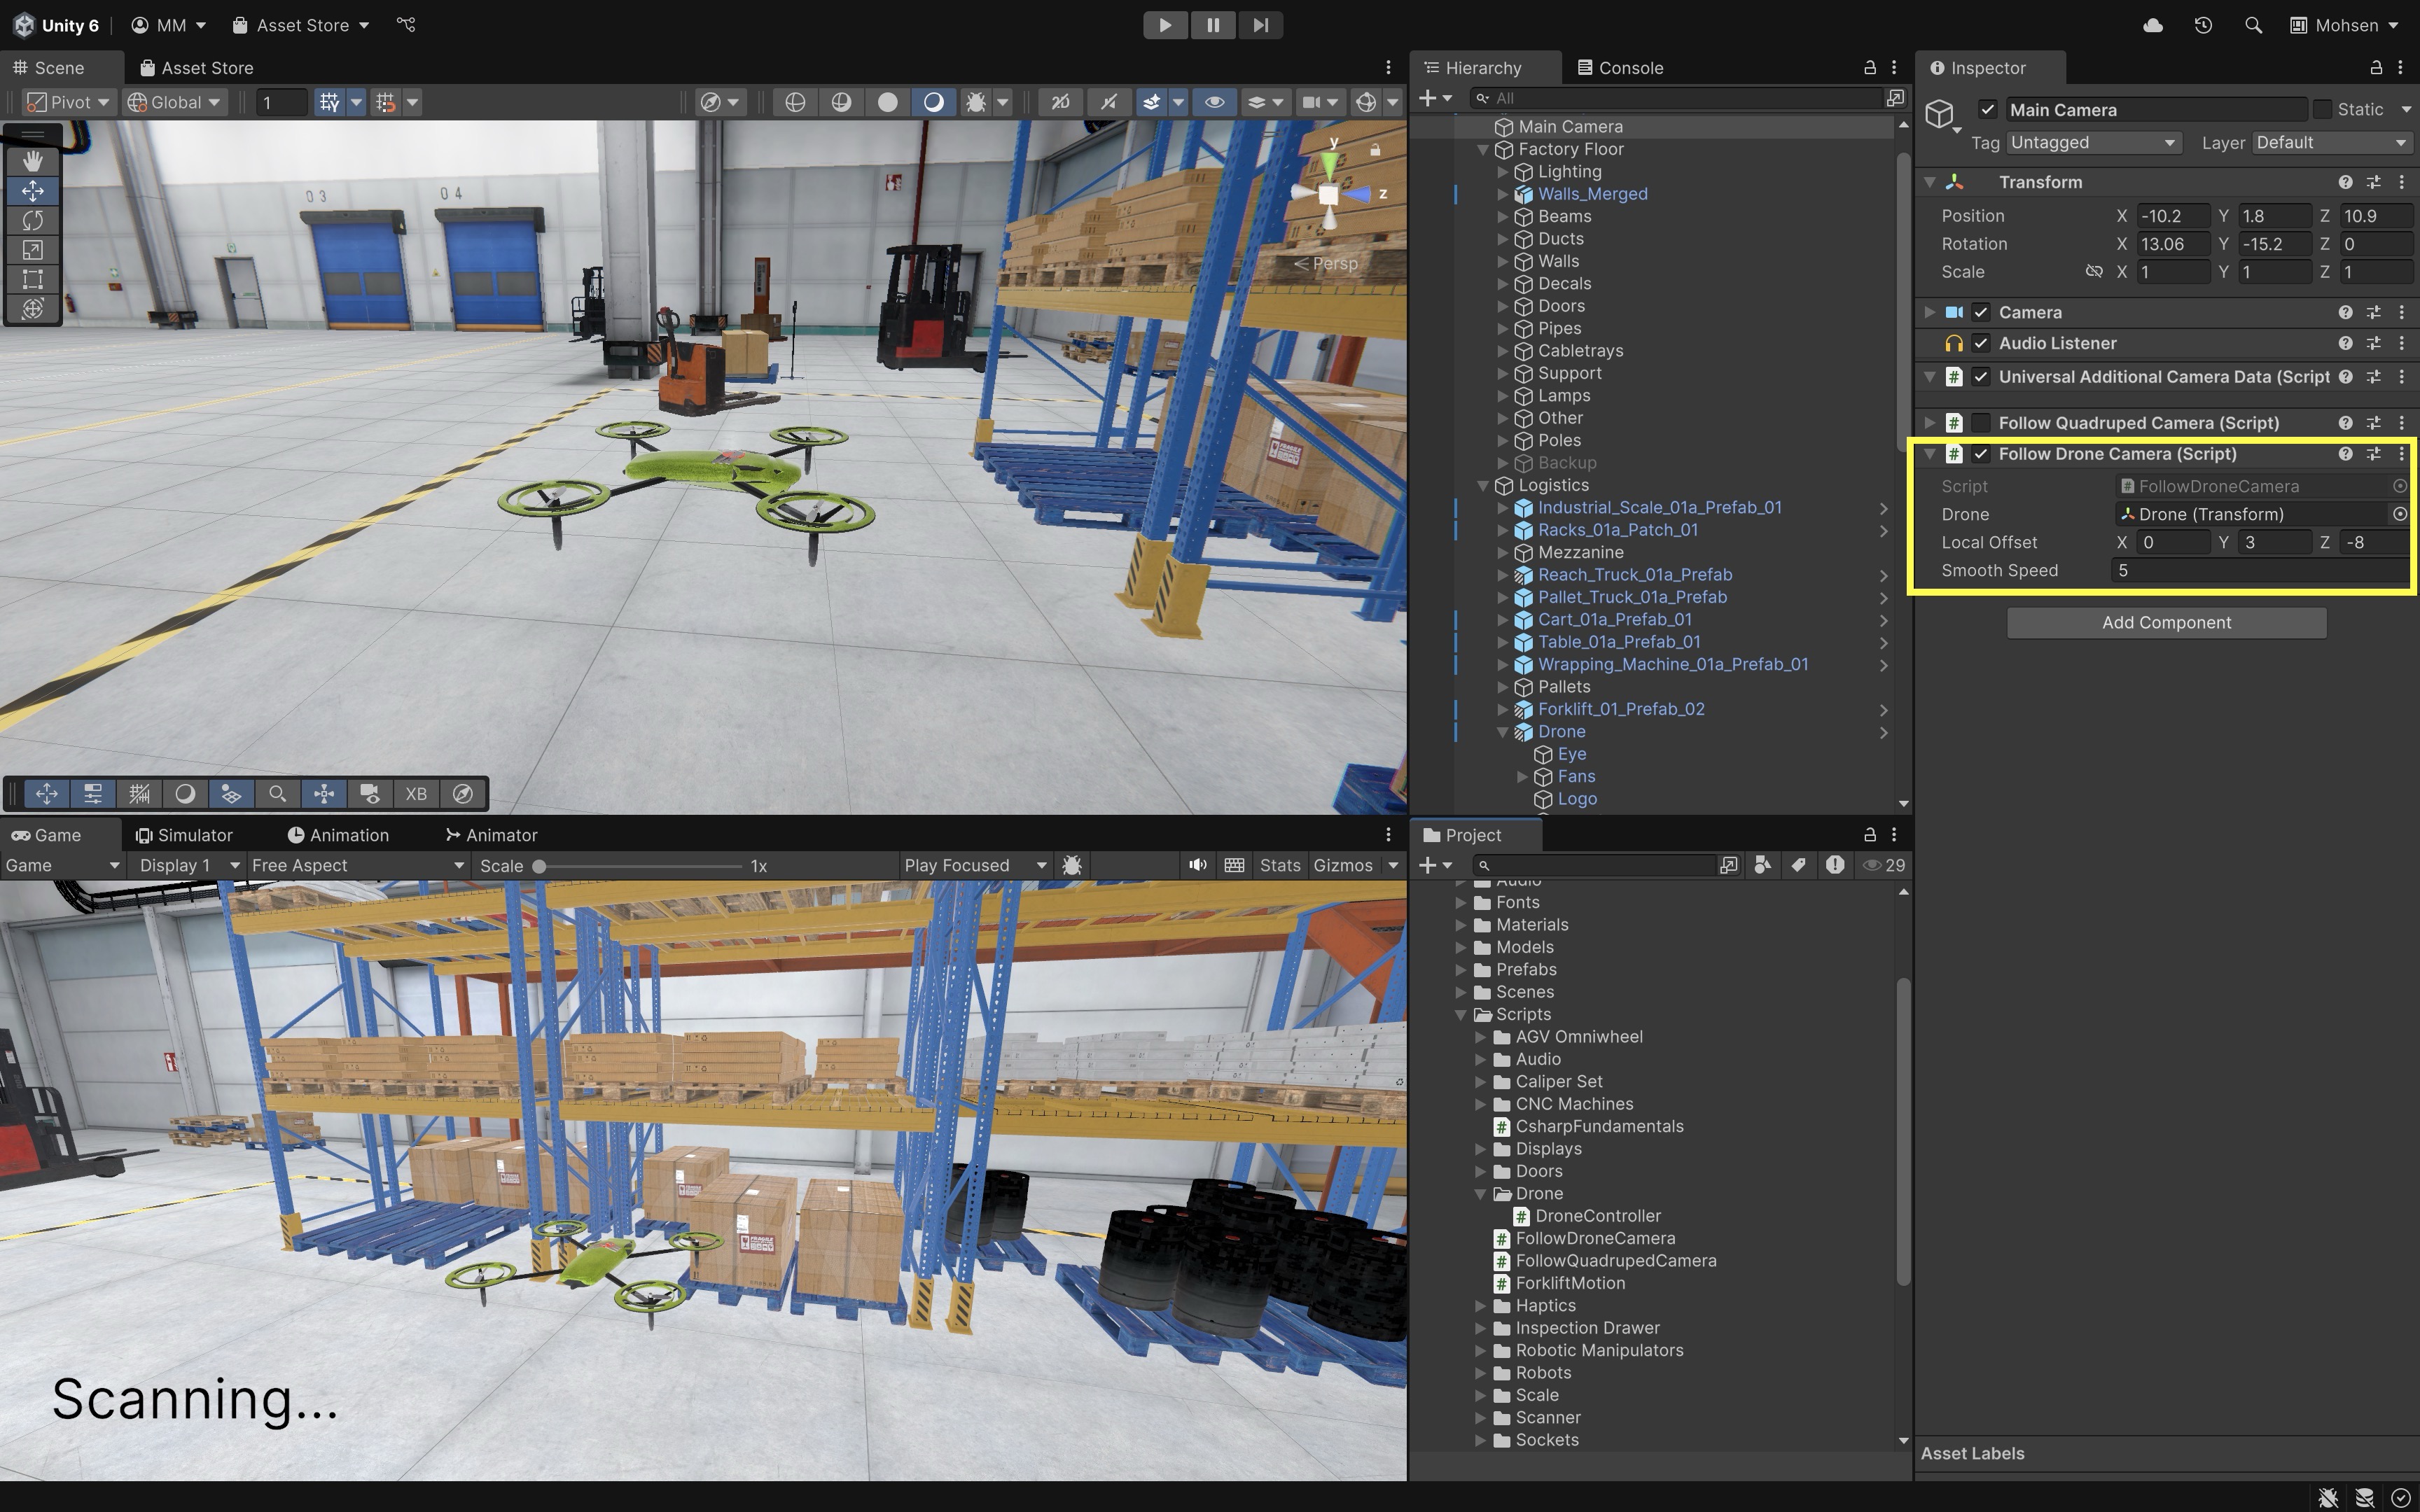
- Drag your drone’s Transform into the
Dronefield on theFollowDroneCameracomponent. - Tweak
Local Offset(X: right/left,Y: height,Z: distance) to position the camera, and adjustSmooth Speedfor responsiveness.
- Drag your drone’s Transform into the
- Play the Scene:
- W/A/S/D: Move and strafe the drone.
- Q/E: Rotate (yaw) the drone.
- Z/C: Move up and down.
- Fans: Spin faster when movement input is detected.
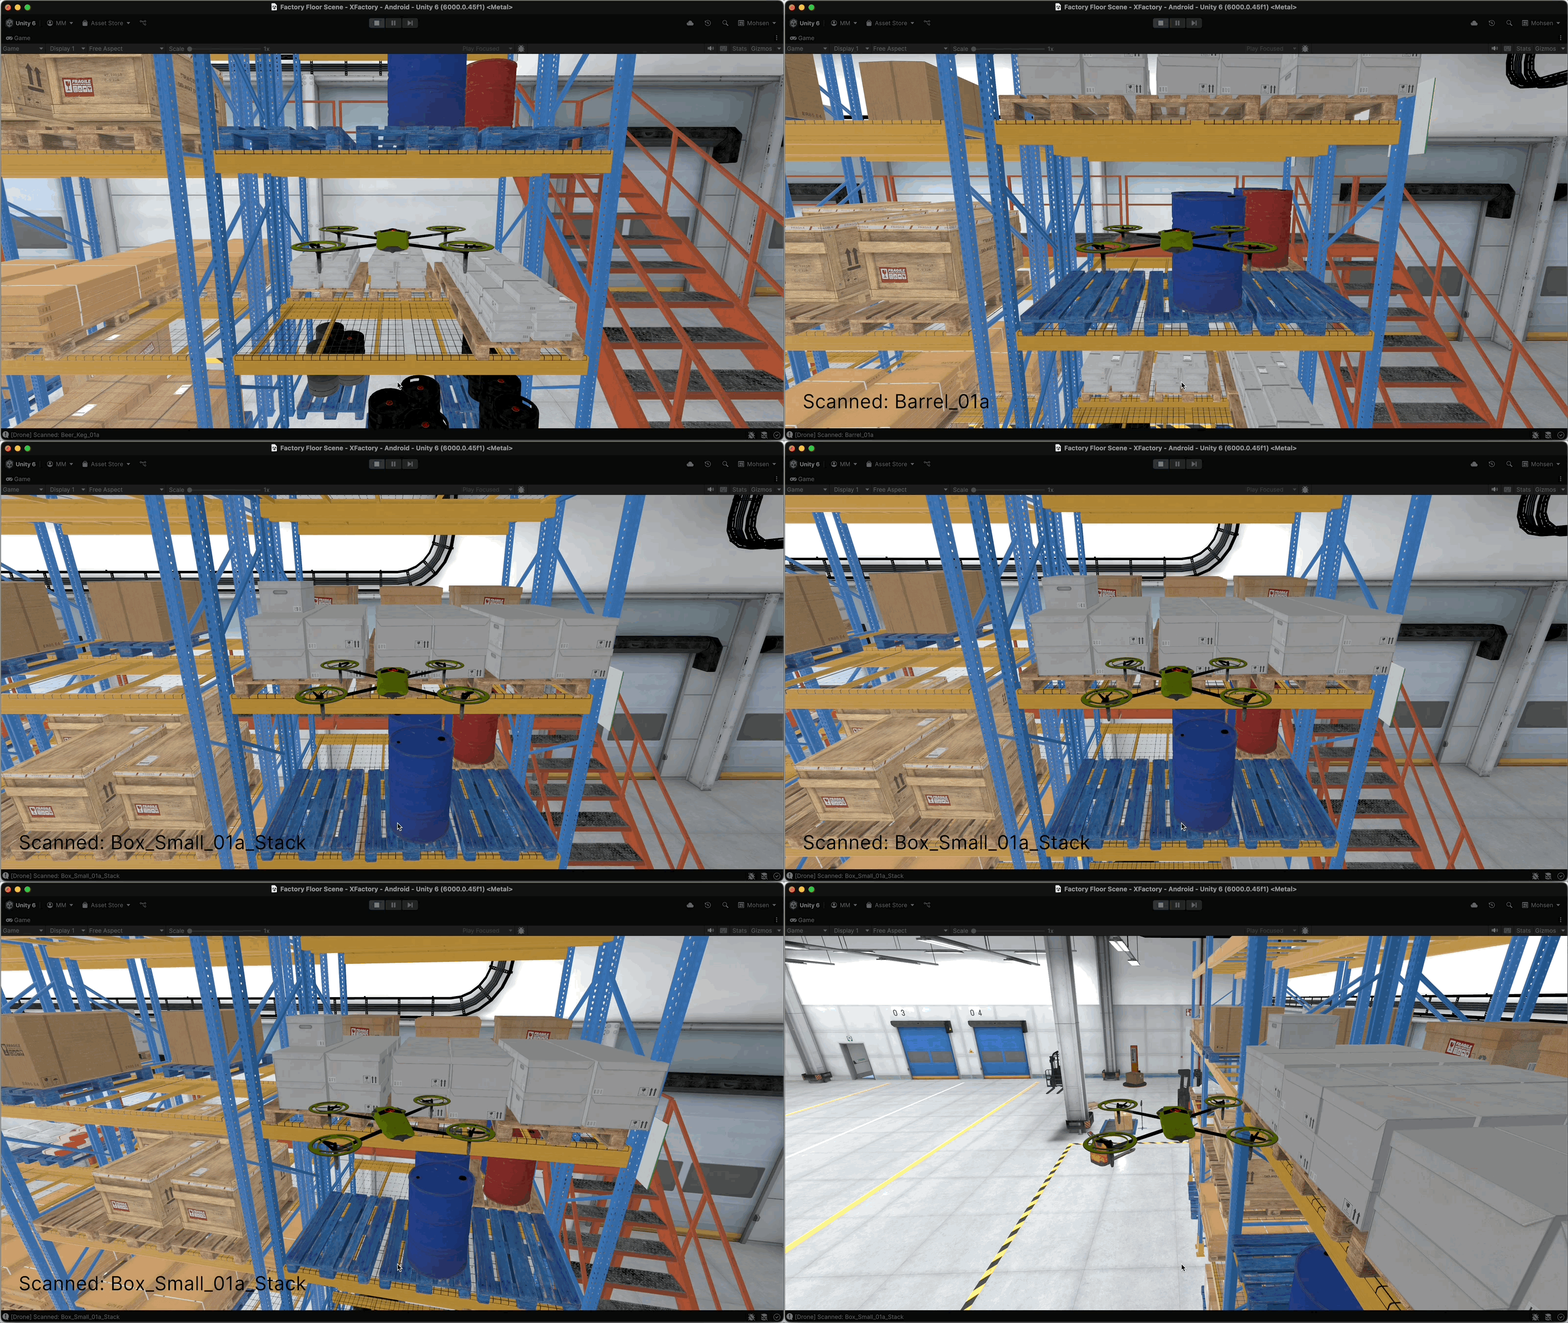
- Scanning: When the Scanner trigger overlaps a StorageBox, its name appears in the UI text for the configured
displayDuration. - Camera: Trails behind the drone at your configured offset, smoothly following in
LateUpdate(). - The drone scan and camera follow can also be viewed in a linked Meta Quest through Quest Link.
Visibility & Rendering

These methods are tied to what Unity’s cameras can see. Unity automatically calls them when a GameObject’s renderer enters or exits the field of view of any camera. In XFactory, these callbacks are essential for performance tuning, debugging, and triggering visibility-based logic for dynamic machines, sensors, or display panels. Key use cases include:
- Optimizing performance by disabling logic or effects when off-screen.
- Triggering animations, sounds, or loading behavior when something appears/disappears.
- Debugging or managing visibility-dependent logic.
OnBecameVisible()
OnBecameVisible() is called when the renderer attached to a GameObject becomes visible to any camera. This message is broadcast to all scripts on the same GameObject with a renderer component. Key features include:
- Visibility Detection: Triggered when an object comes into the camera’s view, allowing the execution of code only when the object is visible.
- Performance Optimization: Helps reduce unnecessary computations by activating behaviors only when required.
- Coroutine Capability: Can be used as a coroutine by incorporating the yield statement within the function.
- Editor Support: In the Unity Editor, the Scene view cameras can also trigger this function, aiding in debugging and scene management.
Example
In XFactory’s assembly station, the large display screen (Display GT) is set up to smoothly power on and off based on camera visibility. By attaching the script to the Screen child of Display GT GameObject (which includes a Renderer so OnBecameVisible() and OnBecameInvisible() are triggered) and ensuring it has a child Canvas for UI elements, the screen will automatically activate its Canvas two seconds after entering the camera’s view and deactivate it two seconds after leaving. This creates a delayed “power-on” and “power-off” effect that makes the display feel more lifelike in the scene.
using UnityEngine;

public class DisplayScreenController : MonoBehaviour
{
    [SerializeField] private Canvas displayCanvas; // Assign in Inspector
    [SerializeField] private float showDelay = 2f;
    [SerializeField] private float hideDelay = 2f;

    private void Awake()
    {
        if (!displayCanvas)
            displayCanvas = GetComponentInChildren<Canvas>(true);

        if (displayCanvas)
            displayCanvas.enabled = false;
    }

    private void OnBecameVisible()
    {
        Debug.Log("[DisplayScreen] Became visible — scheduling power-on.");
        CancelInvoke(nameof(EnableCanvas));   // cancel pending hides
        Invoke(nameof(EnableCanvas), showDelay);
    }

    private void OnBecameInvisible()
    {
        Debug.Log("[DisplayScreen] Became invisible — scheduling power-off.");
        CancelInvoke(nameof(EnableCanvas));   // cancel pending shows
        Invoke(nameof(DisableCanvas), hideDelay);
    }

    private void EnableCanvas()
    {
        if (displayCanvas)
        {
            displayCanvas.enabled = true;
            Debug.Log("[DisplayScreen] Canvas enabled.");
        }
    }

    private void DisableCanvas()
    {
        if (displayCanvas)
        {
            displayCanvas.enabled = false;
            Debug.Log("[DisplayScreen] Canvas disabled.");
        }
    }
}
OnBecameInvisible()
OnBecameInvisible() is invoked when the renderer attached to a GameObject is no longer visible by any camera. This function is called on all scripts associated with the renderer, allowing you to manage behaviors based on object visibility. Key features include:
- Visibility Monitoring: Triggered when an object is no longer seen by any camera, which can be used to halt unnecessary computations.
- Performance Optimization: Helps optimize performance by disabling behaviors when the object is not in view.
- Editor Support: In the Unity Editor, Scene view cameras can also trigger this function, aiding in debugging.
Tutorial
Let’s use OnBecameVisible() and OnBecameInvisible() to monitor when a StorageBox enters or leaves any camera’s view in the logistics station. You will:
- Update a text field to show “Box Visible: [Name]” when it appears on-screen.
- Clear that text when it goes off-screen.
- Log corresponding messages to the Console for each event.
Implementation
-
Create a new script named
BoxVisibilityMonitor.csand attach it to each StorageBox prefab/instance (make sure the box has aRenderercomponent).OnBecameVisible()fires once when the box’sRendererbecomes visible to any camera.OnBecameInvisible()fires once when it leaves all camera views. In the Unity Editor, Scene view cameras may also trigger these callbacks, so test in Game view when validating runtime behavior.using UnityEngine; using TMPro; public class BoxVisibilityMonitor : MonoBehaviour { [Tooltip("Drag your UI TextMeshProUGUI here")] [SerializeField] private TextMeshProUGUI visibilityText; void OnBecameVisible() { if (visibilityText != null) { visibilityText.text = $"Box Visible: {gameObject.name}"; Debug.Log($"[BoxVisibility] Box Visible: {gameObject.name}"); } } void OnBecameInvisible() { if (visibilityText != null) { visibilityText.text = ""; // Clear when no longer visible Debug.Log($"[BoxVisibility] Box Invisible: {gameObject.name}"); } } } - Attach
BoxVisibilityMonitor.csto a box GameObject. -
Select the box and in the
BoxVisibilityMonitorcomponent, drag theText (TMP)UI element into theVisibility Textfield.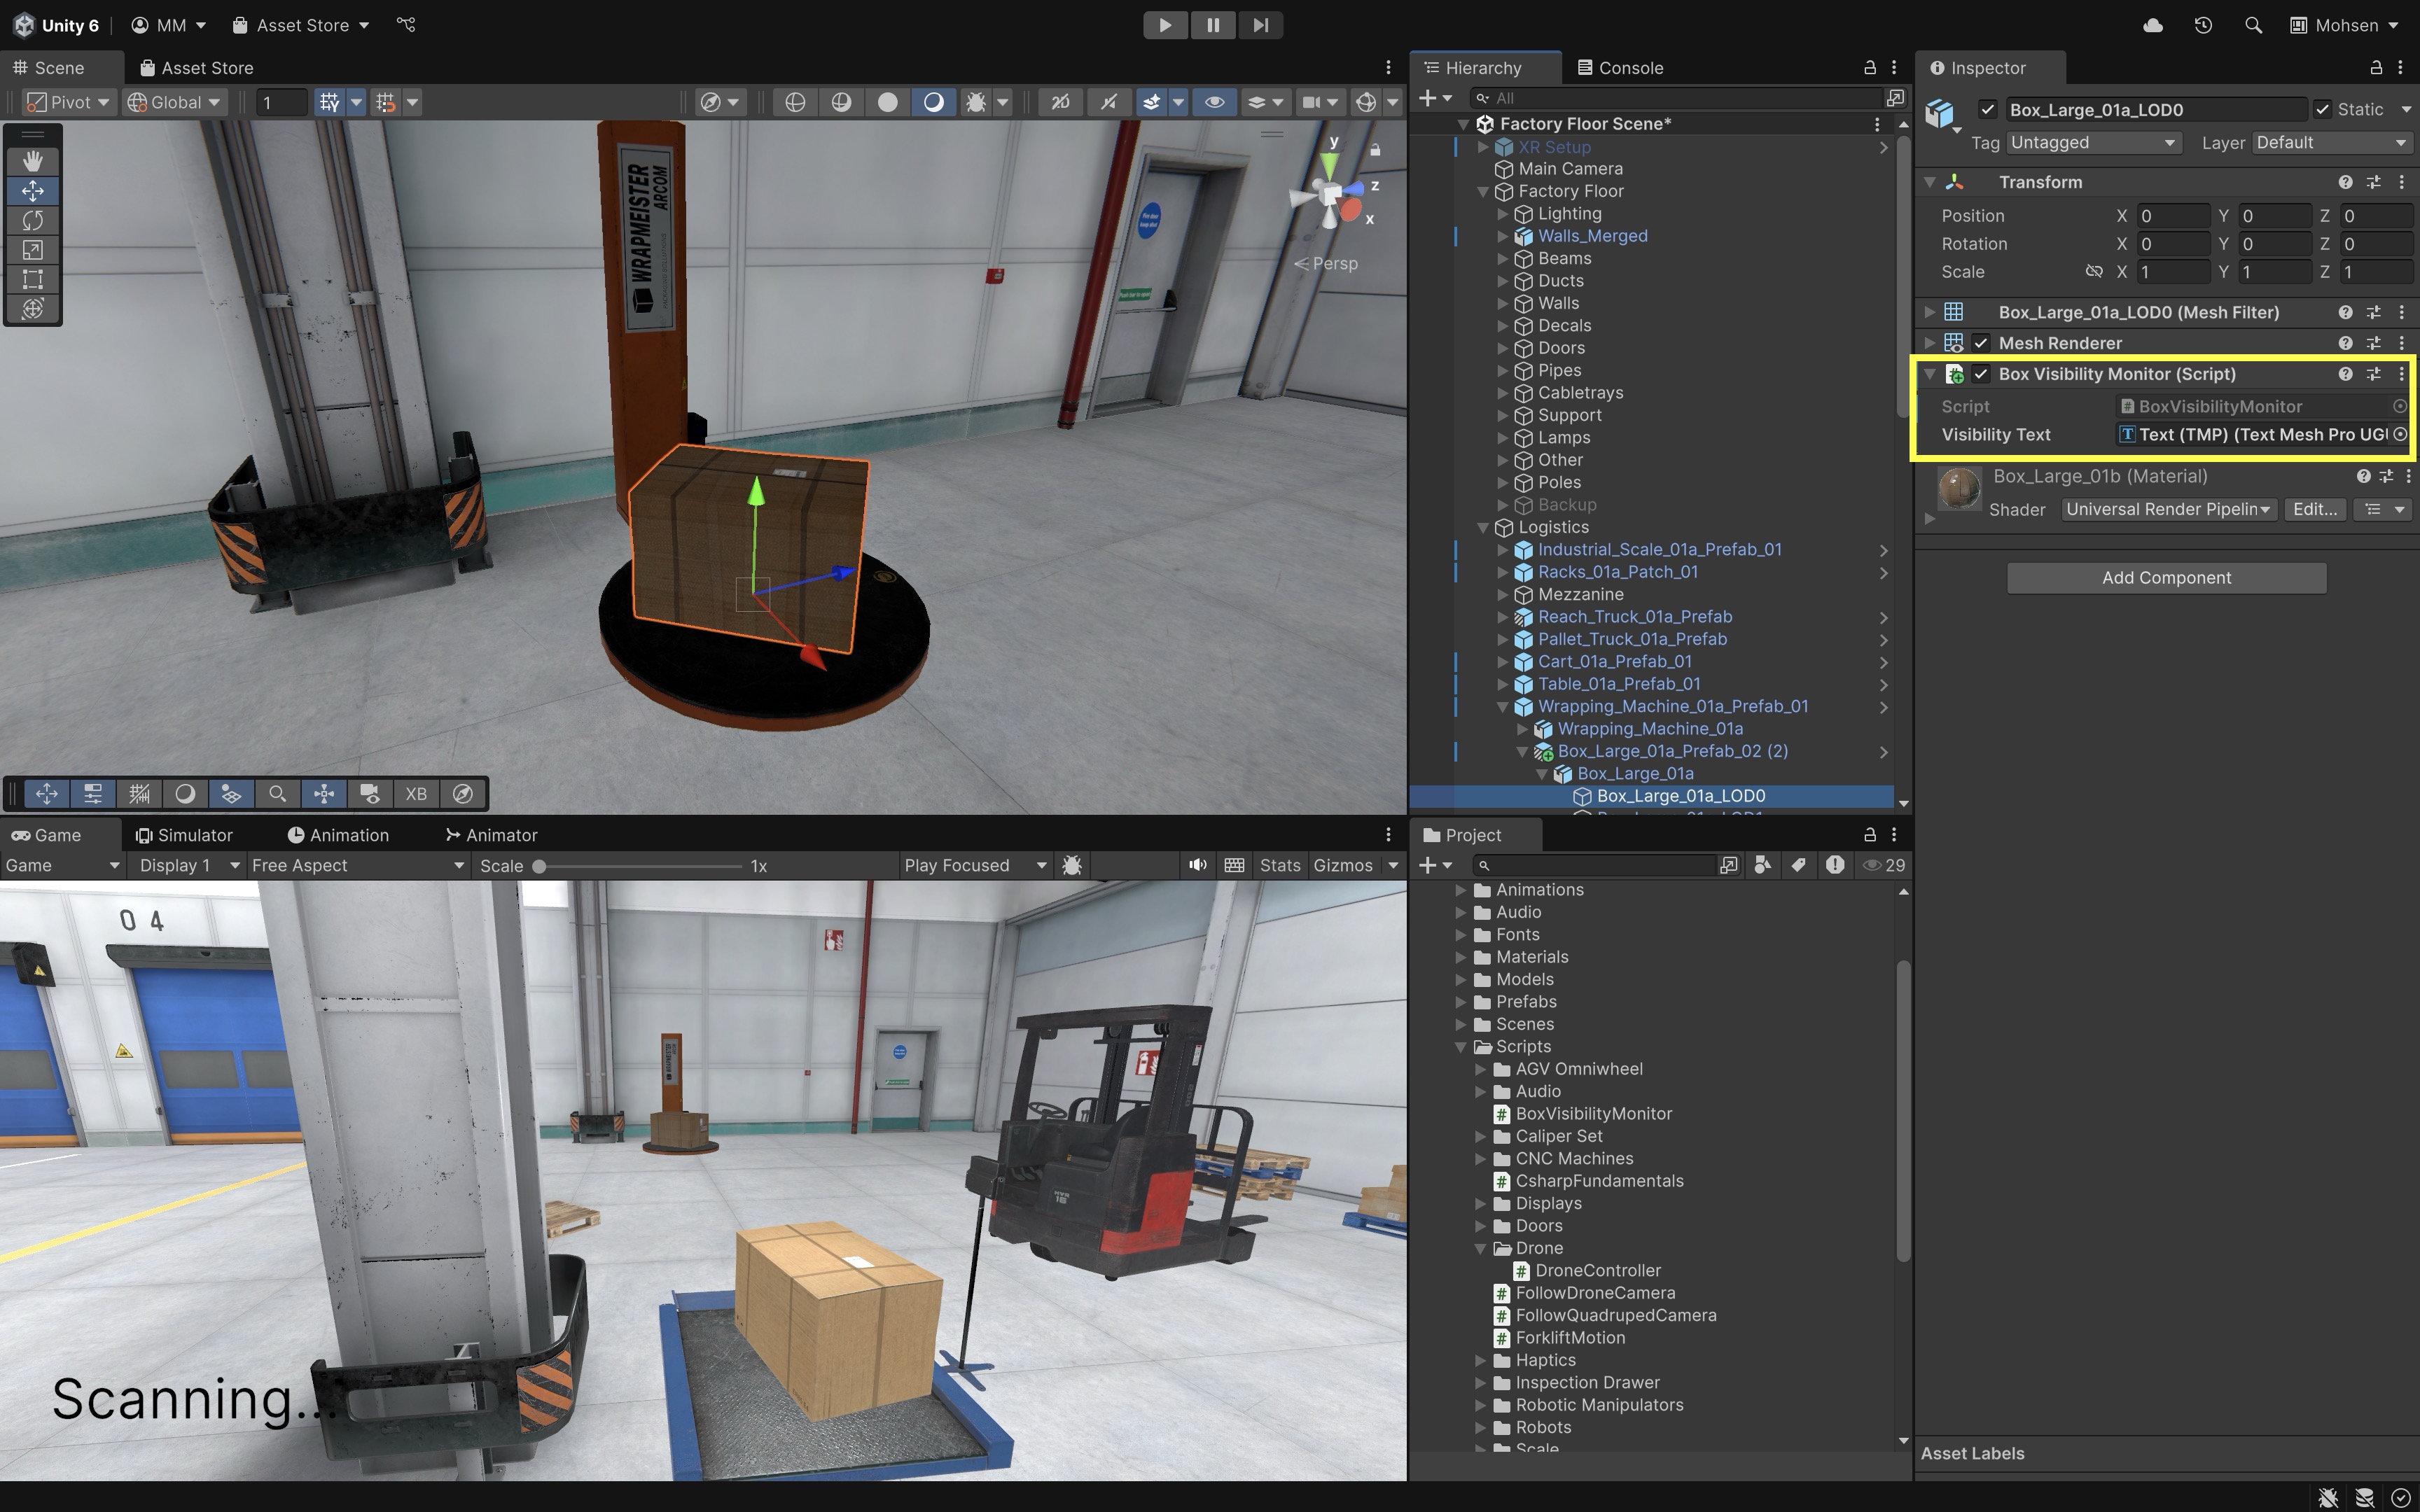
-
Play the scene. Move the drone so that the box enters the view frustum. When the box becomes visible, the UI text will update to Box Visible: [Name of the Box]. When the box leaves view, the UI text will clear. Check the Console for corresponding log messages from
OnBecameVisible()andOnBecameInvisible(). The visibility text can also be viewed on a Quest Link–connected Meta Quest during Play Mode.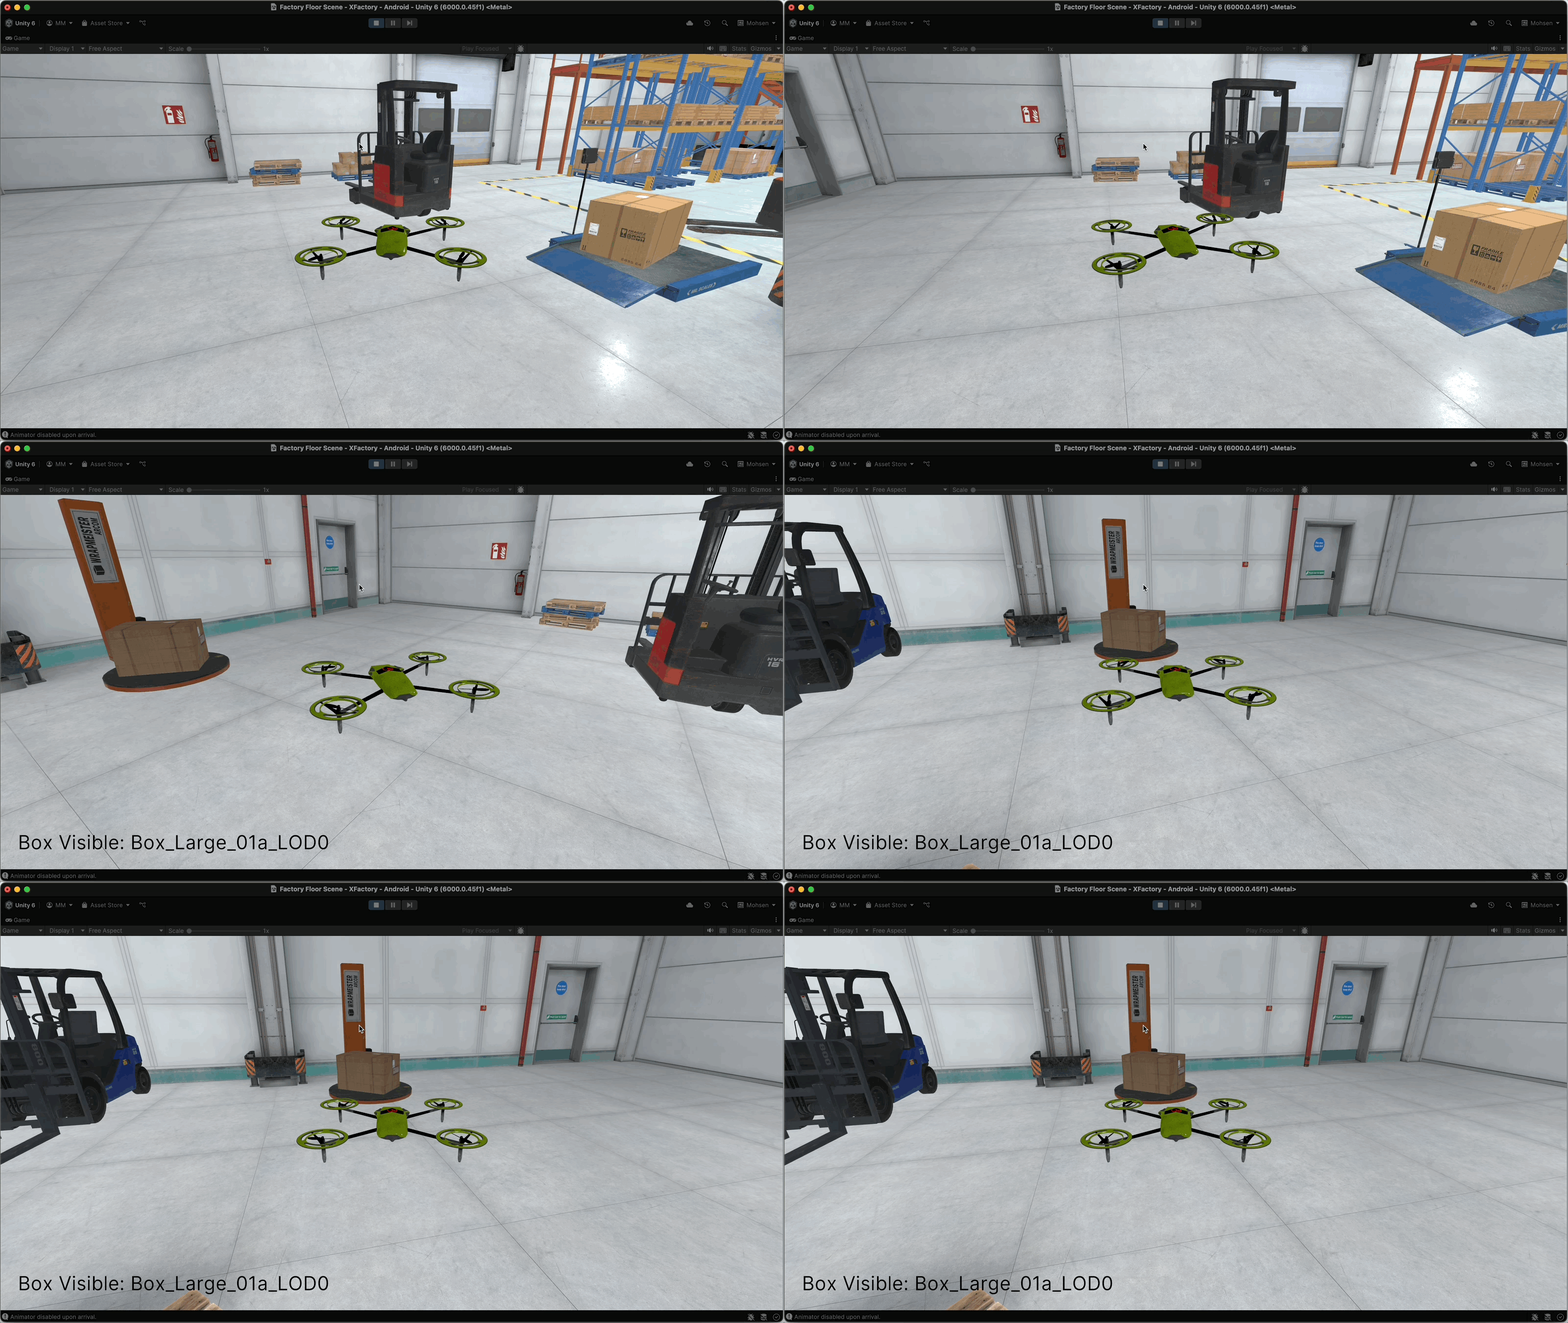
Teardown

These Unity event methods are called when a script or GameObject is disabled or destroyed. They are essential for cleaning up resources, unsubscribing from events, or halting behaviors that should not continue once the object is no longer active. In XFactory, teardown logic can be used when robots shut down or are removed from the scene, temporary diagnostic UI panels are closed, or machines are powered off between simulation phases. Key use cases include:
- Unsubscribing from events (e.g., PLC triggers or telemetry).
- Stopping coroutines or timers.
- Saving state (e.g., storing part progress before shutdown).
- Disabling effects or UI.
OnDisable()
OnDisable() is automatically invoked when a script or its GameObject is disabled. This method is useful for performing cleanup operations such as unsubscribing from events, releasing resources, or other shutdown tasks. It is also called when a GameObject is destroyed or when scripts are reloaded after compilation. Key features include:
- Automatic Invocation: Called by Unity when a GameObject or its component is disabled.
- Cleanup Operations: Ideal for releasing resources or stopping ongoing processes.
- Script Reload Handling: Invoked during script reloads, ensuring proper state management.
- Editor Support: Works in both runtime and edit mode, which is especially useful for testing in the Unity Editor.
Example
In XFactory’s manufacturing station, pressing U toggles the CNC machine’s operating sound via the AudioSource component attached to the machine (CNC_Mill_Set). When the machine is deactivated or the script is disabled, OnDisable() ensures the audio is stopped and a shutdown message is logged. Attach this script to the CNC machine GameObject (CNC_Mill_Set) in the manufacturing station. In the Inspector, assign the AudioSource component of the CNC machine to the machineAudio field. Update() handles audio toggling on key press U, while OnDisable() ensures the machine sound is turned off cleanly when disabled.
using UnityEngine;

public class CNCAudioController : MonoBehaviour
{
    [SerializeField] private AudioSource machineAudio; // Assign CNC machine AudioSource in Inspector
    private bool audioOn = false;

    void Update()
    {
        if (Input.GetKeyDown(KeyCode.U))
        {
            if (machineAudio == null)
            {
                Debug.LogWarning("CNCAudioController: Assign machineAudio in the Inspector.");
                return;
            }

            audioOn = !audioOn;
            if (audioOn)
            {
                machineAudio.Play();
                Debug.Log("CNC machine audio ON.");
            }
            else
            {
                machineAudio.Stop();
                Debug.Log("CNC machine audio OFF.");
            }
        }
    }

    void OnDisable()
    {
        if (machineAudio != null && machineAudio.isPlaying)
        {
            machineAudio.Stop();
        }
        Debug.Log("CNC audio system disabled — sound stopped.");
    }
}
OnDestroy()
OnDestroy() is automatically invoked when a GameObject or its attached behavior is destroyed. This event typically occurs when a scene ends, a new scene is loaded, or the application is closed. Key features include:
- Scene Transitions and Application Shutdown: Called when switching scenes or shutting down the game, ensuring cleanup actions occur.
- Active Object Requirement: It is only invoked for game objects that were active at some point in the scene.
- Debug and Logging: Often used to log cleanup events or release resources as the application exits or transitions between scenes.
Example
In the manufacturing station, multiple finished CNC parts are placed next to the CNC machine and tagged as Finished Part. A central manager (CNCPartManager) destroys parts when the user presses R. Attach CNCPartLifecycleLogger to each part prefab so the part’s own OnDestroy() callback runs when Destroy() is called. HandlePartDestroyed() in the manager is separate manager-side bookkeeping—not the same as the destroyed part’s OnDestroy() method.
using UnityEngine;

public class CNCPartManager : MonoBehaviour
{
    void Update()
    {
        // Press R to randomly destroy one CNC part
        if (Input.GetKeyDown(KeyCode.R))
        {
            GameObject[] parts = GameObject.FindGameObjectsWithTag("Finished Part");

            if (parts.Length > 0)
            {
                int index = Random.Range(0, parts.Length);
                GameObject chosenPart = parts[index];

                Debug.Log($"Manager: Destroying {chosenPart.name}");
                HandlePartDestroyed(chosenPart);
                Destroy(chosenPart);
            }
            else
            {
                Debug.Log("Manager: No CNC parts left to destroy.");
            }
        }
    }

    private void HandlePartDestroyed(GameObject part)
    {
        // Manager-side bookkeeping after scheduling Destroy()
        Debug.Log($"Manager: {part.name} scheduled for teardown.");
    }
}
using UnityEngine;

public class CNCPartLifecycleLogger : MonoBehaviour
{
    void OnDestroy()
    {
        Debug.Log($"CNCPartLifecycleLogger: {gameObject.name} destroyed.");
    }
}
Tutorial
Let’s extend our drone flight simulation further by simulating a landing-shutdown-power on-takeoff cycle. Coroutines are introduced here only as a simple way to animate landing/takeoff over time; they will not replace the main lifecycle concepts.
- Press L to descend gently to a landing height, then disable the
DroneController.csscript. - Press T to ascend back to the original height, then re-enable
DroneController.csafter takeoff completes. - Use
OnDisable()inDroneController.csfor cleanup/logging when controls are locked, andOnEnable()to signal reactivation.
Implementation
-
Add
OnDisable()/OnEnable()methods to your existingDroneController.cs:public class DroneController : MonoBehaviour { // ... existing code ... void OnEnable() { Debug.Log("DroneController enabled - controls active."); } void OnDisable() { Debug.Log("DroneController disabled - controls locked."); } } -
Create
DroneLifecycleManager.csand attach it to the sameDroneGameObject:using UnityEngine; using System.Collections; [RequireComponent(typeof(DroneController))] public class DroneLifecycleManager : MonoBehaviour { [Tooltip("Reference to the DroneController component")] [SerializeField] private DroneController droneController; [Header("Landing / Takeoff Settings")] [SerializeField] private float landingHeight = 0.1f; // Y position to land at [SerializeField] private float speed = 2f; // Ascent/Descent speed private float initialHeight; private bool isTransitioning; private Coroutine activeTransition; void Awake() { if (droneController == null) droneController = GetComponent<DroneController>(); initialHeight = transform.position.y; } void Update() { if (isTransitioning) return; if (Input.GetKeyDown(KeyCode.L)) activeTransition = StartCoroutine(Land()); if (Input.GetKeyDown(KeyCode.T)) activeTransition = StartCoroutine(TakeOff()); } IEnumerator Land() { isTransitioning = true; // Descend until landingHeight while (transform.position.y > landingHeight) { transform.position += Vector3.down * speed * Time.deltaTime; yield return null; } // Disable control after landing if (droneController != null) droneController.enabled = false; Debug.Log("DroneLifecycleManager: Landed, DroneController disabled."); isTransitioning = false; activeTransition = null; } IEnumerator TakeOff() { isTransitioning = true; // Ascend back to initialHeight before restoring flight controls while (transform.position.y < initialHeight) { transform.position += Vector3.up * speed * Time.deltaTime; yield return null; } if (droneController != null) droneController.enabled = true; Debug.Log("DroneLifecycleManager: Takeoff complete, DroneController enabled."); isTransitioning = false; activeTransition = null; } }Because this drone also uses a
Rigidbody, production versions should coordinate coroutine movement with physics control, such as disabling flight physics during landing/takeoff or using Rigidbody movement methods. - Attach the
DroneLifecycleManagercomponent to yourDroneGameObject (alongsideDroneController). - In the
DroneLifecycleManagerinspector, drag the existingDroneControllercomponent into theDrone Controllerfield (it should auto-detect if left blank). -
Adjust
Landing HeightandSpeedto control how low/far and how fast your drone descends and ascends.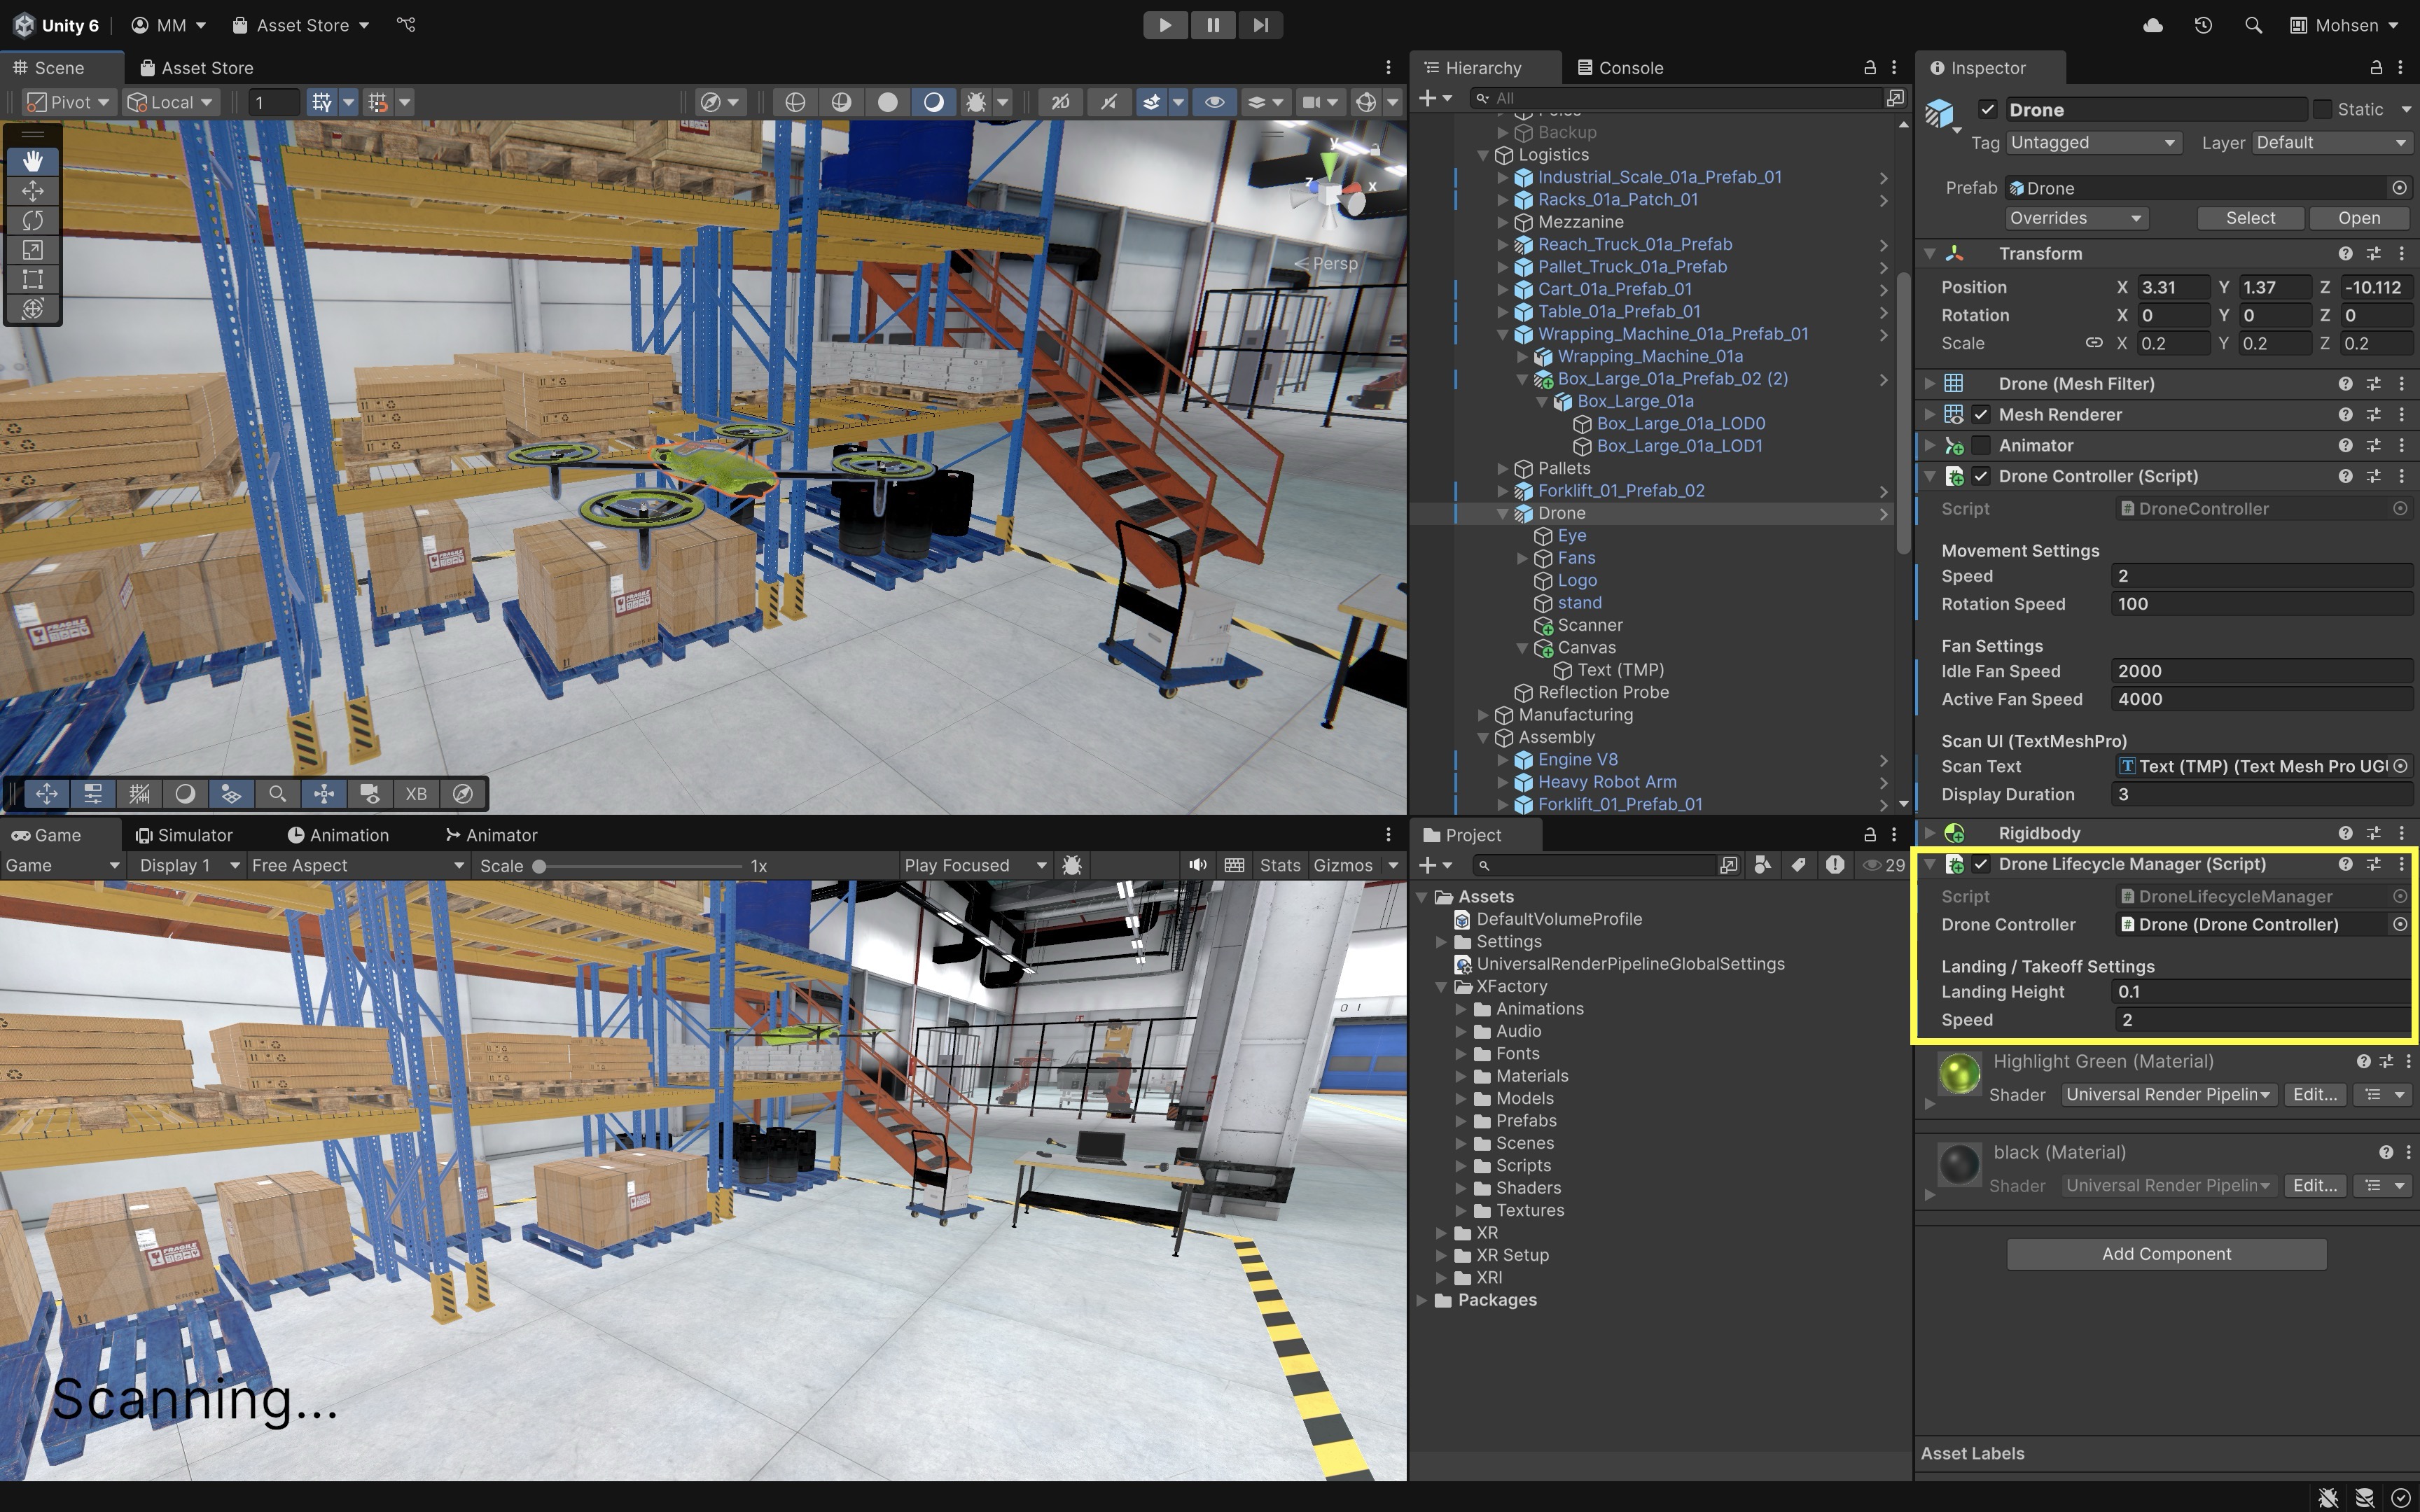
- Press L in Play mode. The drone will smoothly descend to the configured
landingHeight. Once reached,DroneControlleris disabled, locking out movement controls. Check the Console for theOnDisable()log fromDroneController. -
Press T in Play mode. The drone ascends back to its original altitude (
initialHeight), thenDroneControlleris re-enabled, restoring full hover controls. Check the Console for theOnEnable()log fromDroneController. The landing and takeoff can also be watched in a Quest Link–connected Meta Quest headset.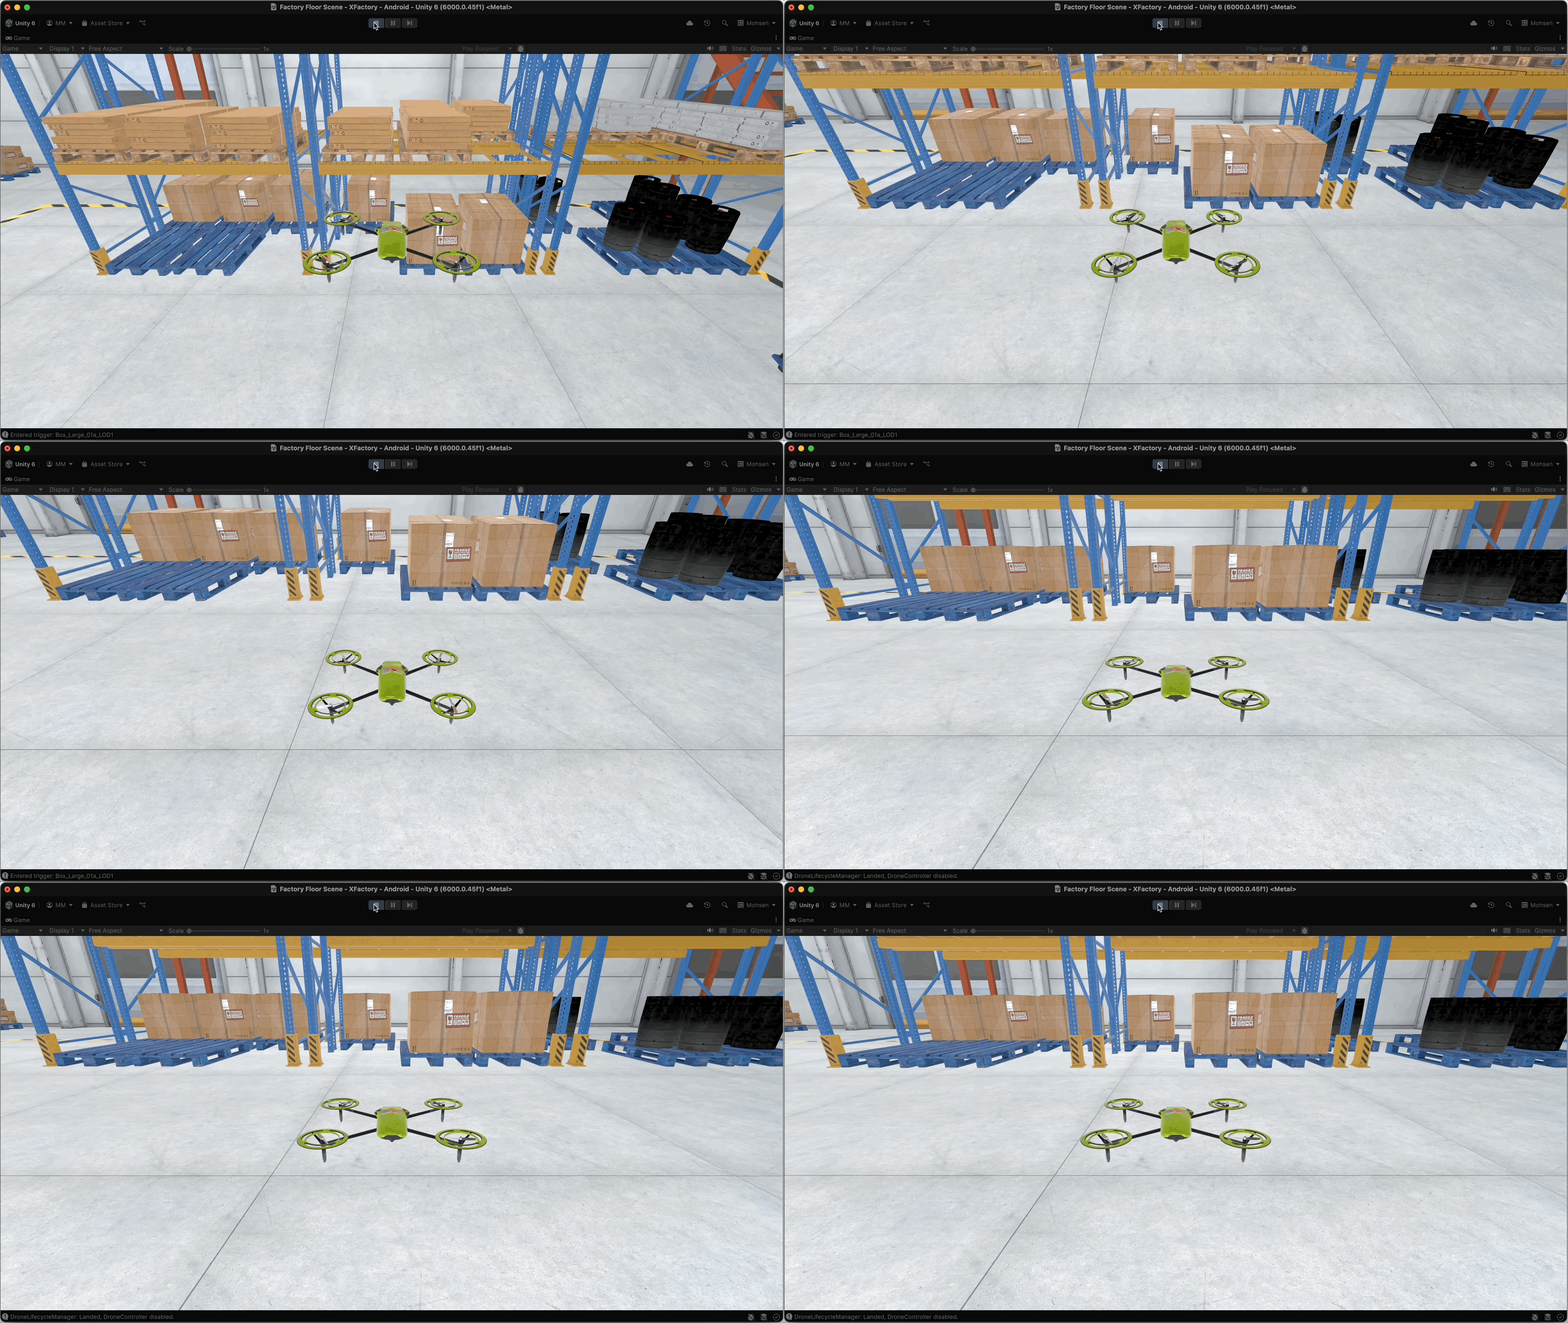
Key Takeaways
- MonoBehaviour connects scripts to Unity’s lifecycle and component model on every GameObject.
- Use
Awake,Start, andOnEnablefor setup; useUpdate,LateUpdate, andFixedUpdatefor frame- and physics-timed logic. - Collision and trigger callbacks respond to physics interactions without polling every frame.
- Serialized fields expose Inspector configuration; public methods support UnityEvents and other callers.
- Lifecycle-aware scripts are easier to reuse across machines, tools, and UI controllers in engineering scenes.