B1. Game Engines
Learning Outcomes
- Identify the purpose and key features of a game engine in XR development. Before class, read the short overview on what a game engine is and why real-time rendering matters, focusing on core terms such as GameObject, physics simulation, and shaders so you can discuss them confidently.
- Set up Unity and verify that it runs on your system. Prior to the session, install Unity Hub and the course-recommended Unity Editor version, create your Unity account, and confirm you can open the Editor without errors to ensure you are ready for hands-on activities.
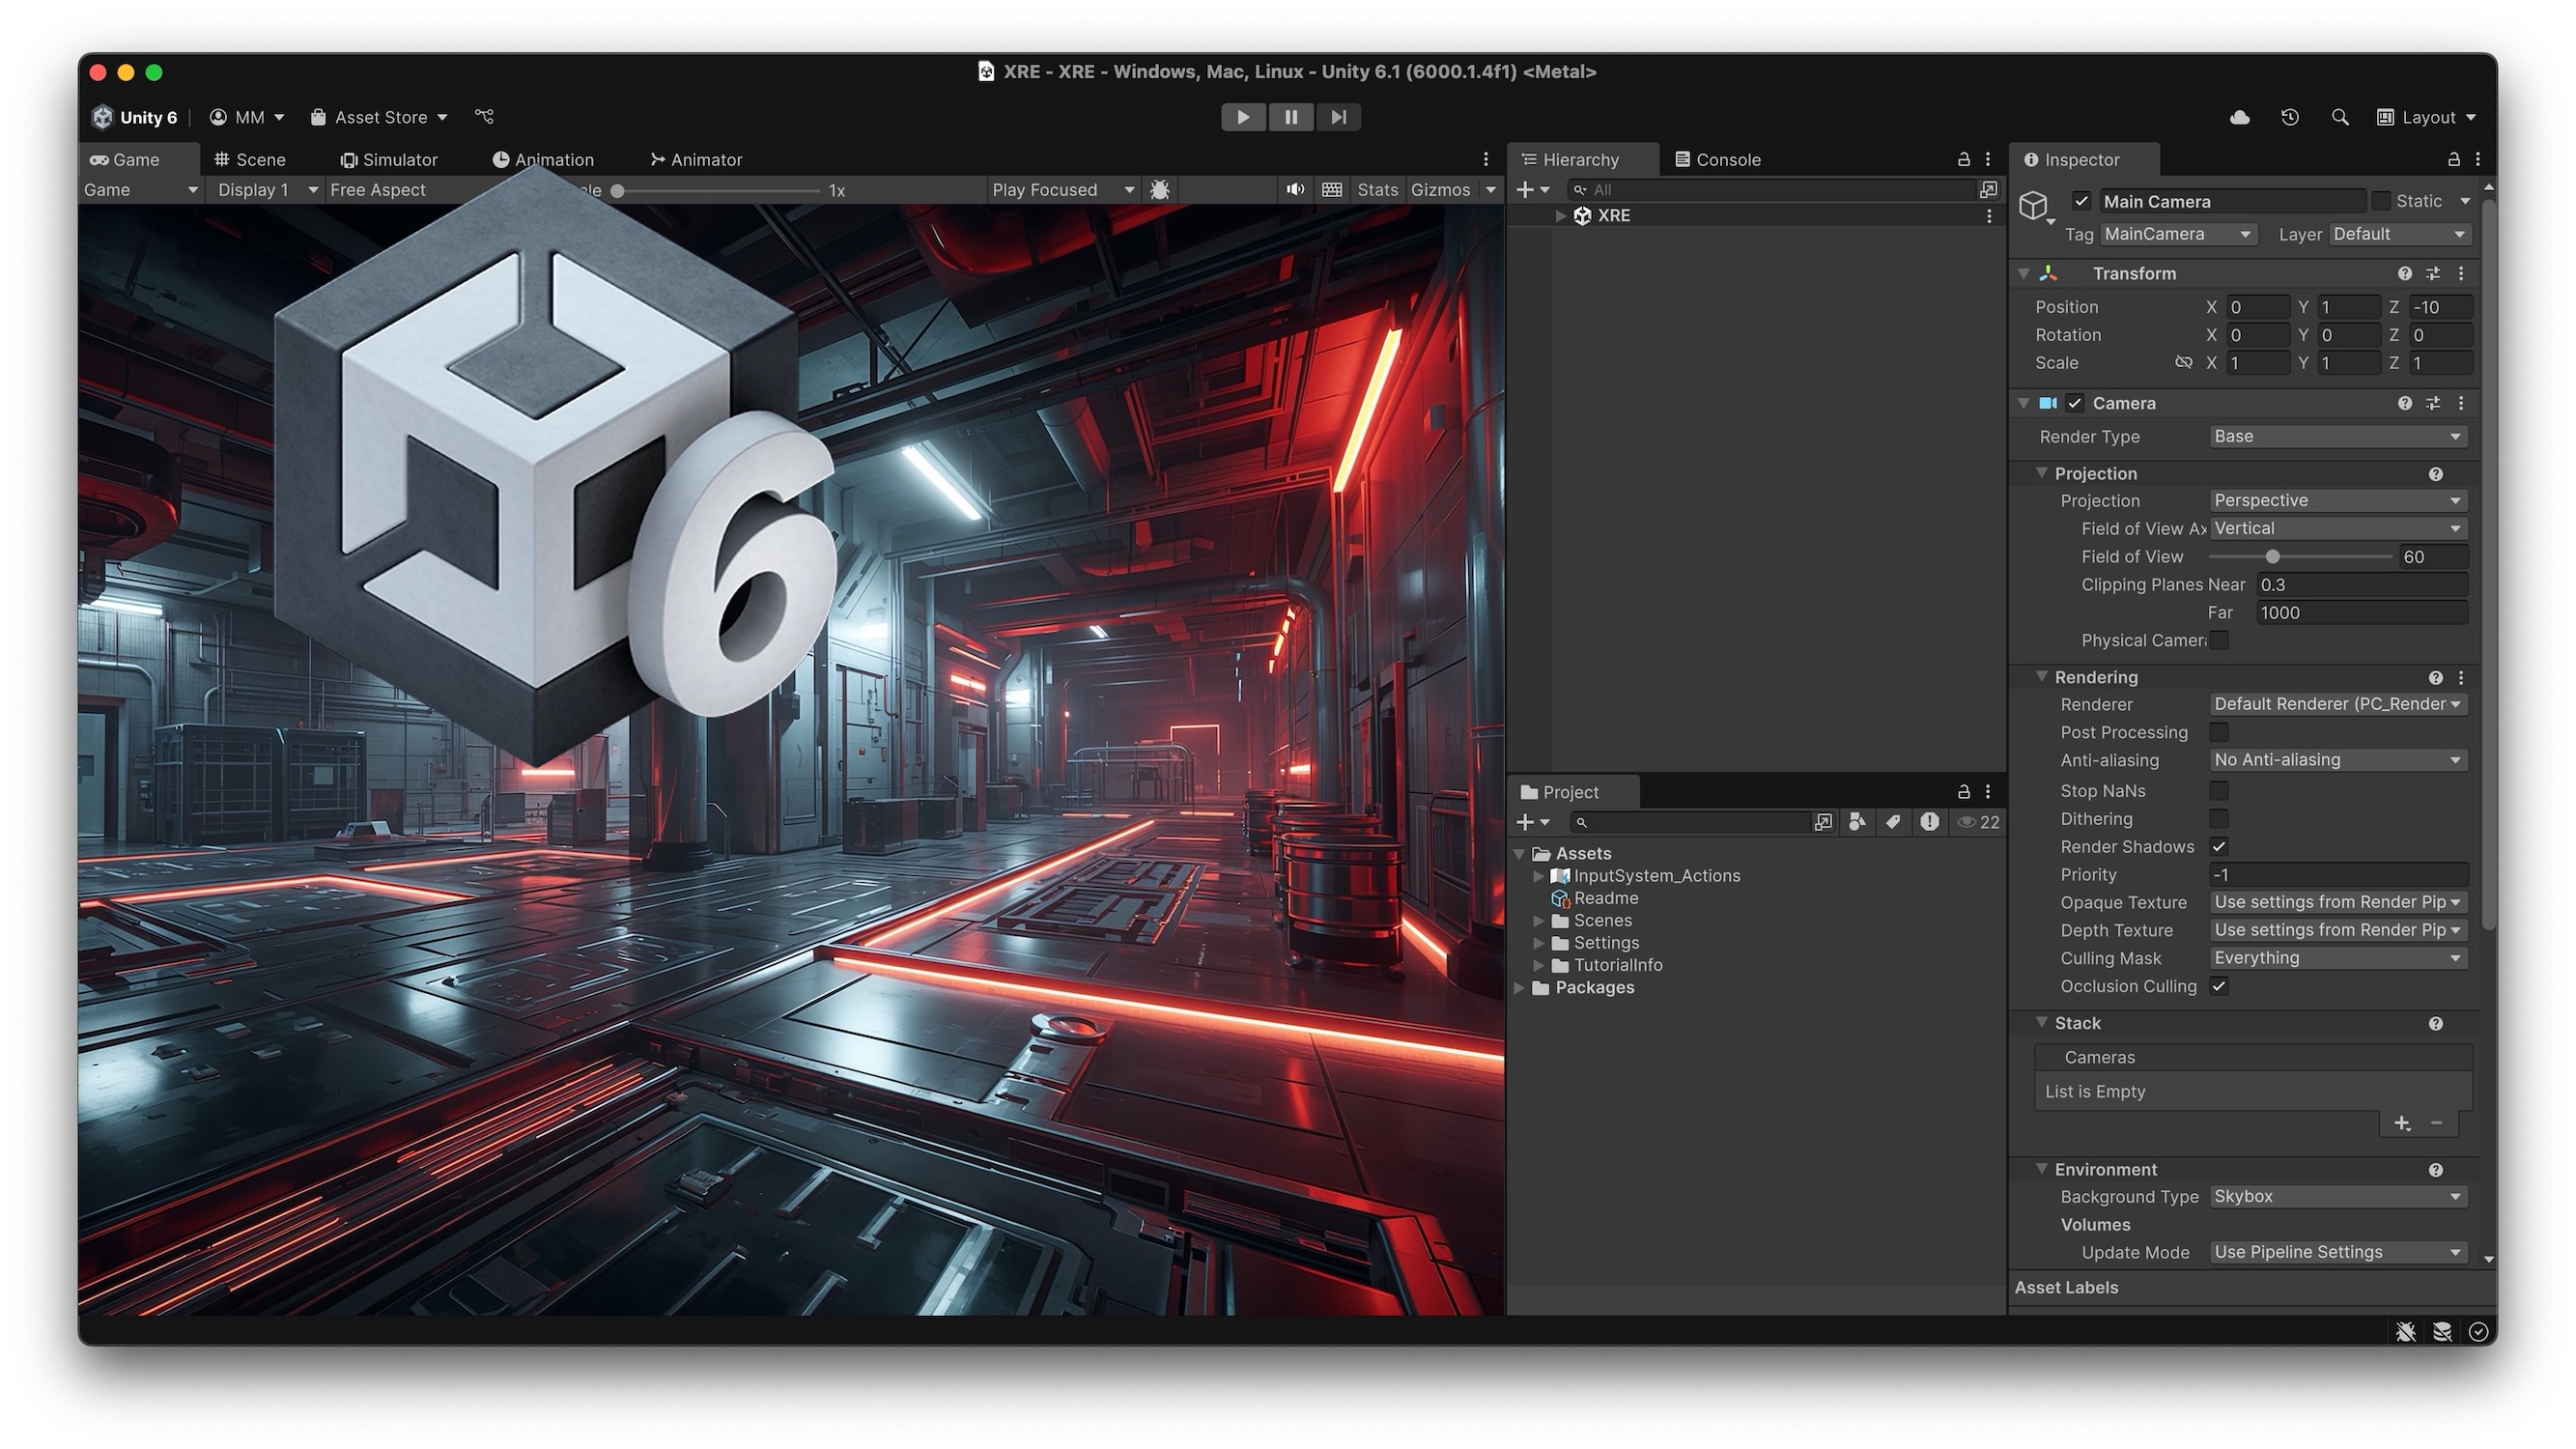
- Recognize the main areas of the Unity interface. Ahead of class, download the XFactory Unity package and review screenshots of the Scene, Game, Hierarchy, and Inspector windows.
- Explain what GameObjects are and create a simple one in Unity. In preparation, skim the introductory material on GameObjects, explore examples like 3D objects, cameras, and UI elements, and try creating a GameObject so you can start manipulating them right away during class.
- Describe what prefabs are and how they improve efficiency in Unity projects. Before attending, read the brief explanation of prefabs and think of scenarios where reusing objects would save time and maintain consistency in a scene.
- Understand the role of components in defining GameObject behavior. As prep work, review how components function in Unity, paying special attention to the Transform component, and be ready to discuss how adding or adjusting components changes what a GameObject can do.
What Is a Game Engine?
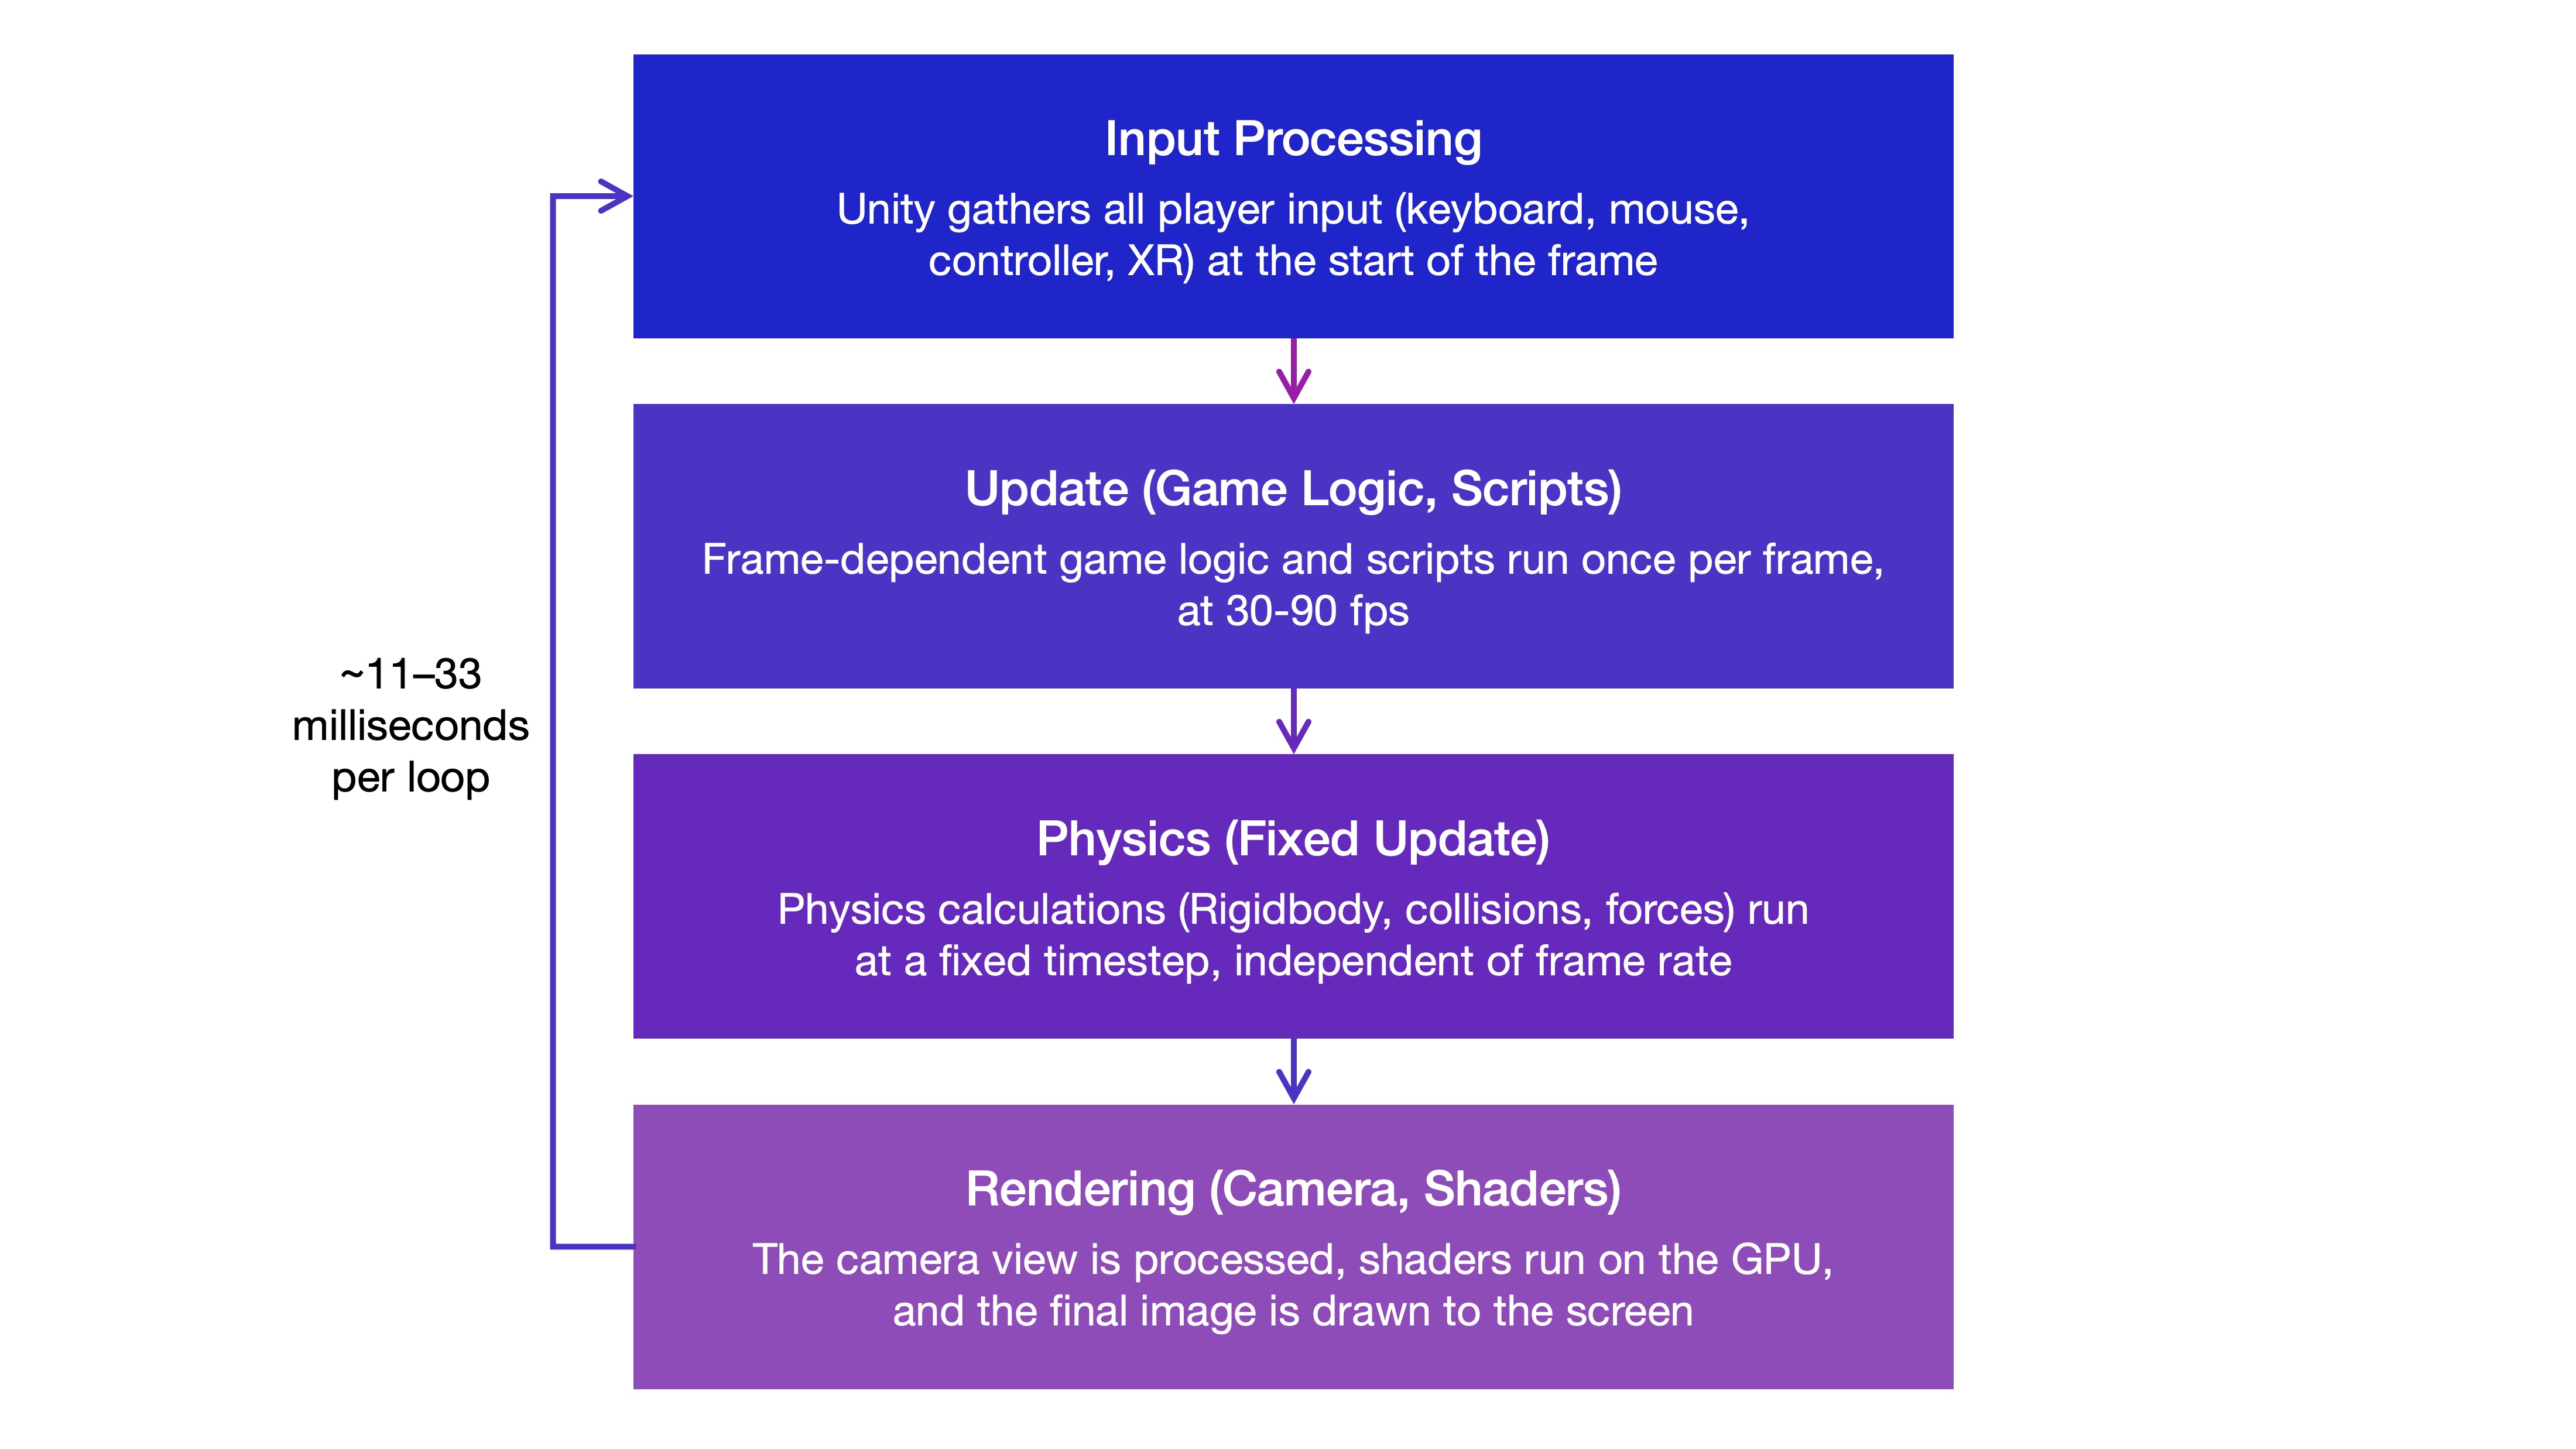
Game engines include rendering engines, but they are more than rendering alone. They function as real-time operating systems for spatial computing, turning static 3D models and data into living, interactive XR environments. Under the hood they blend advanced graphics pipelines, physics solvers, audio engines, networking layers, and XR device APIs into a single, extensible platform. At their core, engines like Unity follow a continuous update loop: first they gather input, then run game logic (Update), step through physics (FixedUpdate), and finally render the scene to the display—repeating this cycle many times per second, commonly 60–120+ frames per second depending on the target device and application. Because everything updates at frame-rate, you can iterate at the speed of thought. The most commonly adopted modern game engines are Unity and Unreal Engine.
Key Features:
- Real‑Time Rendering: The engine draws a fresh image 60–120+ times per second on many modern desktop and XR targets, depending on hardware and performance settings, so anything you move, click, or look at updates instantly. It handles the heavy math of turning 3D triangles into pixels, calculating lighting and shadows, and running tiny GPU programs called shaders—like a high‑speed photo studio that relights your model on the fly.
- Physics Simulation: Built‑in physics makes virtual objects fall, collide, and roll just as they would in real life. Add a
Rigidbodycomponent and the engine automatically applies gravity, detects collisions, and lets you tweak properties such as mass or friction. You can drop a gear into a gearbox, test clearances, or preview crash scenarios without writing physics equations. - Scene Graph and Object Management: Every item in the world is a GameObject with a
Transform(Position,Rotation,Scale). Objects can be parents or children—much like parts in an assembly tree—so moving a parent moves all its children. This lets you group bolts on a flange, animate a robot arm, or hide/show an entire subsystem with one click. - Scripting and Interactivity: To make things happen, you write concise scripts—specifically in C# for Unity—that run each frame or respond to events (e.g., “when the user presses the Start button, play an animation”). Think of a script as a recipe: “grab this part, rotate it 90°, then display a prompt.”
- Asset Management and Import Pipelines: An asset is any 3D model, texture, sound, video, material, script, or other file used by the project. Unity imports common formats such as
FBX,OBJ, textures, audio, and video. Industrial CAD, BIM, mesh, and point-cloud data often require specialized tools such as Unity Asset Transformer / Pixyz or the Unity Industry Toolkit to prepare and optimize models for real-time use. Once imported, you just drag‑and‑drop assets into your scene, and the engine tracks every change automatically. - XR Integration and Input Handling: Unity’s XR Interaction Toolkit and OpenXR help abstract away differences between supported XR devices and input systems. You can map actions (e.g., grab, teleport, pinch) without worrying whether the user has a Meta Quest, HTC Vive, or Microsoft HoloLens. Features such as hand tracking, eye tracking, passthrough, spatial anchors, and haptics depend on the target device and installed packages. Some can be enabled through project settings, while others require platform-specific packages, permissions, or scripts.
- Cross‑Platform Deployment: After your scene works, you can build it for Windows, macOS, Linux, iOS, Android, WebGL, visionOS, and many XR headsets from the same project, depending on installed modules, target platform support, and package configuration. Unity gathers the right libraries, compresses textures, and creates an installer or APK, so you don’t have to maintain separate code bases for each platform.
Get Started with Unity
To begin developing with Unity, you need to install Unity Hub and the Unity Editor, ensuring you have the course-recommended Unity 6.3 LTS version for compatibility and extended support, and select the platform build modules (e.g., Windows, Android, iOS, XR) you plan to deploy to.
Unity Hub
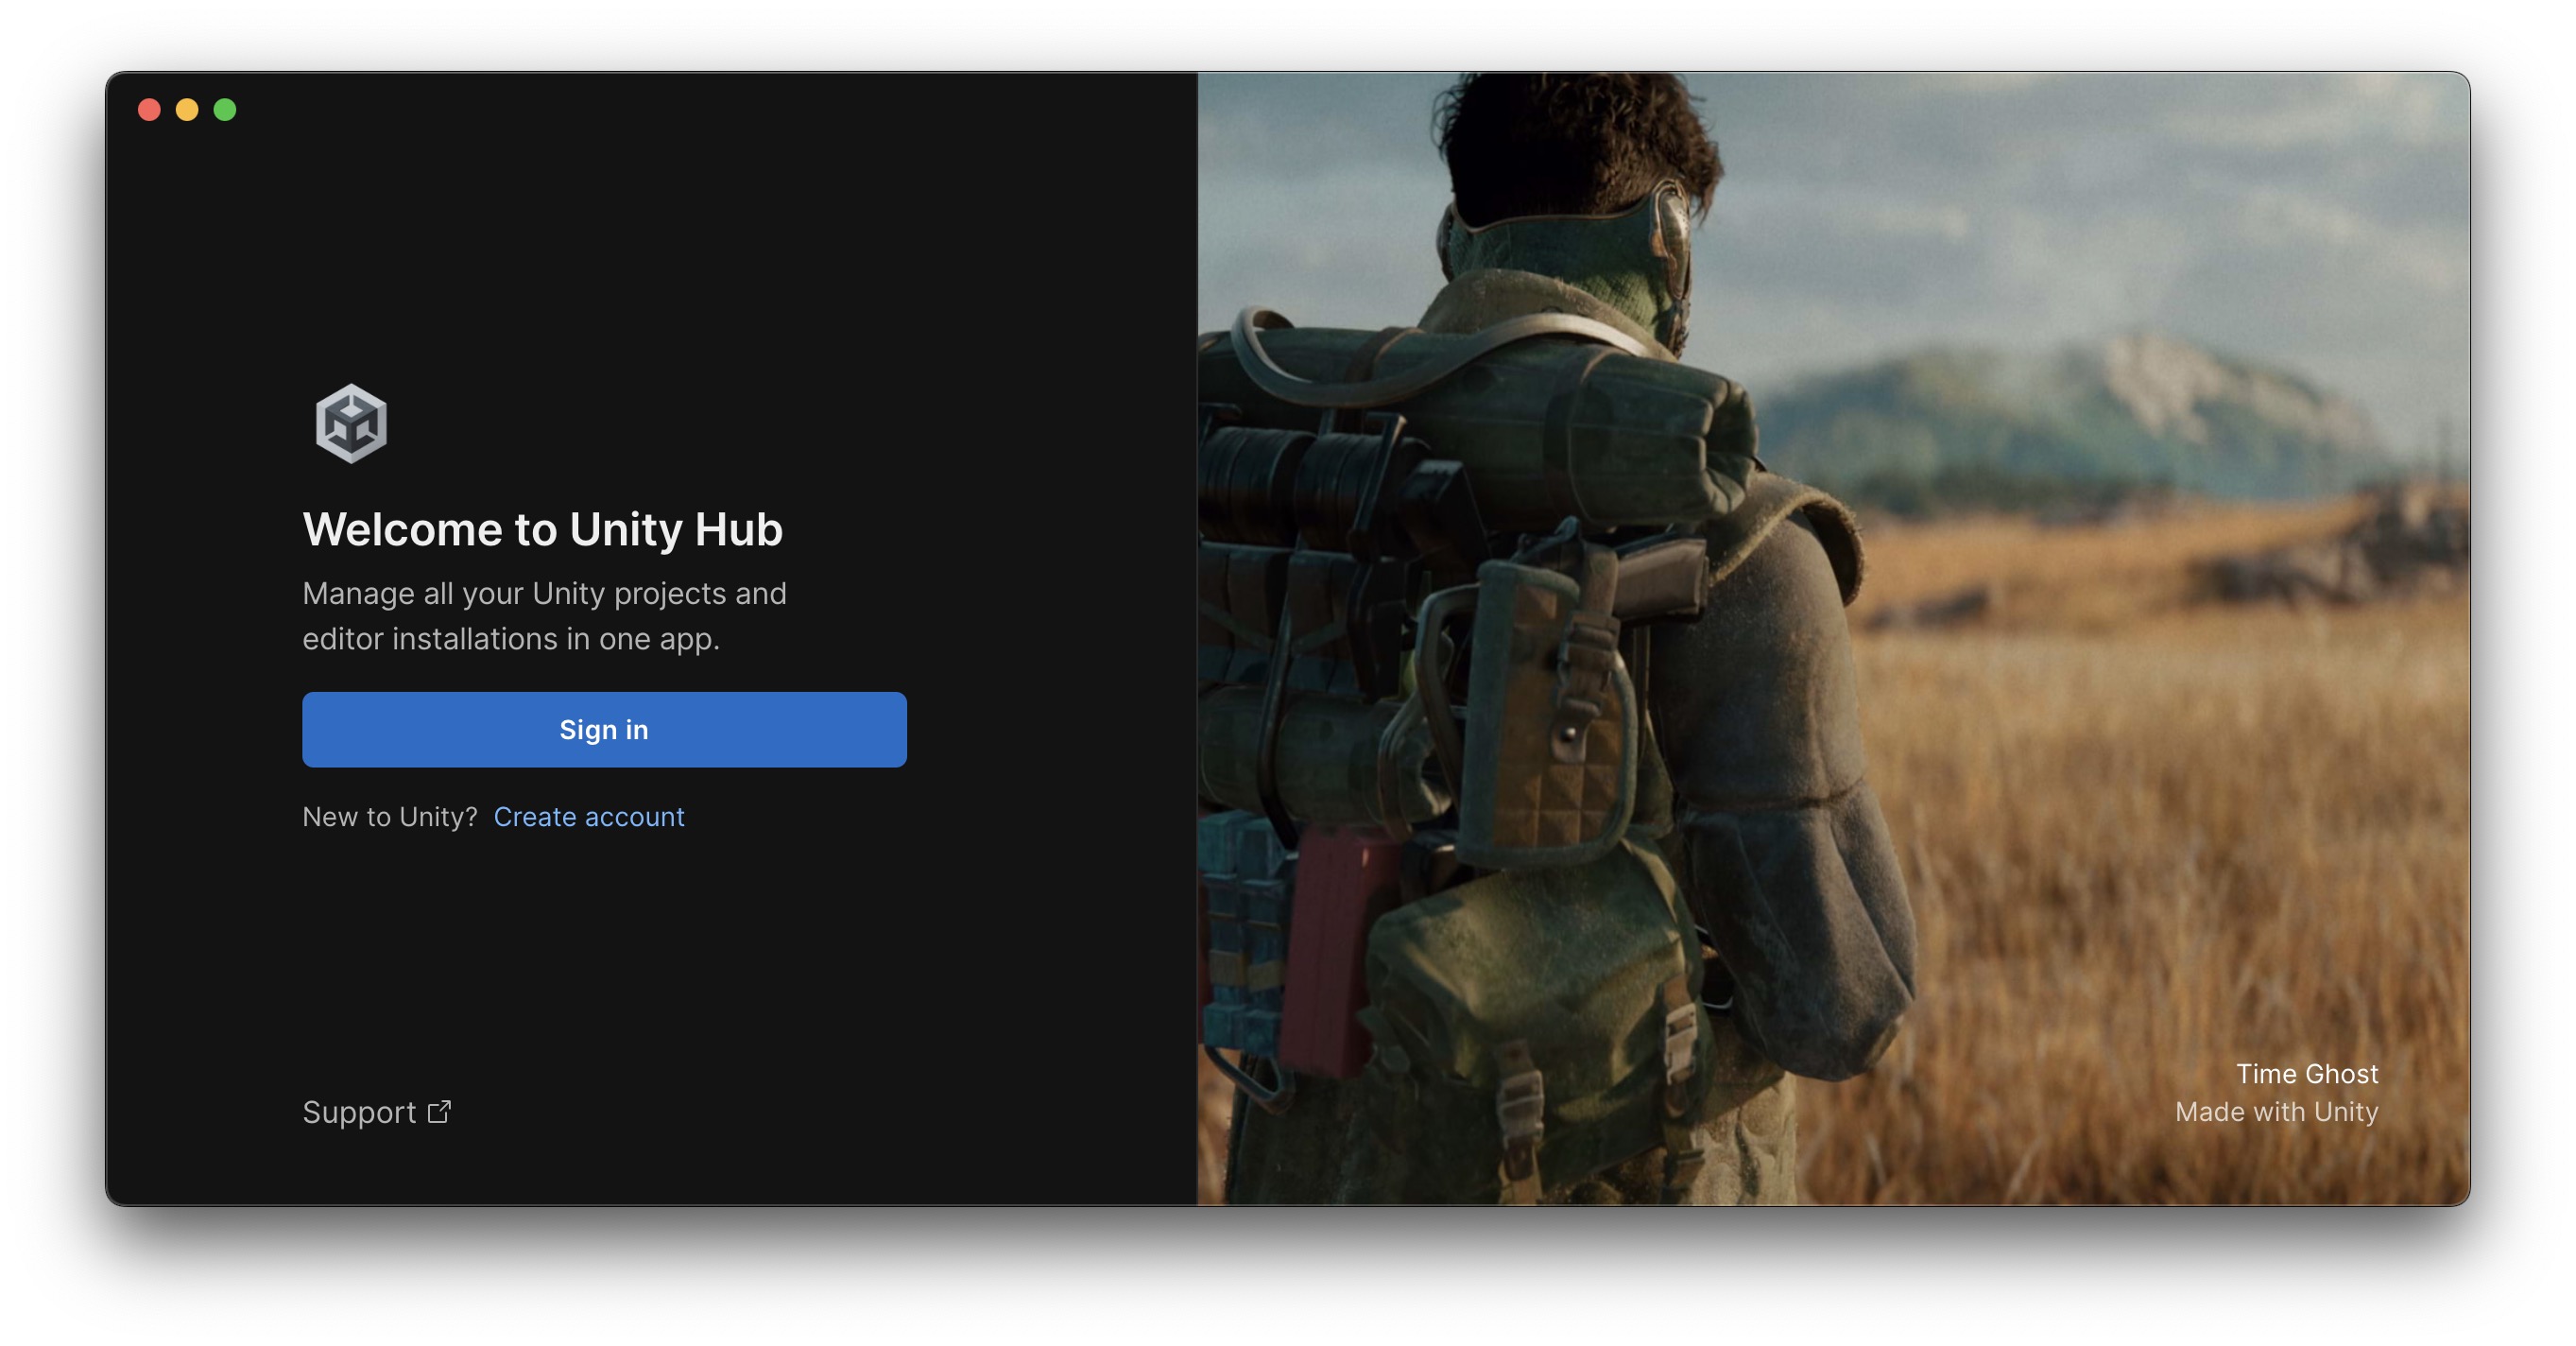
Unity Hub is a centralized management tool for Unity projects and installations. It simplifies the process of handling multiple versions of the Unity Editor and allows seamless switching between them based on project needs. Key features of Unity Hub:
- Manage Multiple Unity Versions: Download, update, and remove various Unity Editor versions tailored for specific projects.
- Create and Manage Projects: Set up new Unity projects, open existing ones, and organize them efficiently.
- Access Unity Services and Settings: Link your Unity account, manage licenses, and configure cloud services.
Unity Editor
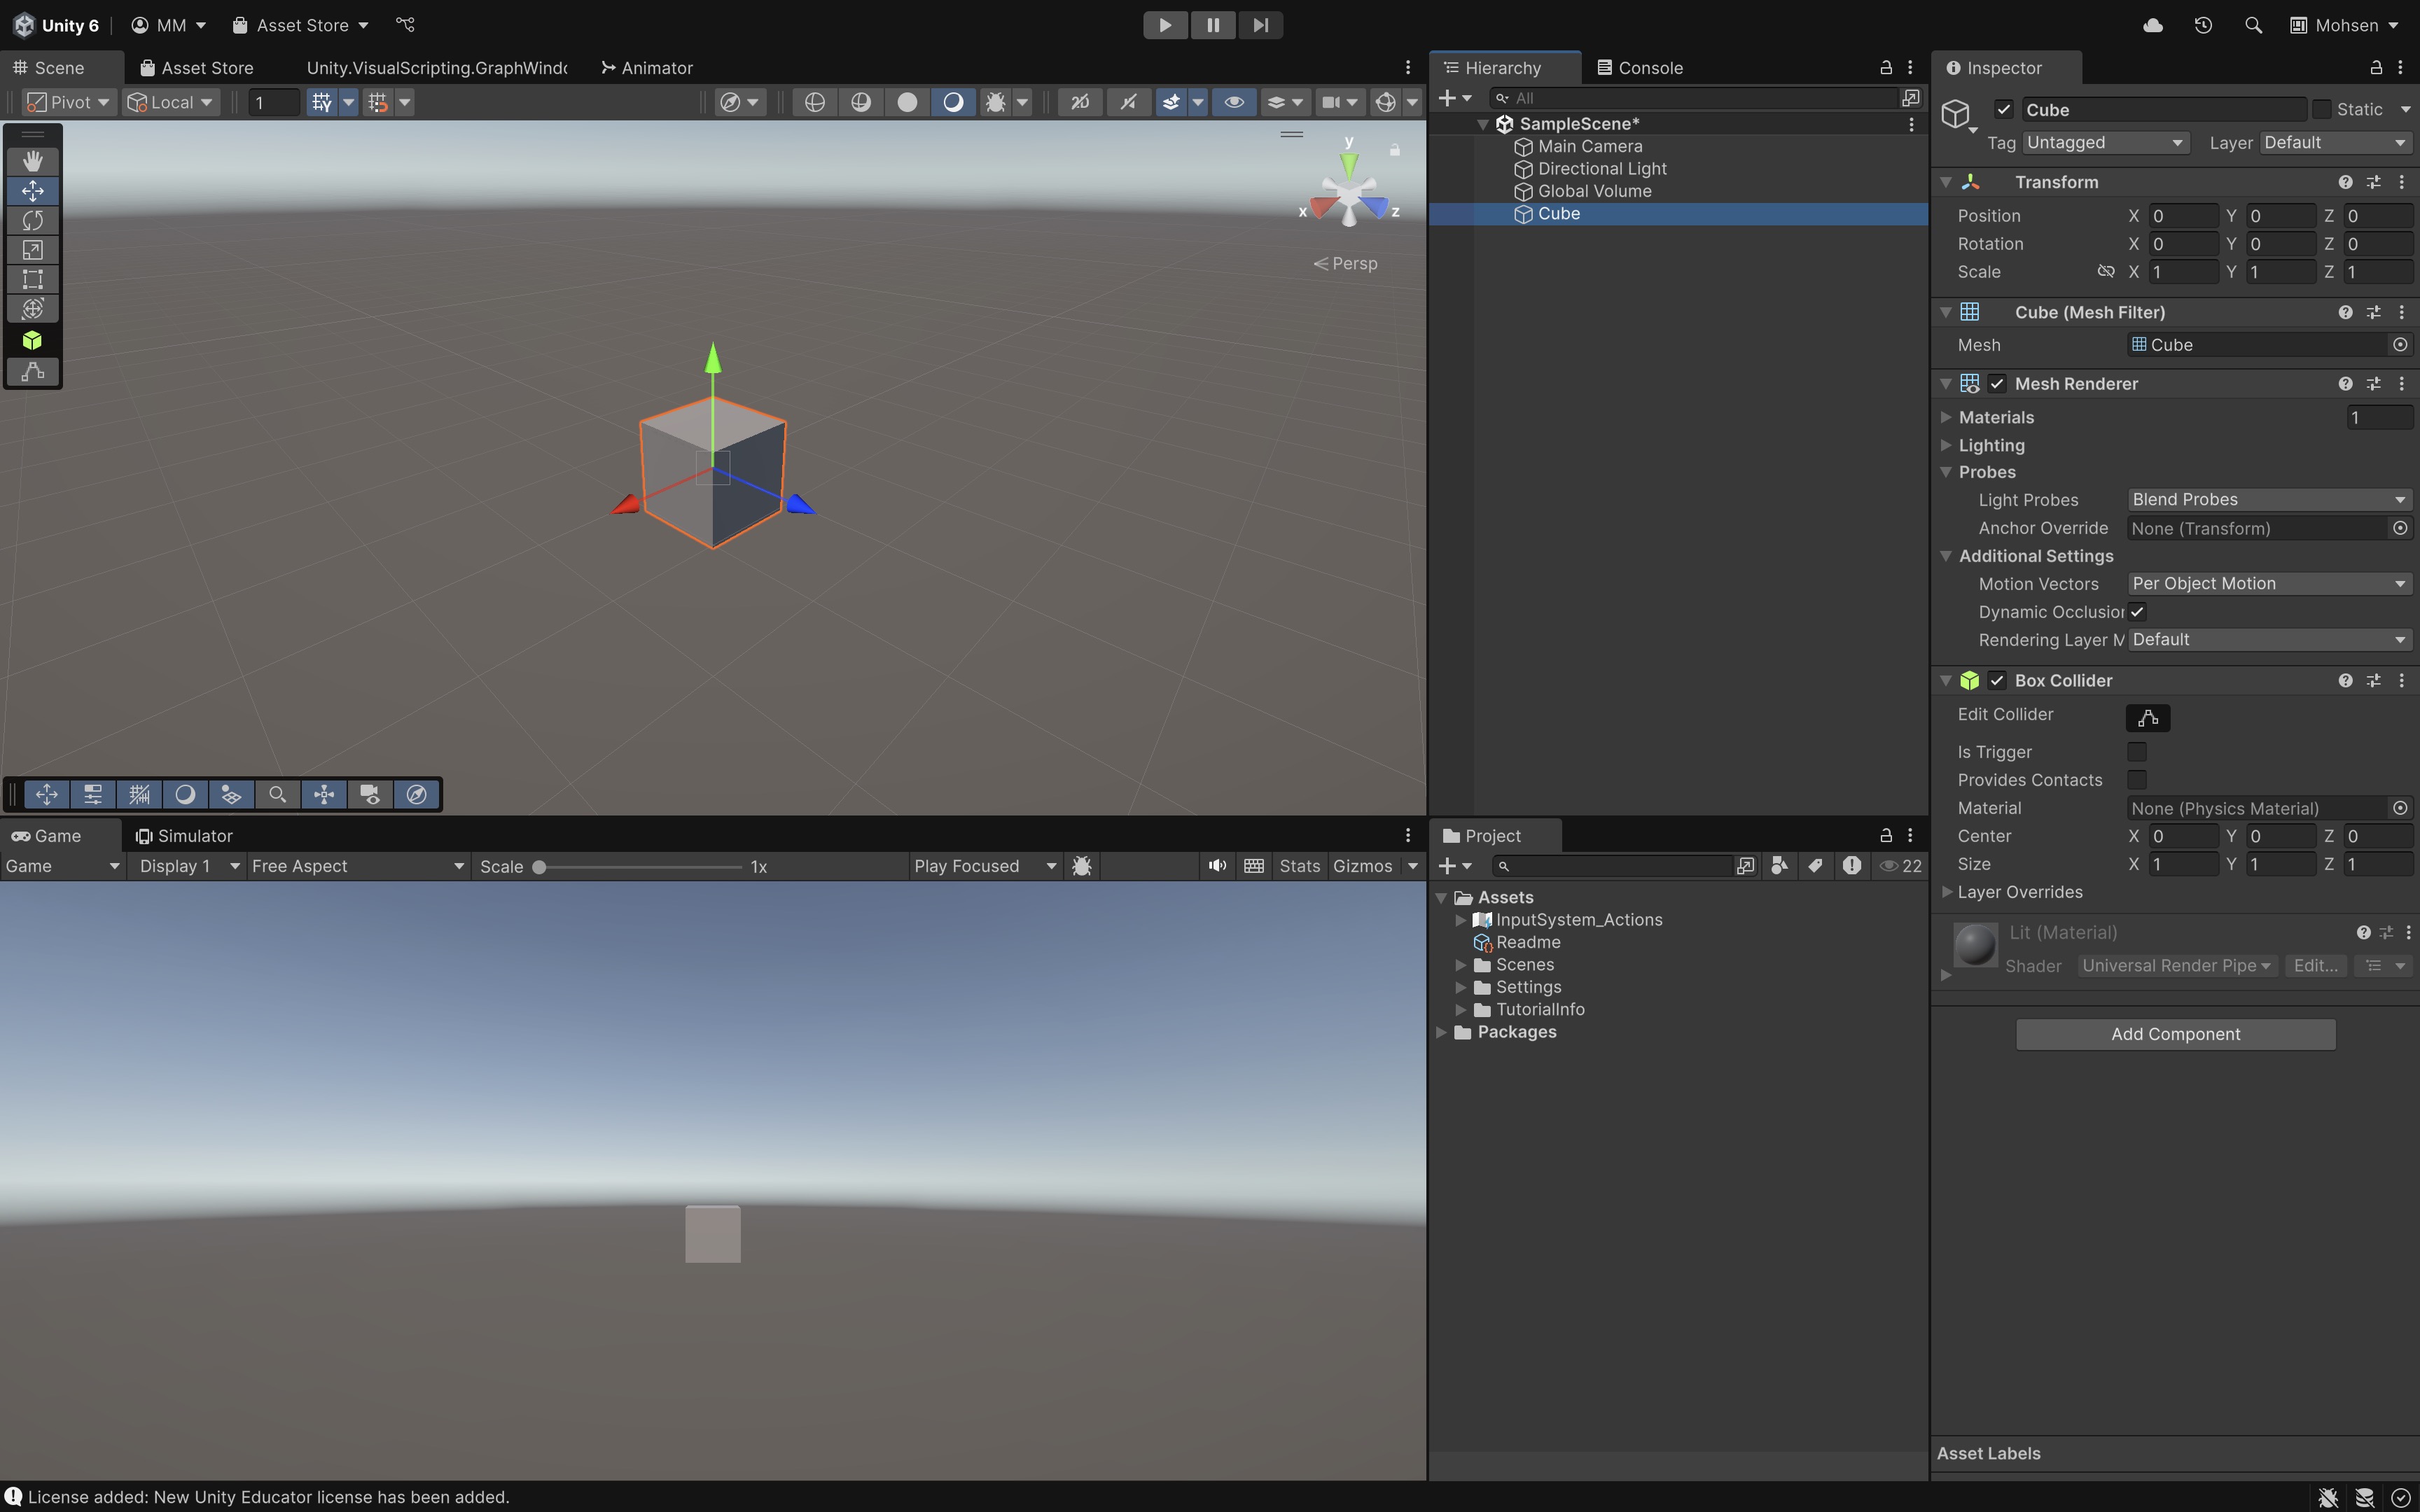
The Unity Editor is the primary integrated development environment (IDE) where developers create interactive experiences. It provides tools for game design, asset management, scripting, and testing. Key elements of the Unity Editor:
- Scene View: A visual layout area to build and manipulate your 2D/3D worlds.
- Inspector Window: Displays and allows editing of properties for selected objects.
- Scripting Environment: Write gameplay logic using C#, Unity’s preferred programming language.
- Asset Management: Import and organize graphics, audio, prefabs, and third-party packages.
- Play Mode: Test your application directly within the Editor to preview behavior and interaction.
Unity version note: This course uses Unity 6.3 LTS. Some screenshots may have been captured in Unity 6.0 or 6.1, but the workflows remain the same unless a note says otherwise. If a menu label or package version looks slightly different, follow the written instructions and use the course-recommended Unity 6.3 LTS installation.
System Requirements
Before installing Unity, ensure your system meets the following minimum specifications:
- Windows: Windows 10 version 21H1 or newer, or Windows 11, on a supported 64-bit system.
- macOS: macOS Ventura 13 or newer, on supported Intel or Apple Silicon hardware.
- Linux: Ubuntu 22.04 or Ubuntu 24.04 on a supported 64-bit system.
- Memory: Unity recommends at least 8 GB RAM, though larger projects may require more.
Unity is not supported on Chromebooks, Android tablets, or iPads. Always refer to Unity’s official System Requirements for the latest compatibility details. For best results, avoid working from cloud-synced project folders such as OneDrive, iCloud Drive, or Dropbox, because Unity projects contain many generated files that can conflict with sync tools.
Unity Account
A Unity account is used to sign in to Unity Hub, manage licenses, access Unity services, and use resources such as Unity Learn and the Asset Store. Services accessible via your Unity account include:
- Unity Asset Store: A marketplace offering ready-to-use assets like models, scripts, environments, and tools.
- Unity Cloud: Cloud-based tools for build automation, collaboration, and live updates.
- Unity Learn: A hub of tutorials, courses, and learning paths to master Unity development.
To create an account:
- Visit Unity’s account page.
- Sign up using an email address or a third-party account (Google, Facebook, Apple).
- Log in to Unity Hub when prompted to connect your projects and licenses.
Unity Plan
Unity offers several subscription tiers to accommodate a wide range of developers, from beginners to enterprise teams:
- Unity Personal: This plan is intended for hobbyists, students, and indie developers whose annual revenue is under $200,000. It is available for free.
- Unity Student: This plan is available for verified students who have an academic email. It is free of charge.
- Unity Educator: This plan is designed for teachers, professors, and academic institutions. It is offered for free.
- Unity Pro/Enterprise: This plan is geared toward professional studios and businesses that require advanced support and services. It is available through a paid, subscription-based model.
For a full comparison of features and limitations, check the Unity pricing page.
Download Unity Hub
To begin, download the Unity Hub application:
- Visit the official Unity Download Page.
- Choose the correct installer for your operating system (Windows, macOS, or Linux).
- Download and run the installer to set up Unity Hub.
Review this Unity documentation to learn more about how to install Unity on your device.
Install the Unity Editor
After installing Unity Hub, follow these steps to install the Unity Editor:
- Launch Unity Hub and sign in with your Unity account.
- Navigate to the Installs tab.
-
Click Install Editor to begin the setup.
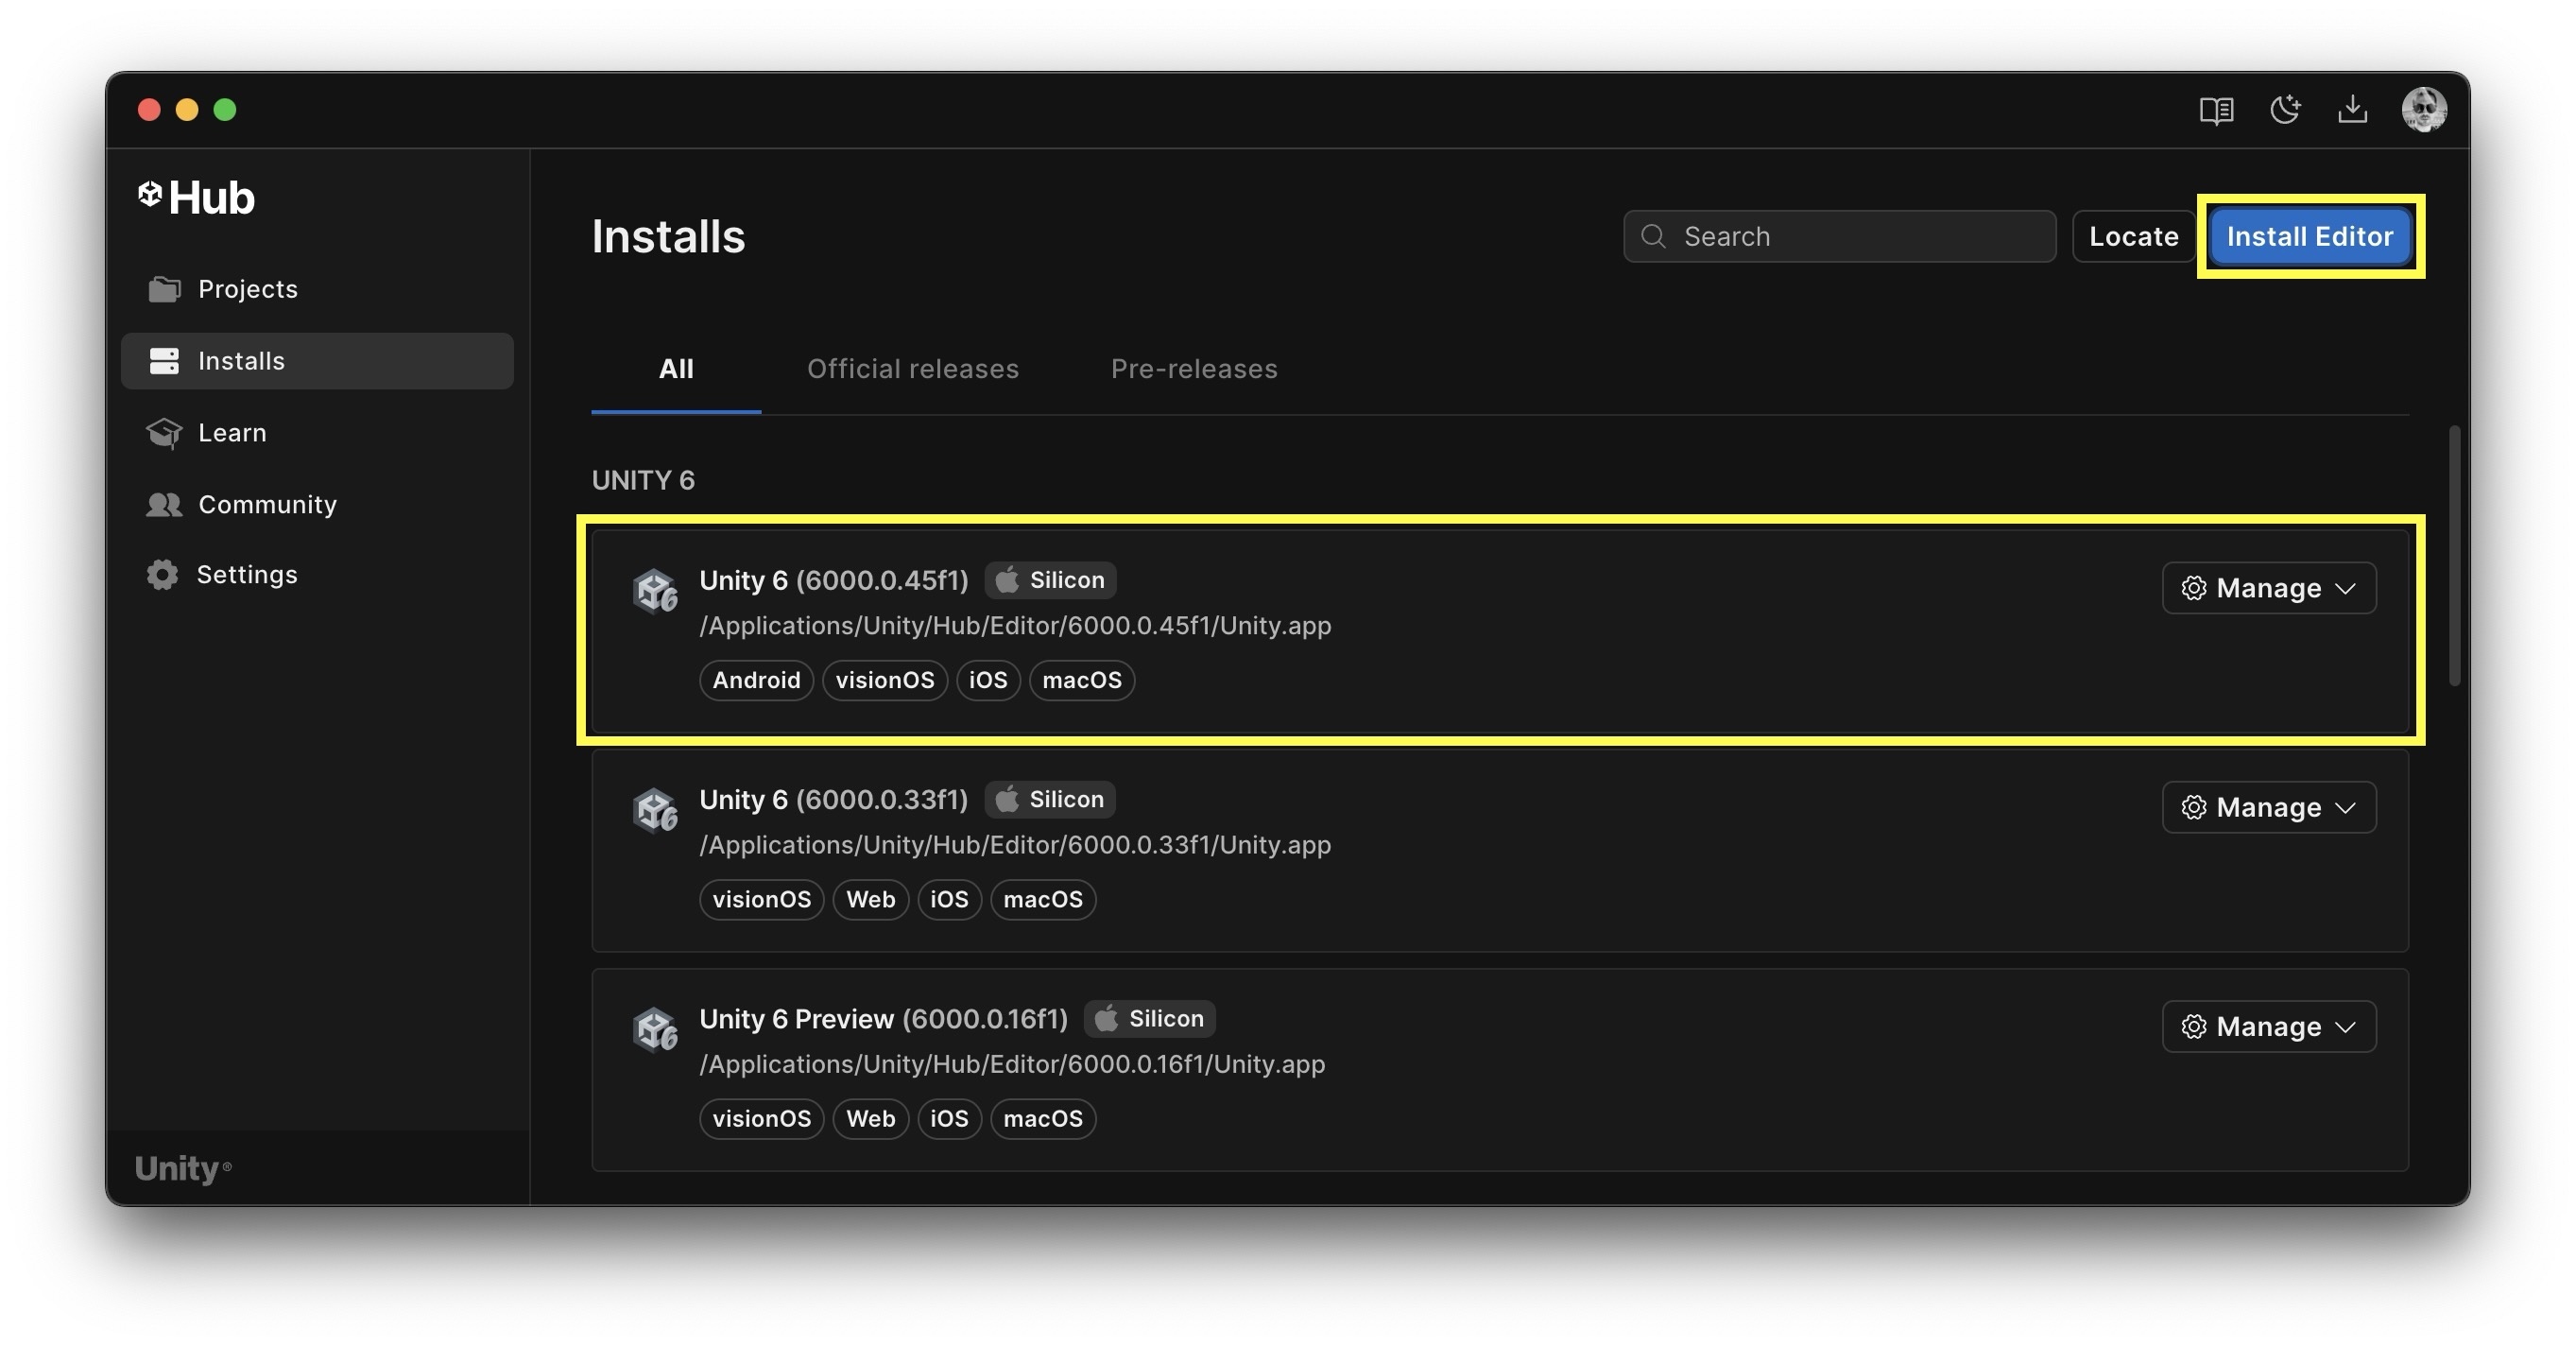
-
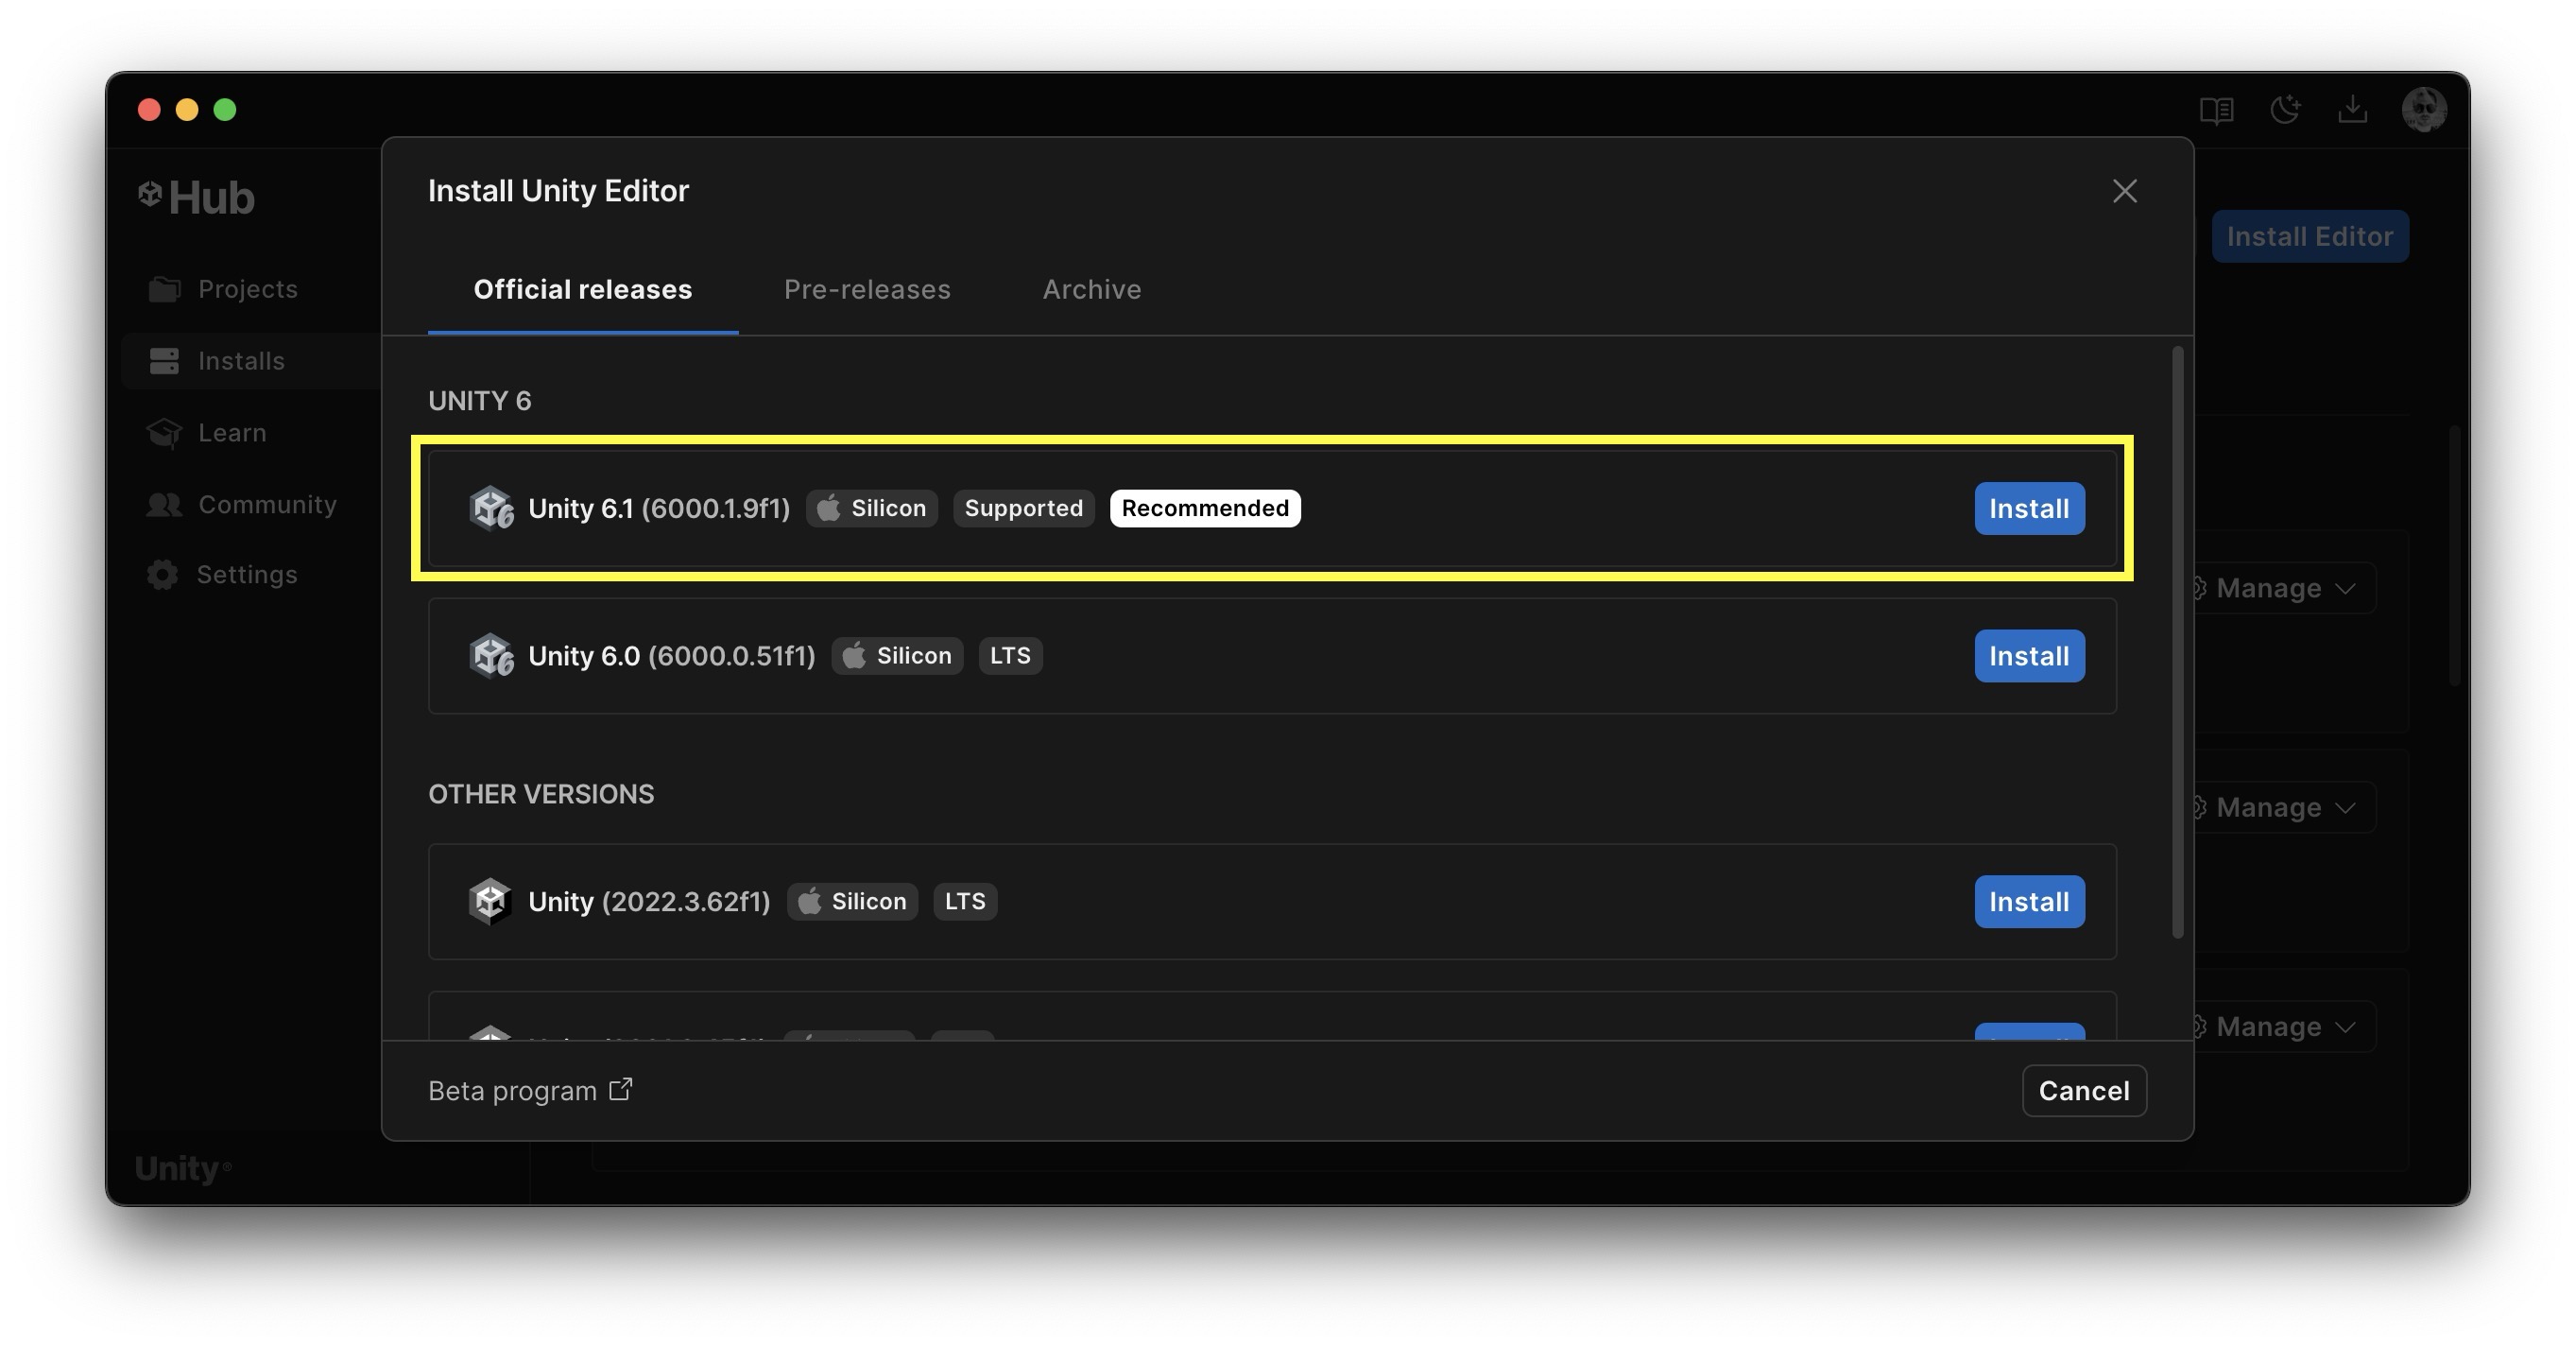
Select the course-recommended Unity 6.3 LTS version. If multiple 6000.3.x patch versions are available, use the exact patch version announced by the instructor. LTS releases are ideal for production due to their extended stability and support.
- Choose additional modules based on your platform needs. For this course, install desktop support for your operating system. Later XR modules may also require Android Build Support with Android SDK/NDK Tools and OpenJDK for Meta Quest deployment.
-
Click Install and allow the download and installation to complete.
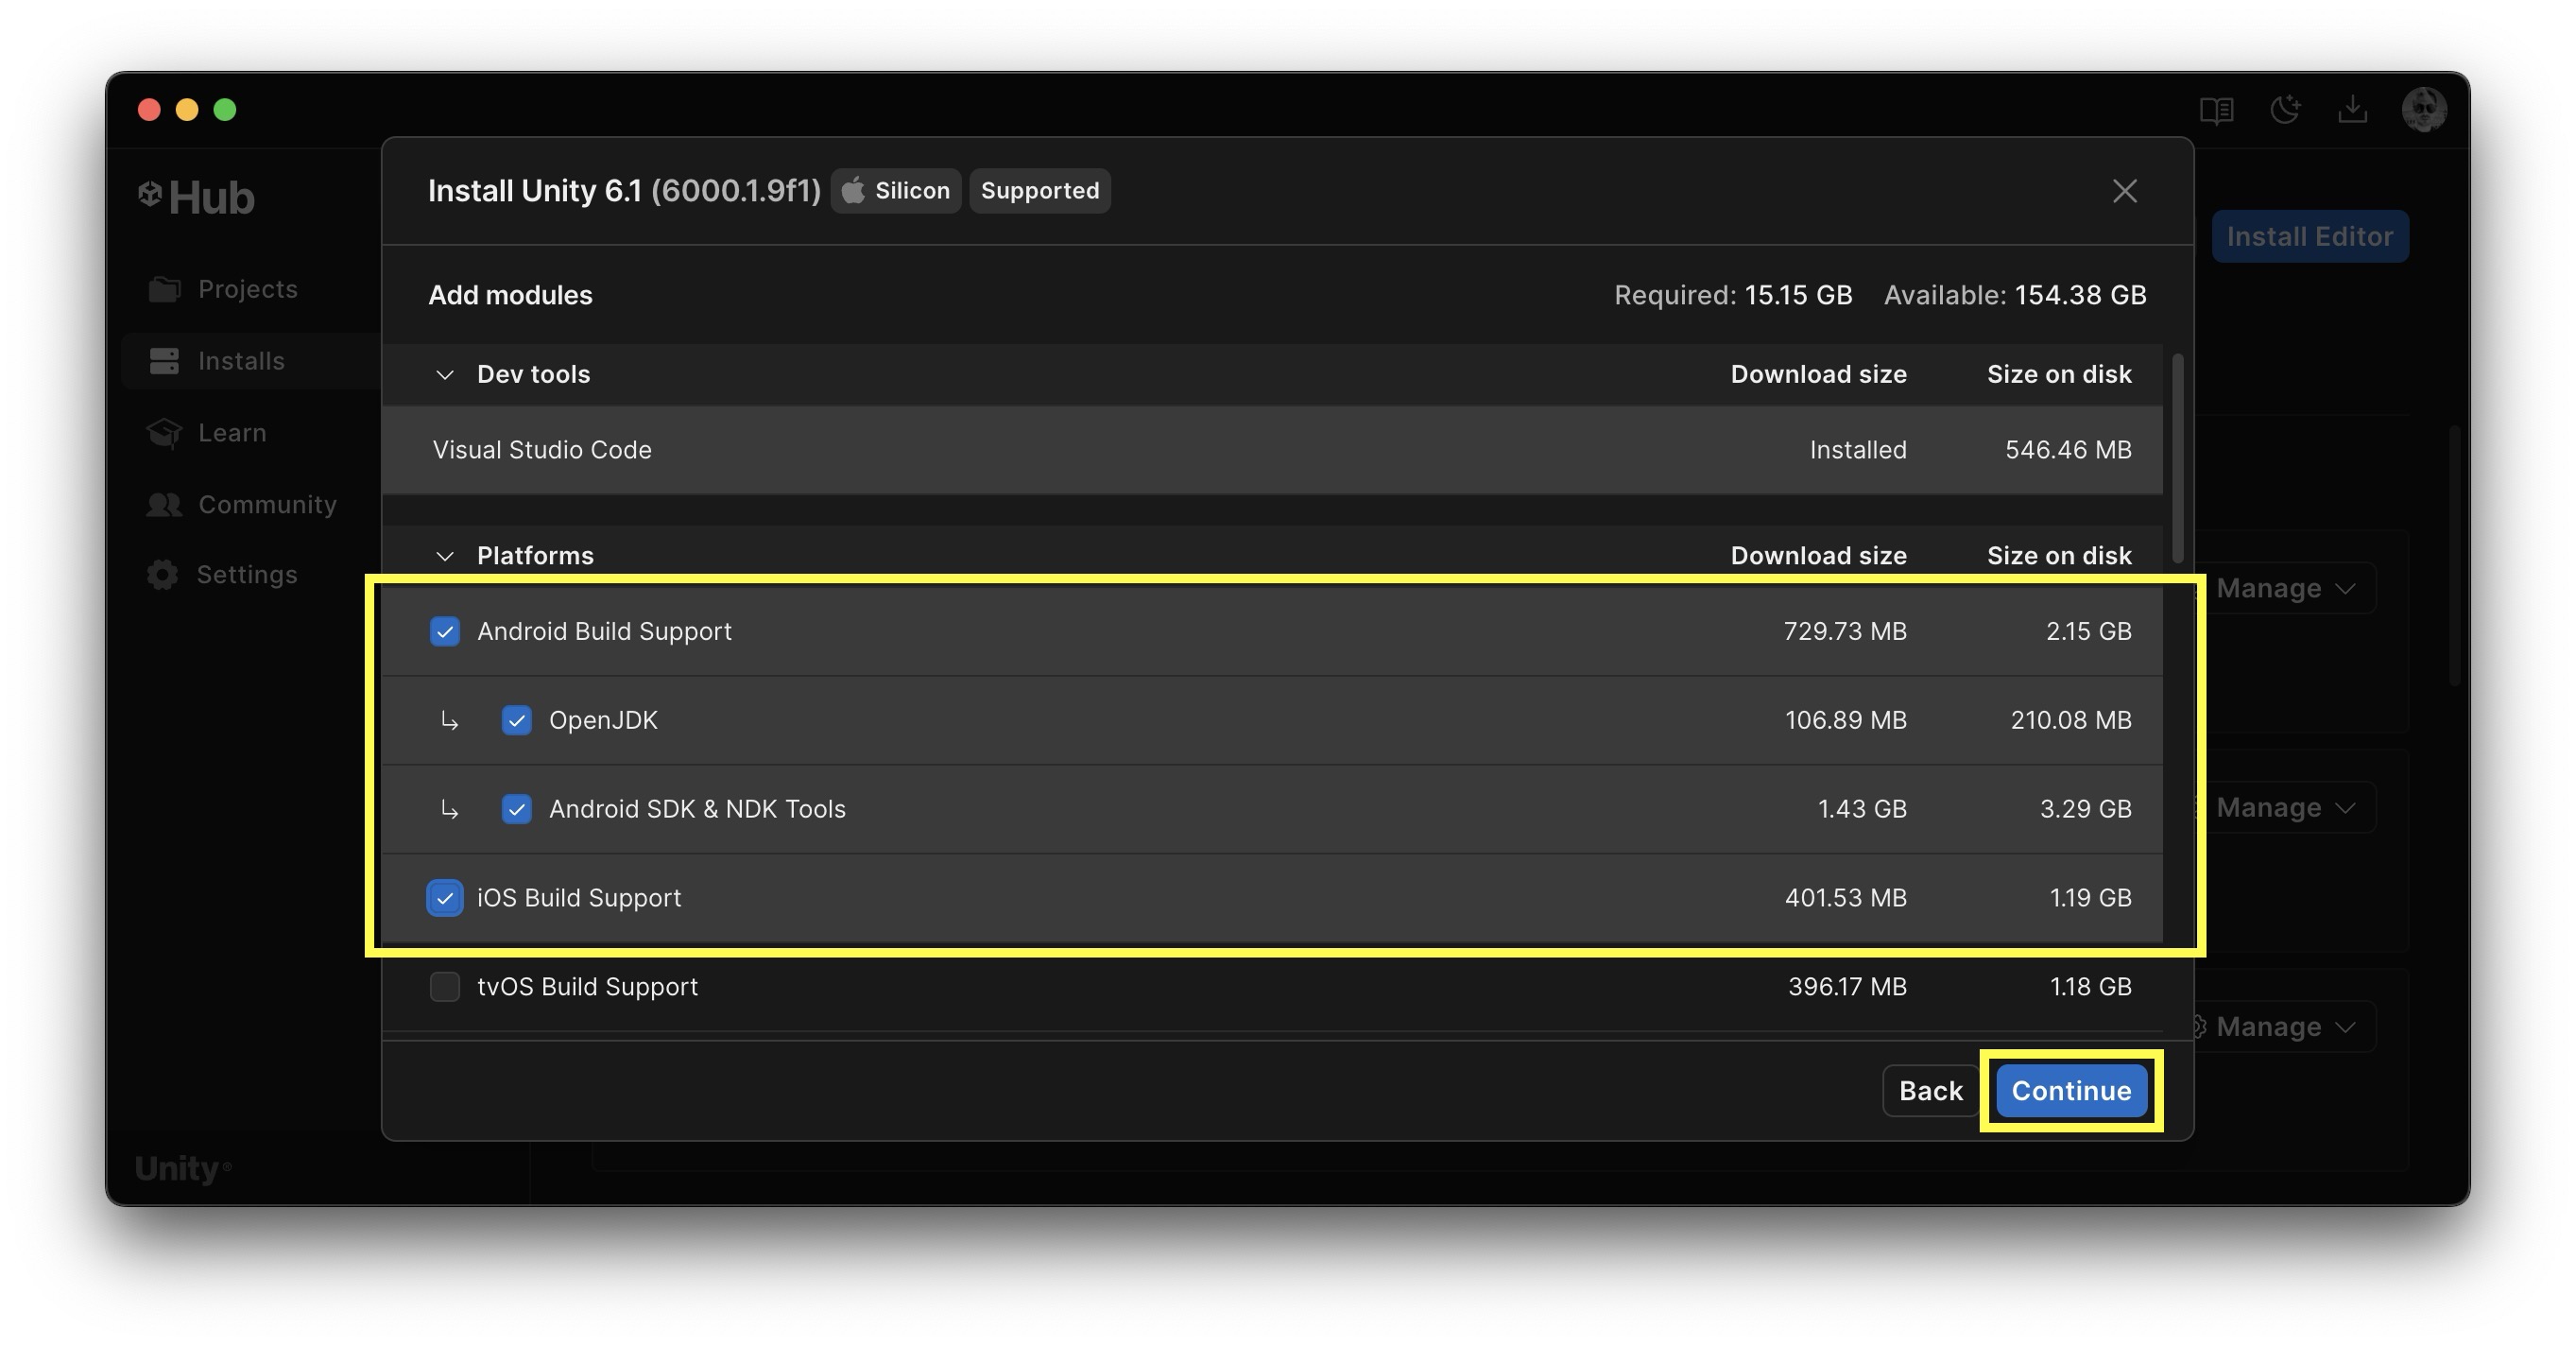
Once installed, the Unity Editor will appear under the Installs section in Unity Hub, ready for use in new or existing projects.
Basics of Unity
At the core of this course lies the Unity Editor—a powerful platform for building immersive applications, games, and simulations. Let’s create our first Unity project and import a custom industrial environment called the XFactory, which will serve as a hands-on environment throughout the course.
Creating a Unity Project
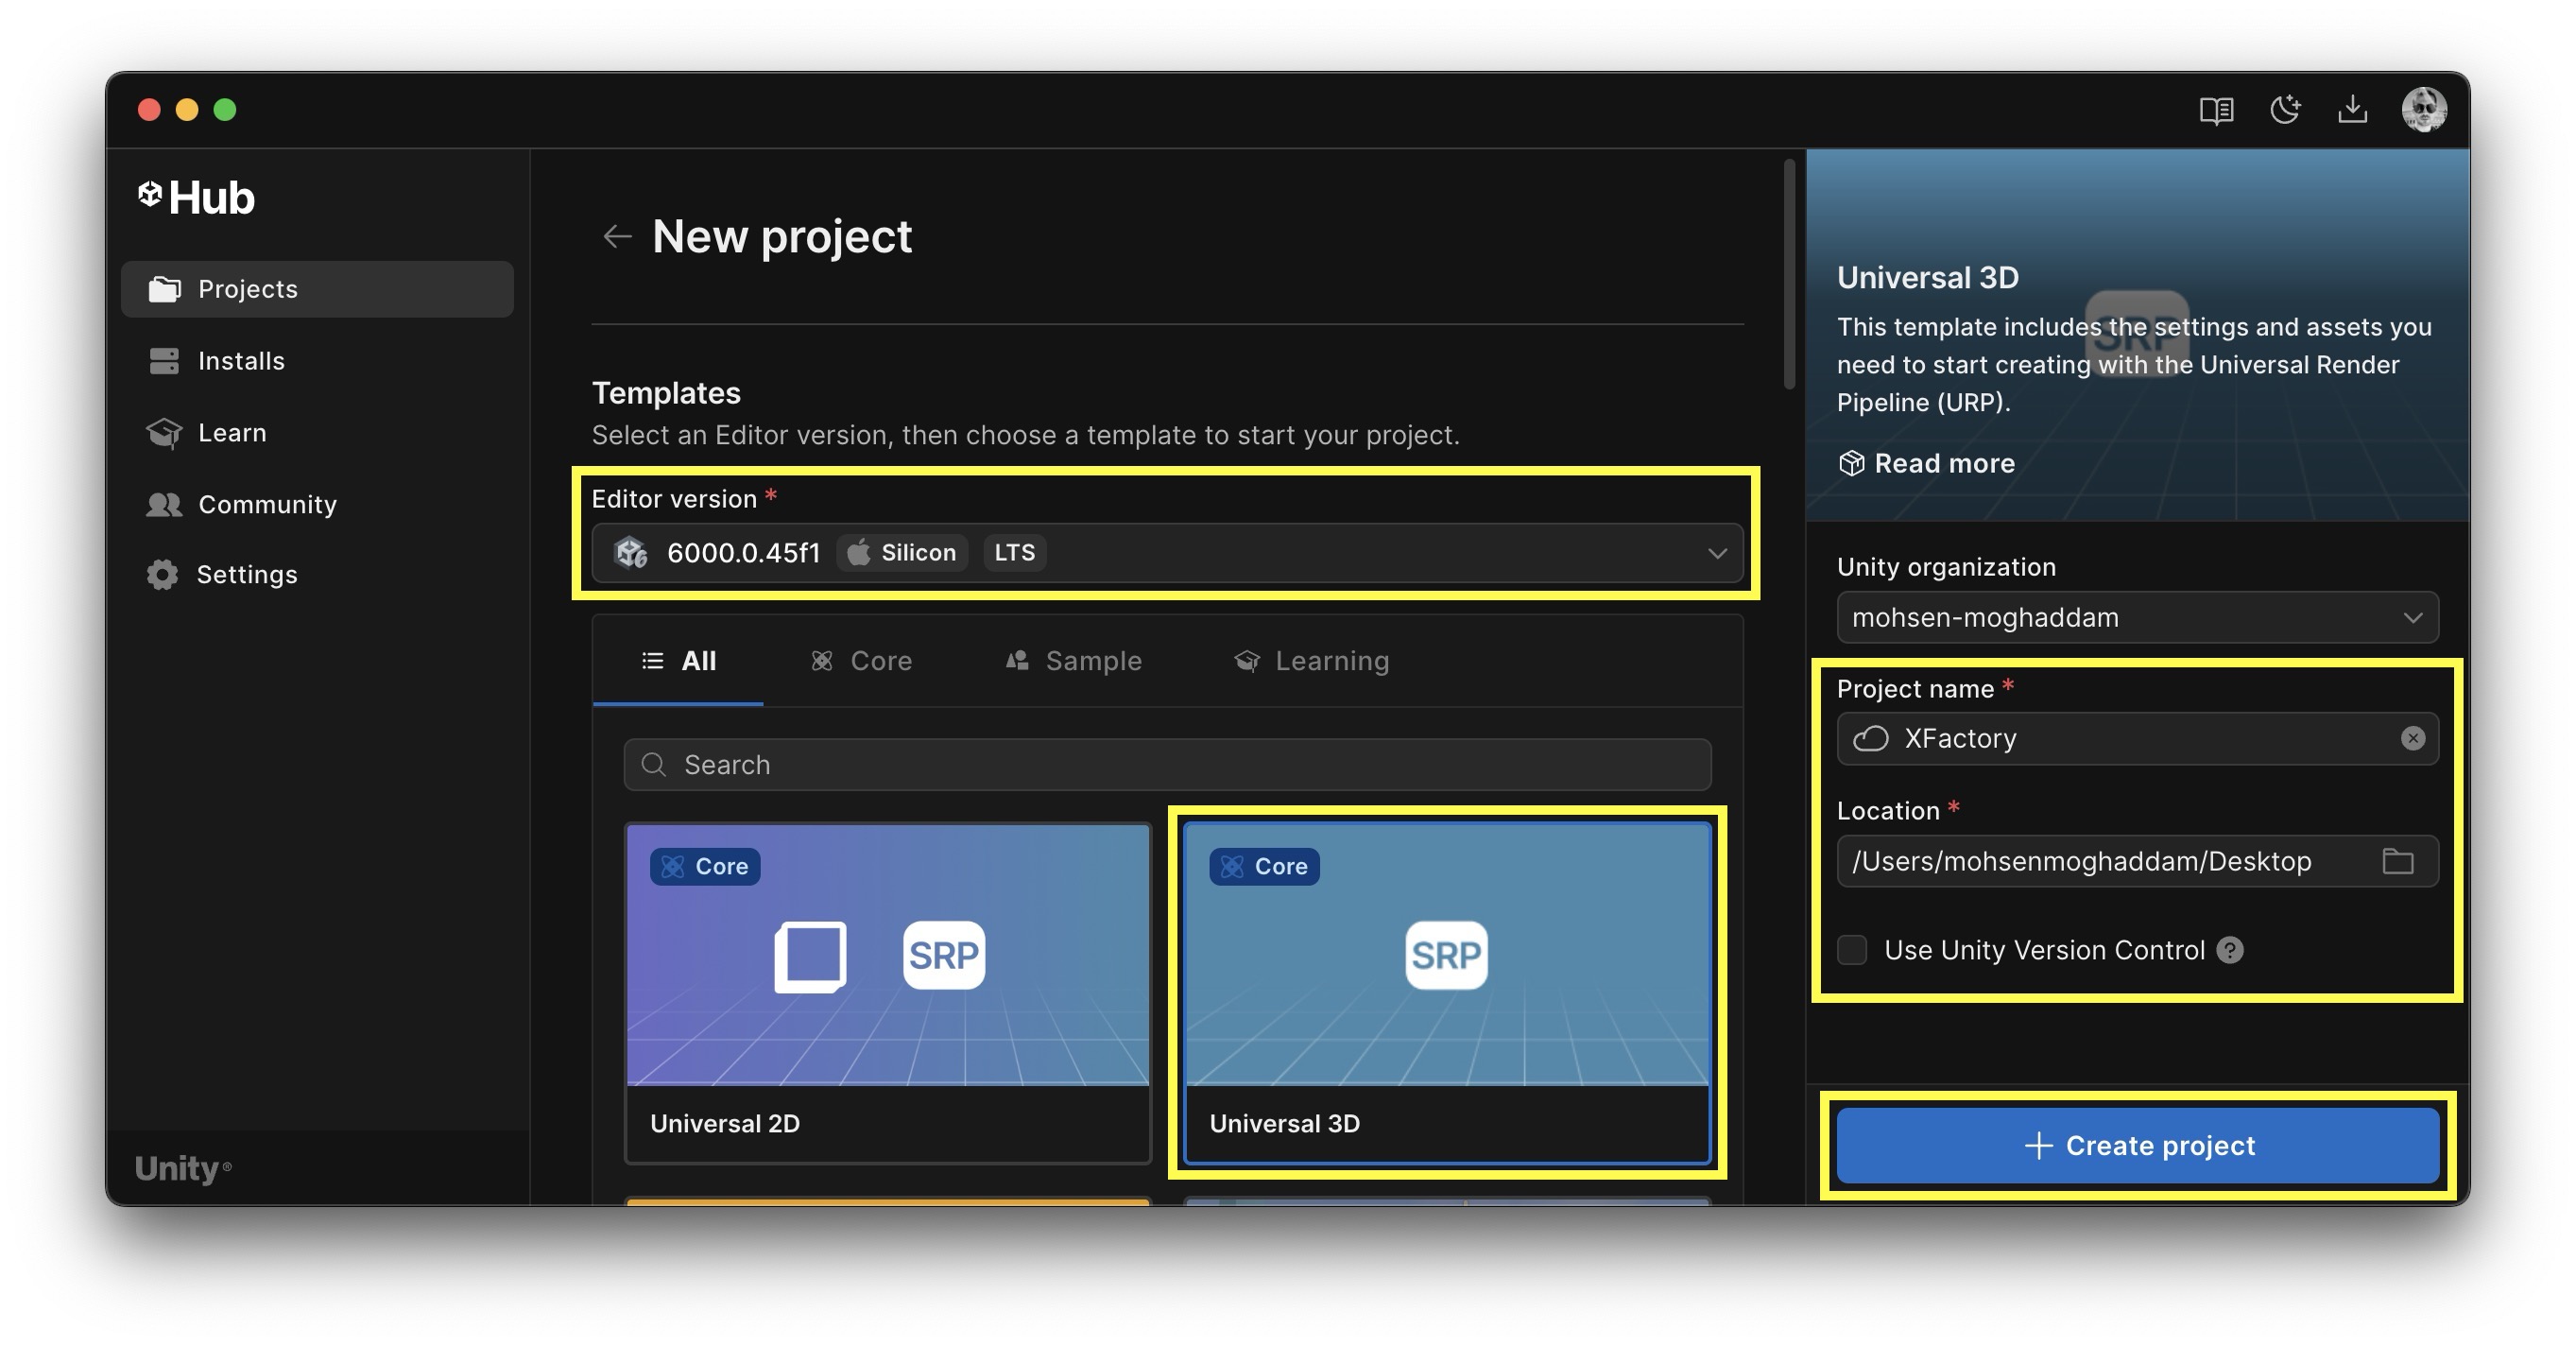
Let’s start by setting up the foundation for our XR project:
- Open Unity Hub.
- Navigate to the Projects tab and click New Project.
- Select the Universal 3D template unless the instructor or repository README specifies a different template.
- Choose the course-recommended Unity Editor version: Unity 6.3 LTS (6000.3.x). Install it via Unity Hub if it is not available.
- Assign Project name something like
XFactory. - Choose a Location on your system to save the project.
-
Click Create project to open the Unity Editor.
Importing Custom Packages
To simulate real-world engineering scenarios, we will use a custom Unity package that contains a virtual factory environment—complete with 3D models, prefabs, textures, materials, lighting, and more. This factory consists of five major stations: Logistics, Manufacturing, Assembly, Welding, and Exhibit. You will explore these areas and use them in practical exercises.
- Download the package: Get
XFactory.unitypackagefrom the course website. - Open your Unity project: In Unity Hub, create a new Universal 3D project or open your existing course project.
-
Import the package: In the Unity Editor, go to
Assets > Import Package > Custom Package....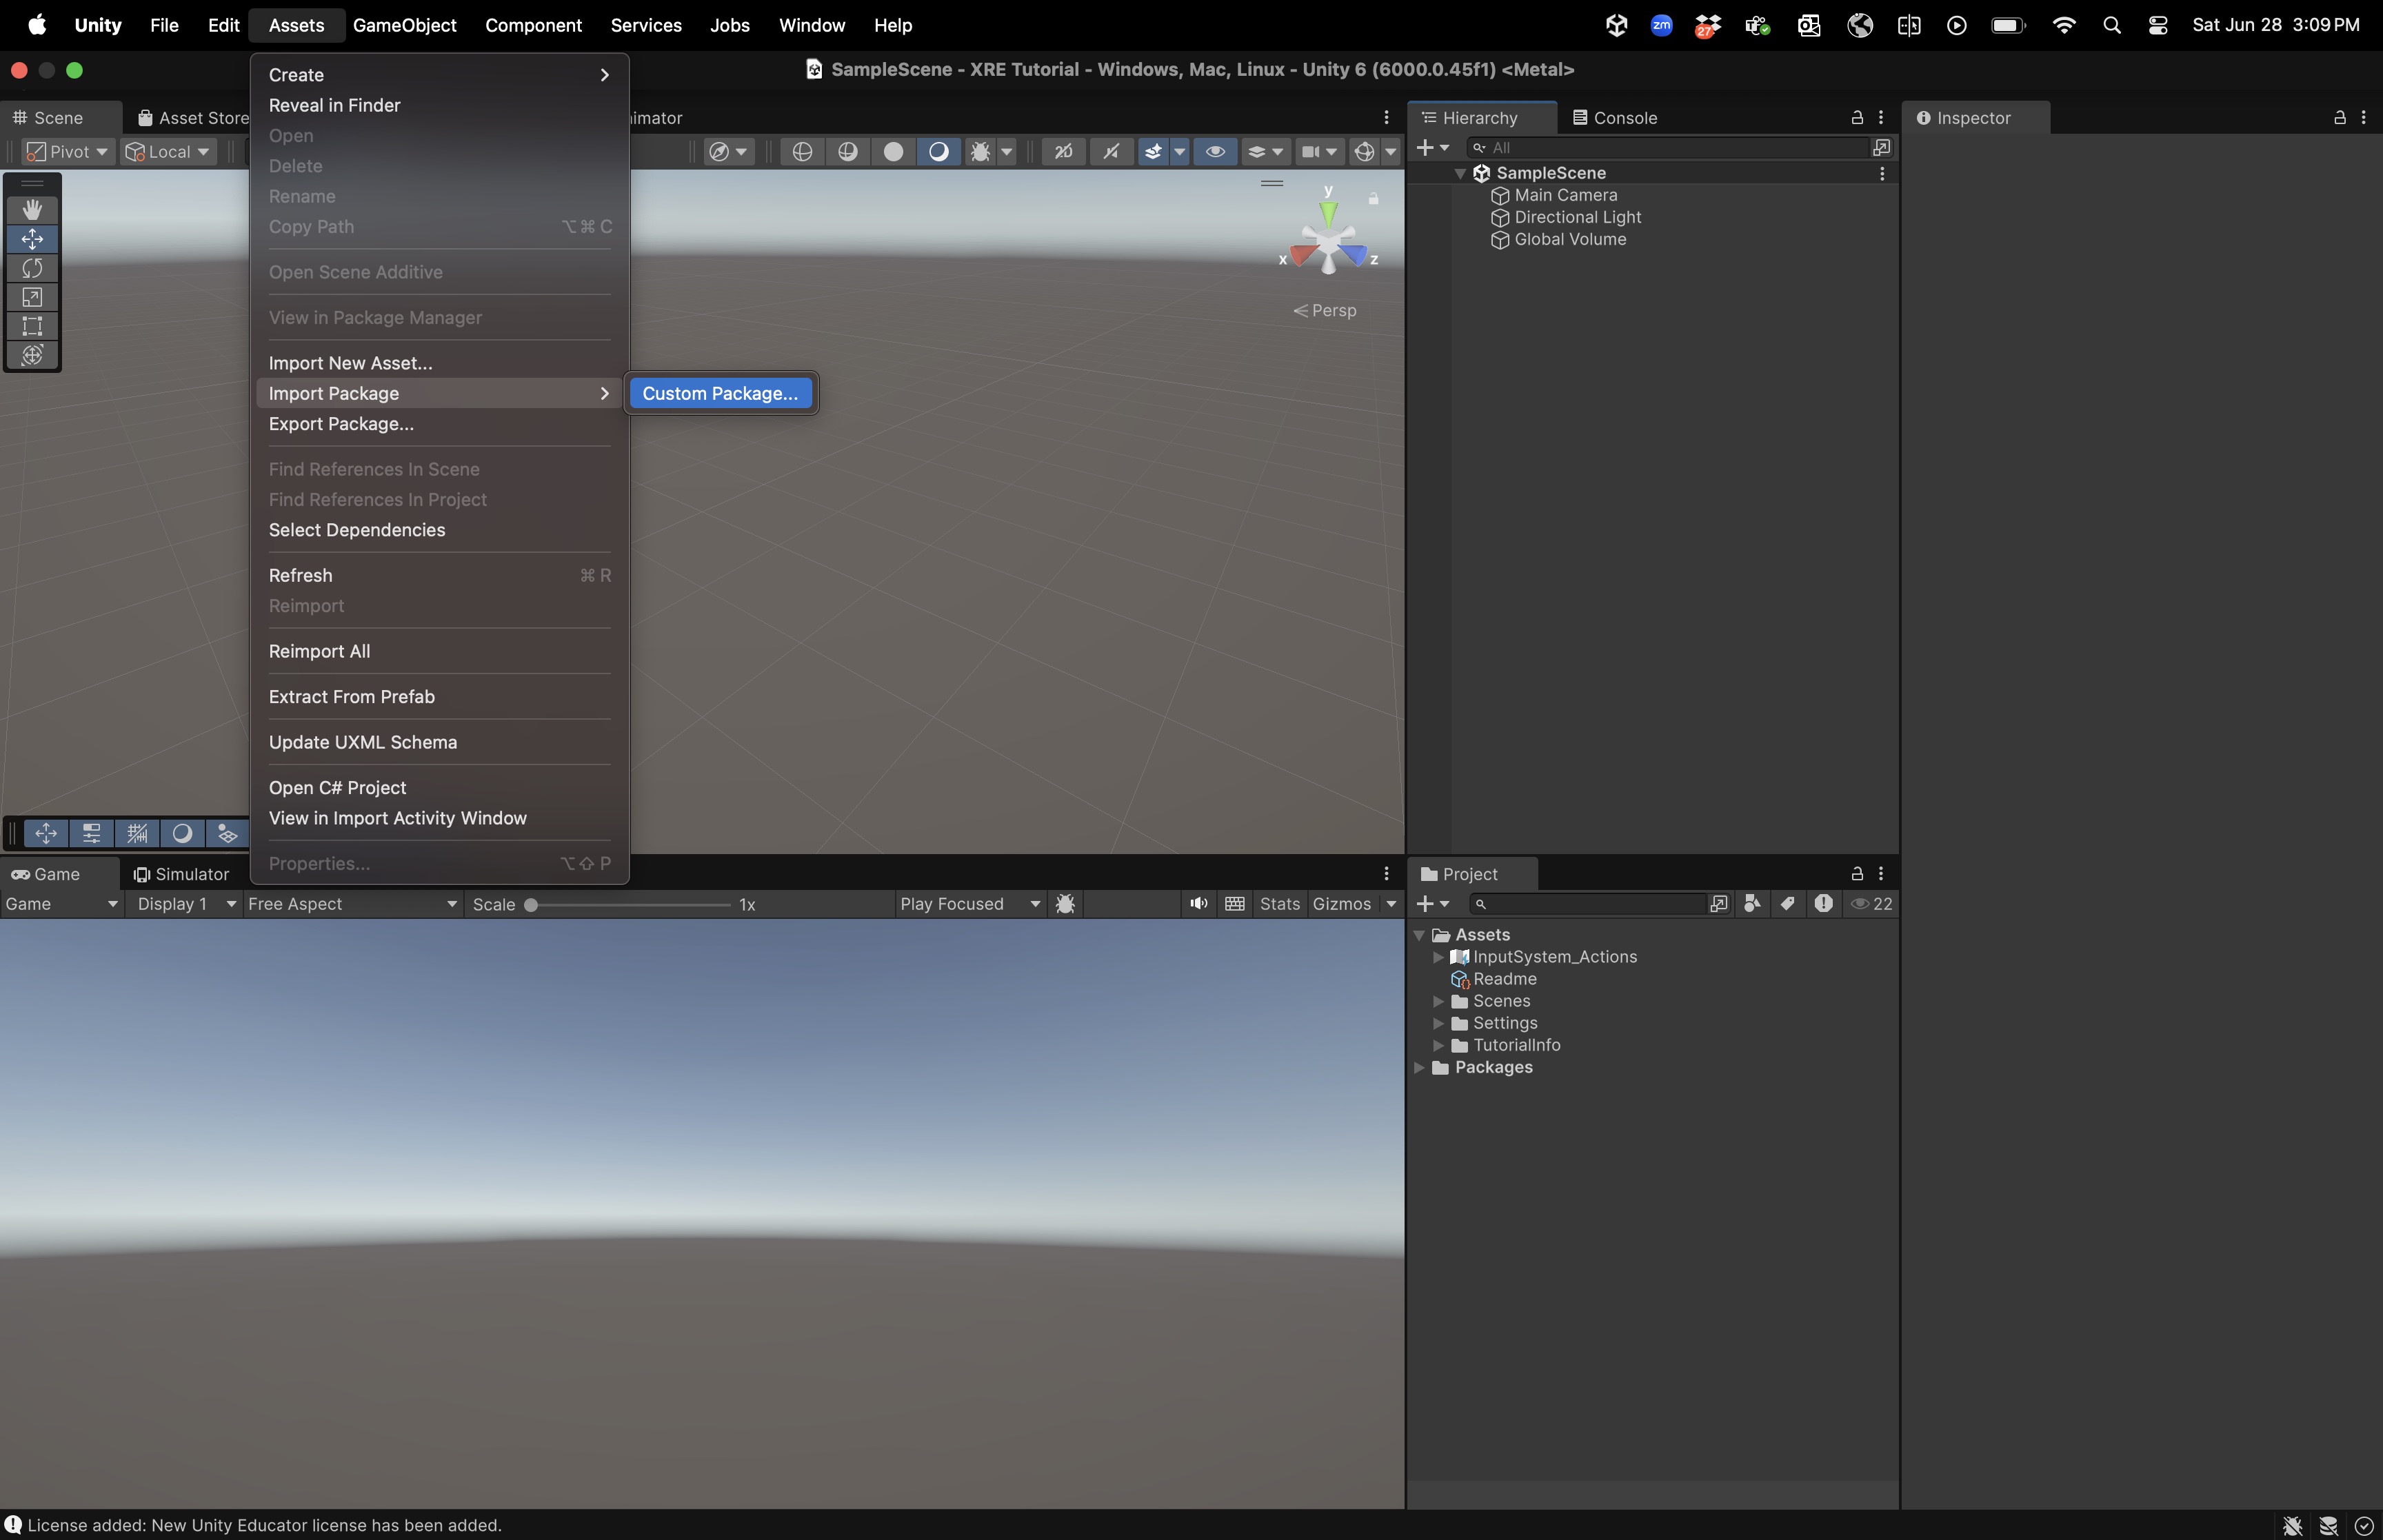
- Select the package file: Choose the
XFactory.unitypackagefile you downloaded. -
Confirm import: In the import dialog, click
Allto ensure every asset is included, then clickImport.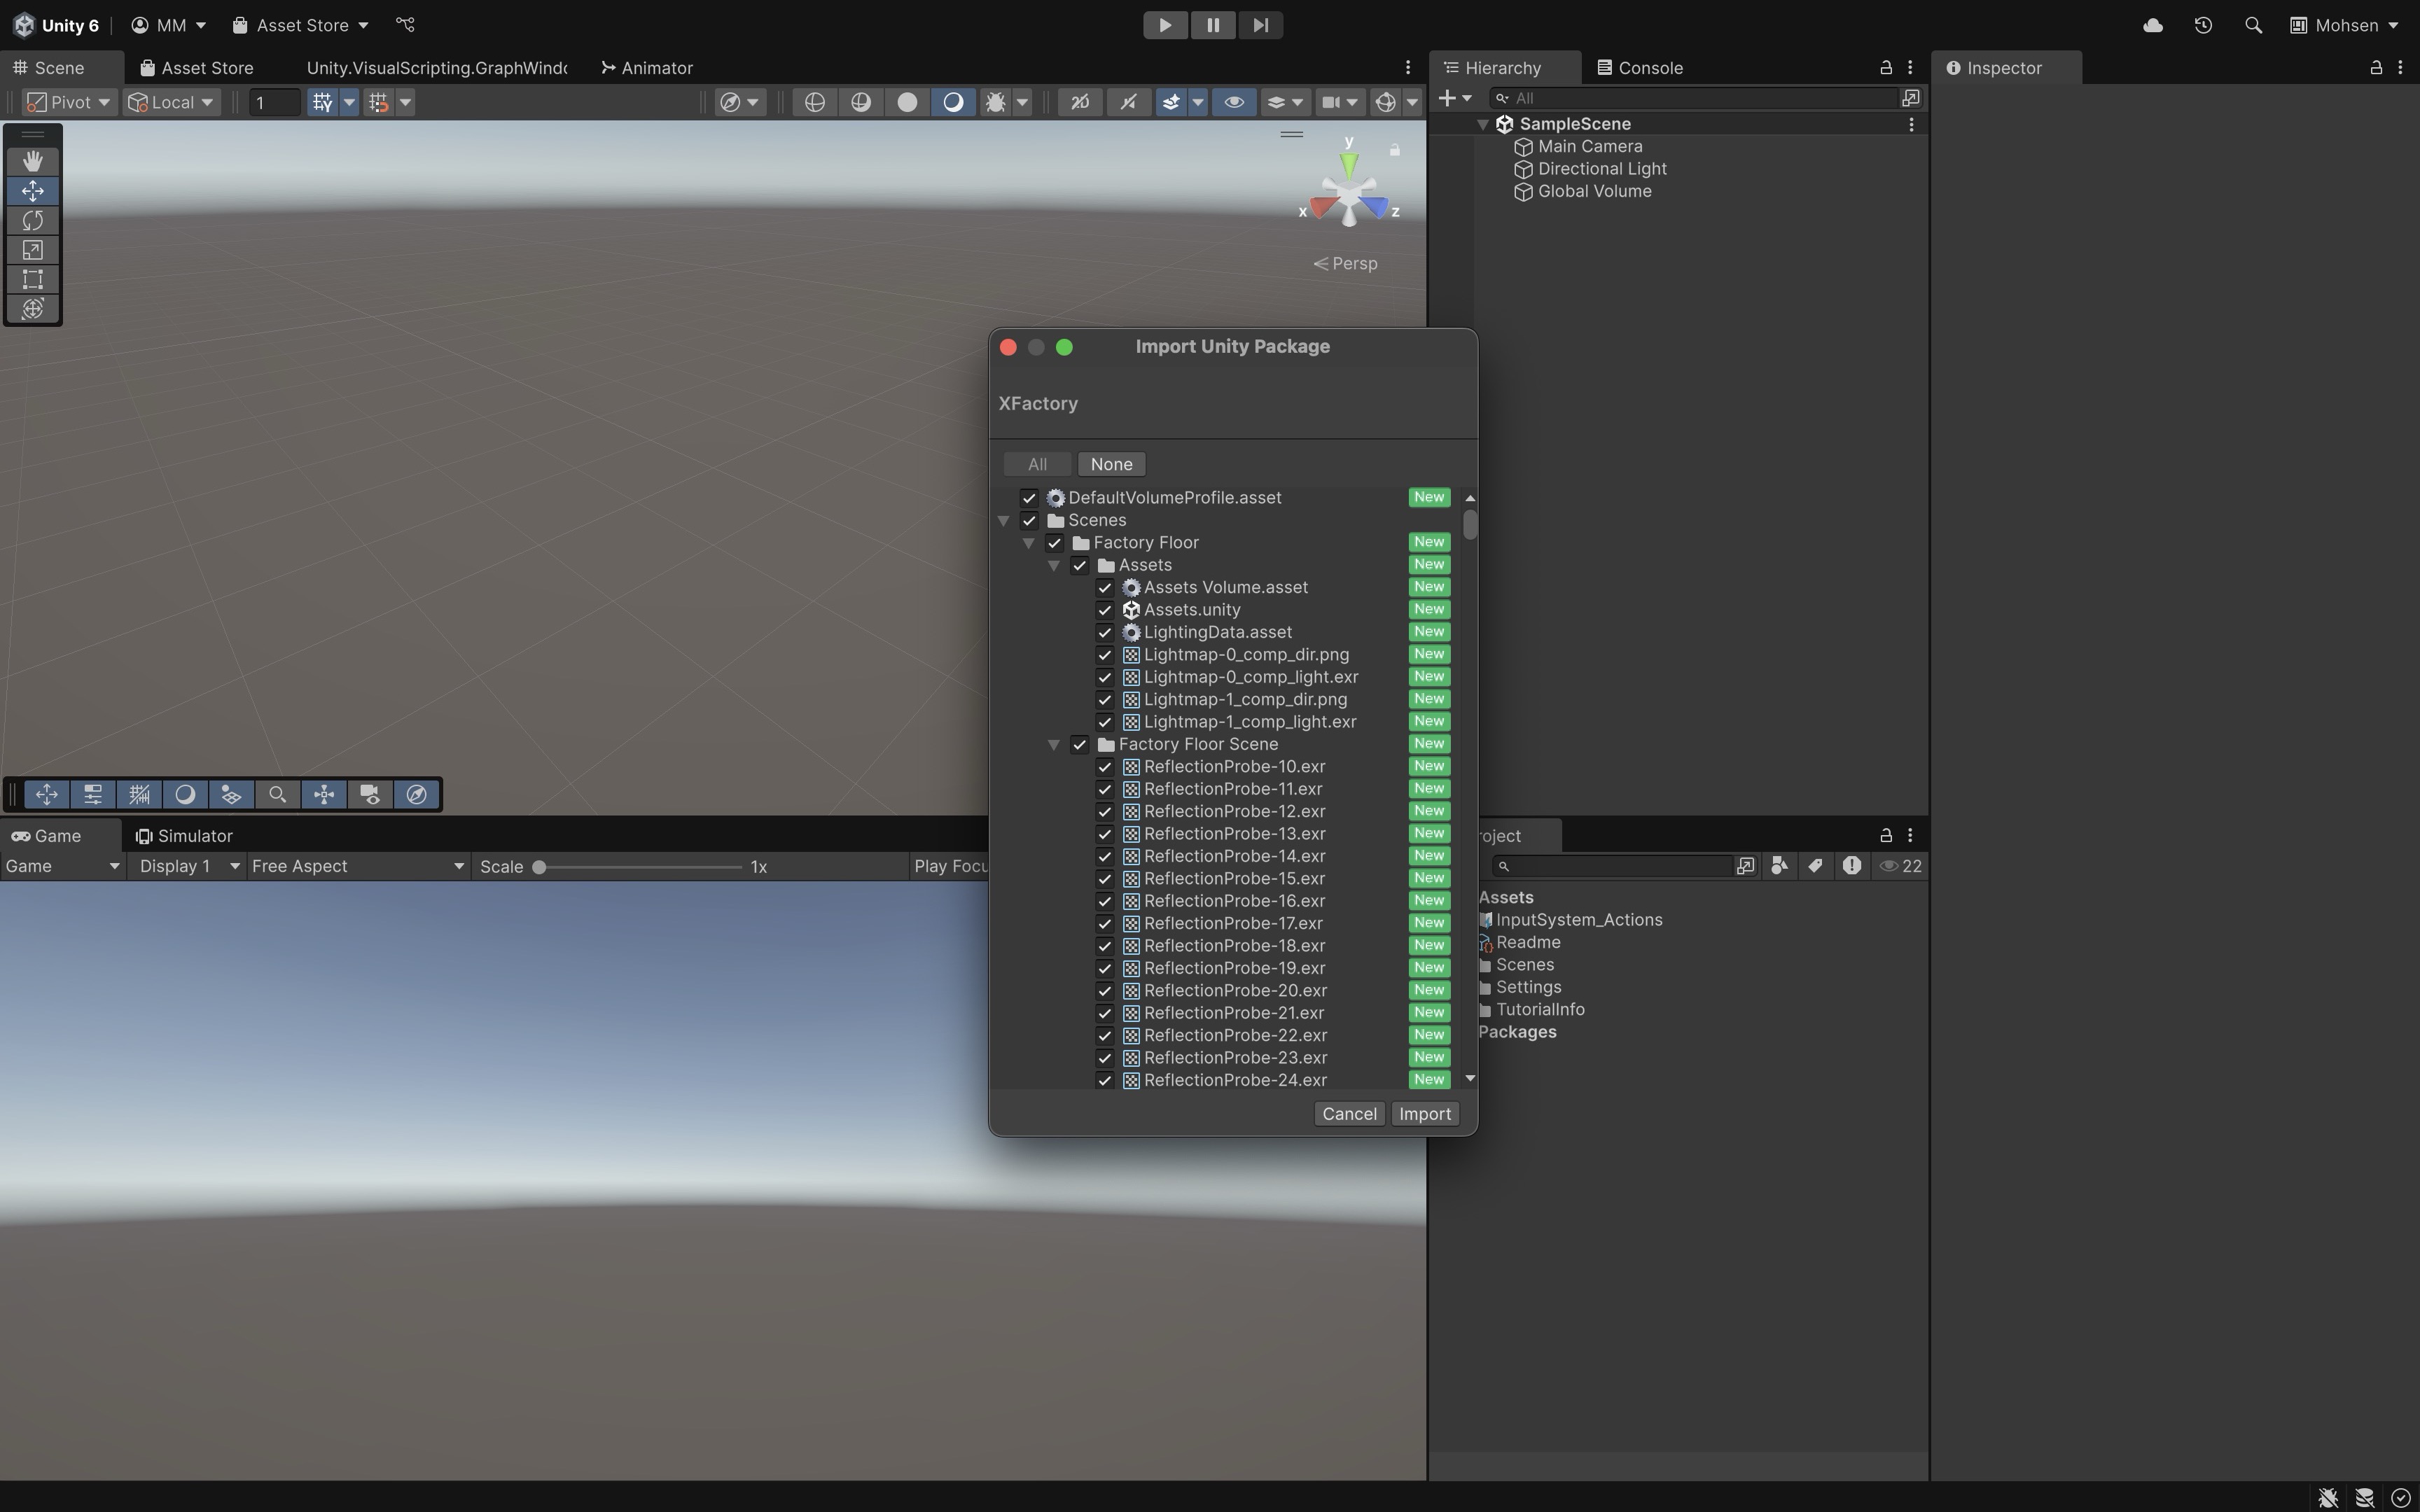
Importing Notes
- After importing, you will find scenes under
Assets/XFactory/Scenes/. We recommend starting with theFactory Floor Scene. - If imported materials appear pink or magenta, the project’s render pipeline and the asset’s materials may not match. Do not panic; material and render-pipeline troubleshooting are covered in the rendering session.
- Unity projects contain both assets and packages. Assets are files inside the project’s
Assets/folder. Packages are dependencies managed through Package Manager and recorded in the project’sPackages/manifest.json. Both can add functionality, but they are managed differently.
- After importing, you will find scenes under
Unity Editor Interface
The Unity Editor interface is your primary workspace for game and application development using Unity. It consists of several customizable panels or windows, each responsible for a different aspect of your project workflow:
- Scene View: Your interactive 3D (or 2D) workspace where you place, move, and organize objects in the environment.
- Game View: A real-time, in-editor preview of how your project will appear and behave when run.
- Hierarchy Window: Displays a tree view of all GameObjects in the current scene, showing their parent-child relationships.
- Project Window: Acts as your asset library, organizing all files in your project folder such as models, scripts, audio, and prefabs.
- Inspector Window: Shows detailed properties of the selected object, allowing you to view and edit components and values.
- Toolbar: Provides essential controls such as Play, Pause, and Step, along with tools for moving, rotating, and scaling objects.
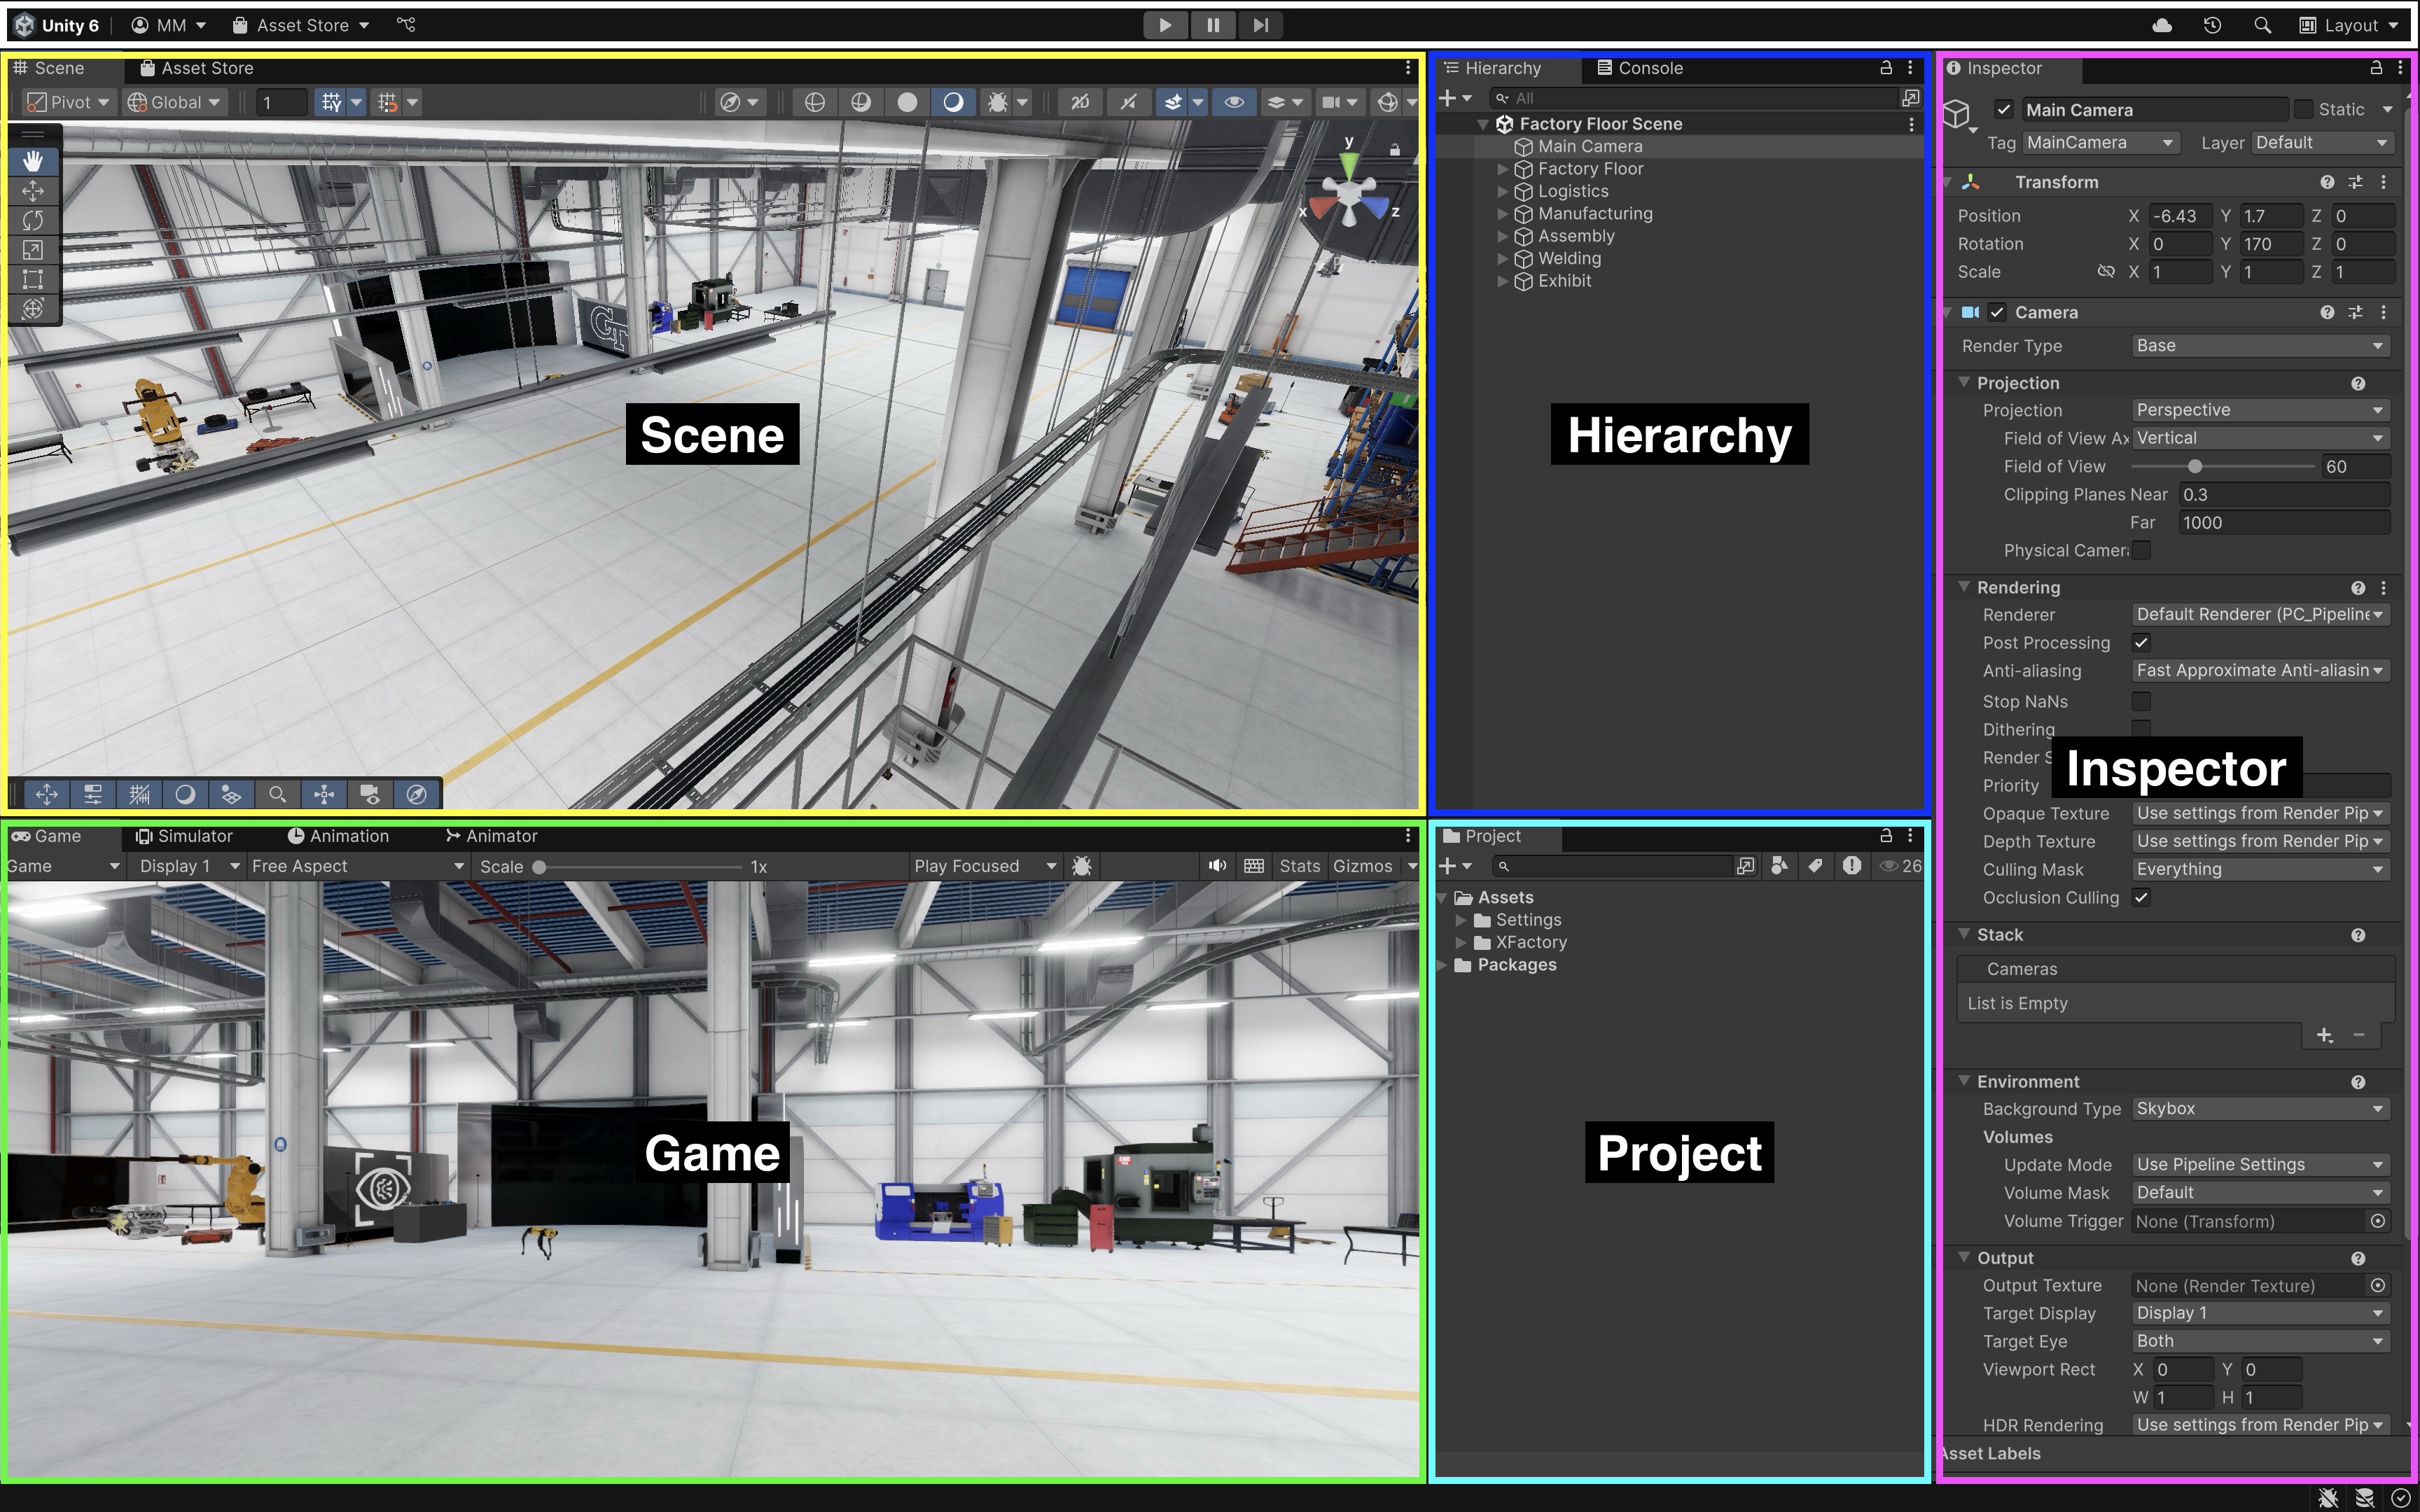
To customize the Default Layout, follow this Unity documentation.
Scene View
The Scene view is your canvas—a 3D environment where you can place, view, and edit GameObjects. After opening the Factory Floor Scene, use the mouse and keyboard to navigate through the factory. Visit each engineering station and examine the assets. Use the Move, Rotate, and Scale tools to interact with equipment.
Navigation Tips:
- Look around: Hold the right mouse button and drag to look around the scene.
- Move: Use the WASD keys or the arrow keys to move around the environment.
- Zoom: Use the mouse scroll wheel to zoom in and out.
- Focus Object: Select an object and press F to center the camera on it.
Scene Tools:
- View Tool: Use this tool to pan the camera around the scene.
- Move Tool: Use this tool to move objects along the X, Y, and Z axes.
- Rotate Tool: Use this tool to spin or rotate objects in the scene.
- Scale Tool: Use this tool to resize objects as needed.
- Rect Tool: Use this tool for 2D or UI elements to move, resize, and align objects within a rectangular bounding box.
- Transform Tool: Use this combined tool to move, rotate, and scale objects with a single unified handle.
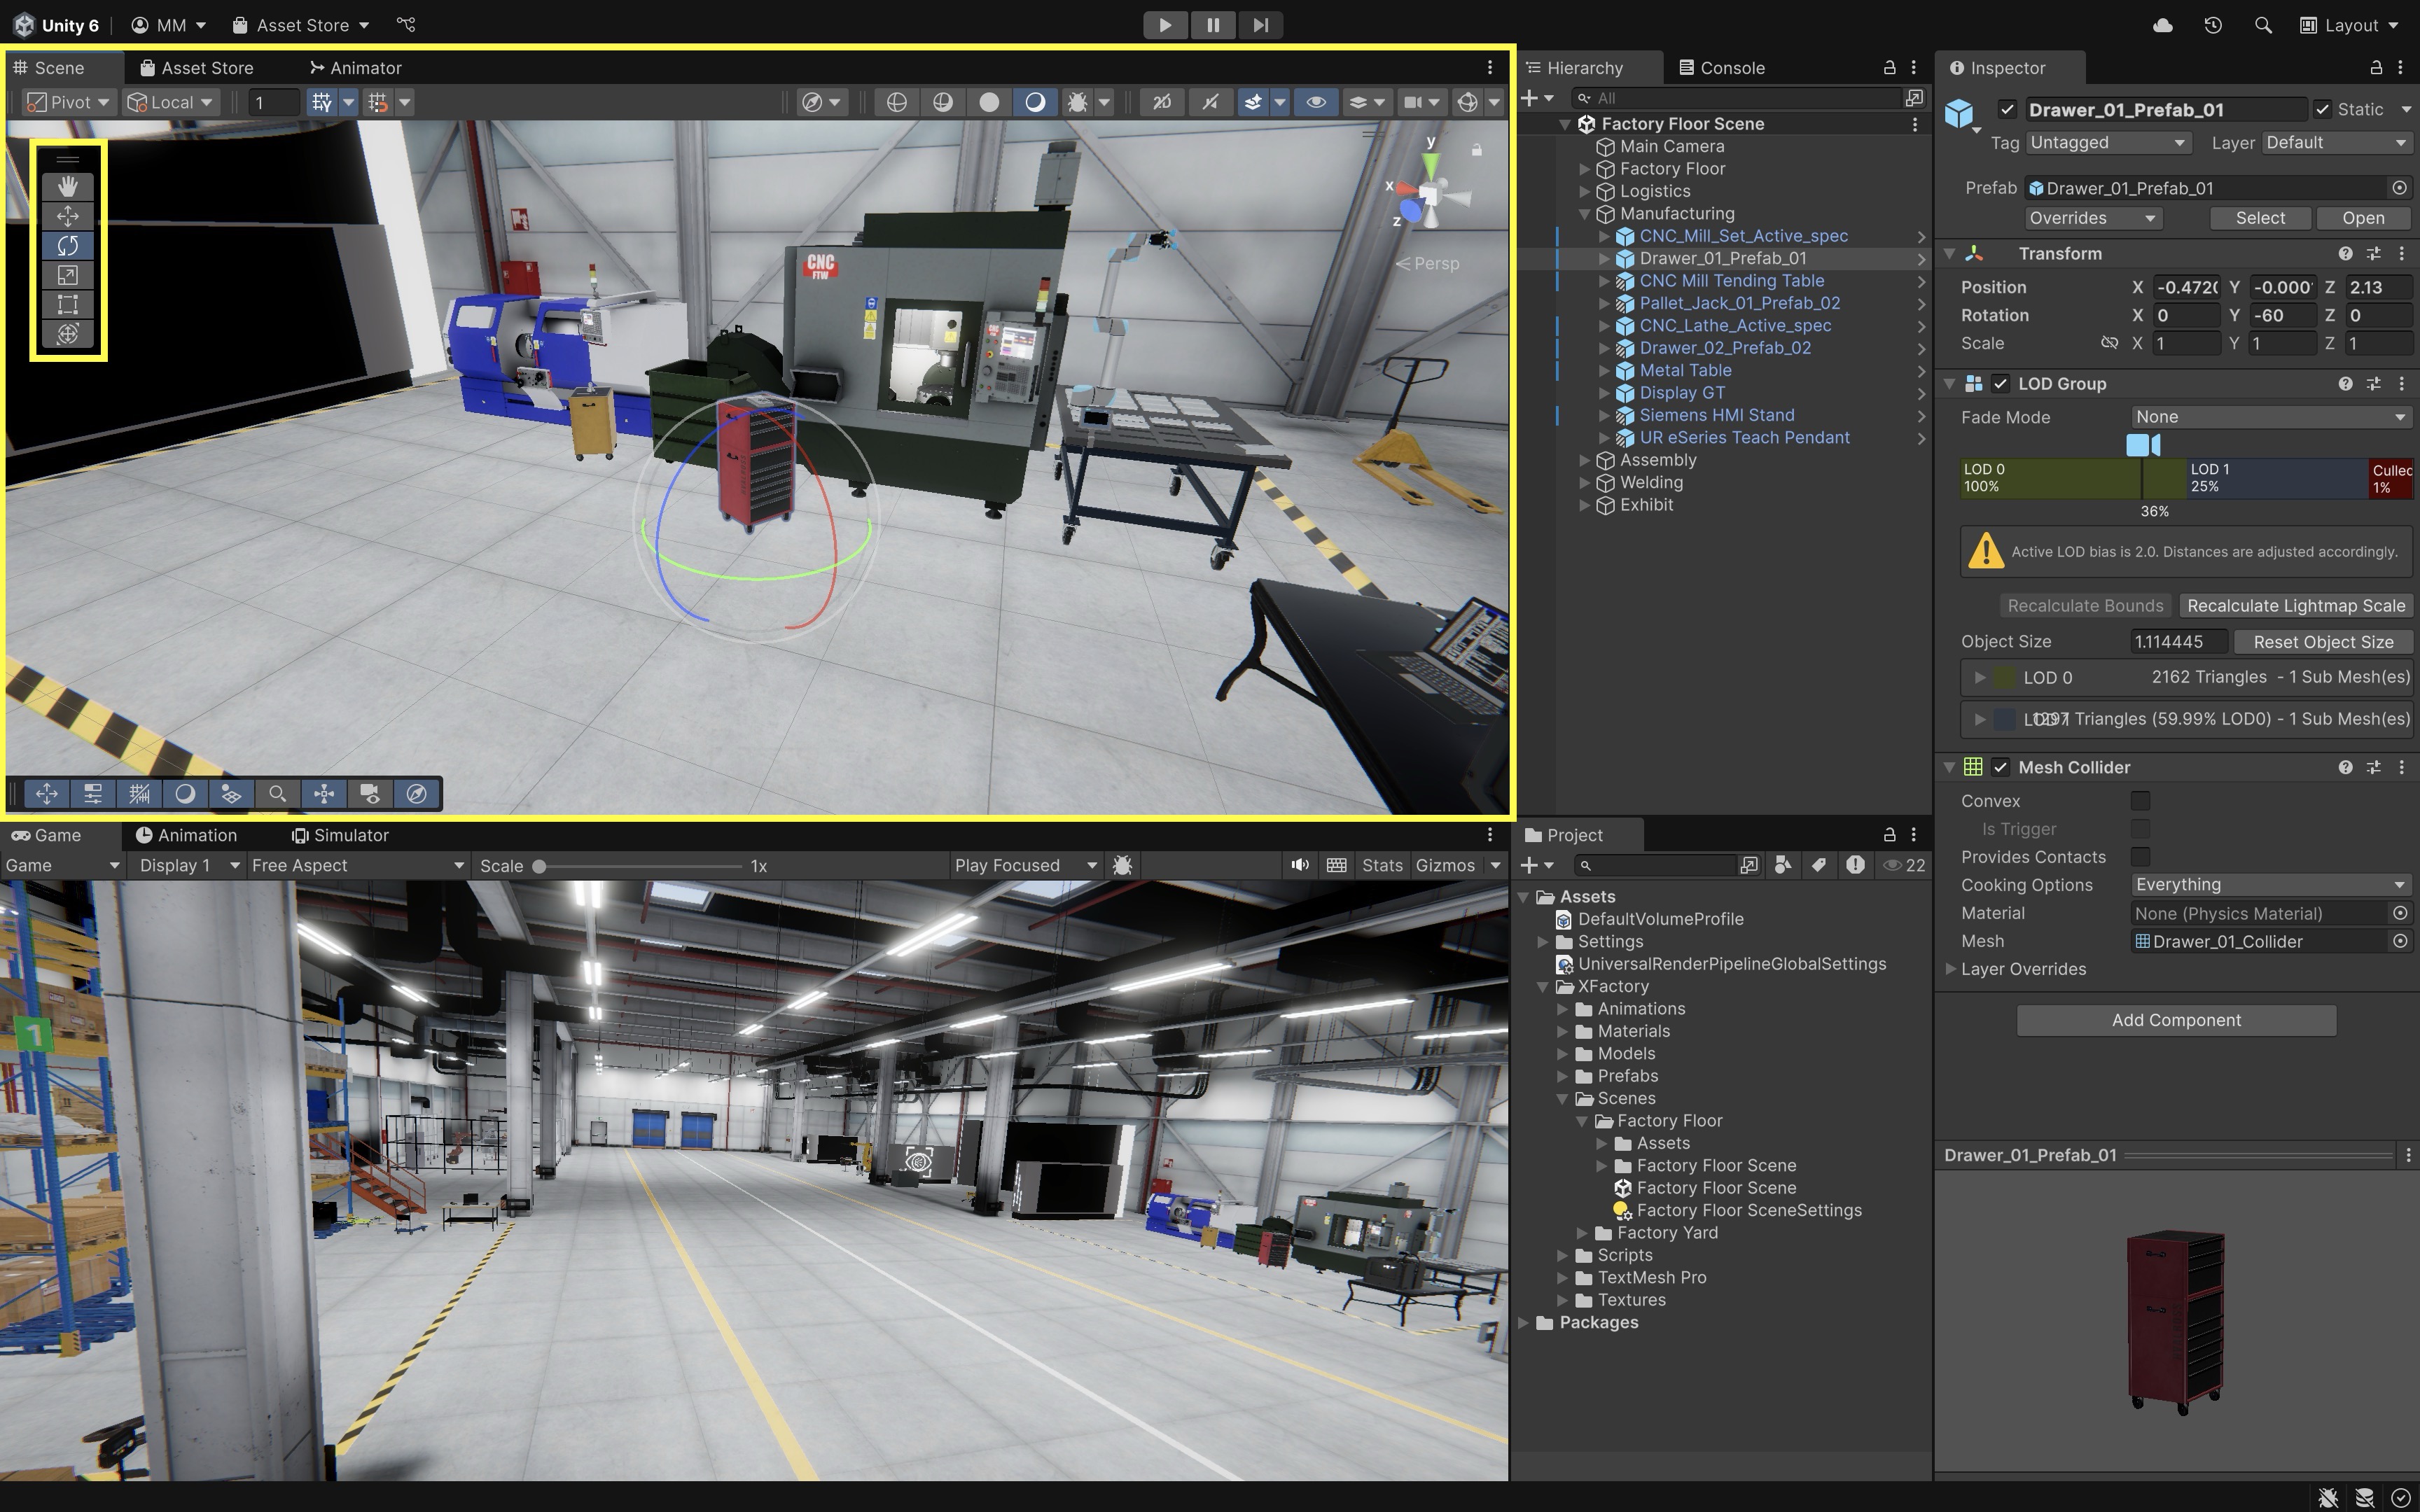
Review this Unity documentation to learn more about the Scene view. Note that Unity does not auto-save your scene, so remember to save frequently! Press Ctrl+S (Cmd+S on Mac) or go to
File > Save Scene. If you see an asterisk (*) next to your scene’s name, there are unsaved changes.
Game View
The Game window shows the camera/player perspective—that is, what the user would see when the application runs.
- Click
Playin the toolbar to enter play mode. - Navigate the factory as a player would in an XR simulation.
- Observe camera perspectives, lighting, and interactivity.
- With Quest Link / Meta Horizon Link enabled, the same Play Mode view can appear in a connected Meta Quest headset; full VR interaction comes in Module D.
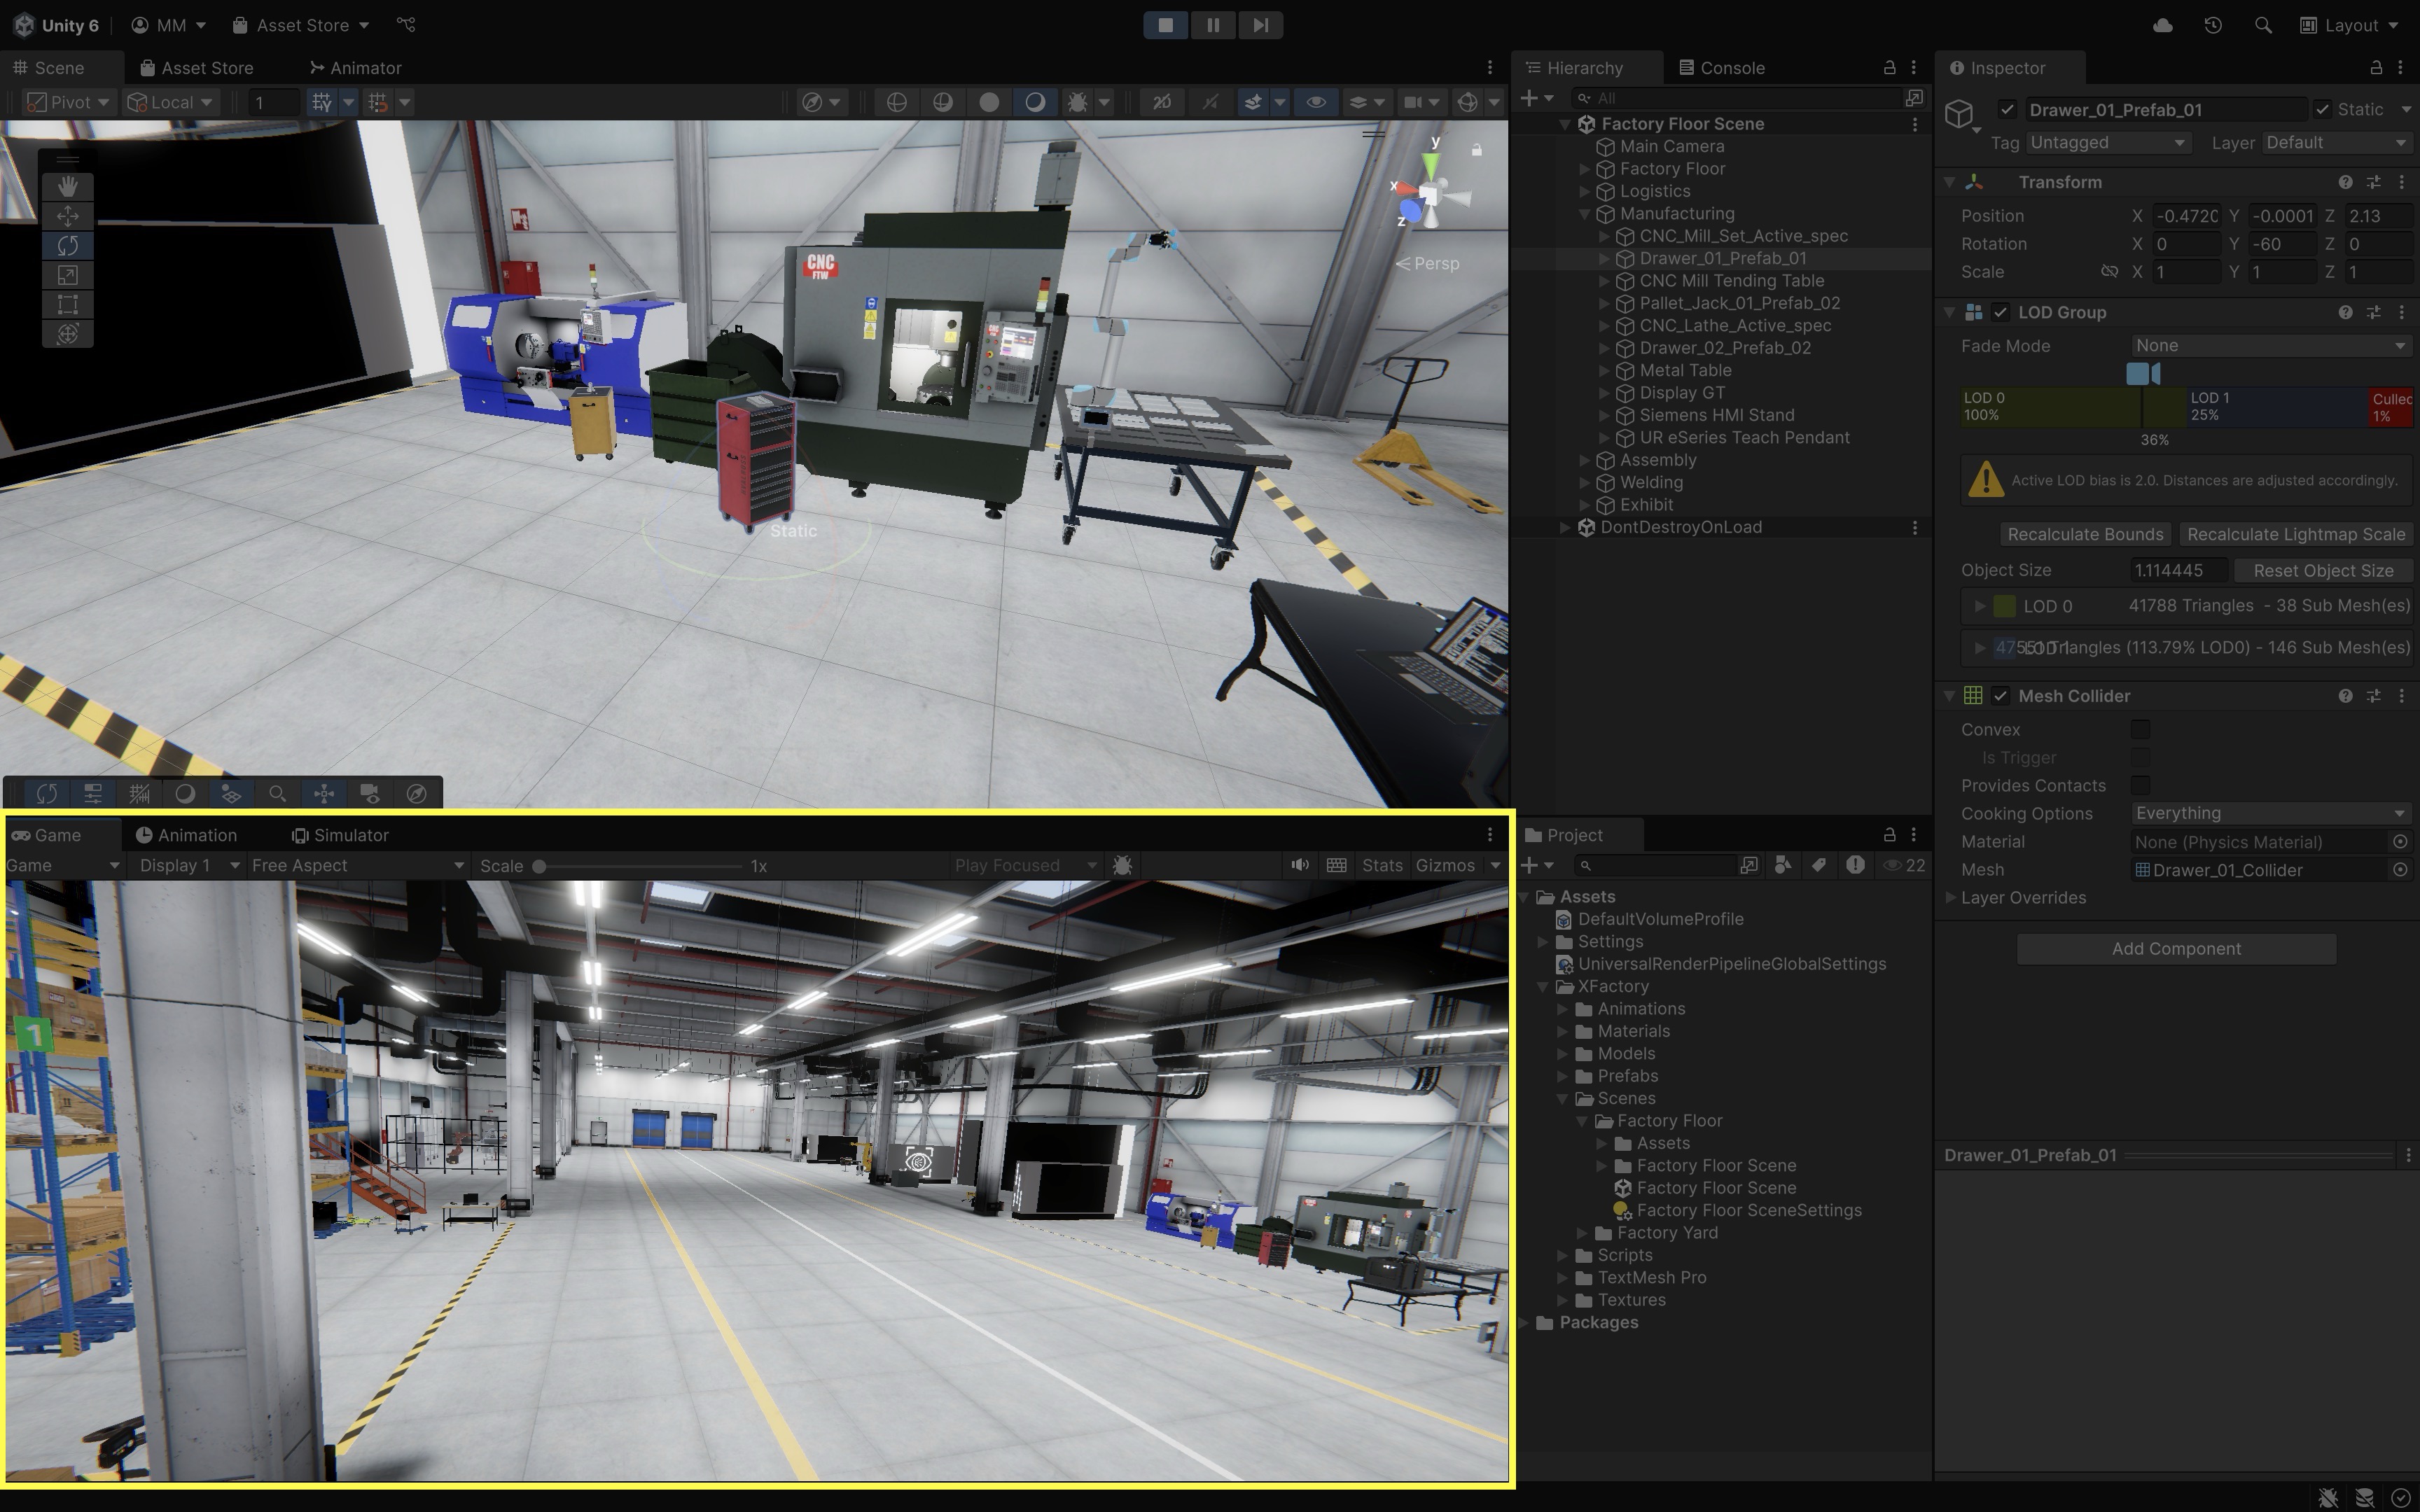
Review this Unity documentation to learn more about the Game view. Note that any changes made in play mode are temporary. Always exit Play Mode before editing assets or scenes.
Hierarchy Window
The Hierarchy window lists every GameObject in your current scene and helps you organize your scene. In the Factory Floor Scene, you will see objects organized by zones, including Factory Floor, Logistics, Manufacturing, Assembly, Welding, and Exhibit.
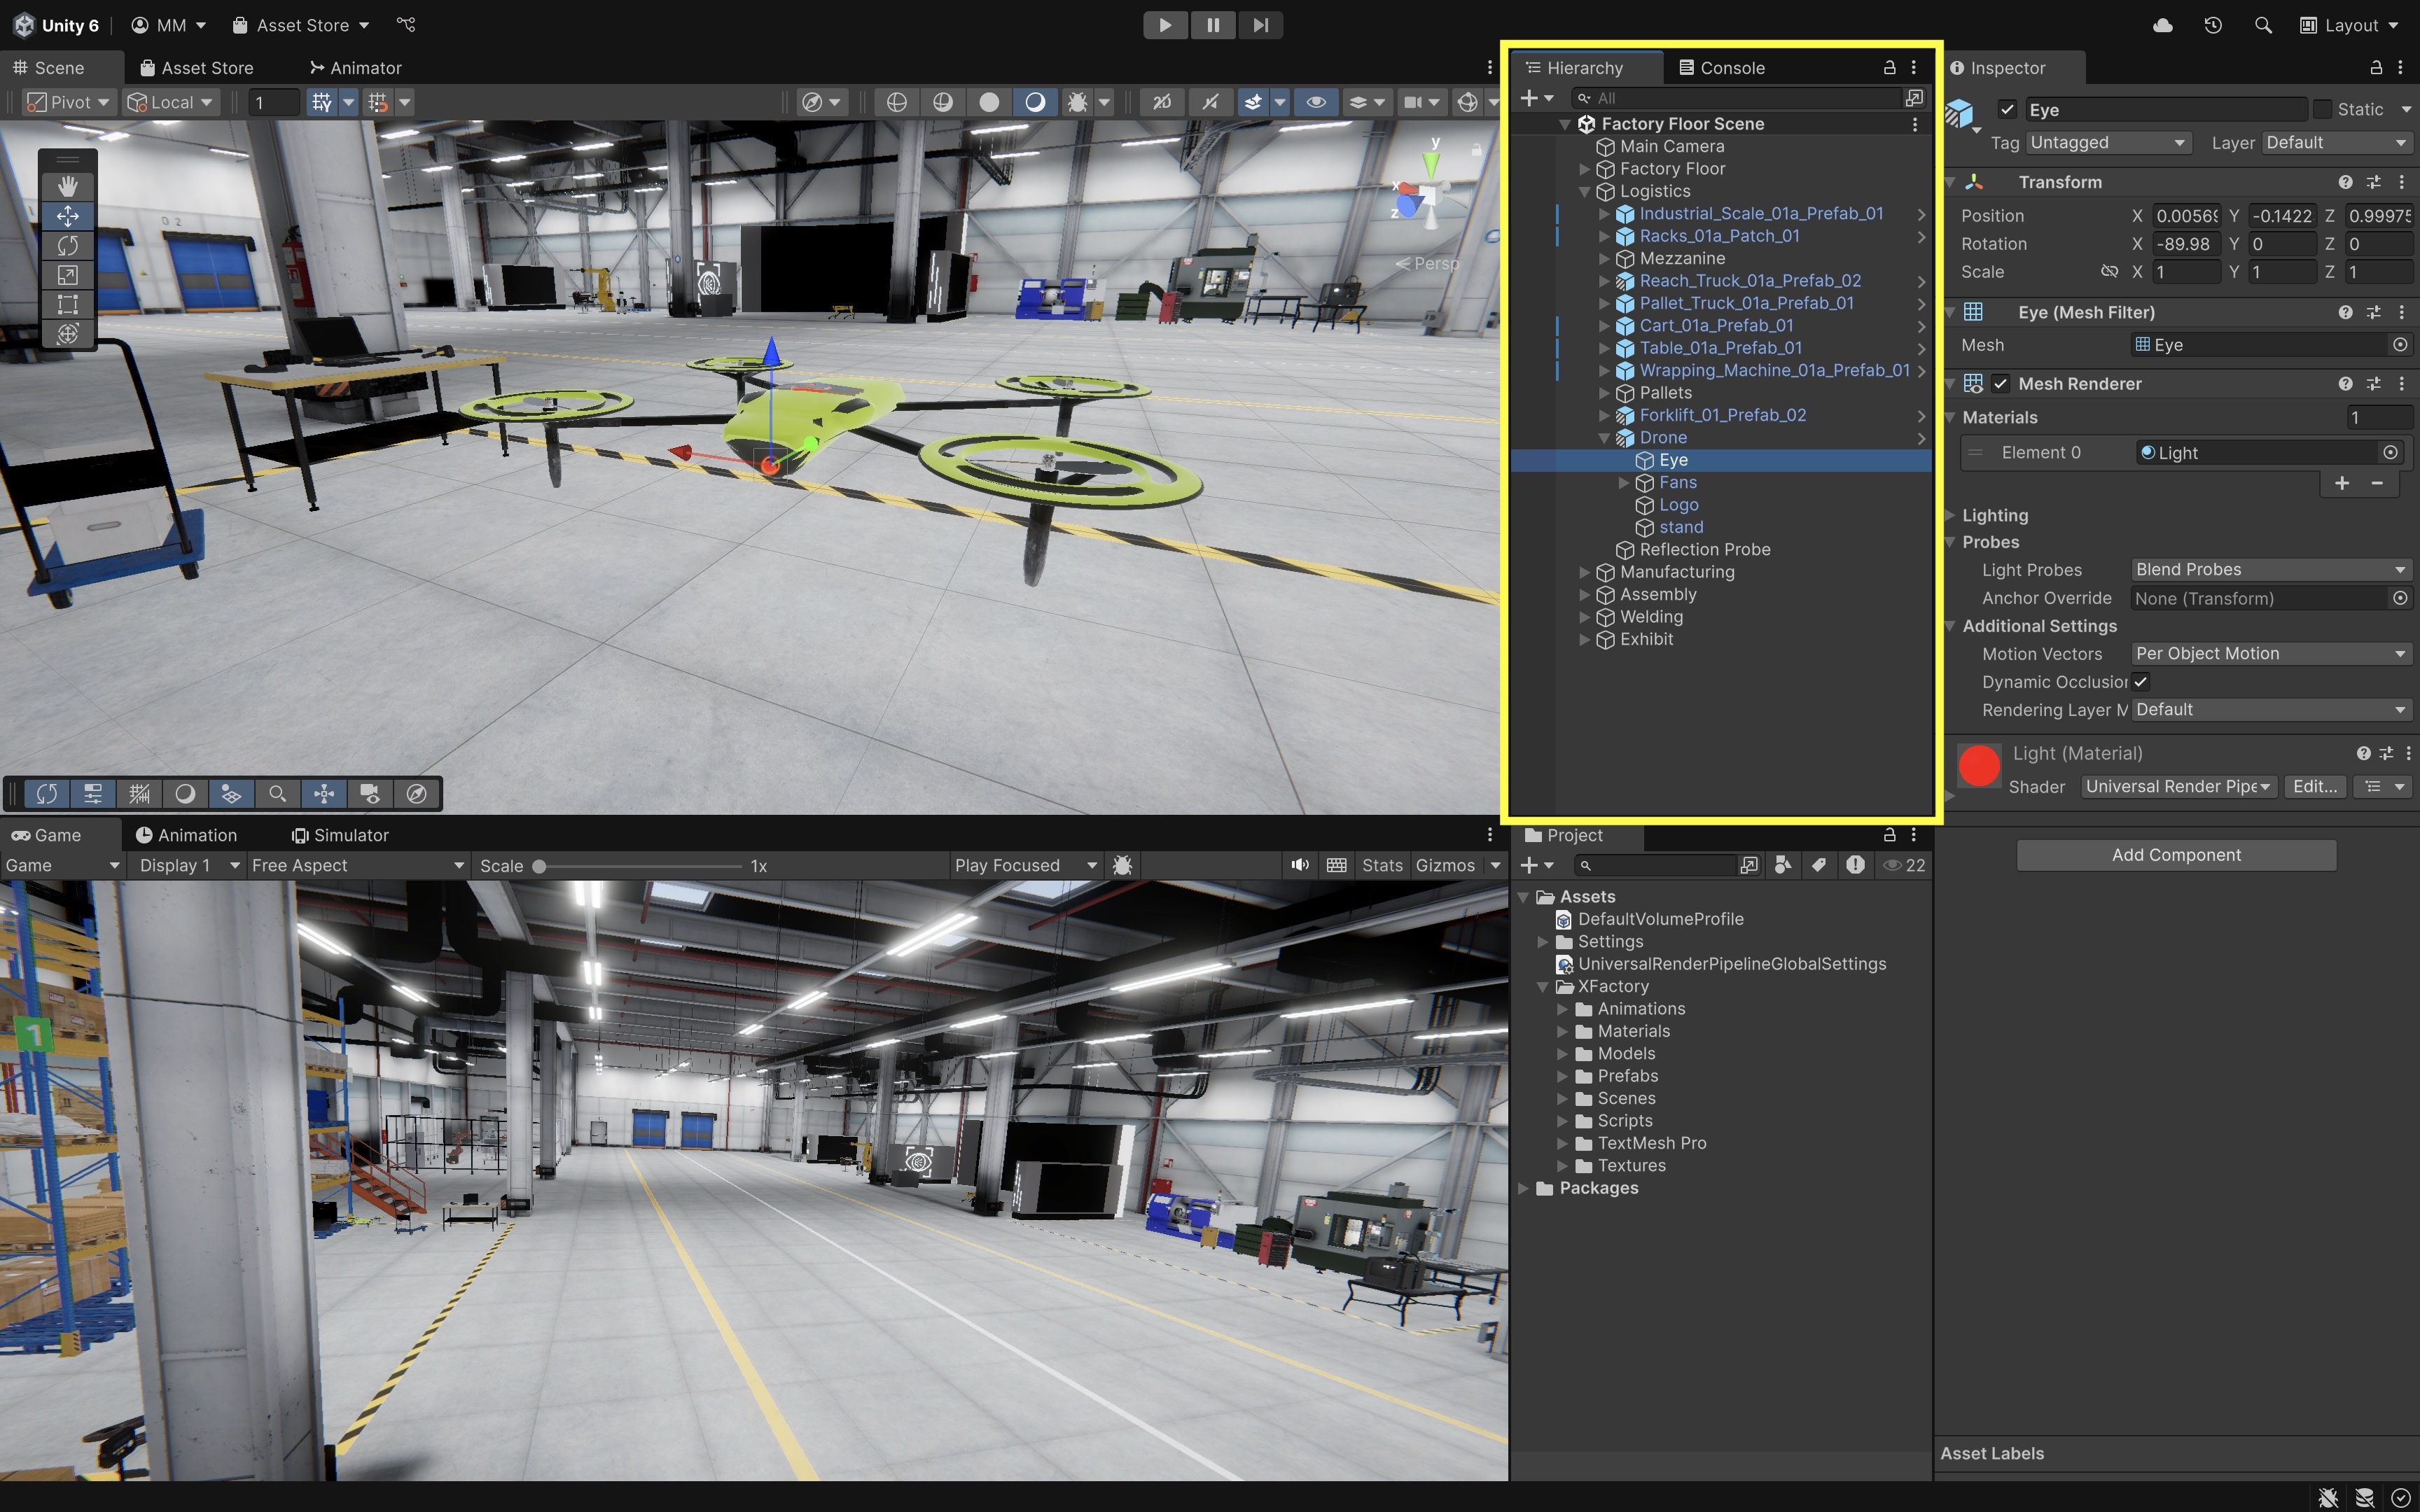
Review this Unity documentation to learn more about the Hierarchy window. Use the triangle next to each to expand and view child objects (e.g.,
Logistics > Drone > Eye).
Project Window
The Project window is the central library for all assets used in your Unity project. It mirrors the structure of your project’s file system and allows you to organize, browse, and manage everything your game or application needs. These reusable assets are critical for building and scaling your project efficiently:
- Animations: Define how objects move or behave over time, bringing characters and UI elements to life.
- Audio: Sound files including music, sound effects, and voiceovers used to enhance the game’s atmosphere and feedback.
- Fonts: Typographic assets used to render text in UI elements, dialogue, menus, and other text-based components.
- Materials: Control how surfaces appear by defining properties like color, texture, and reflectivity.
- Models: 3D or 2D objects imported from external tools (e.g., Blender or Maya) that form the physical components of your scene.
- Prefabs: Saved, reusable GameObjects with predefined configurations—ideal for repeating structures like enemies, items, or UI panels.
- Scenes: Self-contained environments or levels in your game, each with its own arrangement of objects and settings.
- Scripts: Code files (typically in C#) that define custom behavior, logic, and interactivity in your game.
- Shaders: Small programs that define how surfaces are rendered visually, enabling effects like lighting, shadows, transparency, and glow.
- Textures: Image files applied to models and UI to give them visual detail, such as wood grain, metal, or skin.
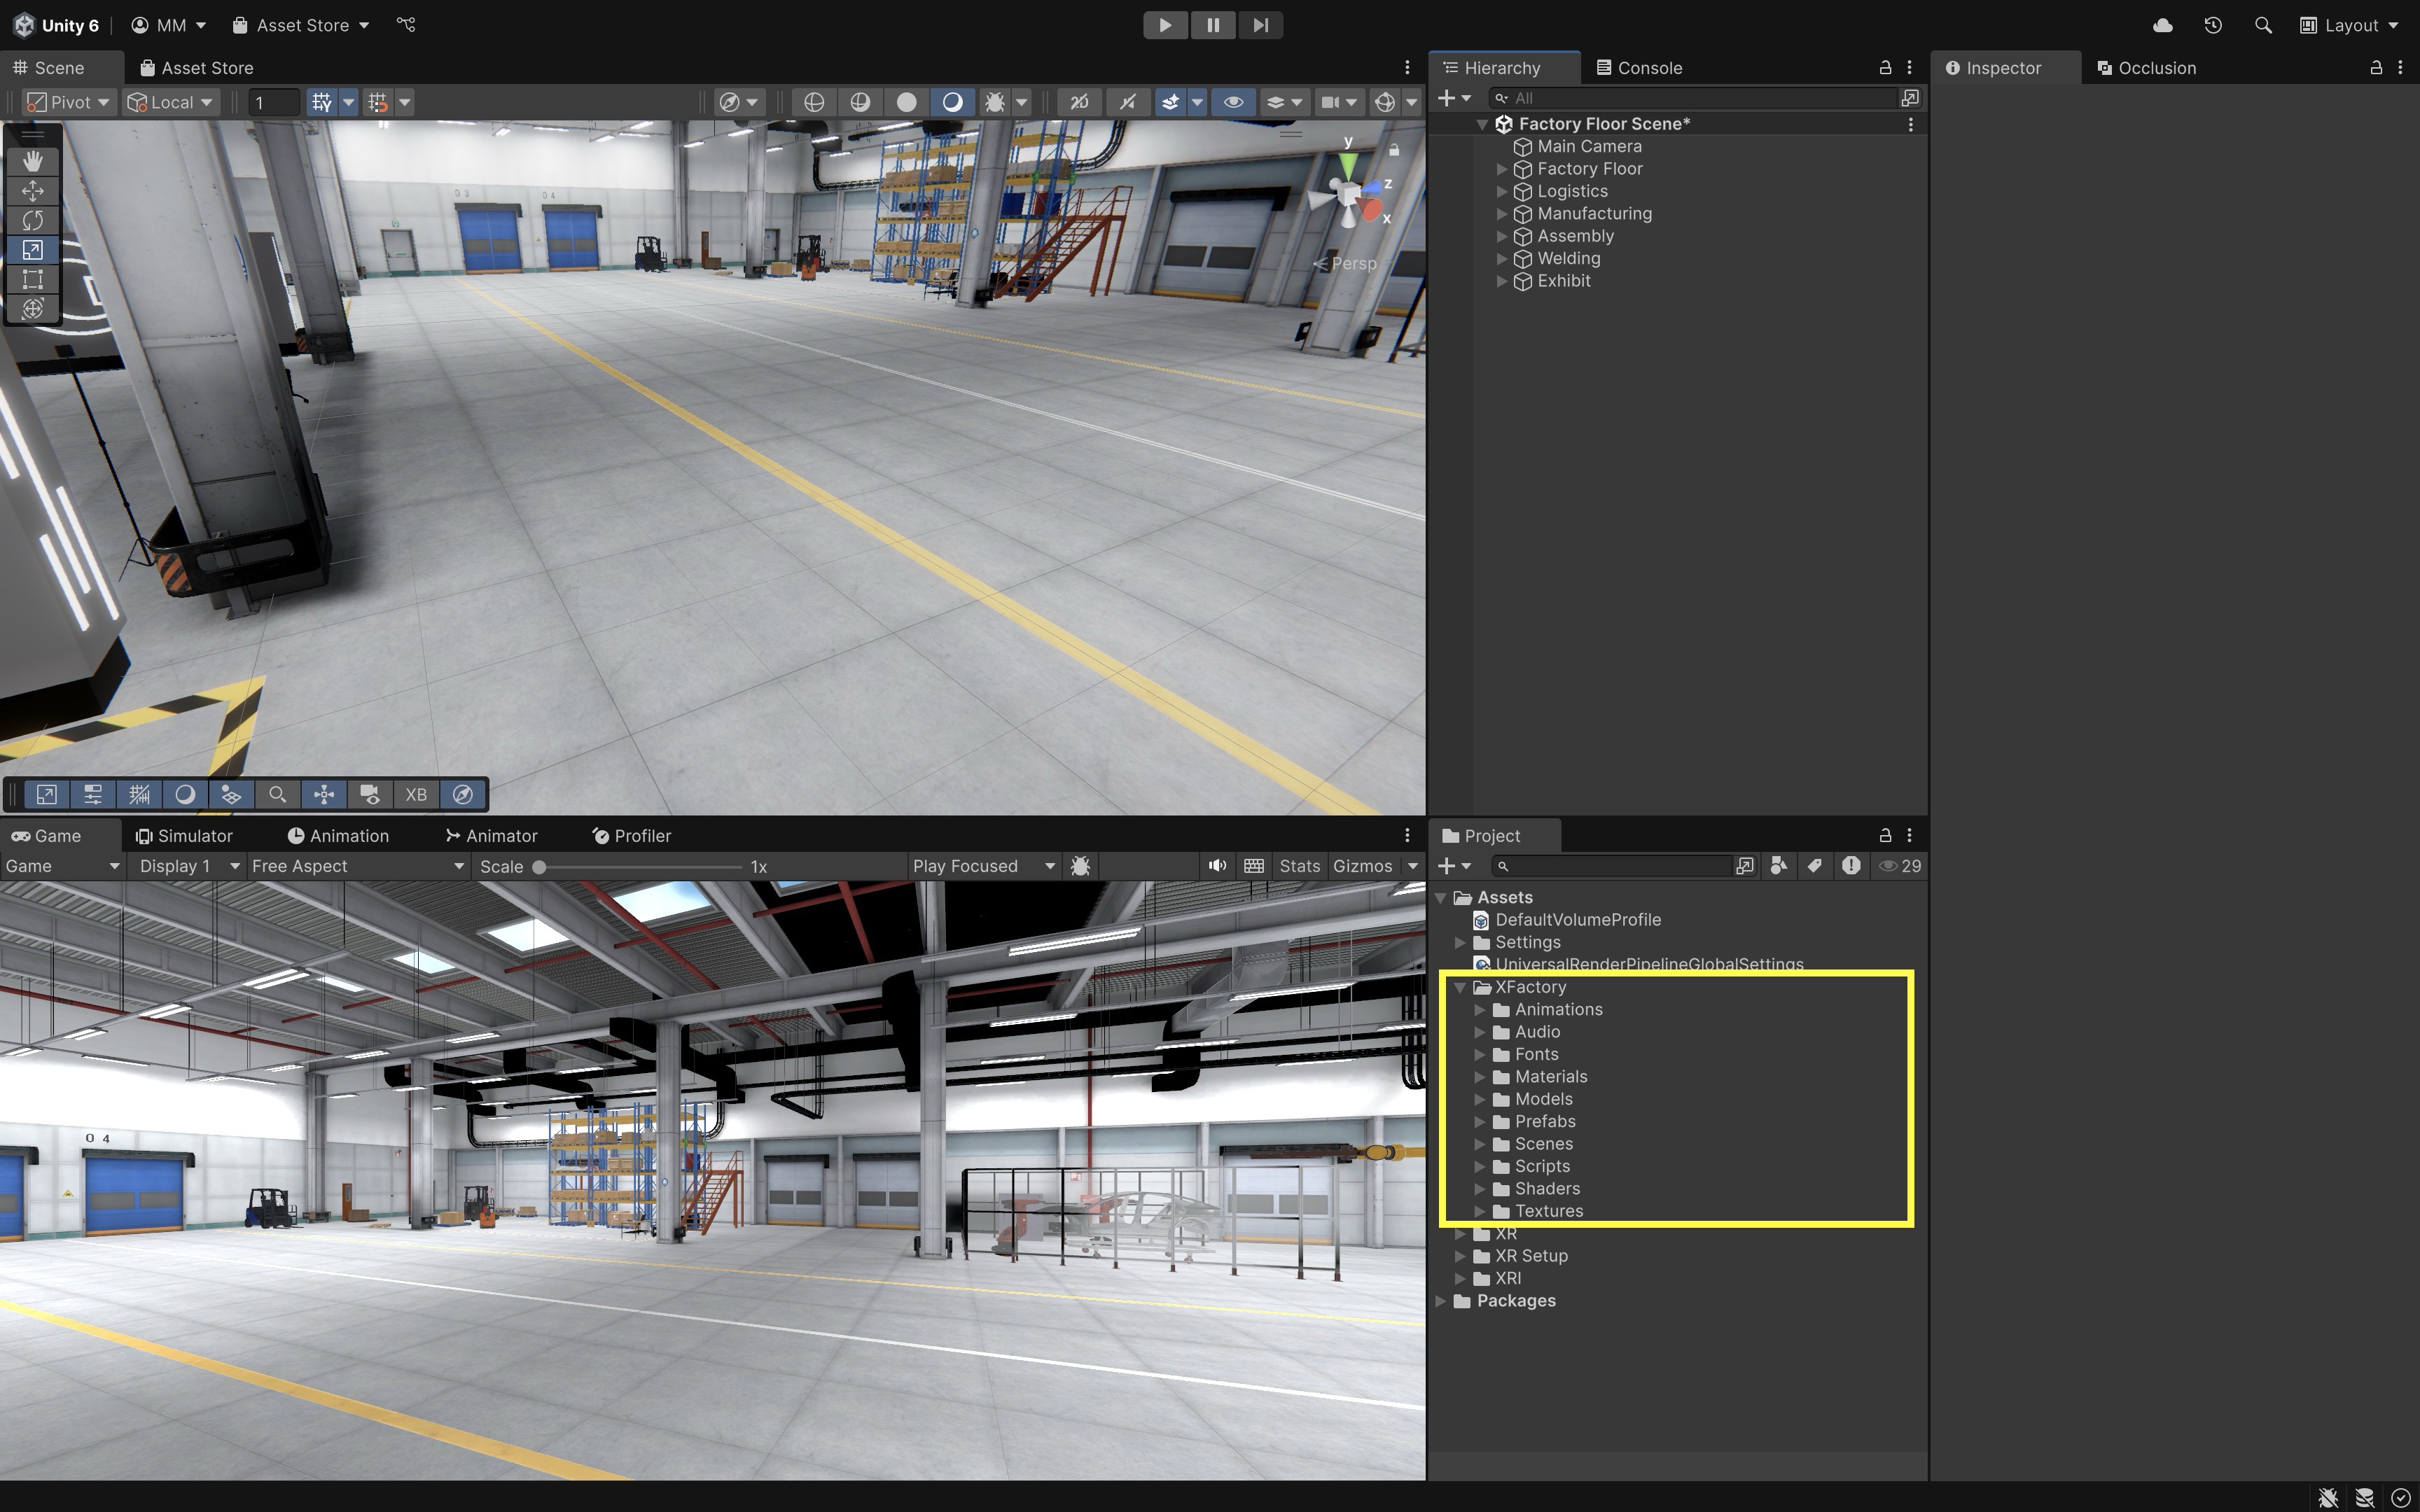
Review this Unity documentation to learn more about the Project window.
Inspector Window
The Inspector window displays a detailed breakdown of the selected GameObject’s components—the modular building blocks that define its behavior and appearance. Using the Inspector, you can attach built-in components like Collider (for collision detection) or Rigidbody (for physics simulation), add your own C# scripts to implement custom logic, or modify values directly in the UI to prototype or fine-tune gameplay behavior. When you select an object (e.g., the drone in a logistics station), the Inspector shows all attached components and allows you to edit their properties in real time. Common components include:
Transform: Defines the object’sPosition,Rotation, andScalein the scene—present on all GameObjects by default.Mesh Filter: Stores the mesh geometry used by a 3D object.Mesh Renderer: Controls how the mesh is drawn, including visibility, materials, lighting, and rendering settings.Collider: Defines the physical shape used for collision detection.Rigidbody: Allows the object to participate in physics simulation.Script(if any): Custom C# scripts that define behavior such as movement, interaction, or animations.
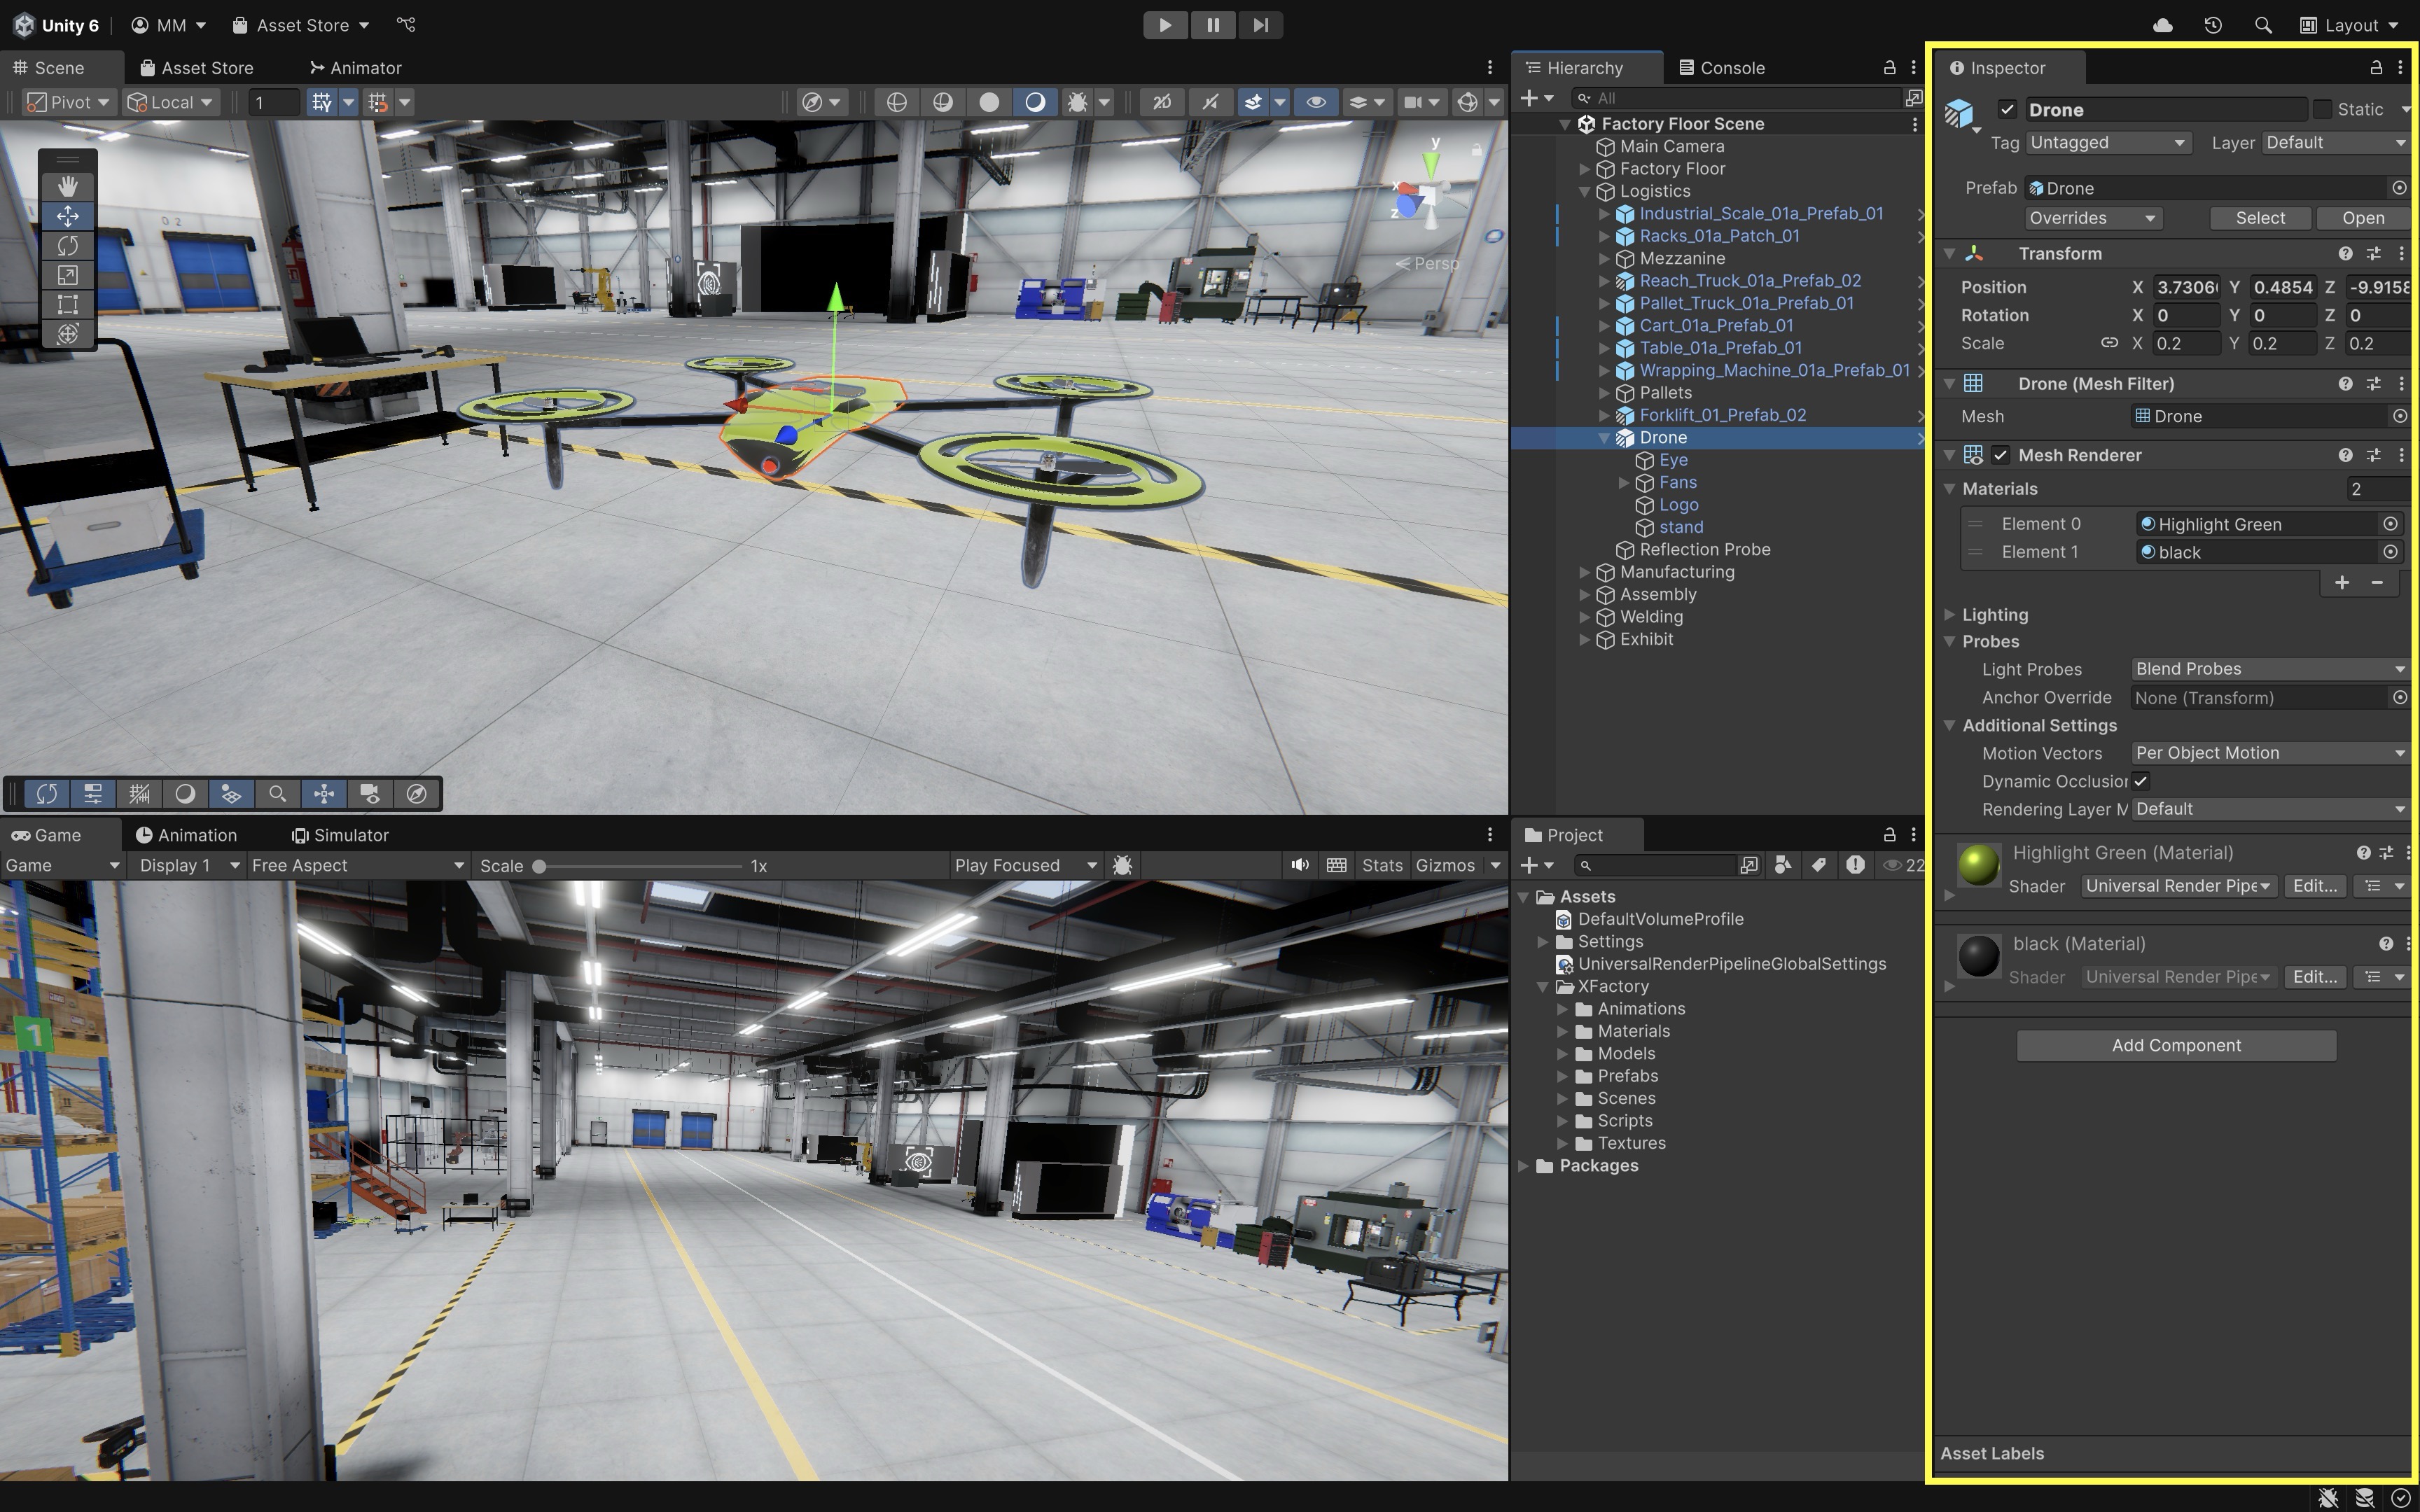
Review this Unity documentation to learn more about the Inspector window.
GameObjects
In Unity, GameObjects are the fundamental building blocks of a scene. They act as “containers for Components“, which define their appearance, behavior, and functionality. Every object in Unity—whether it is a cube, a robot, a light source, or an interactive button—is a GameObject. GameObjects are the core of Unity projects, with different types serving specific roles. Let’s review different types of GameObjects available in Unity and explore their function and significance: Empty, Camera, 2D Object, 3D Object, Effects, Light, Audio, Video, UI, and other GameObjects.
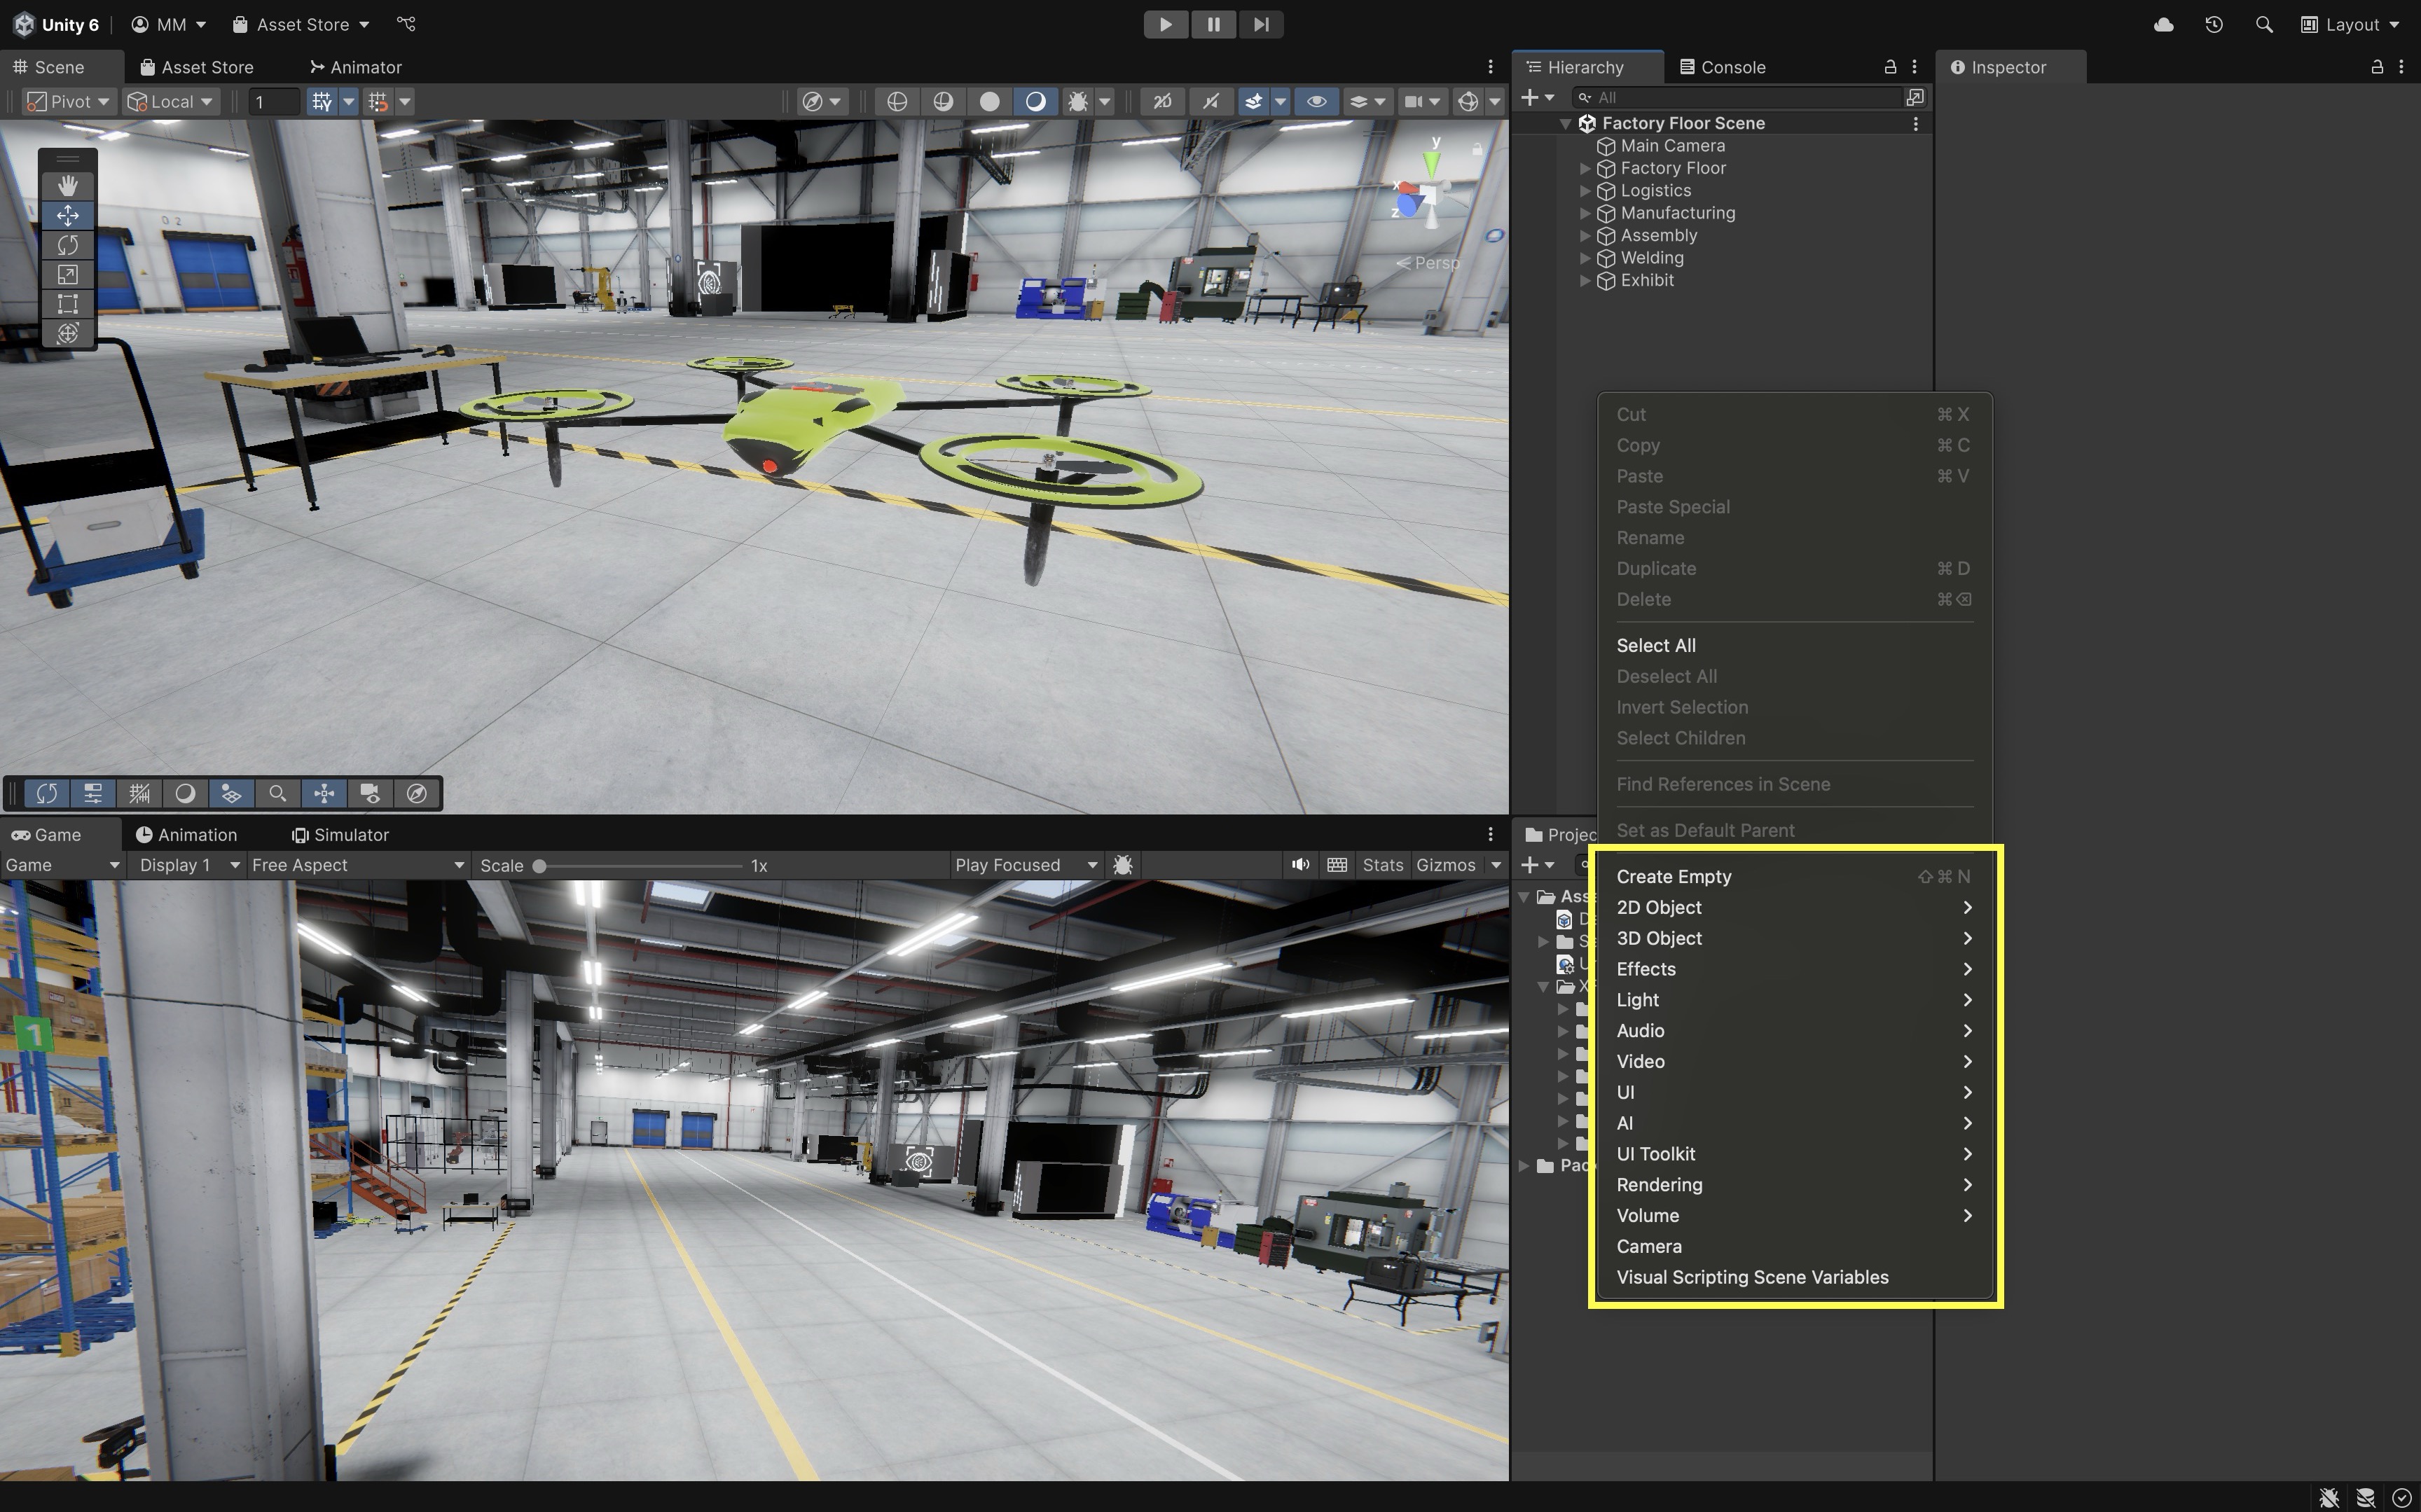
To create a GameObject, right-click in the
Hierarchywindow or clickGameObjectfrom the Unity bar menu and select the desired GameObject type.
Empty GameObject
An Empty GameObject is a basic, featureless object that serves as a container for other GameObjects or components. You might use Empty GameObjects as containers for manager scripts—for example, a central place to handle game flow, input, or scene-wide settings. It can be used for:
- Organizing the scene by acting as a parent object for multiple child objects.
- Acting as a reference point for positioning and transformations.
- Holding scripts to define custom behaviors.
- Scene hierarchy cleanliness, grouping related objects (e.g., all lights, cameras, or UI panels).
- Creating pivots for rotations, scaling, or animation anchors.
- Global event dispatchers, where scripts handle signals like pause menus or score tracking.
Camera
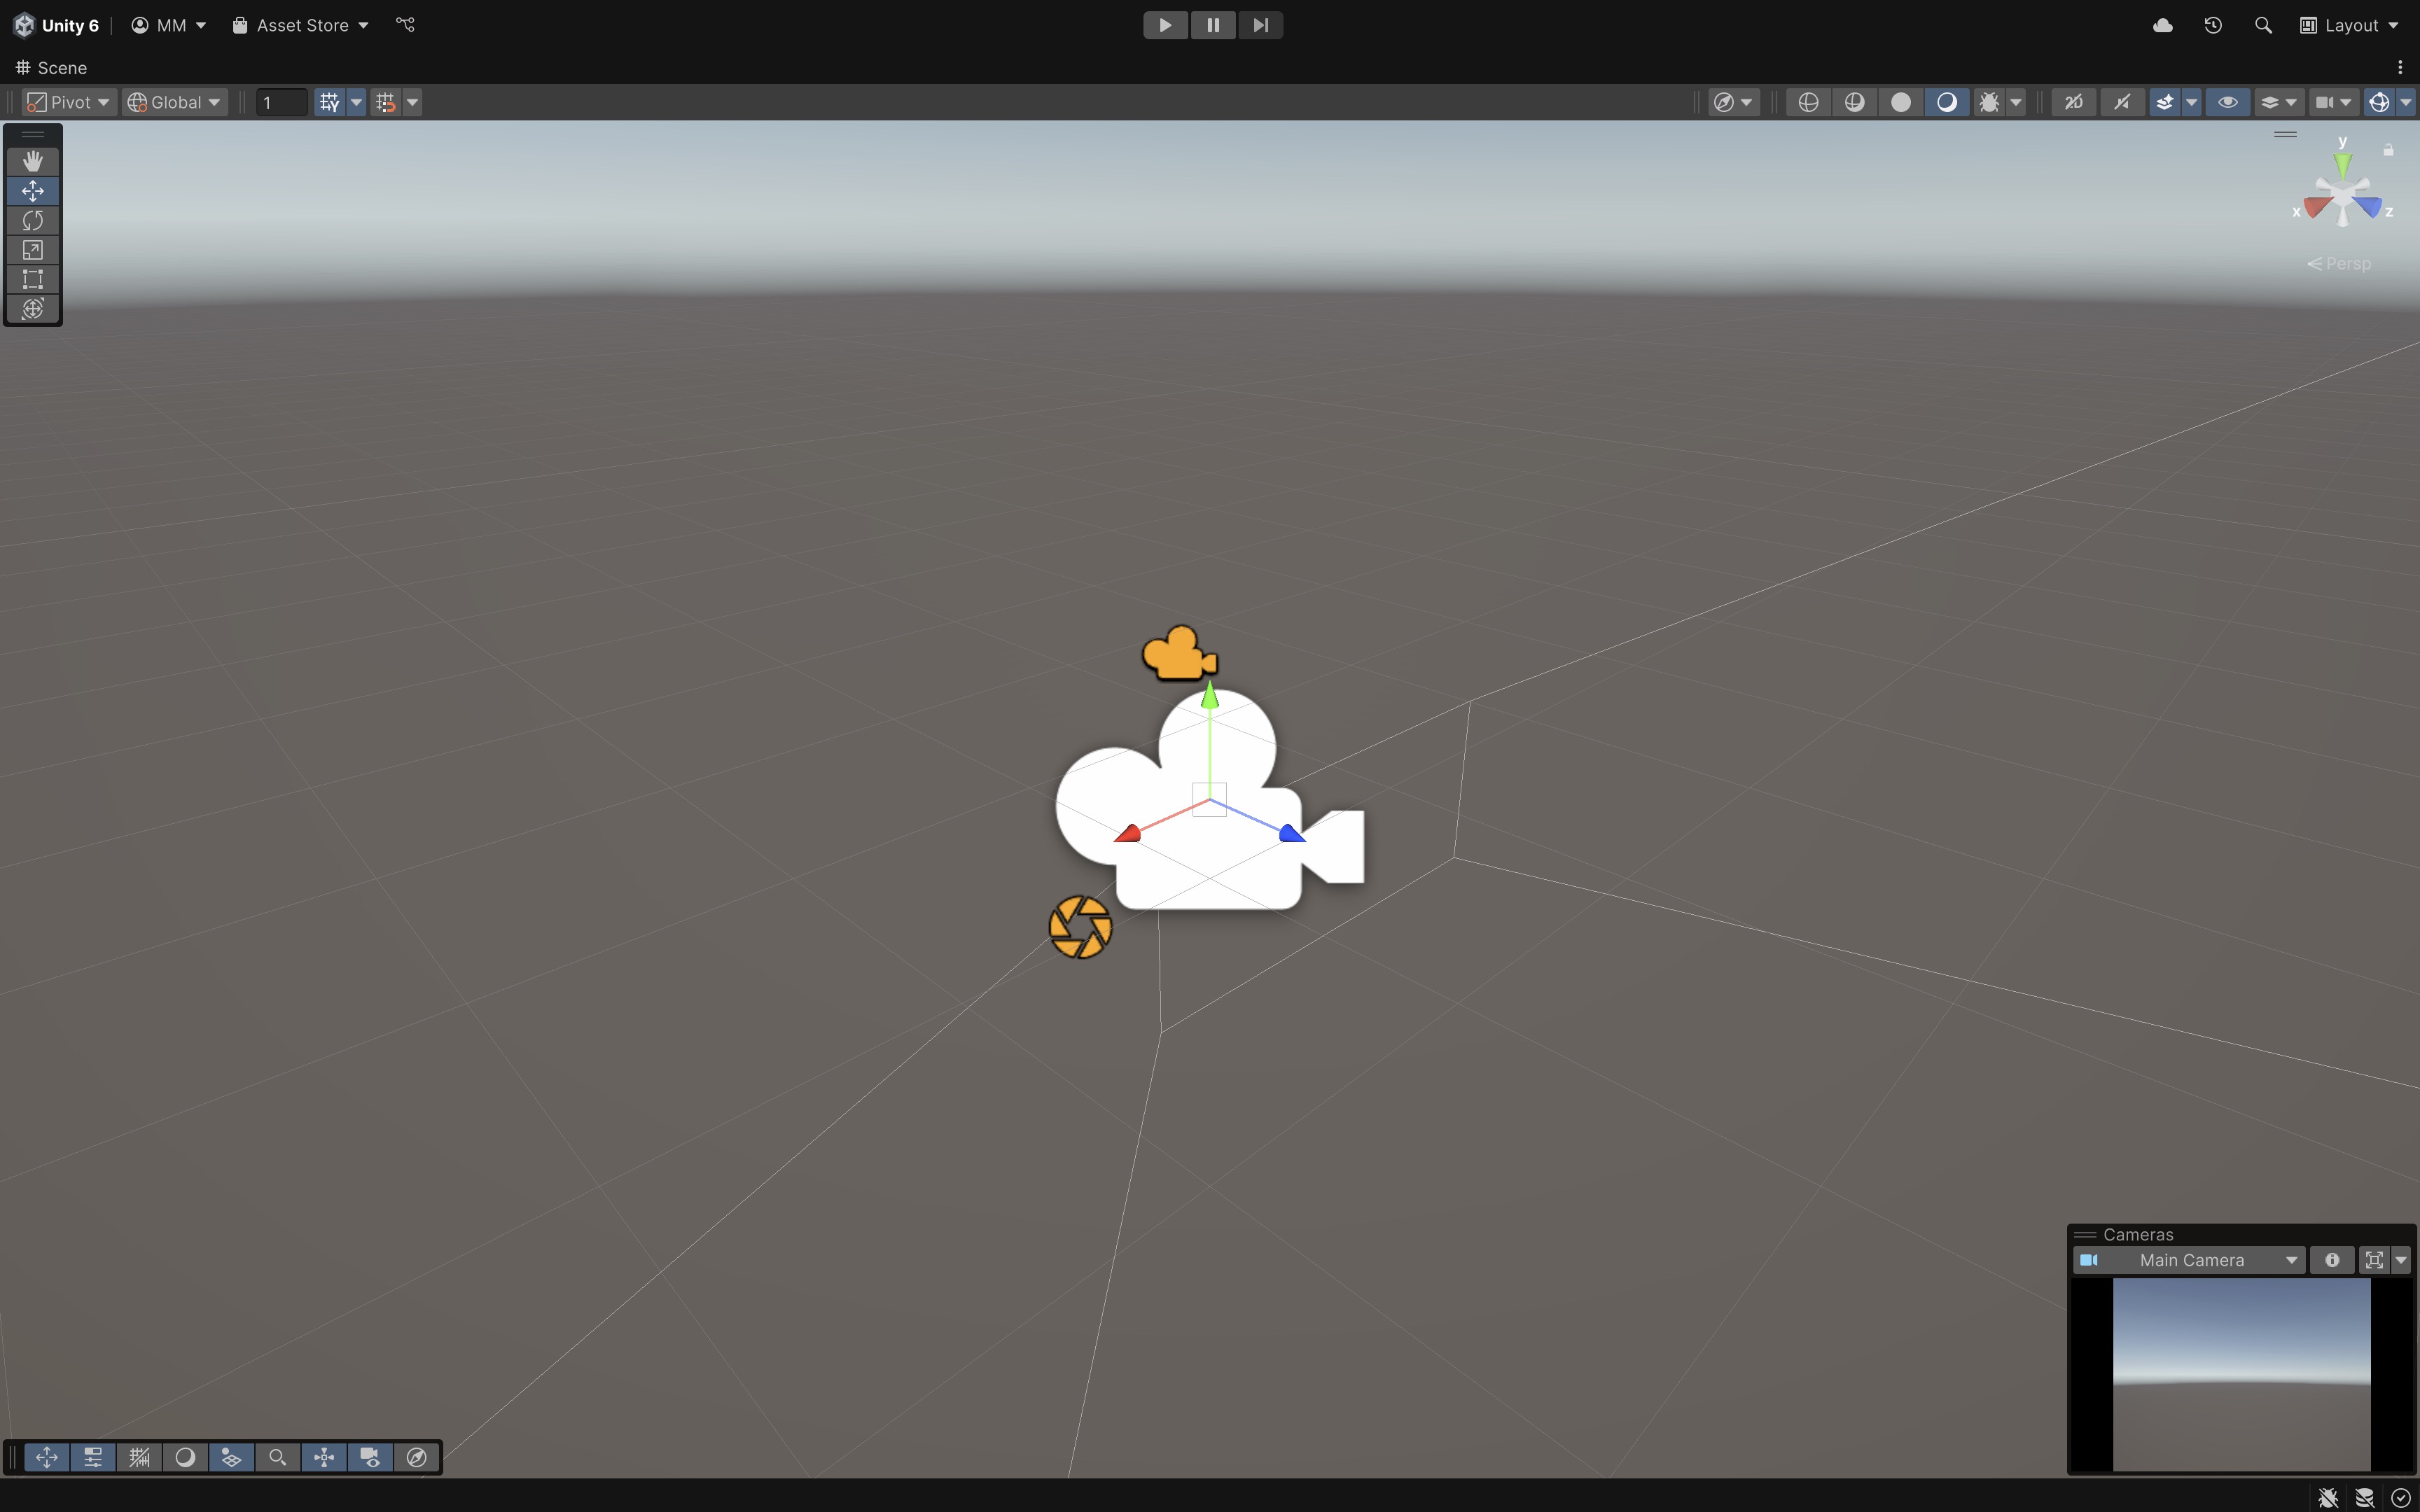
Camera objects in Unity capture and render the game world from a specific perspective. In XFactory, Cinemachine can be used to follow a mobile robot in the assembly area or provide guided tours through the exhibit station. Camera types in Unity include:
- Main Camera: The default camera in Unity scenes, responsible for rendering the player’s view.
- Cinematic Camera (Cinemachine): A more advanced camera used for smooth transitions, cutscenes, and automatic tracking of objects. Cinemachine is provided through a Unity package and may need to be installed through Package Manager if it is not already present in the project.
- Orthographic Camera: Useful for 2D or CAD-like top-down views where perspective distortion is not desired.
- Multiple Cameras: You can layer or stack cameras (e.g., one for UI, one for 3D scene) to compose the final image.
- Post-processing Effects: Cameras can use volumes to apply bloom, depth of field, and color grading, enhancing visual quality.
3D Object
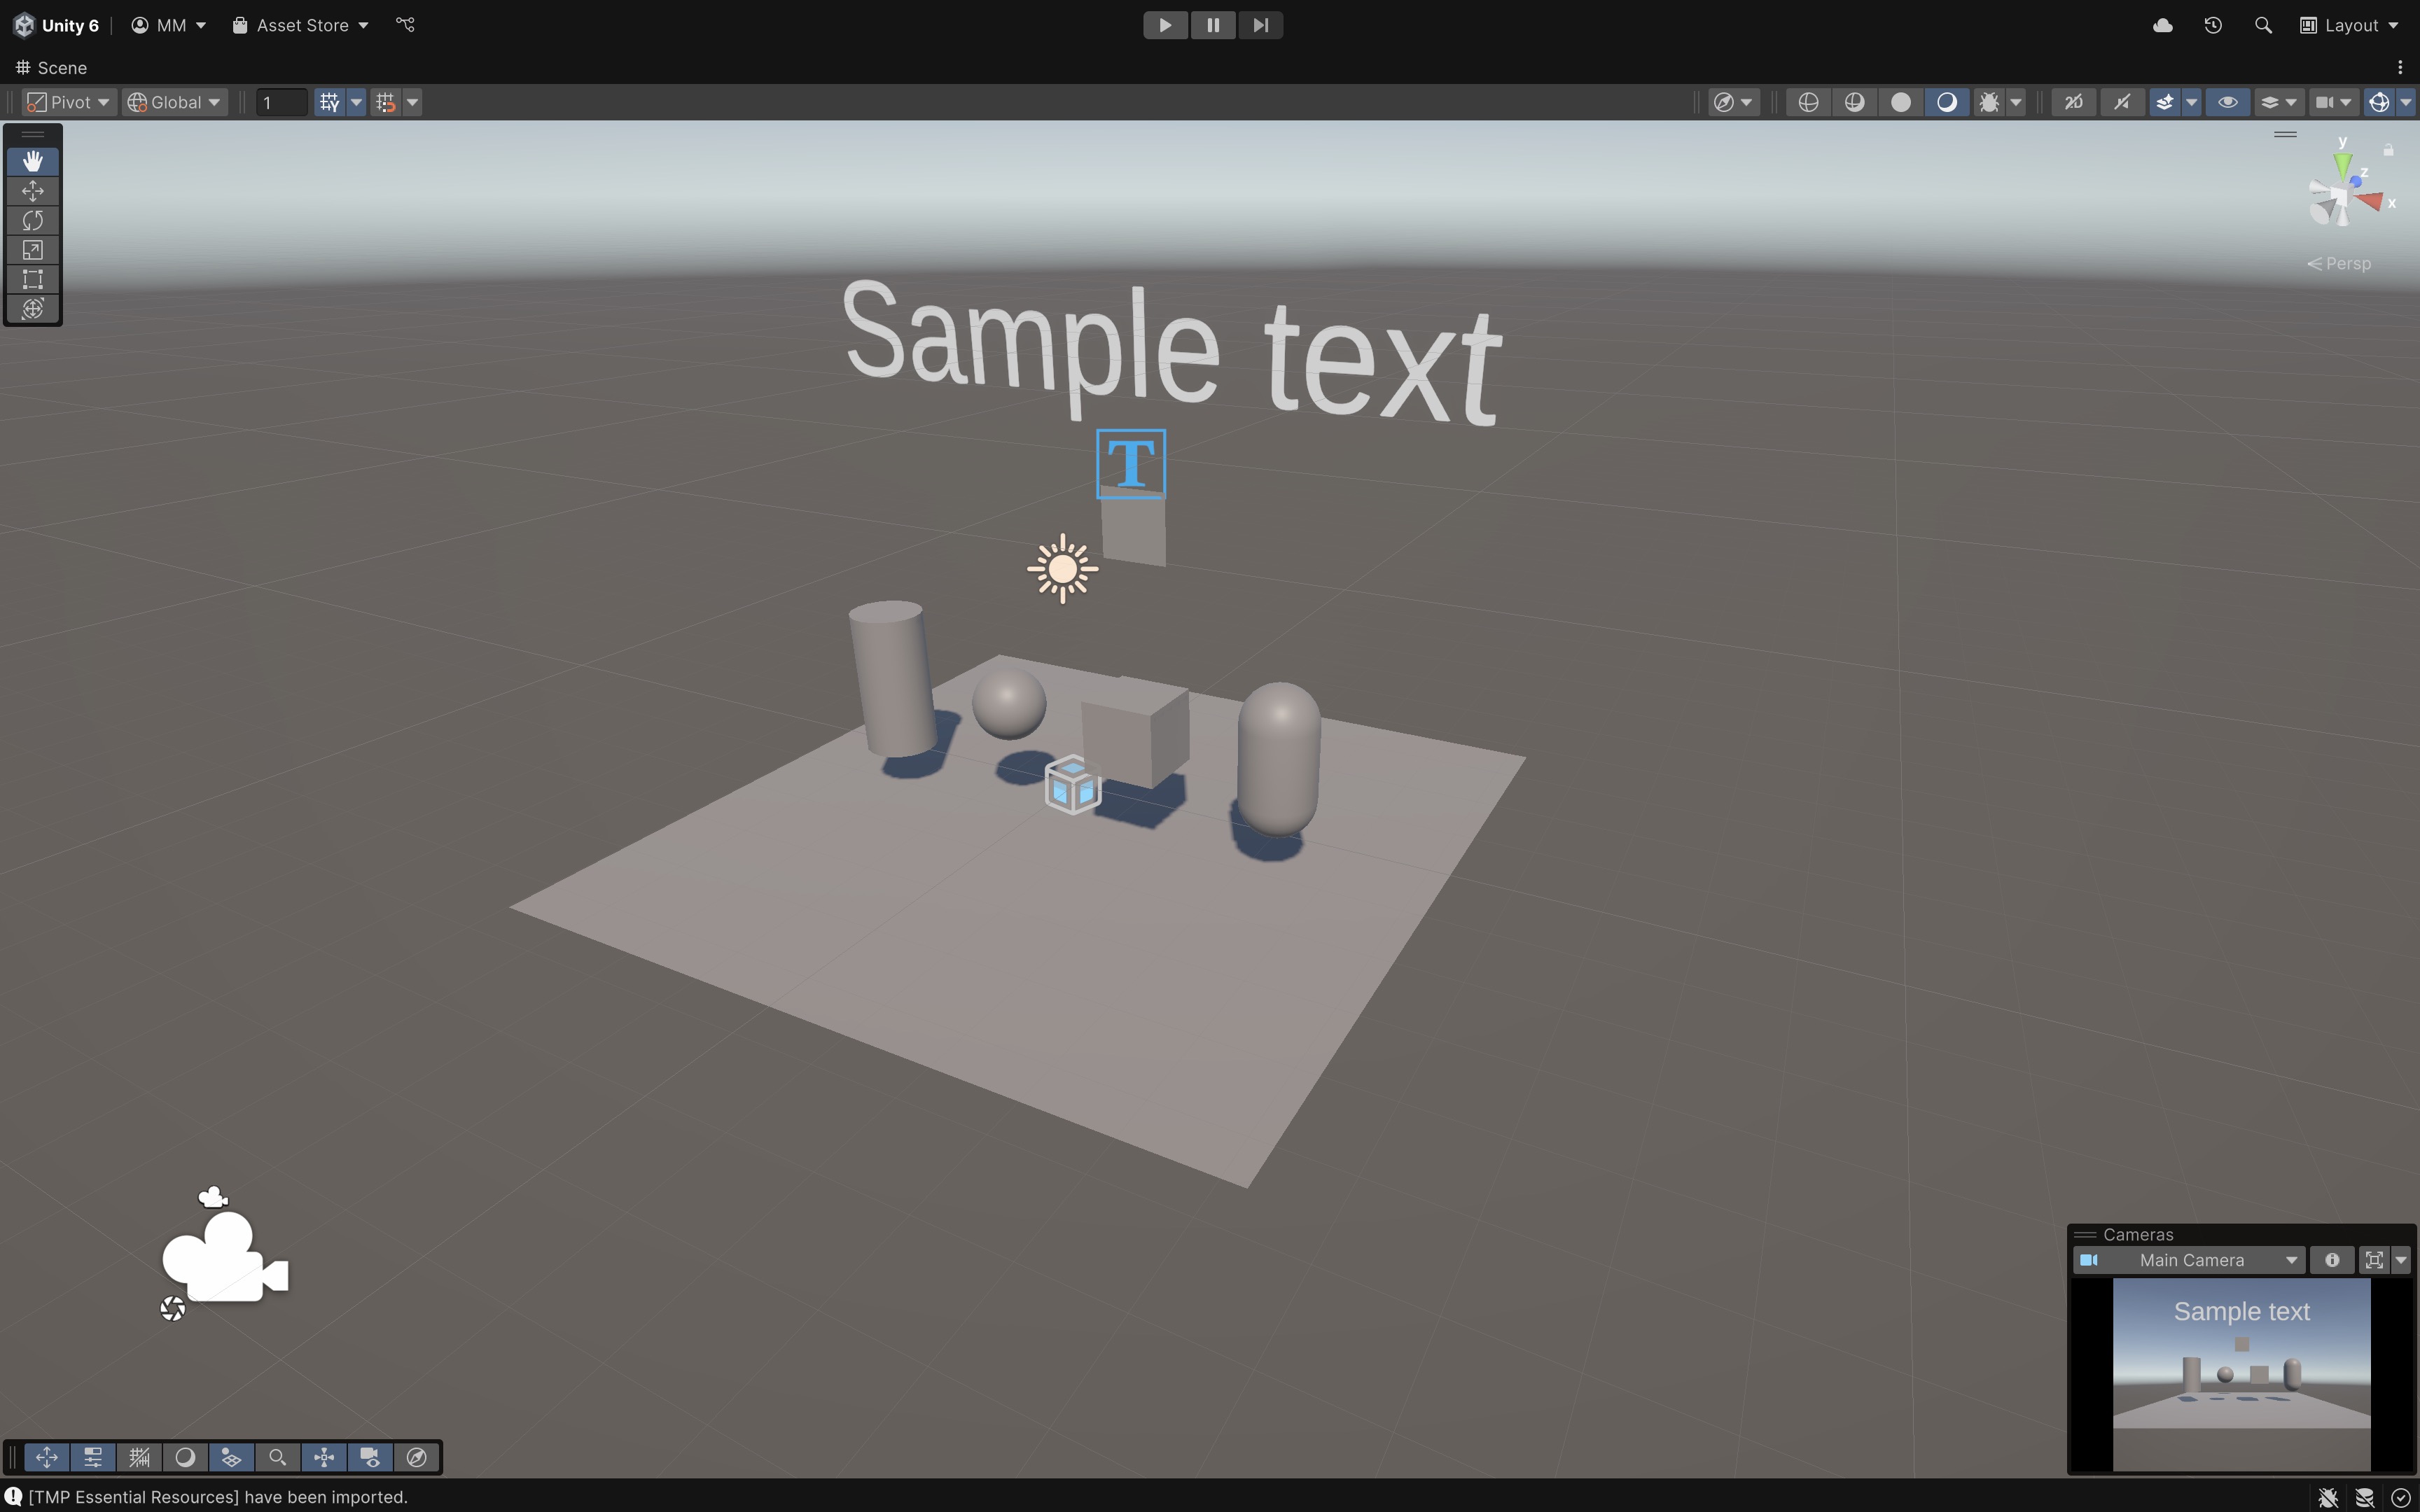
Unity provides built-in 3D primitives and tools for modeling environments. Many base structures in the XFactory scene—such as floors, crates, and placeholder equipment—use Unity’s primitive 3D objects. TextMeshPro is used for floating labels above machines like CNC units and the 3D printer. Important 3D GameObjects:
Cube: A simple six-sided box.Sphere: A perfectly round 3D object.Capsule: A rounded cylinder, often used for character colliders.Cylinder: A circular column.Plane: A flat surface often used as a ground or floor.Quad: A two-triangle surface, useful for textures and billboards.Text - TextMeshPro: A high-quality text rendering system for 3D space.
Effects
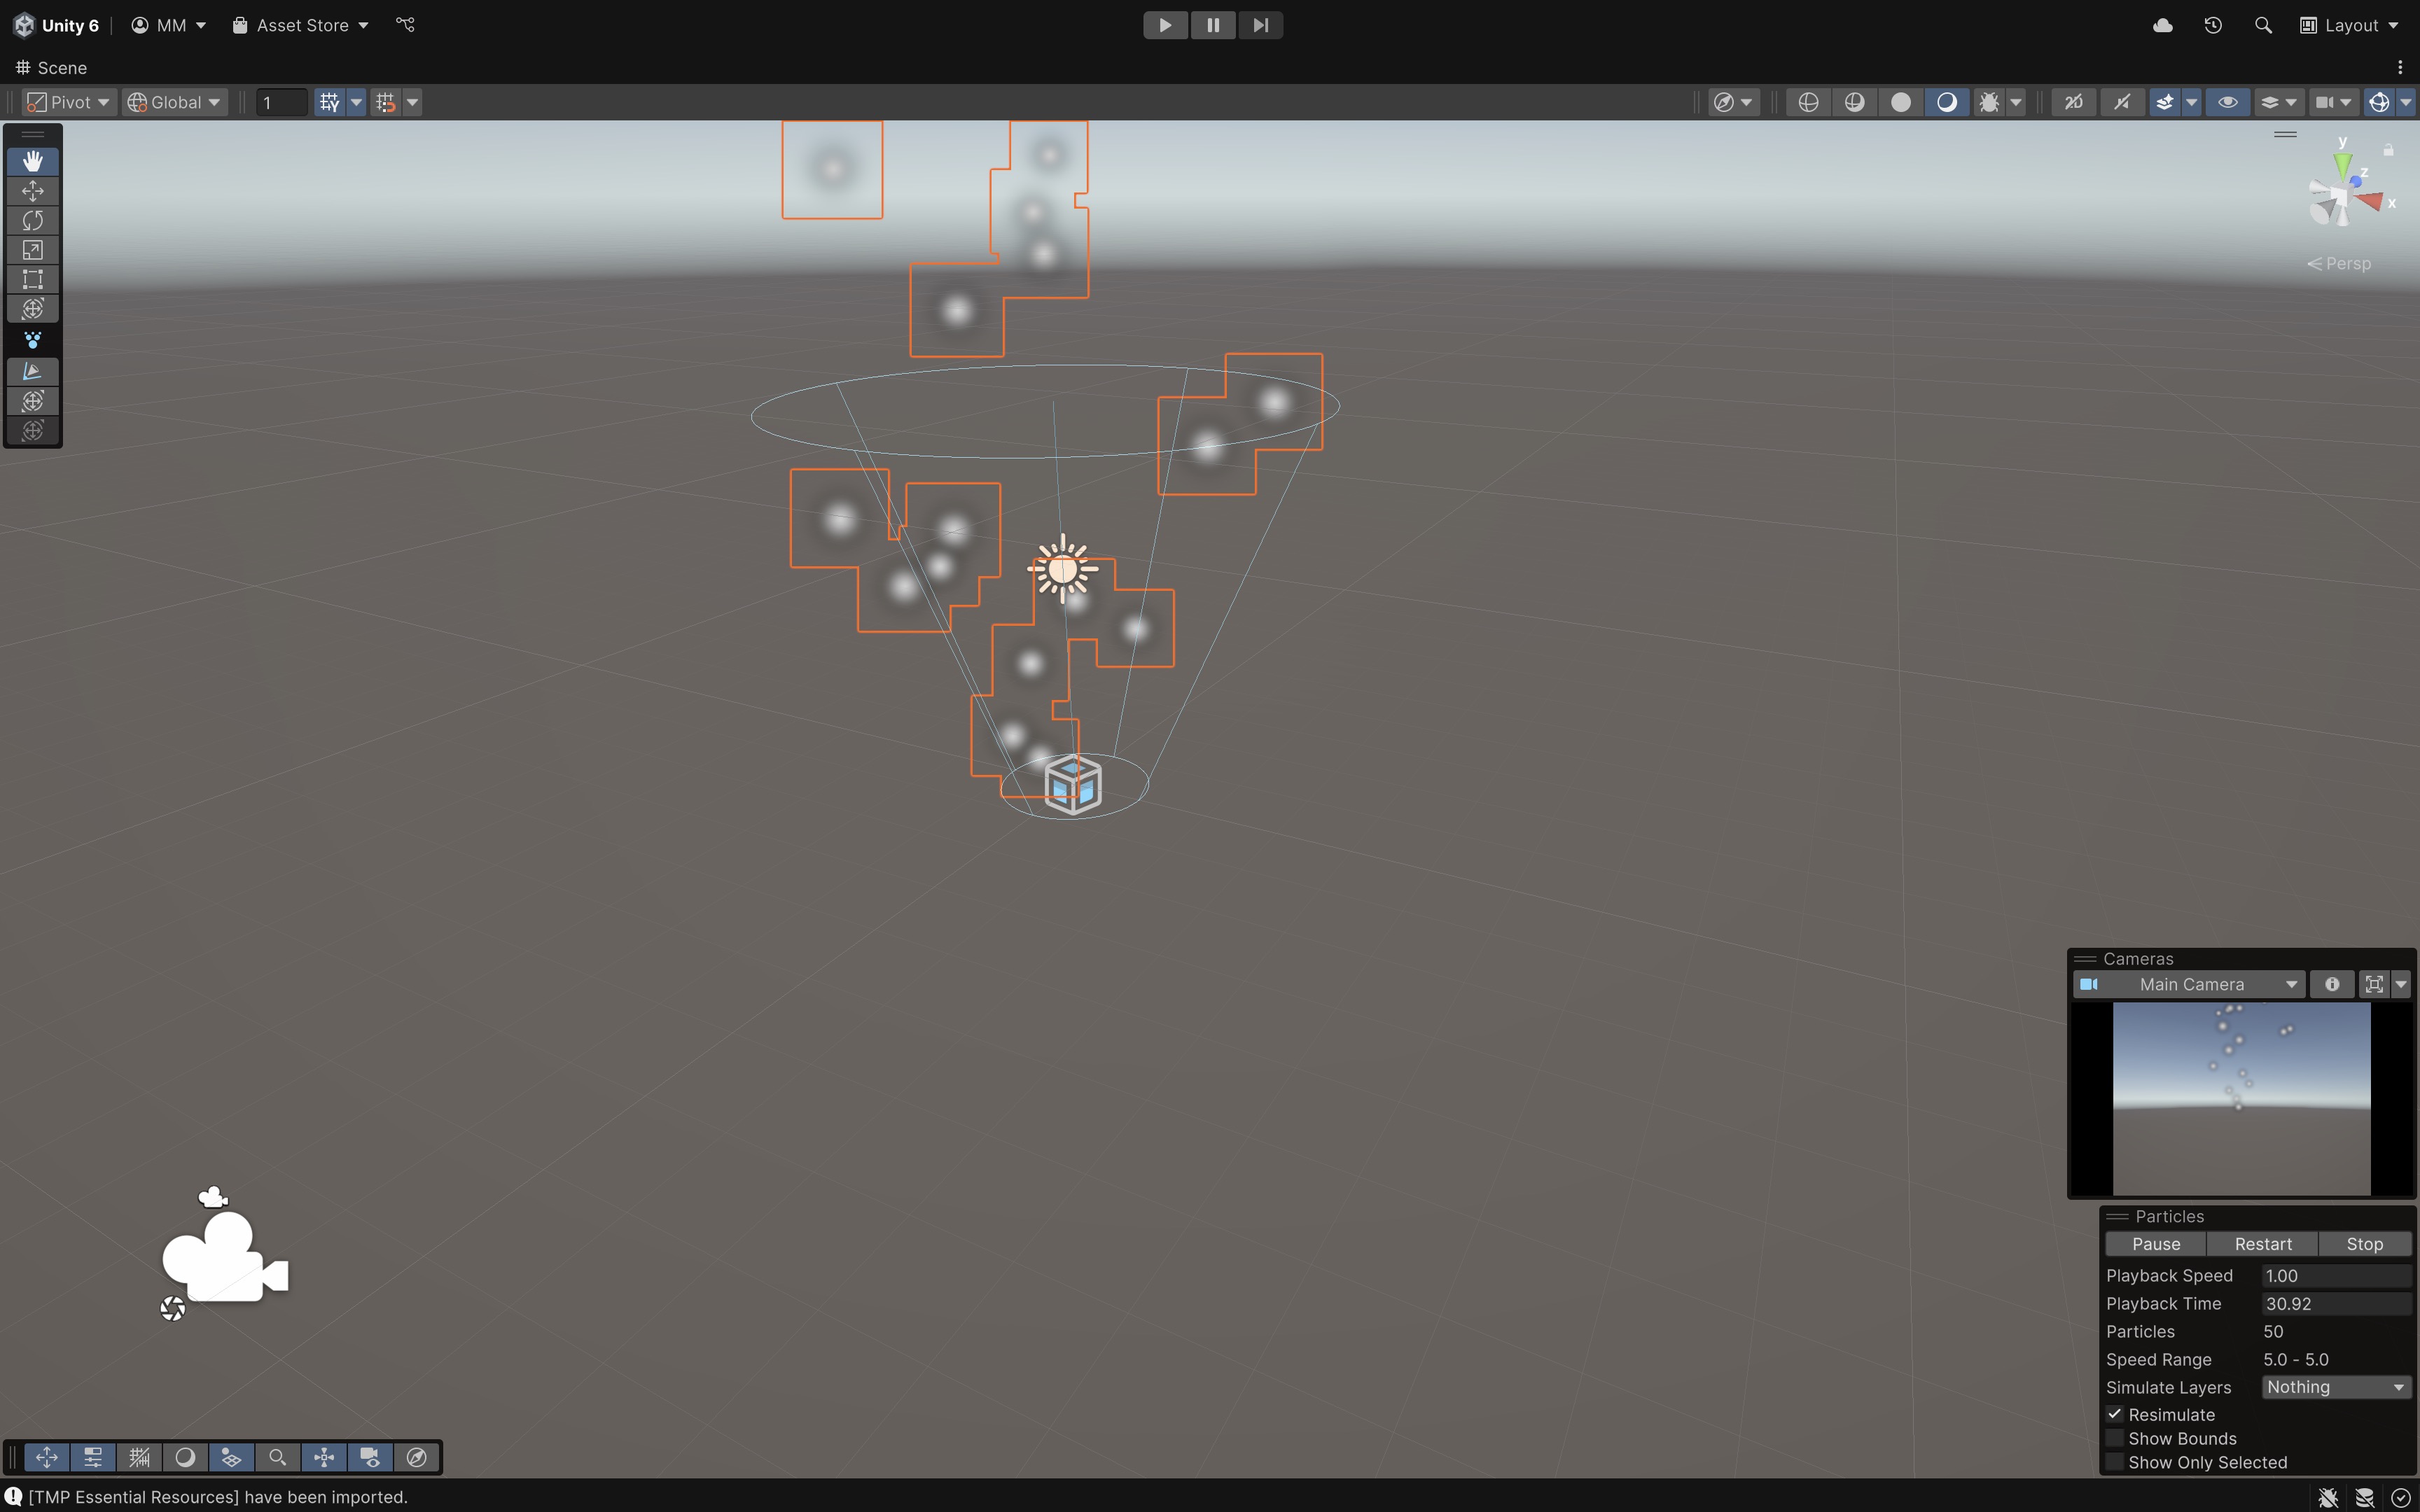
Effects in Unity add visual enhancements such as fire, smoke, trails, or outlines. In XFactory, particle systems can simulate welding sparks, while trail and line renderers can be used to show drone flight paths or laser alignment guides. Common effect types in Unity include:
Particle System: Generates visual effects like fire, smoke, or explosions.Trail Renderer: Creates a fading trail behind a moving object.Line Renderer: Draws a straight or curved line in 3D space.
Light
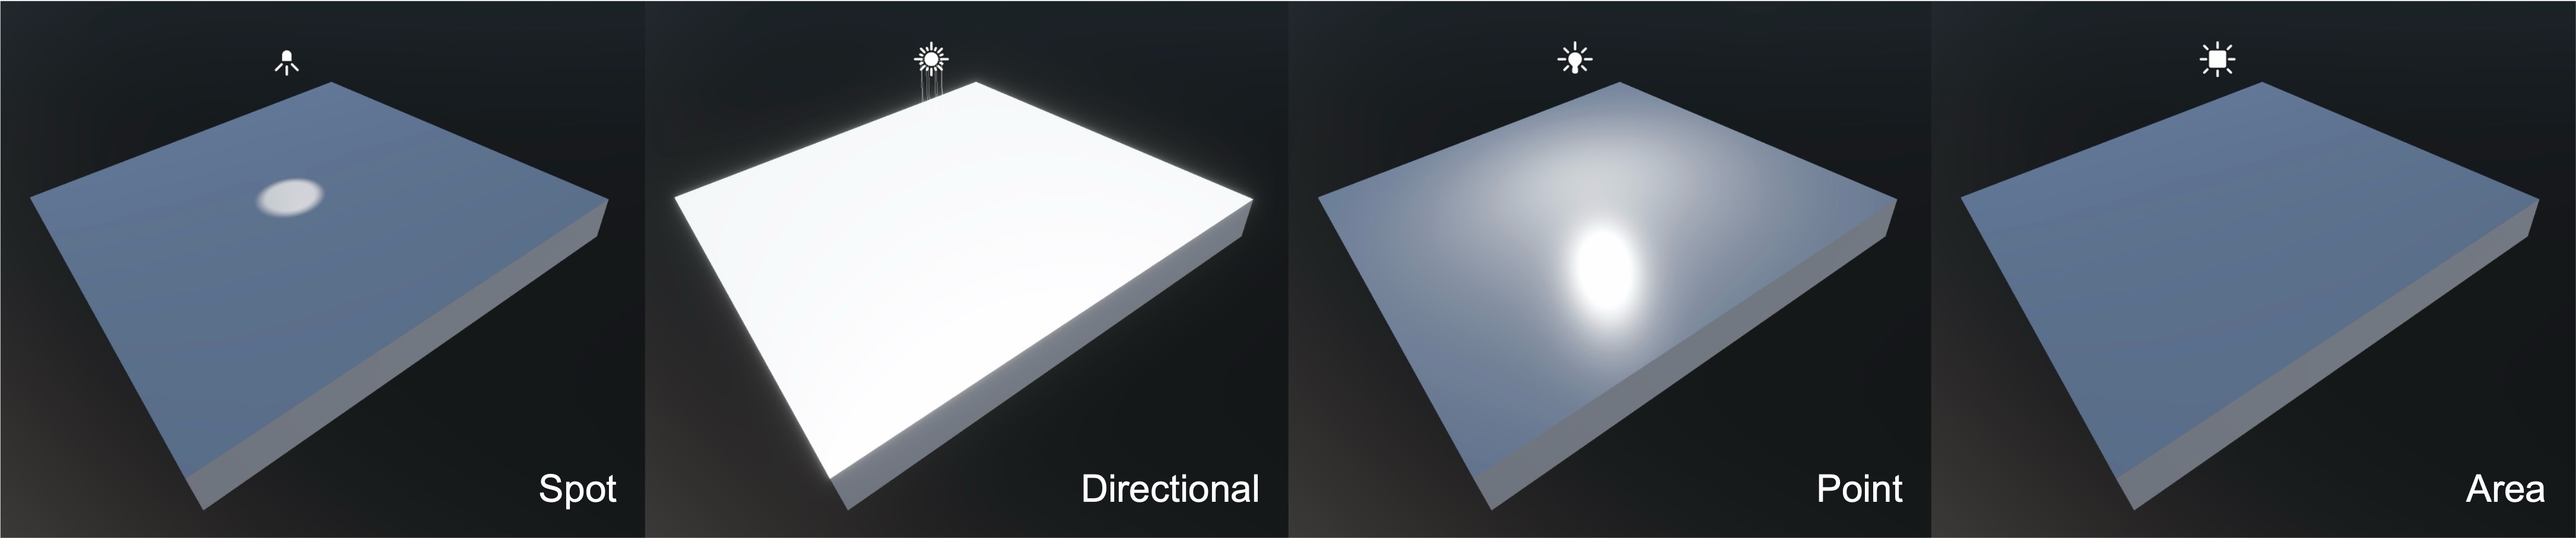
Lighting in Unity enhances realism and atmosphere. The XFactory interior is lit using a mix of point and area lights for realism. Directional light is used in the outdoor scene, while reflection probes help simulate polished surfaces on robotic arms and factory equipment. Common light types include:
Directional Light: Simulates sunlight, affecting all objects uniformly.Point Light: Emits light in all directions from a single point (like a light bulb).Spot Light: Projects light in a cone shape.Area Light: Used for realistic soft lighting (requires baked lighting).Reflection Probe: Captures and reflects the surrounding environment for realistic reflections.
Audio
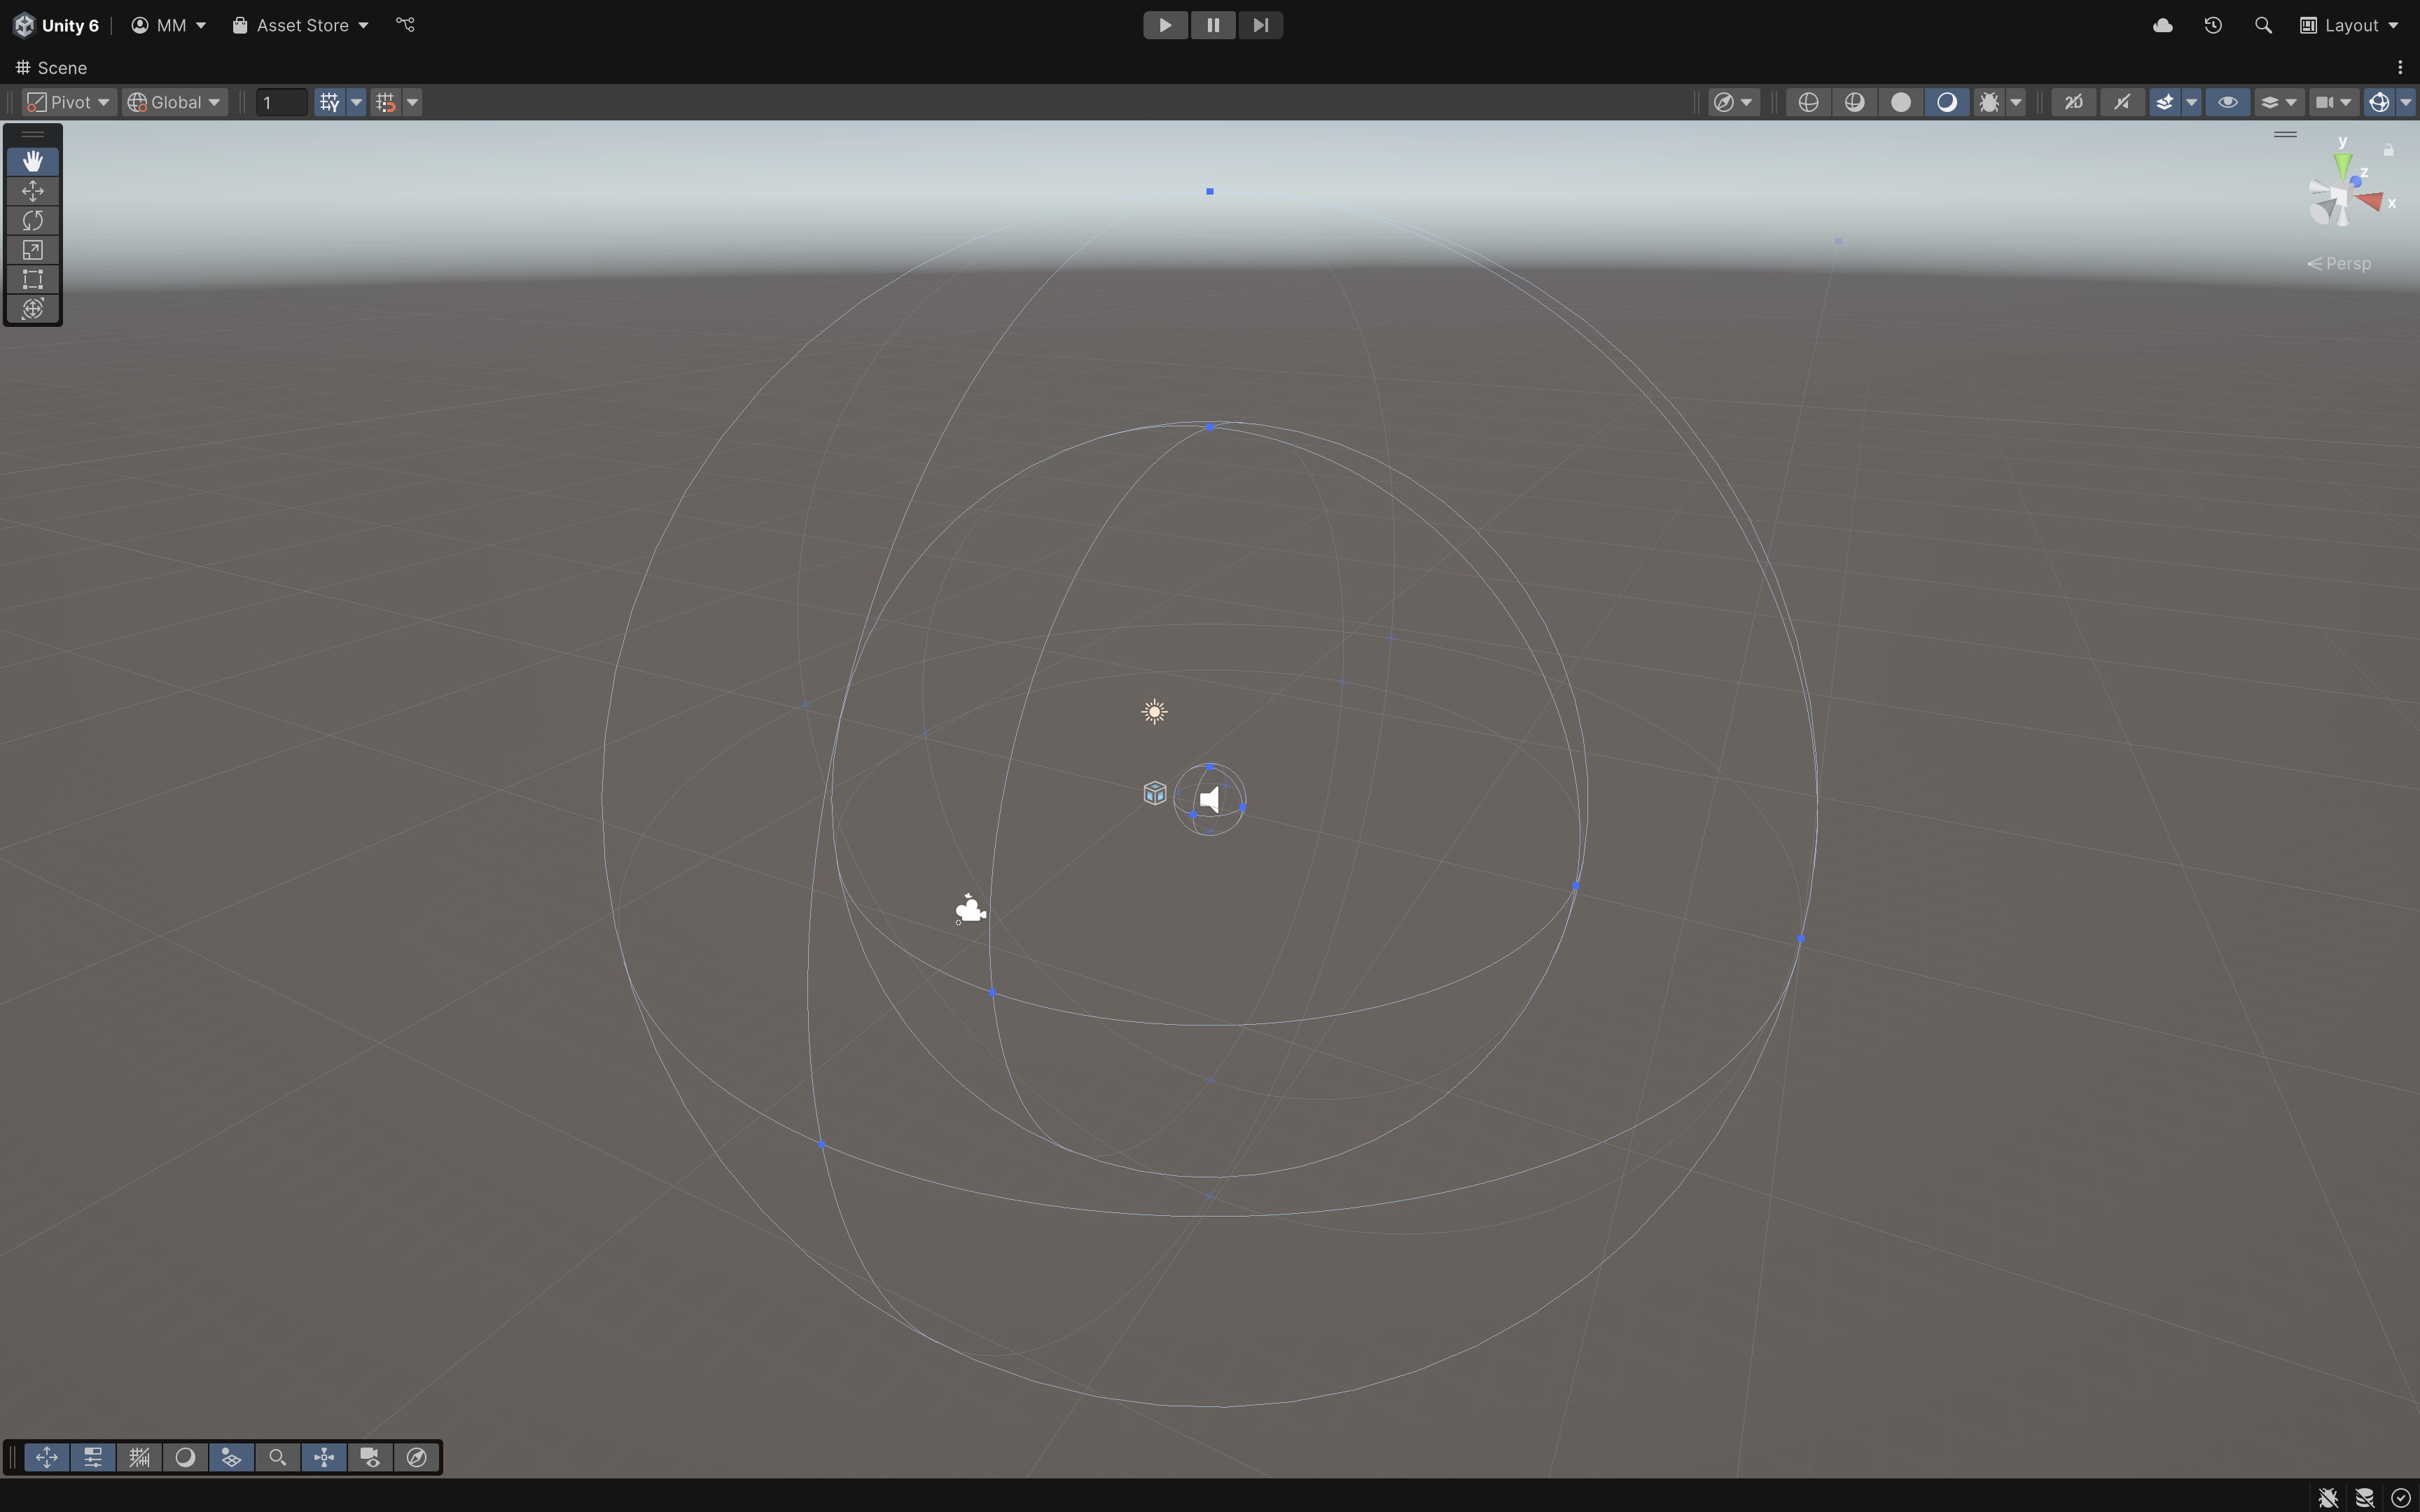
Unity’s audio system allows for spatialized 3D sound and ambient effects. Use audio sources in XFactory to simulate machine noise in the manufacturing station or forklift alerts in Logistics. Reverb zones can enhance immersion in the enclosed welding station. Key audio components in Unity include:
Audio Source: Plays sounds like background music, dialogue, or sound effects.Reverb Zone: Alters how sound behaves in different areas (e.g., echo in a cave).Audio Listener: Attached to the camera, it determines how the player hears the scene.- Spatial Blend: Controls whether a sound is fully 2D (global) or 3D (positional).
- Audio Mixers: Combine and balance multiple sounds, apply effects, and manage volume hierarchies.
Video
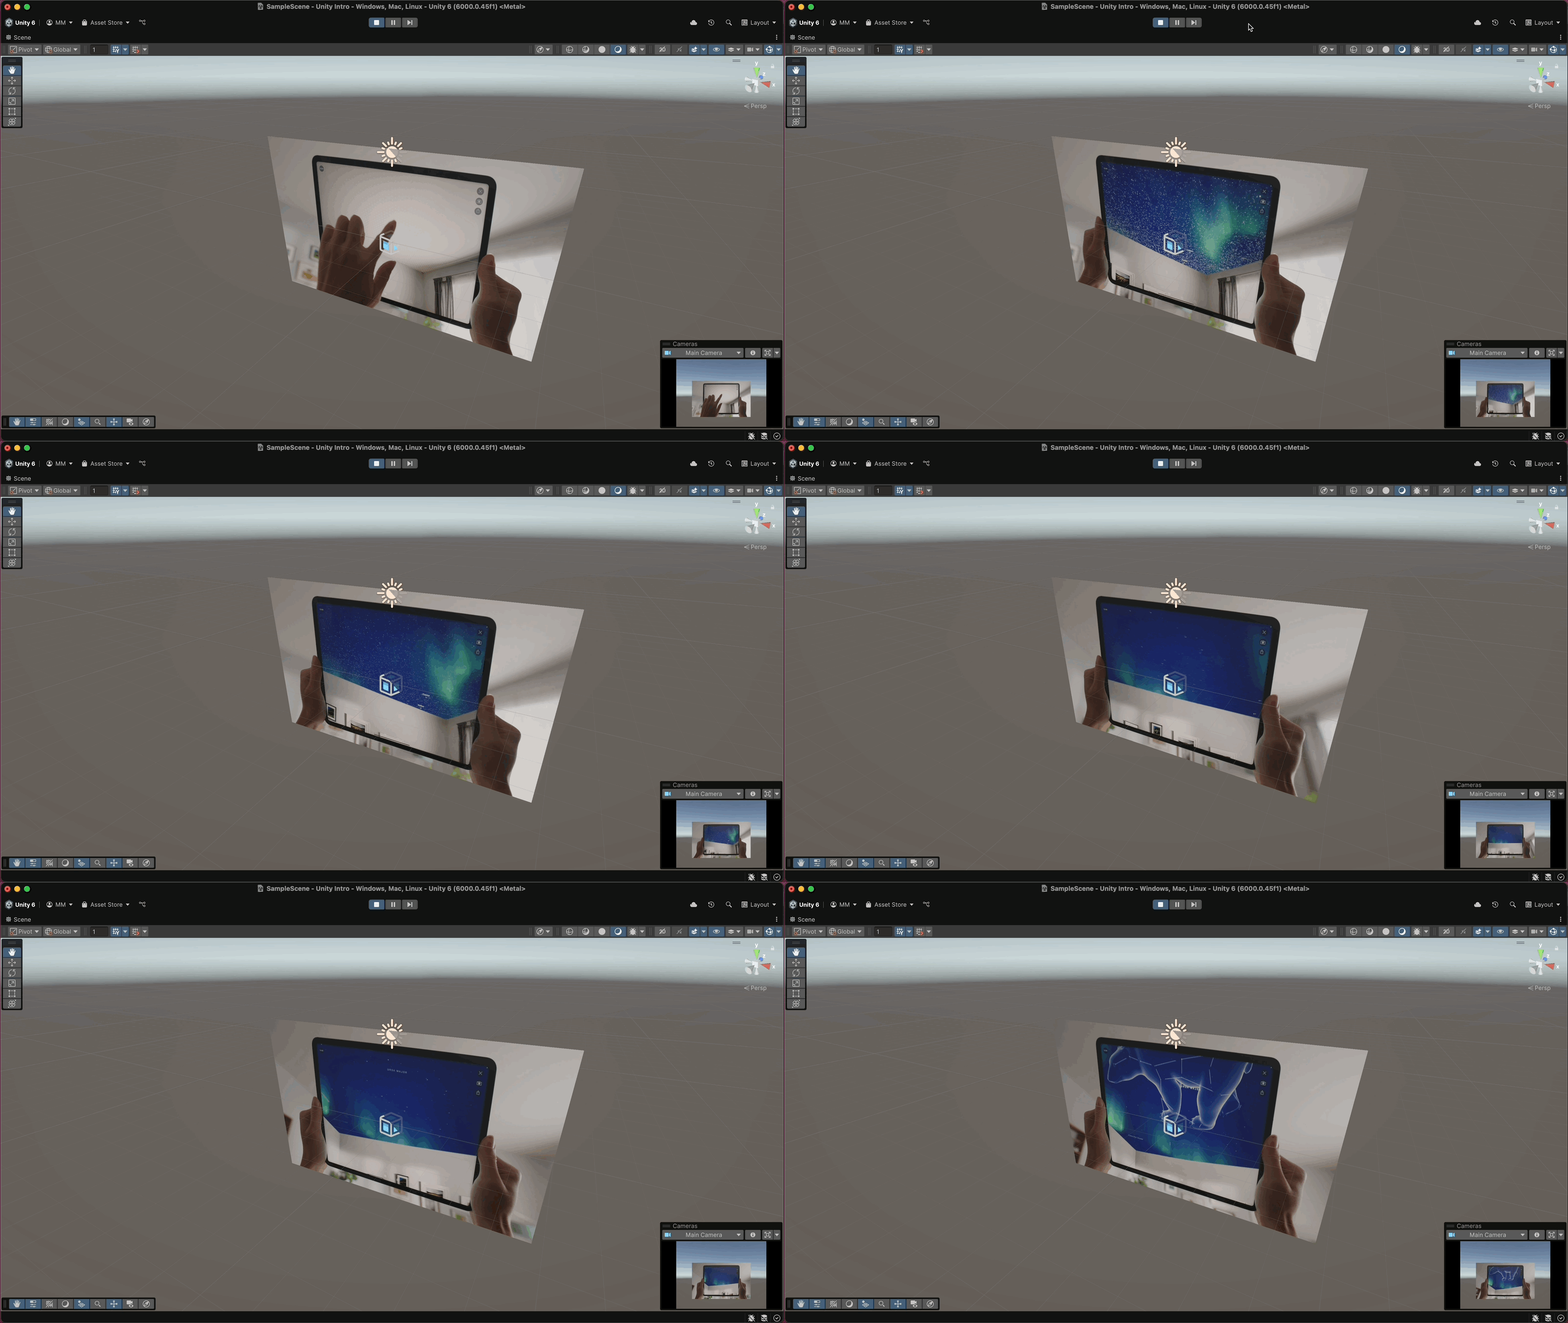
Unity supports video playback in games and XR applications. Video Player plays video files in Unity, either on a 3D object or full-screen. The large interactive displays in the Tech Station use video players to showcase training materials or machine diagnostics.
- Render Modes: Videos can render to a material texture (on a screen) or to the camera background.
- Supported Formats: Common video formats like MP4 are supported; heavy files may require compression.
- Audio Output: Video can route audio to an Audio Source for spatialization.
- Interactive Use Cases: Videos can be triggered by events (button presses, entering a trigger zone).
UI (User Interface)
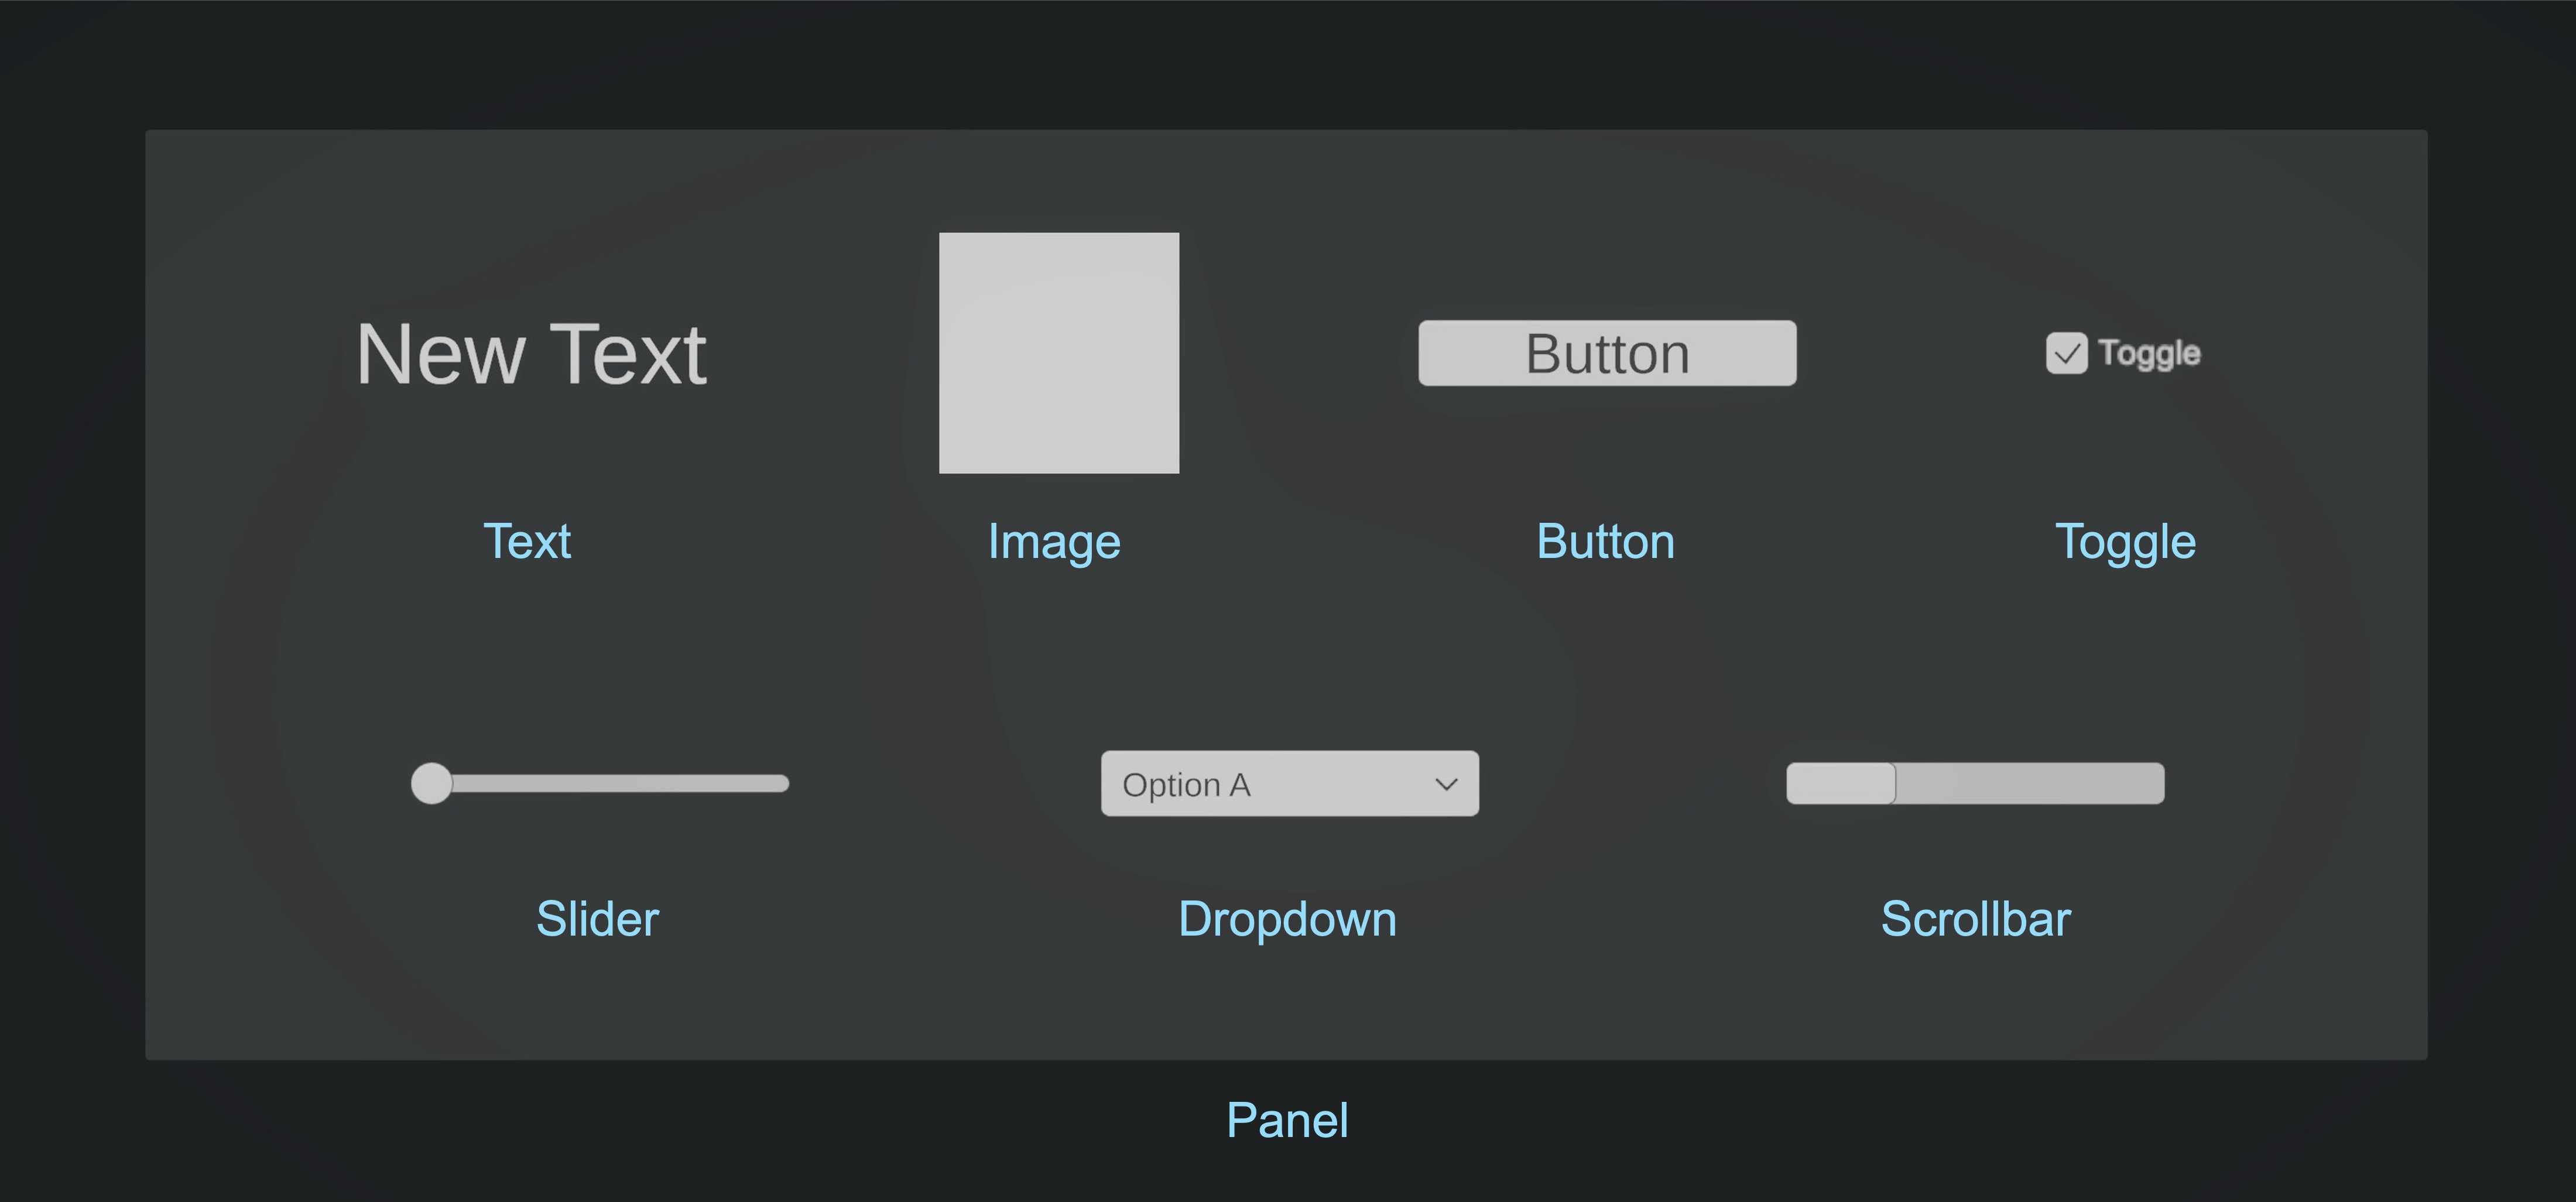
Unity’s UI system is used to create menus, HUDs, and interactive elements. In XFactory, you will find UI elements used on virtual control panels—e.g., toggling between robot programs, adjusting conveyor speed with sliders, or selecting part types from dropdowns in the assembly station. Common UI types in Unity include:
Canvas: The root UI container that holds all UI elements.TextMeshPro: The preferred high-quality text system for readable UI and 3D text. Unity’s legacyTextcomponent may still appear in older projects, but TextMeshPro should be used for new work.Image: Displays a visual image in the UI.Button: An interactive button that triggers actions.Toggle: A checkbox-like UI element for on/off states.Slider: Allows selection of a value within a range.Scrollbar: Enables scrolling content.Dropdown: Displays a list of selectable options.Input Field: Allows users to type text input.Event System: Handles UI interactions and input events.
Unity also includes UI Toolkit, but this course primarily uses Canvas-based UI and TextMeshPro because they are common in runtime XR interfaces and Unity’s XR Interaction Toolkit workflows.
Other GameObjects
Unity includes additional systems for navigation, rendering, and scene effects. Some appear as GameObjects, while others are Components, packages, or assets that you add to existing GameObjects.
NavMeshandNavMesh Agent: Used for AI pathfinding. In newer Unity projects, some navigation features may be provided through the AI Navigation package.Volume: Controls post-processing effects like bloom, depth of field, and color grading.Rendering Components: Used for advanced graphics optimizations.
Prefabs
A Prefab in Unity is a pre-configured GameObject that can be reused multiple times in a scene or across multiple scenes. Prefabs store all components, child objects, and settings of a GameObject as an Asset, making it easier to manage and instantiate objects at runtime. Instead of manually copying and pasting GameObjects, prefabs allow you to:
- Maintain consistency across different scenes.
- Easily update all instances of a prefab from a single source.
- Optimize performance by using pre-configured assets.
- Spawn GameObjects dynamically at runtime (e.g., bullets, NPCs, power-ups).
In the XFactory project, many complex elements—like drones, forklifts, CNC machines, and UI panels—are stored as prefabs in the
Assets > Prefabsfolder for easy reuse across the factory’s interior and exterior scenes.
Creating Prefabs
- Create or Select a GameObject:
- In the
Hierarchywindow, create or select a GameObject that you want to turn into a prefab. - Configure it with the desired Components, Textures, and Settings. For instance, configure a 3D printer model with all necessary materials, animations, and scripts before saving it as a prefab.
- In the
- Convert the GameObject into a Prefab:
- Open the
Projectwindow. - Navigate to the
Assets > Prefabsfolder (or create a new folder for organization). - Drag and drop the selected GameObject from the
Hierarchywindow into theProjectwindow. - The object now appears as a prefab asset in the
Projectwindow, and prefab instances in theHierarchyare usually shown with blue prefab styling or indicators depending on the Unity theme and version. Drag-and-drop from theHierarchyinto theProjectwindow is the safest and most consistent way to create a prefab across Unity versions.
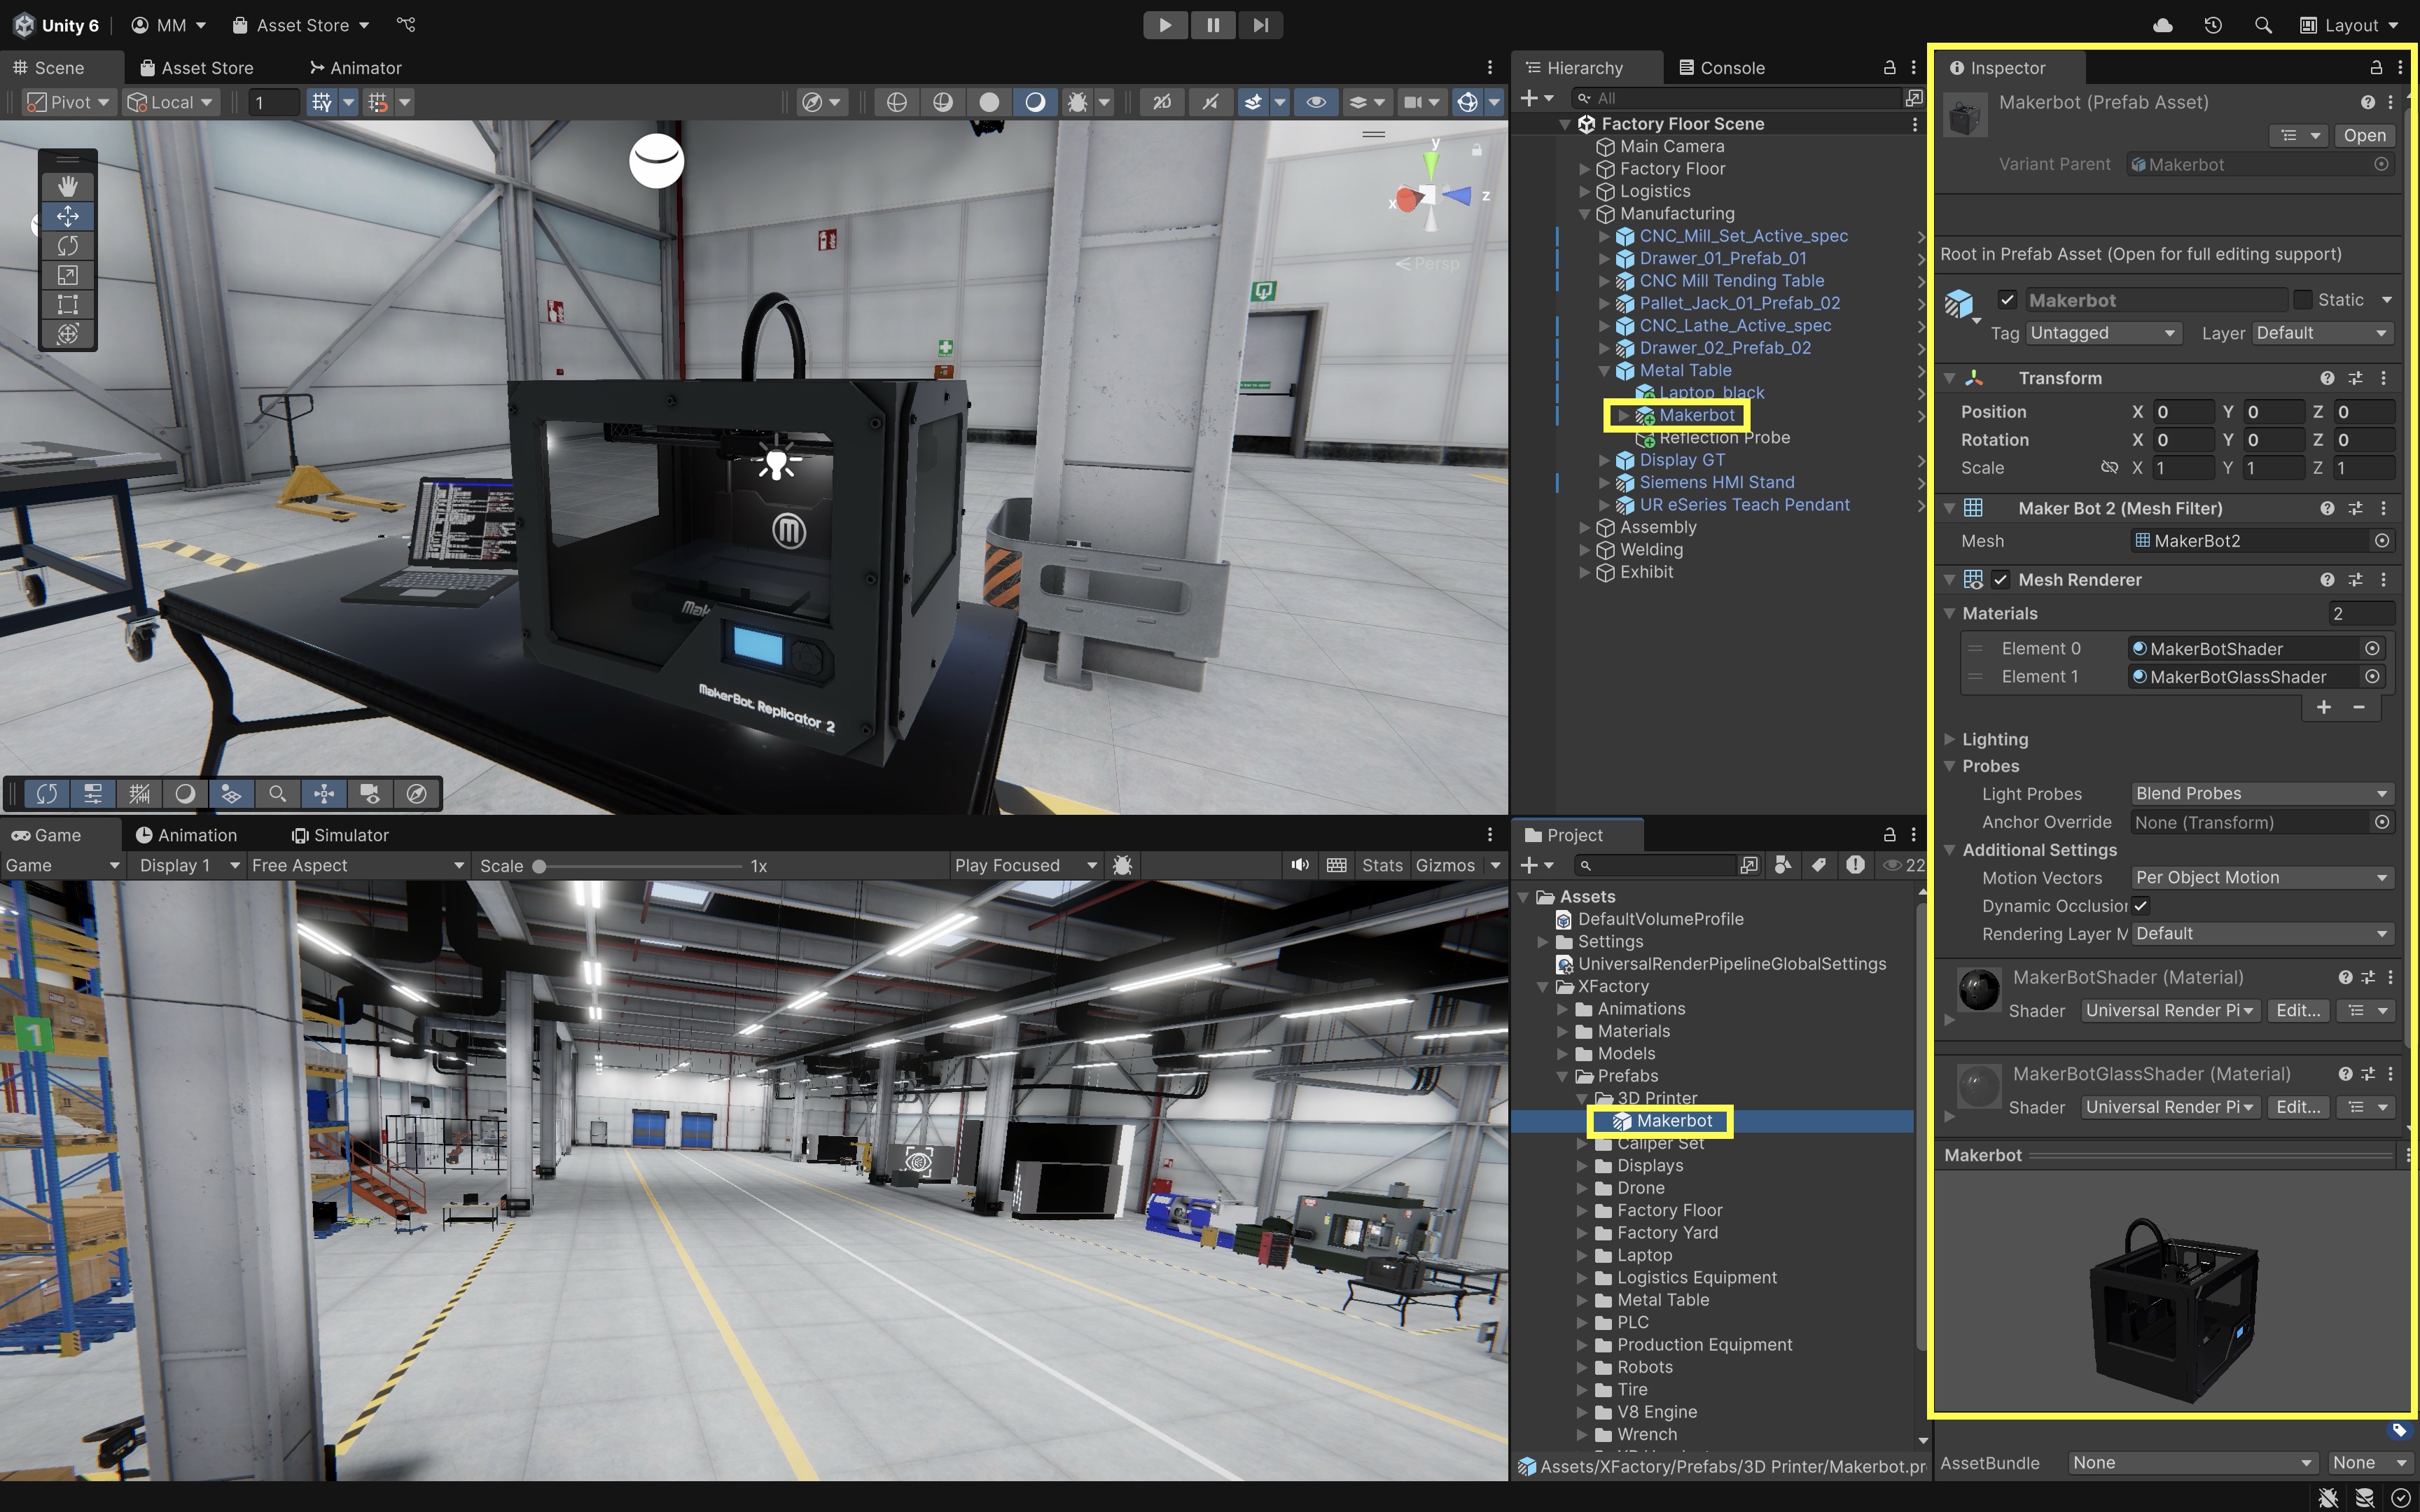
Review this Unity documentation to learn more about how to create a prefab.
- Open the
Editing Prefabs
There are two ways to edit a prefab:
- Editing the Prefab Asset (Affects All Instances):
- Double-click the prefab in the
Projectwindow to enterPrefab Mode. - Modify the object (e.g., change components, adjust materials, add new child objects).
- All instances of the prefab in the scene will update automatically.
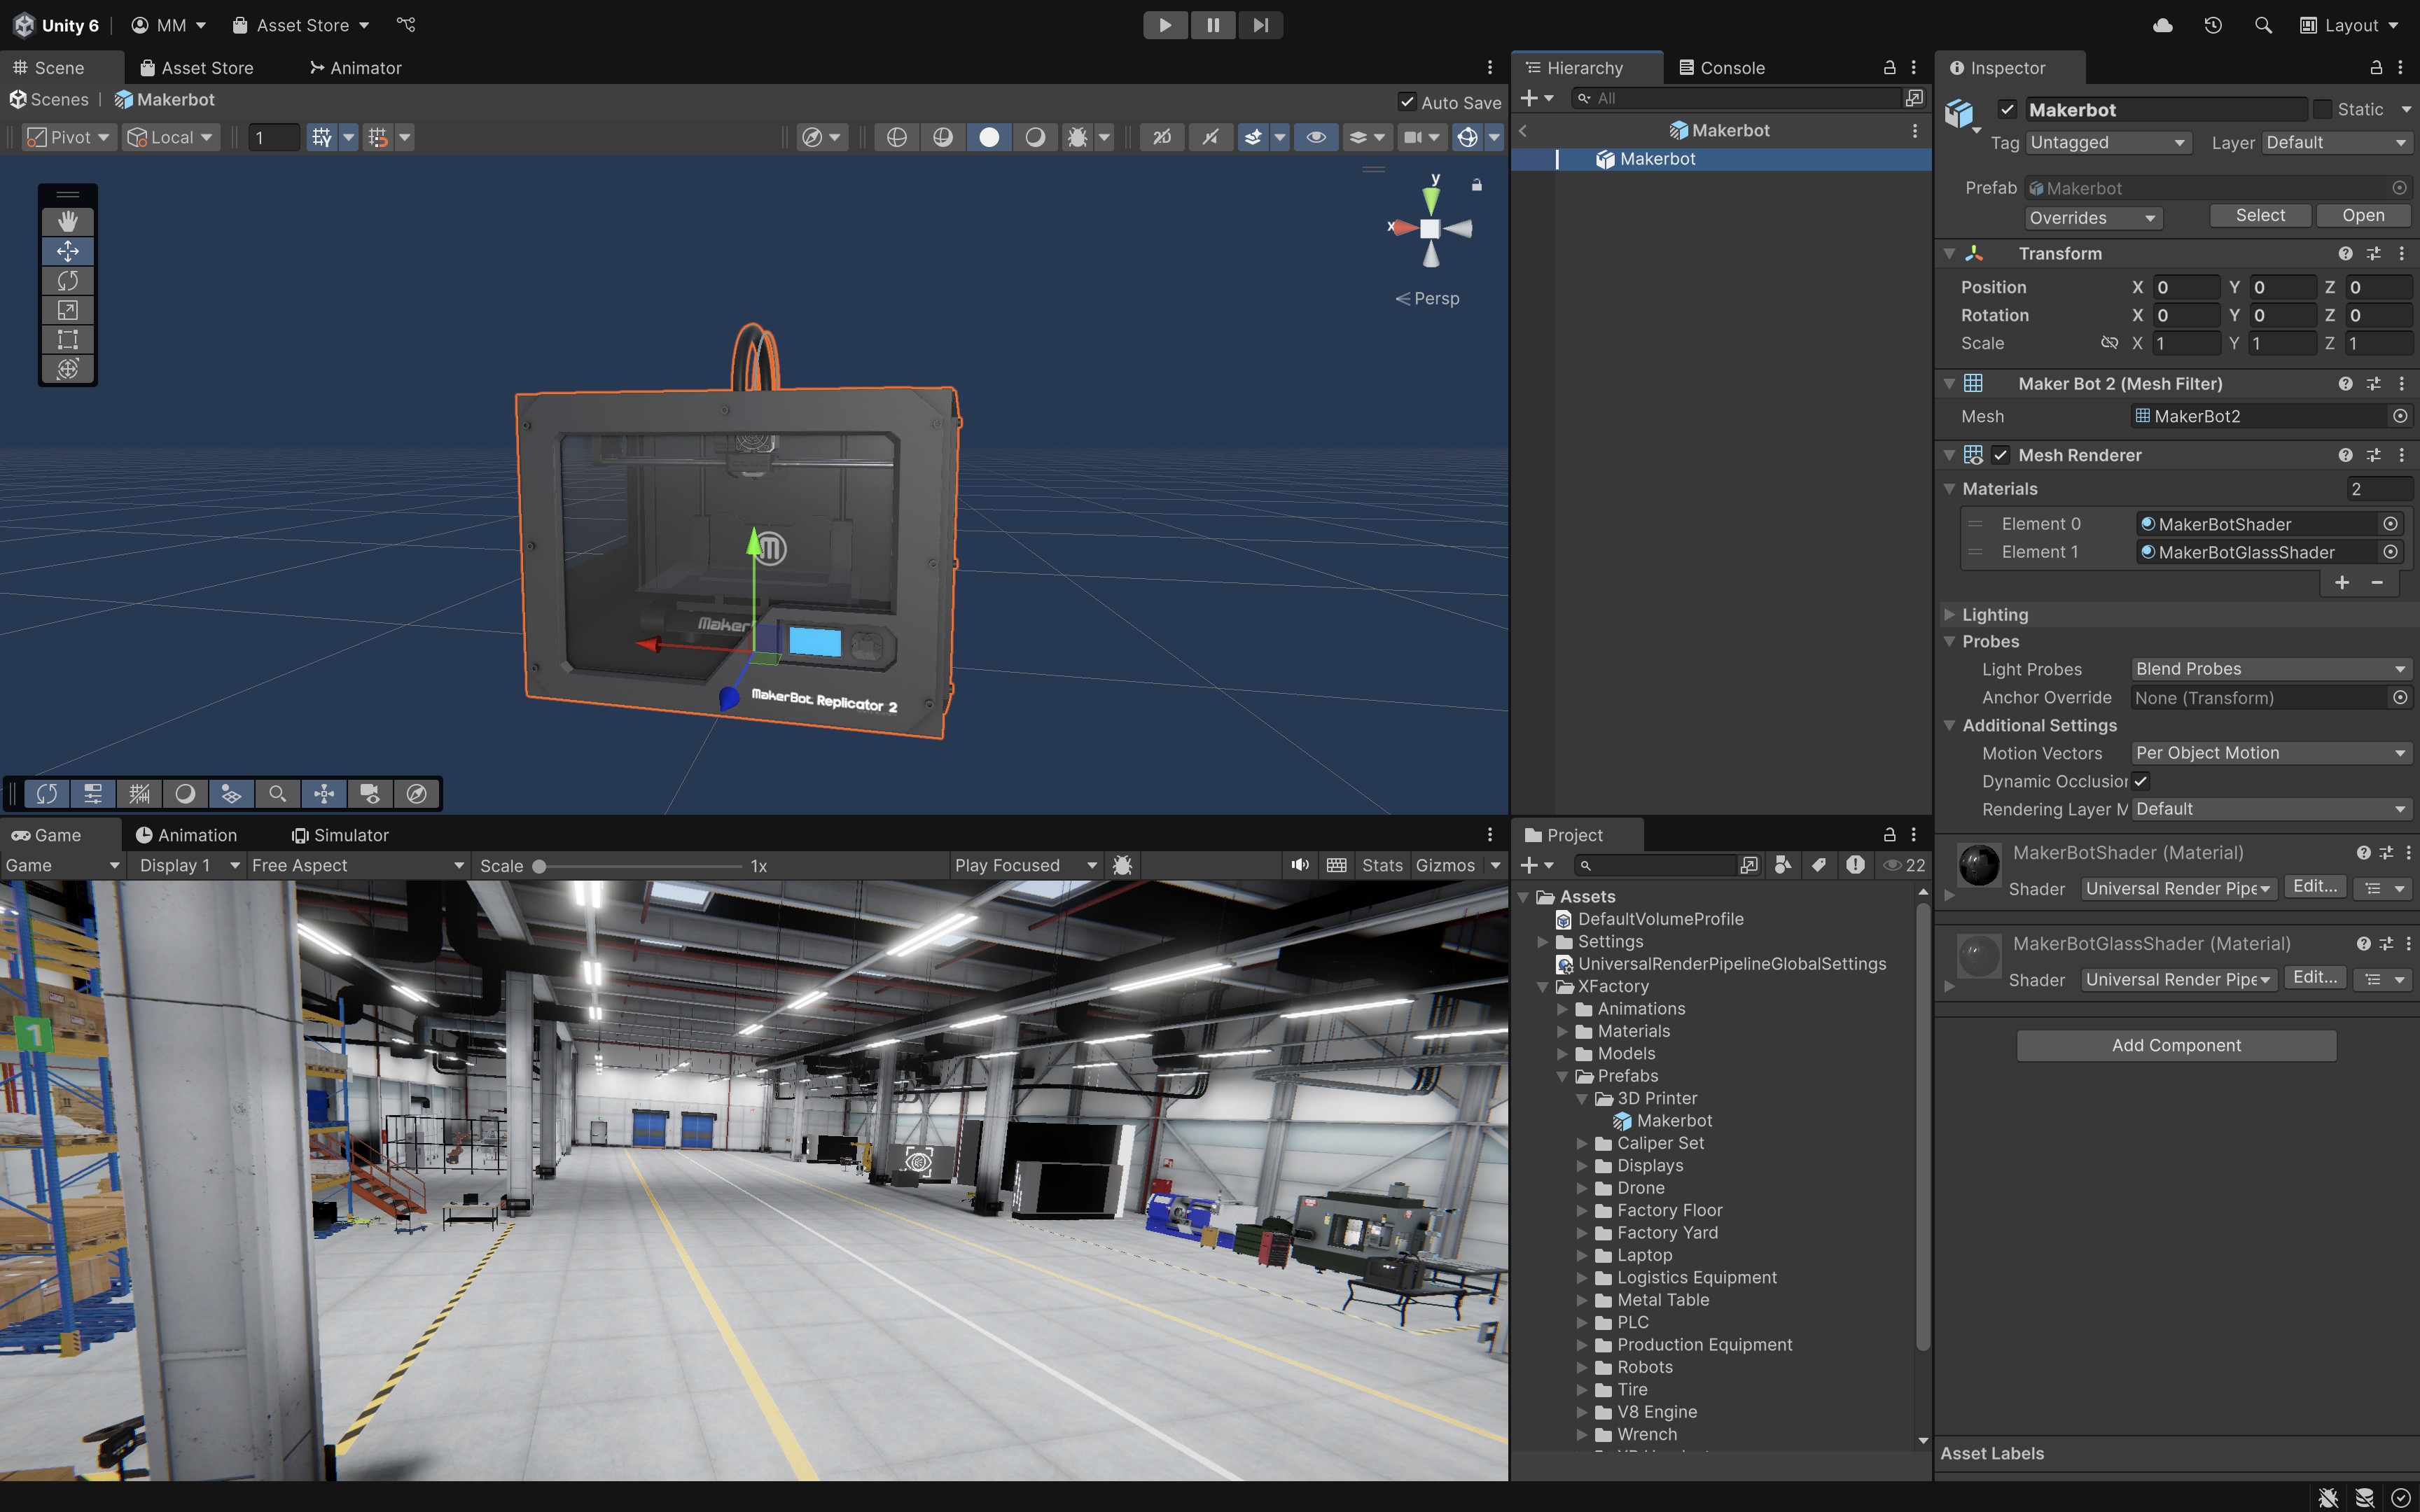
- Double-click the prefab in the
- Editing a Single Prefab Instance (Overrides): Sometimes, you may want some prefab instances to be slightly different from the original prefab. You can override settings on an individual instance.
- Select the prefab instance in the
Hierarchywindow. - Modify the
Transform,Material, or other components in theInspector. - The changes will apply only to that instance (not to other instances).
- If you want to apply the changes back to the prefab asset, use the prefab override controls in the
Inspectorto apply the relevant override. - If you want to reset changes, use the prefab override controls to revert the instance to the original prefab values.
Review this Unity documentation to learn more about how to edit prefabs.
- Select the prefab instance in the
Nested Prefabs
Unity allows prefabs to contain other prefabs as child objects. This is called nested prefabs, and it makes it easier to build complex objects while keeping parts reusable.
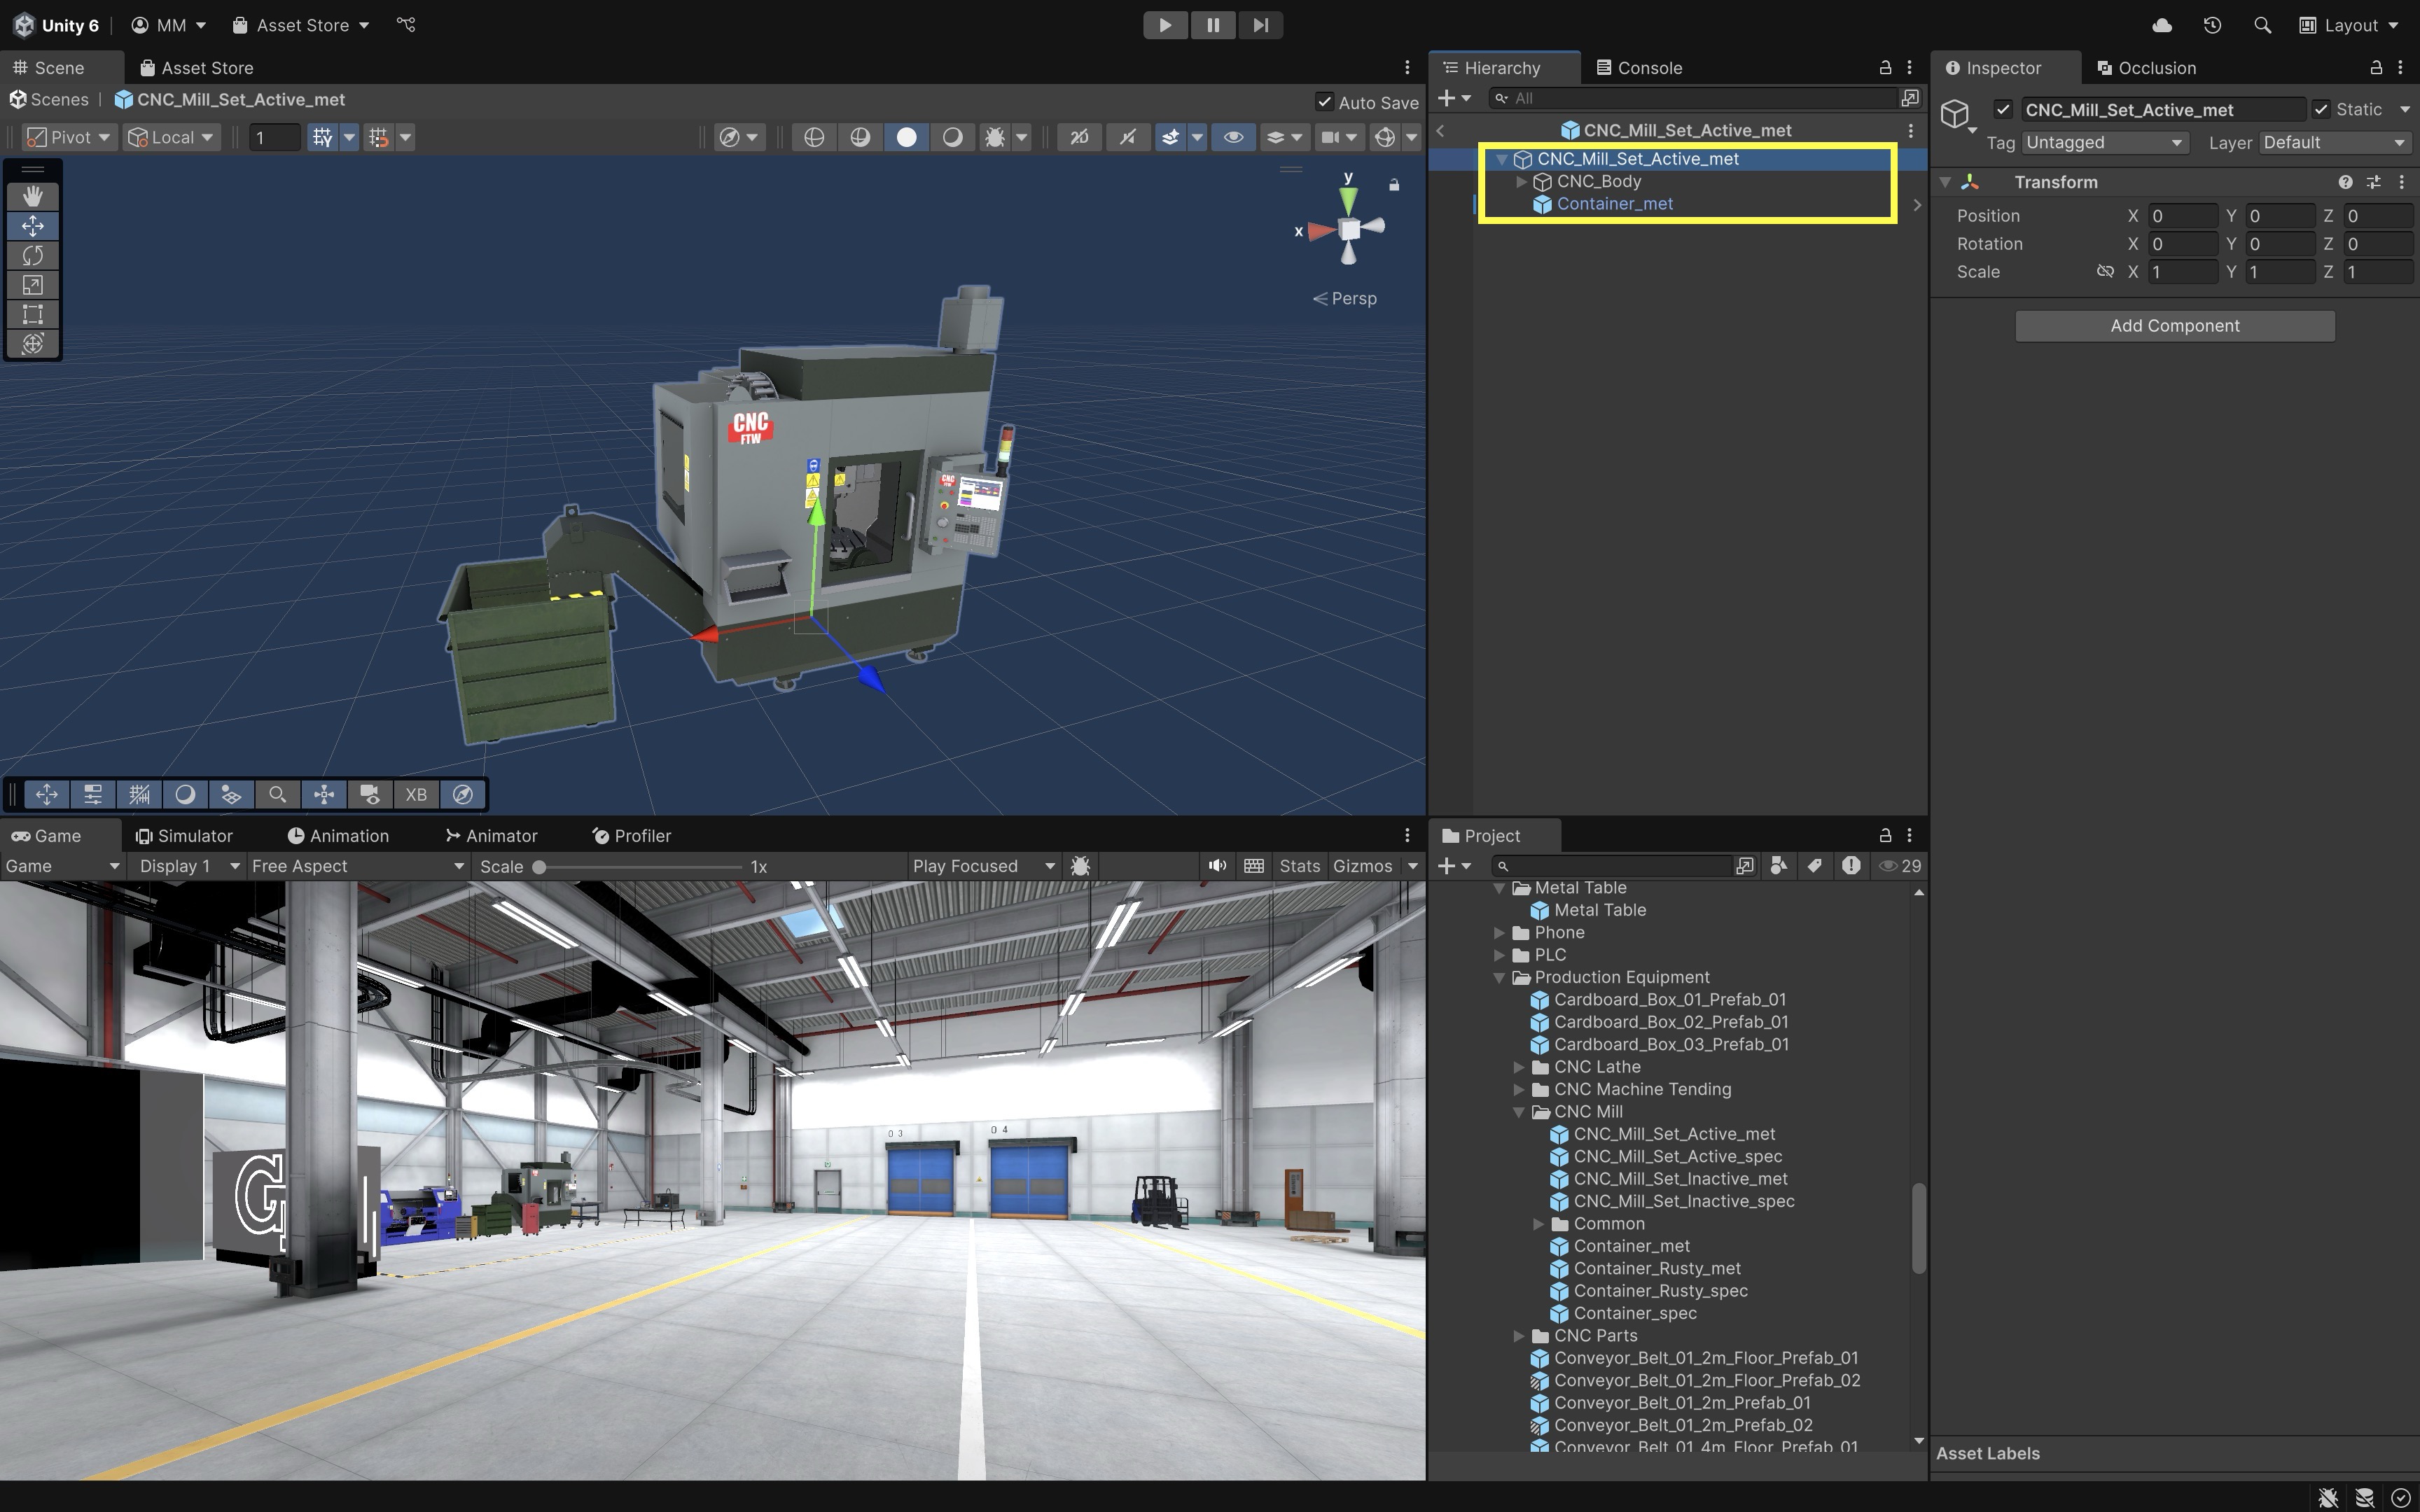
In XFactory, a CNC machine prefab might include nested prefabs for the machine base, control panel, or add-on accessories. This structure allows each component to be reused and managed independently.
Prefab Variants
A prefab variant is a modified version of a base prefab that still maintains a connection to it. This allows for variations of a prefab without completely losing its link to the original. To create a prefab variant:
- Duplicate an existing prefab in the
Projectwindow (Right-click > Duplicate). - Modify the new prefab while keeping its connection to the original.
- Changes made to the base prefab will still affect the variant unless overridden.
In XFactory, use prefab variants to create different models of AMR mobile robots that share a base behavior but have unique attachments or sensors.
Components
In Unity, Components are the building blocks that define the behaviors and functionalities of a GameObject. Every GameObject starts as an empty container, meaning it has no inherent properties beyond its existence in the scene. However, by attaching Components, you can add specific features such as rendering, physics, audio, UI elements, and custom logic through scripting. Components play key roles in Unity:
- They act as modular pieces that you attach to a GameObject to define how it behaves in the virtual world.
- Unity follows a composition-based system, meaning a GameObject is defined by the Components attached to it rather than by inheritance from a predefined class.
- A single GameObject can have multiple Components, each contributing a different aspect of its behavior.
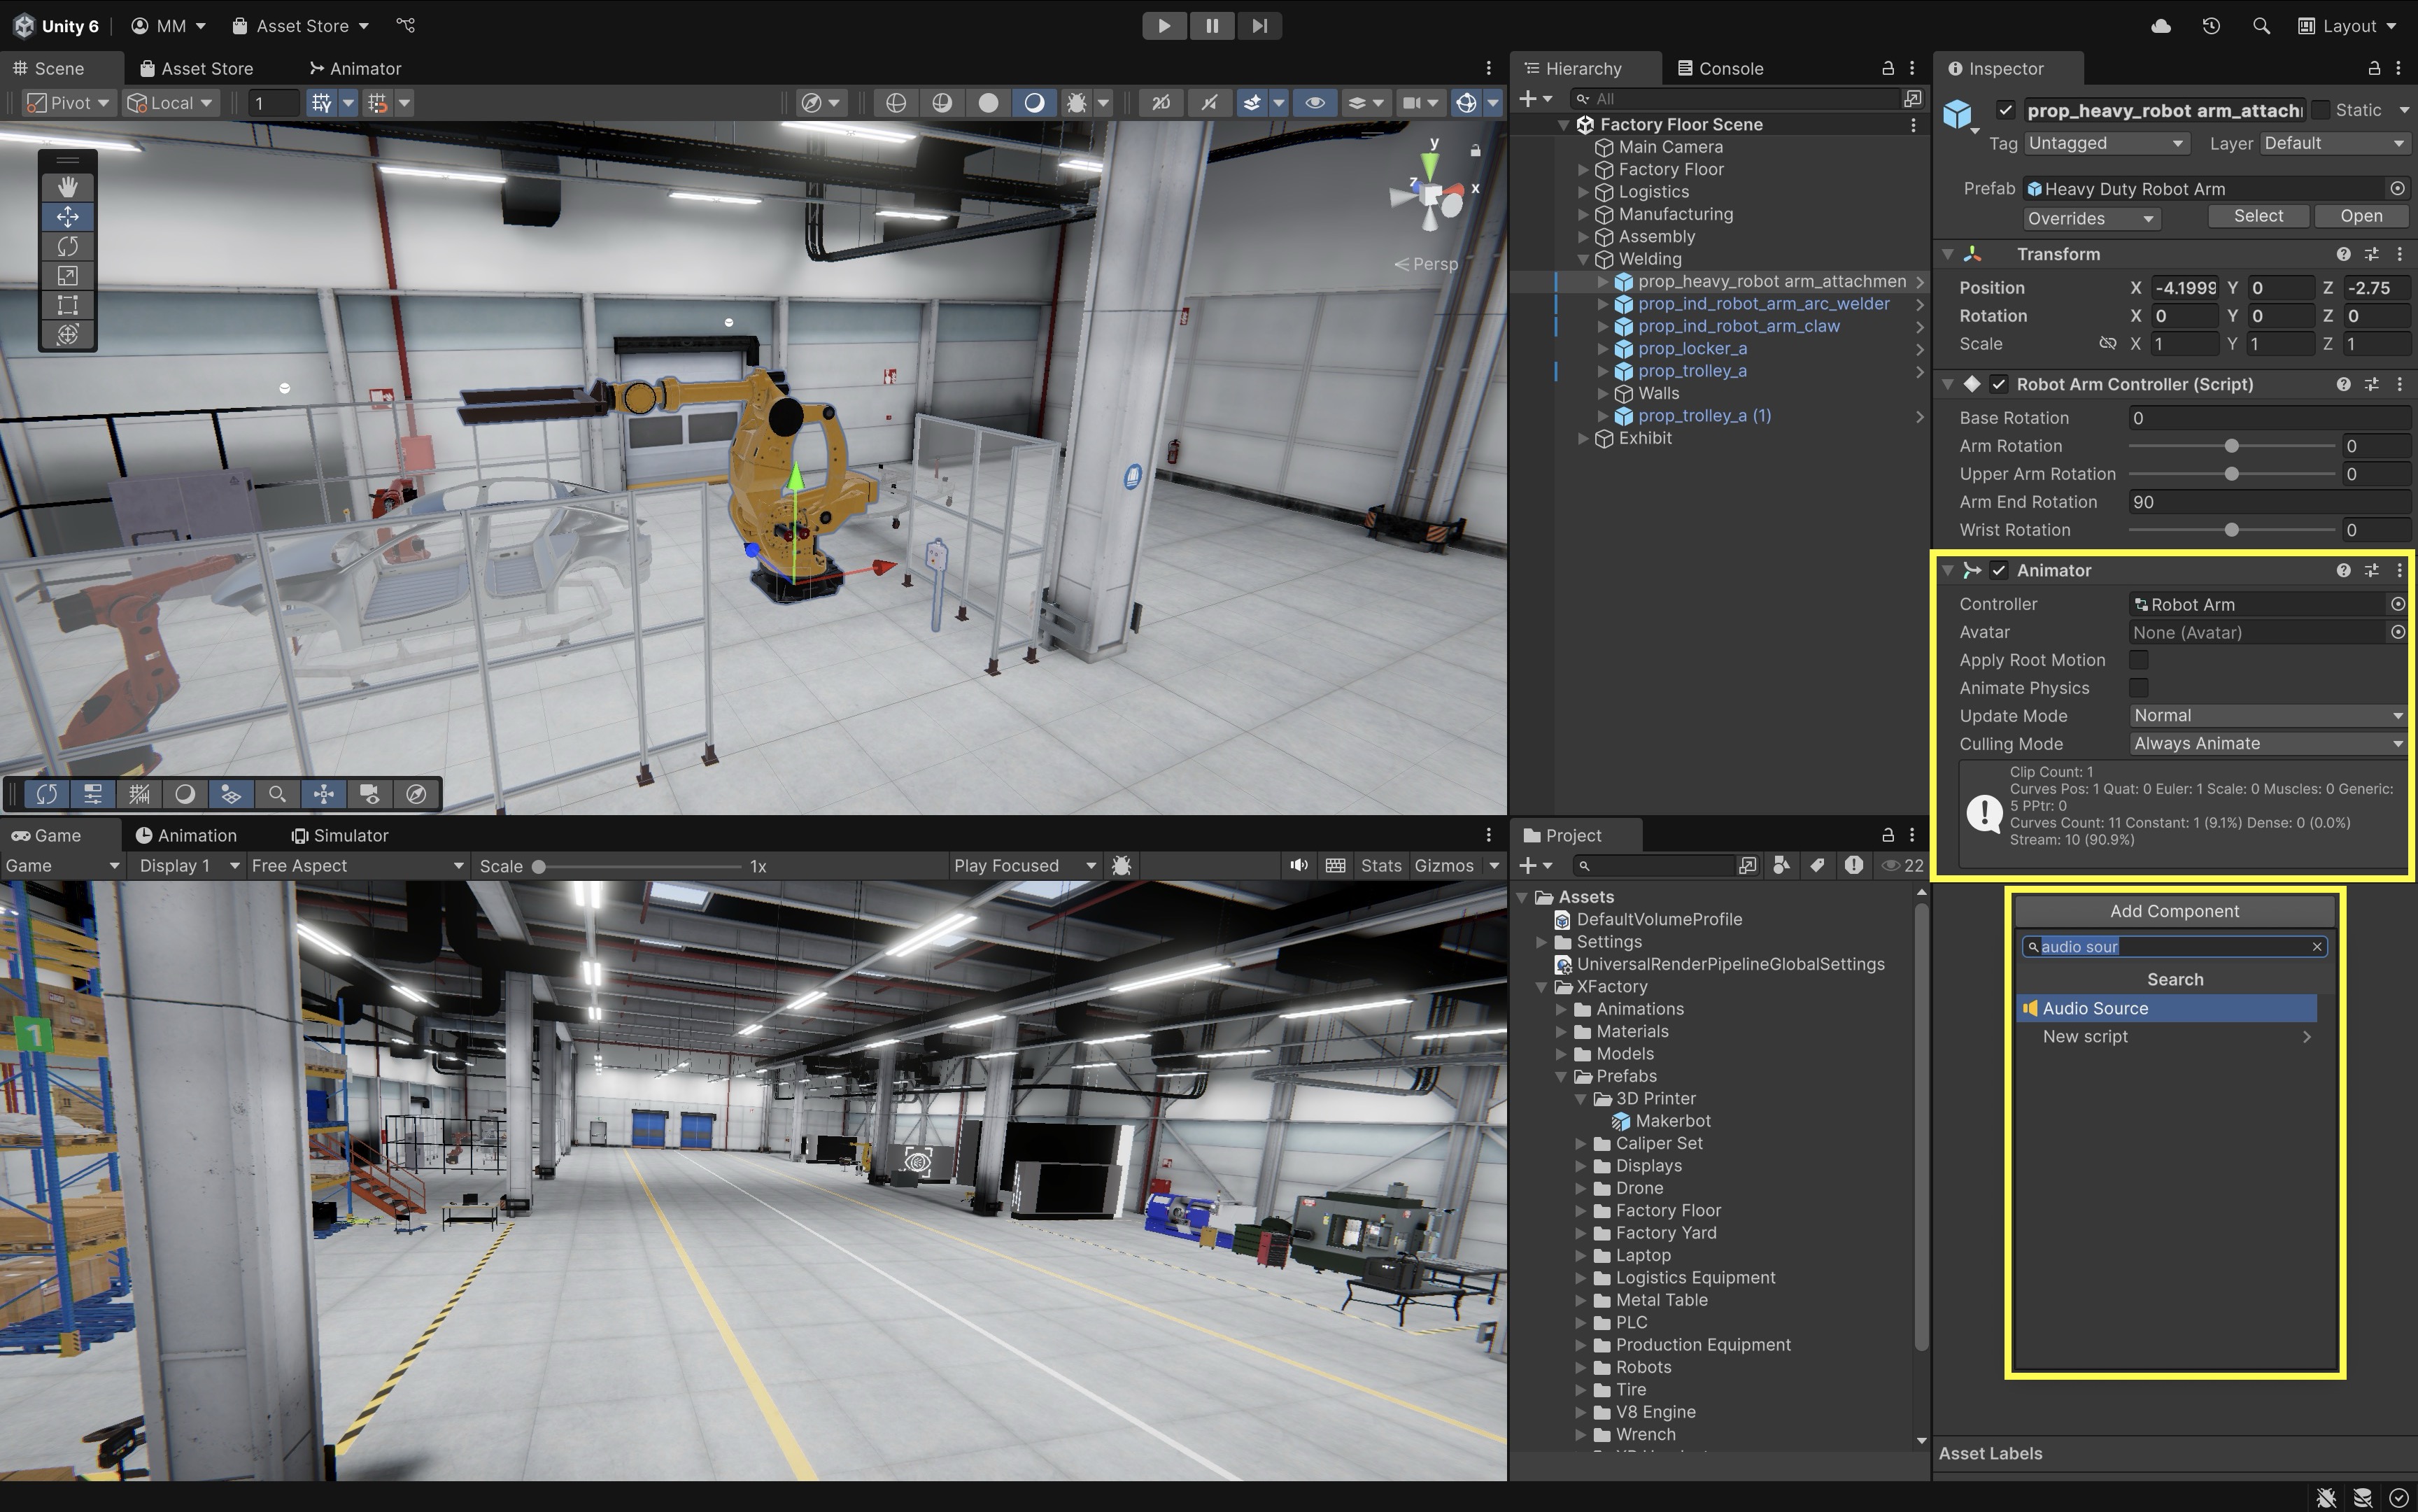
In XFactory, components bring machines, robots, drones, screens, and other objects to life. For instance, adding an
Animatorto a robot arm controls its movements, while anAudio Sourcemakes the welding equipment emit realistic sound effects or a custom script simulates machining processes.
Types of Components
Here are the different types of GameObjects and the components commonly associated with them:
- Basic GameObject: Typically includes a
Transformcomponent and may include custom scripts for behavior. - Camera: Uses the
Cameracomponent and may also include aCinemachine Virtual Camerafor advanced control. - 2D Objects: Often include components like
Sprite Renderer,Rigidbody 2D, andCollider 2Dfor physics and interaction. - 3D Objects: Common components include
Mesh Renderer,Mesh Filter,Rigidbody, and various types ofColliders. - Effects: These objects use components such as
Particle System,Trail Renderer, andLine Rendererto create visual effects. - Lights: Use components like
Light,Reflection Probe, andLight Probe Groupto illuminate and reflect within scenes. - Audio: Include components such as
Audio Source,Audio Listener, andAudio Reverb Zoneto handle sound playback and spatial audio. - Video: Use the
Video Playercomponent to play video content within the scene. - UI Elements: Utilize components such as
Canvas,Rect Transform,Image,Button,TextMeshPro,Slider, andToggleto build user interfaces. - Animated Objects: Include
AnimatorandAnimationcomponents to enable motion and behavior over time. - AI & Navigation: Use
NavMeshAgentandNavMeshObstaclefor AI-controlled navigation and pathfinding. - Post-Processing Effects: In URP projects, post-processing is commonly managed through
Volume,Global Volume, andVolume Profileassets for effects such as bloom, depth of field, and color grading. - XR (VR/AR): XR projects commonly use components such as
XR Origin,Camera Offset,XR Ray Interactor,XR Direct Interactor, and input-related components depending on the XR Interaction Toolkit setup. - Networking (Multiplayer): Multiplayer projects may use Unity’s Netcode for GameObjects with components such as
NetworkManagerandNetworkObject, or another networking framework selected for the project.
To add a component to a GameObject via the
Inspector, select the GameObject in theHierarchy, then click theAdd Componentbutton at the bottom of theInspectorand choose the desired component from the list.
Inspecting a Component
The Inspector window is where you view, edit, and adjust all Components attached to a selected GameObject. It serves as the primary interface for modifying object properties, applying scripts, and fine-tuning behaviors without directly altering code. To navigate the Inspector:
- Select a GameObject in the
Hierarchywindow. - The
Inspectorwindow will display all the Components attached to that GameObject. - Each Component has its own adjustable parameters (e.g., numbers, checkboxes, dropdowns, sliders). You can:
- Modify values (e.g., changing a Transform’s
Position,Rotation, orScale). - Toggle Components on/off (using the checkbox next to a component’s name).
- Add new Components by clicking the
Add Componentbutton. - Remove Components by clicking the
⋮menu (three dots) and selectingRemove Component. - Drag and drop assets (e.g., materials, audio clips, prefabs) into appropriate fields.
- Edit script-exposed variables for custom components (e.g., adjusting player speed in a
PlayerControllerscript).
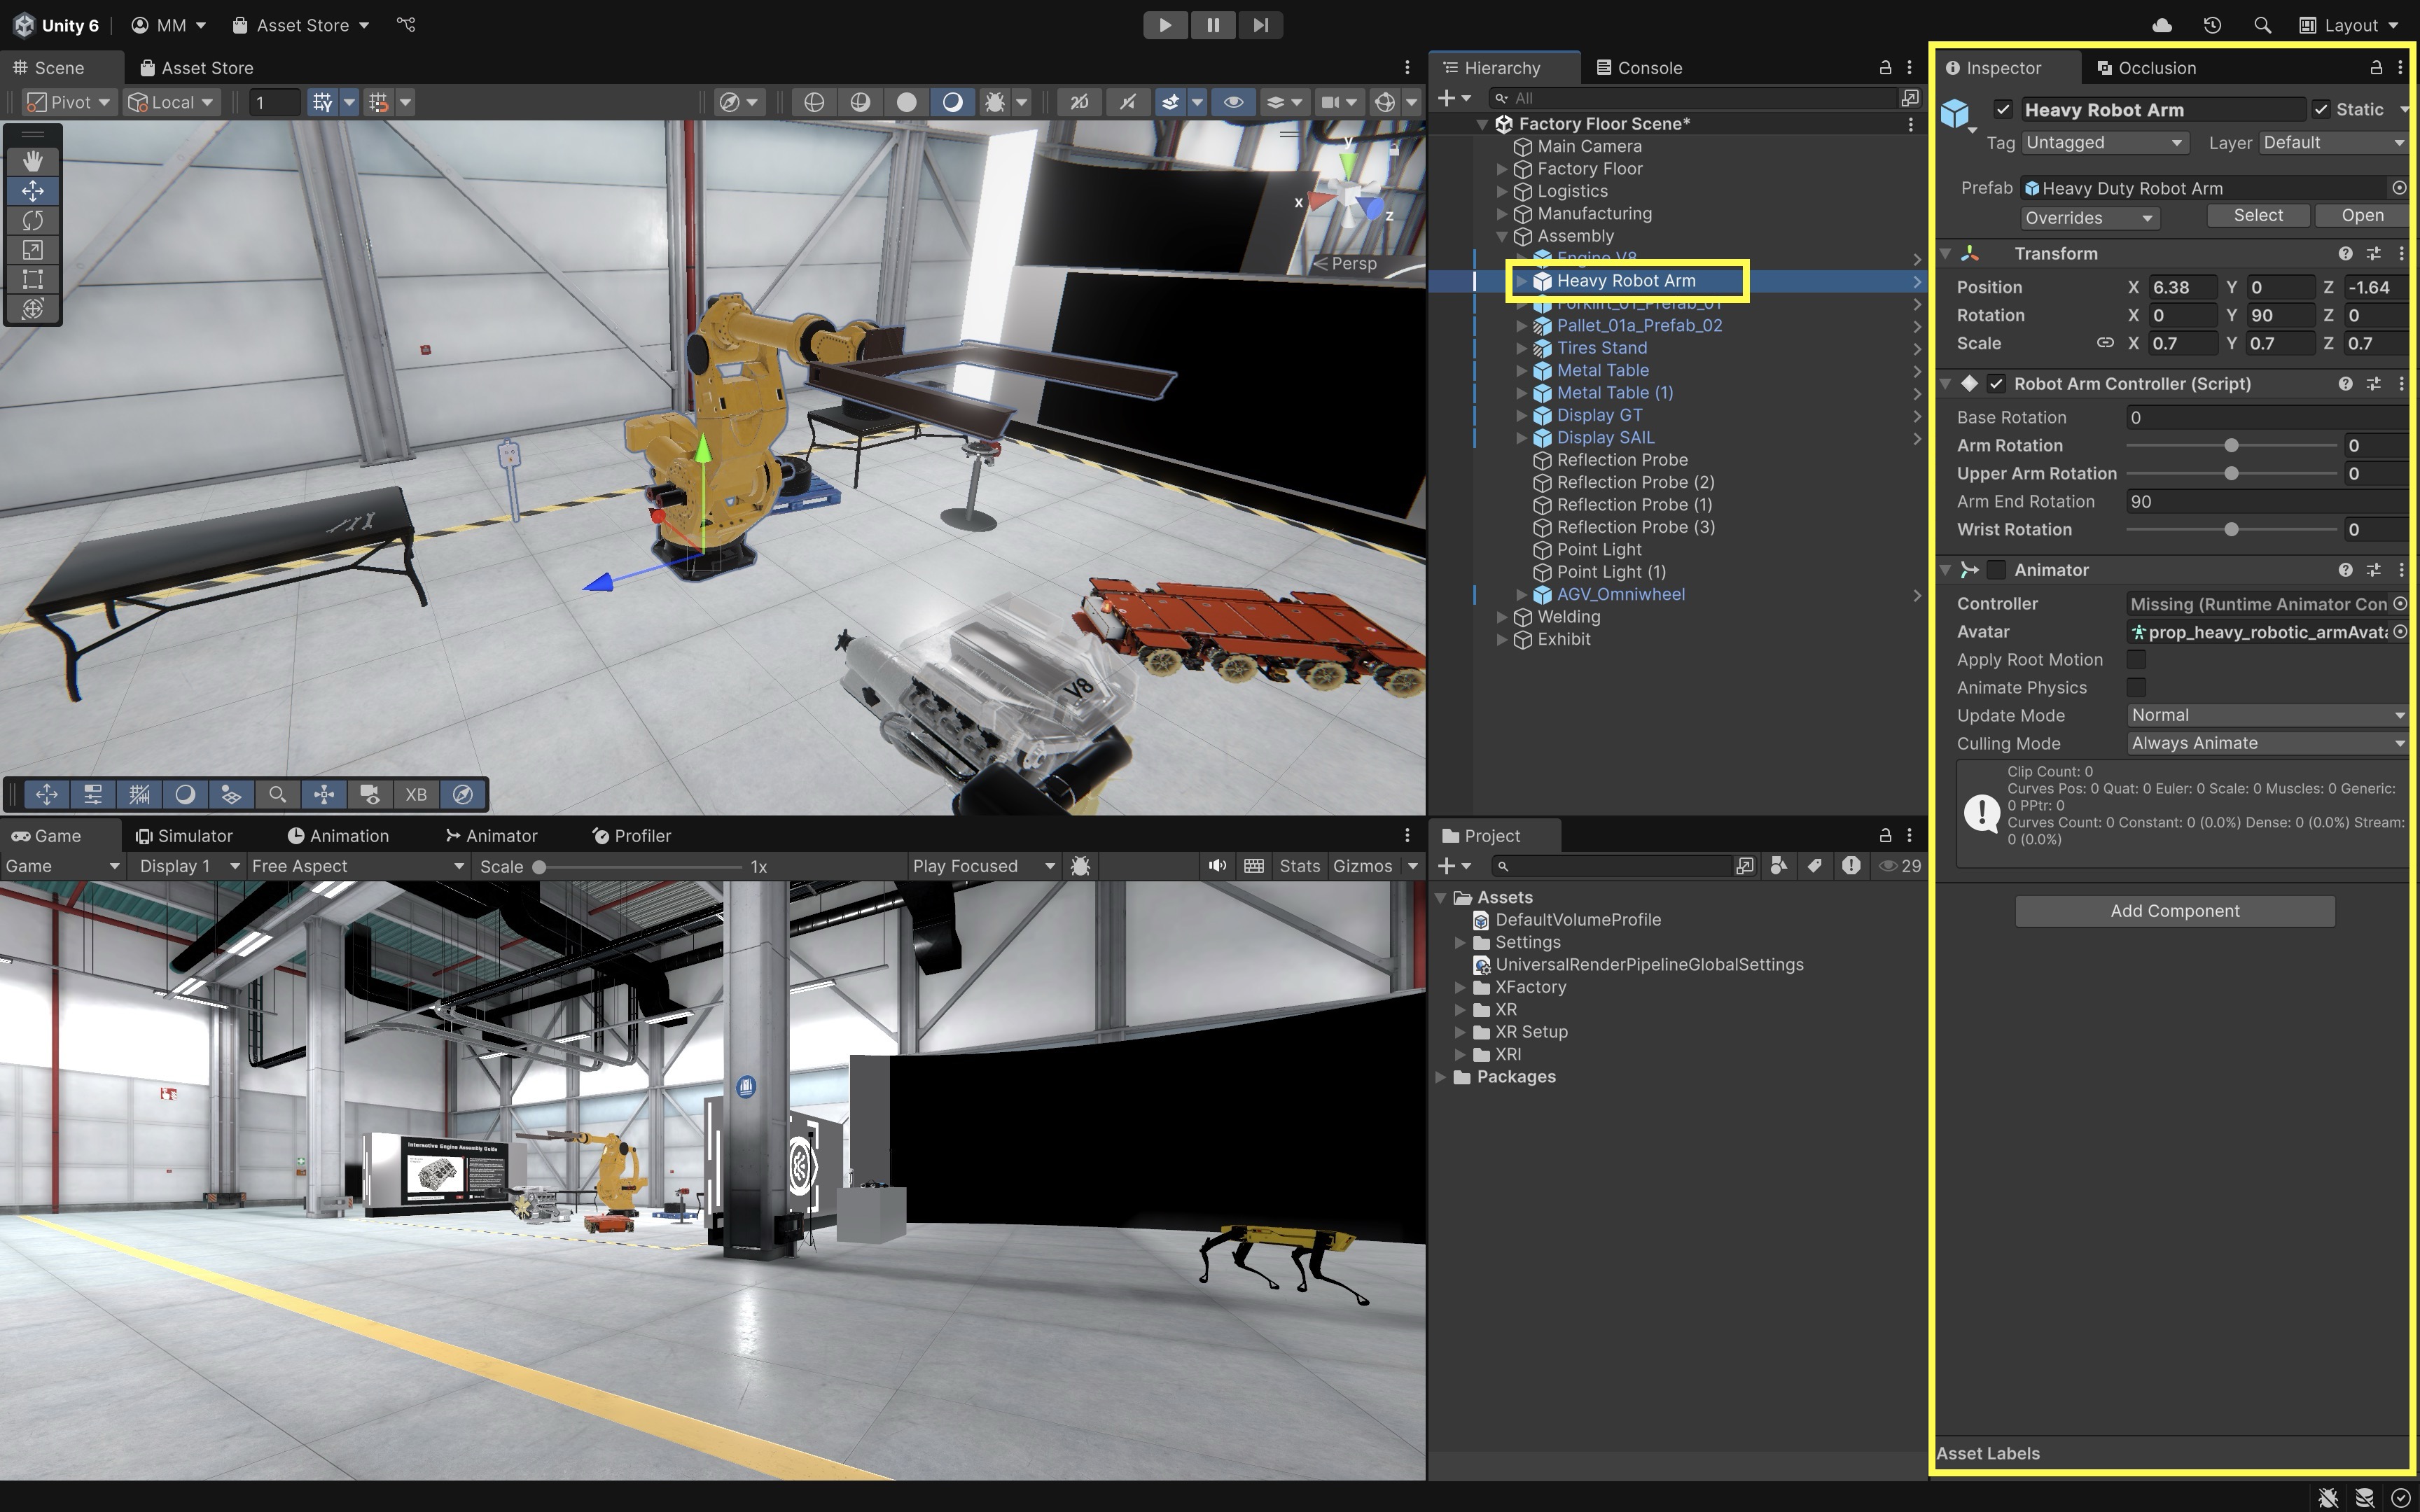
Inspector edits are applied immediately in the Editor, but scene changes still need to be saved. Save frequently with Ctrl+S (Cmd+S on macOS), and remember that changes made during Play Mode are temporary unless explicitly copied back after exiting Play Mode.
- Modify values (e.g., changing a Transform’s
Key Takeaways
- Unity combines rendering, physics, scripting, assets, and deployment in one workflow suited to interactive XR projects.
- GameObjects and components are the core building blocks; prefabs enable reuse and consistent scene organization.
- The Scene, Game, Hierarchy, Project, and Inspector windows are the daily tools for building and debugging experiences.
- Prefab-based, modular scenes scale better than one-off edits for factory and training content.
- Cross-platform deployment from a single Unity project is a major reason the engine fits engineering XR development.